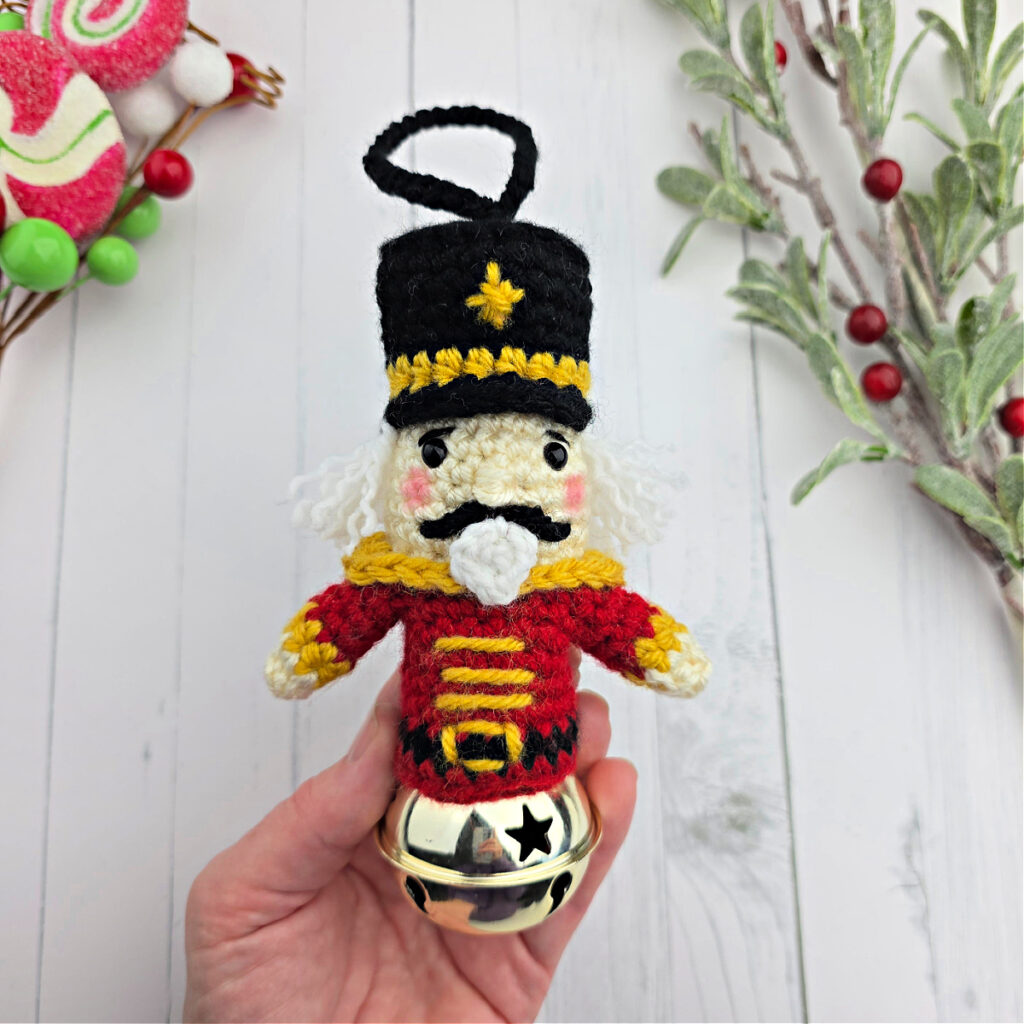
Crochet Nutcracker Jingle Bell Ornament
If you’re looking for the perfect last-minute handmade ornament to add charm and nostalgia to your holiday tree, meet the Crochet Nutcracker Jingle Bell Ornament—a tiny, festive guardian of Christmas spirit! This little guy brings all the magic of the classic Nutcracker ballet, with the added delight of a soft jingle every time the tree branches sway.
Whether you’re decorating your own home or whipping up thoughtful gifts for friends, teachers, or coworkers, this ornament is a joy to make. Quick, detailed, and full of personality—he’s a charming way to sprinkle extra whimsy into your holiday season.
The crochet nutcracker jingle bell ornament pattern is free in the post below, or you can find an ad-free print friendly version (that includes all photo tutorials) on Ravelry, or on Etsy (aff).
The holiday season is all about cozy decor, heartfelt gifts, and festive cheer. If you’re looking for the perfect crochet project to add a personal touch to your Christmas decorations, this crochet nutcracker jingle bell ornament is just what you need! 🐧✨
Whether you’re decking out your own tree, making handmade gifts for loved ones, or adding to your holiday craft fair stock, this adorable nutcracker ornament combines winter charm with a cheerful jingle bell.
Ways to Use Your Crochet Nutcracker Ornament
- Holiday Craft Fairs: These little nutcrackers are quick to make and great sellers at seasonal markets.
- Tree Decoration: Add a handmade charm to your crochet Christmas tree decorations.
- Gift Toppers: Replace traditional bows with this adorable nutcracker for an extra-special touch.
- Stocking Stuffers: The perfect size for slipping into stockings.
An Heirloom Set: A set of crochet Christmas ornaments would make a wonderful housewarming gift or Christmas gift, combine any of our free crochet ornament patterns to create an heirloom collection.
Jingle Bell Alternatives
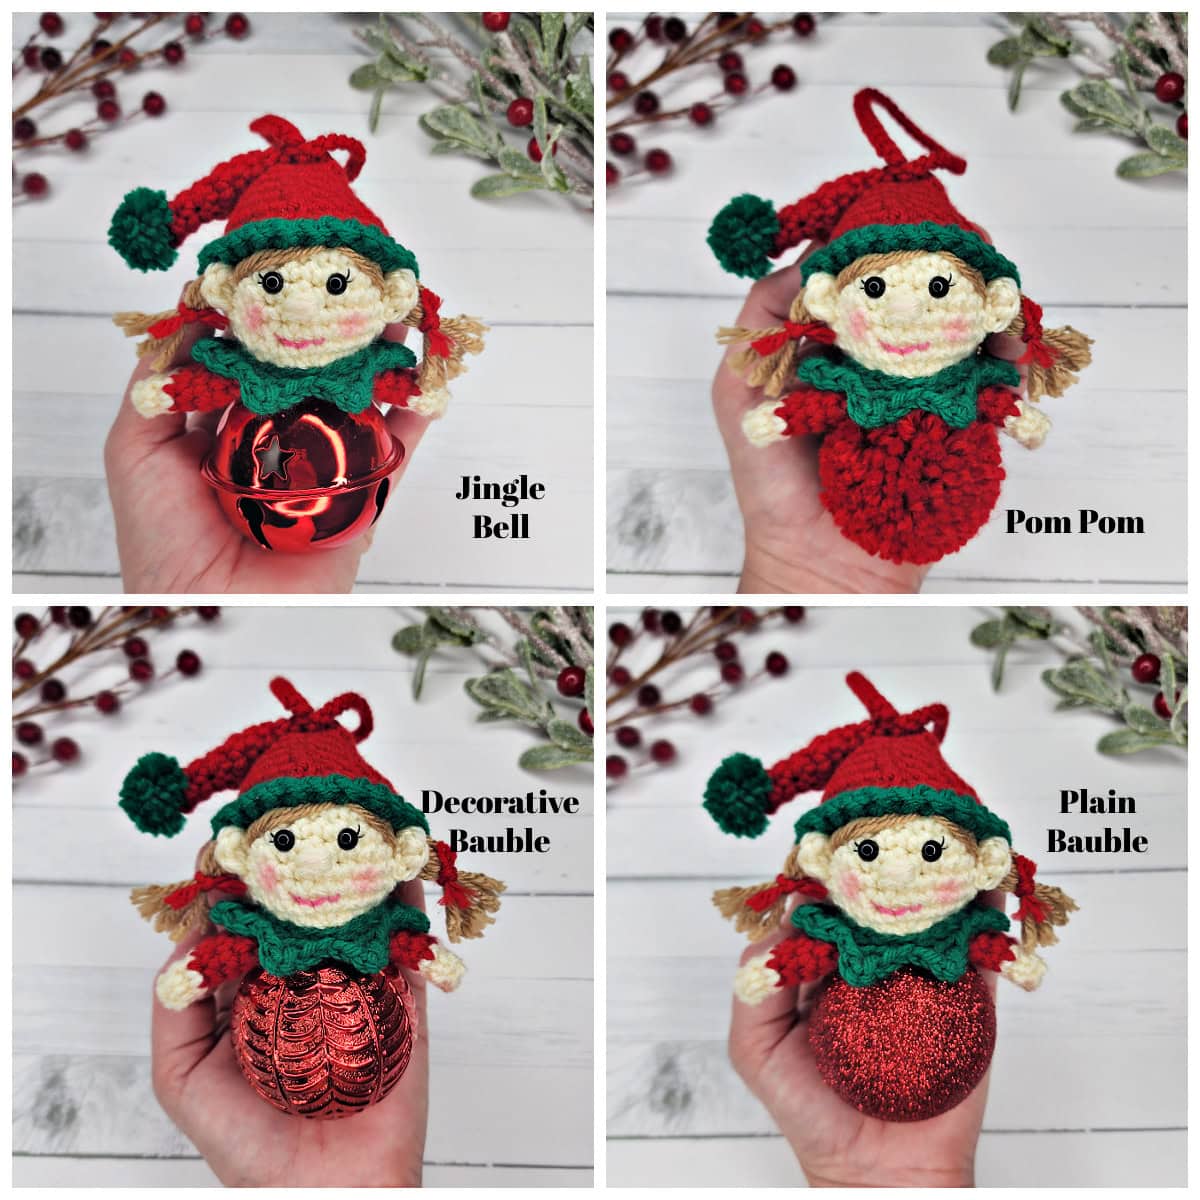
If you don’t have jingle bells and can’t find them anywhere close to you, here are a few great alternatives (see photos of all options near the end of this blog post):
- Big Yarn Pom: The cheapest alternative is to make a big yarn pom and they’re super easy to make with the help of yarn pom makers!
- Shatterproof Ornaments (plain): Another great options is to use a small 2.5″ diameter shatterproof ornament and hot glue the crocheted character to the top of it. You can find these ornaments in dollar stores and big box stores. If you have neither, there are lots of options on Amazon too.
- Shatterproof Ornaments (decorative): Same as option 2 above, but these are a little pricier. Amazon has several fun shatterproof ornaments that are more decorative. I think they’ll add a fun twist to the ornaments. Here are a few examples of what I’m referring to: Option 1, Option 2, and Option 3.

How To Get The
Crochet Nutcracker Jingle Bell Ornament Pattern
Option 1: Scroll down for the free crochet ornament pattern right here in this blog post.
Option 2: Purchase the ad-free printable PDF from one of my shops:
Why You’ll Love This Pattern
⭐ Festive & Traditional – Inspired by the iconic Nutcracker soldier we’ve all grown up with.
⭐ Beginner-Friendly Details – Simple stitches and small color changes give shape without stress.
⭐ A Touch of Magic – A tiny jingle bell is tucked inside so your ornament brings sound as well as charm.
⭐ Perfect for Gifting – Handmade ornaments feel extra special—and this one is guaranteed to earn smiles.
About the Pattern
This pattern uses basic crochet stitches to build the body, coat, and signature hat, while simple embroidery creates the mustache, eyebrows, and tiny details on his uniform. The jingle bell sits securely inside the ornament’s torso—so every movement brings a soft, cheerful ring.
You can hang your Nutcracker on the Christmas tree, add him to a holiday garland, or even tie him onto wrapped gifts for an extra dose of handmade love.
Make It Your Own
Switch up the colors and create a whole battalion of Nutcracker soldiers—white and gold, royal blue, emerald green, or whatever matches your holiday décor. You can even turn him into a custom keepsake ornament by stitching the year on the back.
Yarn
I used Lion Brand Yarn Pound of Love & Basic Stitch for my crochet jingle bell ornament. Both yarns are worsted weight, 100% acrylic yarns. The main reason I chose these yarns is because the colors were perfect for a nutcracker crochet ornament.
Other worsted weight yarns can be substituted.

Crochet Nutcracker Jingle Bell Ornament – Free Pattern
The crochet jingle bell ornament pattern is free below, but if you love to work offline, I’ve got a couple other great options for you.
Purchase the ad-free, printable PDF, including all photo tutorials on Ravelry, or on Etsy (aff).
This post contains affiliate links.
Materials
- Yarn: Worsted Weight / 4 / Yarn, Lion Brand Yarn Pound of Love & Basic Stitch were used for the samples in the photos.
- See Pattern Notes below for exact yardage of each color.
- Crochet Hooks: G/6/4.00mm, or size needed to obtain gauge (My favorite crochet hooks are the Clover Amour Crochet Hooks, I’ve never had an ache in my hands since switching).
- Locking Stitch Markers
- Scissors
- Yarn Needle
- (2) 8mm black safety / craft eyes
- Hot Glue (optional for securing nutcracker to the jingle bell)
- (1) Jingle Bell 1.5″ – 2″ diameter (optional)
- The bell in the photos is a 2″ diameter bell that I purchased from Walmart in the Christmas decor section.
- Jingle Bell alternative: make a big yarn pom!
- Shatterproof Ornaments: See the section “Jingle Bell Alternatives” above.
Abbreviations (US Terms)
- ch(s): chain(s)
- sl st(s): slip stitch(es)
- st(s): stitch(es)
- sc: single crochet
- hdc: half double crochet
- dc: double crochet
- bpsc: back post single crochet
- invsc2tog: invisible single crochet decrease
- Rnd: round
- RS: right side
- FLO: front loop only
- BLO: back loop only
- yo: yarn over
- Join yarn with a standing single crochet
Experience Level
- Easy
Gauge
- In sc with a 4.00mm crochet hook: 4 sts = 1″; 5 rows = 1.125″
Size
- One Size: 4″ W (hand to hand) x 4.5″ H (not including jingle bell or hanging loop)
Special Stitches
- Back Post Single Crochet (bpsc): Insert hook from back to front to back around the post of the designated stitch, yo, pull up a loop, yo, pull thru both loops on hook.
- Invisible Single Crochet Decrease (invsc2tog): Insert hook into the FLO of stitch indicated, insert hook into the FLO of the next stitch, yo, pull up a loop, yo, pull thru all loops on hook.
- 2 Double Crochet Cluster (2dc-cl): Yo, insert hook where indicated, yo, pull up a loop, yo, pull thru 2 loops, yo, insert hook in same st, yo, pull up a loop, yo, pull thru 2 loops, yo, pull thru remaining loops.
- Join yarn with a standing single crochet: Begin with a slip knot on your hook, insert your hook into the stitch or space indicated, yo, pull up a loop, yo and draw thru both loops on hook.
Pattern Notes
- Yarn Notes: Lion Brand Yarn Pound of Love & Basic Stitch were used for the samples pictured in the photos.
- Pound of Love Yarn: 100% Premium Acrylic, (1,020 yards / 454 g / 16 oz / 932 m).
- Basic Stitch: 100% Acrylic, (185 yards / 100 g / 3.5 oz / 170 m)•
- Another comparable worsted weight yarn may be used as long as gauge is met.
- Colors & Yardage
- Pound of Love Cherry: 20 yards
- Pound of Love White: 3 yards
- Pound of Love Black: 20 yard
- Vanna’s Choice Mustard (gold): 7 yards
- Basic Stitch Ivory (skin tone): 30 yards
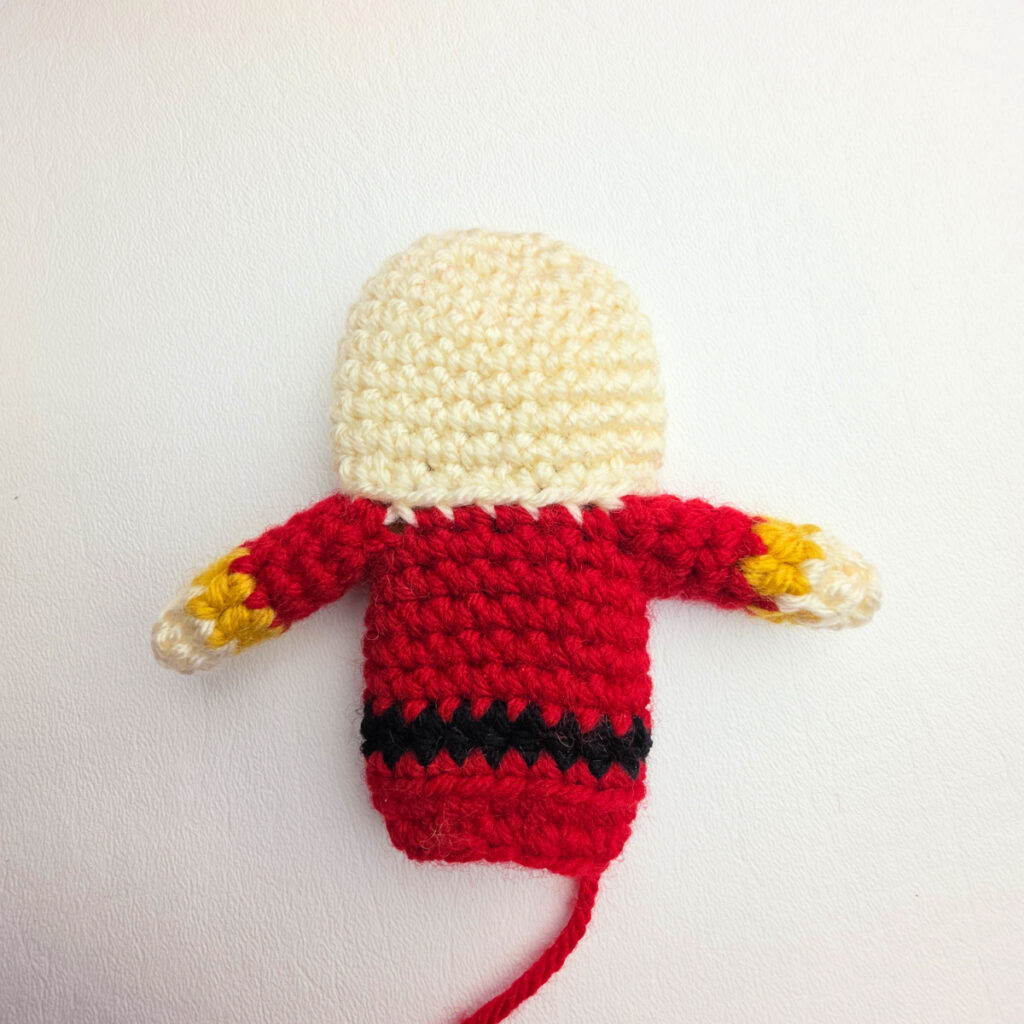
- Nutcracker Jingle Bell Ornament Construction: This jingle bell ornament is crocheted in a few pieces, then assembled. First, you’ll crochet the Nutcracker’s head and work his body and arms directly onto it. Next, you’ll crochet his goatee and hat. After that, make and attach a hanging loop. Then add facial features, attach his hair, stuff the head and body and, attach the Nutcracker to the top of the jingle bell with yarn or hot glue.
- Jingle Bell Alternatives: See the section above with the title “Jingle Bell Alternatives” for a few different options.
Nutcracker Jingle Bell Crochet Ornament Pattern
Nutcracker’s Head
Note: Nutcracker’s head is worked in continuous rounds to keep from having an unsightly seam. Do not join at the end of each round, instead use a scrap piece of yarn to keep track of the beginning of each round. Move the scrap of yarn up as you complete each round.
Rnd 1 (RS): With Skin Tone yarn & a 4.00mm crochet hook, ch 2, work 6 sc into the 2nd ch from your hook. Do not join. (6 sts)
Rnd 2: 2 sc in each st around. (12 sts)
Rnd 3: (2 sc in the next st, sc in the next st) 6 times. (18 sts)
Rnd 4: (2 sc in the next st, sc in each of the next 2 sts) 6 times. (24 sts)
Rnds 5 – 10: Sc in each st around. (24 sts)
Rnd 11: (invsc2tog, sc in each of the next 2 sts) 6 times. (18 sts)
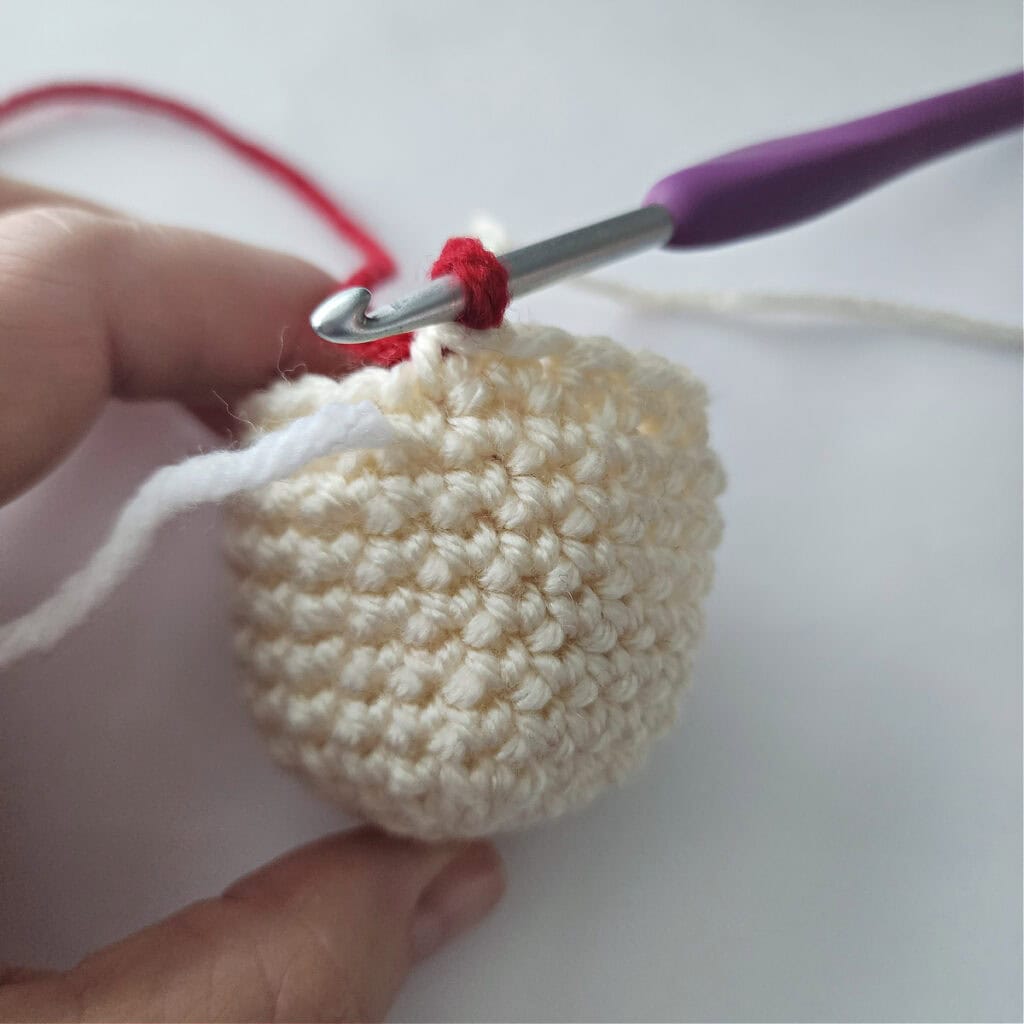
Switch to Red yarn on the last pull through of the last stitch of Round 11.
Do not fasten off red. Fasten off skin tone yarn. No need to weave in ends as they can become stuffing for the head. Continue on to the Body.
Body
Note: Nutcracker’s body is worked in continuous rounds to keep from having an unsightly seam. Do not join at the end of each round, instead use a scrap piece of yarn to keep track of the beginning of each round. Move the scrap of yarn up as you complete each round.
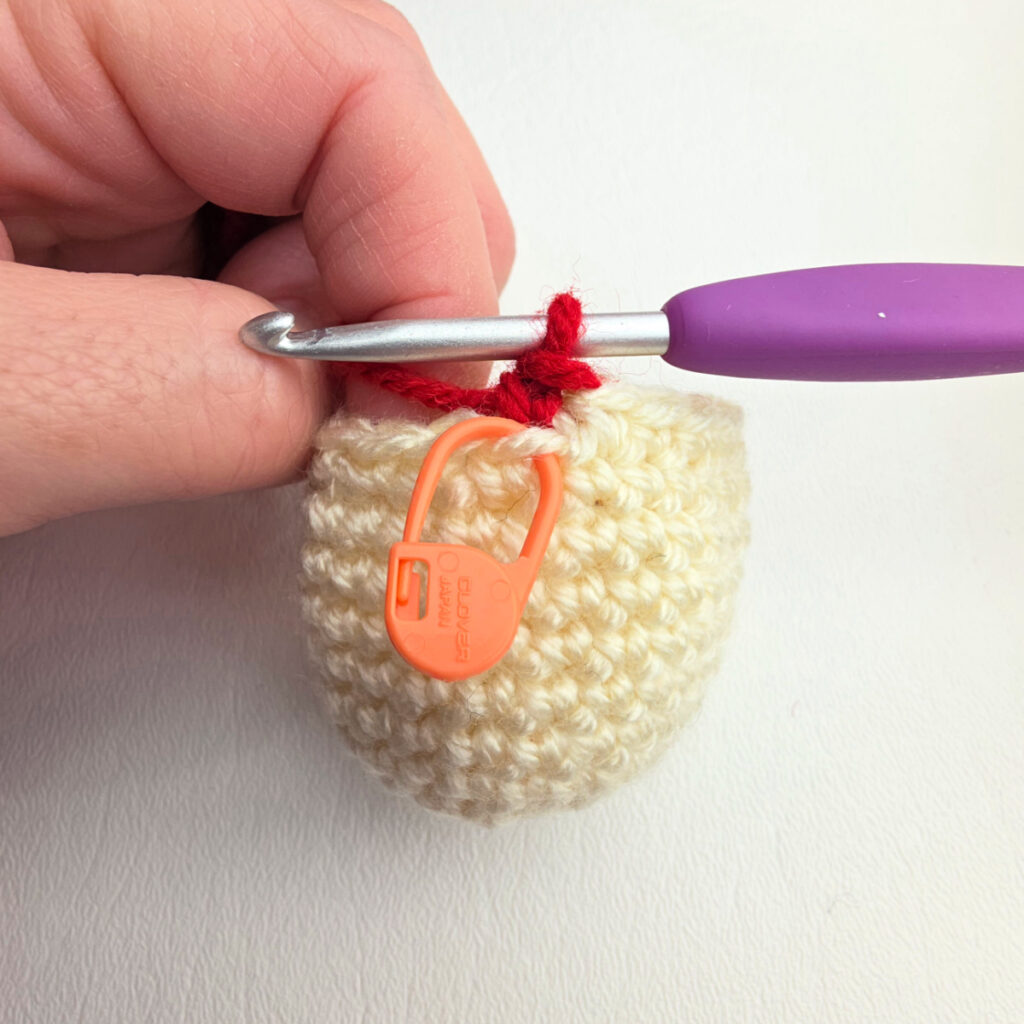
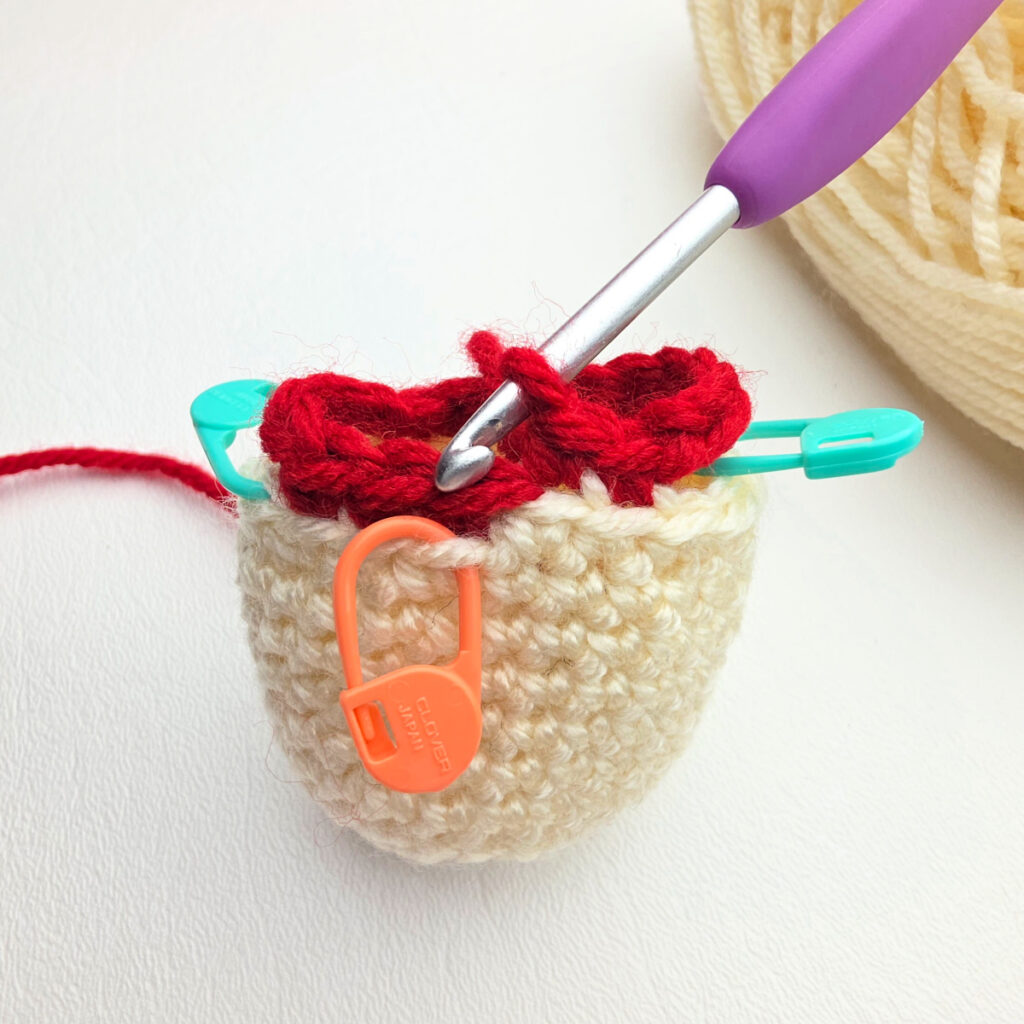
Rnd 1 (RS): With Red yarn & a 4.00mm crochet hook, BLO sc in the next st along the edge of the head and place a SM in the FLO of this same st to mark where to join yarn to later begin the collar, then BLO sc in each of the next 2 sts, place a SM in the BLO of the next st to mark where to join yarn for the 1st arm, loosely ch 4, skip each of the next 4 sts along the edge of the head, BLO sc in each of the next 5 sts, place a SM in the BLO of the next st to mark where to join yarn for the 2nd arm, loosely ch 4, skip each of the next 4 sts along the edge of the head, BLO sc in each of the last 2 sts. Do not join. (10 sc + 2 ch-4’s)
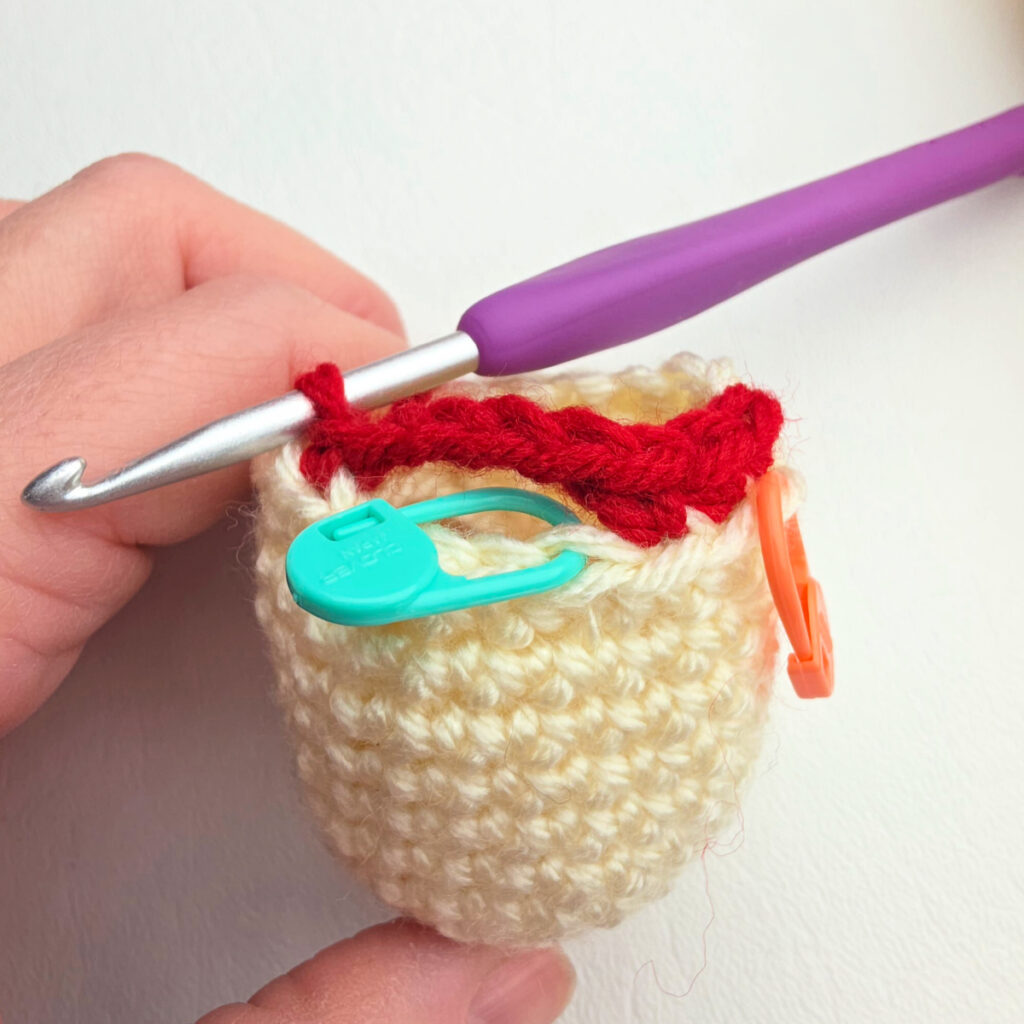
Rnd 2: Working in both loops, sc in each sc and ch around. Do not join. (18 sts)
Rnds 3 – 5: Sc in each st around. (18 sts)
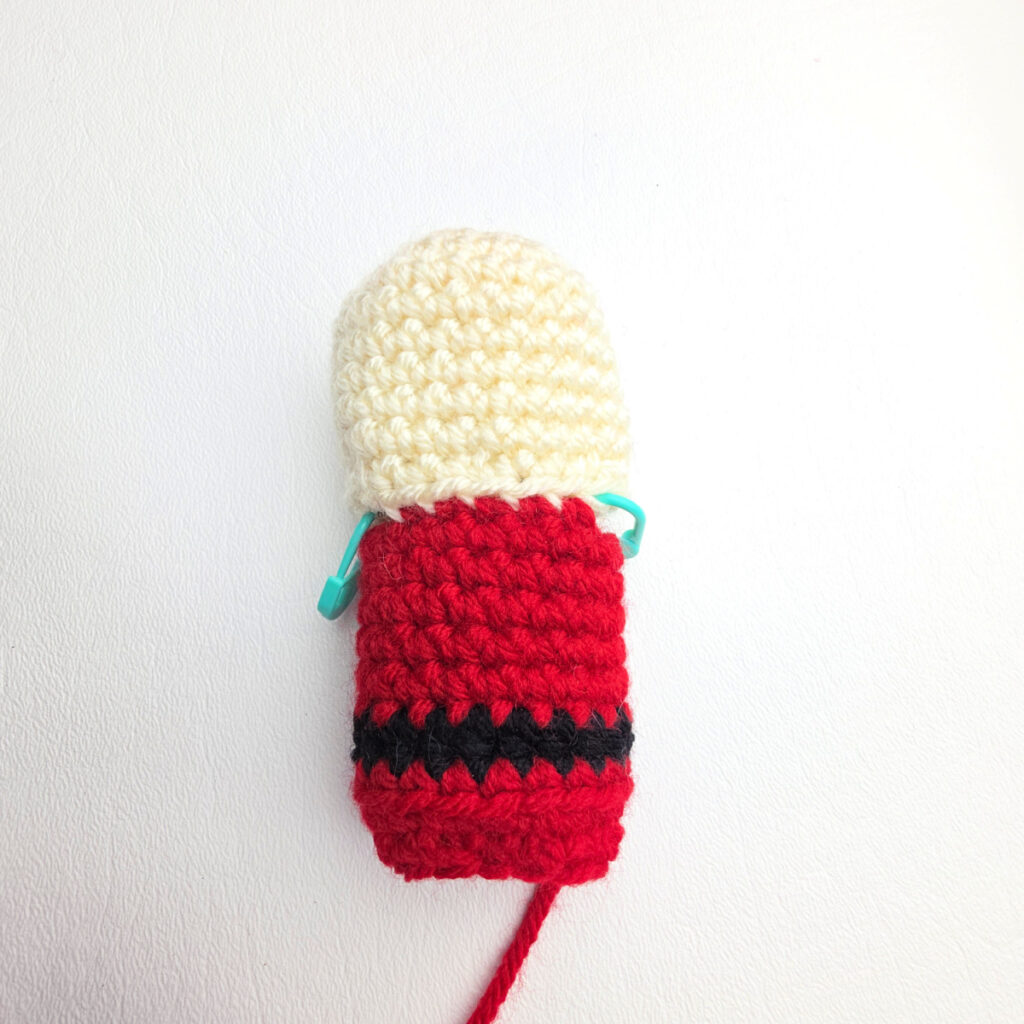
Rnd 6: Sc in each st around. Switch to black yarn on the last pull through of the last stitch of the round. Do not fasten off red. Join with a sl st to the 1st st. (18 sts)
Rnd 7: With Black yarn, ch 1, hdc in each st around. Switch back to red yarn on the last pull through of the last stitch of the round. Fasten off black. Join with a sl st to the 1st st. (18 sts)
Rnd 8: With Red yarn, ch 1, sc in each st around. Do not join. Switch back to working in a spiral. (18 sts)
Rnd 9: BLO sc in each st around. Do not join. (18 sts)
Rnd 10: * invsc2tog, sc in the next st, rep from * 6 times. Join with a sl st to the 1st st. (12 sts)
Fasten off, leaving an 18″ tail of yarn for attaching the body to the jingle bell later. Continue on to the Arms.
Arms
Note: Nutcracker’s arms are worked in continuous rounds to keep from having an unsightly seam. Do not join at the end of each round, instead use a scrap piece of yarn to keep track of the beginning of each round. Move the scrap of yarn up as you complete each round.
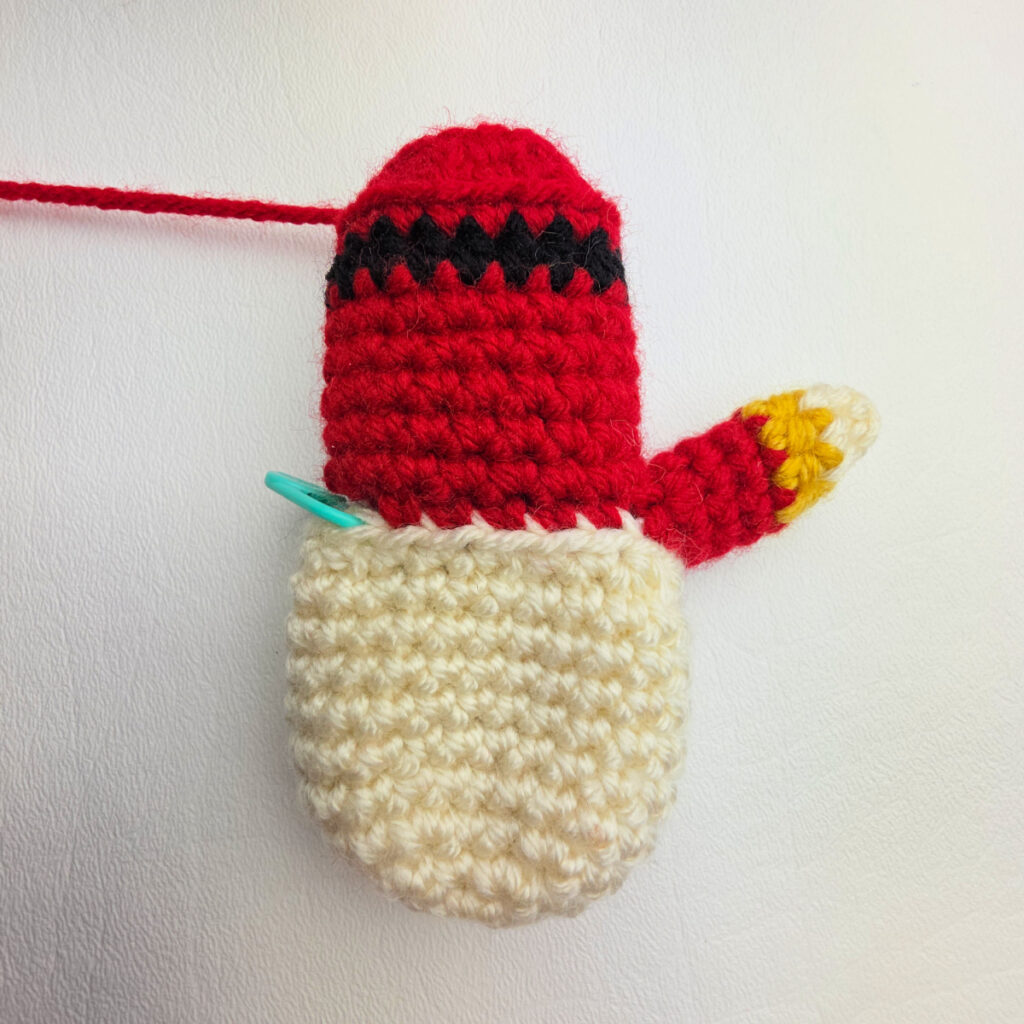
Rnd 1 (RS): With Red yarn & a 4.00mm crochet hook, join yarn with a standing sc in the BLO of the marked st, BLO sc in each of the next 3 sts along the last rnd of the head, sc in each st along the opening of the body. Do not join. (8 sts)
Rnds 2 – 4: Sc in each st around. (8 sts)
Switch to gold yarn on the last pull through of the last stitch of round 4.
Rnd 5: With Gold yarn, hdc in each st around. (8 sts)
Switch to skin tone yarn on the last pull through of the last stitch of round 5.
Rnd 6: With Skin Tone yarn, sc in each st around. (8 sts)
Rnd 7: Invsc2tog 4 times. (4 sts)
Fasten off, leaving a tail of yarn to close the tip of the hand closed. With a yarn needle and tail of yarn, close the top of the hand. Tuck ends inside the arm. Repeat for the second arm. Continue on to the Nutcracker’s Collar & Shoulder Pads.
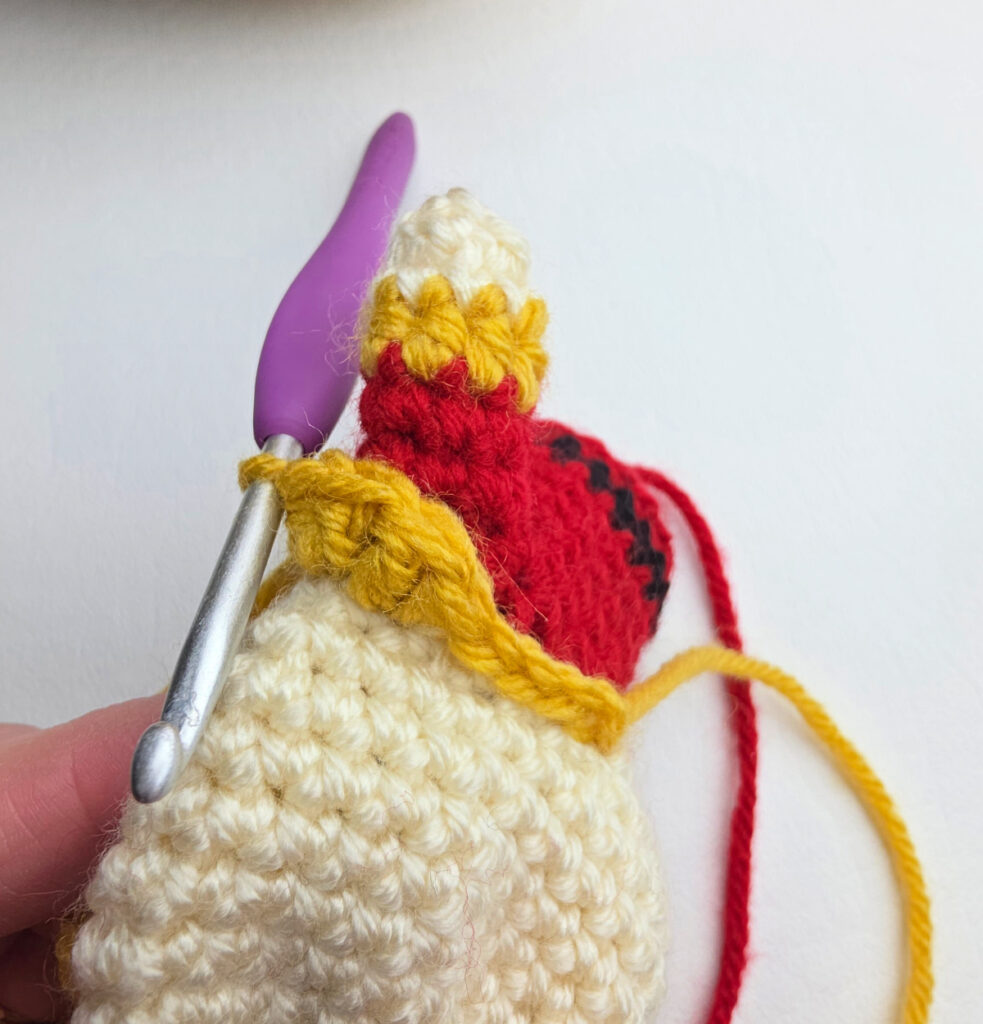
Nutcracker’s Collar & Shoulder Pads
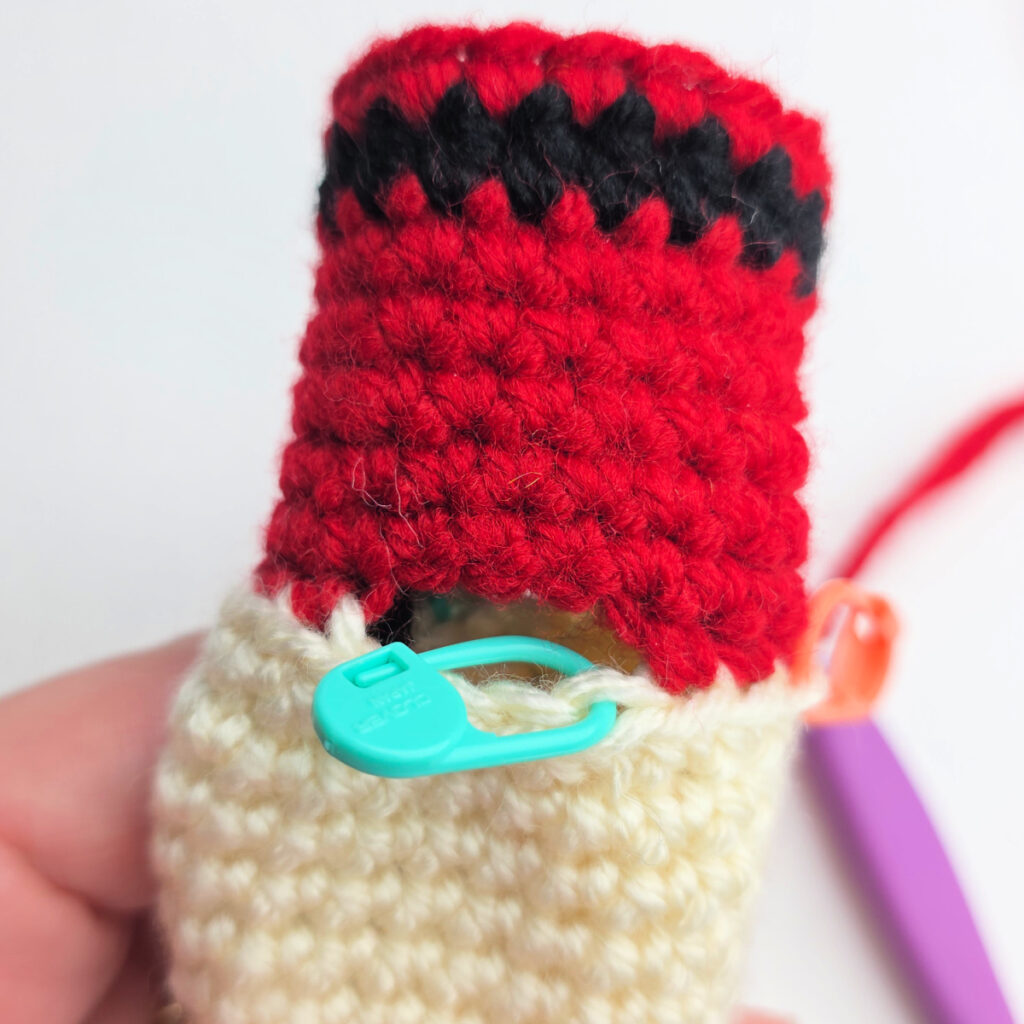
Note: The Nutcracker’s Collar is worked in the front loops of the last round of stitches of the head. The side that you’re joining your yarn to is the Nutcracker’s back side.
Rnd 1: See the photo below for how to position your nutcracker before joining yarn. With Gold yarn & a 4.00mm crochet hook, join yarn with a sl st in the front loop of the st you marked when beginning the body, FLO sl st in the each of the next 3 sts, (hdc, dc) in the FLO of the next st, (dc, hdc) in the FLO of the next st, FLO sl st in each of the next 7 sts, hdc, dc) in the FLO of the next st, (dc, hdc) in the FLO of the next st, FLO sl st in the last st. (20 sts)

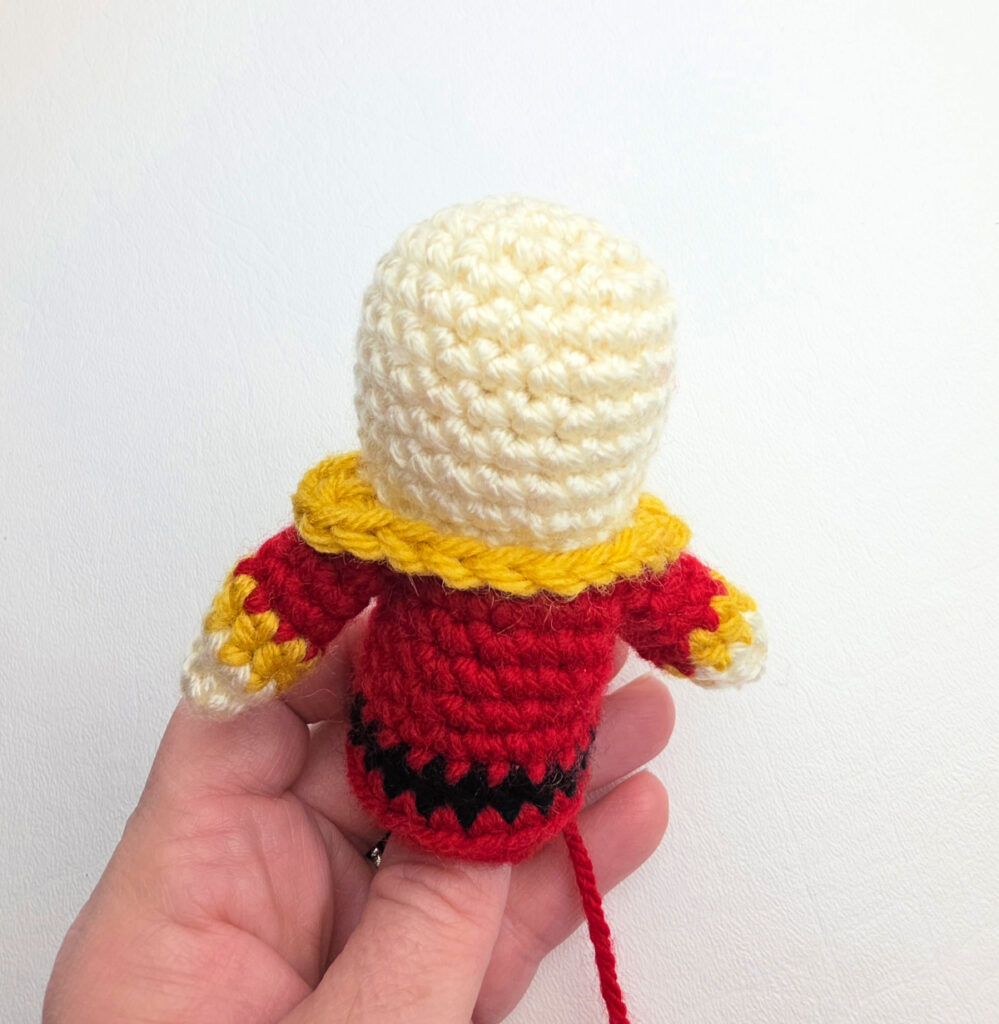
Fasten off. Weave in ends. Continue on to the Jacket Details.
Jacket Details
Belt Buckle: To make the belt buckle, I cut a 24″ long piece of yarn. I then used a yarn needle and stitched a rectangle on my nutcracker’s black belt to create the belt buckle.
Gold Accents: I then stitched three straight lines across the chest of his jacket.

Goatee Beard
Row 1: With White yarn & a 4.00mm crochet hook, ch 3, work a 2dc-cl into the 3rd ch from your hook, ch 2, slip st into the 3rd ch.
Fasten off, leaving a tale of yarn long enough to attach the beard to the Nutcracker. Continue on to the Nutcracker’s Hat.
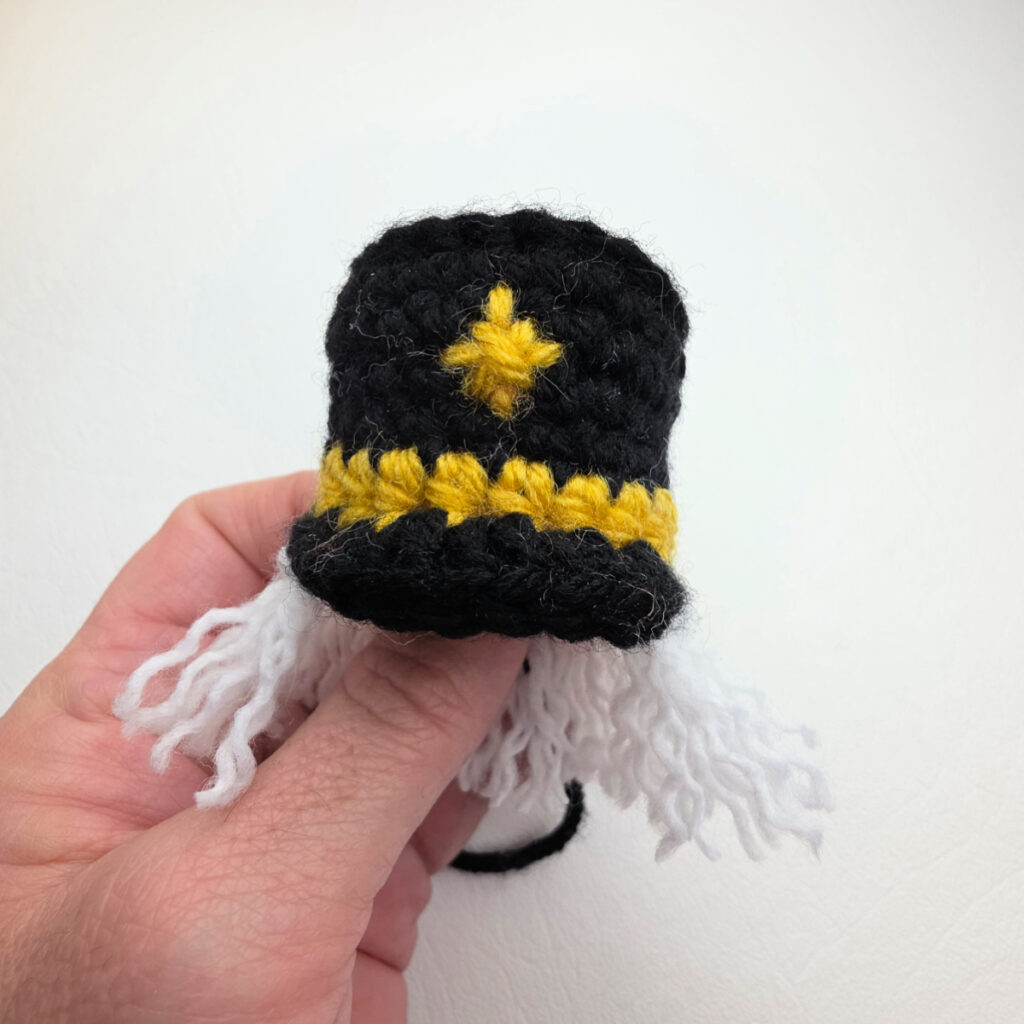
Nutcracker’s Hat
Note: The Nutcracker’s Hat is worked in continuous rounds to keep from having an unsightly seam. Do not join at the end of each round, instead use a scrap piece of yarn to keep track of the beginning of each round. Move the scrap of yarn up as you complete each round.
Rnd 1 (RS): With Black yarn & a 4.00mm crochet hook, ch 2, work 6 sc into the 2nd ch from your hook. Do not join. (6 sts)
Rnd 2: 2 sc in each st around. (12 sts)
Rnd 3: (2 sc in the next st, sc in the next st) 6 times. (18 sts)
Rnd 4: sc in the next st, (2 sc in the next st, sc in each of the next 2 sts) 5 times, 2 sc in the next st, sc in the next st. (24 sts) Circle should be approximately 1.75″ in diameter.
Rnd 5: Bpsc in each st around. (24 sts)
Rnds 6 – 7: Sc in each st around. (24 sts)
Rnd 8: (invsc2tog, sc in each of the next 4 sts) 4 times. (20 sts)
Rnd 9: Sc in each st around. Switch to gold yarn on the last pull through of the last stitch of the round. Do not fasten off black. Join with a sl st to the 1st st. (20 sts)
Rnd 10: With Gold yarn, ch 1, hdc in each st around. Switch back to black yarn on the last pull through of the last stitch of the round. Fasten off gold. Join with a sl st to the 1st st. (20 sts)
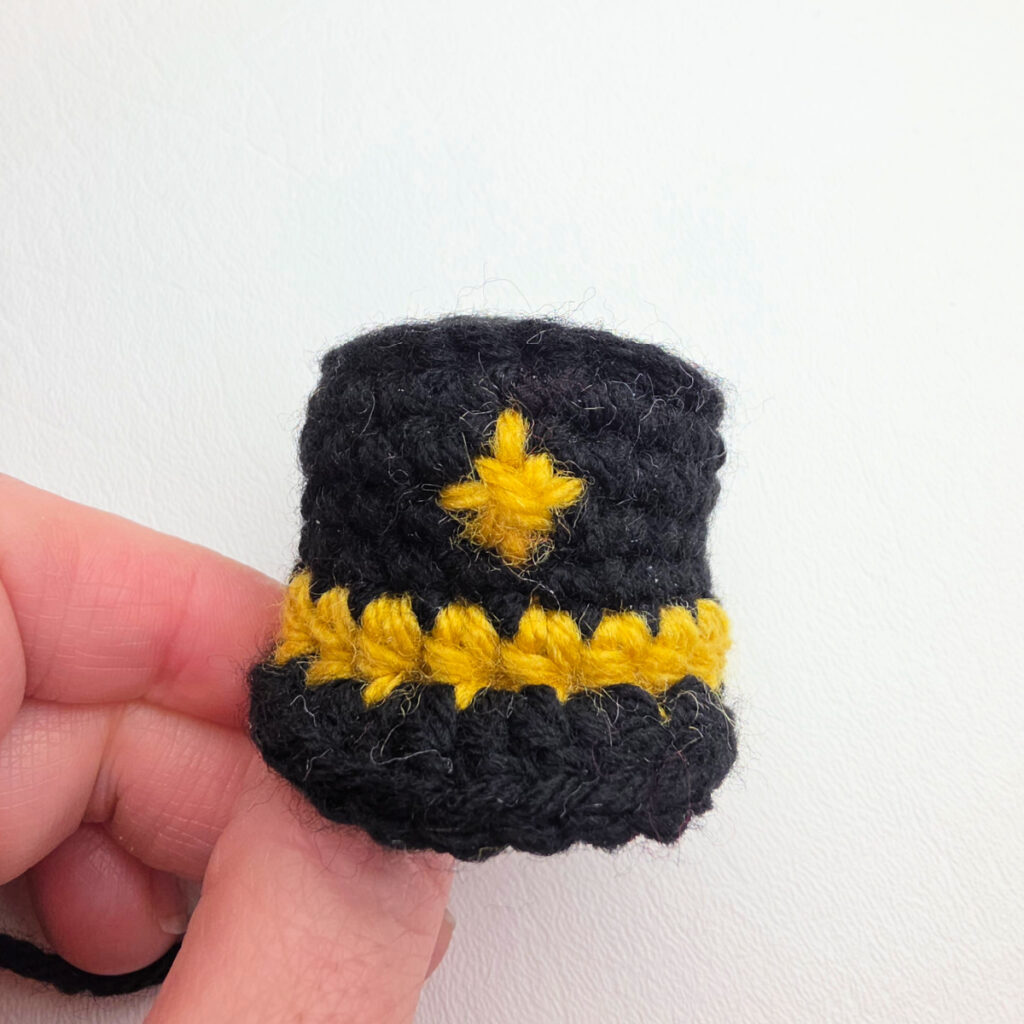
Rnd 11: With Black yarn, ch 1, sc in the first st, sc in each of the next 7 sts, FLO 2 hdc in the next st, (FLO 2 dc in the next st) 3 times, FLO 2 hdc in the next st, Both Loops, sc in each of the remaining 8 st. Join with a sl st to the 1st st. (25 sts)
Fasten off, leaving an 18″ tail of yarn for attaching the hat to the Nutcracker’s head. Continue on to Hat Details.
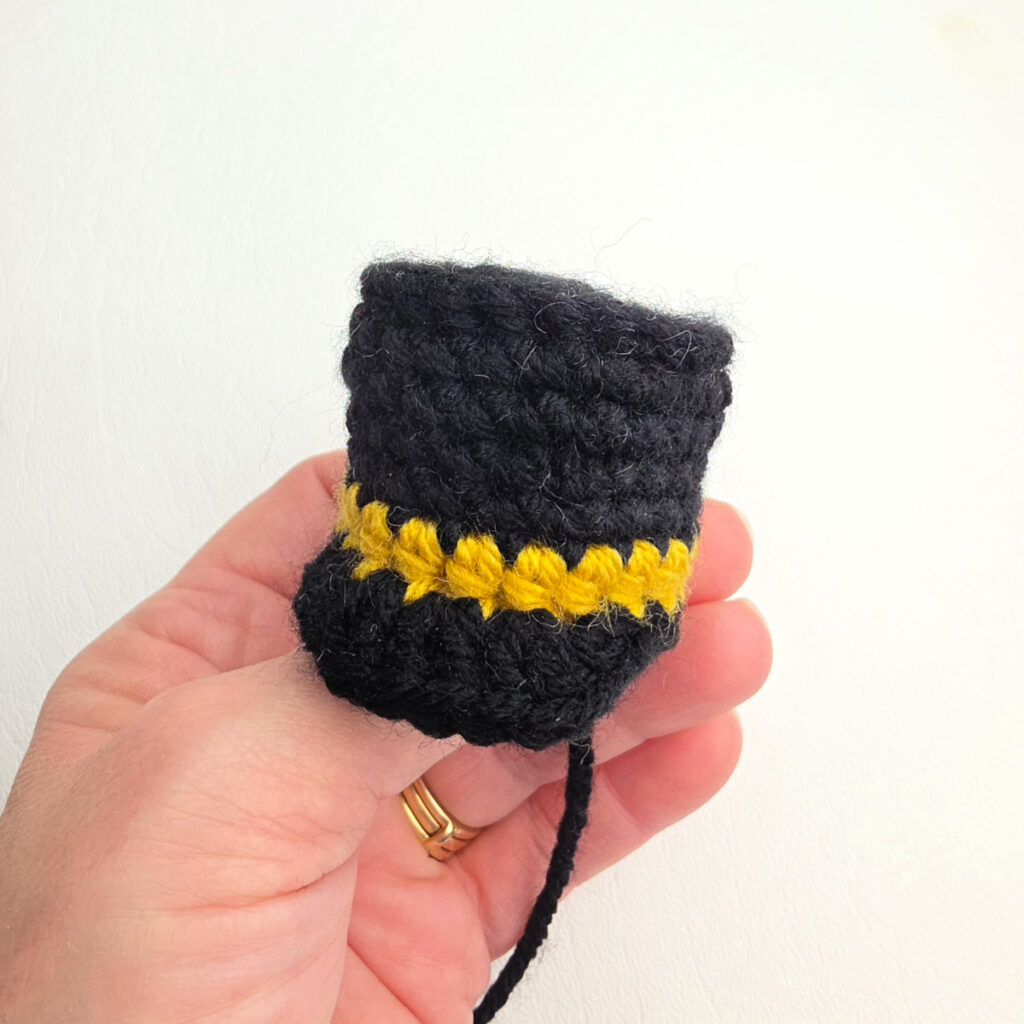

Nutcracker’s Hat measures approximately 1.75″ diameter across the top of the hat x 1.375″ H.
Hat Details
Star: To make the star on the hat, I cut a 12″ long piece of yarn and separated the strands. I then used a yarn needle and two of those strands to stitch a star on my nutcracker’s hat.
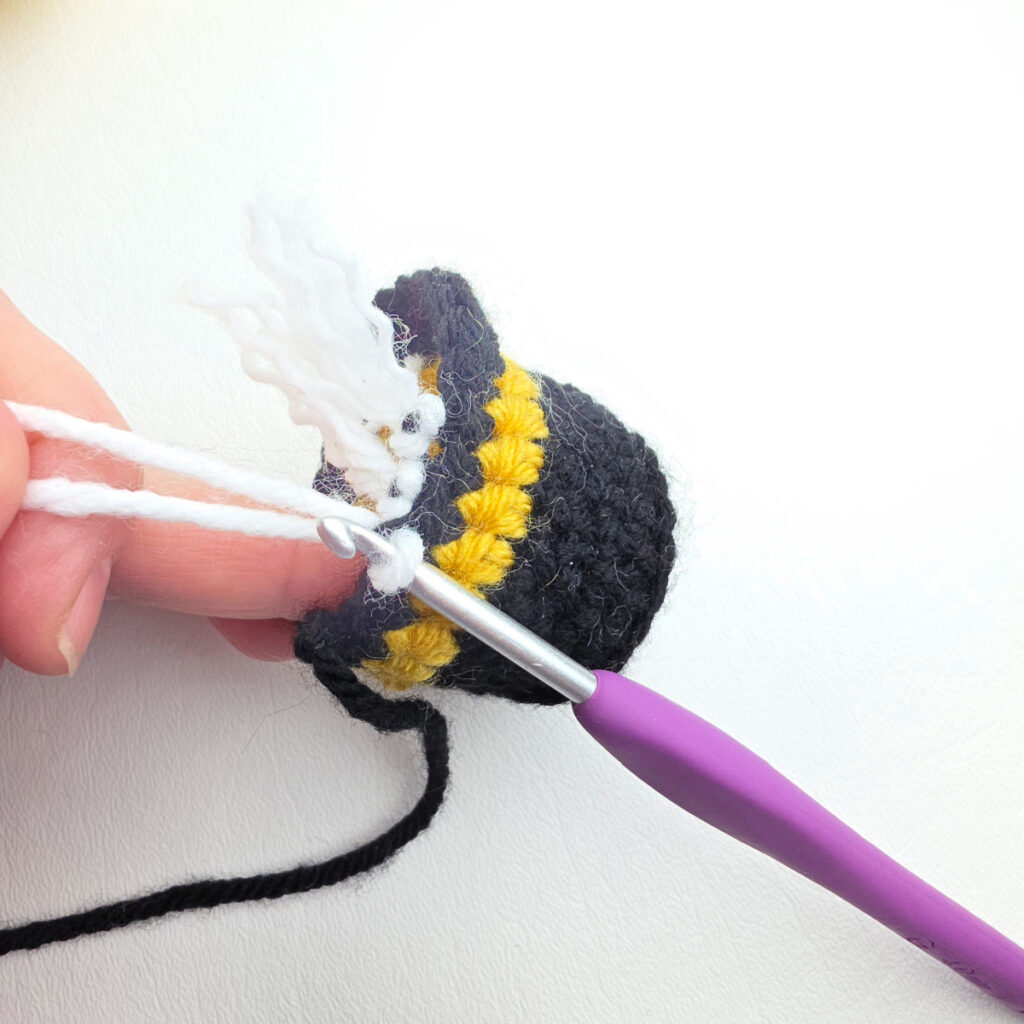
Adding Hair to the Hat
The hair is made by attaching yarn fringe to the inner loops on most of the hat’s bottom edge, leaving an opening for the Nutcracker’s face to be seen.
Cut 13 pieces of white yarn, 4″ long each.
Continue on to Assembly.
Assembly
Step 1: Locate the 7 center stitches along the front edge of the hat. You will not add hair fringe to these stitches.
Step 2: Take 1 piece of the 4″ long white yarn that you just cut and attach them to the inner loop on a stitch along the bottom edge of the hat, like you attach yarn fringe. See photos below. Repeat for remaining 12 pieces of white yarn, skipping the 7 centermost stitches on the front.
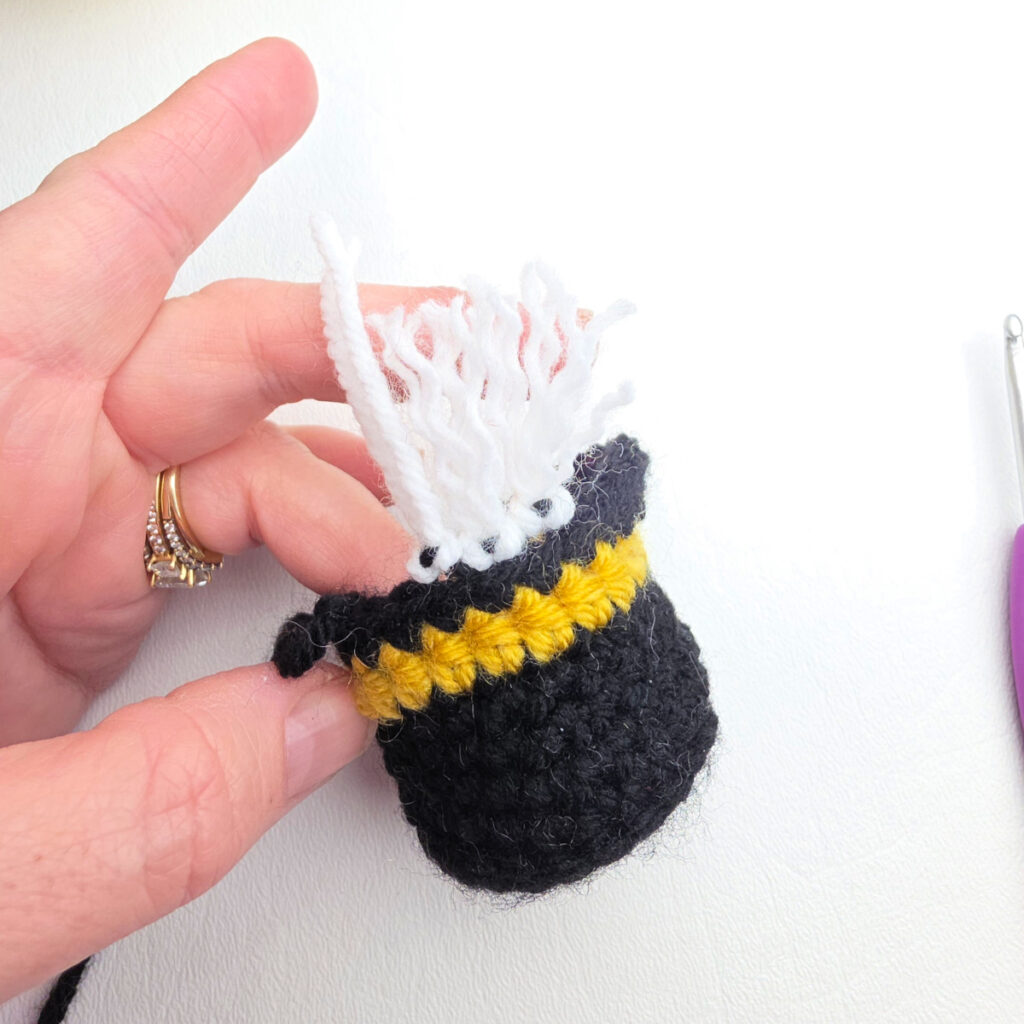
Step 3: Separate the plies of yarn to make the hair fuller looking. Trim the ends, if needed.
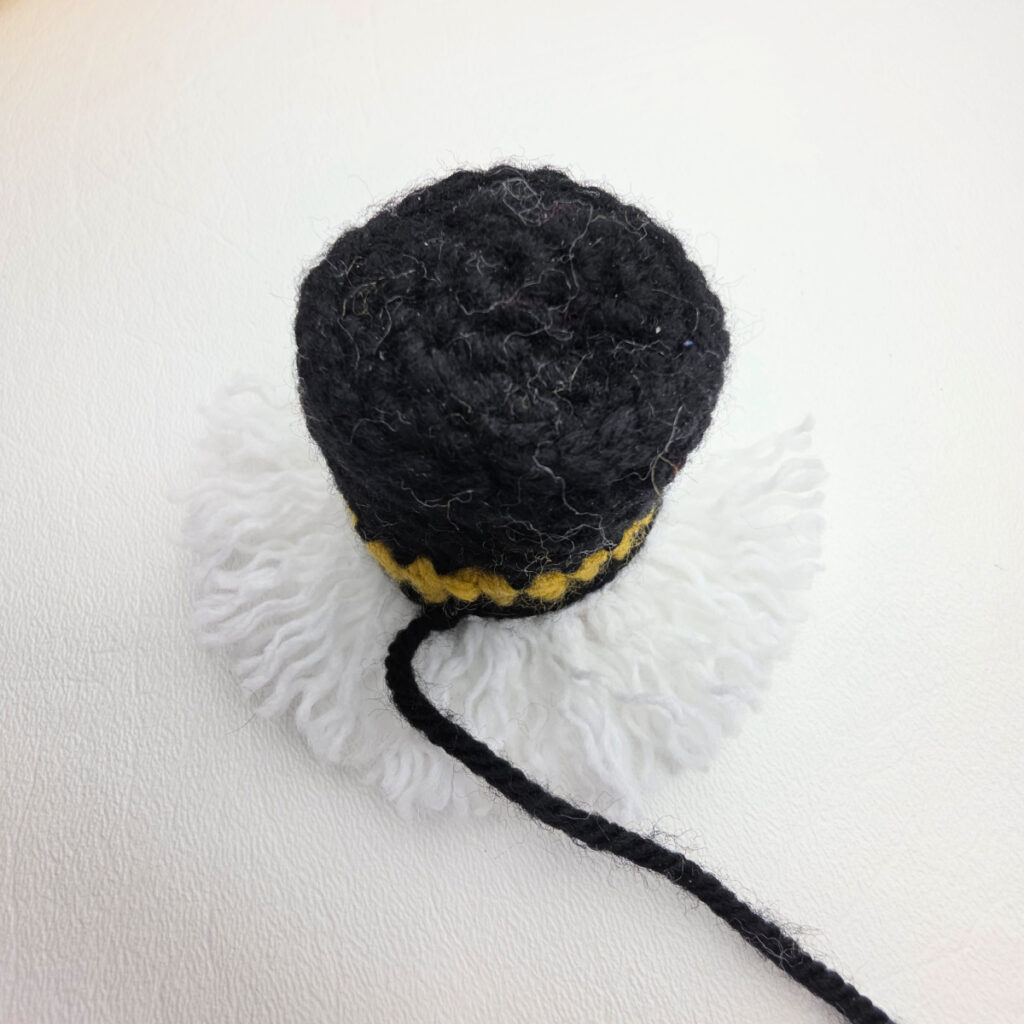
Continue on to the Hanging Loop.
Hanging Loop
With any color yarn & a 4.00mm crochet hook, create a chain that is 6″ long. Join with a sl st to the 1st ch.
Fasten off, leaving a tail of yarn. With a yarn needle & tail of yarn, sew the hanging loop onto the top of the Nutcracker’s Hat. Weave in ends.
Hanging Loop Alternative
You could also use a 6″ piece of ribbon as a hanging loop, instead.
Then attach it onto the top of the Nutcracker’s hat, with a needle and thread.
Continue on to Facial Features.
Facial Features
Eyes
I used (2) 8mm black plastic safety eyes for the Nutcracker. You can also embroider eyes with black thread or yarn.
With the Nutcracker facing you, as shown below, center the safety eyes on the head between Rounds 6 & 7, with 3 or 4 stitches between them.
Continue on to Eyebrows.
Eyebrows
For this step, you can use black thread, OR pull apart the plies of the black yarn and use only one ply.
With a 12″ piece of black yarn and yarn needle, embroider eyebrows on the nutcracker’s face, near his eyes, as shown in the photo.
Continue on to the Nose.
Nose
With a 12″ long piece of skin tone yarn and a yarn needle, create a nose on the Nutcracker by going back and forth horizontally around one stitch between his eyes, but slightly lower (see photos below). This creates a small bump for a nose.
Continue on to Attaching the Goatee Beard.

Attaching the goatee beard
With tail of yarn left and a yarn needle, attach the goatee beard to the Nutcracker’s face, as shown in the photos. Make sure to leave a little room between the nose and goatee for you to add the mustache.
Continue on to Embroider Mustache.
EMbroider mustache
Cut a piece of black yarn 12″ long. With a yarn needle and piece of black yarn, embroider the mustache, as shown in the photos.

Tuck ends in Nutcracker. Continue on to Blush (optional), or Attaching the Nutcracker’s Hat.
Blush
I added pink cheeks to my Nutcracker by lightly dabbing a Q-tip in my blush (make-up) and rubbing it in a gentle circle on his cheeks.
Continue on to Attaching the Nutcracker’s Hat.
Attaching the Nutcracker’s Hat
Position the Nutcracker’s hat on his head as shown. With black yarn & a yarn needle, attach the hat to his head. I did not weave in my ends. I used them to help stuff his head.
Continue on to Attaching the Nutcracker to the Jingle Bell.

Attaching the Nutcracker to the Jingle Bell
See below for jingle bell alternatives.
If you did not use your ends to stuff your nutcracker, or you feel he needs more stuffing, add batting (or yarn scraps), to his head and body. Don’t overstuff his body or it’ll be harder to attach him to the jingle bell.
Using the yarn tail left from his body and a yarn needle, secure Nutcracker to the top loop of the jingle bell. Once he’s snug, secure the yarn, fasten off and weave in ends.
Note: If you struggle getting your nutcracker tightly secured on top of the jingle bell, you can glue the bottom of his body to the top of the jingle bell.
Jingle Bell Alternatives

Related: If you enjoyed making this Nutcracker Christmas ornament, I think you’ll love the Snowman Jingle Bell Ornament, Reindeer Jingle Bell Ornament, Gingerbread Girl Jingle Bell Ornament, Mrs. Claus Jingle Bell Ornament, and Girl Elf Jingle Bell Ornament.
I Made It! Now What?
Pin this post! Save this crochet nutcracker jingle bell ornament to your Pinterest boards so that you can come back and make it again.
Leave a comment below: We love to hear your feedback.
Share Your Finished Projects on Facebook or Instagram: I love to see your finished projects! Share with us on social media and tag me @acrochetedsimplicity or use the hashtag #ACrochetedSimplicity so I can find your posts.
Join us in the Facebook Community Group!
I hope you’ve enjoyed this crochet nutcracker jingle bell ornament and will make many crocheted Christmas gifts!
Come share your finished projects with us in the A Crocheted Simplicity Crochet Community Group on Facebook. Join us for fun community events such as crochet alongs, join in on crochet conversations, ask questions, get advice, and share your love for crochet!

More Crochet Christmas Tree Decorations You’ll Love
- Santa Candy Cane Holder Ornament
- Santa Boot Ornament
- Gingerbread Boy & Girl Candy Cane Holder
- Cookies for Santa Ornament
- Gnome Candy Cane Holder Ornament
thanks so much for your lovely patterns, the bell ornaments are so cute, I would like to save them all, is this post going to be taken down after the holidays or can I go back to it at any time as long as I don’t put it in trash or delete this post I should be able to do so couldn’t I? I’m not tech savvy so please help me save this, I shall put on the star at top of post to remind me not to trash, but I hope to always find it, can it b pinned to save?
Hi Carol,
Yes, you can absolutely pin it to save it for later. They post will NOT be taken down. It will be here forever. 🙂
This is absolutely adorable and I’m going to make a bunch for Christmas gifts!!! Thank you for the great pattern!!!
Merry Christmas!
I’m so happy to hear that. Thank you!