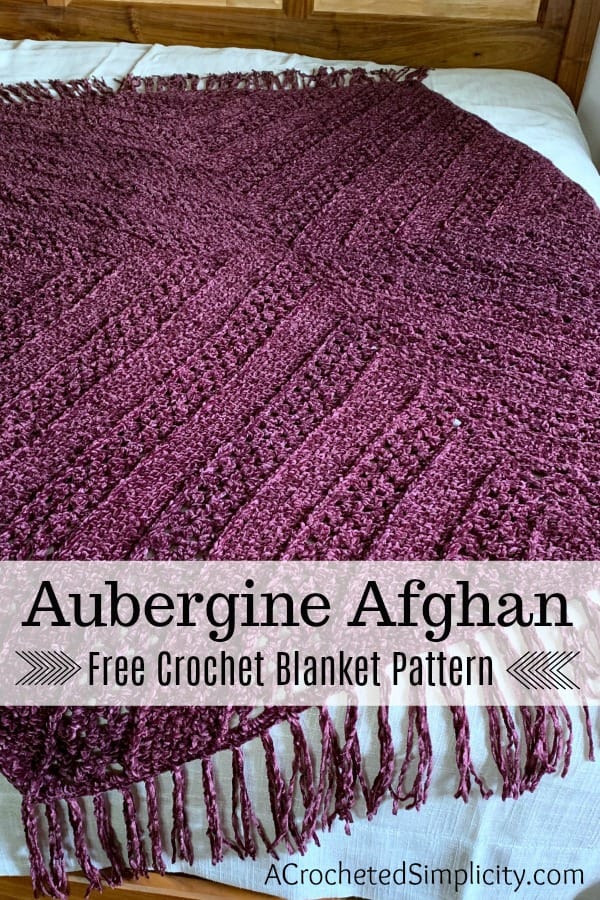
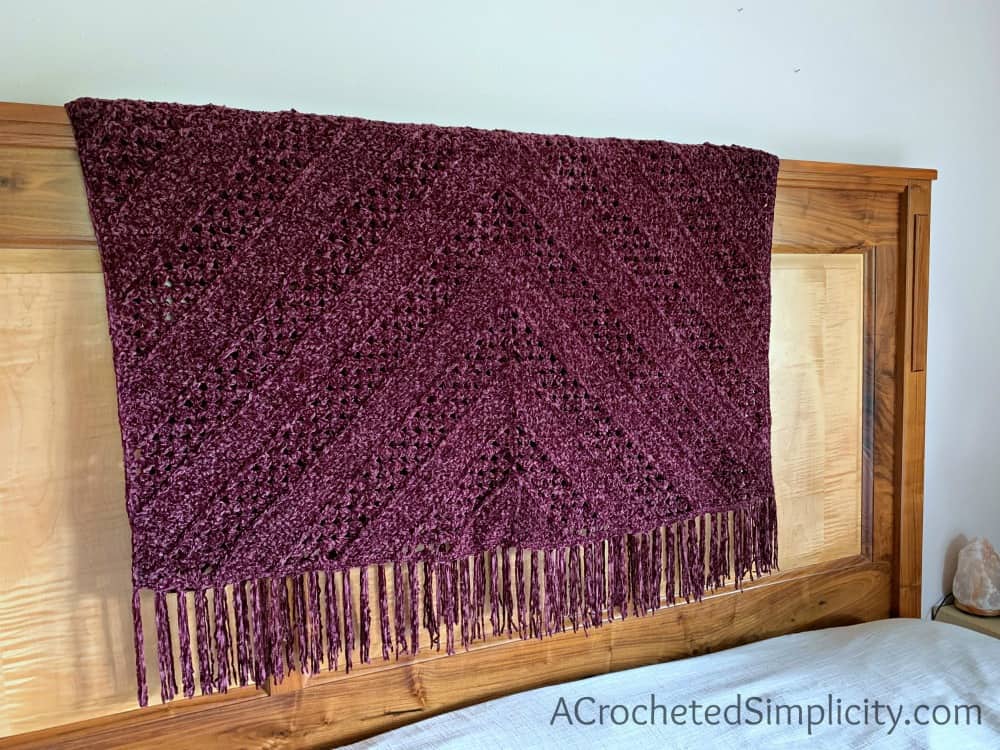
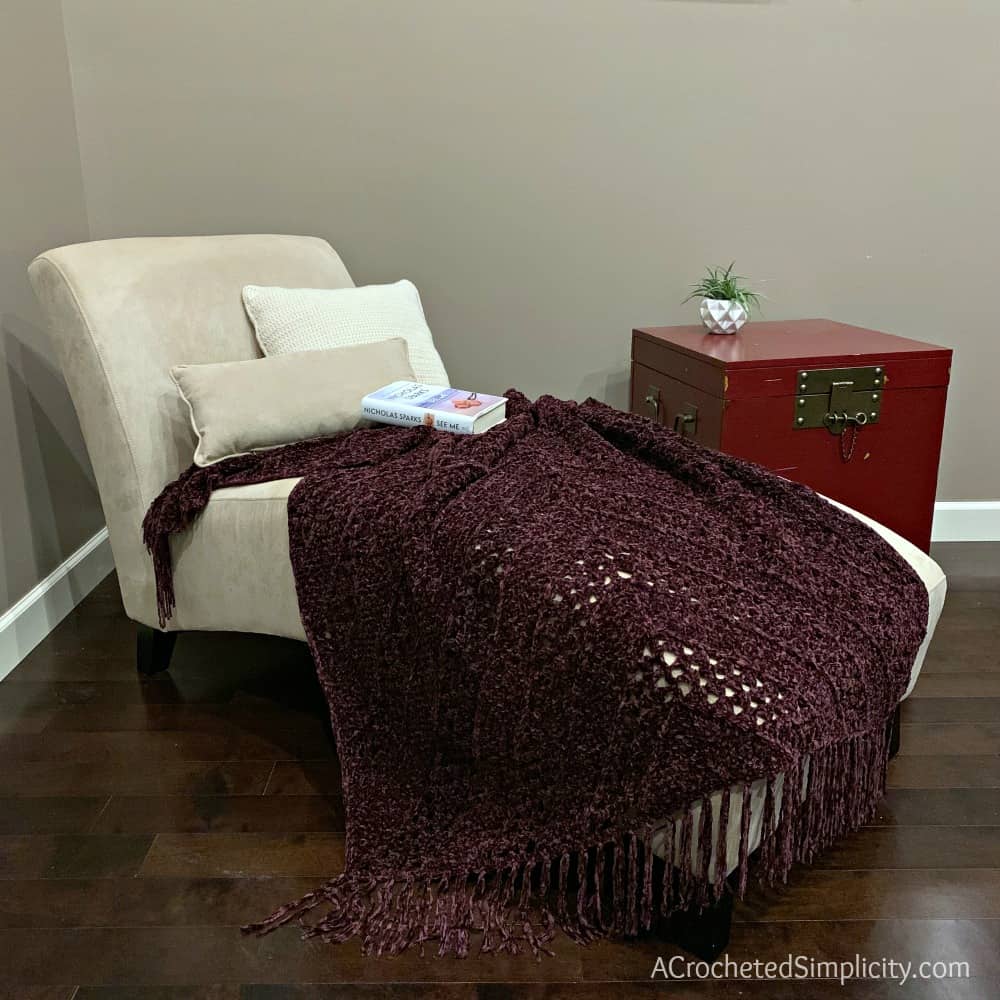
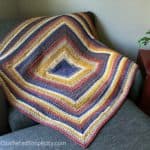
Aubergine Afghan – Free Crochet Blanket Pattern
The Aubergine Afghan is crocheted with the luxurious Vel-Luxe, chenille yarn. Beginners and seasoned crocheters alike will love that this modern crochet blanket pattern uses simple crochet stitches to create the textured design, making it perfect crochet blanket pattern for those days when you need to sit, crochet and decompress. It’ll quickly become your favorite cozy afghan to crochet and to cuddle up in this winter. It’s also perfect for gift giving! You can find the free crochet pattern in this post below, or an ad-free print friendly version on Love Crafts here, Ravelry here, or on Etsy here.
> CLICK HERE TO SIGN-UP TO RECEIVE OUR NEWSLETTER <
Velvet like yarns have become very popular over the past year. So as soon as I laid eyes on Lion Brand Yarn’s Vel-Luxe Yarn in Eggplant, I knew it would be the perfect yarn for a crochet afghan design I had had rolling around in my head for a few months. This velvet afghan was so much fun to crochet and I love that the yarn was truly the perfect choice for this crochet design.
THE YARN
For this crochet afghan, I chose Lion Brand Yarns Vel-Luxe Yarn in Eggplant, which is a worsted weight, polyester chenille yarn. This velvet yarn is perfect for cozy crochet blankets that you can cuddle up with on cold winter nights. It is available in 7 beautiful colors. I chose Eggplant with the intentions of it coordinating with my Christmas decor.
DESCRIPTION
The Aubergine Afghan is crocheted with the luxurious Vel-Luxe, velvet yarn. This modern crochet afghan is constructed with only 4 larger rectangles and is a perfect project for those evenings where you just want to relax and watch your favorite television show. It’ll quickly become your favorite cozy afghan to cuddle up in this winter. It’s also perfect for gift giving!
Check out my Blanket Size Chart HERE, for standard blanket sizes.
Aubergine Afghan – Free Crochet Blanket Pattern
The free pattern is below, but if you love to work offline, or need to order your yarn, I’ve got a couple other great options for you.
Purchase the ad-free, printable PDF, including all photo tutorials, on Love Crafts here, Ravelry here, or Etsy here.
Purchase the kit here! Use code: SAVE40SEPT to save 40% this week!!! Lion Brand also has a full kit of the Aubergine Afghan, available on their website. The kit includes your choice of 6 colorways and a printed copy of the pattern below.
Save this pattern to your Ravelry favorites here.
Pin it for later here.
This post contains affiliate links.
Materials
- Yarn: Worsted Weight / 4 / Yarn (Lion Brand Yarns, Vel-Luxe, in Eggplant was used for the sample in the photos) (246 yards / 225 m / 150 g / 5.3 oz / 100% polyester) per cake – You’ll need approximately 9 cakes (2,060 yards) to make a 48″ x 60″ afghan (size shown in the photos).
- Crochet Hook: J/10/6.00mm (My favorite crochet hooks are the Clover Amour Hooks, I’ve never had an ache in my hand since switching)
- Locking Stitch Markers
- Scissors
- Yarn Needle
Many of these materials are available for purchase through our affiliates below:
 Lion Brand Yarn Vel-Luxe Ya...Shop on Amazon
 Clover 1049/J Amour Crochet...Shop on Amazon
  Fiskars 154110-1001 Non-sti...Shop on Amazon
  Clover Lock Ring Markers, 2...Shop on Amazon
Skill Level
- Easy
Gauge
-
Dimensions are included at the end of Row 5 to check beginning gauge. Gauge isn’t crucial for this project.
Size
- One Size: 48″ x 60″
- Check out my Blanket Size Chart HERE, for standard blanket sizes.
Abbreviations (US Terms)
- ch(s): chain(s)
- sl st(s): slip stitch(es)
- st(s): stitch(es)
- sc: single crochet
- dc: double crochet
- sc2tog: single crochet decrease
- yo: yarn over
- sp: space
- Rep: repeat
- Rnd: round
- Beg: beginning
Notes
- I tend to crochet on the tighter side. You may need to go down a hook size (or two) to meet gauge if you crochet on the looser side.
- The first stitch of every row is worked into the same stitch as the turning chain, unless stated otherwise.
- Chains (for chain spaces) are included in stitch count. When reading the instructions, skipped stitches can be chains or stitches.
- Yardage: 9 cakes (approximately 2,060 yards) made a 48″ x 60″ size afghan (shown in photo).
- Construction: You’ll work 2 of each of the rectangles, seam them, then add a border and fringe, if desired.
- Check out my Blanket Size Chart HERE, for standard blanket sizes.
Aubergine Afghan – Crochet Blanket
Rectangle Instructions
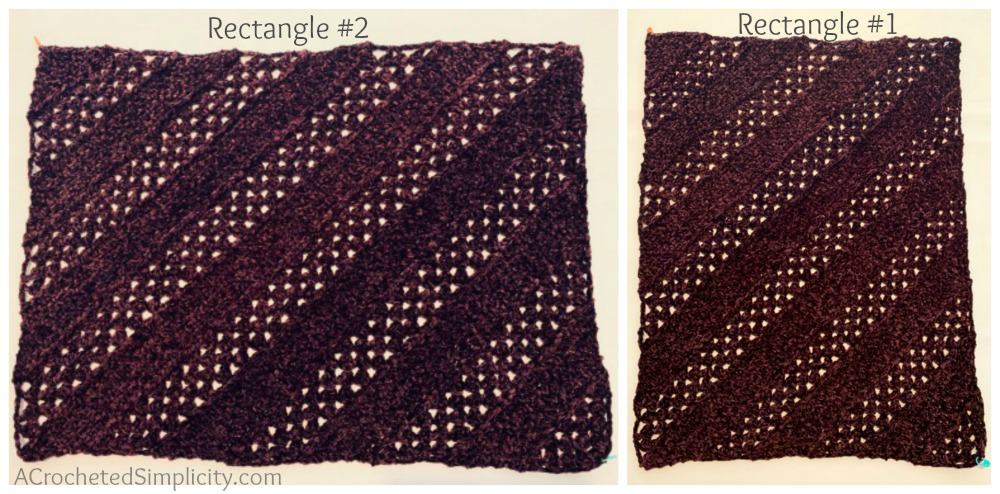
There are 2 different rectangles. They are similar, yet different. Make 2 of Rectangle #1 and 2 of Rectangle #2. Work the sections in the order listed below for each rectangle you’re making for your crochet afghan.
- Rectangle #1: Beginning Rows, Increase Rows, Rectangle #1 Rectangular Rows, Decrease Rows, Ending Rows.
- Rectangle #2: Beginning Rows, Increase Rows, Rectangle #2 Rectangular Rows, Decrease Rows, Ending Rows.
Beginning Rows
Note: Make sure to keep your ch-1’s loose in the linen stitch / moss stitch rows (sc in the next ch-1 sp, ch 1, skip the next st), or your work will cinch.
Beg Row 1: With a 6.00mm crochet hook, ch 5 (counts as 1st dc & ch-1), (3 dc, ch 1, dc) in the first ch. Turn. (7 sts) *Ch-1 spaces are included in stitch count. *Place a stitch marker in the bottom of Row 1. This will help with seaming later.
Beg Row 2: Ch 4 (counts as 1st dc & ch-1), 3 dc in first ch-1 sp, ch 1, skip each of the next 3 dc, 3 dc in the next ch-1 sp, ch 1, dc in the same sp. Turn. (11 sts)
Beg Row 3: Ch 4, (counts as 1st dc & ch-1), 3 dc in the first ch-1 sp, (ch 1, skip each of the next 3 dc, 3 dc in the next ch-1 sp) twice, ch 1, dc in same sp as last 3 dc. Turn. (15 sts)
Beg Row 4: Ch 4, (counts as 1st dc & ch-1), 3 dc in the first ch-1 sp, (ch 1, skip each of the next 3 dc, 3 dc in the next ch-1 sp) across, ch 1, dc in same sp as last 3 dc. Turn. (19 sts)
Beg Row 5: Ch 4, (counts as 1st dc & ch-1), 3 dc in the first ch-1 sp, (ch 1, skip each of the next 3 dc, 3 dc in the next ch-1 sp) across, ch 1, dc in same sp as last 3 dc. Turn. (23 sts)
*Approximate Size at this point: 7.5″ across the top of Row 5 and 3.5″ H from the bottom of Row 1.
Do not fasten off. Continue on to Increase Rows.
*Gauge Check at the end of the first Increase Row 12 (afghan’s 17th row): 12.75″ W across the top of the 17th row and 6.5″ H from the bottom of Row 1, perpendicular to the last row.
Increase Rows
Increase Row 1: Ch 1, sc in each st and ch-1 sp across. Turn. *Stitch count does not increase.
Increase Row 2: Do Not Chain, sl st in each st across. Turn. *Stitch count does not increase.
Increase Row 3: Ch 1, working into the stitches from Increase Row 1, sc in the first st, ch 1, (sc in the next st, ch 1, skip the next st) rep across to the last 2 sts, sc in the next st, ch 1, sc in the last st. Turn. *Stitch count increases by 2 stitches.
Increase Rows 4 – 10: Ch 1, sc in the first st, ch 1, (sc in the next ch-1 sp, ch 1, skip the next st) rep across to the last 2 sts, sc in the next ch-1 sp, ch 1, sc in the last st. Turn. *Stitch count increases by 2 stitches each row.
Increase Row 11: Ch 1, sc in each st and ch-1 sp across. Turn. *Stitch count does not increase.
Increase Row 12: Do Not Chain, sl st in each st across. Turn. *Stitch count does not increase.
Increase Row 13: Ch 4, (counts as 1st dc & ch-1), working into the stitches from Increase Row 11, skip the first st, (3 dc in the next st, ch 1, skip each of the next 3 sts) rep across to the last 2 sts, 3 dc in the next st, ch 1, dc in the last st. Turn. *Stitch count increases by 4 stitches.
Increase Rows 14 – 16: Ch 4, (counts as 1st dc & ch-1), 3 dc in the first ch-1 sp, (ch 1, skip each of the next 3 dc, 3 dc in the next ch-1 sp) across, ch 1, dc in same sp as last 3 dc. Turn. *Stitch count increases by 4 stitches each row.
Rows 17 – 44: Repeat Increase Rows 1 – 16, ending w/ a Increase Row 12 repeat. (103 sts at the end of the last row)
Do not fasten off. Then continue on to the Rectangular Rows for the square you’re making.
Rectangle #1 (Make 2)
Rectangular Rows
Note: Your stitch count will not increase or decrease in this section.
Rec Row 1: Ch 4 (counts as 1st dc & ch-1), working into the stitches from Inc Row 11 or Rec Row 15, skip each of the first 4 sts, (3 dc in the next st, ch 1, skip each of the next 3 sts) rep across to the last 3 sts, 3 dc in the next st, ch 1, skip the next st, dc in the last st. Turn. (103 sts)
Rec Row 2: Ch 4, (counts as 1st dc & ch-1), 3 dc in the first ch-1 sp, (ch 1, skip each of the next 3 dc, 3 dc in the next ch-1 sp) across to the last 3 dc & ch-1 sp, ch 1, skip each of the next 3 dc, dc in the last ch-1 sp. Turn.
Rec Row 3: Ch 4 (counts as 1st dc & ch-1), skip the first ch-1 sp & next 3 dc, (3 dc in next ch-1 sp, ch 1, skip each of the next 3 dc) rep across to the last ch-1 sp, (3 dc, ch 1, dc) in the last ch-1 sp. Turn.
Rec Row 4: Rep Rec Row 2.
Rec Row 5: Ch 1, sc in each st and ch-1 sp across. Turn.
Rec Row 6: Do Not Chain, sl st in each st across. Turn.
Rec Row 7: Ch 1, working into the stitches from Rec Row 5, skip the first st, (sc in the next st, ch 1, skip the next st) rep across to the last 2 sts, sc in the next st, ch 1, sc in the last st. Turn.
Rec Row 8: Ch 1, sc in the first st, ch 1, (sc in the next ch-1 sp, ch 1, skip the next st) rep across to the last 2 sts (ch-1 sp & st), sc2tog in the next ch-1 sp & last st. Turn.
Rec Row 9: Ch 1, sc2tog in the first st & next ch-1 sp, ch 1, skip the next st, (sc in the next ch-1 sp, ch 1, skip the next st) rep across to the last 2 sts, sc in the next ch-1 sp, ch 1, sc in the last st. Turn.
Rec Rows 10 – 14: Rep Rows 8 – 9, ending with a Rec Row 8 repeat.
Rec Row 15: Ch 1, sc2tog in the first st & next ch-1 sp, sc in each st and ch-1 sp across to the last st, 2 sc in the last st. Turn.
Rec Row 16: Do Not Chain, sl st in each st across. Turn.
Do not fasten off. Continue on to Decrease Rows.
Rectangle #2 (Make 2)
Rectangular Rows
Note: Your stitch count will not increase or decrease in this section.
Rec Row 1: Ch 4, (counts as 1st dc & ch-1), working into the stitches from Increase Row 11 or Rec Row 15, skip the first st, (3 dc in the next st, ch 1, skip each of the next 3 sts) rep across to the last 2 sts, skip the next st, dc in the last st. Turn. (103 sts)
Rec Row 2: Ch 4 (counts as 1st dc & ch-1), skip the first ch-1 sp & next 3 dc, (3 dc in next ch-1 sp, ch 1, skip each of the next 3 dc) rep across to the last ch-1 sp, (3 dc, ch 1, dc) in the last ch-1 sp. Turn.
Rec Row 3: Ch 4, (counts as 1st dc & ch-1), 3 dc in the first ch-1 sp, (ch 1, skip each of the next 3 dc, 3 dc in the next ch-1 sp) across to the last 3 dc & ch-1 sp, ch 1, skip each of the next 3 dc, dc in the last ch-1 sp. Turn.
Rec Row 4: Rep Rec Row 2.
Rec Row 5: Ch 1, sc in each st and ch-1 sp across. Turn.
Rec Row 6: Do Not Chain, sl st in each st across. Turn.
Rec Row 7: Ch 1, working into the stitches from Rec Row 5, sc in the first st, ch 1, (sc in the next st, ch 1, skip the next st) rep across to the last 2 sts, sc2tog. Turn.
Rec Row 8: Ch 1, sc2tog in the first st & next ch-1 sp, ch 1, skip the next st, (sc in the next ch-1 sp, ch 1, skip the next st) rep across to the last 2 sts, sc in the next ch-1 sp, ch 1, sc in the last st. Turn.
Rec Row 9: Ch 1, sc in the first st, ch 1, (sc in the next ch-1 sp, ch 1, skip the next st) rep across to the last 2 sts, sc2tog. Turn.
Rec Rows 10 – 14: Rep Rows 8 – 9, ending with a Rec Row 8 repeat.
Rec Row 15: Ch 1, 2 sc in the first st, sc in each st and ch-1 sp across to the last 2 sts, sc2tog. Turn. Rec
Row 16: Do Not Chain, sl st in each st across. Turn.
Do not fasten off. Continue on to Decrease Rows.
Decrease Rows
Decrease Row 1: Ch 4 (counts as 1st dc & ch-1), working into the stitches from Rec Row 15 or Dec Row 15, skip each of the first 4 sts, 3 dc in the next st, (ch 1, skip each of the next 3 sts, 3 dc in the next st) rep across to the last 10 sts, ch 1, skip each of the next 4 sts, 3 dc in the next st, ch 1, skip each of the next 4 sts, dc in the last st. Turn. *Stitch count decreases by 4 stitches.
Decrease Rows 2 – 4: Ch 4 (counts as 1st dc & ch-1), skip the first ch-1 sp & next 3 dc, (3 dc in next ch-1 sp, ch 1, skip each of the next 3 dc) rep across to the last ch-1 sp, dc in the last ch-1 sp. Turn. *Stitch count decreases by 4 stitches each row.
Decrease Row 5: Ch 1, sc in each st and ch-1 sp across (last 2 sts are worked in ch-1 and top of ch 3). Turn. *Stitch count does not decrease.
Decrease Row 6: Do Not Chain, sl st in each st across. Turn. *Stitch count does not decrease.
Decrease Row 7: Ch 1 (working into the stitches from Decrease Row 5), sc2tog, ch 1, skip the next st, (sc in the next st, ch 1, skip the next st) rep across to the last 2 sts, sc2tog. Turn. *Stitch count decreases by 2 stitches.
Decrease Rows 8 – 14: Ch 1, sc2tog in the first st & next ch-1 sp, ch 1, skip the next st, (sc in the next ch-1 sp, ch 1, skip the next st) rep across to the last 2 sts (ch-1 sp & st), sc2tog in the next ch-1 sp & last st. Turn. *Stitch count decreases by 2 stitches each row.
Decrease Row 15: Ch 1, sc in each st and ch-1 sp across (last 2 sts are worked in ch-1 and top of ch 3). Turn. *Stitch count does not decrease.
Decrease Row 16: Do Not Chain, sl st in each st across. Turn. *Stitch count does not decrease.
Rows 17 – 36: Repeat Decrease Rows 1 – 16, ending with a Dec Row 4 repeat. (23 sts at the end of Row 36)
Do not fasten off. Continue on to Ending Rows.
Ending Rows
End Row 1: Ch 1, sc2tog in the first st & next ch-1 sp, sc in each st and ch-1 sp across to the last 2 sts (ch-1 sp & st), sc2tog in the next ch-1 sp & last st (last st is the 3rd ch from the ch 4). Turn. (21 sts) *Stitch count decreases by 2 stitches.
End Row 2: Do Not Chain, sl st in each st across. Turn. *Stitch count does not decrease.
End Row 3: Ch 1 (working into the stitches from End Row 1), sc2tog, ch 1, skip the next st, (sc in the next st, ch 1, skip the next st) rep across to the last 2 sts, sc2tog. Turn. (19 sts) *Stitch count decreases by 2 stitches.
End Rows 4 – 10: Ch 1, sc2tog in the first st & next ch-1 sp, ch 1, skip the next st, (sc in the next ch-1 sp, ch 1, skip the next st) rep across to the last 2 sts (ch-1 sp & st), sc2tog in the next ch-1 sp & last st. Turn. (5 sts) at the end of Row 10 *Stitch count decreases by 2 stitches each row.
End Row 11: Ch 1, sc2tog in the first st & next ch-1 sp, ch 1, skip the next st, sc2tog in the next ch-1 sp & last st. Turn. (3 sts)
End Row 12: Ch 1, sc2tog in the first & last sts (skipping over the middle ch-1 sp). (1 st)
Fasten off. Weave in any ends. Approximate size of each finished rectangle is: 23.5″ W x 30″ L. After completing all 4 rectangles, continue on to Layout & Seaming.
Layout & Seaming
- Step One: Lay out your rectangles as shown in the photo below. All right sides facing up. The rectangles in the photo are numbered and I’ve marked a pink dot to show Row 1 of each rectangle.
- Step Two: Use locking stitch markers to hold the rectangles together while seaming. Make sure that the sections line up properly. I prefer to add them at the corners and also where the rows of slip stitches meet along the edges. Stitch markers really help to keep the afghan lined up during seaming.
- Step Three: Use a Mattress Stitch Seam to seam the 4 rectangles together. I seamed mine toward the center. So, bottom up to center, top down to center, left side to center, and right side to center. You’ll find my tutorial for the Mattress Stitch Seam HERE.
- Step Four: Weave in all ends. Continue on to Border.


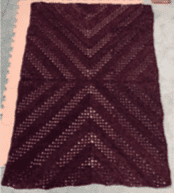
The photo above shows the rectangles seamed.
Border
Tip! If your edge starts to become wavy, go down a hook size or two until it’s nice and flat.
Rnd 1: With a 6.00mm crochet hook, join yarn in any corner you’d like, ch 1, work 1 sc into the side of each sc and alternate working 2 sc or 3 sc into the side of each dc (ch-3), also work 3 sc in each corner. Do not join. *Stitch count isn’t crucial.
Rnd 2: Work 1 sc in each st around and 3 sc in each corner. Join with a sl st to the first sc. *Stitch count isn’t crucial.
Fasten off. Weave in ends. Continue on to Adding Fringe, if desired.
Fringe
I chose to add fringe to my crochet afghan. I thought it was the perfect accent to finish off the style of this design.
With Right Side facing up.
Step 1: Cut 2 pieces of yarn, 13″ L, for each fringe.
Step 2: Take 2 strands of yarn and fold it in half to create a small loop. Using a crochet hook, pull the loop (from right side to wrong side of top) thru a stitch along the top or bottom edge of the afghan. Pull loose ends to tighten fringe. Place 1 strand every 3 stitches along the top and bottom edges of the afghan.
Step 3: Trim fringe to 6″ to even out the ends.
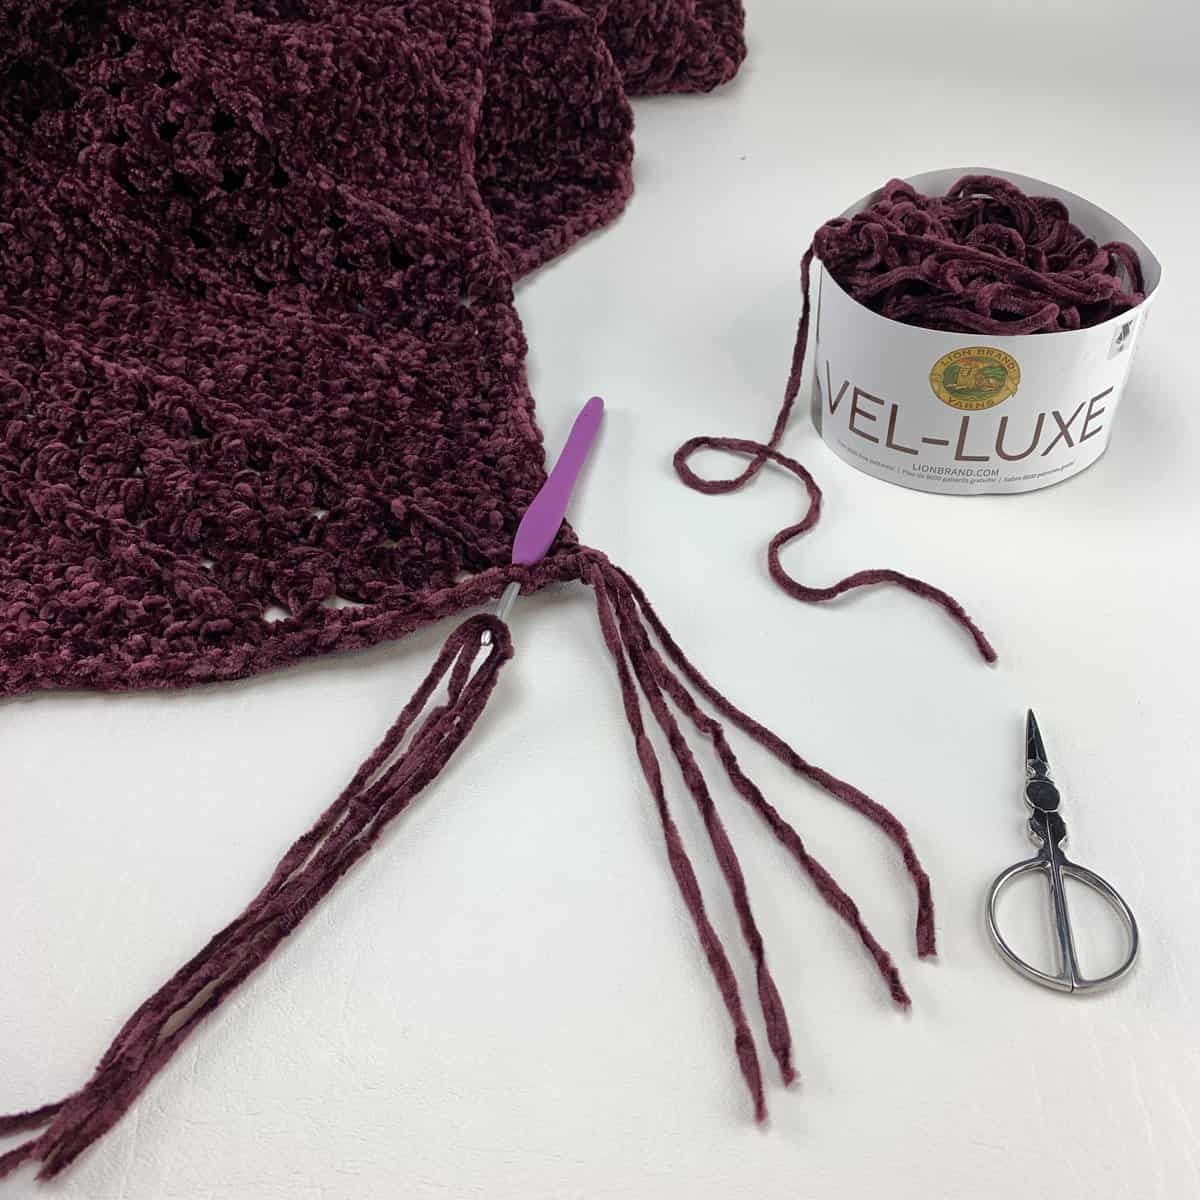
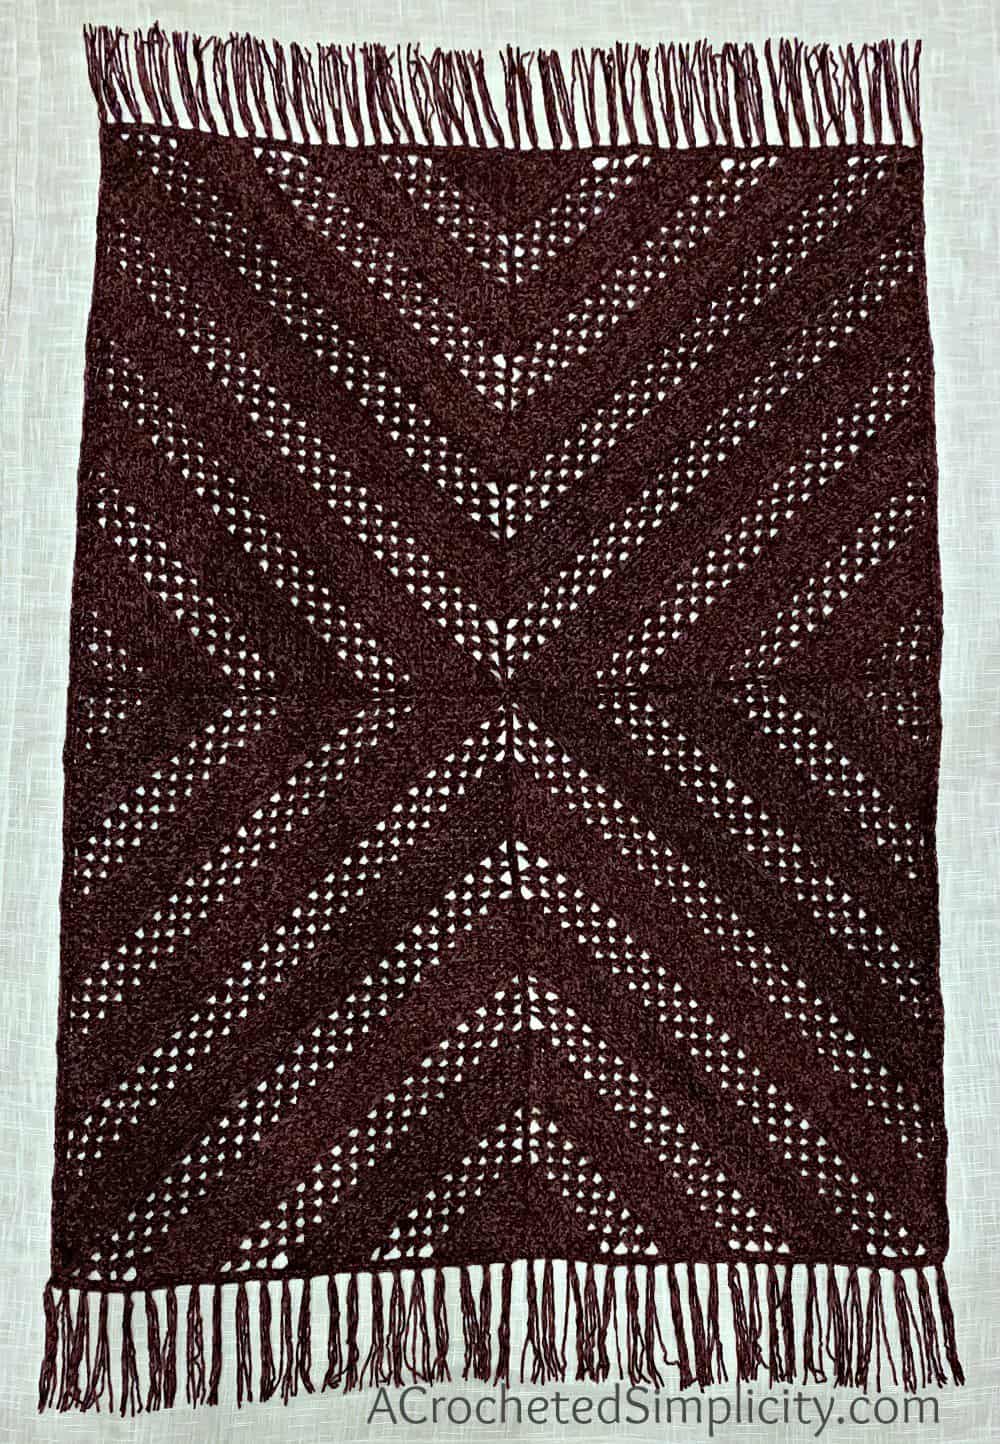
Fasten off. Weave in ends. Professionally finish your velvet afghan by blocking it. Click HERE for my Super Easy Blocking Tutorial.
MORE FREE CROCHET PATTERNS FROM A CROCHETED SIMPLICITY
If you enjoy this crochet blanket pattern, you may enjoy these other projects as well. And if you just want to browse, you can find all of our free crochet patterns HERE.
Are you intimidated by knit-look crochet? Would you love to learn my tips & tricks? Take an Annies Video Class with me and let me ease your fears and help you increase your skills! Click on the photo below to watch a free preview. You can also see the other 4 video classes I have available!

Please share your finished ACS projects with us in the A Crocheted Simplicity Crochet Community Group on Facebook! Use hashtag #ACrochetedSimplicity when sharing on social media so I can find your posts!

I’ve seen and heard of a similar yarn that “wormed” when washed. (It was even handwashed!!) Does this yarn do that?
Hi Lorena,
I have not yet washed my afghan as I haven’t used it yet, but I also haven’t heard of that issue with this yarn.
I’ve heard that worming seems to be more of an issue with knit projects with this yarn. I also believe it’s best to use hooks that aren’t overly large. I used a 6mm and I would’t go any larger than that.
I’d also guess that the stitches used play a part in worming as well.
Jennifer
If I wanted to make this larger, 60 by 72, do you think I could just make an additional part number one and part number two to add to the side?
Hi Deborah,
If you did that, it would totally change the design of the afghan.
Is there perhaps a way you would choose to make it bigger? I love the look, but would like it to be a bit bigger.
When you’re working the increase sections, you can add one more repeat to each of the 4 rectangles. That will add 16 more rows and increase the size of each of the 4 rectangles, increasing the size of your blanket.