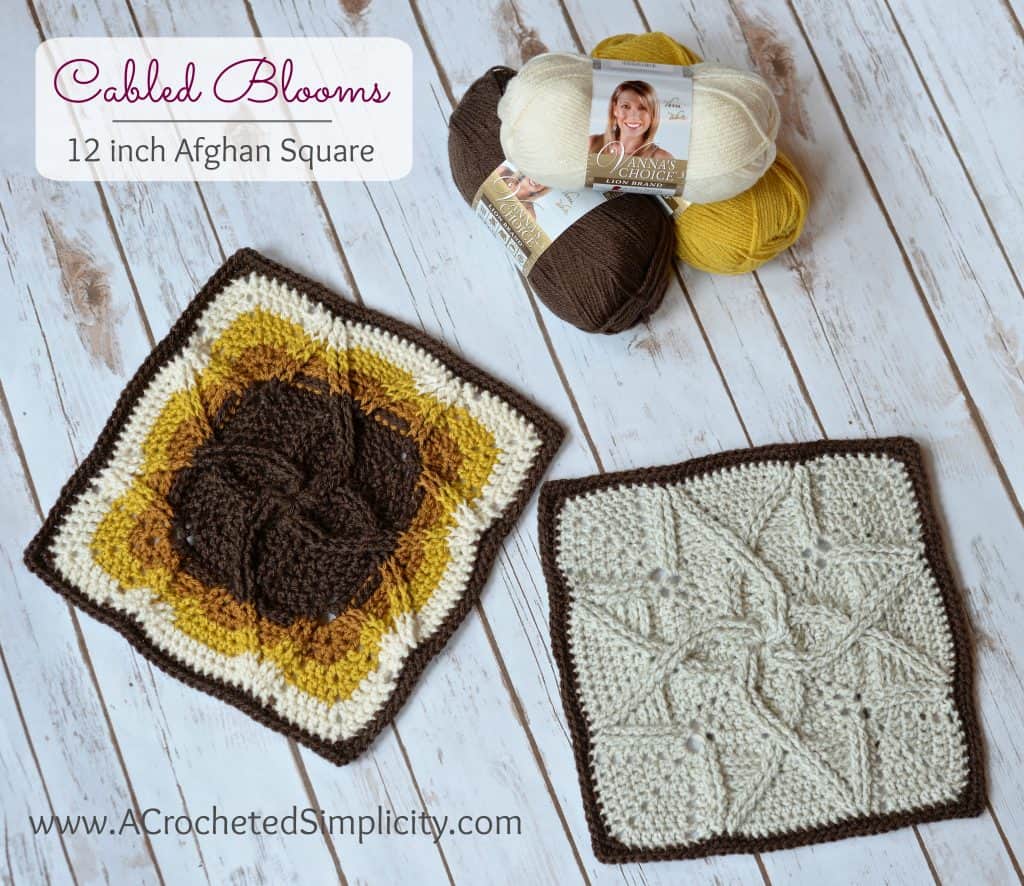
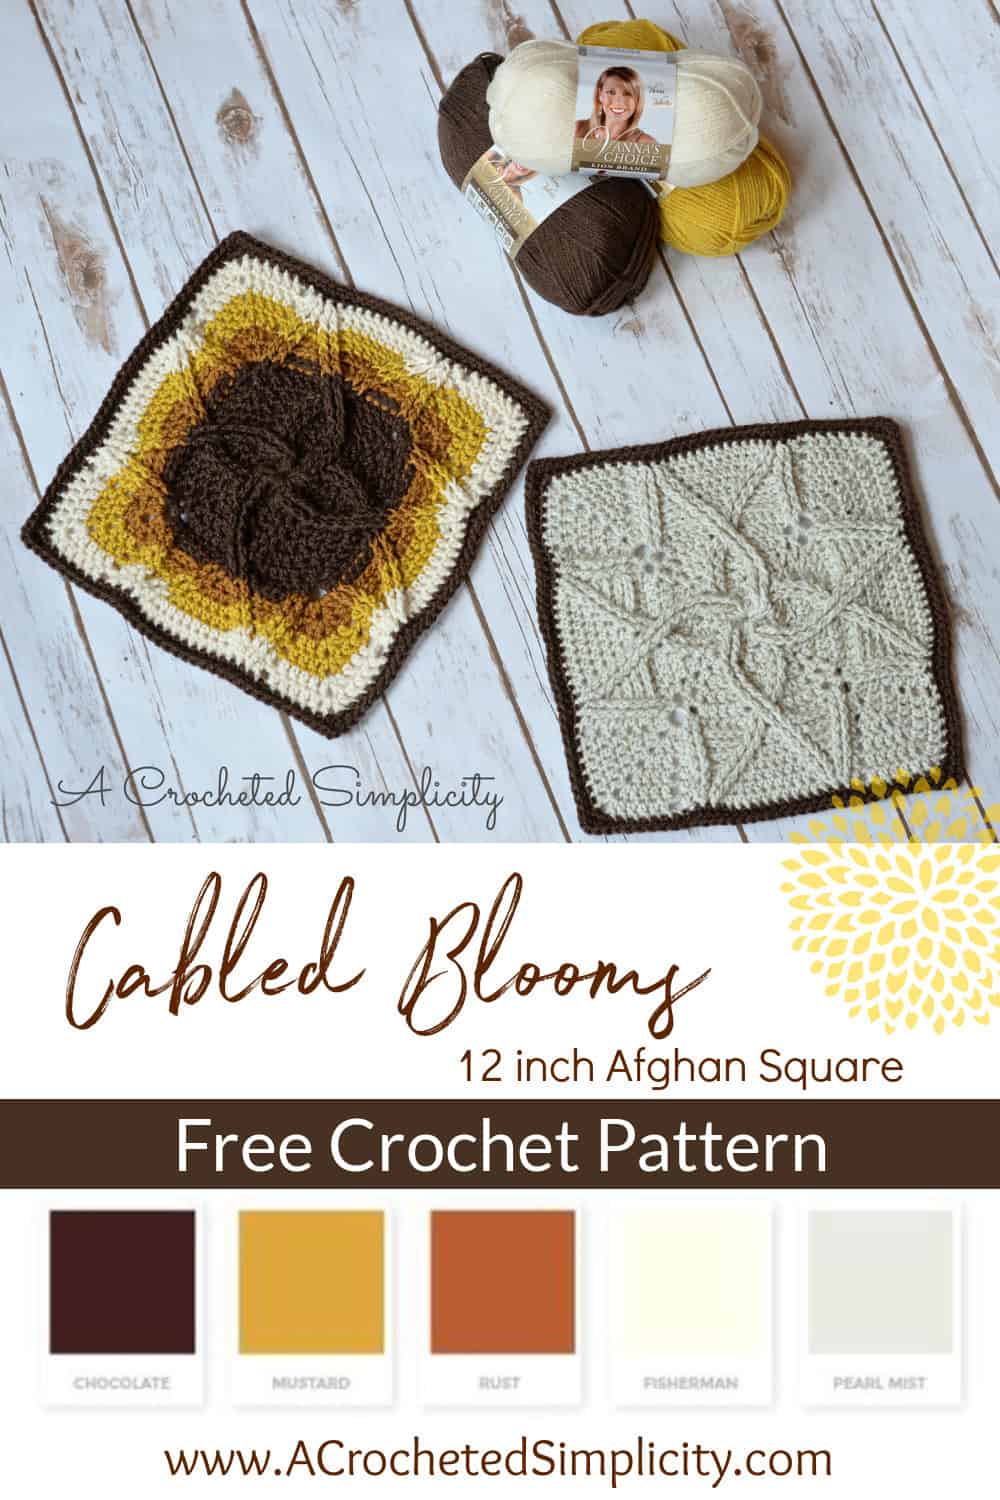
Free Crochet Pattern – Cabled Blooms 12 inch Afghan Square

Learn to Crochet the 12″ Cabled Blooms Crochet Square with this free written crochet pattern.
If you love texture and cables, this 12” afghan square is right up your alley! Make it in a solid color (using only one skein), or change it up and use several of your favorites.
You’ll find the free 12″ crochet square pattern below, or an ad-free print friendly PDF on Love Crafts, Ravelry, or on Etsy.
Confession time… I’m not entirely sure I should start off with this, but here goes nothing… (and possibly everything). 😉
When Tamara invited me to design a square for the #MooglyCAL2017 I was very excited and honored to receive the invite, but that excitement was quickly replaced with anxiety because…. well, the truth of the matter is, I had never designed an afghan square before! Eek! I surely couldn’t admit that to her, right?
As I watched time tick on by, I became increasingly anxious about designing this square. “What on earth was I going to design? Would a design come to me in time? Oh my gosh I forgot to place my yarn order!” These and many other thoughts raced through my head as the deadline quickly approached!
Then one day it hit me! Cables…. I needed to design a cabled square. Once I had decided to stick with something I loved, the rounds of the square seemed to crochet themselves and the Cabled Blooms Afghan Square was born.
Yarn
For this 12 inch crochet blanket square, I used Lion Brand Yarn’s Vanna’s Choice. Vanna’s Choice is a great worsted weight acrylic yarn that’s available in 54 colors! You’ll have a hard time choosing colors, but this crochet afghan square will look great in any and every color combination!
Pin It to Save it for Later!
Cabled Blooms Square – FREE 12″ CROCHET SQUARE PATTERN
The free cabled crochet square pattern is below, but if you love to work offline, I’ve got a couple other great options for you.
Purchase the ad-free, printable PDF, on Love Crafts, Ravelry, or on Etsy.
Save this pattern to your Ravelry favorites.
Subscribe to my YouTube Channel!
This post contains affiliate links.
Materials
- Yarn: Lion Brand Yarns Vanna’s Choice, (solids 3.5 oz / 100 g / 170 yds / 156 m / 100% acrylic) (If you’re making your square in a solid color, you’ll need only 1 ball.)
- Crochet Hook: J/10/6.00mm (My favorite crochet hooks are the Clover Amour Hooks, I’ve never had an ache in my hand since switching)
- Scissors
- Yarn Needle
Many of these materials are available for purchase through our affiliates below:
 Lion Brand 860-126 Lb860-12...Shop on Amazon
  Clover 1049/J Amour Crochet...Shop on Amazon
  Fiskars 154110-1001 Non-sti...Shop on Amazon
  Lion Brand Yarn 400-5-5002 ...Shop on Amazon
Gauge
- Measurements noted throughout the pattern.
Difficulty Level
- Intermediate
Finished Size
- 12″ x 12″ crochet square
Abbreviations (U.S. Terms)
- ch: chain
- sl st: slip stitch
- sc: single crochet
- hdc: half double crochet
- dc: double crochet
- fpdc: front post double crochet
- fptr: front post treble crochet
- fpdc2tog: front post double crochet decrease
- bpdc: back post double crochet
- yo: yarn over
- MR: magic ring
- st(s): stitch(es)
- sp(s): space(s)
- rep: repeat
- Rnd: round
Special Stitches
- Cable A: skip the next 2 sts, fptr around each of the next 2 sts, working in front of the fptr just made, fptr around each of the skipped sts.
Notes
- The first stitch of each round is worked in/around the same stitch as the beginning chain, unless stated otherwise.
- Beginning chains are not counted as a stitch.
- Each ch-1 space worked within a round is counted as a stitch.
- Color combinations shown in the photos.
- Solid square w/ dark border: Rnds 1 – 14 (Pearl Mist), Rnds 15 – 16 (Chocolate).
- Multi-Colored Square: Rnds 1 – 8 (Chocolate), Rnds 9 – 10 (Honey), Rnds 11 – 12 (Mustard), Rnds 13 – 14 (Fisherman), Rnds 15 – 16 (Chocolate)
Free 12 inch Crochet Square Instructions
Rnd 1: Begin with a Magic Ring, ch 2 (does not count as a st), work 20 dc into MR. Join with a sl st to the 1st st. (20 sts) *Approximately 1.625” dia.
Rnd 2: Ch 1, [ Cable A, (dc, ch 1, dc) in the next st ] rep from [ to ] around. Join. (28 sts) *Approximately 2.5” dia.
Rnd 3: Ch 1, [ fpdc around each of the next 4 post sts, dc in the next st, ch 1, dc in the next ch-1 sp, ch 1, dc in the next st ] rep from [ to ] around. Join. (36 sts) *Approximately 3” measured across cables.
Rnd 4: Ch 1, [ fpdc around each of the next 2 post sts, work (dc, ch 1, dc) between the 2nd & 3rd post sts from Rnd 3, fpdc around each of the next 2 post sts, skip next dc, dc in next ch-1 sp, ch 1, skip next dc, dc in next ch-1 sp, skip next dc ] rep from [ to ] around. Join. (40 sts) *Approximately 3.75” square.
Rnd 5: Ch 1, [ fpdc around each of the next 2 post sts, 2 dc in next st, ch 1, dc in next ch-1 sp, ch 1, 2 dc in next st, fpdc around each of the next 2 post sts, dc in next st, dc in next ch-1 sp, dc in next st ] rep from [ to ] around. Join. (56 sts) *Approximately 4.25” square.
Rnd 6: Sl st over to the 1st dc (remember to work the first st of the rnd into this same st), ch 1, [ 2 dc in the next st, dc in next st, ch 1, dc in next ch-1 sp, ch 1, skip next st, dc in next ch-1 sp, ch 1, dc in next st, 2 dc in next st, fpdc around each of the next 2 post sts, skip next st, sc in next st, skip next st, fpdc around each of the next 2 post sts ] rep from [ to ] around. Join. (64 sts) *Approximately 4.75” square.
Rnd 7: Ch 1, [ 2 dc in next st, dc in each of the next 2 sts, dc in the next ch-1 sp, (ch 1, skip next st, dc in next ch-1 sp) twice, dc in each of the next 2 sts, 2 dc in next st, Cable A (skipping over sc between the post sts) ] rep from [ to ] around. Join. (68 sts) *Approximately 6” square.
Rnd 8: Ch 1, [ dc in each of the next 5 sts, 2 dc in the next ch-1 sp, ch 2, 2 dc in the next ch-1 sp, dc in each of the next 5 sts, fpdc around each of the next 4 post sts ] rep from [ to ] around. Join. (80 sts) *Approximately 7.25” at this point.
Rnd 9: Ch 1, [ skip the next st, bpdc around each of the next 4 dc, fpdc around each of the next 2 dc, (2 dc, ch 1, 2 dc) in the next ch-2 sp, fpdc around each of the next 2 dc, bpdc around each of the next 4 sts, skip next st, fpdc around each of the next 2 post sts, work 2 dc between the 2nd & 3rd post sts from Rnd 8, fpdc around each of the next 2 post sts ] rep from [ to ] around. Join. (92 sts)
Rnd 10: Ch 1, [ skip next st, bpdc around each of the next 3 post sts, fpdc around each of the next 2 post sts, dc in next st, ch 1, skip next st, (2 dc, ch 1, 2 dc) in the next ch-1 sp, ch 1 skip next st, dc in next st, fpdc around each of the next 2 post sts, bpdc around each of the next 3 post sts, skip next st, fpdc around each of the next 2 post sts, 2 hdc in each of the next 2 sts, fpdc around each of the next 2 post sts ] rep from [ to ] around. Join. (108 sts)
Rnd 11: Ch 1, [ skip next st, bpdc around each of the next 2 post sts, fpdc around each of the next 2 post sts, dc in next st, ch 1, dc in next 2 sts, (dc, ch 1, dc) in next ch-1 sp, dc in next 2 sts, ch 1, dc in next dc, fpdc around each of the next 2 post sts, bpdc around each of the next 2 post sts, skip next st, fpdc around each of the next 2 post sts, 2 hdc in next st, hdc in next 2 sts, 2 hdc in next st, fpdc around each of the next 2 post sts ] rep from [ to ] around. Join. (116 sts) *Approximately 9.50” at this point.
Rnd 12: Ch 1, [ skip next st, bpdc around the next post st, fpdc around each of the next 2 post sts, dc in next st, ch 1, dc in next 3 sts, (dc, ch 1, dc) in next ch-1 sp, dc in next 3 sts, ch 1, dc in next st, fpdc around each of the next 2 post sts, bpdc around the next post st, skip next st, fpdc around each of the next 2 post sts, 2 hdc in next st, hdc in each of the next 4 sts, 2 hdc in next st, fpdc around each of the next 2 post sts ] rep from [ to ] around. Join. (124 sts)
Rnd 13: Sl st over to 1st dc (remember to work the first st of the rnd into this same st), ch 1, [ dc in next st, ch 1, dc in next 4 sts, (dc, ch 1, dc) in next ch-1 sp, dc in next 4 sts, ch 1, dc in next st, fpdc around each of the next 4 post sts (skipping over post st between 2nd & 3rd post st), 2 hdc in next st, hdc in each of the next 6 sts, 2 hdc in next st, fpdc around each of the next 4 post sts (skipping over post st between 2nd & 3rd post st) ] rep from [ to ] around. Join. (132 sts) *Approximately 11.25”.
Rnd 14: Ch 1, [ dc in next st, ch 1, dc in each of the next 5 sts, (dc, ch 1, dc) in next ch-1 sp, dc in each of the next 5 sts, ch 1, dc in next st, (fpdc2tog) twice, 2 hdc in next st, hdc in each of the next 8 sts, 2 hdc in next st, (fpdc2tog) twice ] rep from [ to ] around. Join. (132 sts)
Rnd 15: Ch 1, [ sc in each st & ch-1 sp across to corner ch-1 sp, (sc, ch 1, sc) in next ch-1 sp ] 4 times, then sc in each st & ch-1 sp in each remaining st. Join. (140 sts)
Rnd 16: Ch 1, [ sc in each st across to ch-1 sp at corner, (sc, ch 1, sc) in next ch-1 sp ] 4 times, then sc in each remaining st. Join. (148 sts)
Fasten off. Weave in ends.
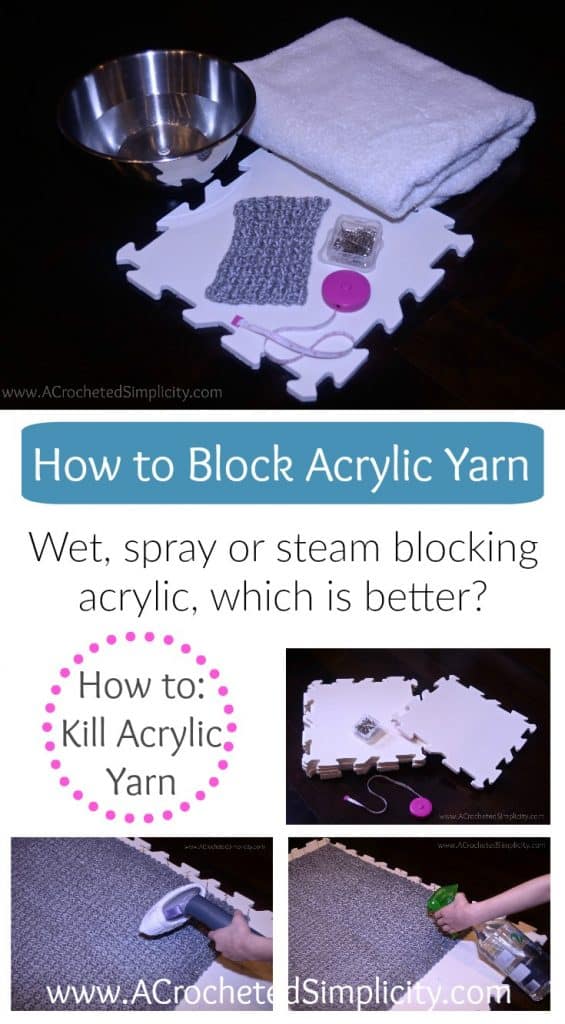
Give your work a professional finish by blocking it!
Learn 3 different ways to block acrylic yarn.
I chose to steam block to really relax my cables, which technique will you choose?
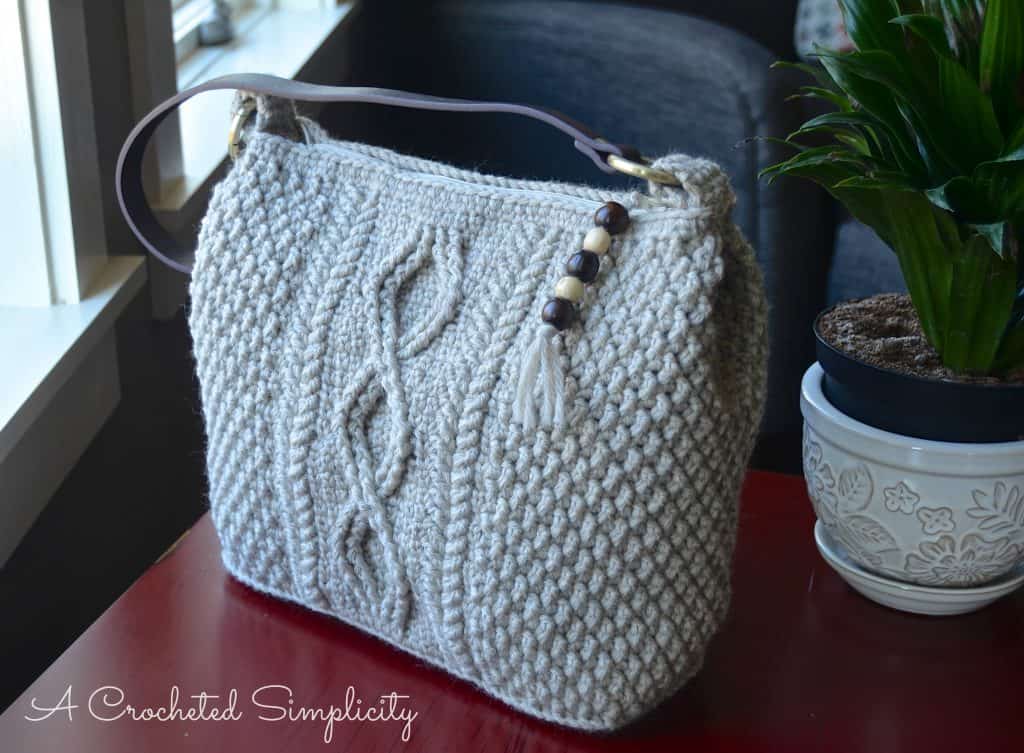
Do you LOVE crocheted cables? Visit my Ravelry shop to check out all of my cabled designs, including the Cateline Cabled Bag shown above.
Find all of my FREE crochet patterns
Are you intimidated by crocheted cables? Would you love to learn more? Take an Annies Video Class with me and let me ease your fears of crocheted cables! Click on the photo below to watch a free preview. You can also see the other 2 classes I have available! (affiliate link)

JOIN US IN THE FACEBOOK COMMUNITY GROUP!
Come share your finished projects with us in the A Crocheted Simplicity Crochet Community Group on Facebook. Join us for fun community events such as crochet alongs, join in on crochet conversations, ask questions, get advice, and share your love for crochet!

Thank you for this pattern, its really lovely.
I did it.!I did it!
Thank you so much for answering my questions and straight to my inbox too. I didn’t even have to wait. I’m 71 young and I’m advanced in the Frog stitch and now intermediate at cables.
I’m SO glad to hear that!!!
I’ve never heard frogging referred to like that before… that cracked me up!
Beautiful pattern, I’ve really enjoyed making it. The pattern is really nicely written too. Thank you for sharing it. I’m curious though, how do you get your center to close up so tight? I’m just at loss with how to do it when there’s so many stitches in the ring. I pull as tight as I can but still can’t get it closed.
Hi,
When I’m weaving in ends I’m able to tighten it up and close the gap.
Jennifer
Hi, there.
Worked up a few squares so far for an afghan. Loving the pattern, but was wondering if in row 9 the 2 dc that get worked between the 2nd and 3rd posts should be hdc instead. I’m finding if I use dcs there’s a slight hump throughout the rest of the pattern in that area. Was wondering if this was a mistake or if there was a reason the first stitches her are dcs instead the hdc that’s worked in each of the subsequent rows. Thanks for your time, and for writing up a pattern so beautifully.
Hi ALicia,
It’s been so long since designing this square and I can’t remember exactly why I chose dc there instead of hdc. That being said, if yours is laying better with a hdc instead, I’d use hdc as you mentioned. 🙂
Jennifer
P.S. I’d love to see your afghan when you complete it!
No problem, thank you! I will for sure upload a picture once it’s finished. I’m halfway there! 🙂
I love this square, and I want to make a whole blanket out of them!
I love this one!!!!!!
I would like to know if this pattern would be possible in a thread instead of worsted?
Hi Barbara,
Yes, you could adapt it for thread as long as you adjust your hook size. You’ll also need to make quite a few more squares to complete a full size blanket, but it can be done!
Happy Crocheting,
Jennifer