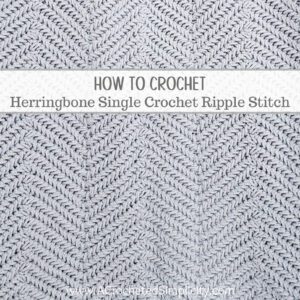
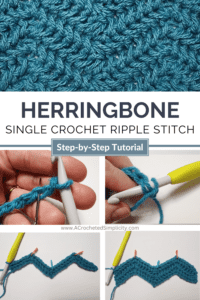
Herringbone Single Crochet Ripple Stitch
Learn how to crochet the Herringbone Single Crochet Ripple Stitch pattern with this step-by-step photo tutorial!
The herringbone single crochet ripple is perfect for advanced beginners who have learned the basic crochet stitches and the herringbone single crochet stitch.
In this tutorial, I worked the herringbone single crochet stitch in a classic crochet ripple stitch pattern.
>CLICK HERE TO SIGN-UP TO RECEIVE OUR NEWSLETTER!<
Crochet Ripple Stitch
The crochet ripple stitch is also referred to as a crochet chevron stitch, or crochet zig-zag. It is a classic crochet stitch pattern that can be adapted for almost every crochet project you can imagine, including blankets, hats, bags, and more!
A crochet ripple stitch is created when you take a horizontal stitch pattern and work increases and decreases to form peaks and valleys, just as I did in the herringbone single crochet ripple stitch pattern.
The three most popular herringbone crochet stitches are the Herringbone Single Crochet (HSC), Herringbone Half Double Crochet (HHDC), and the Herringbone Double Crochet (HDC).
I have seen crochet ripple patterns using the herringbone half double crochet and herringbone double crochet, but I haven’t seen any that use the herringbone single crochet stitch. This is why I created the Herringbone Single Crochet Ripple Stitch.
The herringbone single crochet stitch is a modern knit look crochet stitch pattern that closely resembles the herringbone knit stitch.
I love knit look crochet stitches and crochet chevrons so pairing the two was a lot of fun for me!
Knit Look Crochet
I love the look of knit, but I can’t knit a stitch to save my life. I tried and I failed. Then I taught myself to crochet.
The herringbone single crochet stitch resembles a knit stitch, the herringbone knit stitch. When I first saw it, I knew I had to learn it.
Once I learned it, I knew I had to do more with it. This is how the herringbone single crochet ripple stitch pattern was created.
So if you’re like me, and you love to learn knit look crochet stitches, you’ll love this one!
Herringbone Single Crochet Stitch
Both the knit and crochet herringbone stitches are worked back and forth in rows. Each row leans in the opposite direction.
When the right side is facing you, you will clearly see that all right side rows lean to the left and all wrong side rows lean to the right. After completing several rows, your fabric will appear to be made up of several arrows (or horizontal chevrons) pointing in either direction.
The best thing about the rows leaning in opposite directions is how easy it makes it to count them!
Tips for Working the Herringbone Single Crochet Ripple Stitch
- One of the most important tips I can give you for working the herringbone single crochet ripple stitch is to work your stitches more loosely than you normally would.
- Use a larger hook than what is suggested on the yarn label.
- Make sure to pull all 3 loops up to the same height before completing the stitches. This helps to keep your stitches loose enough to work into in following rows. (there’s a photo below to show & explain this)
- Practice with a small swatch until your tension is consistent and you’re comfortable working the inverse crochet stitches.
Simple Two Row Repeat
In this crochet ripple stitch tutorial, you will learn how to crochet herringbone ripple stitch back and forth in rows.
You’ll learn how to increase the herringbone single crochet stitch (HSC) to create the peaks in the ripple pattern. You’ll also learn how to crochet the herringbone single crochet decrease (HSC2tog) to create the valleys.
This beautifully textured, knit-look crochet ripple stitch pattern uses a simple two row repeat that’s easy to memorize.
The herringbone single crochet stitch is a slight variation of a regular single crochet. The only difference between the two stitches is how and where you insert your hook to complete the stitches.
- Right Side Rows: When working all right side rows, you will insert your hook as you normally do, from the front of your work through to the back.
- Wrong Side Rows: When working all wrong side rows, you will insert your hook in the opposite direction, from the back of your work through to the front, to work inverse stitches.
I recommend practicing the herringbone single crochet stitch in horizontal rows before attempting to crochet the herringbone single crochet ripple stitch pattern. You can find the crochet tutorial for the herringbone single crochet stitch HERE.
It may sound a little tricky, but I promise it’s super easy once you work a couple rows!
INVERSE CROCHET STITCHES
Definition of Inverse: something that is the opposite or reverse of something else.
When working inverse crochet stitches, there are two things that you do opposite or in reverse of regular crochet stitches.
- Hold the working yarn IN FRONT OF your work (instead of behind it).
- Insert your hook from back to front through the fabric (instead of front to back).
Inverse stitches are ONLY worked on wrong side rows.
When working all wrong side rows of the herringbone single crochet ripple stitch, you will work three inverse stitches, the Inverse Single Crochet, Inverse Herringbone Single Crochet, and the Inverse Herringbone Single Crochet Decrease.
I’ll show you how to work all three of these inverse crochet stitches in the photo tutorial below.
STITCH FACTS: Herringbone Single Crochet Ripple Stitch
- The herringbone single crochet ripple stitch pattern is a simple two row repeat.
- The first row is always the right side.
- This crochet stitch pattern has only one “Right Side”. However, I think the backside has its’ own unique look and I like it too!
- All right side or odd numbered rows use regular stitches.
- All wrong side or even numbered rows use inverse stitches.
- It can be worked in rows or in joined and turned rounds.
- If you chose to work in the round, join with a slip stitch at the end of the round and then turn to work the next round in the opposite direction.
- Keeping your tension loose is critical to being able to successfully crochet this ripple stitch pattern.
- I’ve found that it is helpful to use a crochet hook that is larger than the recommended hook size noted on the yarn label.
- Turning chains do not count as a stitch.

This post contains affiliate links.
Materials
- Yarn: I used Lion Brand Yarn’s Pound of Love, a worsted weight / 4 yarn, for my swatch.
- Choose any weight yarn & larger hook than what is stated on the yarn label.
- Crochet Hooks: 7.00mm & L/8.00mm (or hook sizes to match the yarn you chose)
- Scissors
- Tapestry Needle
These items are available through our affiliates below.
 Lion Brand Pound of Love Ya...Shop on Amazon
 ,Yellow") Clover Amour Crochet Hook (...Shop on Amazon
Clover Amour Crochet Hook (...Shop on Amazon  Clover 1055/L Amour Crochet...Shop on Amazon
  Fiskars 154110-1001 Non-sti...Shop on Amazon
Abbreviations (US Terms)
- ch(s): chain(s)
- st(s): stitch(es)
- sc: single crochet
- HSC: herringbone single crochet
- HSC2tog: herringbone single crochet decrease
- InvSC: inverse single crochet
- InvHSC: inverse herringbone single crochet
- InvHSC2tog: inverse herringbone single crochet decrease
- sp: space
- RS: right side
- WS: wrong side
SPECIAL STITCH DEFINITIONS
All 5 of the special stitches are shown step-by-step in the photo tutorial below.
- Herringbone Single Crochet (HSC): Insert your hook into the left leg of the stitch previously worked, insert your hook into the next st, yo, pull up a loop, yo, pull through all 3 loops on your hook. Click here if you’d like to work this stitch in rows.
- Herringbone Single Crochet Decrease (HSC2tog): This is a variation of a typical decrease stitch as you will be working it in the 1st & 3rd of the next 3 sts (skipping over the 2nd st), instead of working it in the next 2 sts. It is worked this way to create the bottom “valley” in the ripple. See photo tutorial below. Insert your hook into the left leg of the stitch previously worked, insert your hook into the 1st st, yo, pull up a loop, skip the 2nd st, insert your hook into the 3rd st, yo, pull up a loop, yo, pull through all 4 loops on your hook.
- Inverse Single Crochet (InvSC): With the working yarn IN FRONT of your work, insert your hook from back to front through the indicated stitch, yo, pull up a loop, yo, pull through both looks on your hook.
- Inverse Herringbone Single Crochet (InvHSC): Tip your project towards you to work into the stitches from the back side, with the working yarn IN FRONT of your work, insert your hook from back to front into the left leg of the stitch previously worked, insert your hook from back to front into the next st, yo, pull up a loop, yo, pull through all 3 loops on your hook.
- Inverse Herringbone Single Crochet Decrease (InvHSC2tog): This is a variation of a typical decrease stitch as you will be working it in the 1st & 3rd of the next 3 sts (skipping over the 2nd st), instead of working it in the next 2 sts. It is worked this way to create the bottom “valley” in the ripple. See photo tutorial below. With the working yarn IN FRONT of your work, insert your hook from back to front into the left leg of the stitch previously worked, insert your hook from back to front into the 1st st, yo, pull up a loop, skip the 2nd st (the HSC2tog from the previous row), insert your hook from back to front into the 3rd st, yo, pull up a loop, yo, pull through all 4 loops on your hook.
Herringbone Single Crochet Ripple Stitch – Swatch Written Instructions
Before you tackle a crochet project that uses the herringbone single crochet ripple stitch, I suggest crocheting a sample swatch.
Pro Tip! You may find it helpful to place a SM in each ch-2 space and sc2tog to make it easier to find them when working the next row.
The crochet swatch shown in the photos below (blue sample) uses the following written instructions:
Set-Up: With yarn & a 8.00mm crochet hook, ch 30.
Row 1 (RS): Switch to a 7.00mm crochet hook, working into the back humps of the foundation ch, sc in the 2nd ch from your hook, HSC in each of the next 5 chs, (HSC, ch 2, HSC) in the next ch, HSC in each of the next 6 chs, work a HSC2tog in the 1st & 3rd of the next 3 chs (skipping the 2nd ch), HSC in each of the next 6 chs, (HSC, ch 2, HSC) in the next ch, HSC in each of the next 6 chs. Turn. (29 sts + 2 ch-2’s)
Row 2 (WS): Ch 1, skip the first st, InvSC in the 2nd st, InvHSC in each of the next 5 sts, (InvHSC, ch 2, InvHSC) in the next ch-2 sp, InvHSC in each of the next 6 sts, work a InvHSC2tog in the next 2 HSC (skipping HSC2tog from previous row), InvHSC in each of the next 6 sts, (InvHSC, ch 2, InvHSC) in the next ch-2 sp, then InvHSC in each of the next 5 sts, skip the next st, InvHSC in the last st. Turn. (29 sts + 2 ch-2’s)
Row 3: Ch 1, skip the first st, sc in the 2nd st, HSC in each of the next 5 sts, (HSC, ch 2, HSC) in the next ch-2 sp, HSC in each of the next 6 sts, work a HSC2tog in the next 2 InvHSC (skipping InvHSC2tog from previous row), HSC in each of the next 6 sts, (HSC, ch 2, HSC) in the next ch-2 sp, then HSC in each of the next 5 sts, skip the next st, HSC in the last st. Turn. (29 sts + 2 ch-2’s)
Rows 4 – 8: Repeat Rows 2 – 3, ending with a Row 2.
Note: Make yourself a herringbone single crochet ripple scarf by repeating Rows 2 – 3 until it’s the desired length!
Practice your new skills on the Herringbone Single Crochet Ripple Stitch Blanket! You’ll find the Free Crochet Blanket Pattern HERE.
How to Crochet Herringbone Single Crochet Ripple Stitch
Step-by-Step Photo Tutorial
Row 1 (Right Side)
Chain 30.
Work the stitches into the back hump of the foundation chain.
The yarn needle below shows the back hump.
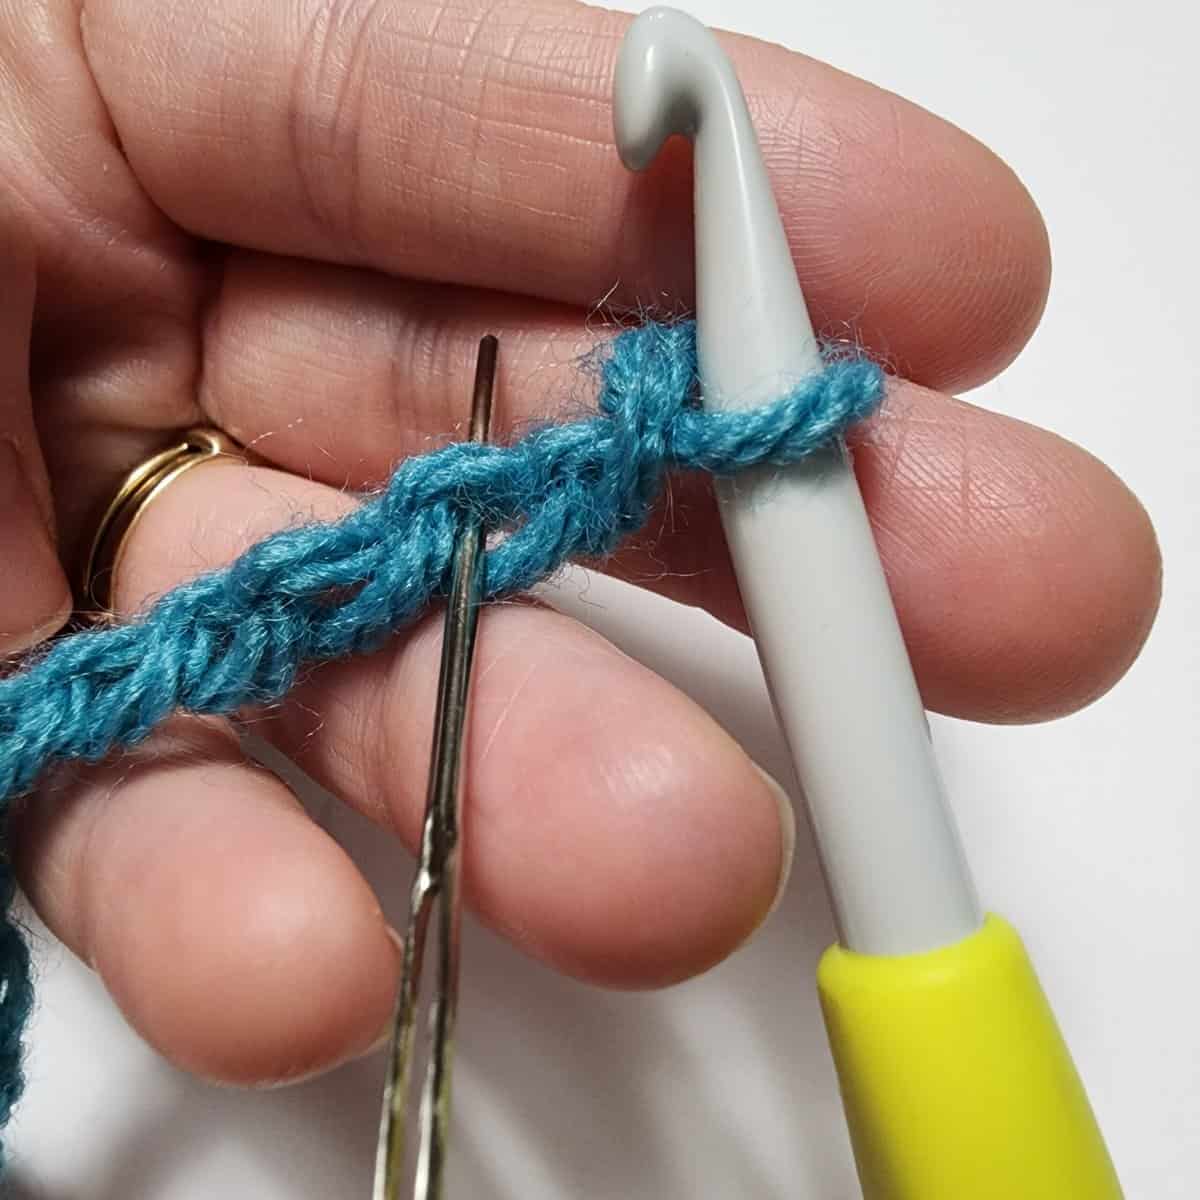
Work a sc into the 2nd ch from your hook.
HERRINGBONE SINGLE CROCHET STITCH < STEP-BY-STEP >
This stitch is only worked when crocheting rows on the Right Side of your project.
Herringbone Single Crochet (HSC): Insert your hook into the left leg of the stitch previously worked, insert your hook into the next st, yo, pull up a loop, yo, pull through all 3 loops on your hook.
Let’s work a Herringbone Single Crochet Stitch.
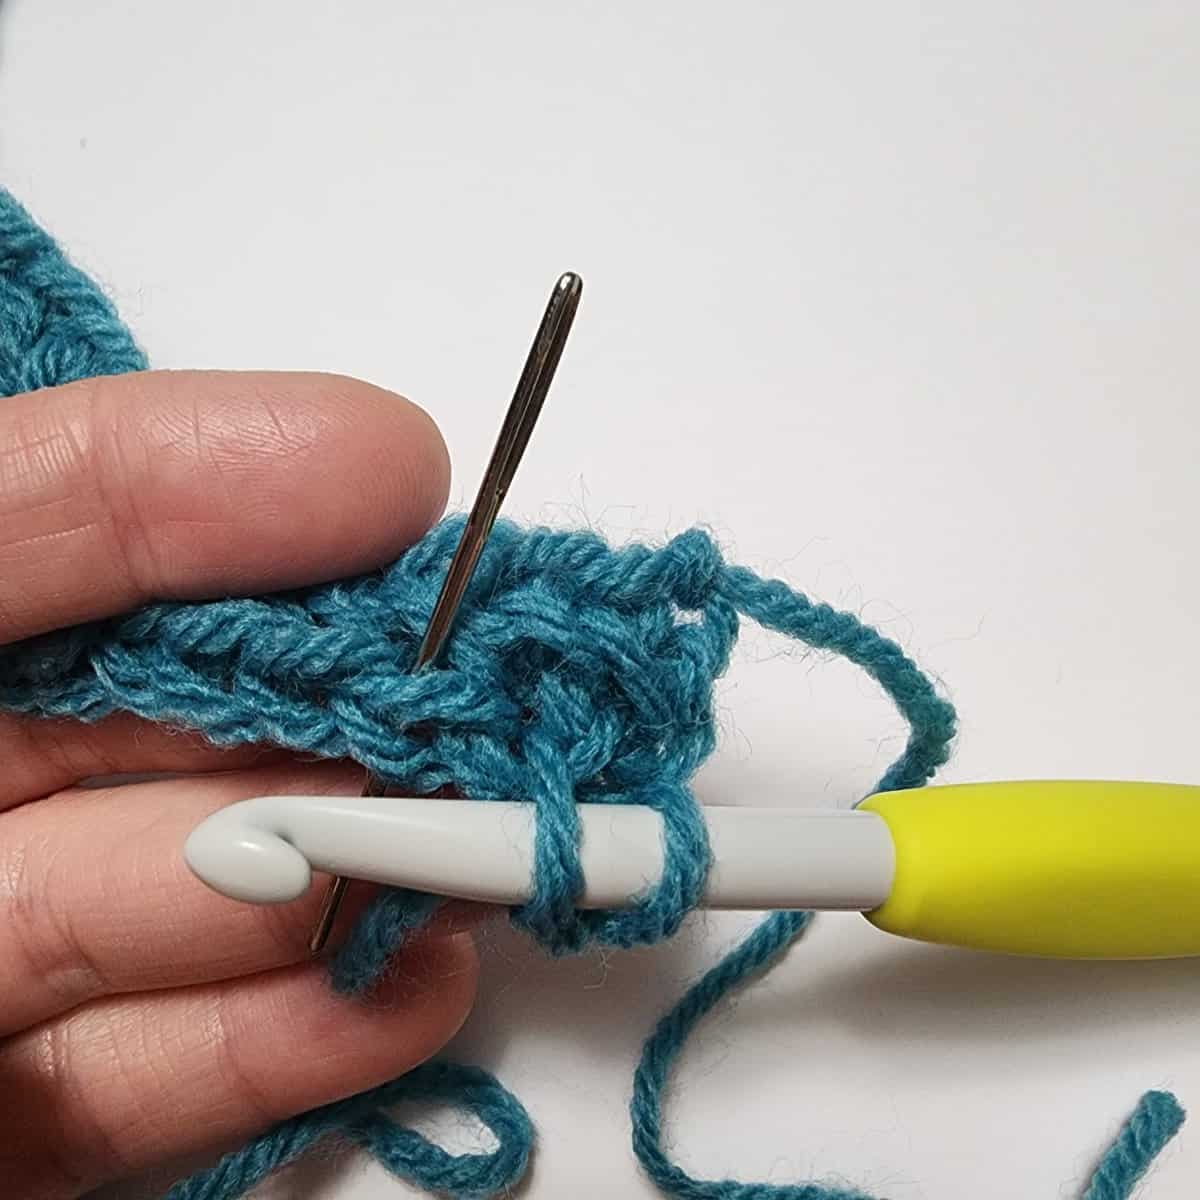
Insert your hook, from front to back, into the left leg of the stitch previously worked.
The yarn needle below shows you where to insert your hook into the left leg of the stitch previously worked.
Insert your hook, from front to back, into the back hump of the next chain.
The yarn needle below is showing the next stitch.
The photo below shows your hook inserted into the left leg of the stitch previously worked AND into the next stitch.
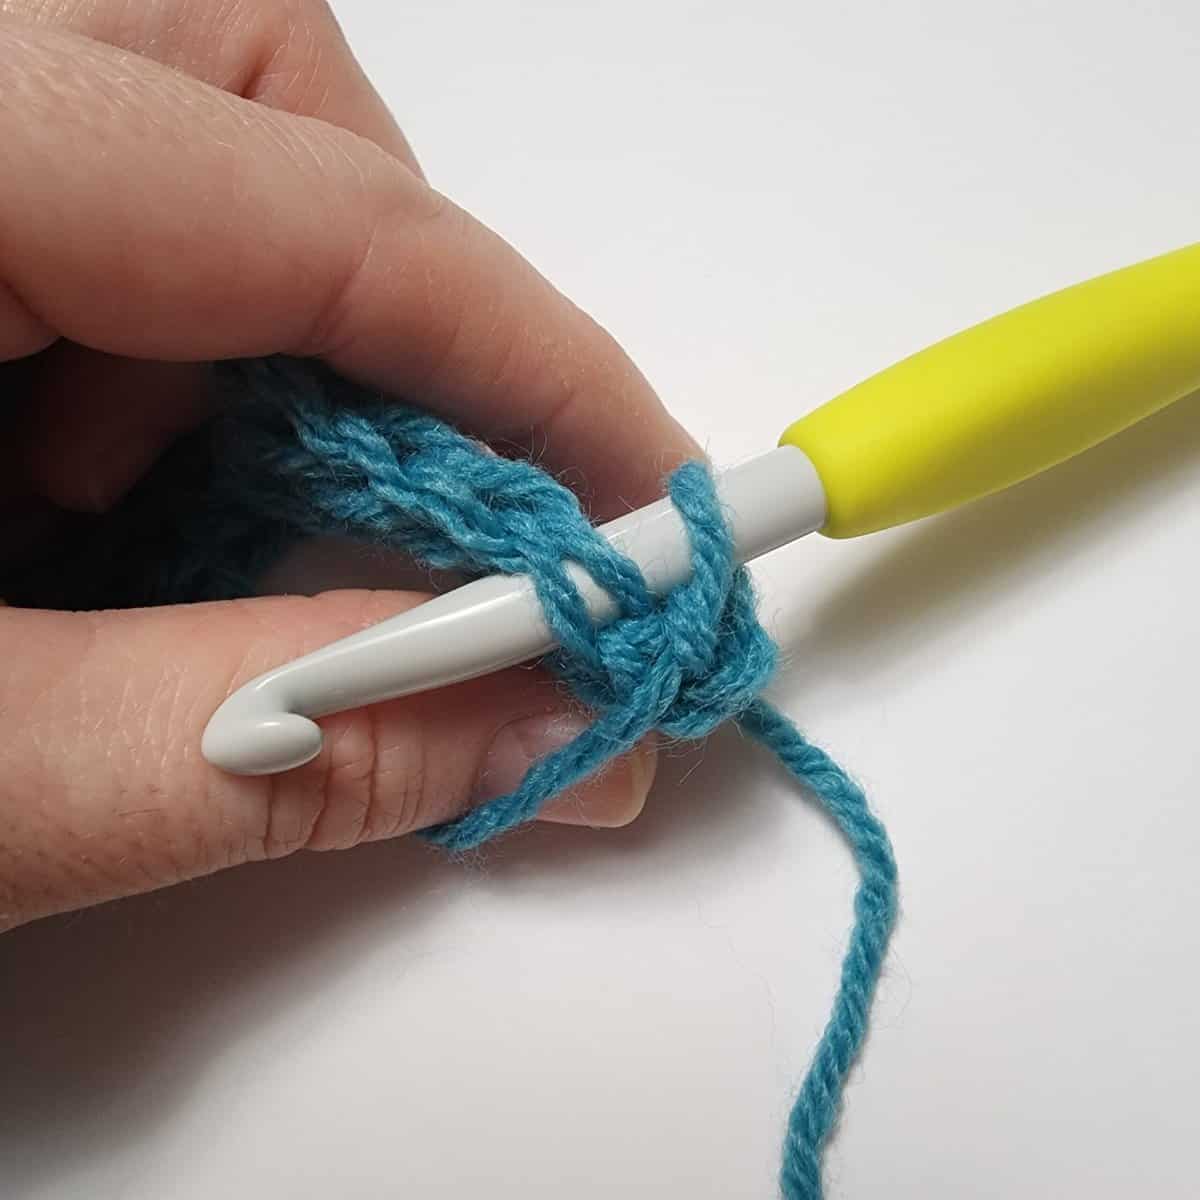
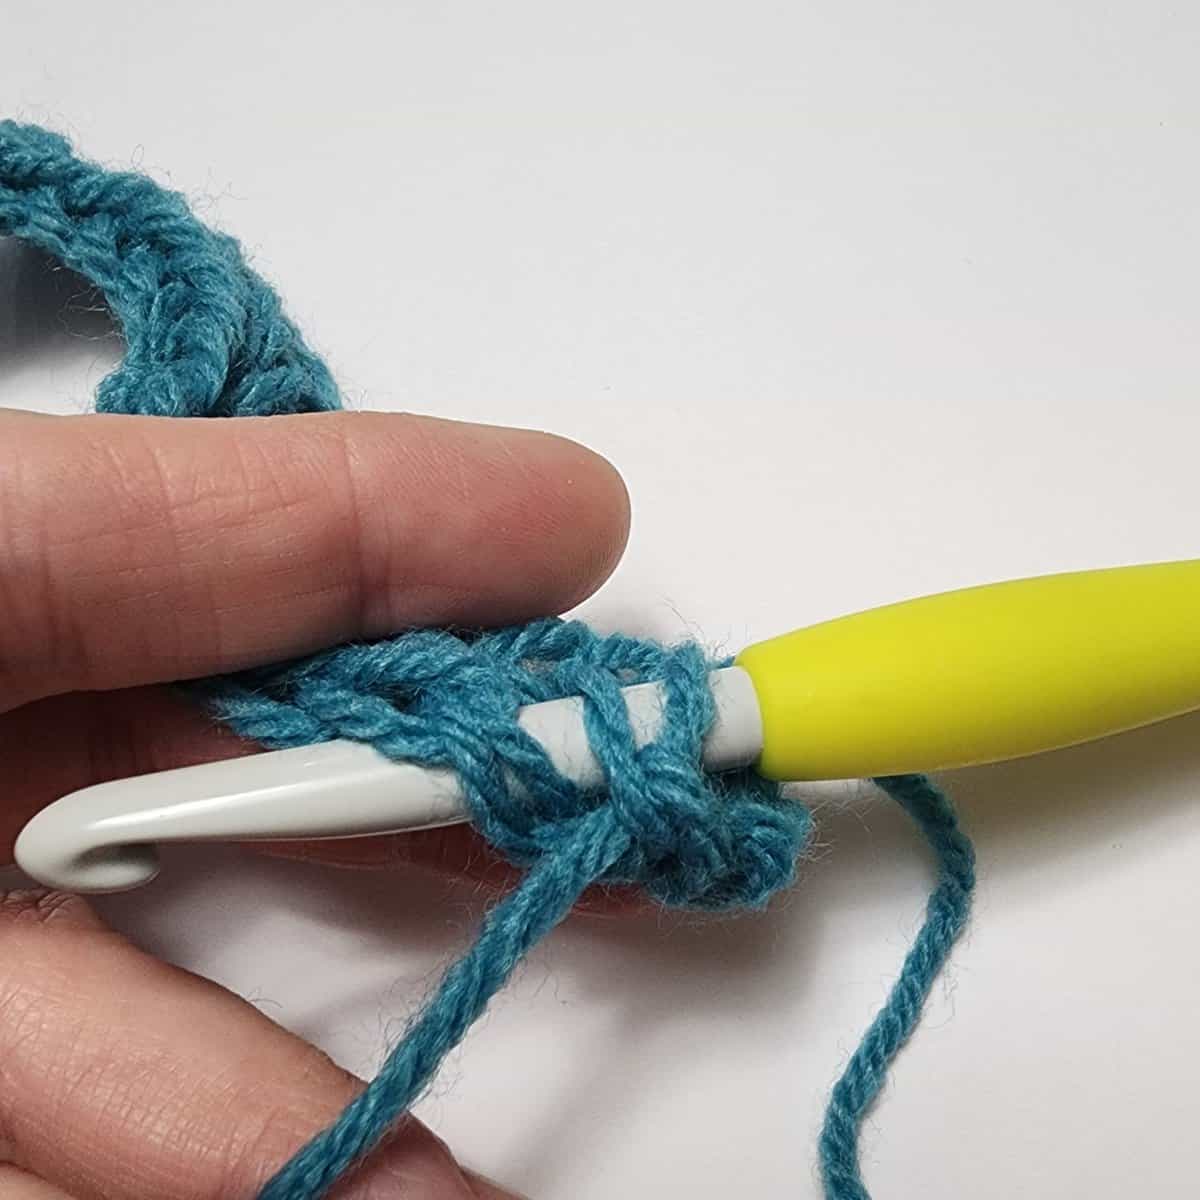
Yarn over.
Pull up a loop & yarn over.
Pro Tip! Make sure to pull all 3 loops up to the same height before completing the stitch. This helps to keep your stitches loose enough to work into in following rows.

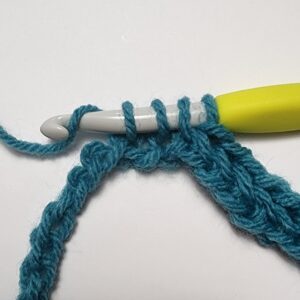
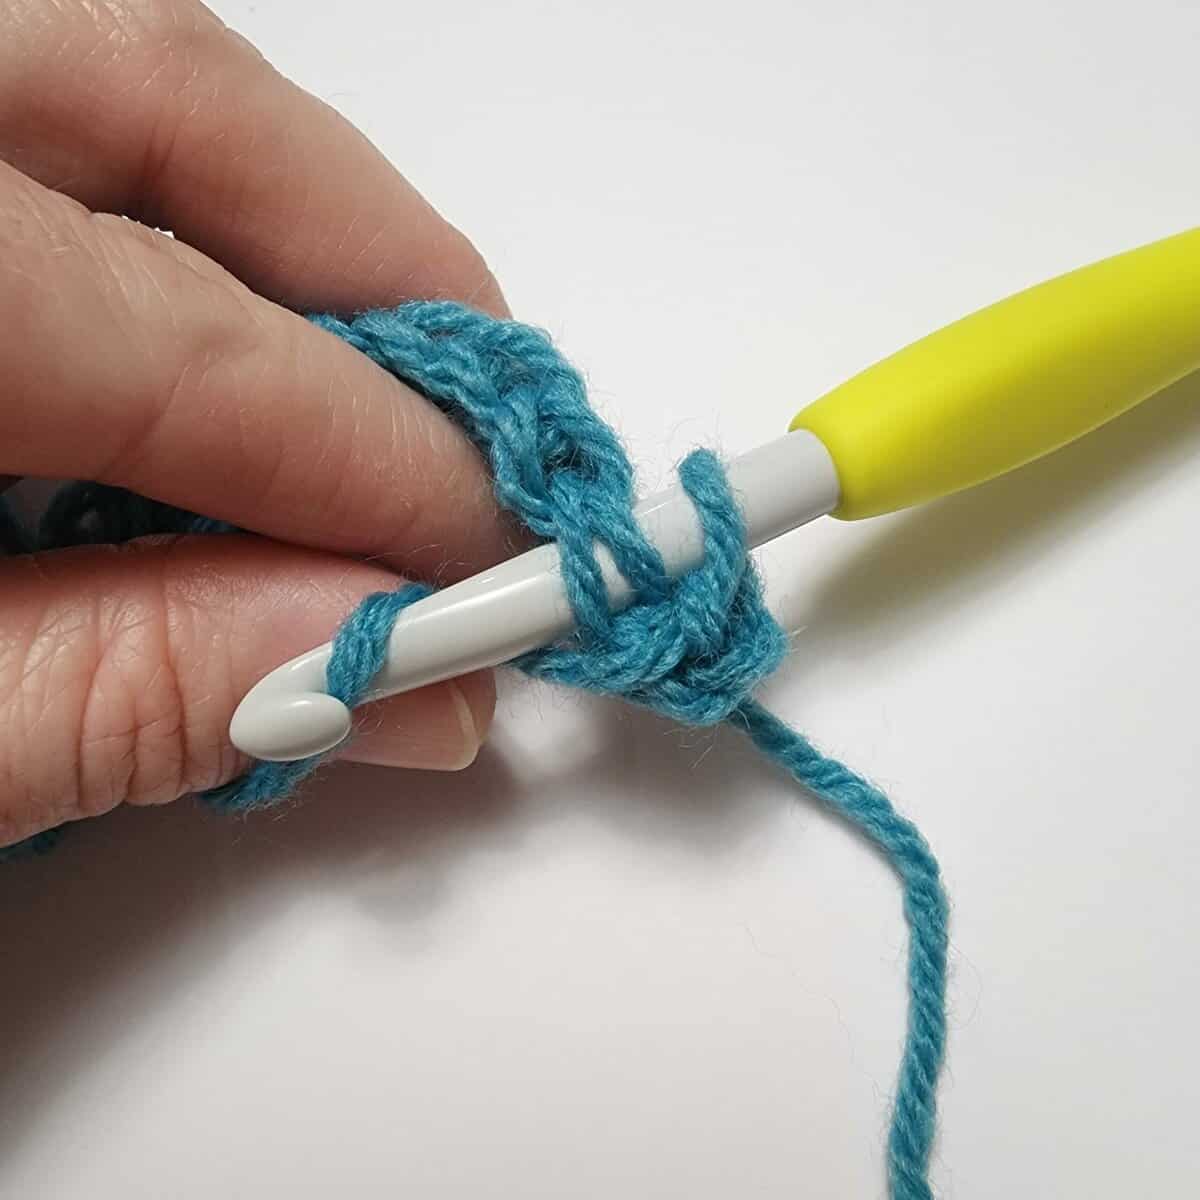
Pull through all 3 loops on your hook to complete your first Herringbone Single Crochet (HSC) stitch.
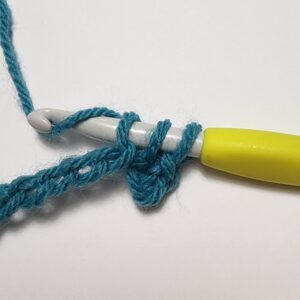
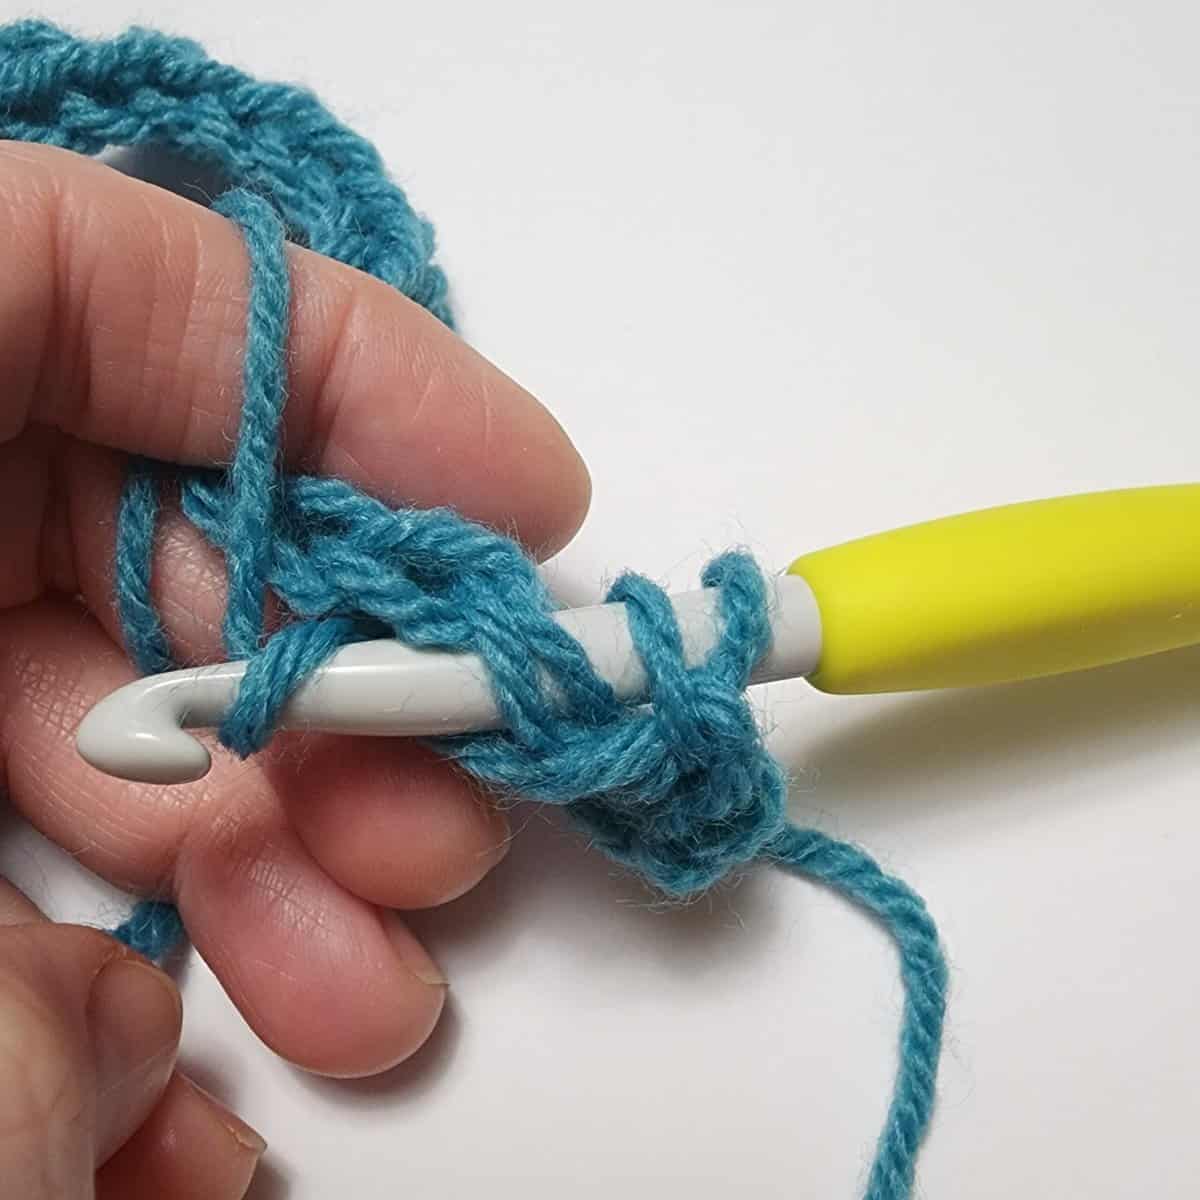
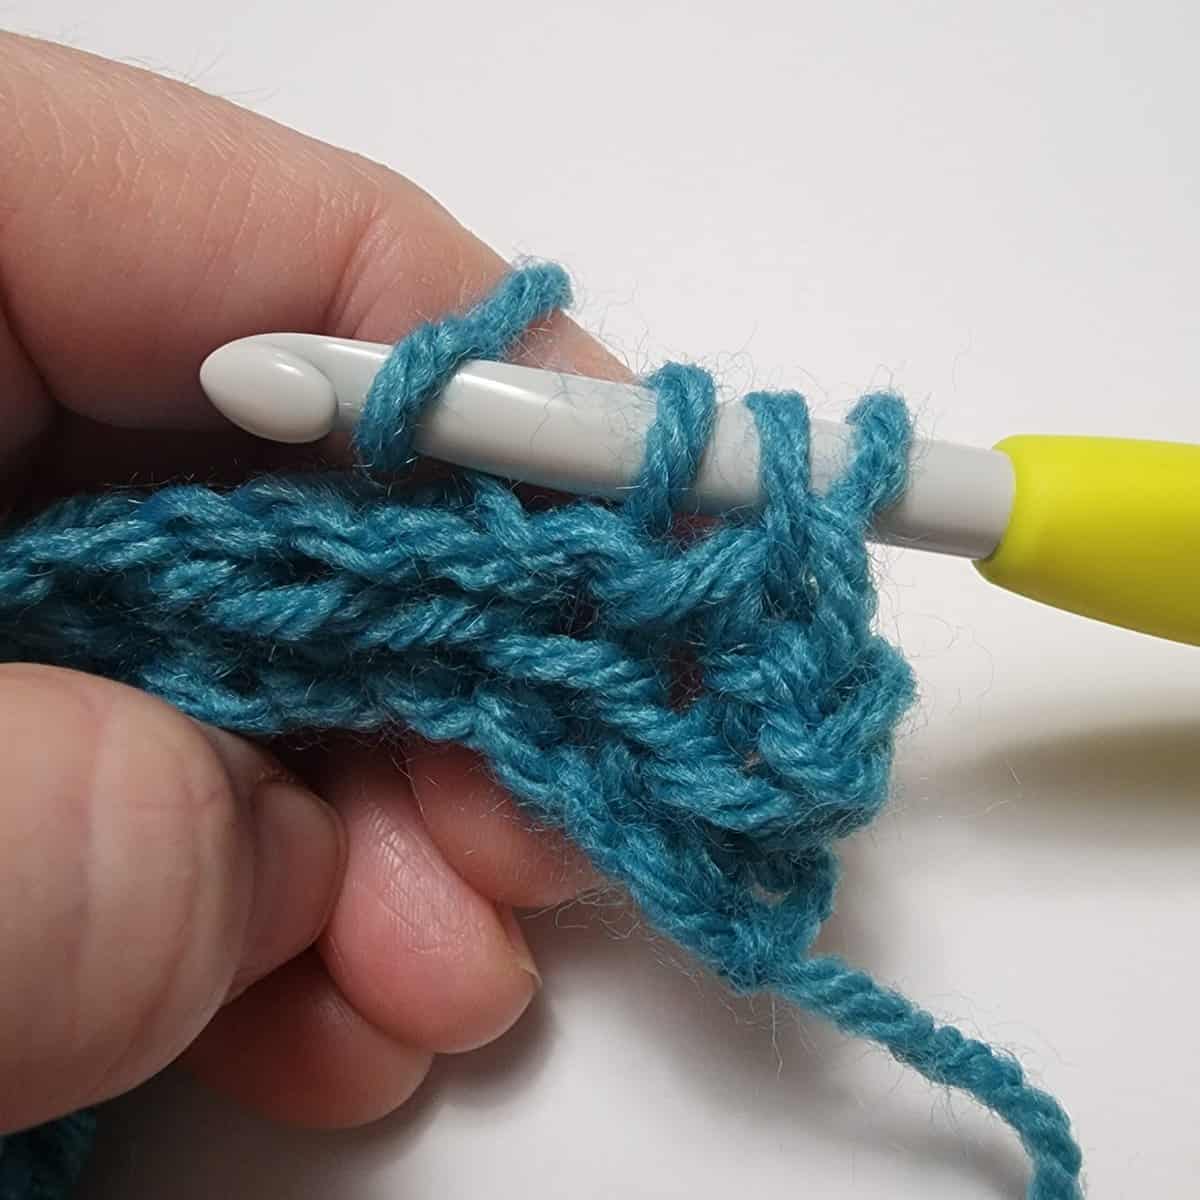
The photo below shows where you will insert your hook to work the next HSC.
- First, insert your hook from front to back into the left leg of the HSC previously worked (shown below by the yarn needle).
- Then, insert your hook from front to back into the next stitch (in this photo the next stitch is the back hump of the foundation chain – shown by the smaller hook).
Work a HSC in each of the next 4 chs.
You should have 1 sc and 5 HSC at this point.
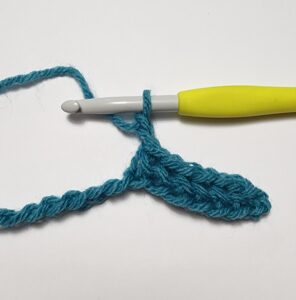
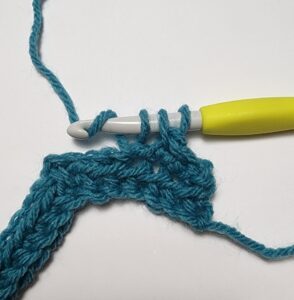
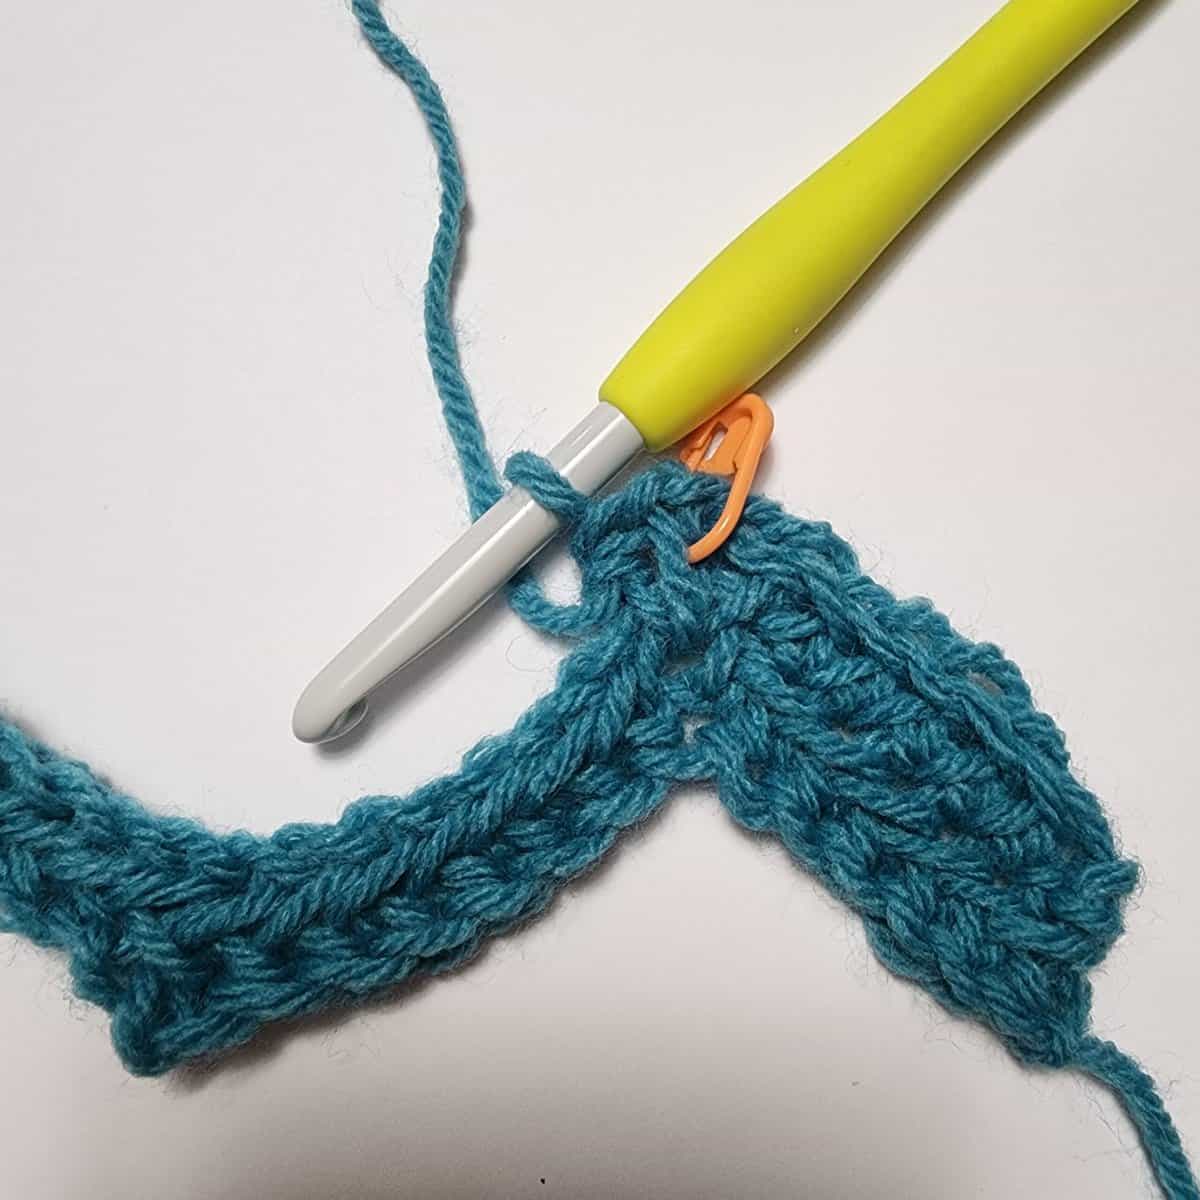
(HSC, ch 2, HSC) in the next ch.
The yarn needle in the photo below shows where the (HSC, ch 2, HSC) will be worked in the same stitch to create a peak in the ripple.
The photo below shows a HSC, ch 2, worked in the next stitch.
Work 1 more HSC in the SAME stitch as the HSC, ch 2.
The yarn needle below shows that you insert your hook into the left leg of the previous stitch and then the SAME stitch as the HSC just worked. The hook is showing the same stitch as the HSC, ch 2 just worked.
The photo below shows (HSC, ch 2, HSC) worked in the same stitch to create the first peak in the ripple stitch.
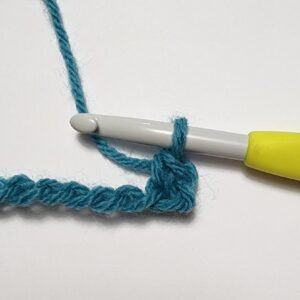
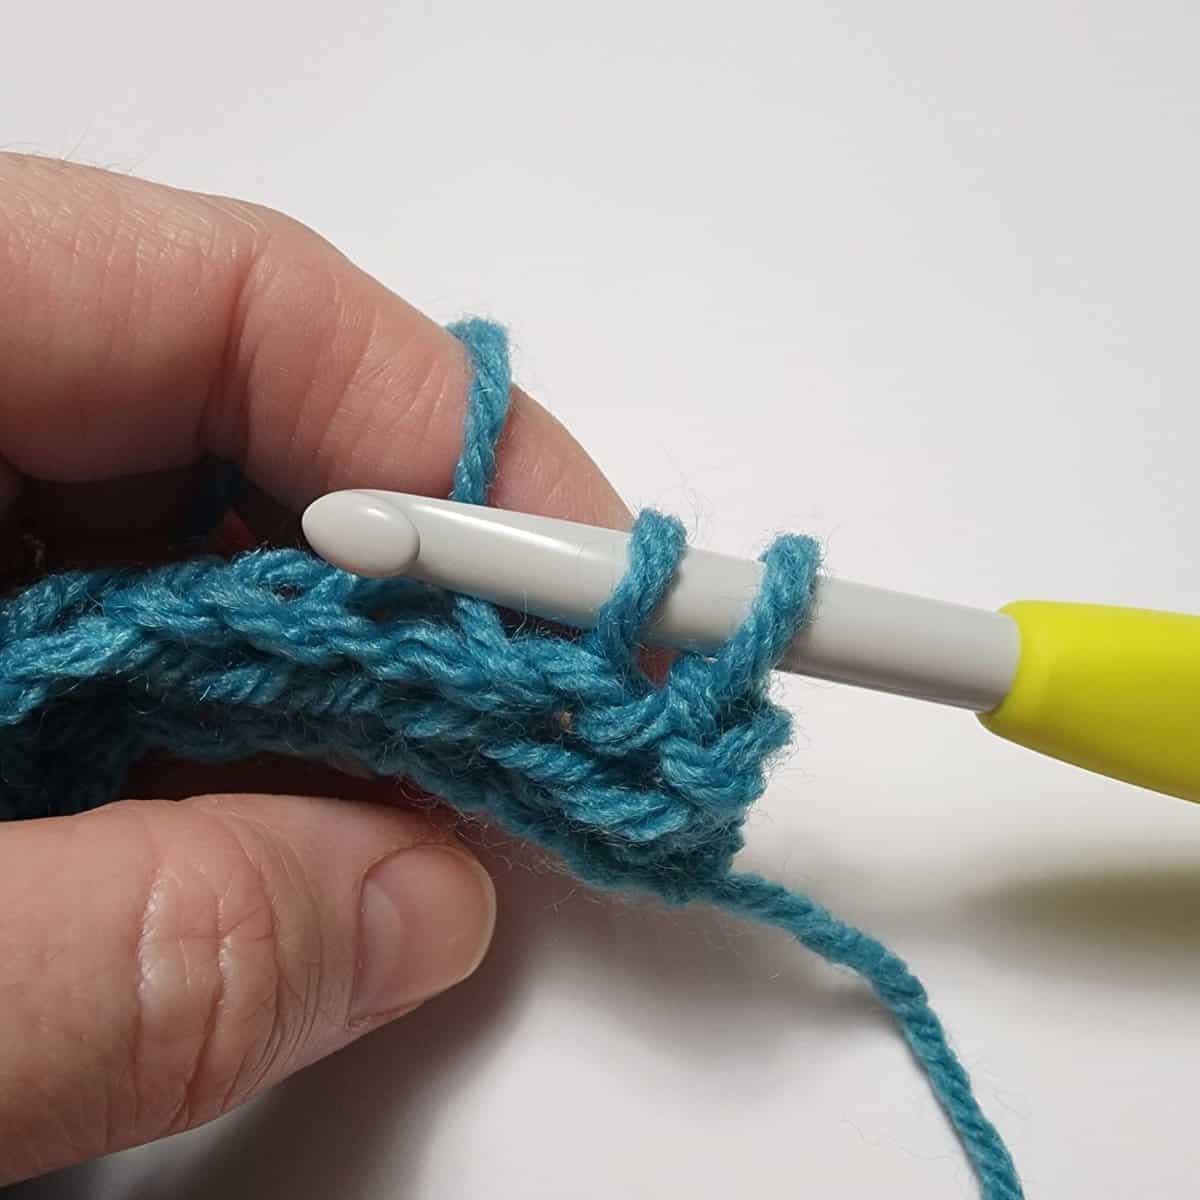
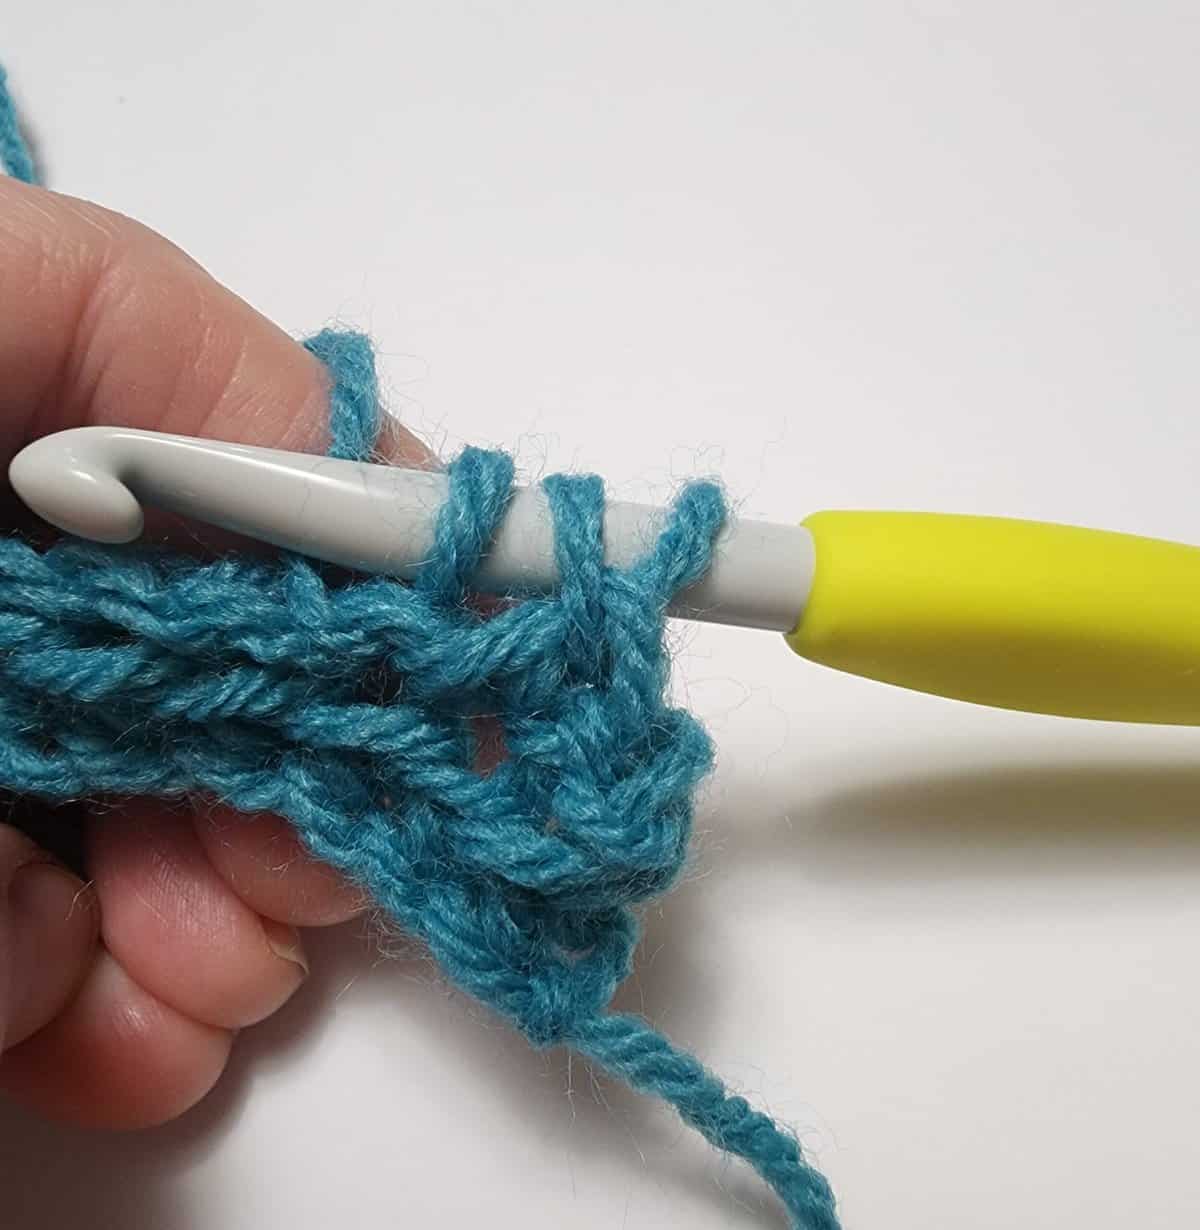
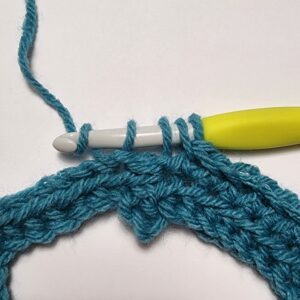
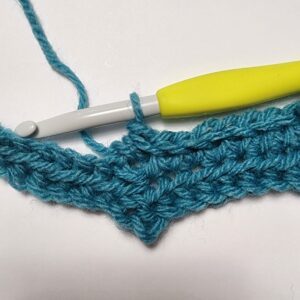
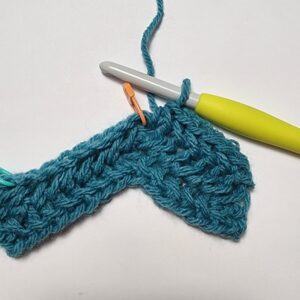
Next, work a HSC in each of the next 6 chs.
Herringbone Single Crochet Decrease < step-by-step>
This stitch is only worked when crocheting rows on the Right Side of your project.
This is a variation of a typical decrease stitch as you will be working it into the 1st & 3rd of the next 3 sts (skipping over the 2nd st), instead of working it into the next 2 sts. It is worked this way to create the bottom “valley” in the ripple. See photos below.
Herringbone Single Crochet Decrease (HSC2tog): Insert your hook into the left leg of the stitch previously worked, insert your hook into the 1st st, yo, pull up a loop, skip the 2nd st, insert your hook into the 3rd st, yo, pull up a loop, yo, pull through all 4 loops on your hook.
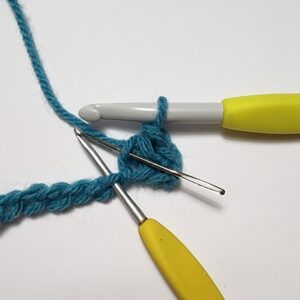
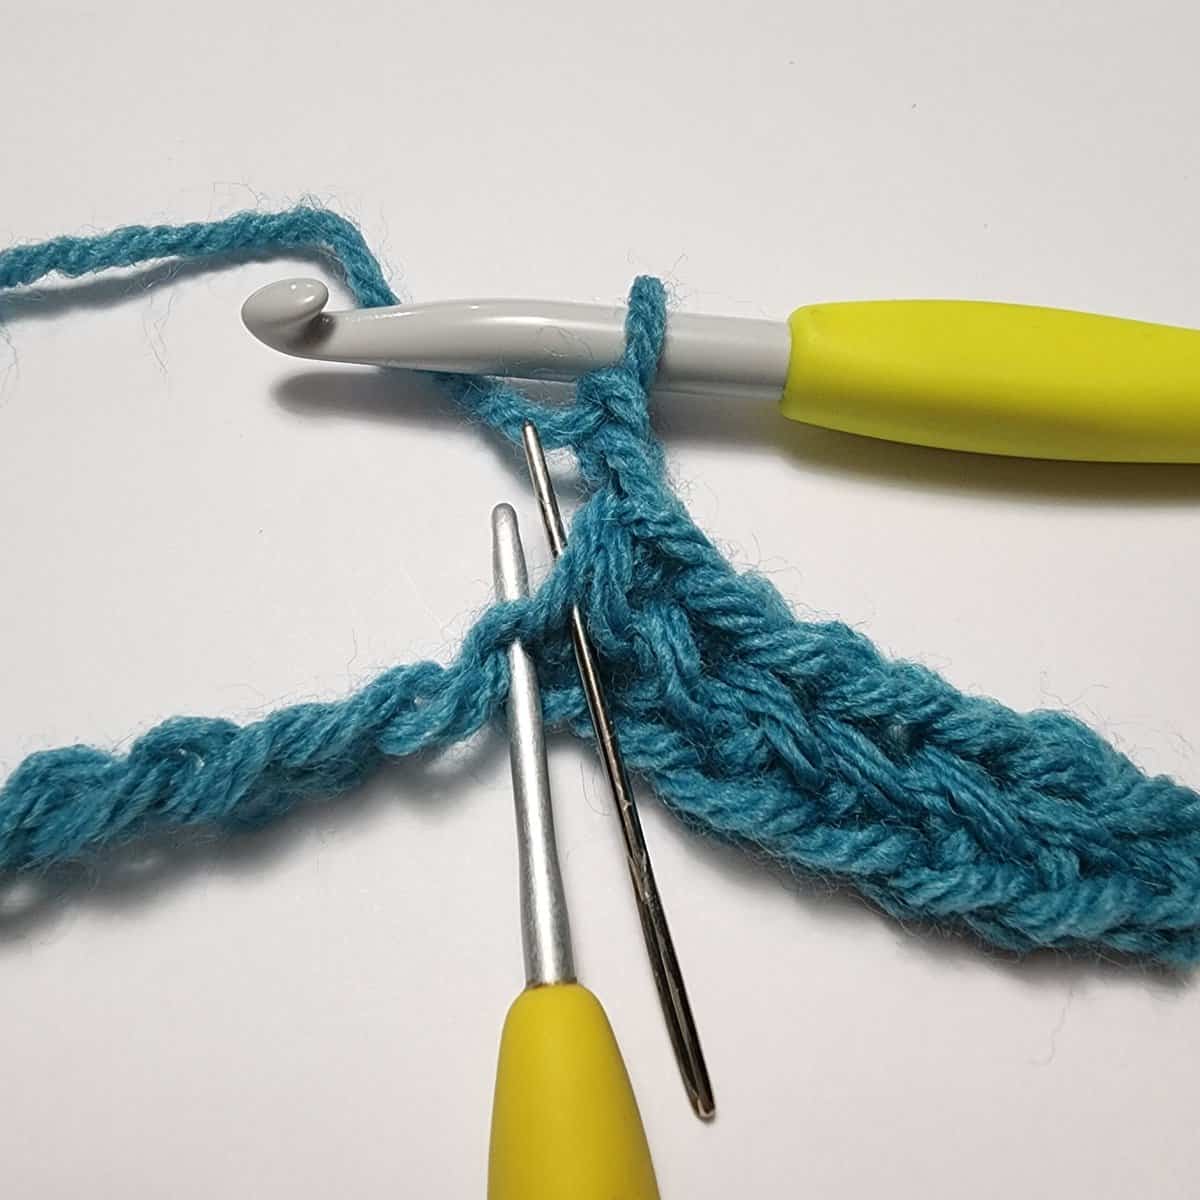
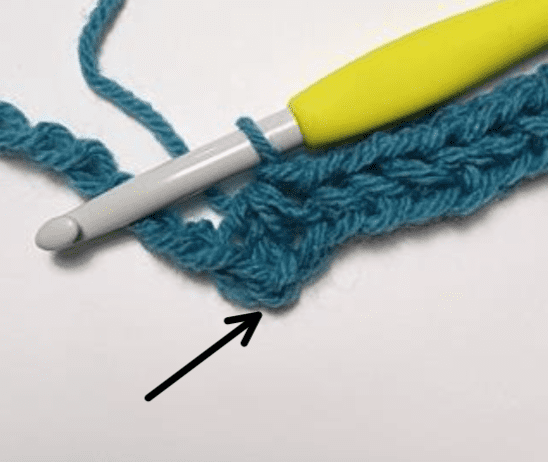
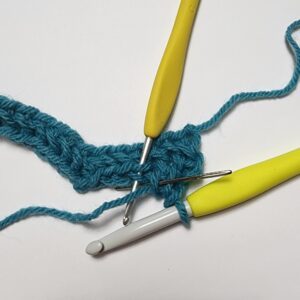
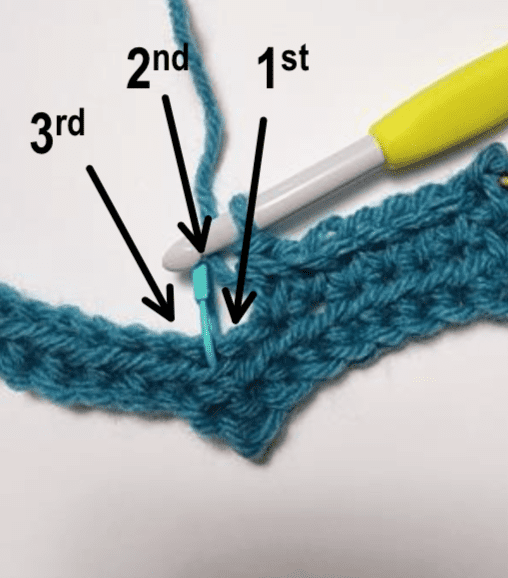
The arrows in the photo below are pointing to the next 3 stitches that will be used to work the HSC2tog.
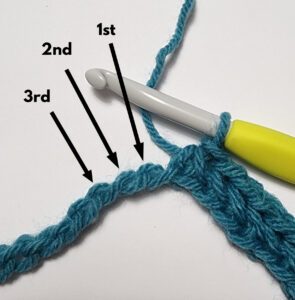
The yarn needle below is showing the left leg of the stitch previously worked. The crochet hook is showing the 1st of the next 3 stitches.
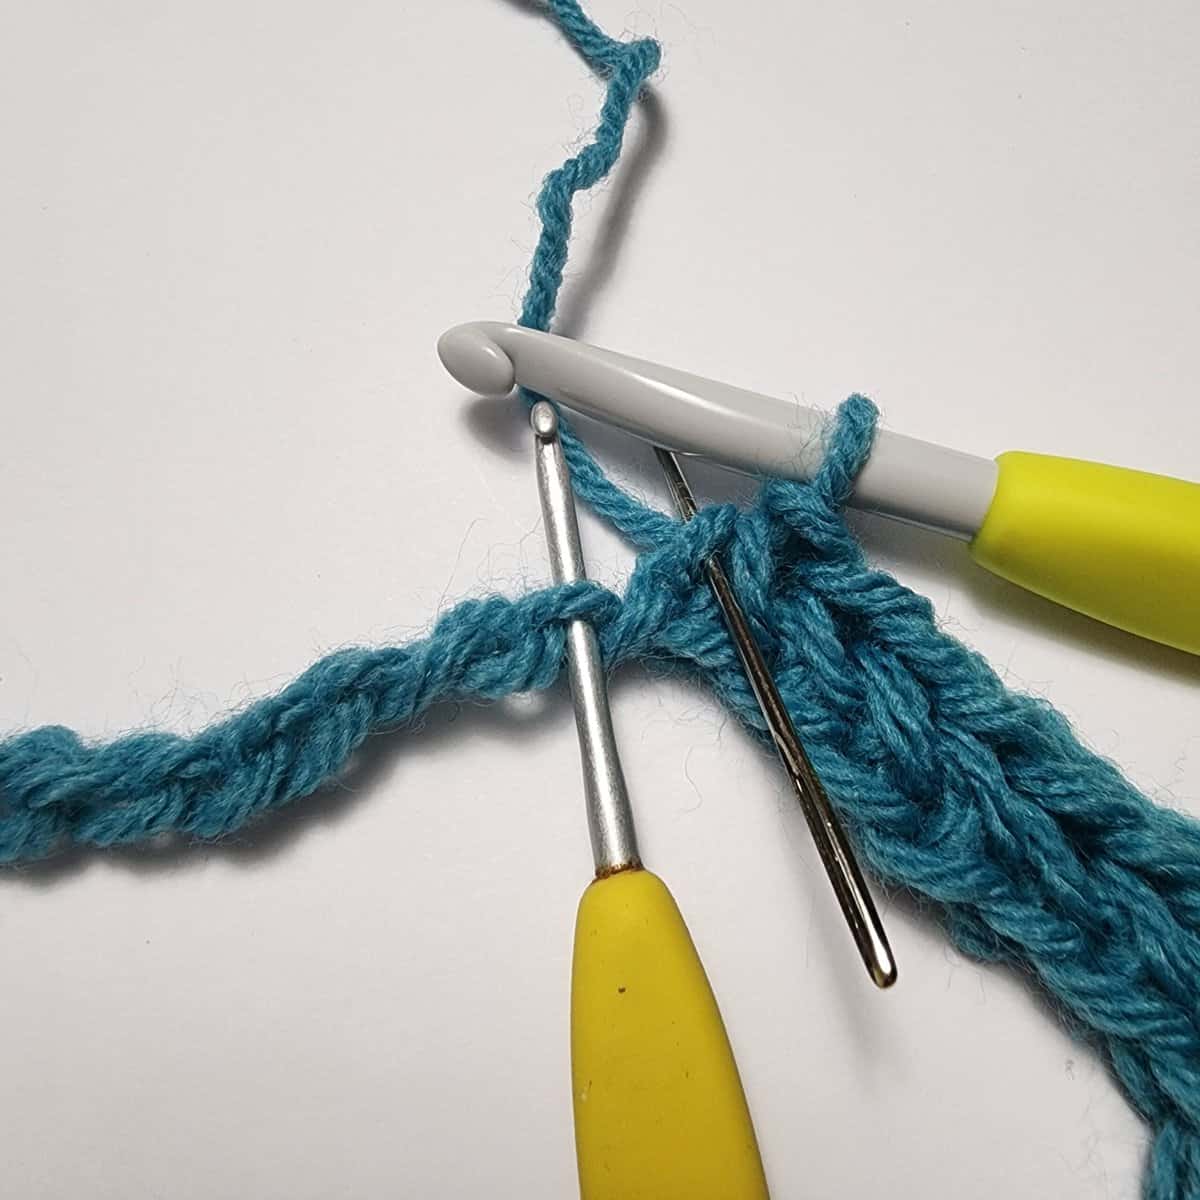
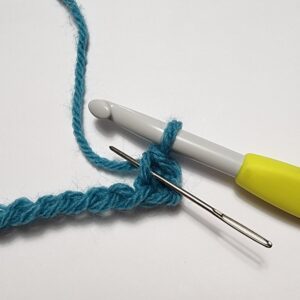
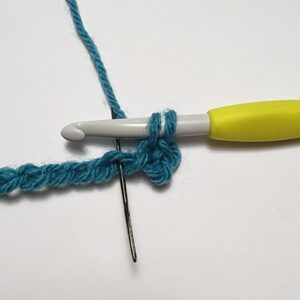
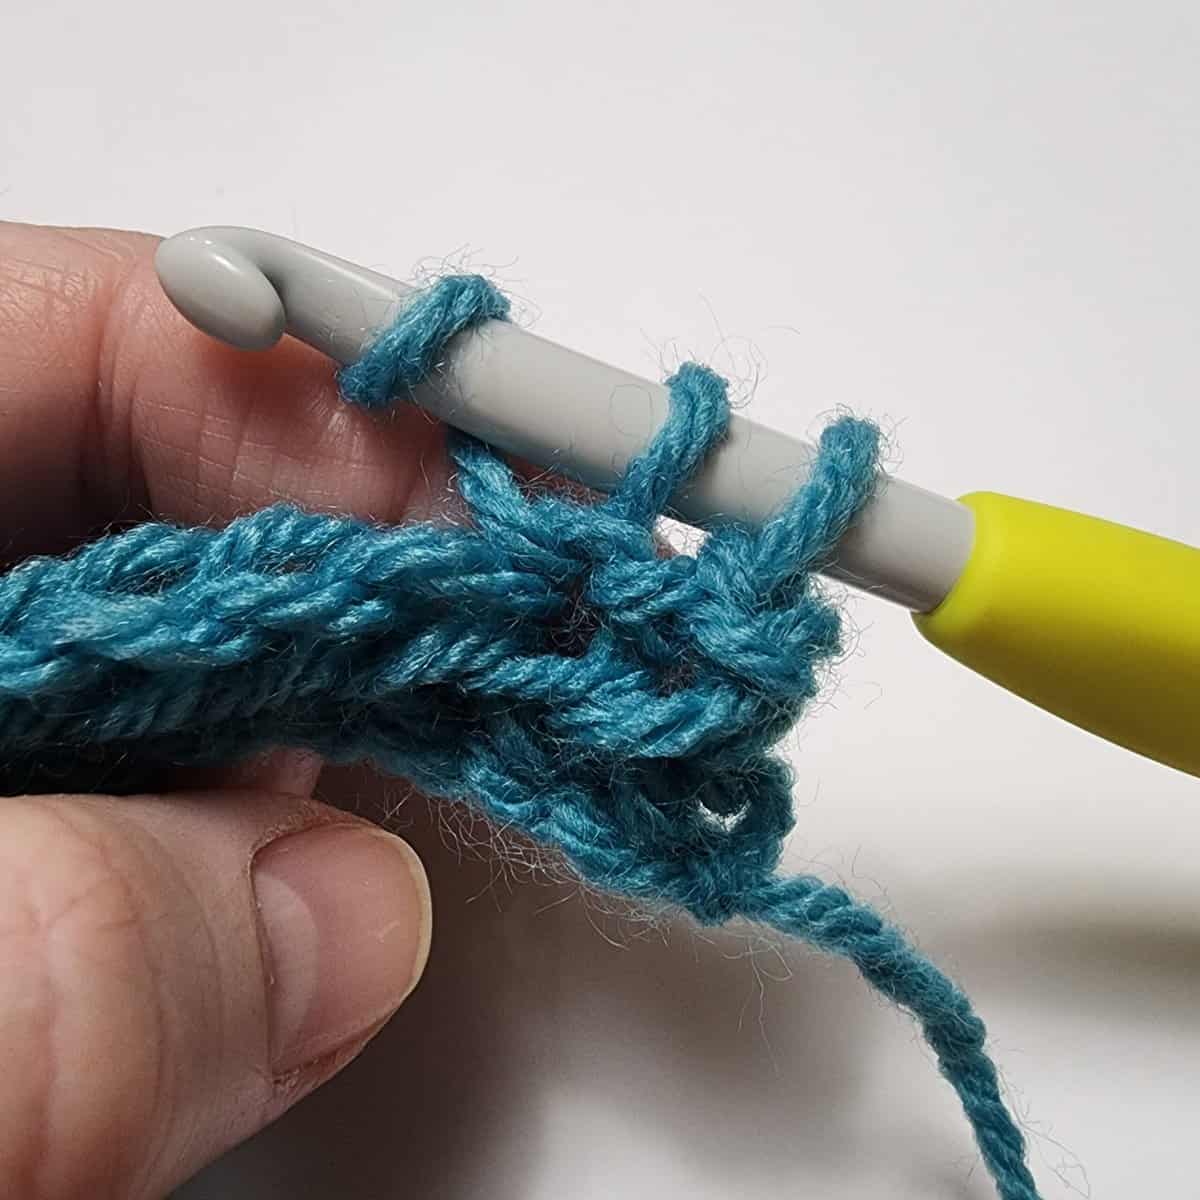
Insert your hook into the left leg of the stitch previously worked, insert your hook into the 1st st, yo.
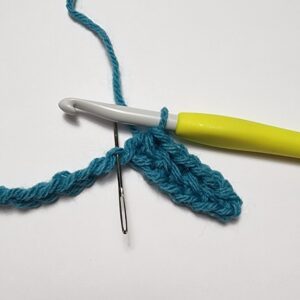
Pull up a loop.
Skip the 2nd st. The yarn needle below is showing the 3rd st.
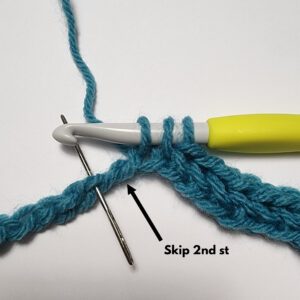
Insert your hook into the 3rd st, yo.
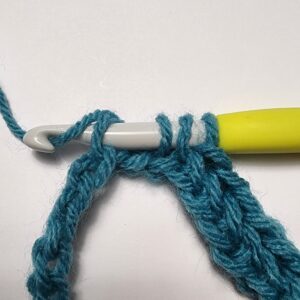
Pull up a loop, yo.
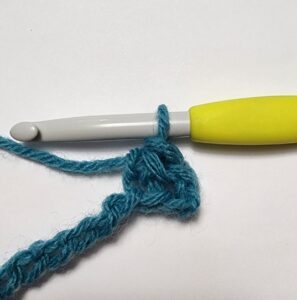
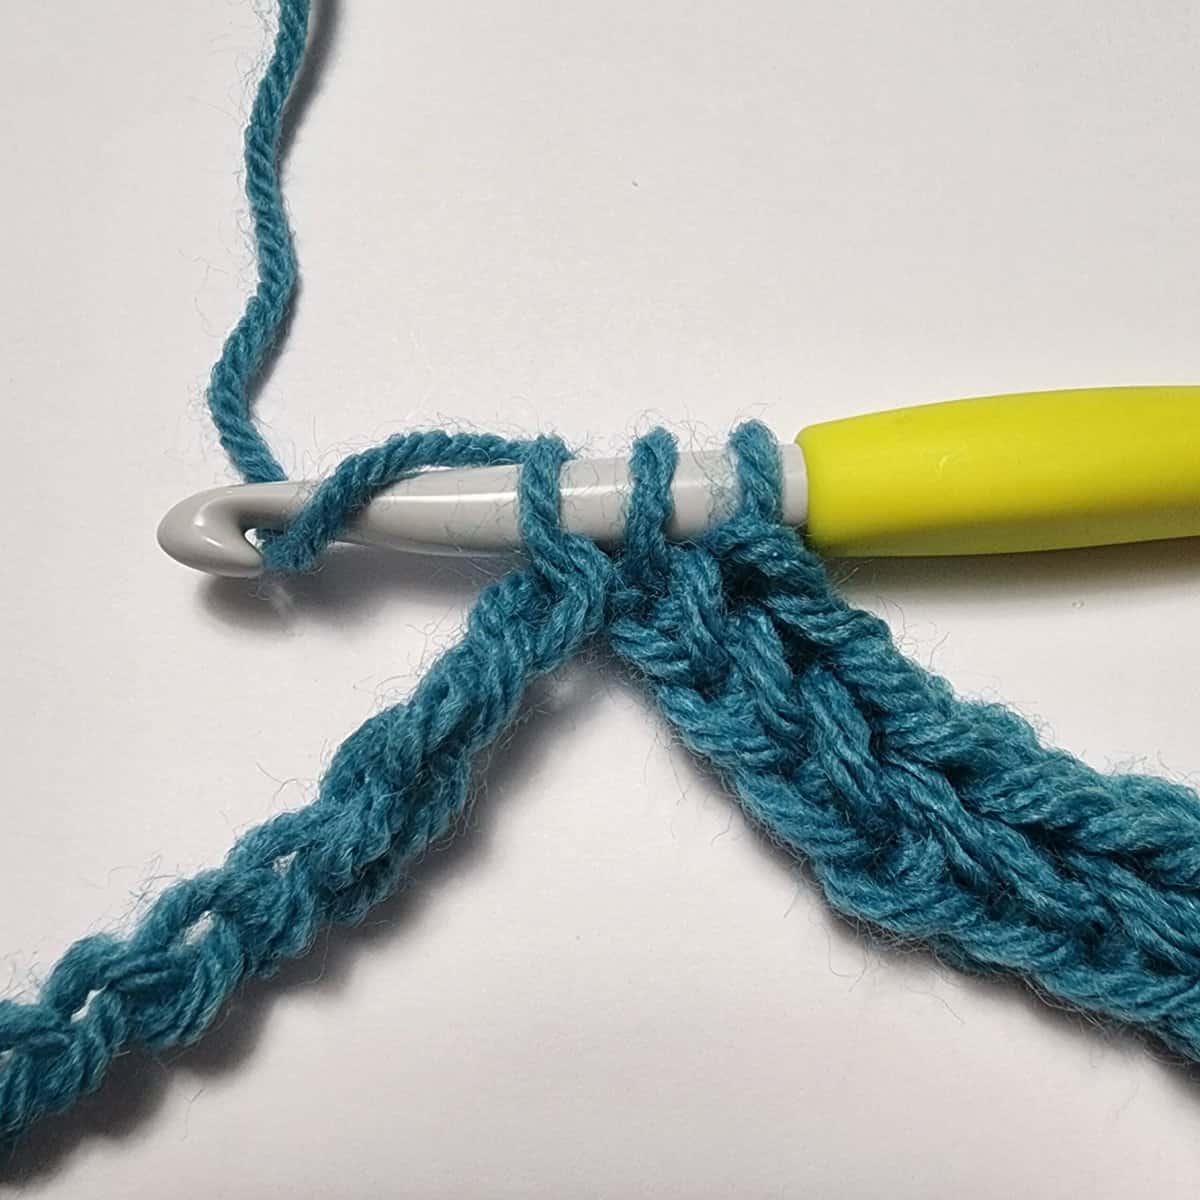
Pull through all 4 loops on your hook to complete the Herringbone Single Crochet Decrease (HSC2tog) stitch shown below.
Do you see how skipping over that 2nd stitch helps to create the valley in our herringbone single crochet ripple stitch pattern?
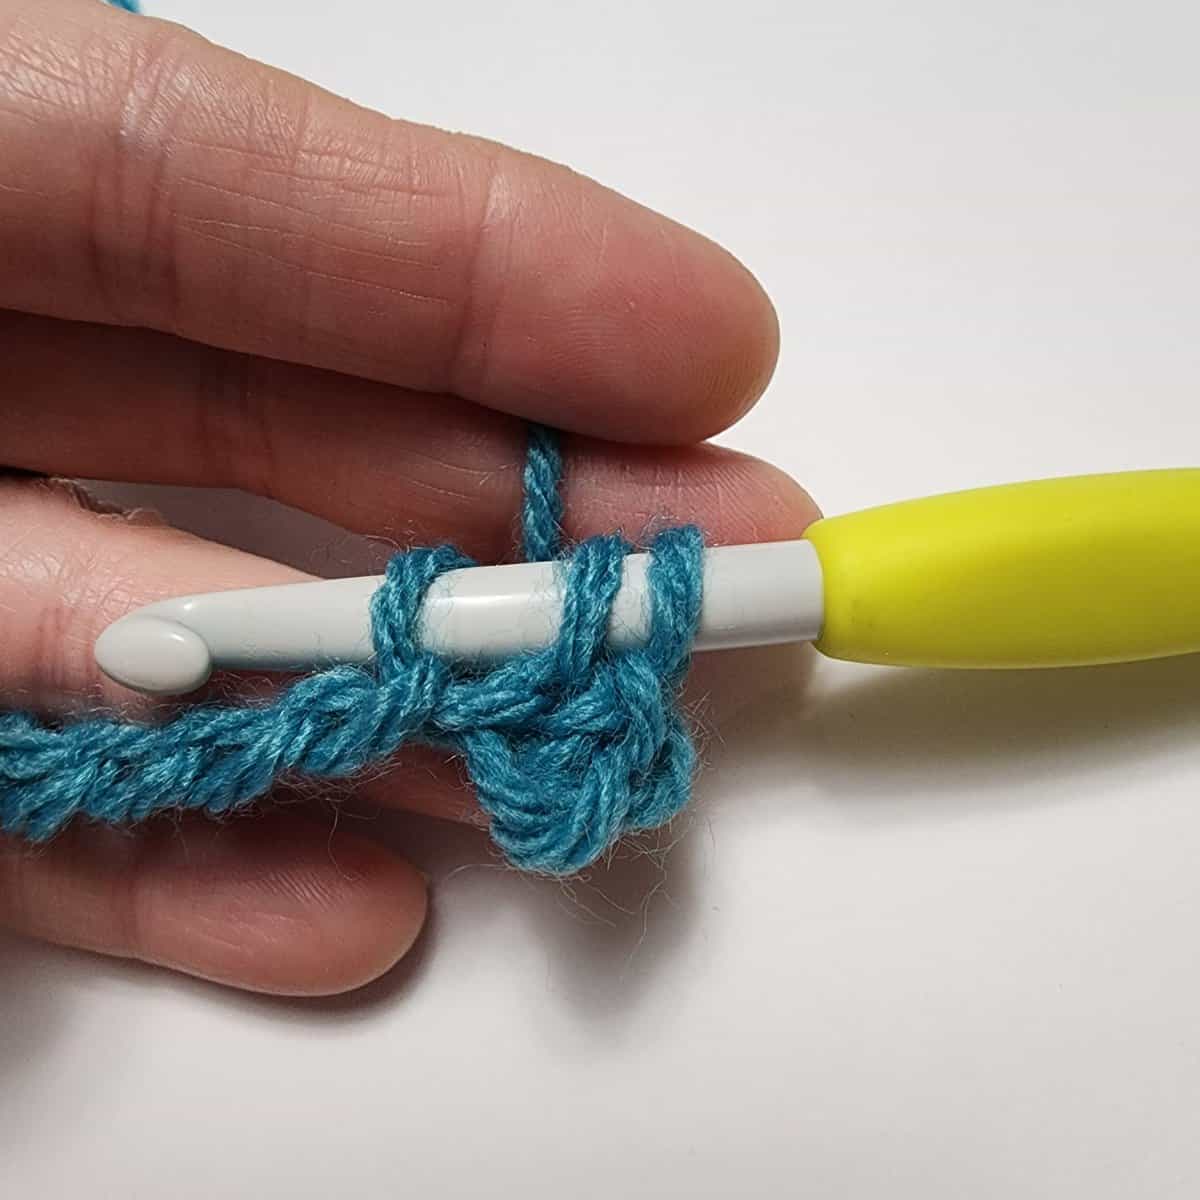
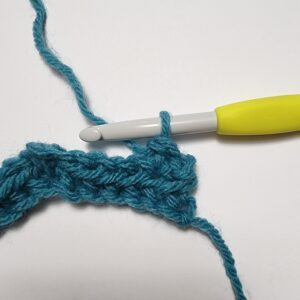
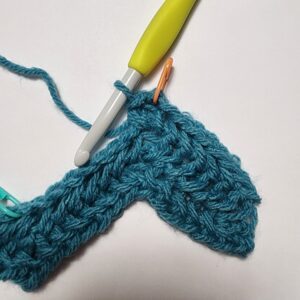
HSC in each of the next 6 chs.
(HSC, ch 2, HSC) in the next ch.
HSC in each of the last 6 chs.
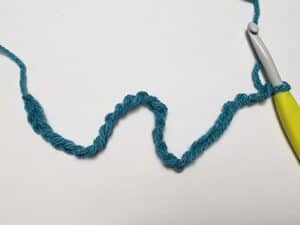
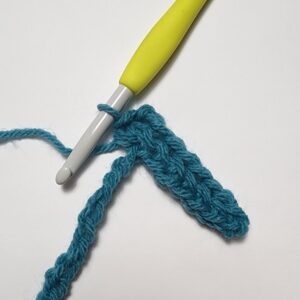
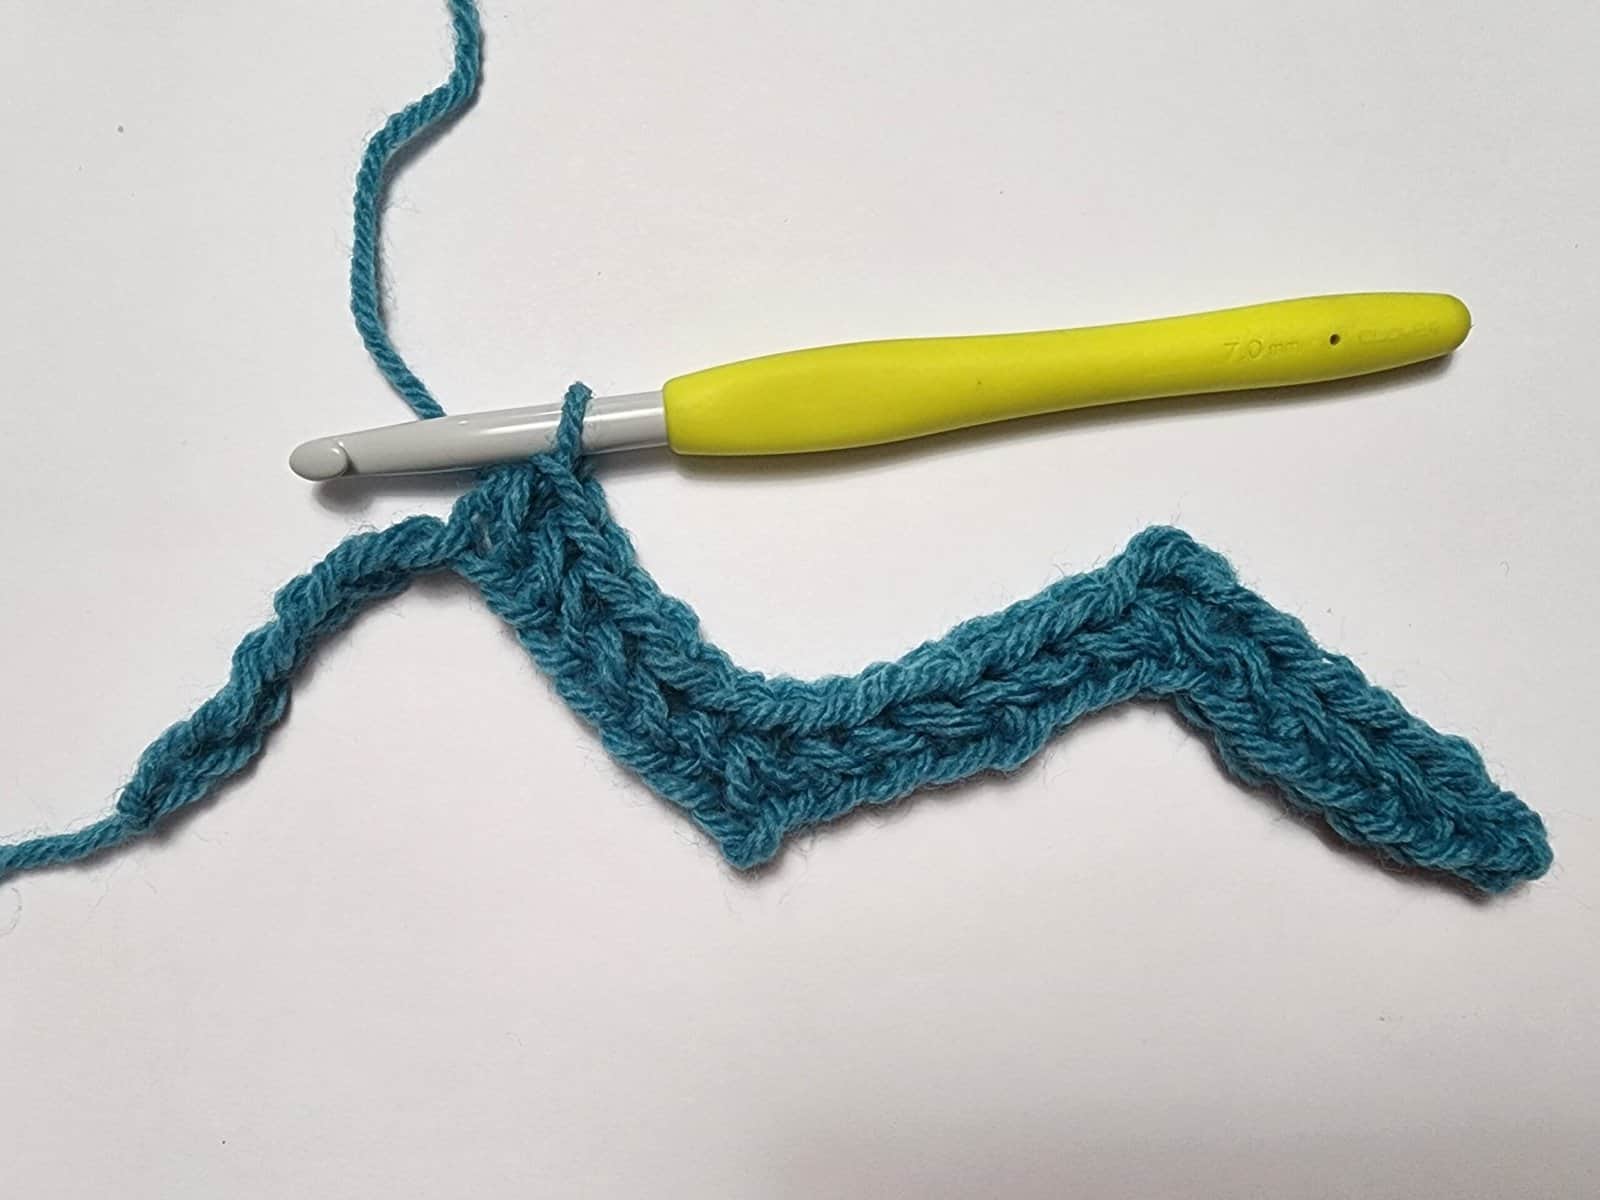
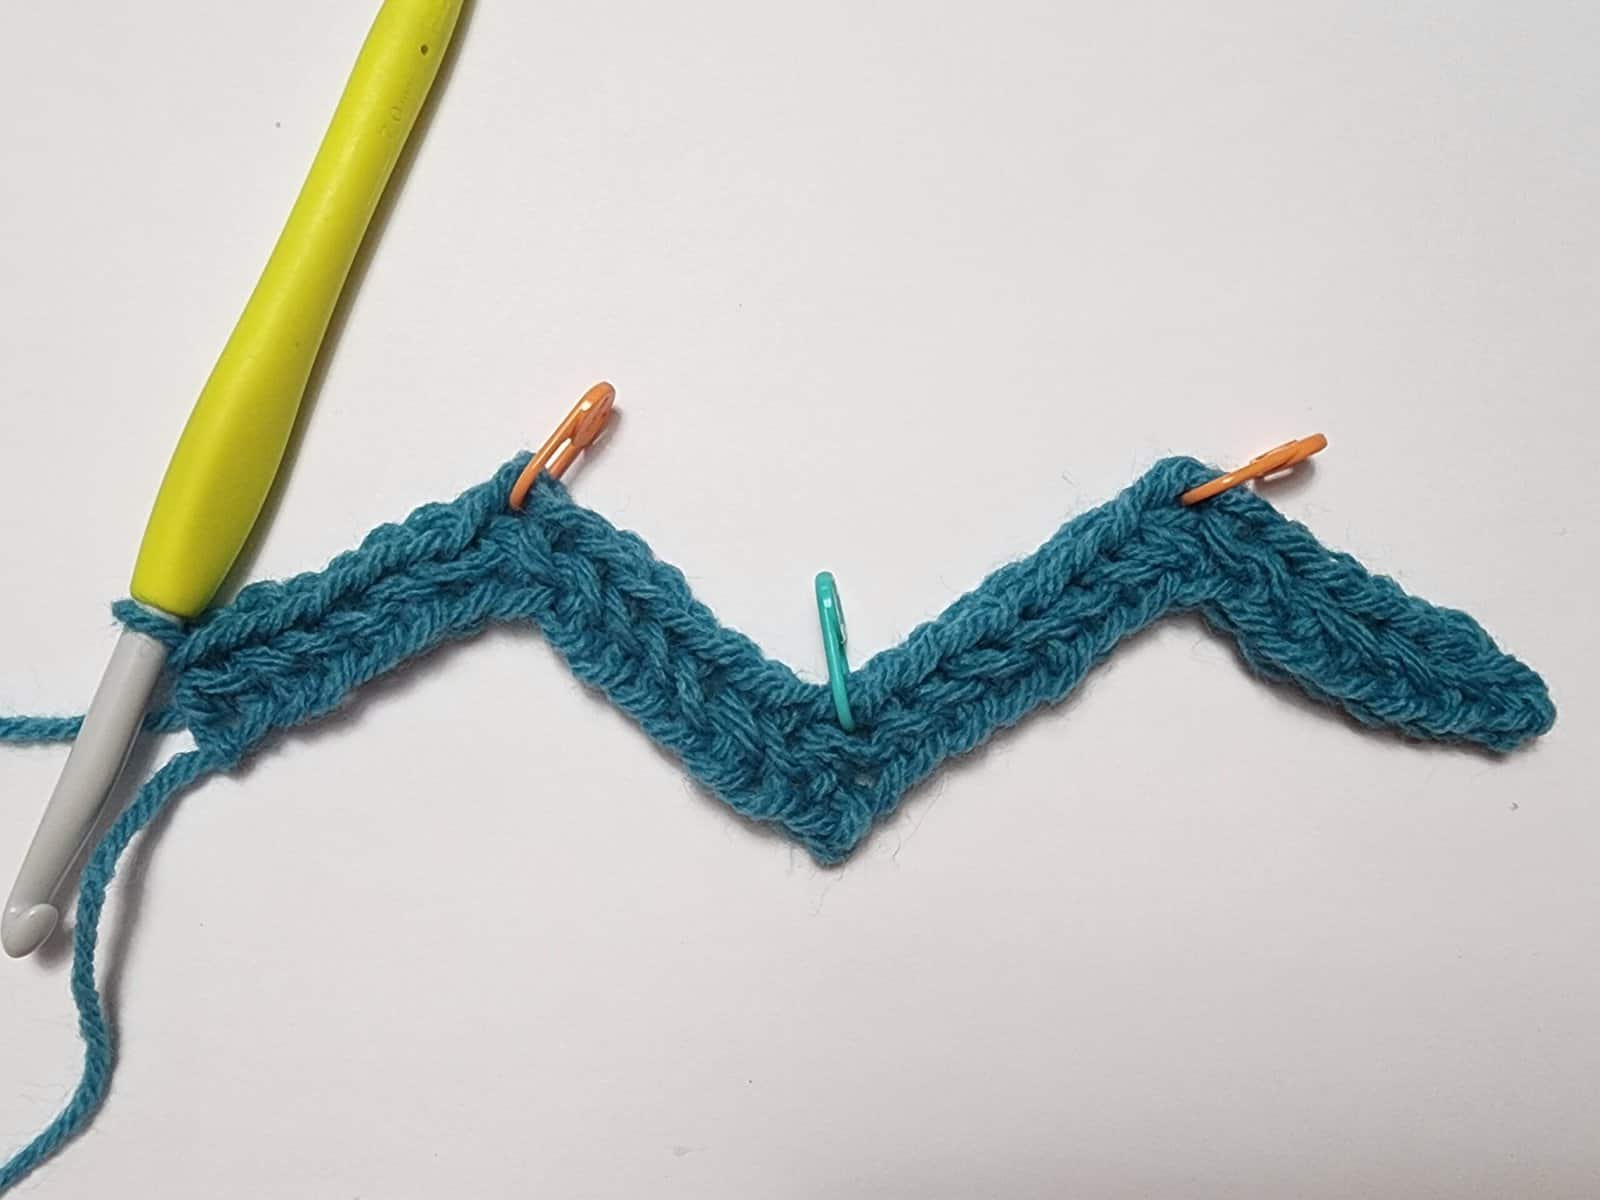
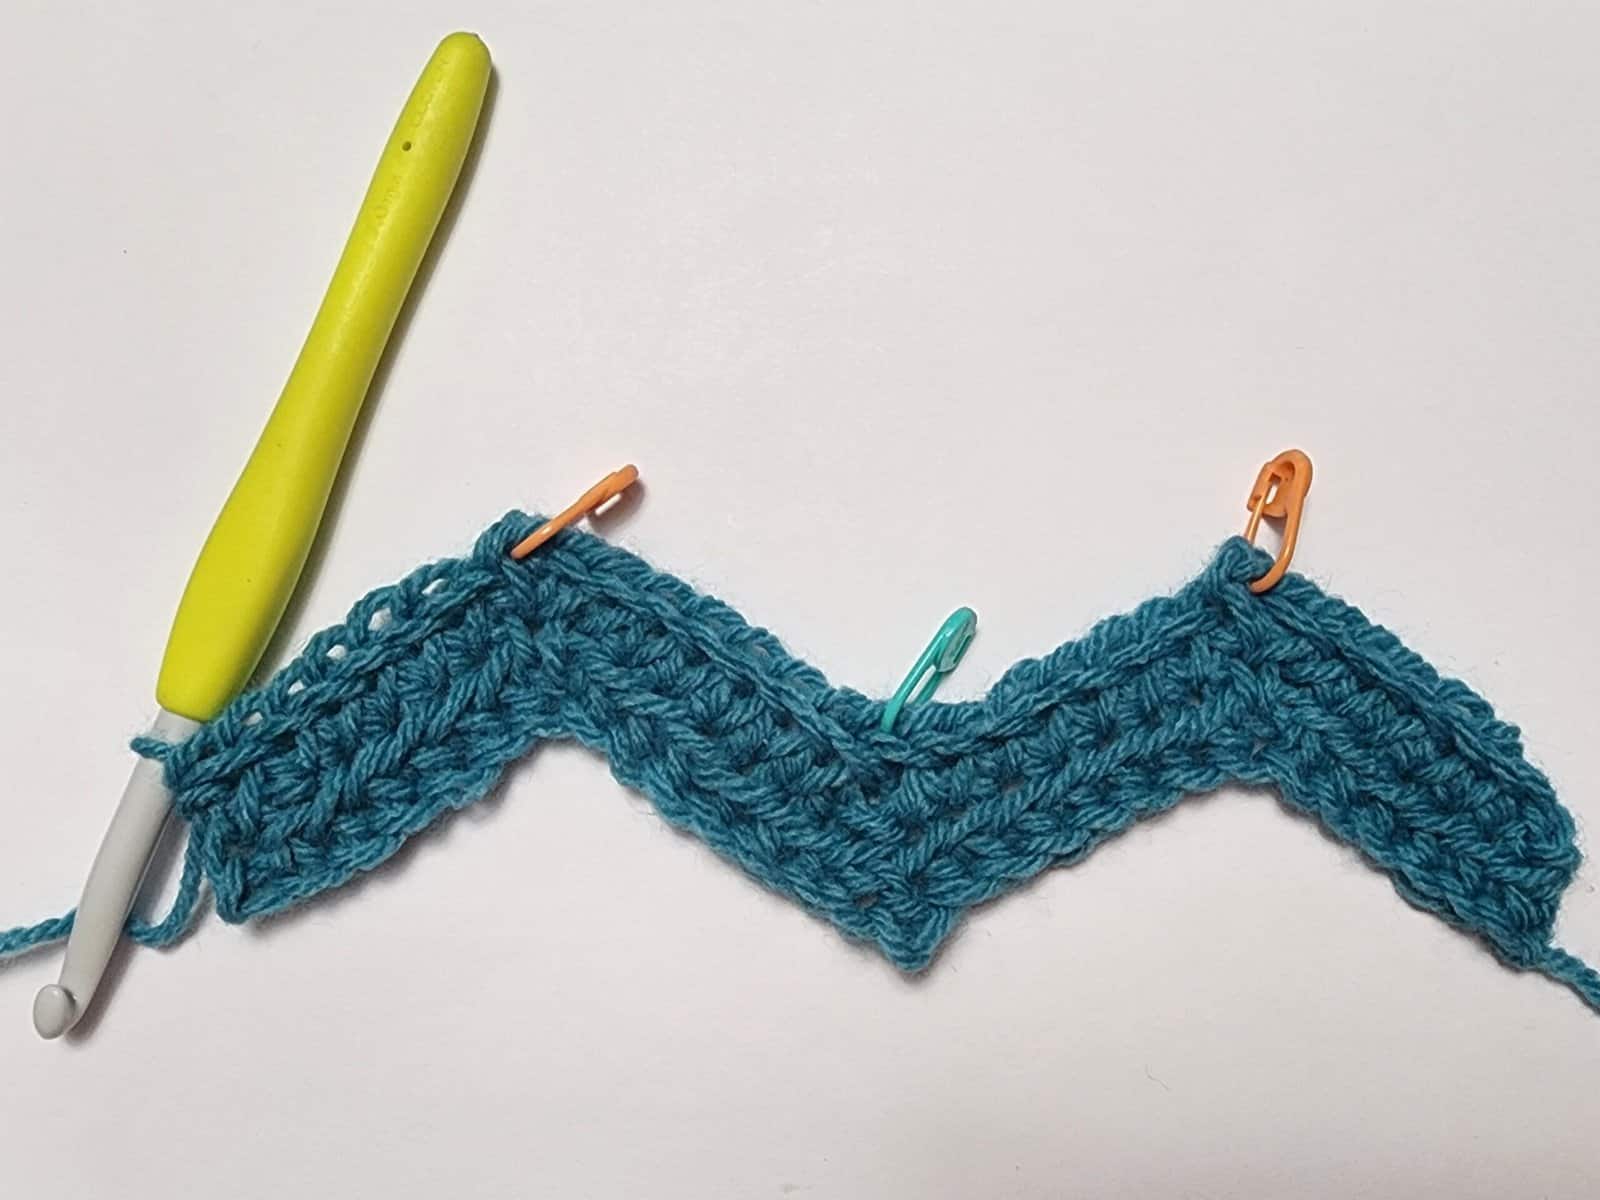
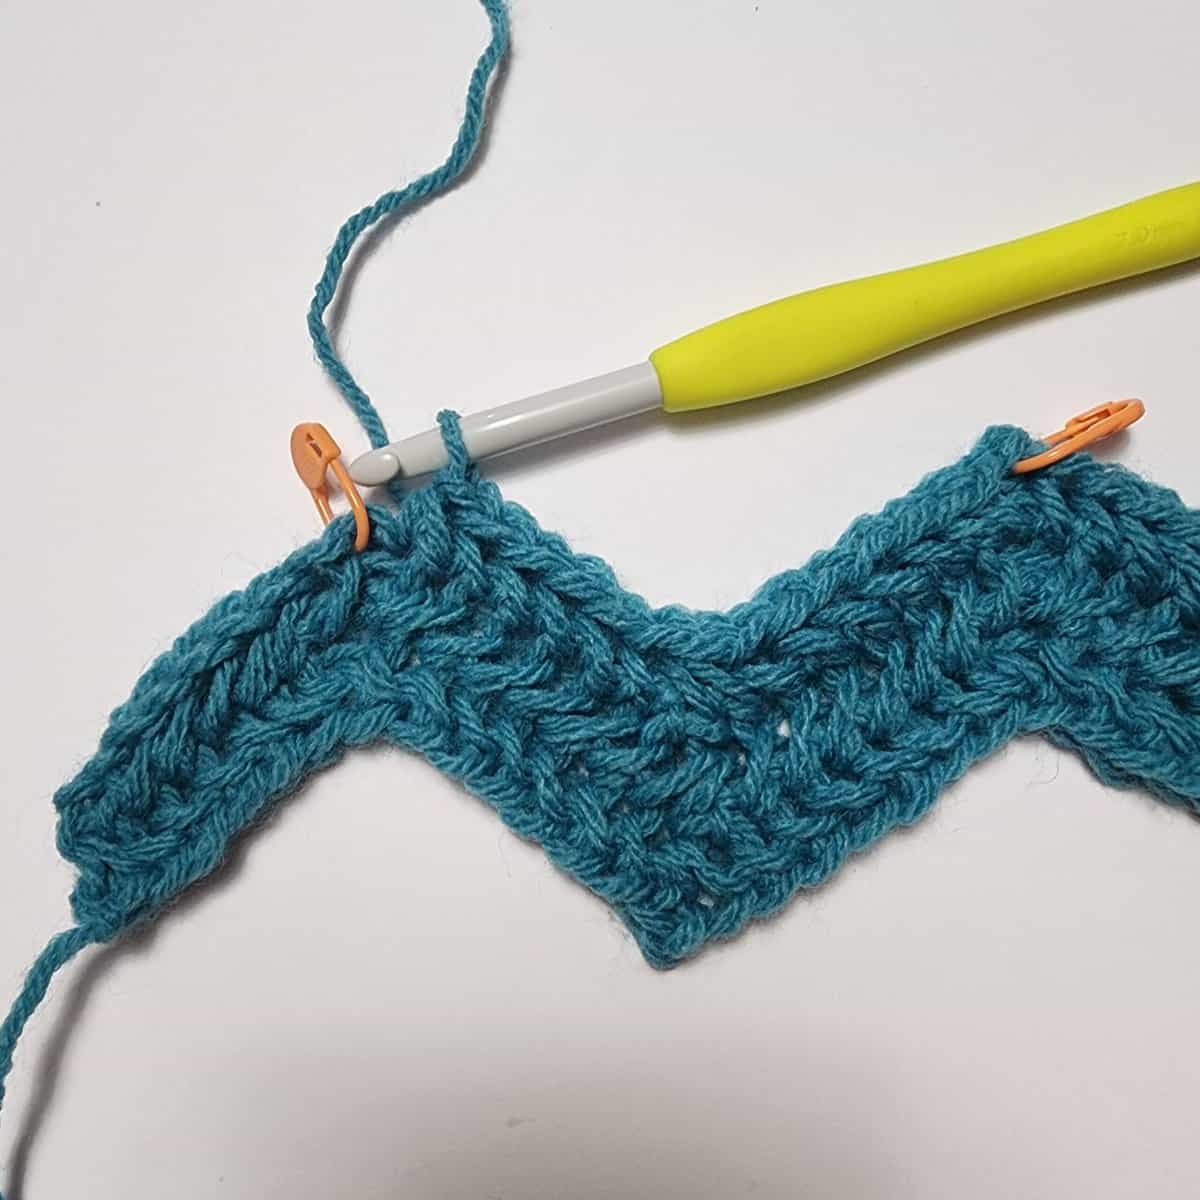
The photo below shows Row 1 completed.
Pro Tip! Place a SM in each ch-2 space and sc2tog to make it easier to find them when working the next row.
Row 2 (Wrong Side)
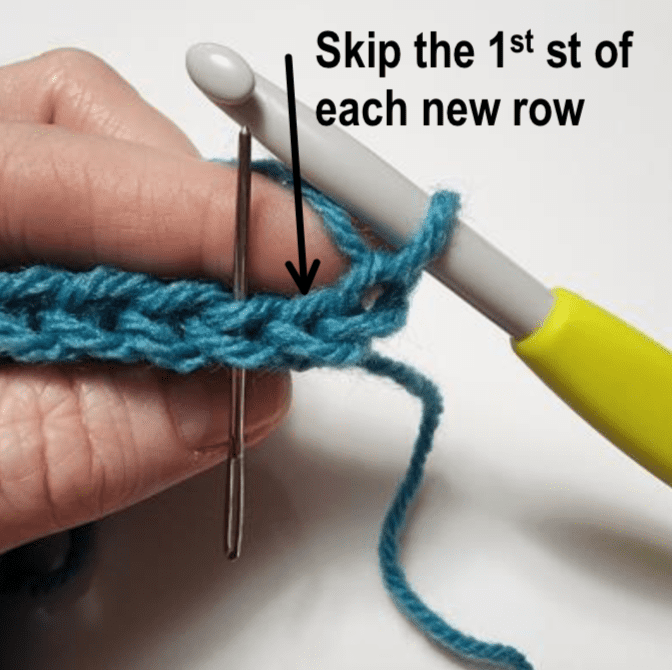
After you’ve completed Row 1, ch 1 and turn your work to begin working your first wrong side row / Row 2.
Beginning in Row 2, you will skip the first stitch at the beginning of every row and work the SC or InvSC into the 2nd stitch.
Skipping the first stitch of each row is what keeps the edge of the ripple pattern straight.
INVERSE SINGLE CROCHET STITCH < STEP-BY-STEP >
You’ll begin each wrong side row with an Inverse Single Crochet Stitch.
This stitch is only worked when crocheting rows on the Wrong Side of your project.
Inverse Single Crochet (InvSC): With the working yarn IN FRONT of your work, insert your hook from back to front through the indicated stitch, yo, pull up a loop, yo, pull through both looks on your hook.
Pro Tip! When working inverse stitches, it is helpful to tip your work towards you so it’s easier to see where to insert your hook.
The yarn needle in the photo above shows the stitch you will begin your InvSC in.
Let’s work an Inverse Single Crochet Stitch.
With the working yarn IN FRONT of your work, insert your hook from back to front through the indicated stitch. Remember to skip the first st of the row.
Yarn over.
Pull up a loop.
Yarn over.
Pull through both loops on your hook to complete the Inverse Single Crochet (InvSC) stitch. Shown below.
INVERSE HERRINGBONE SINGLE CROCHET STITCH < STEP-BY-STEP >
This stitch is only worked when crocheting rows on the Wrong Side of your project.
Inverse Herringbone Single Crochet (InvHSC): With the working yarn IN FRONT of your work, insert your hook from back to front into the left leg of the stitch previously worked, insert your hook from back to front into the next st, yo, pull up a loop, yo, pull through all 3 loops on your hook.
Pro Tip! When working inverse stitches, it is helpful to tip your work towards you so it’s easier to see where to insert your hook.
The photo above shows your work facing you before you begin to work an Inverse Herringbone Single Crochet stitch.
Tip your work towards you so you can see the back side of your stitches.
The yarn needle in the photo below was inserted, from back to front, into the left leg of the stitch previously worked.
With the working yarn IN FRONT of your work, insert your hook, from back to front, into the left leg of the stitch previously worked.
The yarn needle below shows where you insert your hook next.
Insert your hook from back to front into the next st.
Yarn over.
Pull up a loop.
Pro Tip! Make sure to pull all 3 loops up to the same height before completing the stitch. This helps to keep your stitches loose enough to work into in following rows.
Yarn over.
Pull through all 3 loops on your hook to complete the Inverse Herringbone Single Crochet (InvHSC) stitch.

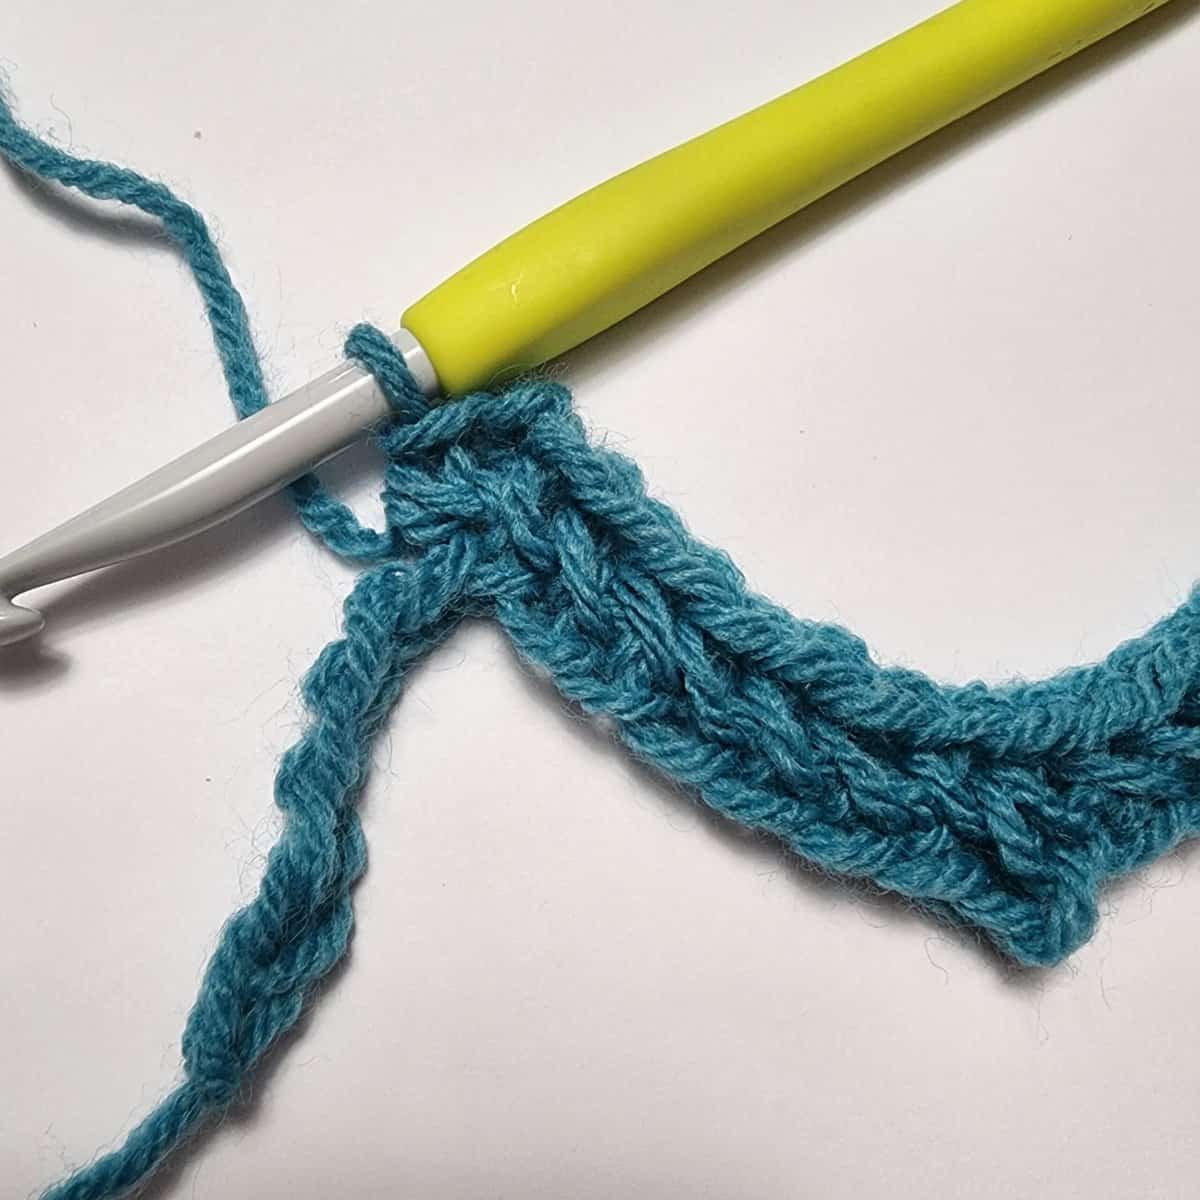
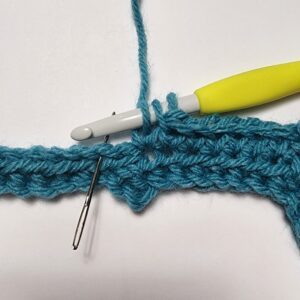
The photo below shows the back side of your work where you will insert your hook to work the next InvHSC.
- First, insert your hook from back to front into the left leg of the InvHSC previously worked (shown with a yarn needle).
- Then, insert your hook from back to front into the next stitch (shown with a smaller crochet hook).
Pro Tip! Make sure to pull all 3 loops up to the same height before completing the stitch. This helps to keep your stitches loose enough to work into in following rows. See photo below.
InvHSC in each of the next 4 sts.
You should have 1 InvSC and 5 InvHSC at this point.
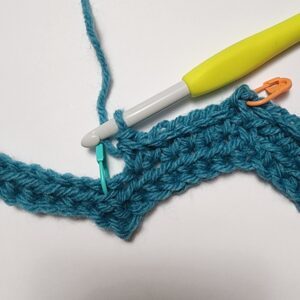
The stitch marker below shows the next ch-2 sp.
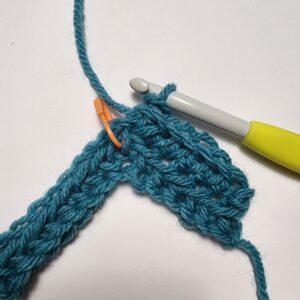
Work (InvHSC, ch 2, InvHsc) in the next ch-2 space. Move your SM up to the ch-2 sp you just created.
InvHSC in each of the next 6 sts.
INVERSE HERRINGBONE SINGLE CROCHET DECREASE < STEP-BY-STEP >
This stitch is only worked when crocheting rows on the Wrong Side of your project.
Inverse Herringbone Single Crochet Decrease (InvHSC2tog): With the working yarn IN FRONT of your work, insert your hook from back to front into the left leg of the stitch previously worked, insert your hook from back to front into the next st, yo, pull up a loop, yo, pull through all 3 loops on your hook.
Pro Tip! When working inverse stitches, it is helpful to tip your work towards you so it’s easier to see where to insert your hook.
The photo above shows your work facing you before you begin to work an Inverse Herringbone Single Crochet Decrease stitch.
Tip your work towards you so you can see the back side of your stitches.
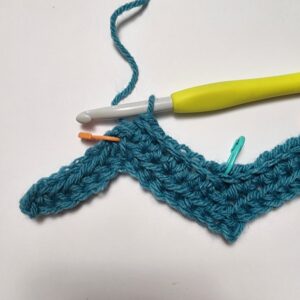
In the photo below, the arrows are pointing to the next 3 stitches that will be used to work the InvHSC2tog. The 2nd stitch is the HSC2tog from the previous row. This is the stitch you will skip over.
With the working yarn IN FRONT of your work, tip your work towards you and insert your hook, from back to front, into the left leg of the stitch previously worked, insert your hook from back to front into the 1st st, yo, pull up a loop.
The yarn needle below is showing the 3rd st.
Skip the 2nd st (the HSC2tog from the previous row), tip your work towards you and insert your hook from back to front into the 3rd st, yo, pull up a loop, yo.
Note: The photo below shows the side of your work that is facing you, but remember to insert your hook from back to front into stitches on the backside.
Pull through all 4 loops on your hook to complete the Inverse Herringbone Single Crochet 2 Together (InvHSC2tog) stitch.
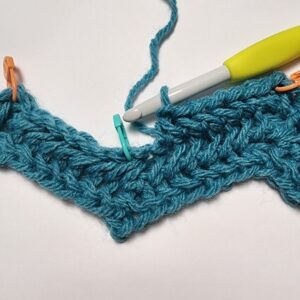
Next, InvHSC in each of the next 6 sts.
(InvHSC, ch 2, InvHSC) in the next ch-2 sp.
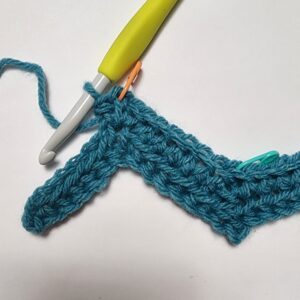
InvHSC in each of the next 5 sts, skip the next st.
Beginning with Row 2, you will skip the 2nd to last stitch of the row and work the last stitch of the row into the last stitch.
Skipping the second to last stitch of each row is what keeps the edge of the ripple pattern straight.
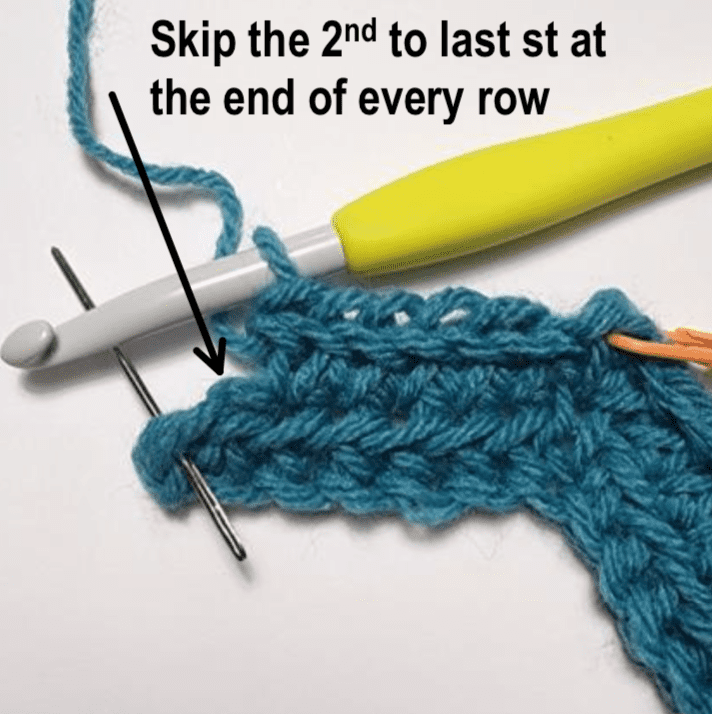
Work a InvHSC in the last st.
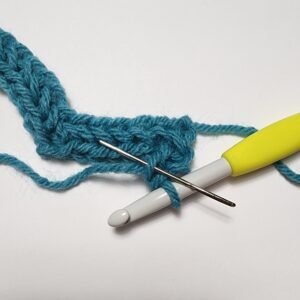
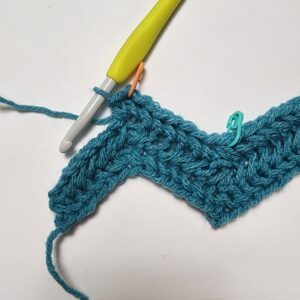
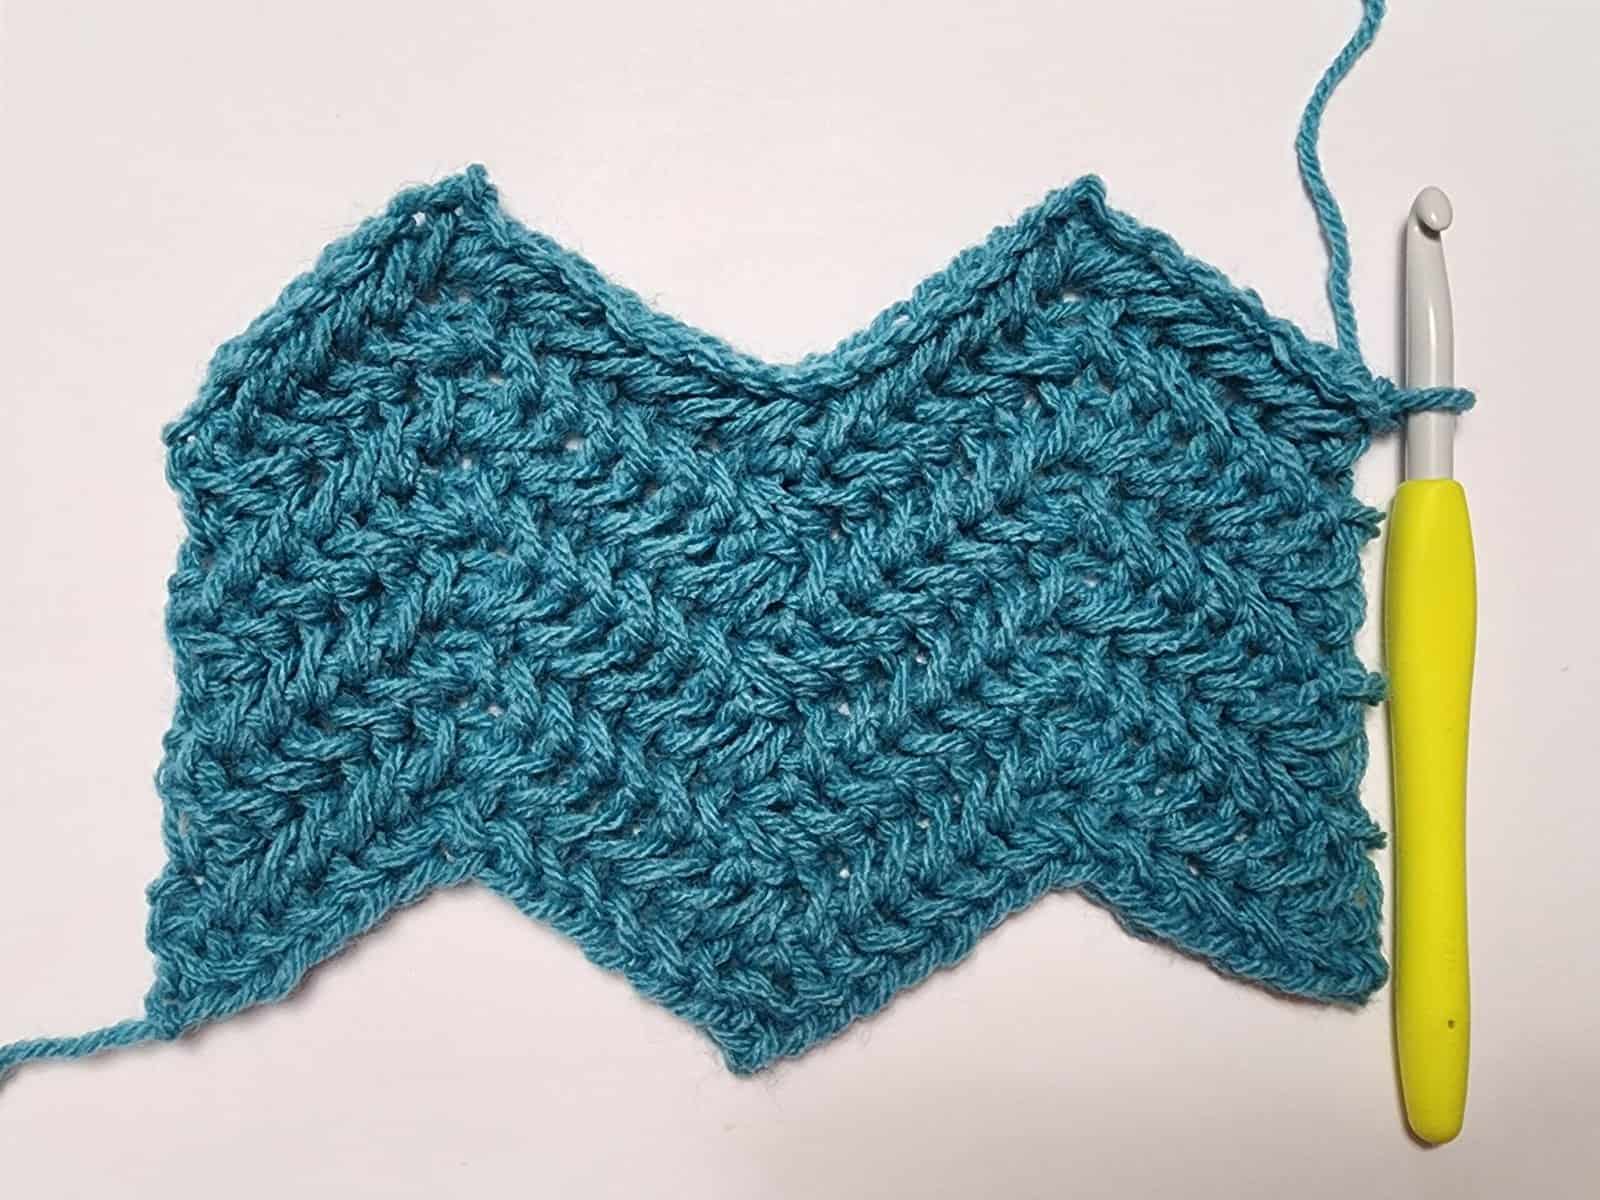
Row 2 is now completed.
Tip! Place a SM in each ch-2 space and sc2tog to make it easier to find them when working the next row.
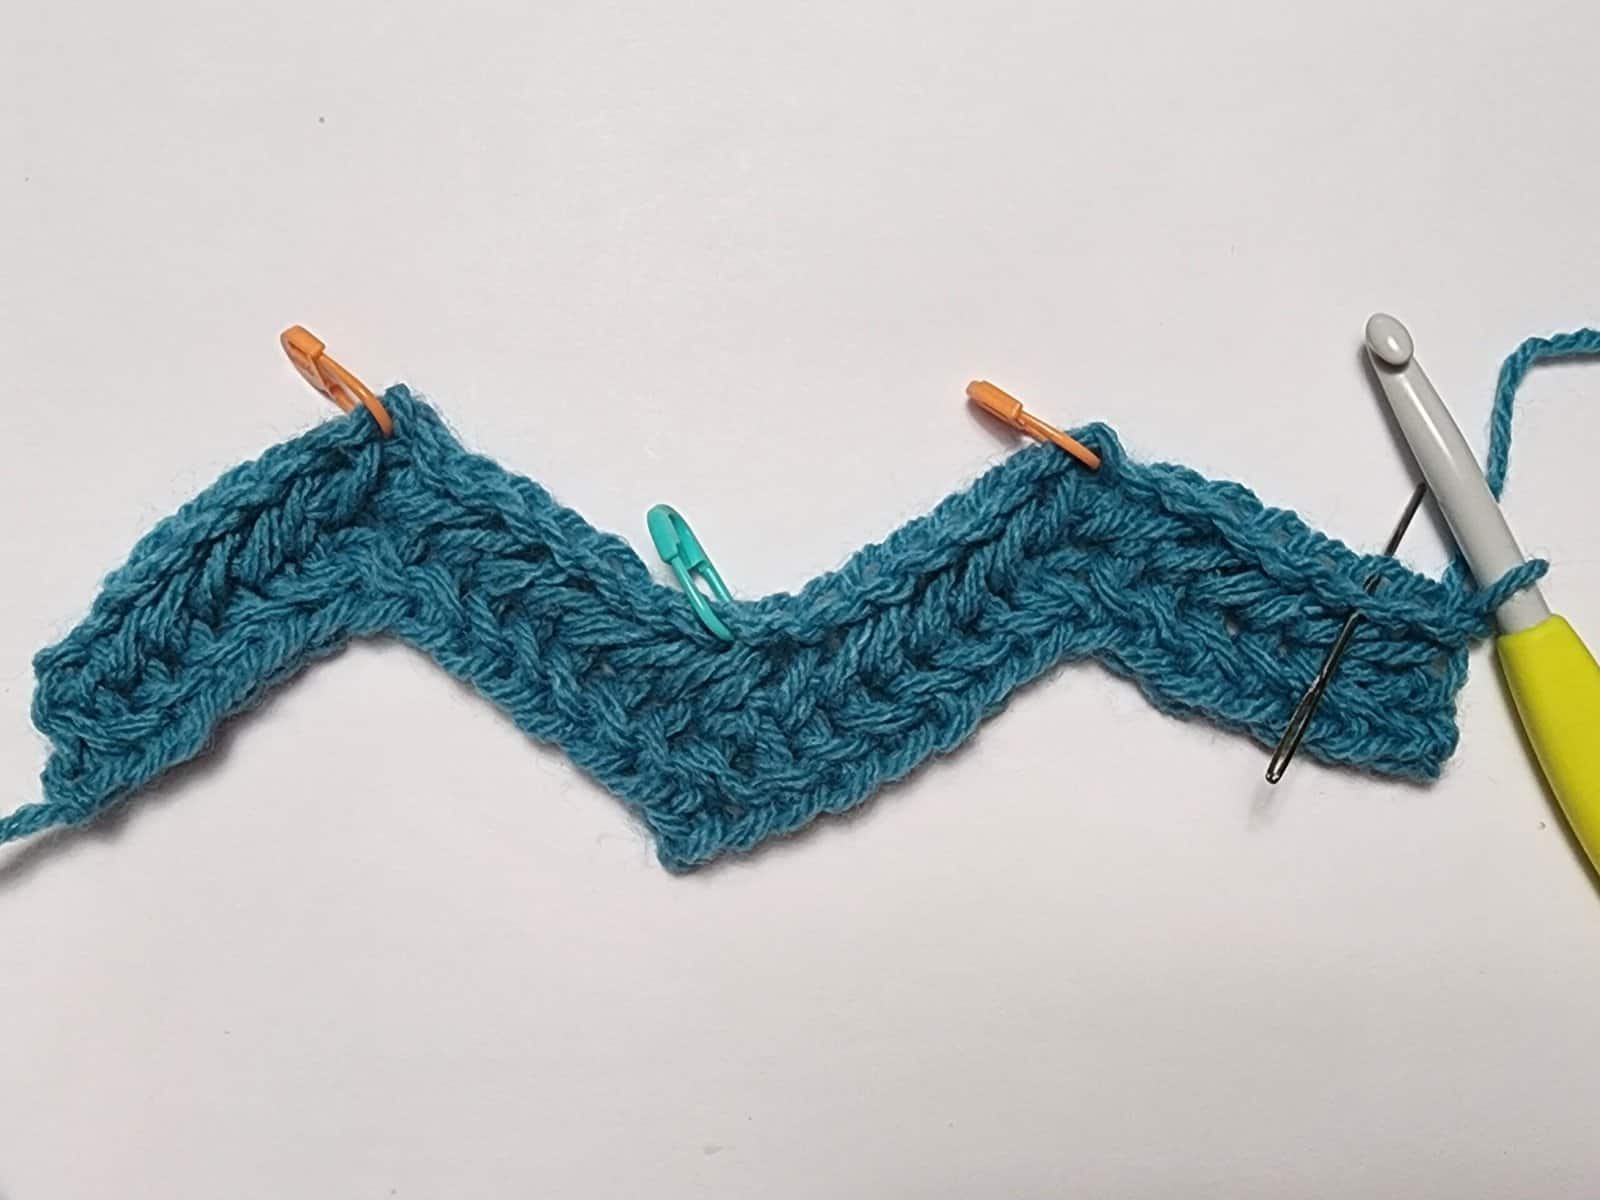
The photo below shows Row 2 complete. This is the wrong side of your swatch.
The photo below shows the right side of your swatch and the first 2 rows complete.
Row 3 (Right Side)
Ch 1, skip the first st, sc in the next st.
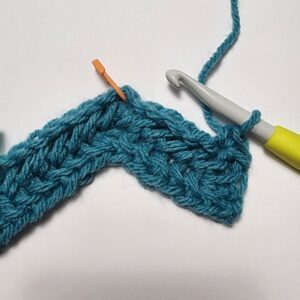
HSC in each of the next 5 sts.
(HSC, ch 2, HSC) in the next ch-2 sp.
HSC in each of the next 6 sts.
HSC2tog into the 1st & 3rd of the next 3 sts (skipping over the 2nd st which is the InvHSC2tog from the previous row)

The photo below shows the HSC2tog complete.
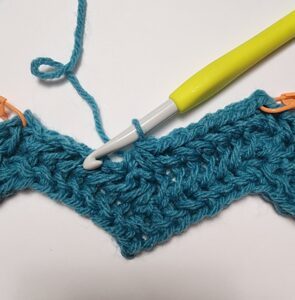
HSC in each of the next 6 sts.
(HSC, ch 2, HSC) in the next ch-2 sp.
HSC in each of the next 5 sts, skip the next st, HSC in the last st.
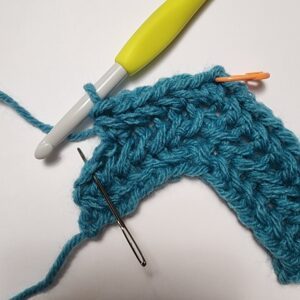
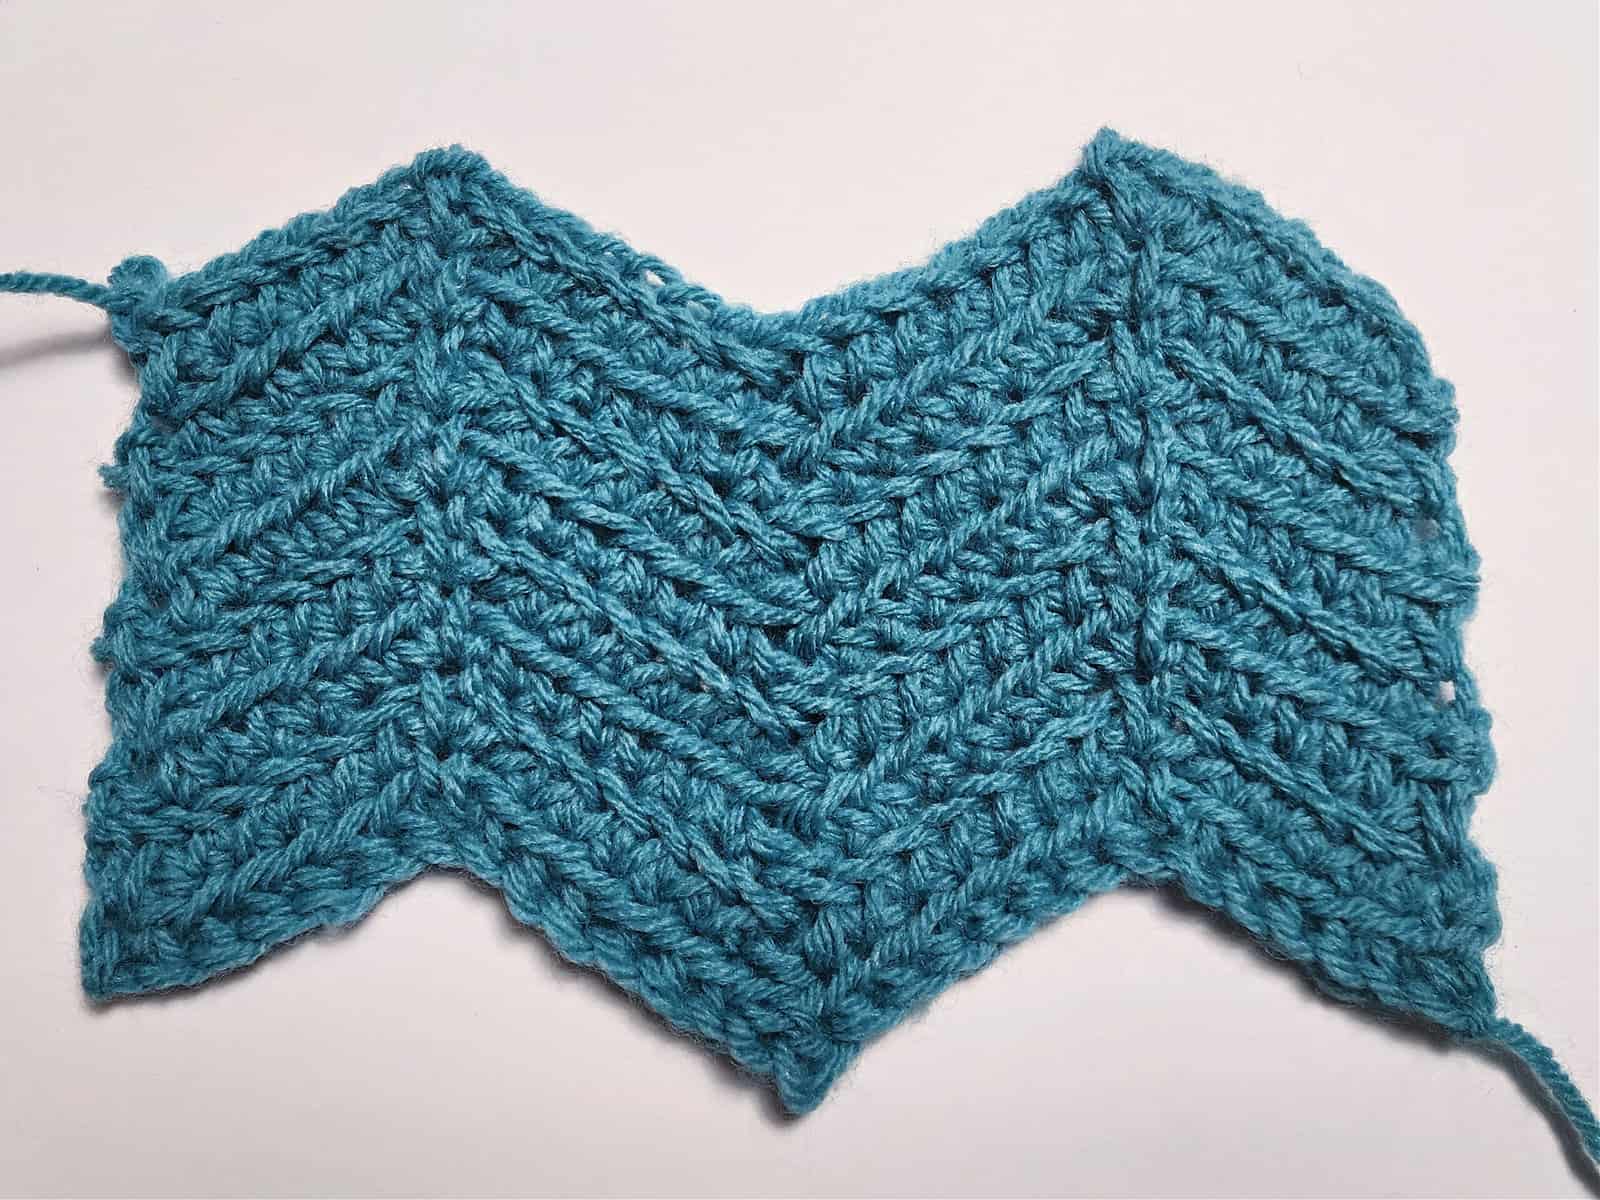
The photo below shows Row 3 complete. This is the right side of the swatch.

ROWS 4 – 8: REPEAT THE INSTRUCTIONS FOR ROWS 2 – 3, ending with a Row 2.
- The written swatch instructions are in the blog post above.
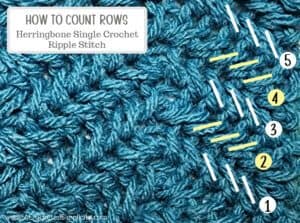
How to Count Rows of Herringbone Single Crochet Ripple Stitch
Each row of herringbone single crochet leans. This makes it much easy to keep track of and count which row you’re on.
With the Right Side of your swatch facing you, count the rows.
- All Right Side Rows lean to the LEFT (white lines shown above).
- All Wrong Side Rows lean to the RIGHT (yellow lines shown above).
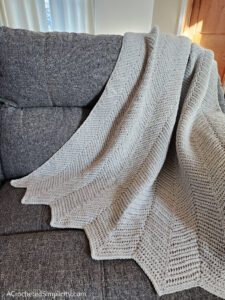
Finished Swatch
Learn to Crochet the Herringbone Single Crochet Ripple Stitch Blanket!
Once you’re comfortable with the Herringbone Single Crochet Ripple Stitch, come learn how to crochet the Herringbone Single Crochet Ripple Stitch Blanket! Click HERE or the graphic below to be taken to the free crochet blanket pattern.
KNIT-LOOK CROCHET STITCH TUTORIALS
If you love crochet that mimics knitting, you may also love my other knit look crochet stitch tutorials.


Are you intimidated by knit-look crochet? Would you love to learn my tips & tricks? Take an Annies Video Class with me and let me ease your fears and help you increase your skills! Click on the photo below to watch a free preview. You can also see the other 4 video classes I have available!

Please share your finished ACS projects with us in the A Crocheted Simplicity Crochet Community Group on Facebook! Use hashtag #ACrochetedSimplicity when sharing on social media so I can find your posts!
