Crochet Stitch Photo & Video Tutorial | Modified Slst2tog
I can’t knit a stitch to save my life…I tried, I failed, I taught myself to crochet! 🙂
I love crochet and all of the gorgeous stitch patterns that can be created, but I also love a good challenge and the look of knitted garments. So I thought to myself, “What better challenge than to design “Knit-Look” crochet garments & accessories?” This tutorial is for the modified slst2tog and it is the stitch I use most in my “Knit-Look” line. I believe this stitch is the closest crochet stitch that resembles knit. The photo below is of my Men’s “Knit-Look” Reversible Beanie. This design was the first in my “Knit-Look” line and is a classic look for men!

This stitch isn’t complicated, but it will take a minute for you to train your brain to work it. Included in this stitch tutorial is a step-by-step photo tutorial, a video tutorial and a list of the most common mistakes. After working thru both tutorials and the troubleshooting list you should be able to work the modified slst2tog like a pro! 😀
Let’s begin with the written stitch definition!
Modified slst2tog (Mslst2tog): Insert hook into the same st as the last st worked, yo, pull up a loop, insert hook into the next st, yo, pull up a loop and pull it thru both loops on hook.
A Couple Quick Notes:
- In my designs and this tutorial I have abbreviated the modified slst2tog to simply Mslst2tog because typing out modified slst2tog every time is rather redundant.
- I call this a modified slst2tog because you begin each one in the last st worked, therefore, your stitch count will not decrease.
- It will seem as though you’re working these stitches along the backside of the previous row stitches.
That’s it! Easy peasy, right? Well, it is an easy stitch, but there are a couple of tricky things about it that I’ll go over after the photo tutorial.
Click HERE to watch the Video Tutorial
Continue below for a complete photo tutorial.
Shop our affiliates for the perfect project bag!
 ArtBin 6934SA Yarn Drum 12-...Shop on Amazon
Modified Slst2tog Photo Tutorial
*If you’d like to work up a swatch to practice this stitch, chain any number you’d like (15-20 is usually a good number), sc in 2nd ch from hook, sc in each ch across. Continue on to Photo A.
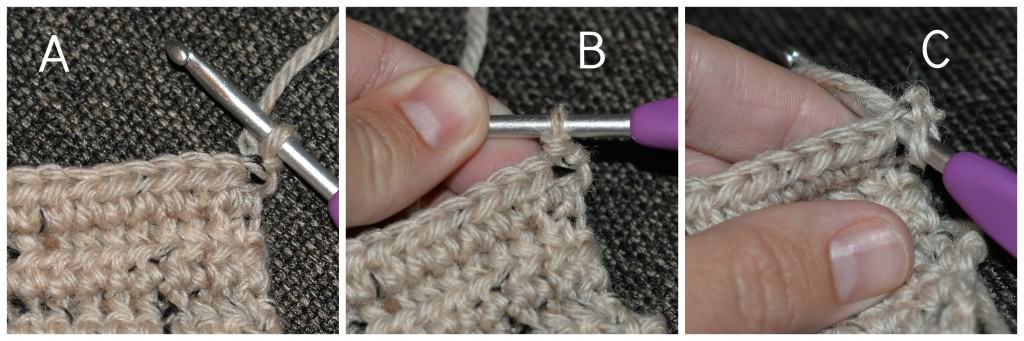
Photo A: Shows the ch 1, Turn, before you begin an even numbered row.
Photo B: Shows a sl st into the first stitch.
Photo C: Begin your first Mslst2tog by inserting your hook into the same st as the last st worked (the sl st from photo B).
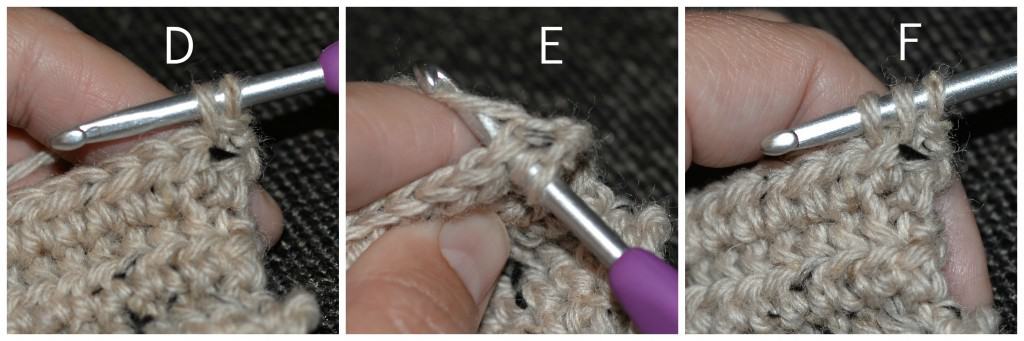
Photo D: Yo, pull up a loop.
Photo E: Insert your hook into the next st.
Photo F: Yo, pull up a loop.
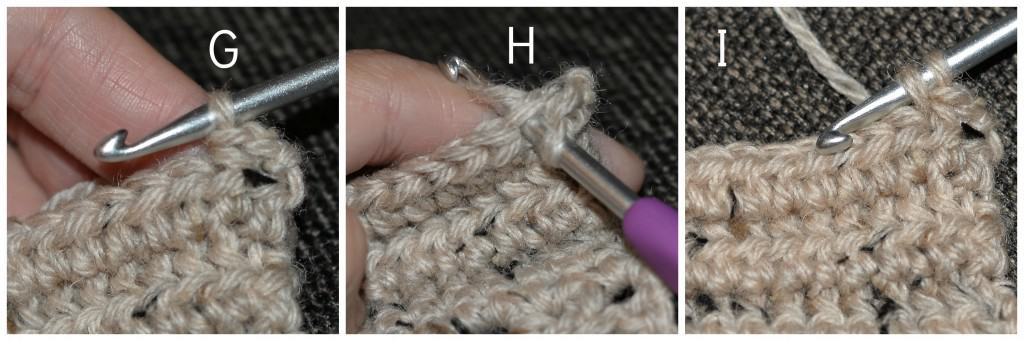
Photo G: Pull thru both loops on hook. (1 Mslst2tog created)
Photo H: Begin the next Mslst2tog (and each additional Mslst2tog) by inserting your hook into the SAME stitch as the previous Mslst2tog, yo.
Photo I: Pull up a loop.

Photo J: Insert hook into next st.
Photo K: Yo, pull up a loop.
Photo L: Pull thru both loops on hook. (2nd Mslst2tog created)
Repeat steps H thru L for each remaining Mslst2tog that the pattern calls for.
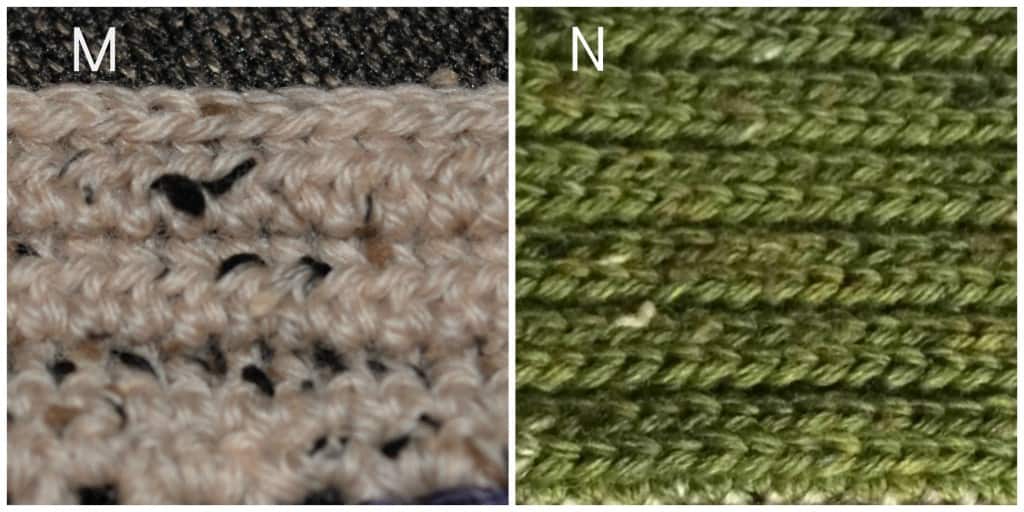
Photo M: This photo shows what the Wrong Side of your work will look like.
Photo N: This photo shows what the Right Side of your work will look like. *Note: Depending on which stitches and hook sizes are used for your odd numbered rows, your “knit-look” ribbing may be spaced further apart.
Troubleshooting
- If you’ve worked thru the step-by-step photo tutorial and the video tutorial and your completed swatch still doesn’t look right, double check to make sure you’re not making 1 of 2 of the most common mistakes below.
- The most common mistake made is adding a “yo” and pulling thru 3 loops on hook to complete the stitch. While this feels like a natural thing to do, DO NOT yo again before completing the stitch. Refer to Photos K & L above.
- The second most common mistake is stitch placement. Make sure you’re beginning each Mslst2tog in the same st as the last st worked. Refer to Photo H above.
Practice the Mslst2tog on the following designs!


This post contains affiliate links.

I hope by now you’re on your way to mastering the modified slst2tog! 😀

Great video tutorial! Love this stitch! Thank you for sharing! I love your patterns, will purchase more in future.
Thank you!
Great tips on modified slip stitch and great tutorial. Very easy to see and follow.
Thanks, Wendy!