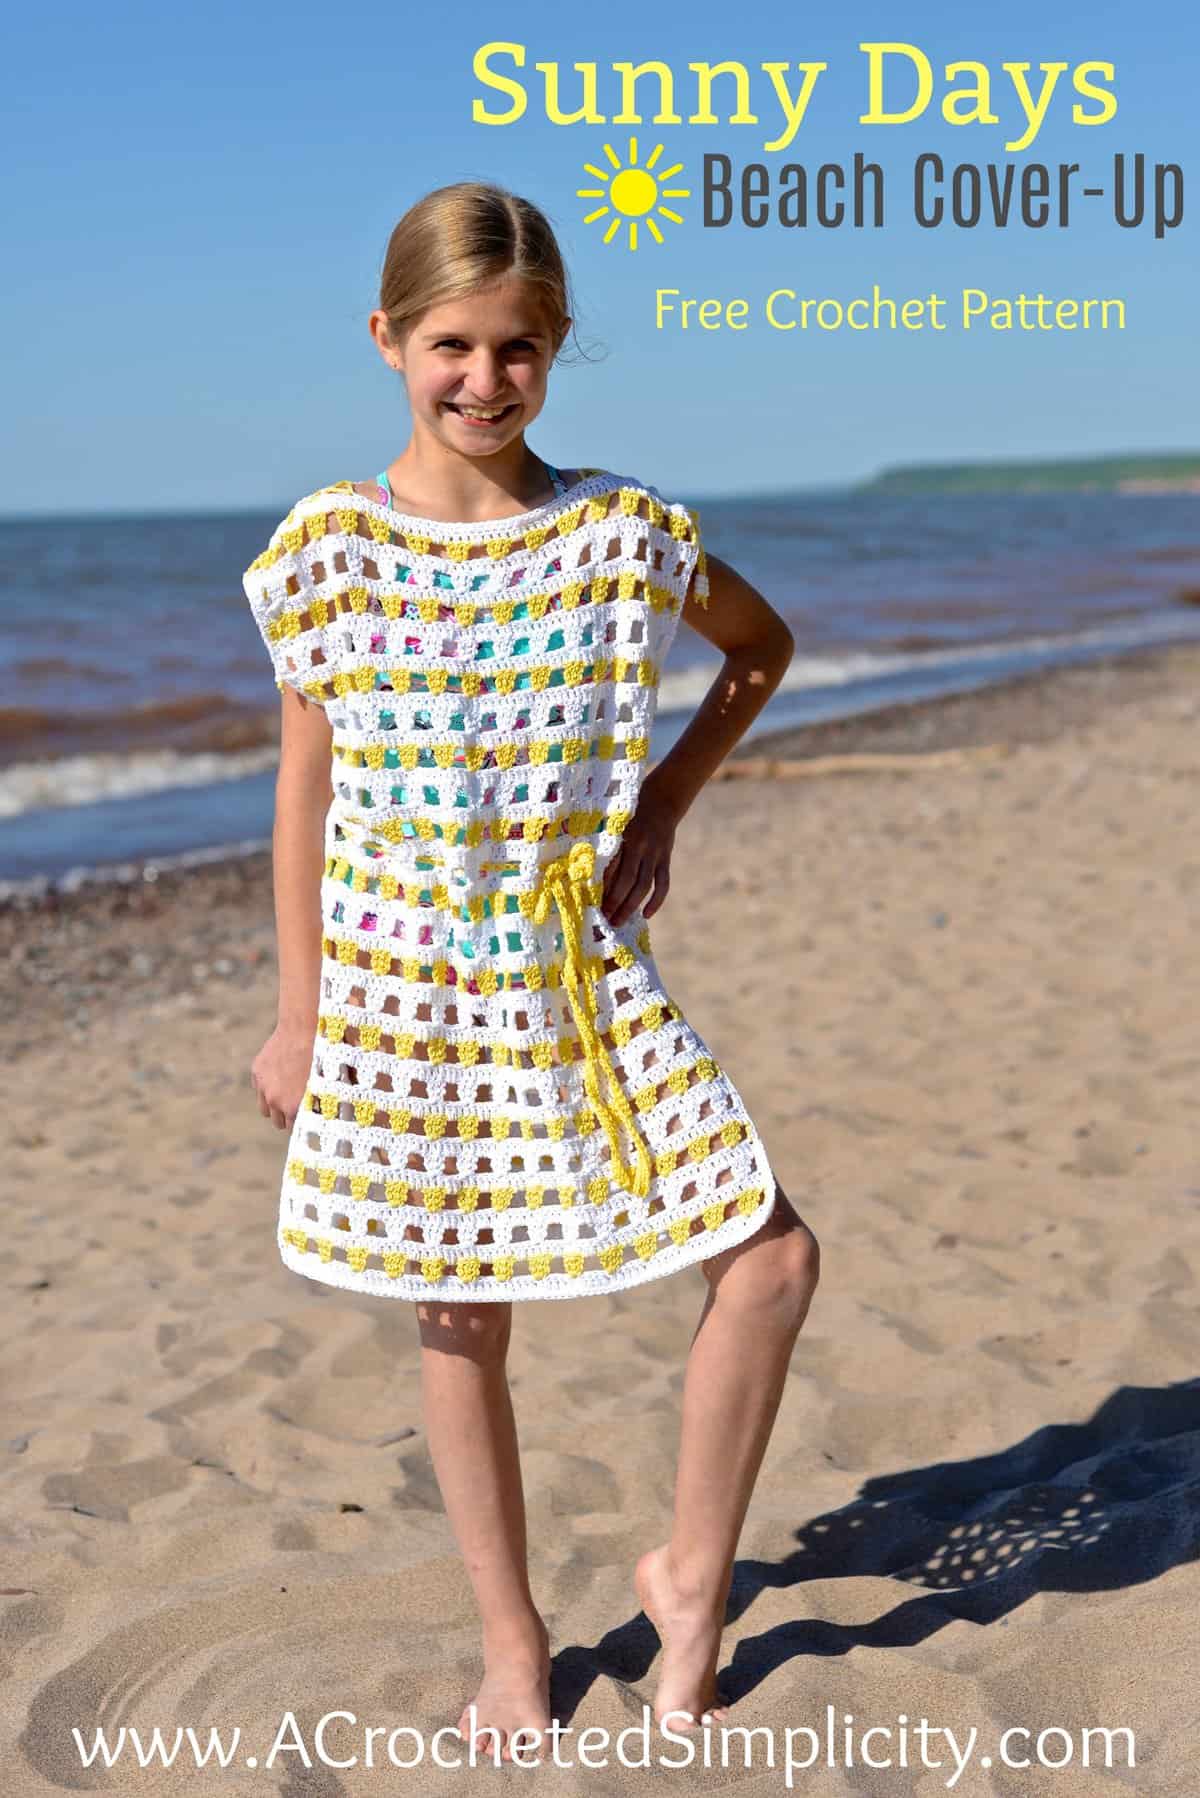
Sunny Days Crochet Beach Cover Up
Summer vacation is just around the corner and now’s the time to finish making those plans! Whether you’re going for a trip abroad, or staying back home and making the most of your time together before your kids head off to college, you’ll need to be summer ready. For those beach days in between, make sure your itinerary has all the necessities including sunscreen, sand tools, water bottles . . . and a crochet beach cover up?
This is one of those items that’s often overlooked and you only remember how important it is when you get to the beach. Having a swimsuit cover up that’s uniquely yours will also set you apart from the crowd! That’s why you should get out your crochet hook and some skeins of yarn to crochet one up for yourself, and your girls, while you still have time.
You’ll find the free beginner-friendly crochet beach cover up pattern in the post below, or you can find an ad-free printable PDF (that includes all photo tutorials) on Ravelry, or Etsy (aff).
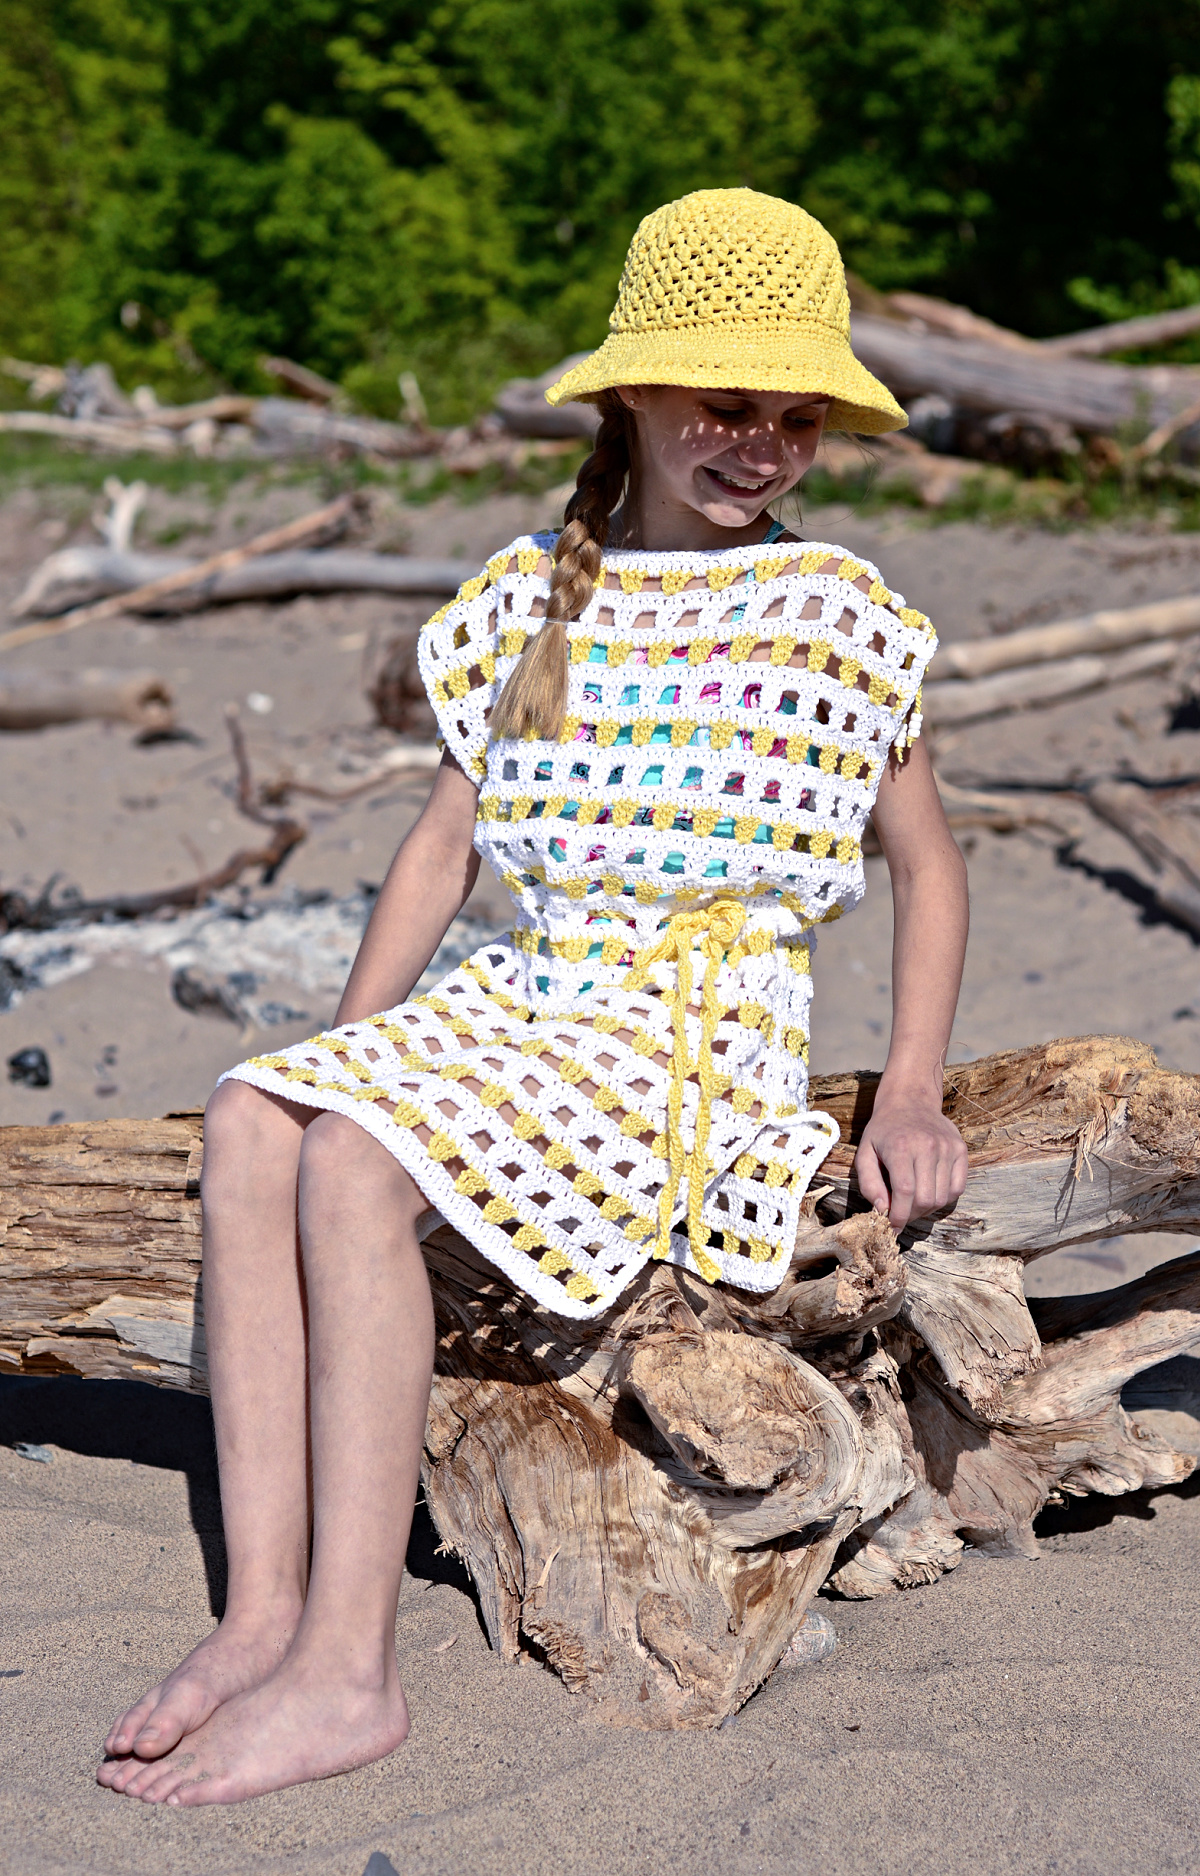
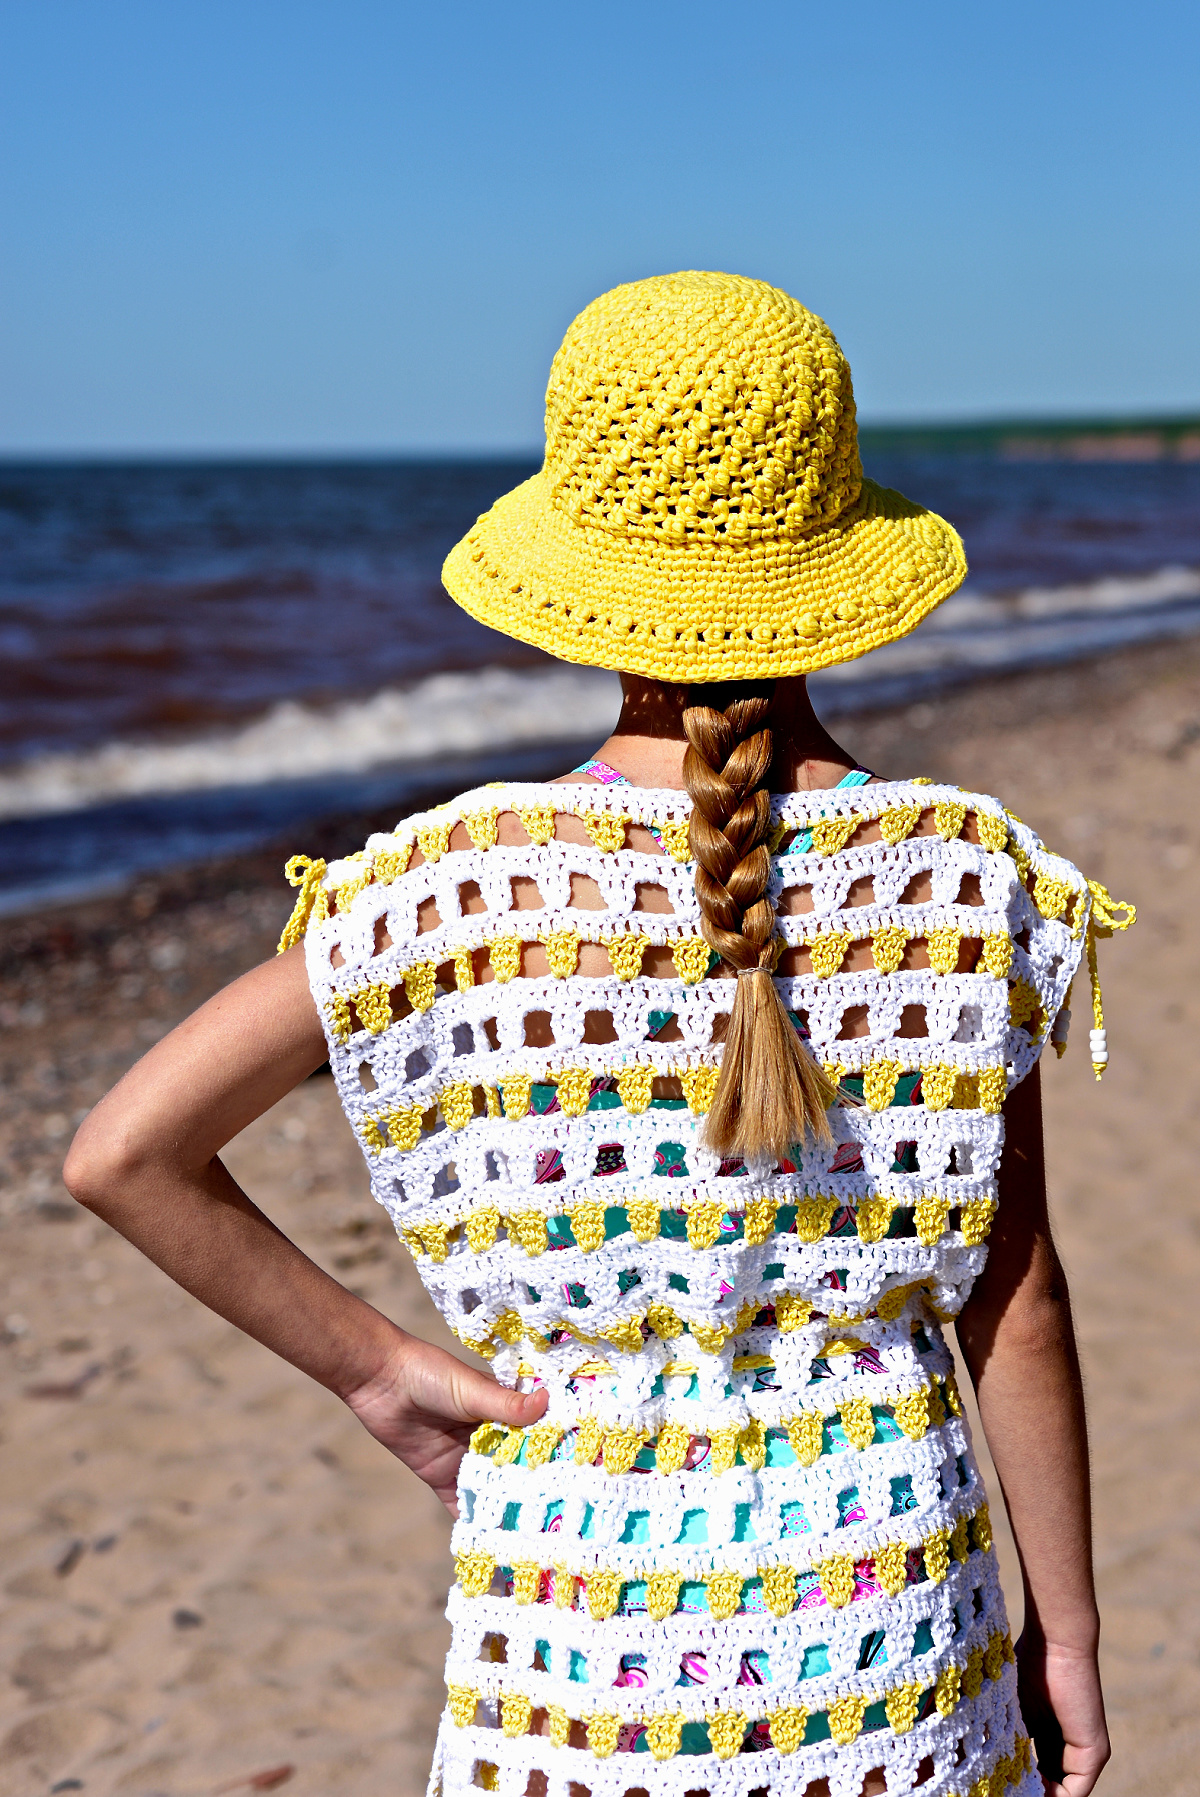
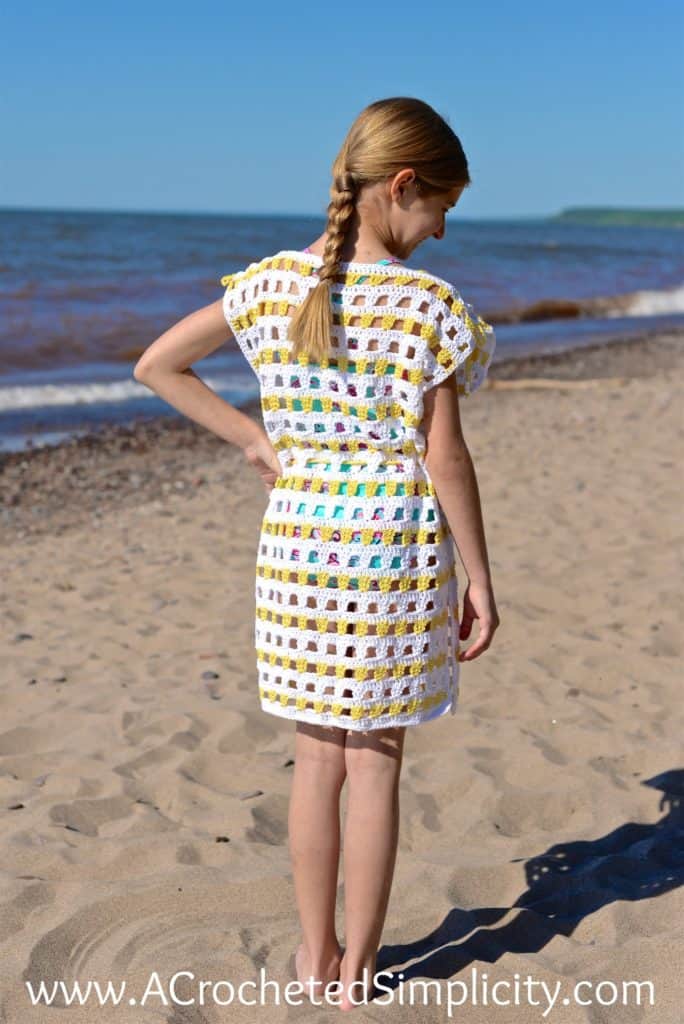
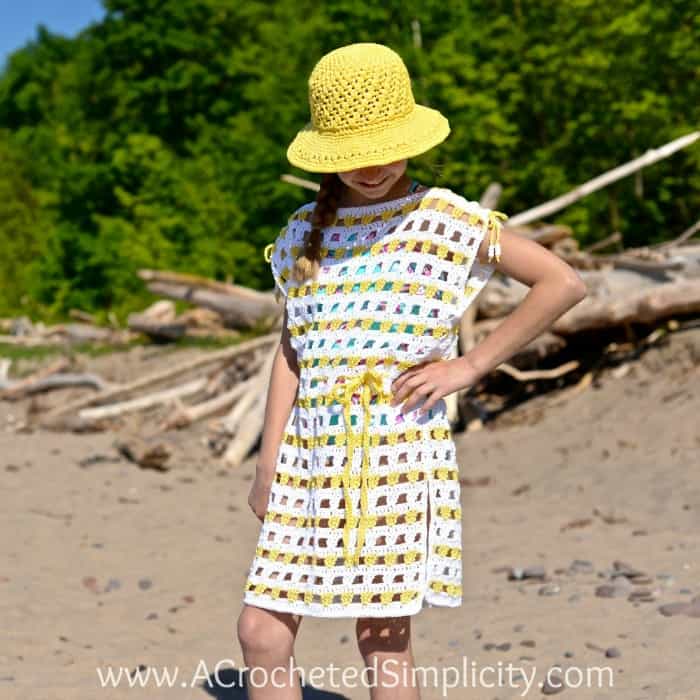
I’ve added some stripes of yellow along with the white of this girls crochet swim cover up and you have the option to do it up as you like. You can stick to the colors I used to stay true to the “sunny days” theme or change it up with a solid or variegated yarn. The final result should be something you love wearing!
And for those who don’t like a lot of seaming and shaping, this is the pattern for you. This crochet beach cover up is worked in one piece which allows you to get just the right length you want.
Related: Looking for a summer accessory to pair with this girls crochet swim cover up? Add the Stop & Rewind Sunhat your to-crochet list!
Why Crochet a Beach Cover Up?
A crochet beach cover up is not only fashionable but also incredibly practical. Here are a few reasons why you should consider making one:
- Easy to Make: This pattern is great for beginners and experienced crocheters alike, requiring only basic stitches that are explained below.
- Customizable: Choose your favorite yarn and color to match your personal style.
- Lightweight and Breathable: This particular openwork crochet design allows for airflow, making it comfortable to wear in warm beach weather.
How to Crochet a Beach Cover Up
This girls crochet swim cover up doesn’t have multiple parts to it. Instead, you’ll start by crocheting up the main panel of the body and then edging it to give it a neat and tidy finish. After this, you’ll seam the sides together.
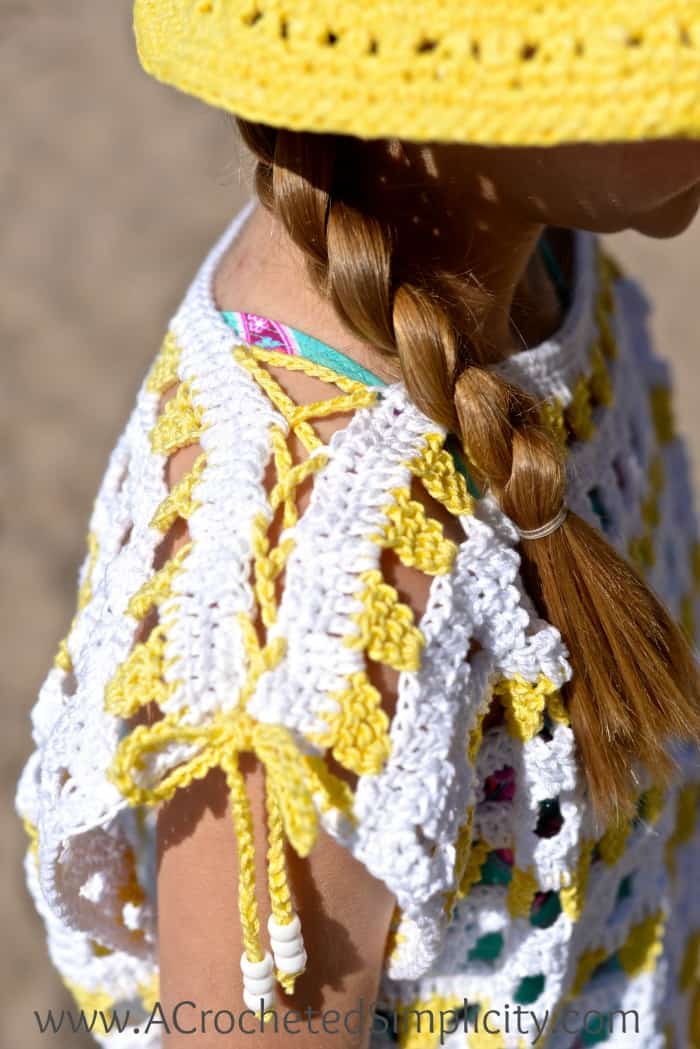
For the shoulders, you’ll crochet ties and weave them in. You have the option of keeping these ties as is or embellishing them with beads and tassels for extra personality. The final piece is the belt which gives the piece some shape and hold its together around the waist area. And you’re ready to hit the beach!
How To Get The
Sunny Days Crochet Beach Cover Up Pattern
Option 1: Scroll down for the free crochet beach cover up pattern right here in this blog post.
Option 2: Purchase the ad-free printable PDF from one of my shops:
Yarn
I used Lion Brand Yarns 24/7 Cotton Yarn for my version of the crochet beach cover up. This is a 100% mercerized cotton yarn. The mercerization process gives the yarn an incredible sheen. It is available in so many wonderful colors that include brights that are perfect for summertime and neutrals which are great for everyday. This yarn can be used for a variety of projects ranging from garments to home decor.
Because it’s a cotton yarn, it’s durable and easy-to-wash, making it ideal for garments that get a lot of wear out of them.
Use ANY Weight Yarn: Written instructions for how to use ANY weight yarn for any of the sizes are included in the Ad-Free PDF.
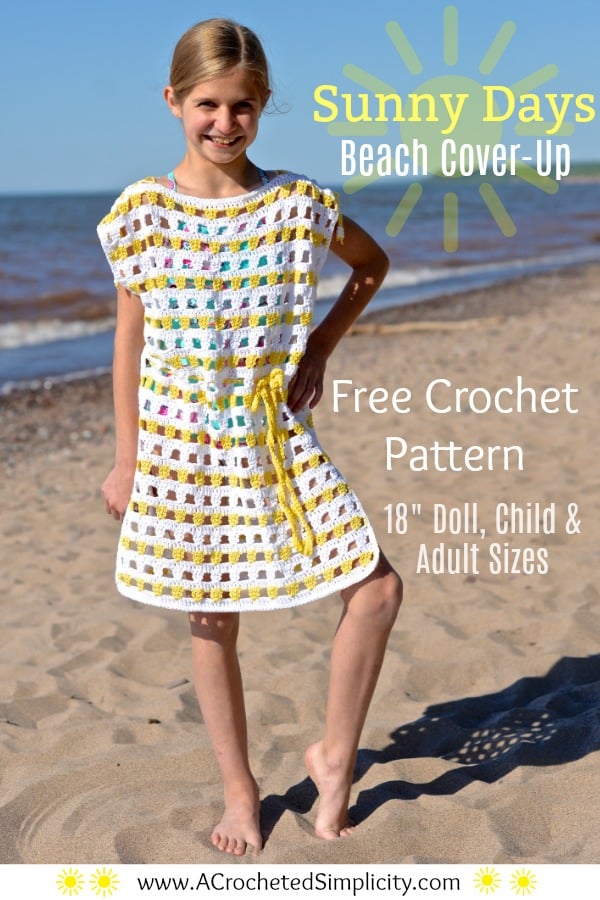
Sunny Days Beach Cover Up Pattern
The crochet beach cover up is a free pattern below, but if you love to work offline, I’ve got a couple other great options for you.
Purchase the ad-free, printable PDF (that includes all photo tutorials), on Ravelry, or on Etsy (aff).
This post contains affiliate links.
Materials
- Yarn: Worsted Weight / 4 / Yarn, Lion Brand Yarns 24/7 Cotton Yarn (100% Mercerized Cotton/ 186 yards / 170 m / 3.5 oz / 100 g) was used for the crochet beach cover up shown in the photos.
- Colors:
- MC: White #761-100
- CC: Lemon #761-157D
- Crochet Hooks: H/8/5.00mm; G/6/4.00mm; or size needed to obtain gauge (My favorite crochet hooks are the Clover Amour Crochet Hooks, I’ve never had an ache in my hand since switching).
- Scissors
- Yarn Needle
- Locking Stitch Marker
- Pony Beads (optional)
Abbreviations (U.S. Terms)
- ch(s): chain(s)
- sl st(s): slip stitch(es)
- sc: single crochet
- dc: double crochet
- tr: treble crochet
- st(s): stitch(es)
- sp(s): space(s)
- Rep: repeat
- Rnd(s): round(s)
- yo: yarn over
- SM: stitch marker
- MC: main color
- CC: contrasting color
- alt-dc: alternate double crochet
- alt-tr: alternate treble crochet
Gauge
- In dc, using a 5mm hook: 18 sts = 4.25″
- In Stitch Pattern as written Rows 1 – 5 = 3″ (not crucial)
- Row Height Gauge is not crucial for this project.
Experience Level
- Easy / Intermediate
Size
- 18″ Doll – 15″
- Toddler – 27″
- Child Small (29.5″), Child Large (34″), Child X-Large (38.5″)
- Women’s XS/S (41″), M/L (50.5″), XL/2X (57.5″), 3X/4X (69.5″)
Special Stitches
- Alternate Double Crochet (alt-dc): After turning your work, do not ch, instead, insert your hook into the first st, yo, pull up a loop, yo, pull thru both loops, insert your hook between the legs of the st just made, yo, pull up a loop, yo, pull through one loop, yo, pull through remaining loops.
- Alternate Treble Crochet (alt-tr): After turning your work, do not ch, instead, insert your hook into the first st, yo, pull up a loop, yo, pull thru both loops, insert your hook between the legs of the st just made, yo, pull up a loop, yo, pull thru both loops, insert your hook between the legs of the st just made, yo, pull up a loop, yo, pull through one loop, yo, pull thru remaining loops.
Pattern Notes
- I tend to crochet on the tighter side. You may need to go down a hook size (or two) to meet gauge if you crochet on the looser side.
- Beginning chain(s) are not included in stitch count, unless noted otherwise.
- Yarn Notes: Lion Brand Yarns 24/7 Cotton Yarn (100% Mercerized Cotton/ 186 yards / 170 m / 3.5 oz / 100 g) was used for the sample shown in the photos.
- Yardage & Color
- MC (White): 140 / 440 (520, 600, 720) / 840 (1,060, 1,280, 1,580) yards
- CC (Lemon): 60 / 180 (200, 220, 260) / 420 (520, 630, 790) yards
- Changes for Sizes as Follows: 18″ Doll / Toddler (Child Small, Child Large, Child X-Large) / Adult XS/S (Adult M/L, Adult XL/2X, Adult 3XL/4XL)
- Use ANY weight yarn: You can use any weight yarn and desired hook size. The complete instructions for this are given in the PDF.
- Construction Notes: Beach cover-up is constructed by making 2 rectangular panels, partially seaming each side, and adding a lace tie to create each shoulder seam. Shoulders can be seamed instead of joined with a lace tie, if preferred.
Sunny Days Crochet Beach Cover Up – Free Crochet Pattern
Body of Cover Up
Note on Changing Colors: I chose to work 1 of every 4 rows in CC. I cut my yarn at the end of every color change and wove in ends as I worked.
Row 1 (RS): Using MC & a 5.00mm crochet hook, ch 34 / 59 (64, 74, 84) / 89 (109, 124, 149) switch to a 4.00mm crochet hook, working in the back hump of the foundation ch, dc in the 3rd ch from your hook, dc in each ch across. Turn. 32 / 57 (62,, 72, 82) / 87 (109 , 122, 147) sts
Row 2 (CC): Alt-tr, ch 1, skip the next 2 sts, 3 tr in next st, *ch 2, skip the next 4 sts, 3 tr in next st, rep from * across to the last 3 sts, ch 1, skip the next 2 sts, tr in the last st. Turn. *Chains count as stitches.
Row 3 (MC): Alt-dc, dc in the next ch-1 sp, dc in each of the next 3 sts, *2 dc in the next ch-2 sp, dc in each of the next 3 sts, rep from * across to the last ch-1 sp, dc in the next ch-1 sp, dc in the last st. Turn.
Row 4 (MC): Alt-tr, ch 1, skip the next 2 sts, 3 tr in next st, *ch 2, skip the next 4 sts, 3 tr in next st, rep from * across to the last 3 sts, ch 1, skip the next 2 sts, tr in the last st. Turn.
Row 5 (MC): Alt-dc, dc in the next ch-1 sp, dc in each of the next 3 sts, *2 dc in the next ch-2 sp, dc in each of the next 3 sts, rep from * across to the last ch-1 sp, dc in the next ch-1 sp, dc in the last st. Turn.
Rep Rows 2 – 5, ending w/ either a Row 3 or Row 5 rep, until work measures: 10″ / 17″ (21″, 26″, 29″) / 34″ (34″, 36″, 36″)
Do not fasten off. Continue on to Panel Edging. Complete edging then make the second panel.
Panel Edging
Note: Do not turn at the end of the last row of the panel. Instead, rotate your work to begin working the edging into the sides of the rows. Stitch count isn’t crucial for this part.
Tip: When working into the sides of the stitches on the two vertical edges, work your stitches into the middle of the stitches and not around them. Doing so will give your edging a cleaner look.
Rnd 1 (RS): Continuing on from panel, rotate to begin working into the sides of the rows along the first vertical edge, work 2 sc into the side of each dc and 3 sc into the side of each tr along edge, rotate to work into the bottom of the foundation ch from Row 1, sc in each st across bottom edge, rotate to work into the sides of the rows along the opposite vertical edge, work 2 sc into the side of each dc and 3 sc into the side of each tr along edge, rotate to work into the top edge, sc in each st across. Join w/ a sl st to the 1st st.
Fasten off. Weave in ends. Complete second panel then continue on to Side Seams.
Side Seams
Step 1: Measure down from the top edge for armhole depth and place a SM. 3″ / 6.5″ (7.25″, 8.25″, 9.25″) / 9.25″ (10.25″, 11.25″, 12.25″)
Step 2: Measure up from the bottom edge for split hem height and place a SM. 2.5″ / 5.5″ (6.5″, 8″, 8.5″) / 9″ (9″, 10″, 10″)
Step 3: Seam side of cover-up between the 2 SM using a mattress stitch seam.
Weave in ends. Continue on to Shoulder Tie, or seam shoulders using mattress stitch seam.
Shoulder Tie (Make 2)
The shoulder seams of the beach cover-up in the photos are created using chain ties. The ties lace the shoulders together.
Doll Size: Do not use a chain tie, use only a single strand of yarn as a tie.
Tie: Using a 4.00mm crochet hook, ch until tie measures: XX / 19″ (22″, 27″, 33″) / 33″ (44″, 50″, 61″)
Fasten off.
Lace each shoulder the following width: 2″ / 3.5″ (4″, 5″ 6″) / 6″ (8″, 9″, 11″)
After lacing, add 3 beads to both ends of each tie, if desired. Knot tie ends to secure beads. Continue on to Belt, if desired.
Belt
Belt: Using a 4.00mm crochet hook, ch a length that is double the width of your cover-up plus 18-24″ to give you enough to tie into a bow, sc in the 2nd ch from your hook and in each ch across.
Fasten off. Weave in ends. Weave belt in and out of every ch-2 sp in a Row 2 or 4 repeat.
I MADE IT! NOW WHAT?
Pin this post!: Save this crochet beach cover up pattern to your Pinterest boards so that you can come back and make it again.
Leave a comment below: We love to hear your feedback.
Share Your Finished Projects on Facebook or Instagram: I love to see your finished projects! Share with us on social media and tag me @acrochetedsimplicity or use the hashtag #ACrochetedSimplicity so I can find your posts.
Join us in the Facebook Community Group!
Come share your finished projects with us in the A Crocheted Simplicity Crochet Community Group on Facebook. Join us for fun community events such as crochet alongs, join in on crochet conversations, ask questions, get advice, and share your love for crochet!

Looking for More Crochet Patterns?
Check out our other free crochet patterns for scarves/shawls, hats, and cozy accessories.
More Free Crochet Summer Patterns
Very good
Very nice! I am in love with this crochet beach cover-ups. I can’t wait to try this. Thanks for sharing the great article.