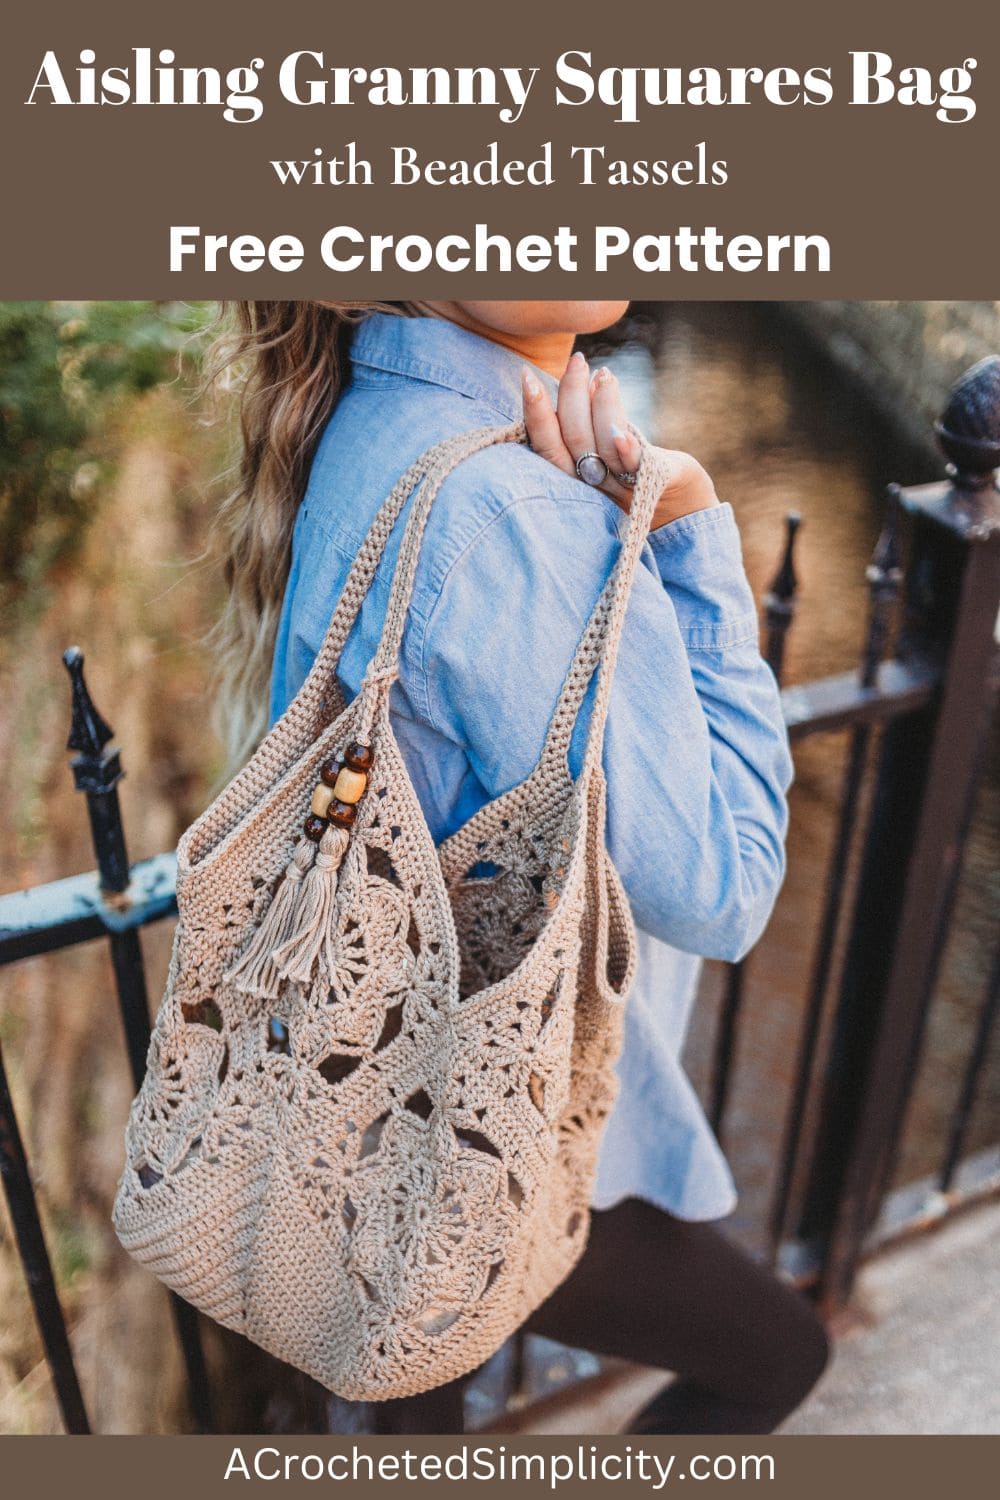
Aisling Granny Squares Bag
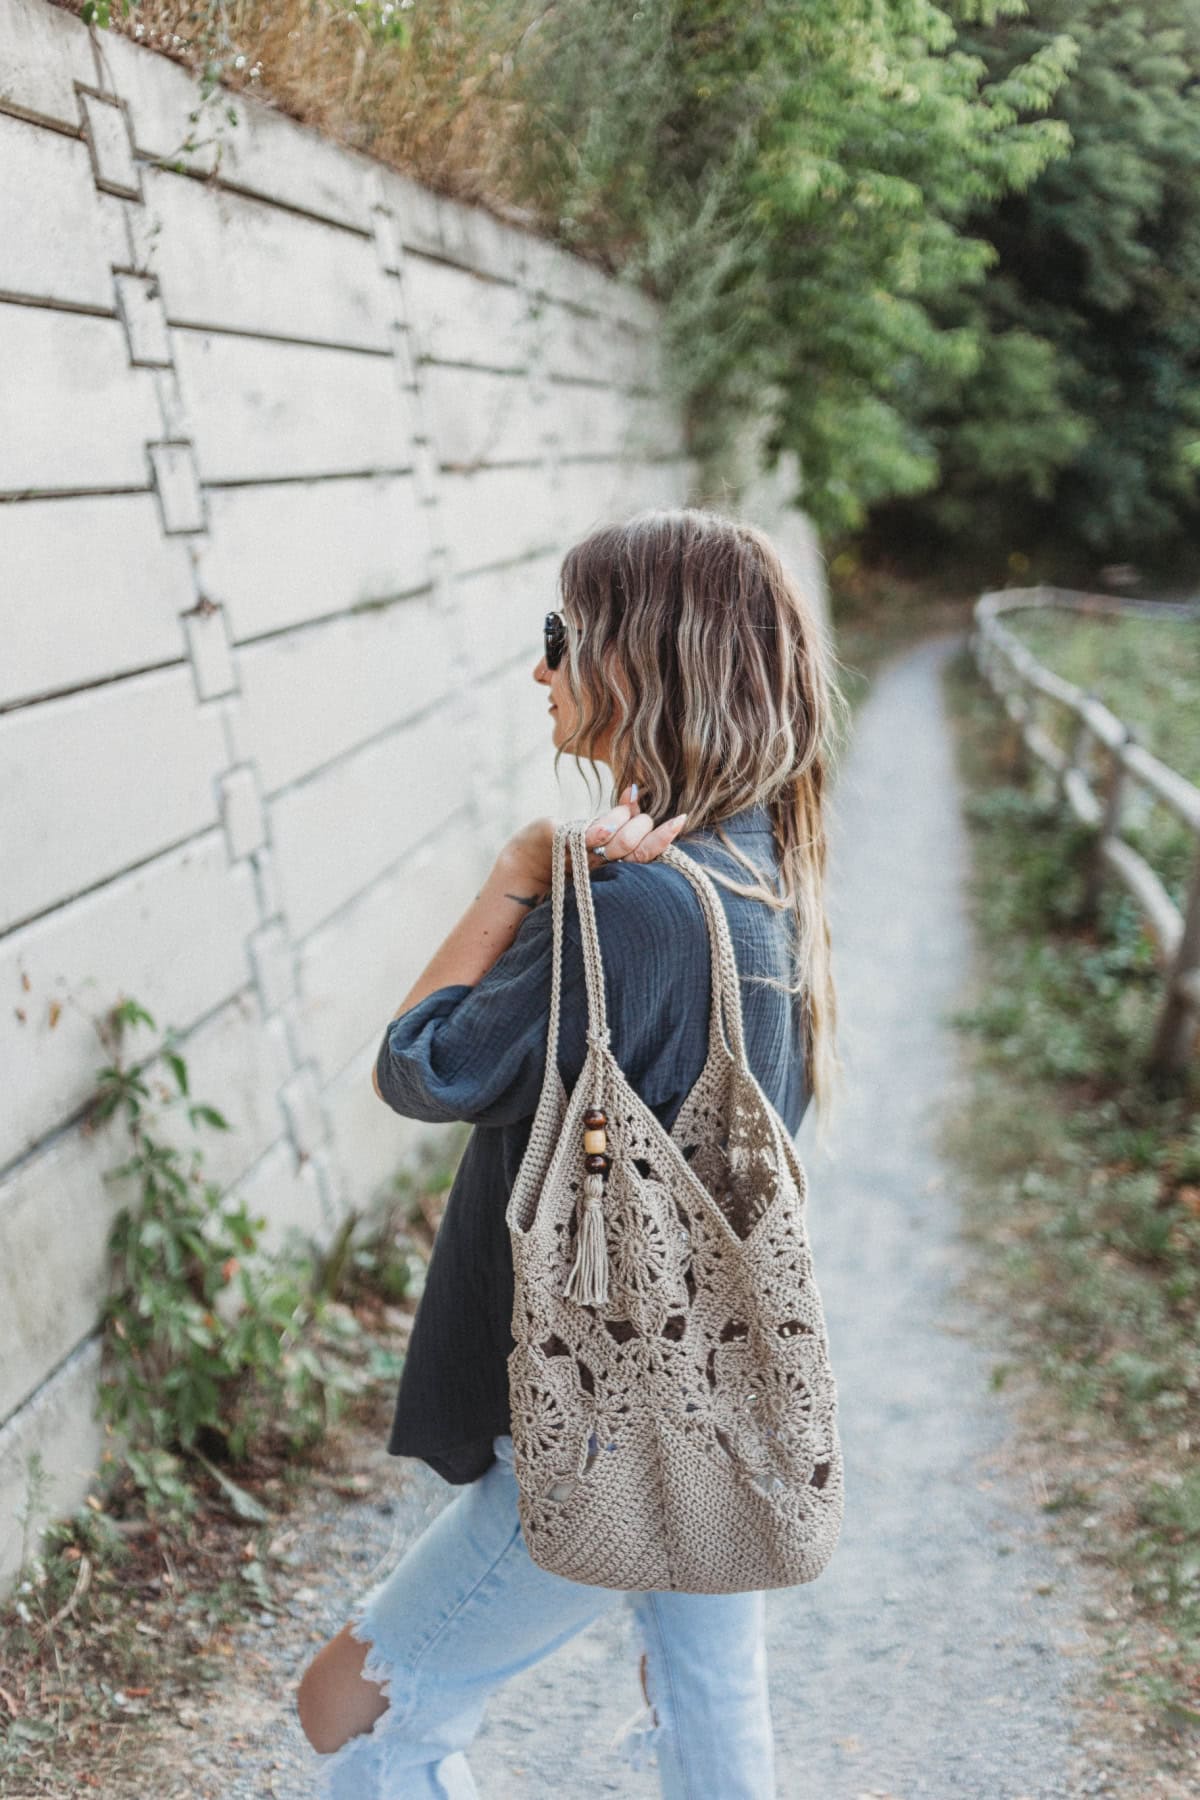
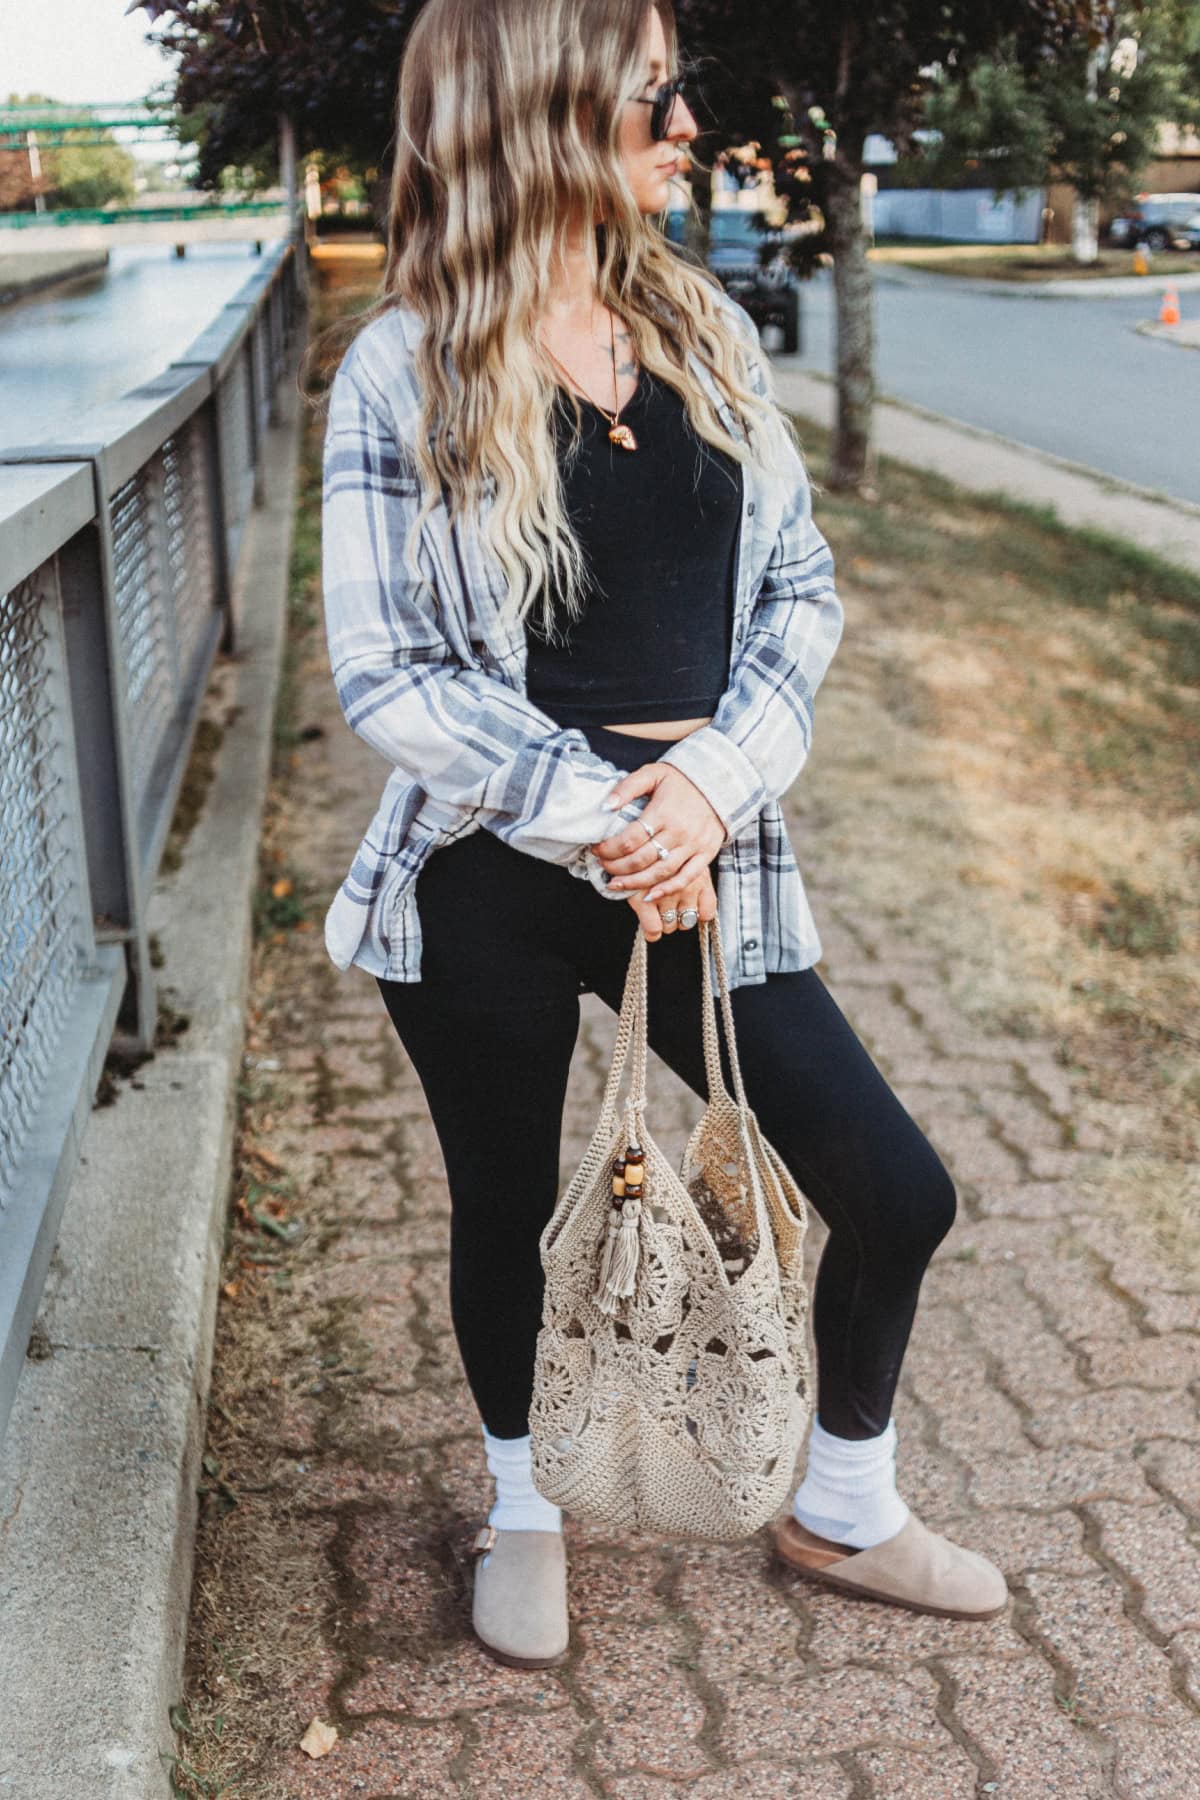
A granny squares bag is that perfect accessory for when you need a large enough bag to hold all of your essentials but not too big to clash with your outfit.
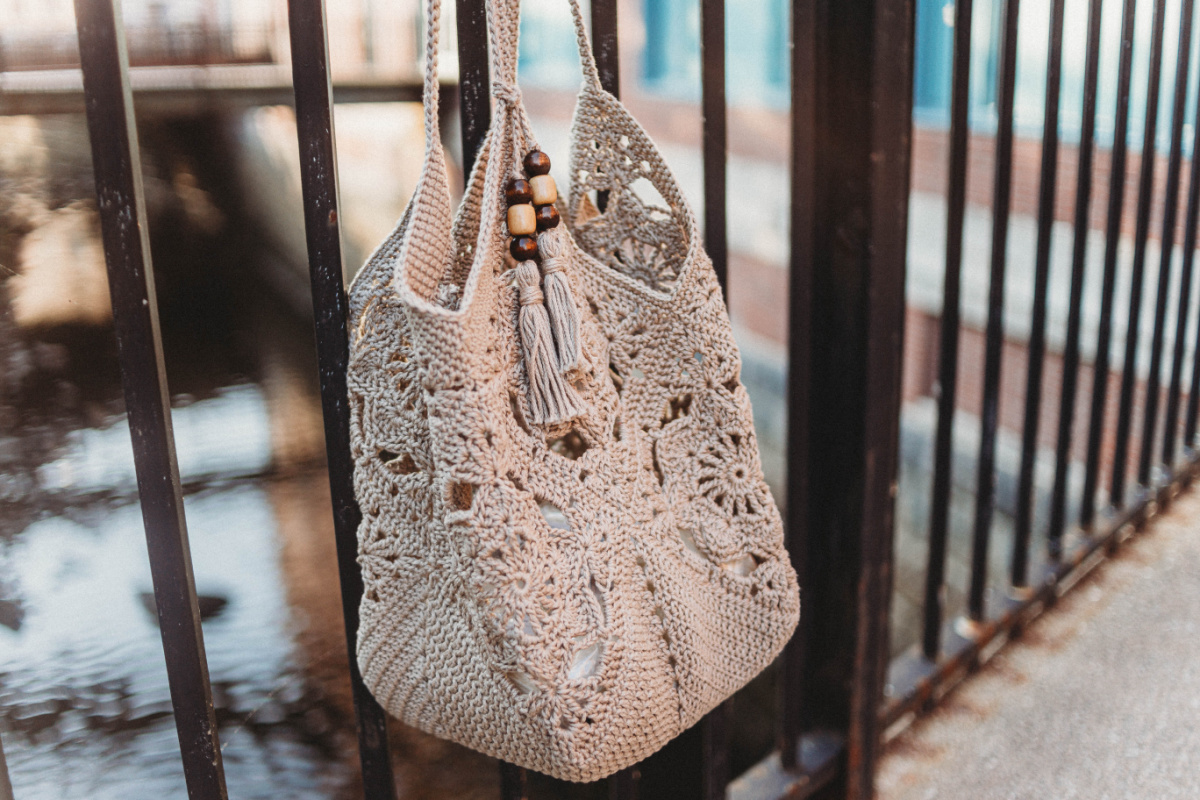
You can work on the motifs on the go before seaming them all together and adding beautiful beaded tassels as the finishing touch.
You’ll find the free crochet tote bag pattern in the post below, or you can find an ad-free printable PDF (that includes all photo tutorials + 2 BONUS stitch charts), on Ravelry, or Etsy (aff).
While I’ve added beaded tassels to my granny squares bag, you can choose to embellish it however you’d like. That’s the great part about crochet — every item you make can be personalized in whichever way suits you most! Get your creative gears turning on how to make this bag truly yours.
This pattern is part of the Granny Square Day Crochet Along hosted by myself and Blackstone Designs.
How to Crochet a Bag
For those who don’t love carrying around big projects wherever they go, this is a great project to work on because it’s made in pieces. This granny squares bag is constructed with eight six-inch motif squares and one twelve-inch double crochet square.
After crocheting the squares, you’ll whipstitch seam the six-inch squares together in the specified layout. Next, you’ll whipstitch the large square onto the smaller squares to form the base of the bag which gives it that sturdiness to hold all of your items.
Then, you’ll crochet around the top edge of the bag and create simple bag straps to pull everything together neatly. An optional last step is to make beaded tassels to embellish your granny squares bag.
How To Get The
Aisling Granny Squares Bag Pattern
Option 1: Scroll down for the free tote bag crochet pattern right here in this blog post.
Option 2: Purchase the ad-free printable PDF from one of my shops:
Best Yarn for Crochet Bags
I typically recommend using 100% cotton yarn for a crochet bag for several reasons:
- Cotton yarns are soft and durable.
- Cotton yarns don’t pill easily.
- They hold up well to several washes in a washing machine.
- They show crochet stitch definition really well.
- They keep their shape.
- They don’t snag easily.
- They’re fairly inexpensive.
My second favorite yarn to crochet a bag with is 100% worsted weight wool, but keep in mind that animal fibers have a tendency to felt. And my third choice is double stranded acrylic yarn with a smaller hook than what’s recommended on the yarn label (because acrylic is stretchier).
If you’re going to line a crochet bag with fabric, you can use any yarn you’d like because the fabric will bear the weight of the items you place in the bag.
Related: If you love spacious crochet tote bags, you may also love the Lille Shoulder Bag.
Yarn
Since I love to use cotton for crochet bags, for the Aisling Granny Squares Bag, I chose Lion Brand Yarn 24/7 Cotton which is 100% mercerized cotton.
For the beige colored bag shown in the photos, I chose the shade Taupe. This collection is known for both its sheen and structure which remain no matter how much you wash and wear out your project. Since it’s machine washable, your handmade tote bag can easily get a lot of use before you clean it.
The weight of this yarn give it a firmness and density that help the bag hold its shape better compared to lighter yarns.
Aisling Granny Squares Bag – Free Pattern
The crochet granny squares bag pattern is free below, but if you love to work offline, I’ve got a couple other great options for you.
Purchase the ad-free, printable PDF, (that includes all photo tutorials + 2 BONUS stitch charts), on Ravelry, or on Etsy (aff).
This post contains affiliate links.
Materials
- Yarn: Worsted Weight / 4 / Yarn, Lion Brand Yarn 24/7 Cotton in Taupe was used for the sample in the photos [100% Mercerized Cotton (186 yds / 170 m / 100 g / 3.5 oz)].
- Yardage and Color:
- Taupe: #761-122 / 550 – 560 yards
- Crochet Hook: G/6/4.00mm or size needed to obtain gauge (My favorite crochet hooks are the Clover Amour Crochet Hooks, I’ve never had an ache in my hand since switching).
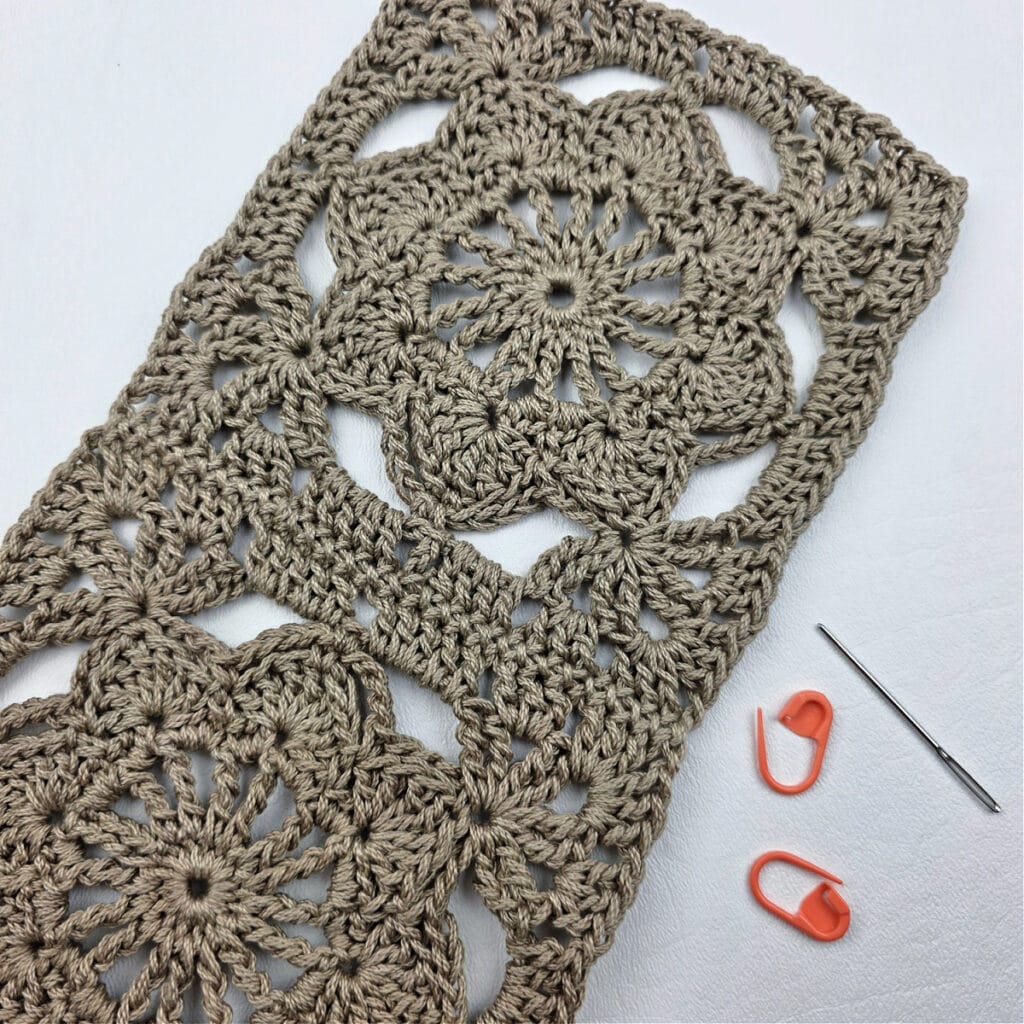
- Measuring Tape
- Locking Stitch Markers
- Scissors
- Yarn Needle
- (6) Wooden Beads (optional)
Abbreviations (US Terms)
- ch(s): chain(s)
- sl st(s): slip stitch(es)
- st(s): stitch(es)
- sc: single crochet
- dc: double crochet
- sc2tog: single crochet decrease
- Alt-tr: alternate treble
- Rep: repeat
- RS: right side
- SM: stitch marker
- Rnd: round
- yo: yarn over
- sp: space
- Special Join Technique
Experience Level
- Easy / Intermediate
Gauge
- Measurements given throughout pattern.
Sizes
- 8″ W x 8″ L x 12″ H (not including straps)
Special Stitches
- Alternate Treble Crochet (alt-tr): After turning your work, do not ch, instead, insert your hook into the first st, yo, pull up a loop, yo, pull thru both loops, insert your hook between the legs of the st just made, yo, pull up a loop, yo, pull thru both loops, insert your hook between the legs of the st just made, yo, pull up a loop, yo, pull through one loop, yo, pull thru remaining loops.
- Join with a standing single crochet: Begin with a slip knot on your hook, insert your hook into the stitch or space indicated, yo, pull up a loop, yo and draw thru both loops on hook.
Pattern Notes
- Turning chains are not included in stitch count unless noted otherwise.
- Yarn Notes: Lion Brand Yarn 24/7 Cotton (3.5oz / 100 g / 186 yards / 170 meters / 100% mercerized cotton) was used for the samples. Another comparable worsted weight yarn may be substituted.
- Yardage & Color:
- Taupe: #761-122 / 550 – 560 yards
- Construction Notes: This bag is constructed with (8) six inch motif squares and (1) twelve inch double crochet square. After crocheting the squares, you’ll whipstitch seam the six inch squares together in the specified layout. Next, you’ll whipstitch the large square onto the smaller squares to form the base of the bag. Then, you’ll crochet around the top edge of the bag and create simple bag straps. An optional last step is to make beaded tassels to embellish the granny squares bag.
Aisling Granny Squares Bag – Written Pattern
6″ Motif Square – Make 8
In this section, you’ll crochet eight motif squares that will later become the sides of your granny squares bag.
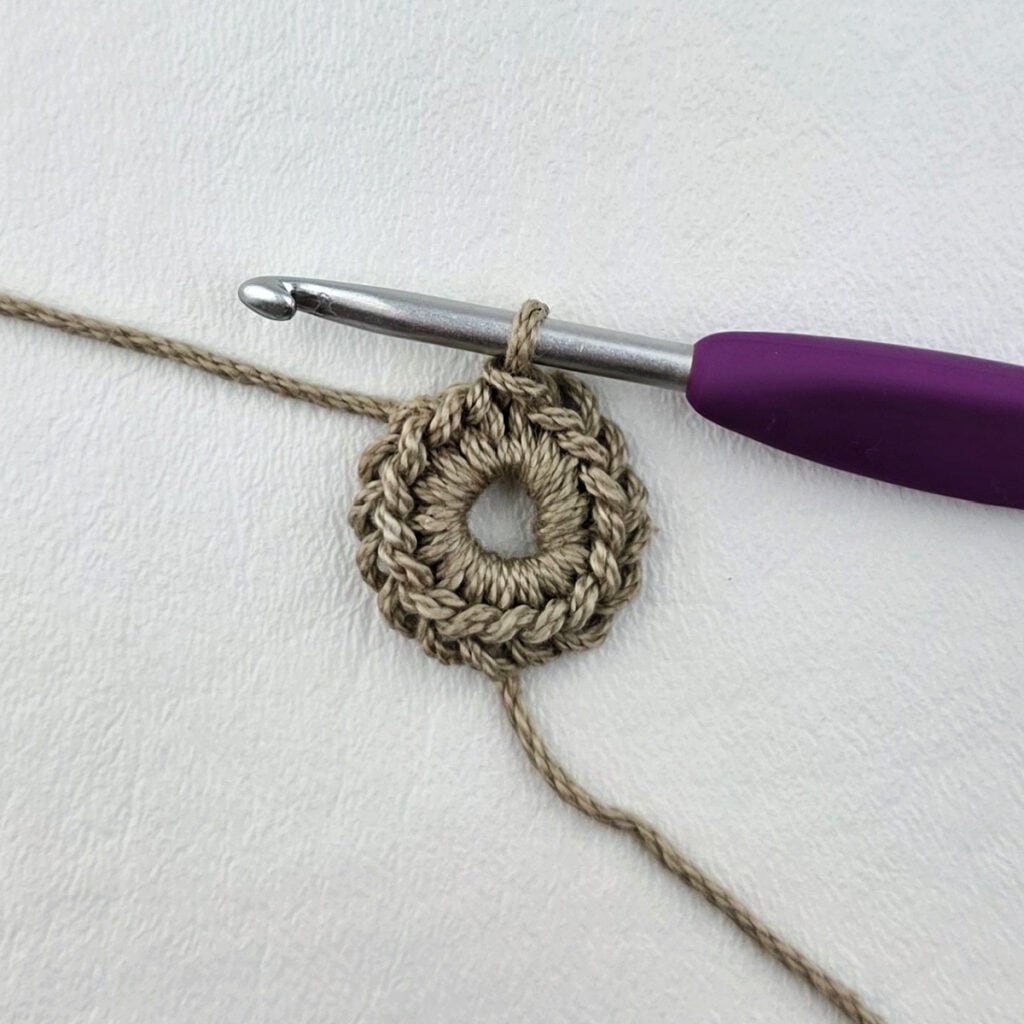
Set-Up: With yarn and a 4.00mm crochet hook, ch 4. Join with a sl st to the 1st ch to form a circle.
Note: If you have a hard time fitting the Rnd 1 sts into your ch-4 circle, use a magic ring for your set-up instead. Either method works.
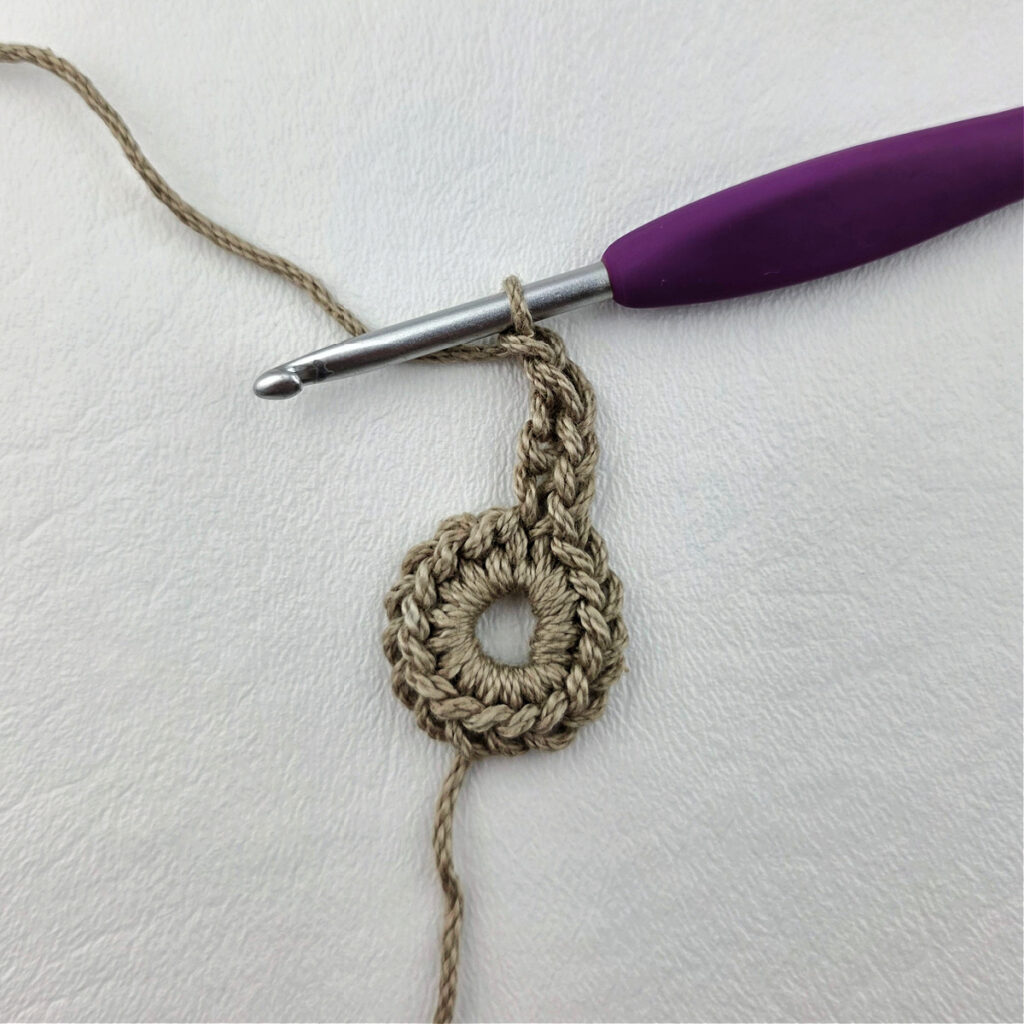
Rnd 1 (RS): Ch 1, work 16 sc into the circle. Join with a sl st to the 1st sc. (16 sts)
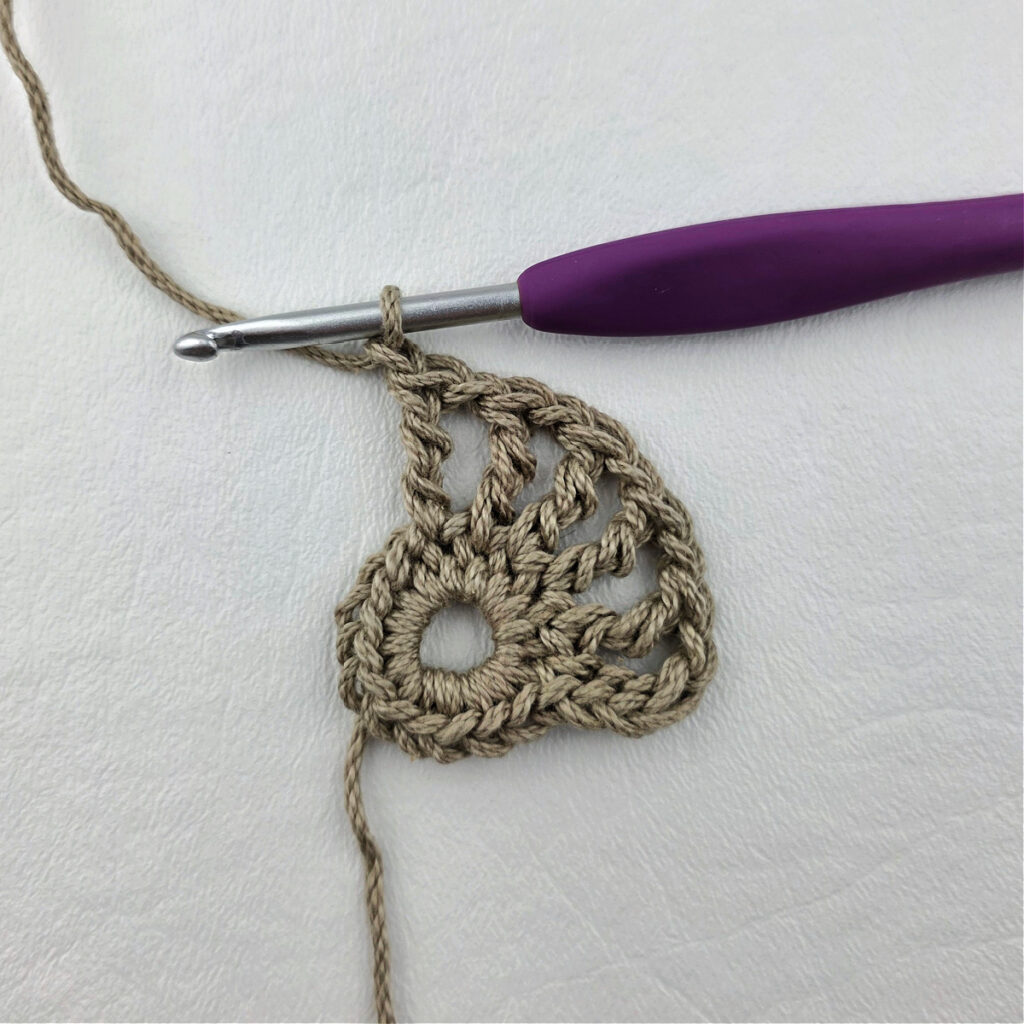
Rnd 2: Alt-tr in the first st, ch 1, (tr, ch 1) in each st around. Join with a sl st to the alt-tr. (32 sts)
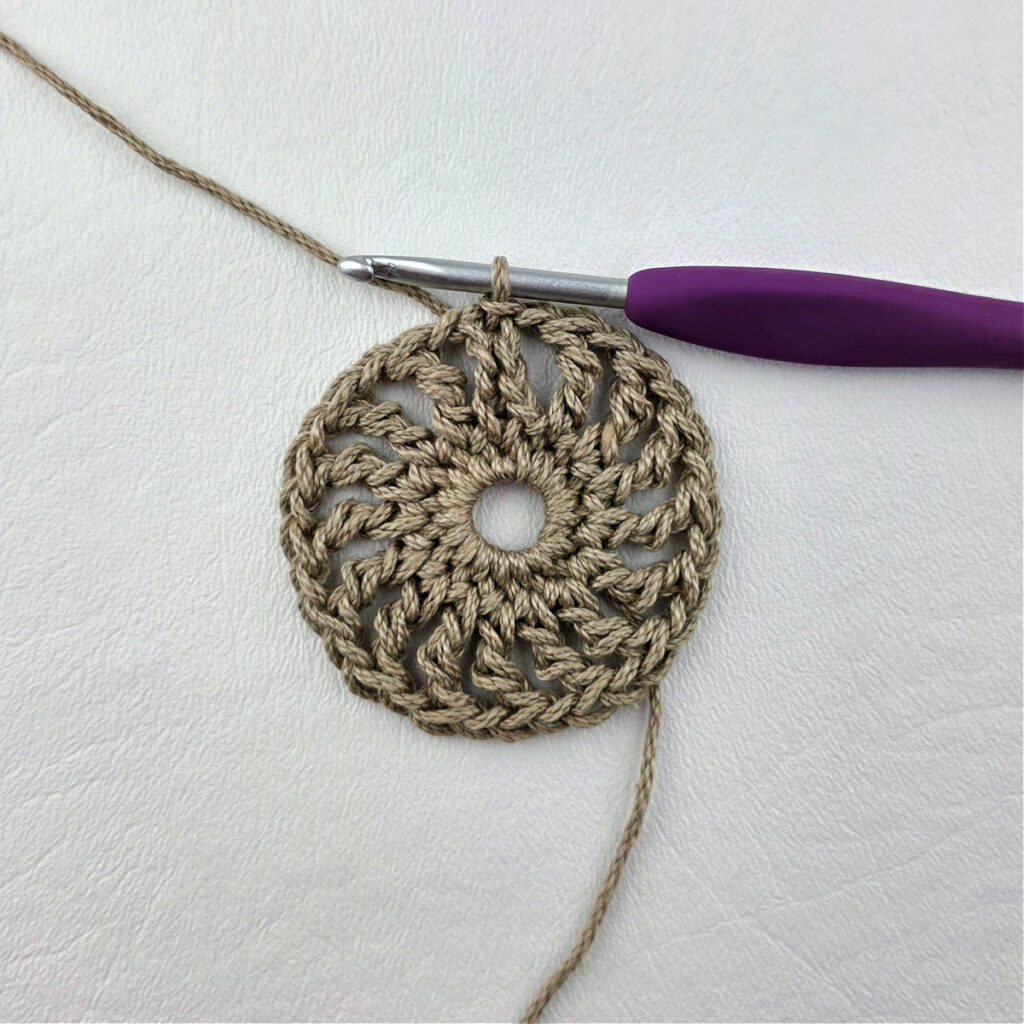
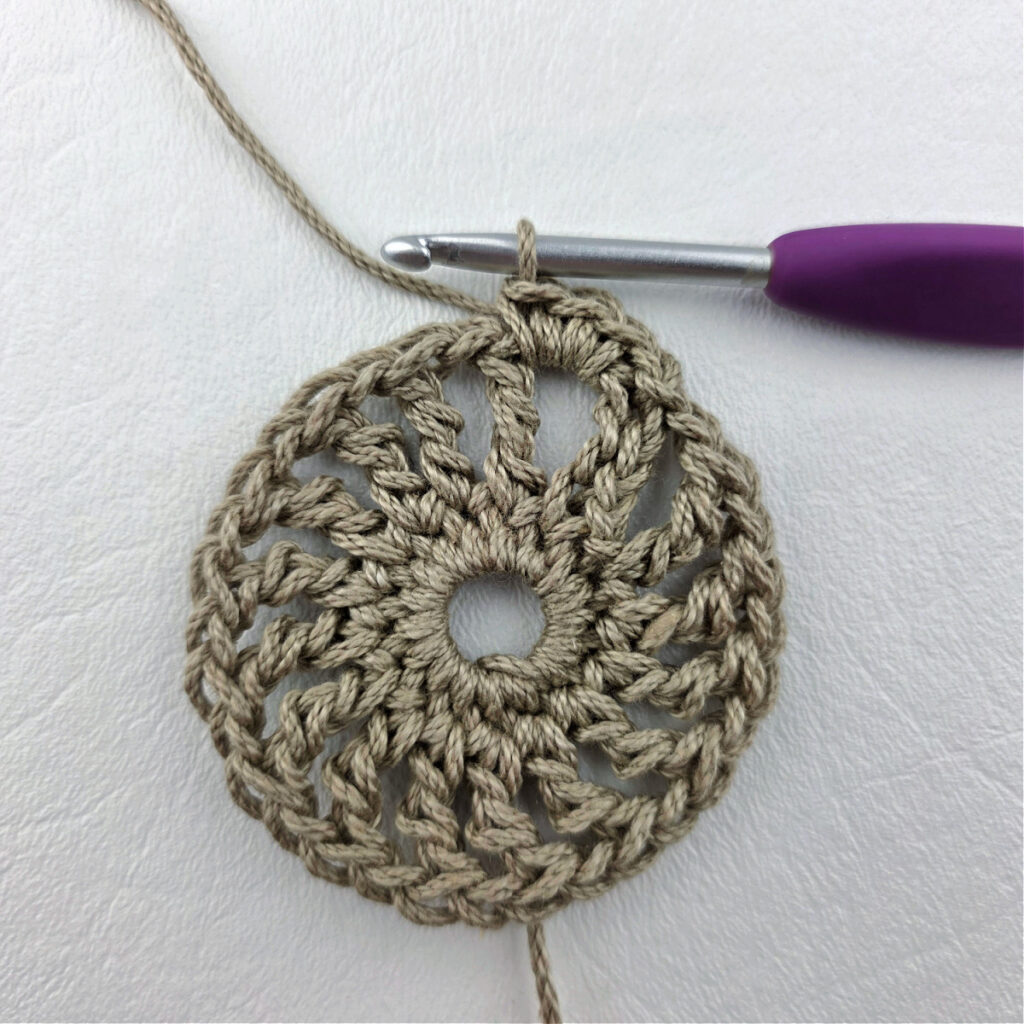
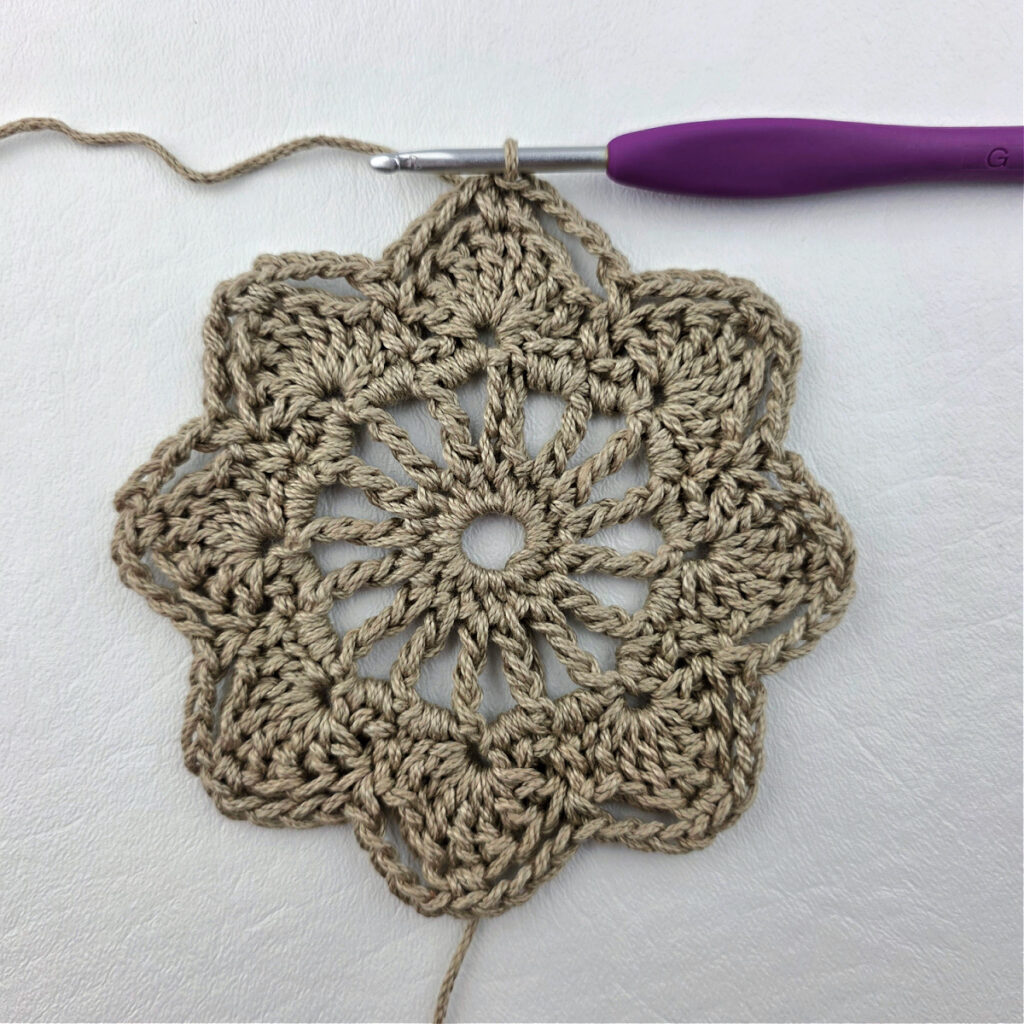
Rnd 3: Ch 1, skip the first st, work 3 sc in each ch-1 sp around, skipping over each tr. Join with a sl st to the 1st sc. (48 sts)
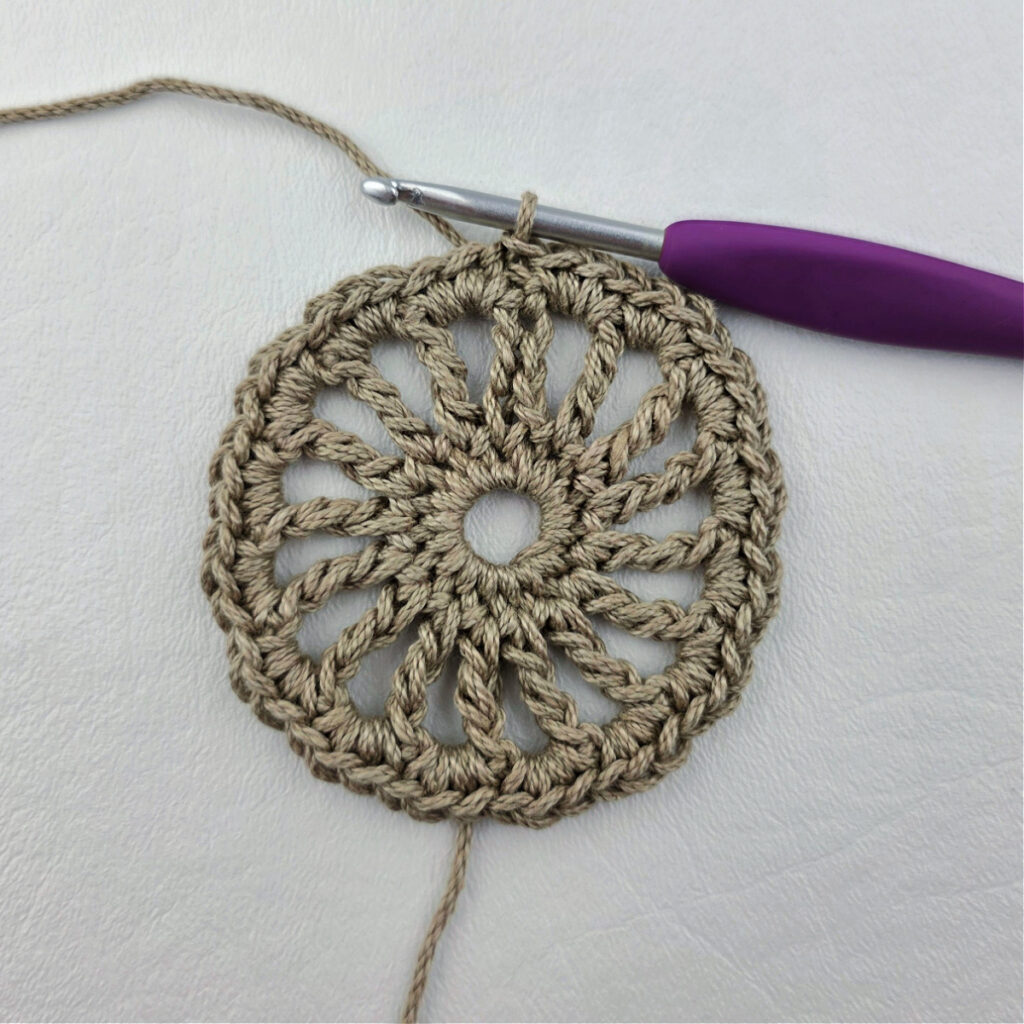
Gauge Check: Your square (which is a circle at this point) should measure 2-1/2″ in diameter (across).
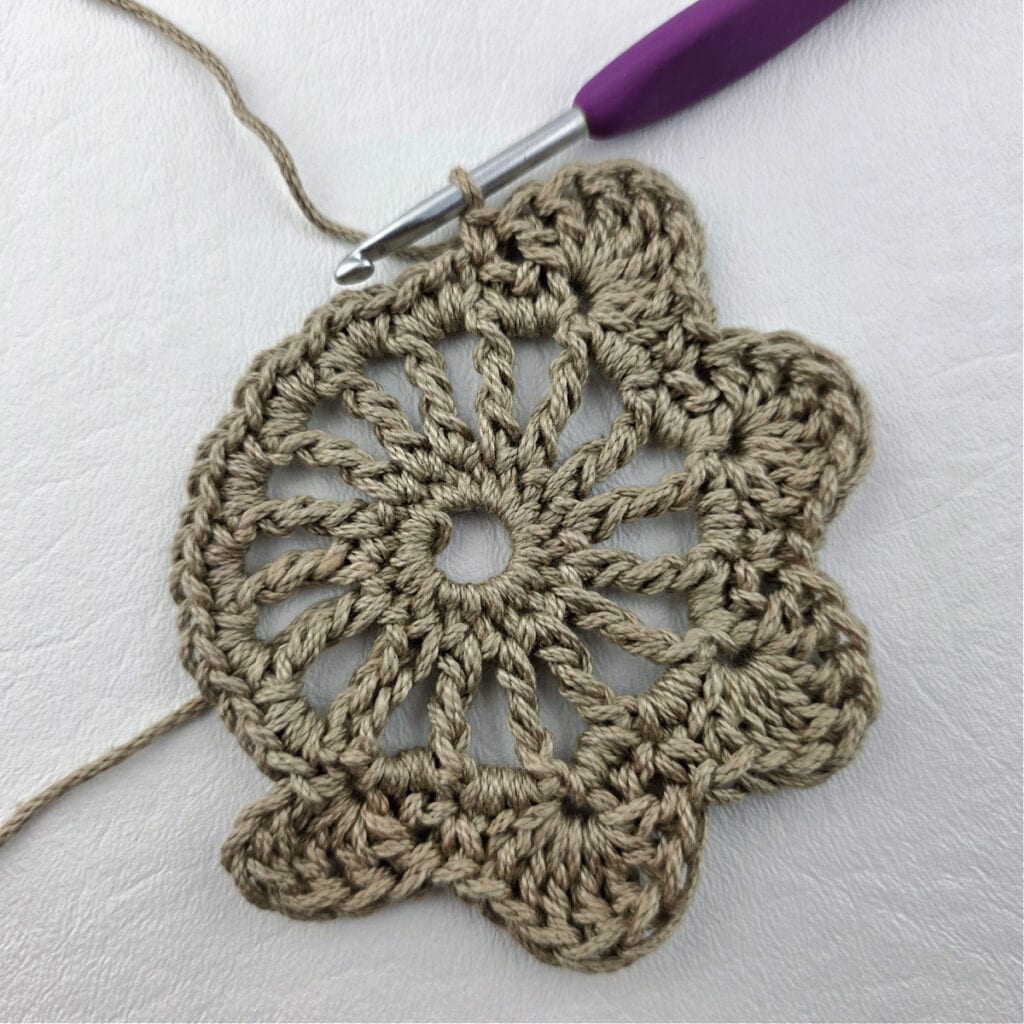
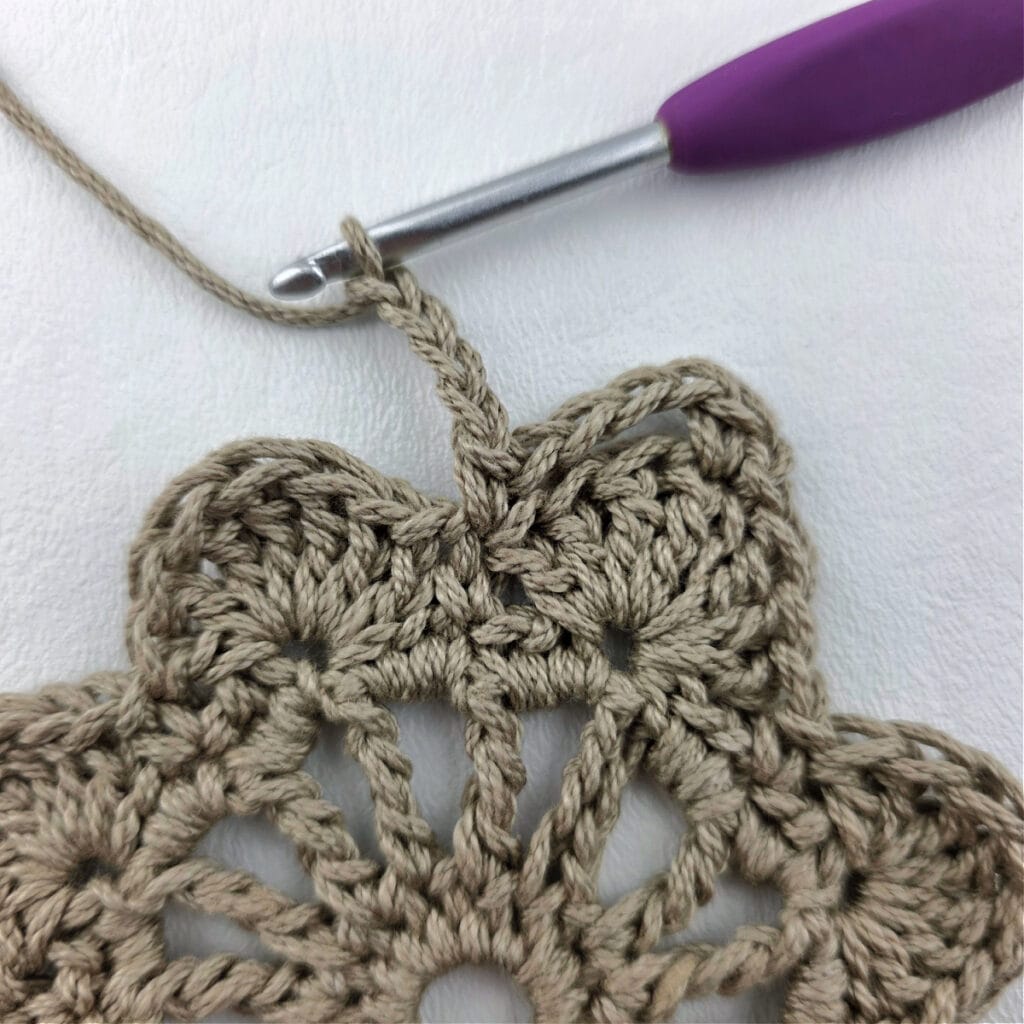
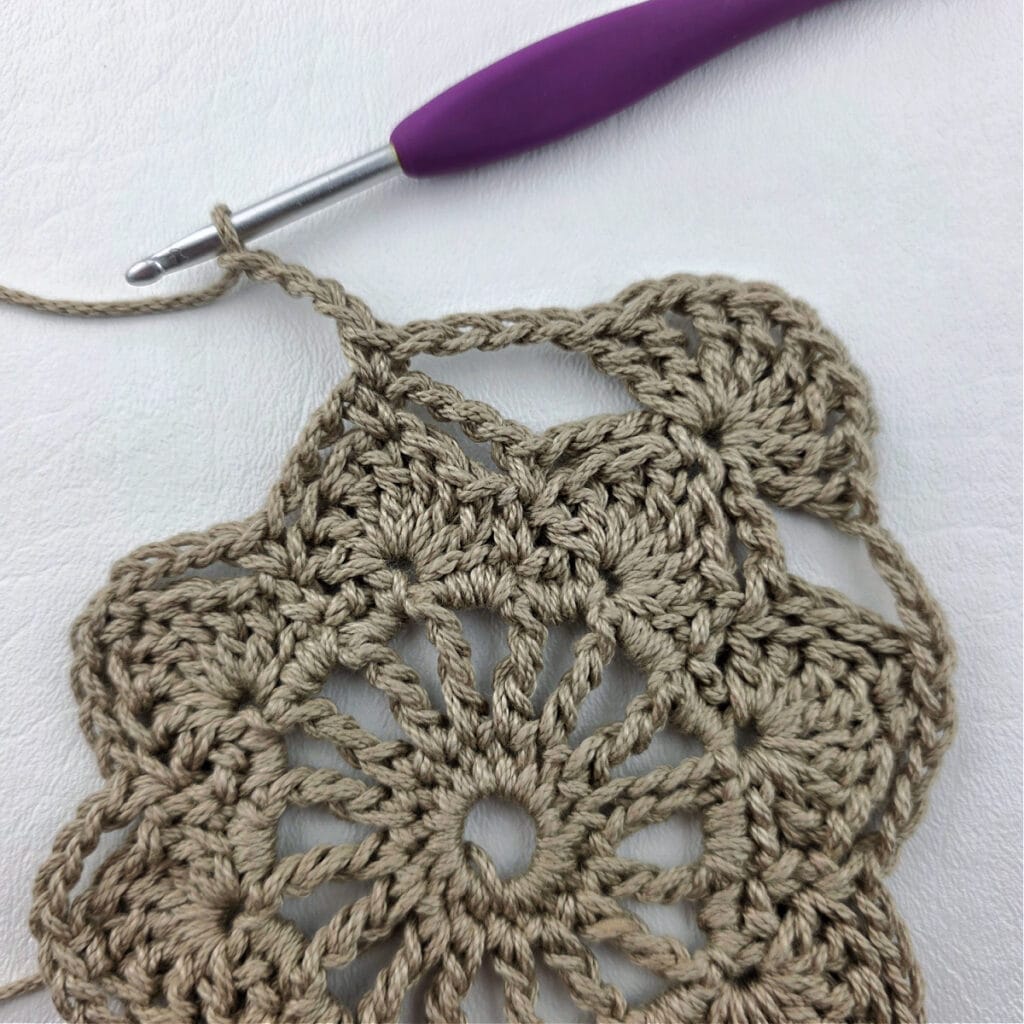
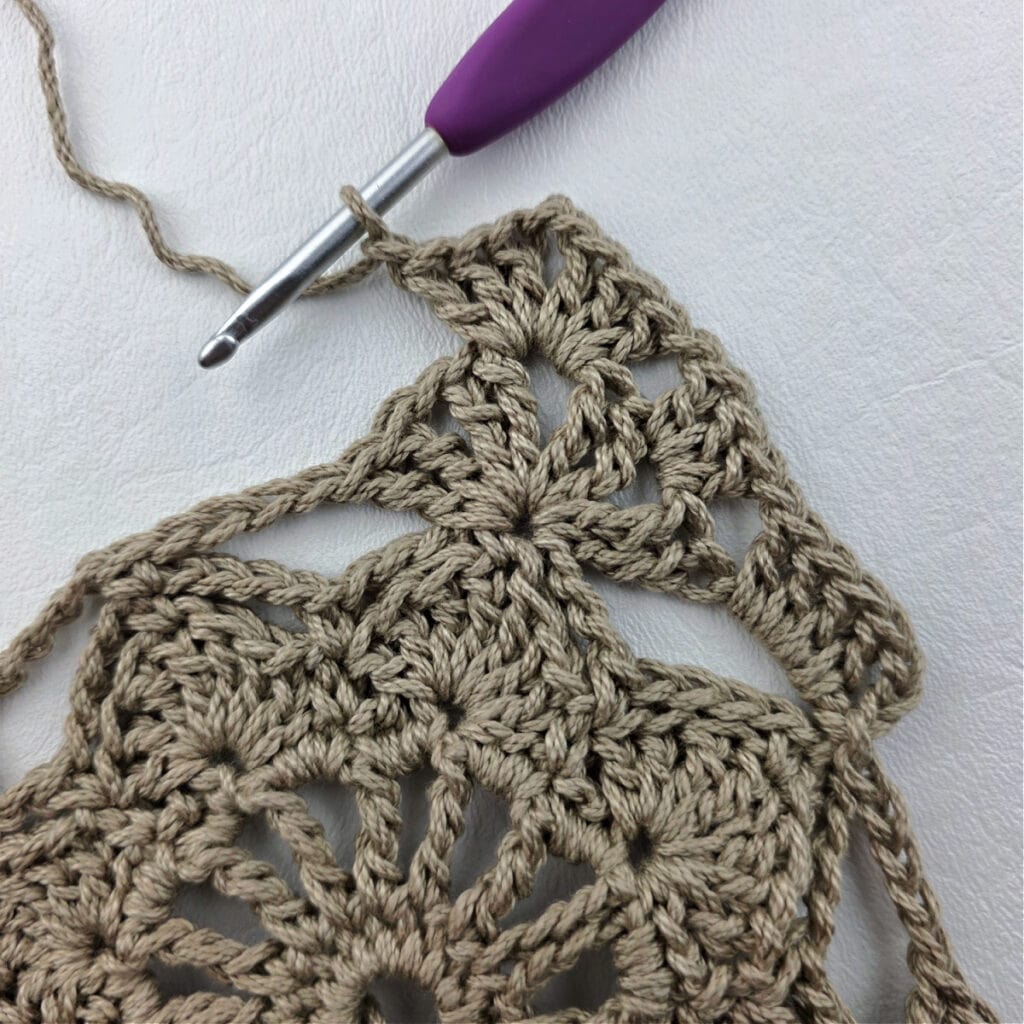
Rnd 4: Ch 3 (does not count as a st), (2 tr, 2 dc) in the first st, skip each of the next 2 sts, sc in the next st, * skip each of the next 2 sts, (2 dc, 3 tr, 2 dc) in the next st, skip each of the next 2 sts, sc in the next st, work from * 7 times, skip each of the next 2 sts, (2 dc, tr) in the first st of the rnd. Join with a sl st to the 1st tr. (64 sts)
Gauge Check: Your square (which is an 8 point star at this point) should measure 4-1/4″ across (from one point straight across to the opposite point).
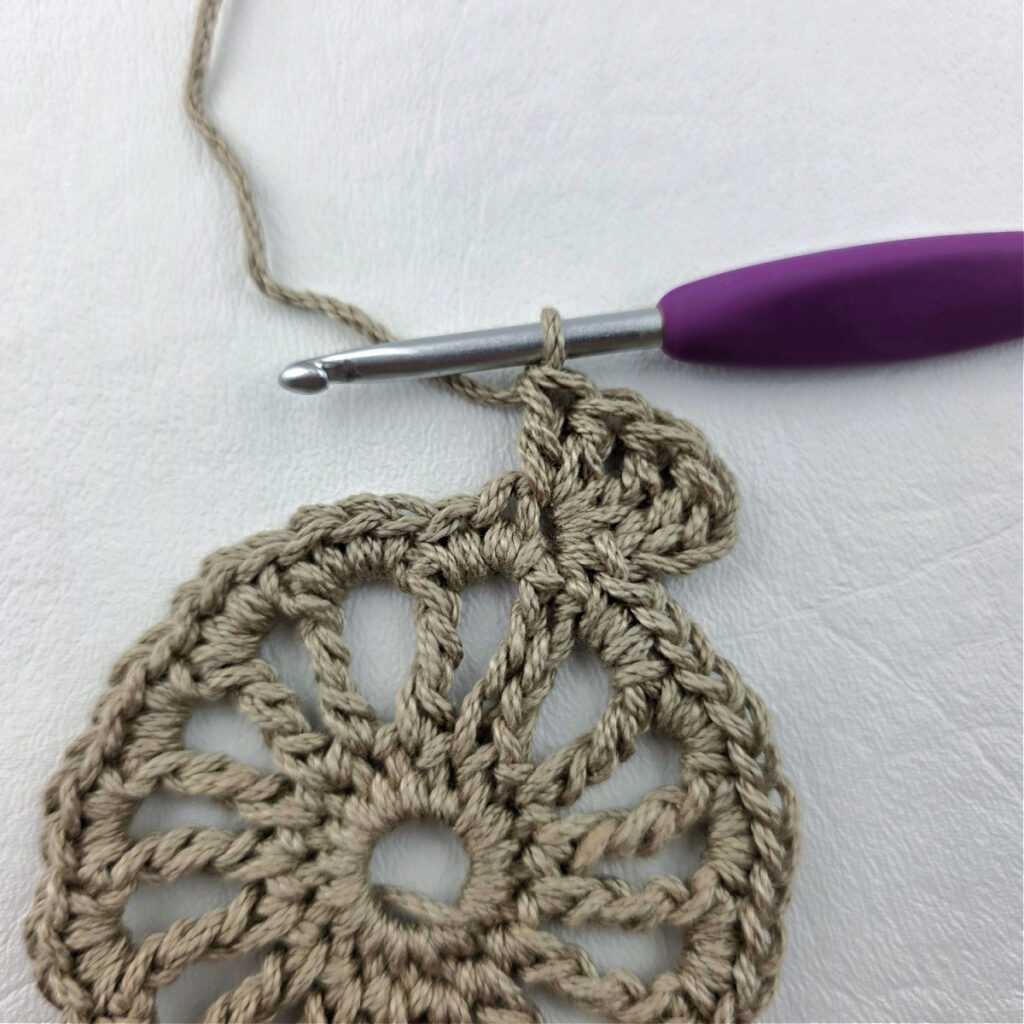
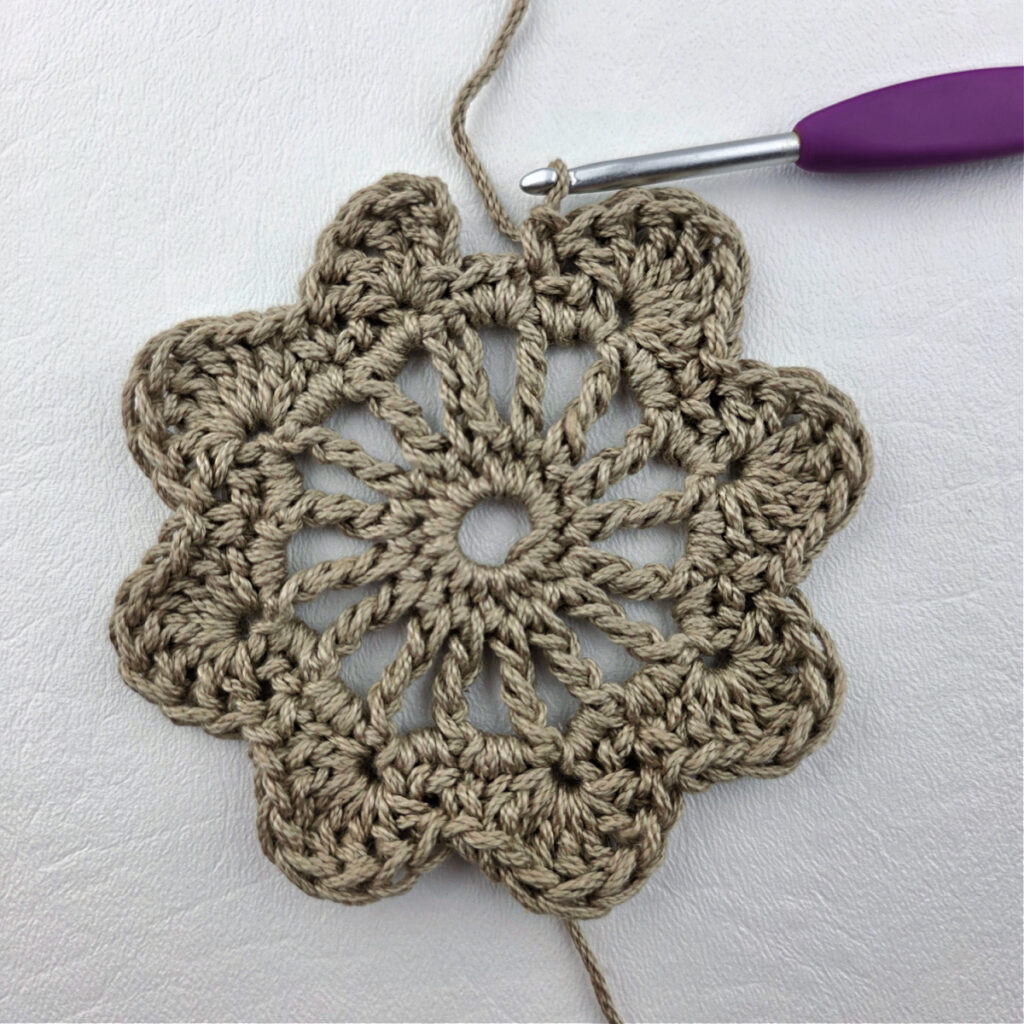
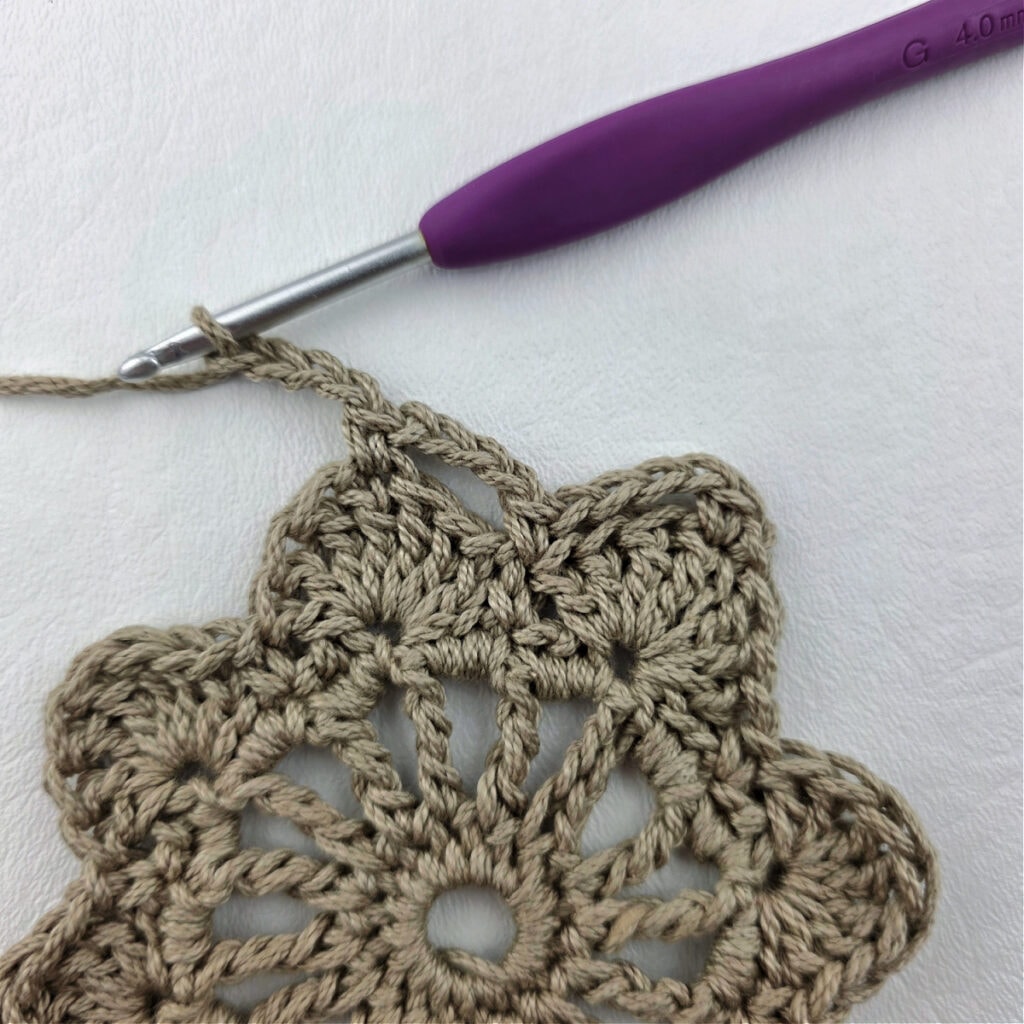
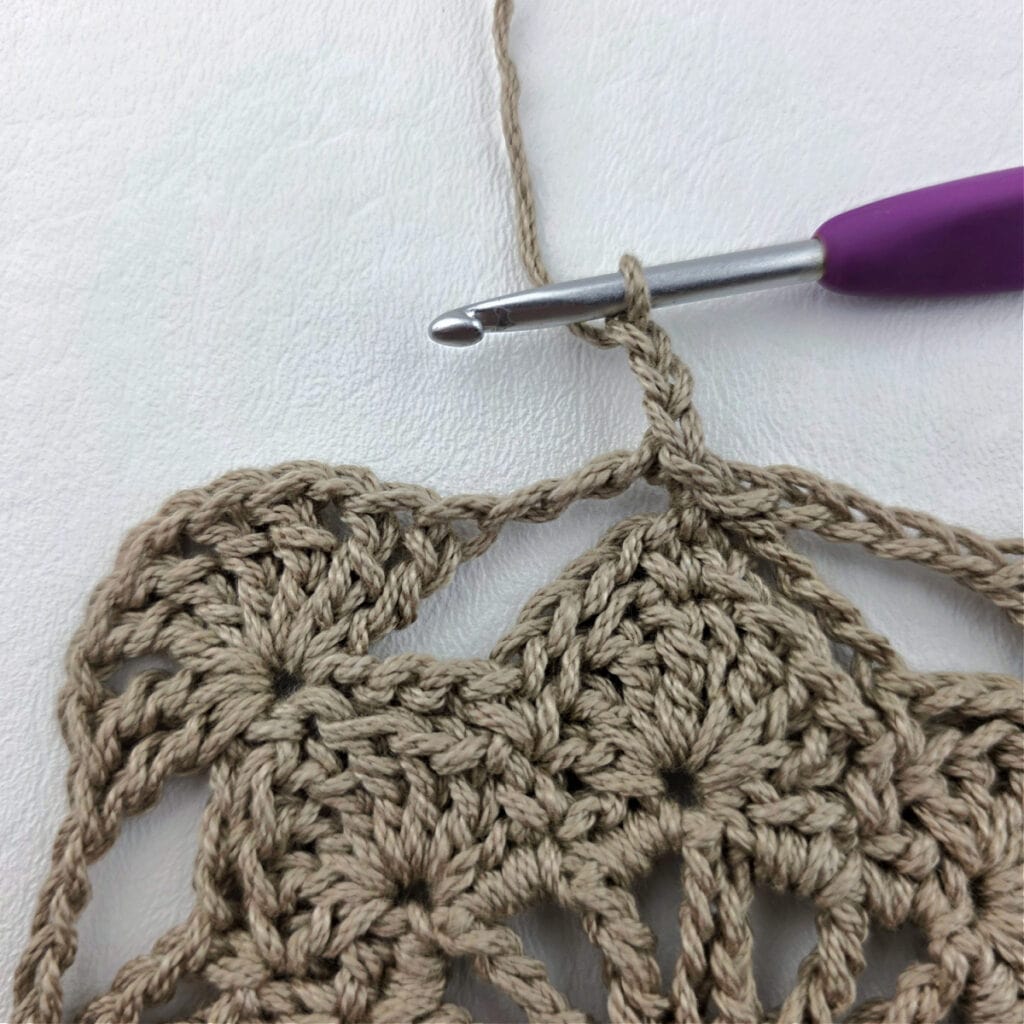
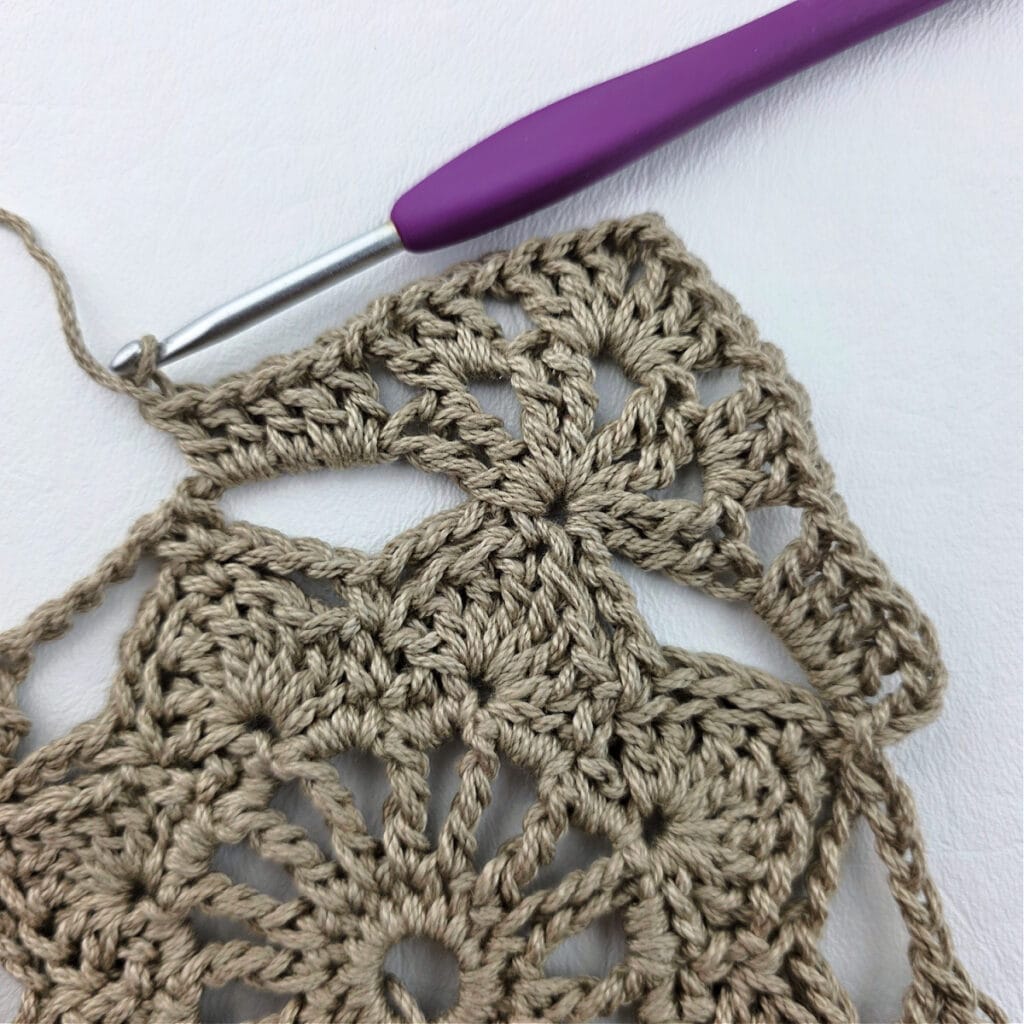
Rnd 5: Ch 1, sc in the first st, ch 4, skip each of the next 3 sts, * sc in the next st, ch 4, skip each of the next 3 sts, work from * 15 times. Join with a sl st to the 1st st. (16 sc + 16 ch-4’s)
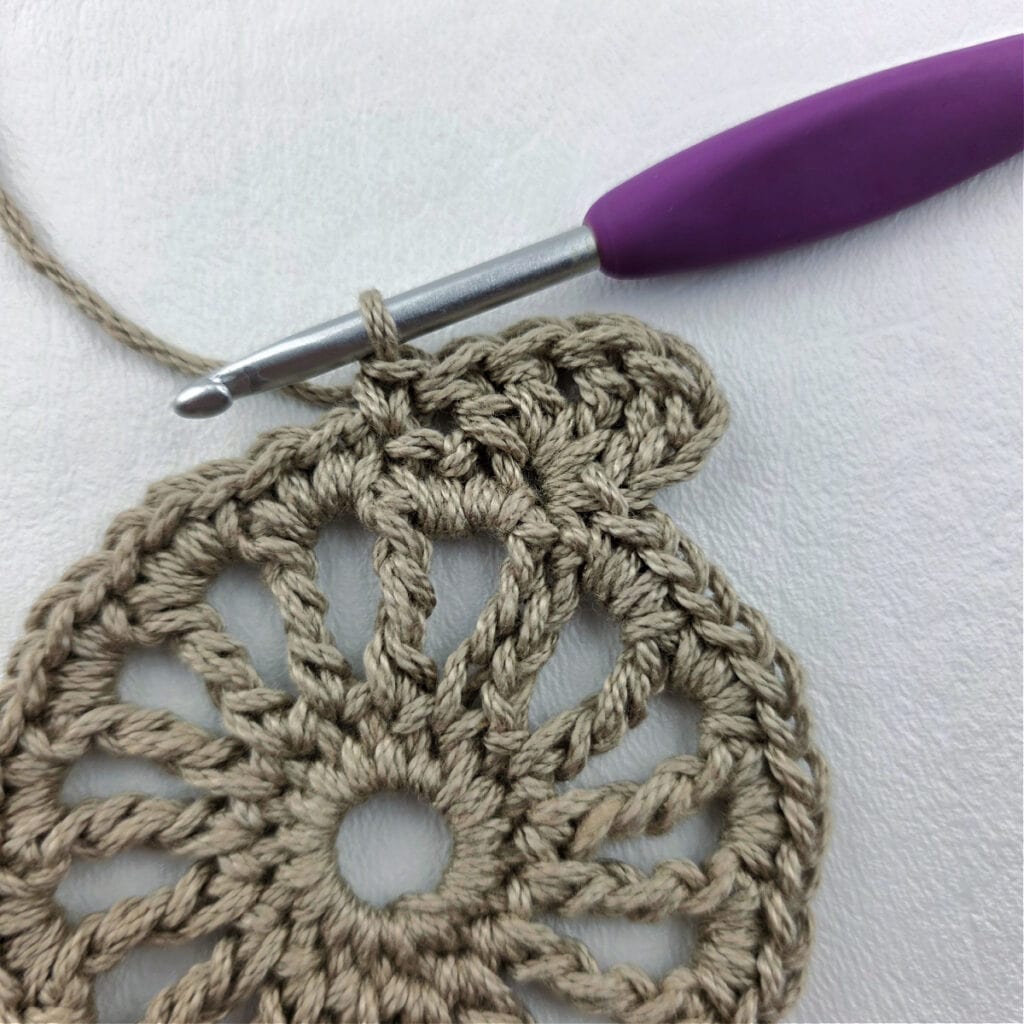
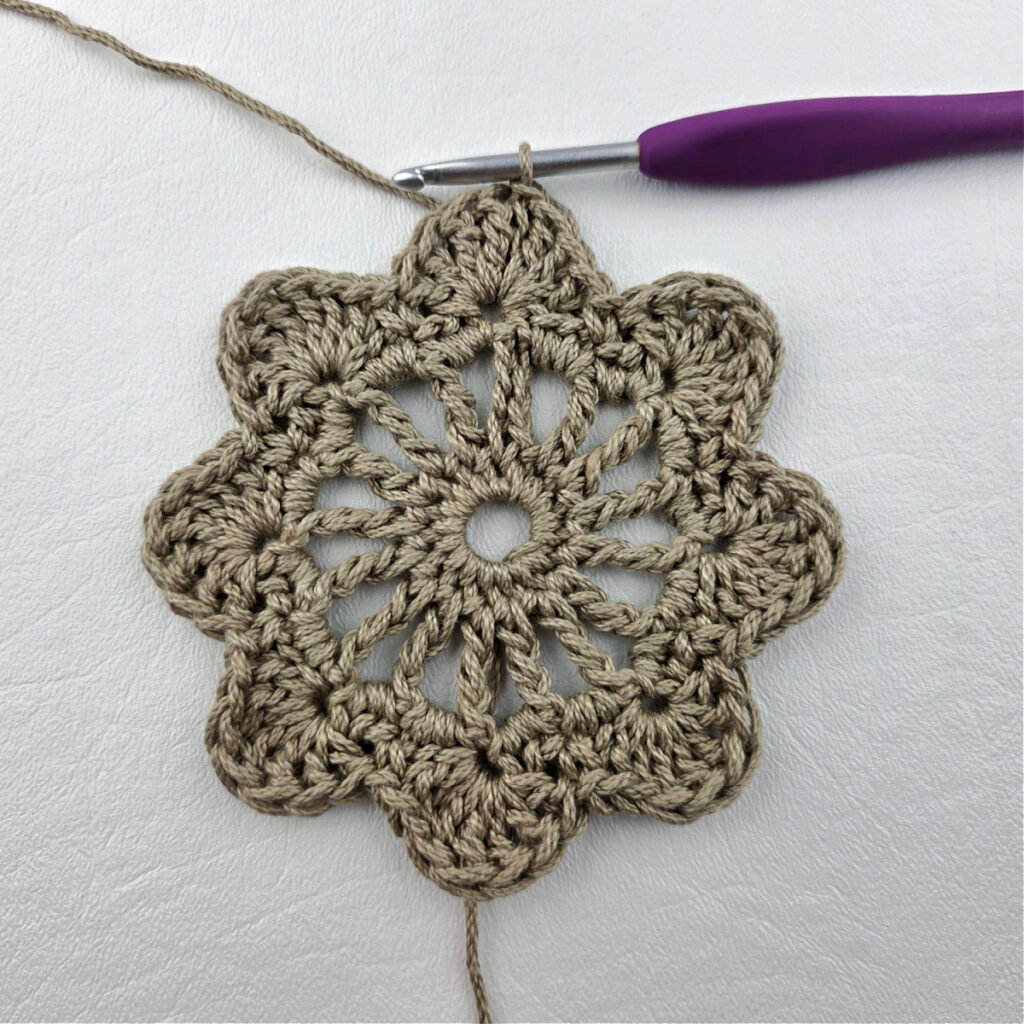
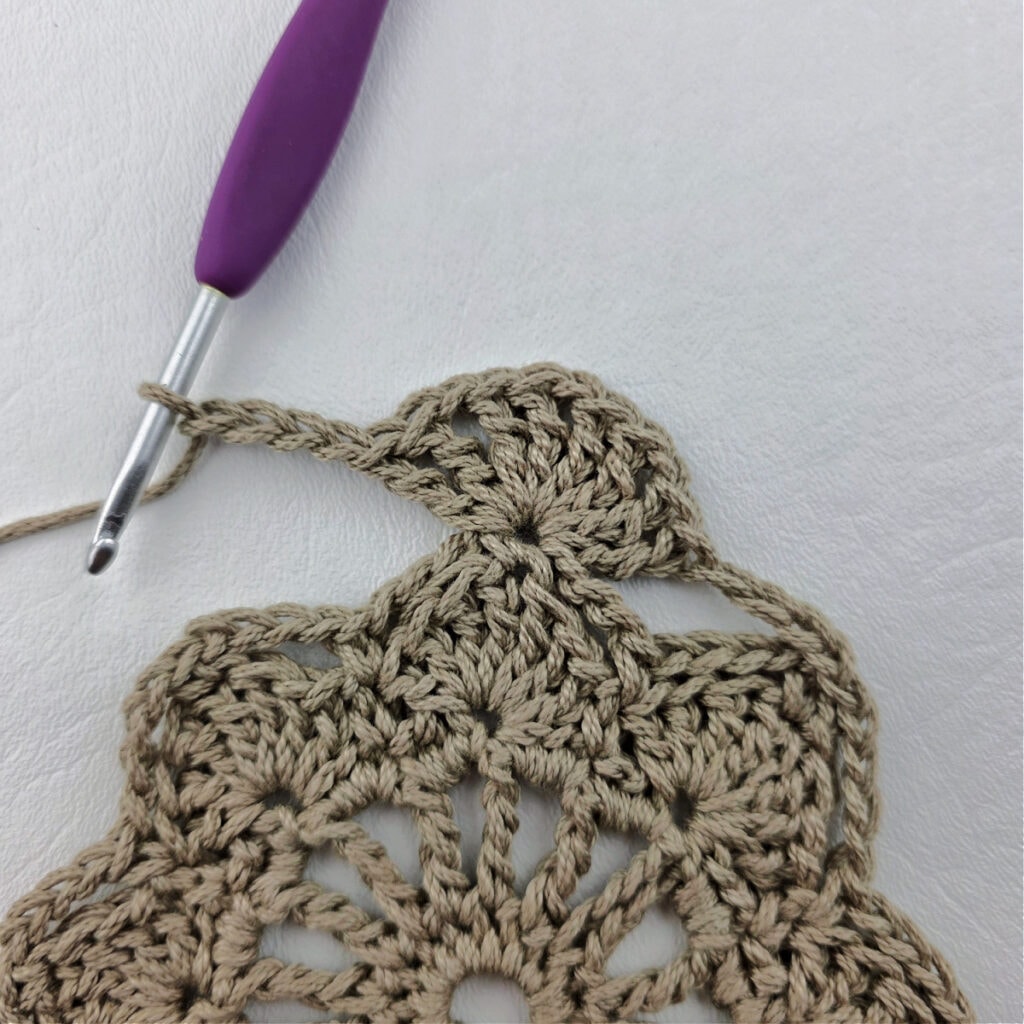
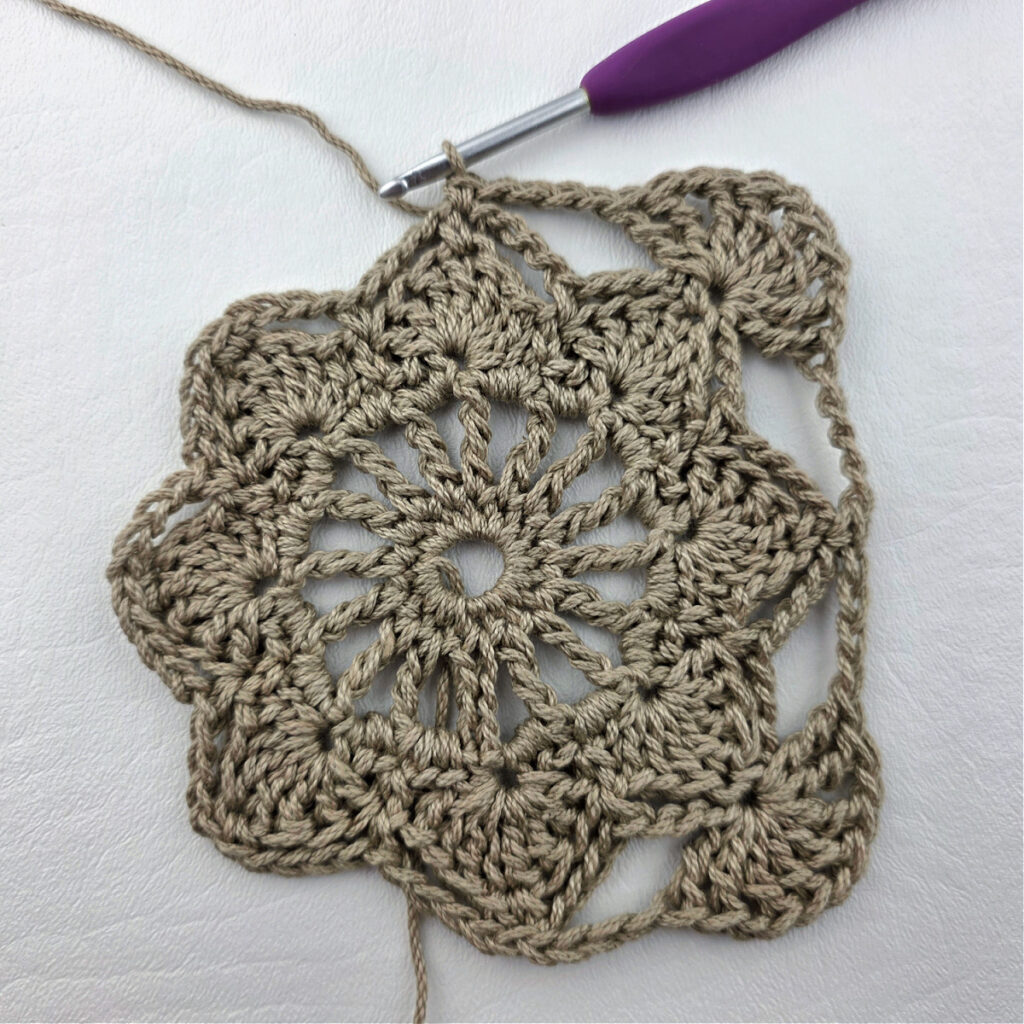
Rnd 6: Ch 1, sc in the first st, ch 4, skip the next 2 ch-4 sps & 1 sc, (2 tr, ch 1, 2 tr, ch 1, 2 tr, ch 1, 2 tr) in the next sc, ch 4, skip the next 2 ch-4 sps & 1 sc, * sc in the next sc, ch 4, skip the next 2 ch-4 sps & 1 sc, (2 tr, ch 1, 2 tr, ch 1, 2 tr, ch 1, 2 tr) in the next sc, ch 4, skip the next 2 ch-4 sps & 1 sc, work from * 3 times. Join with a sl st to the 1st sc. (36 sts + 12 ch-1’s + 8 ch-4’s)
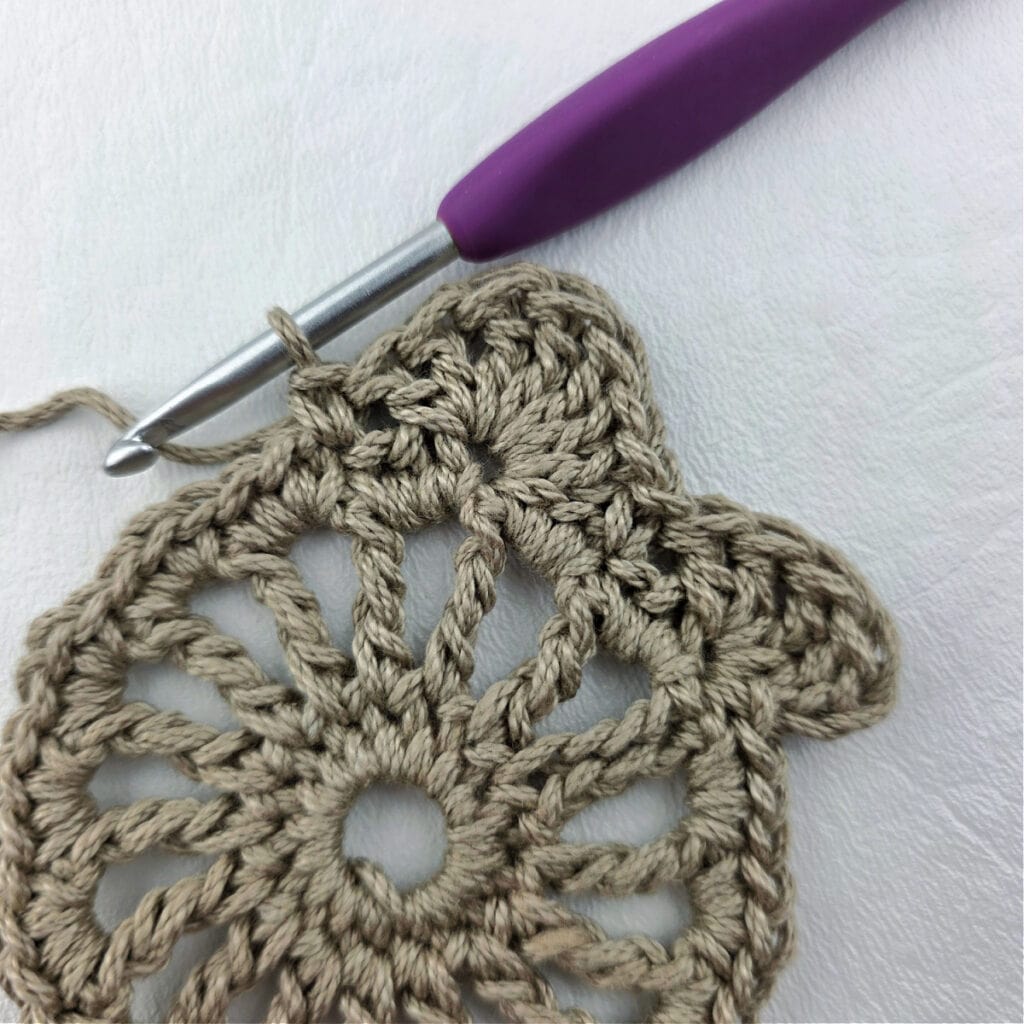
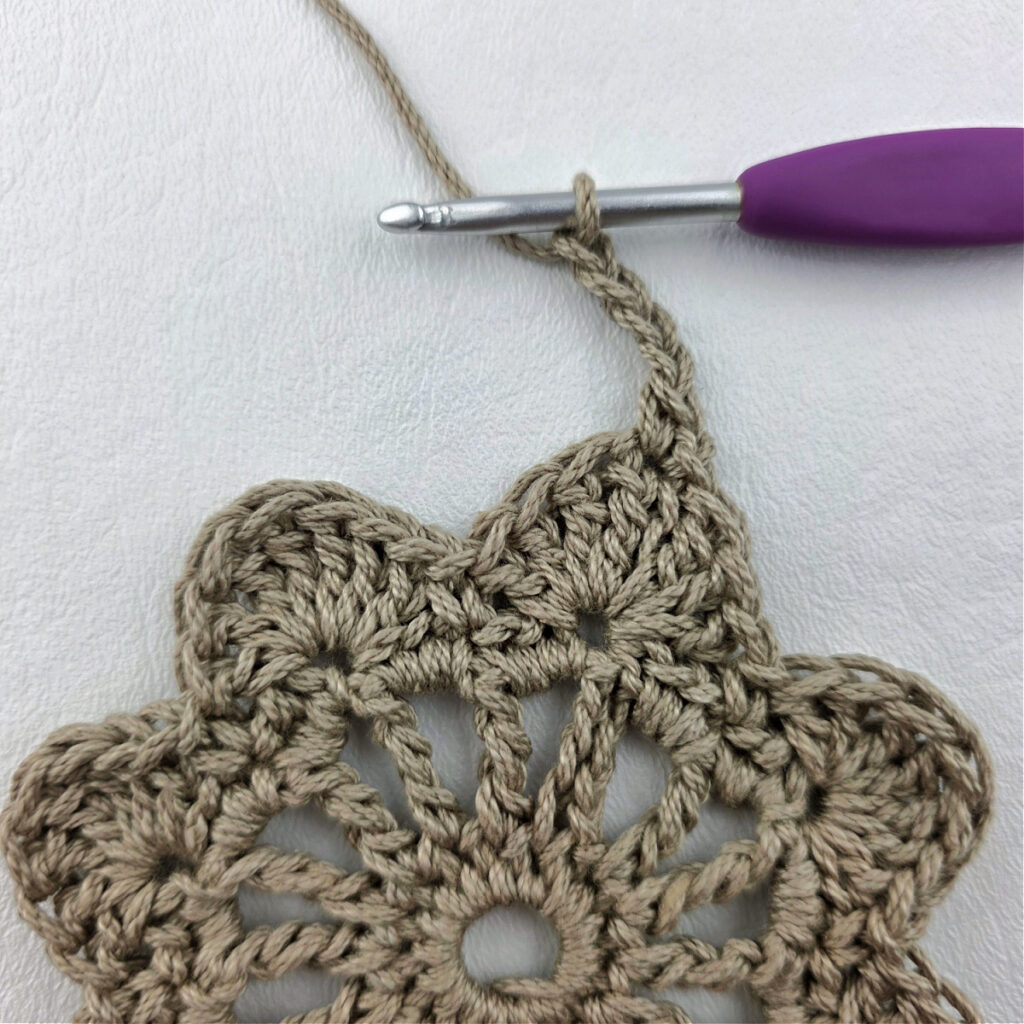
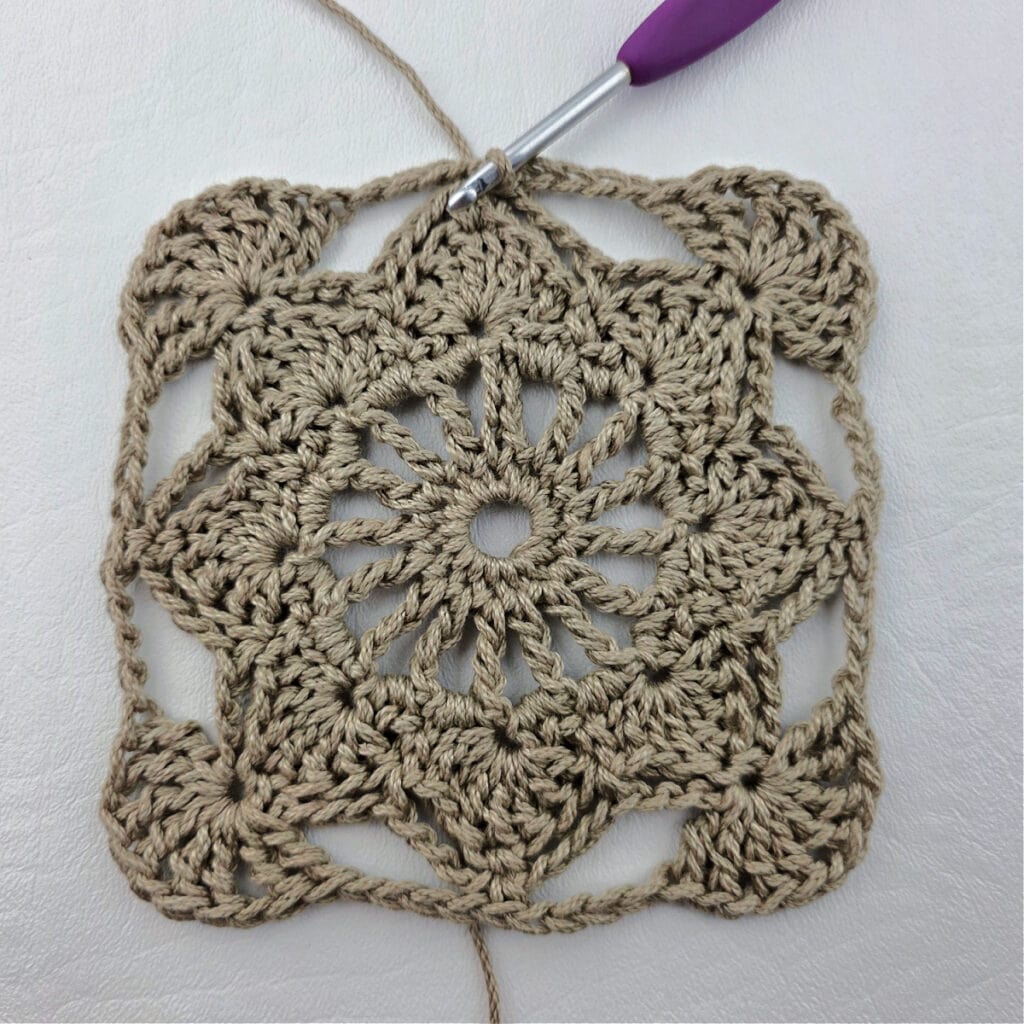
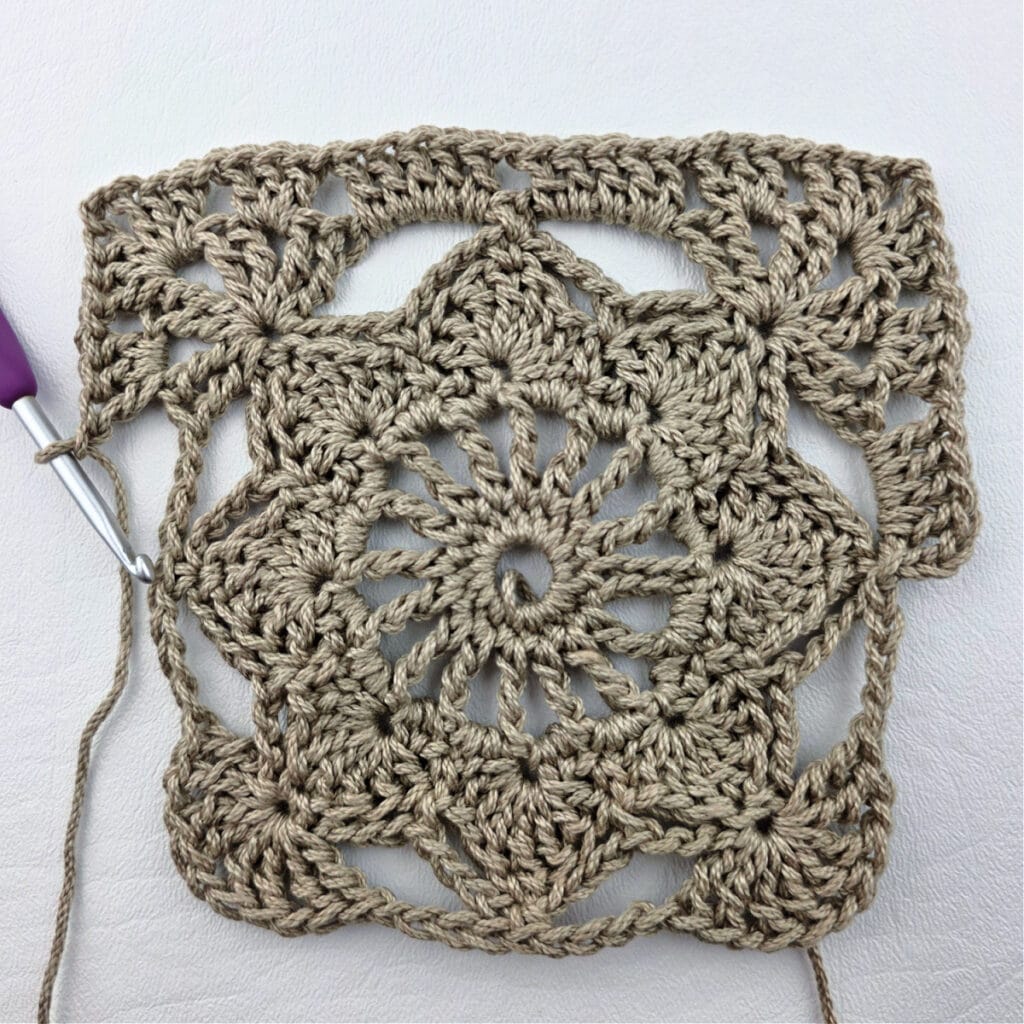
Rnd 7: Sl st into the first ch-4 sp, ch 3 (counts as 1 dc), work 4 dc into the same ch-4 sp, ch 1, skip each of the next 2 sts, (3 dc, ch 1) in the next ch-1 sp, skip each of the next 2 sts, (3 dc, ch 2, 3 dc, ch 1) in the next ch-1 sp, skip each of the next 2 sts, (3 dc, ch 1) in the next ch-1 sp, skip each of the next 2 sts, (5 dc, ch 1) in the next ch-4 sp, skip the next st, * (5 dc, ch 1) in the next ch-4 sp, ch 1, skip each of the next 2 sts, (3 dc, ch 1) in the next ch-1 sp, skip each of the next 2 sts, (3 dc, ch 2, 3 dc, ch 1) in the next ch-1 sp, skip each of the next 2 sts, (3 dc, ch 1) in the next ch-1 sp, skip each of the next 2 sts, (5 dc, ch 1) in the next ch-4 sp, skip the next st, work from * 3 times. Join with a sl st to the top of the ch-3. (88 sts + 20 ch-1’s + 4 ch-2’s)
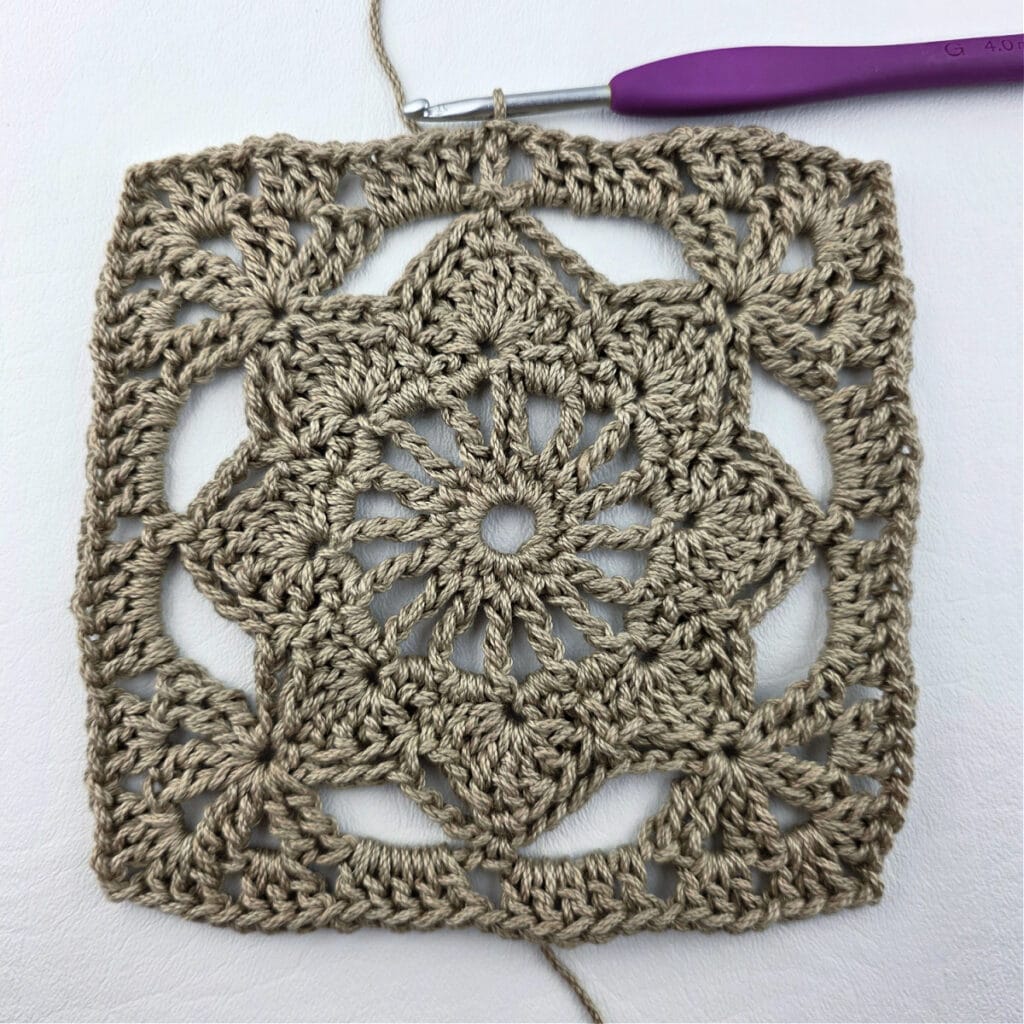
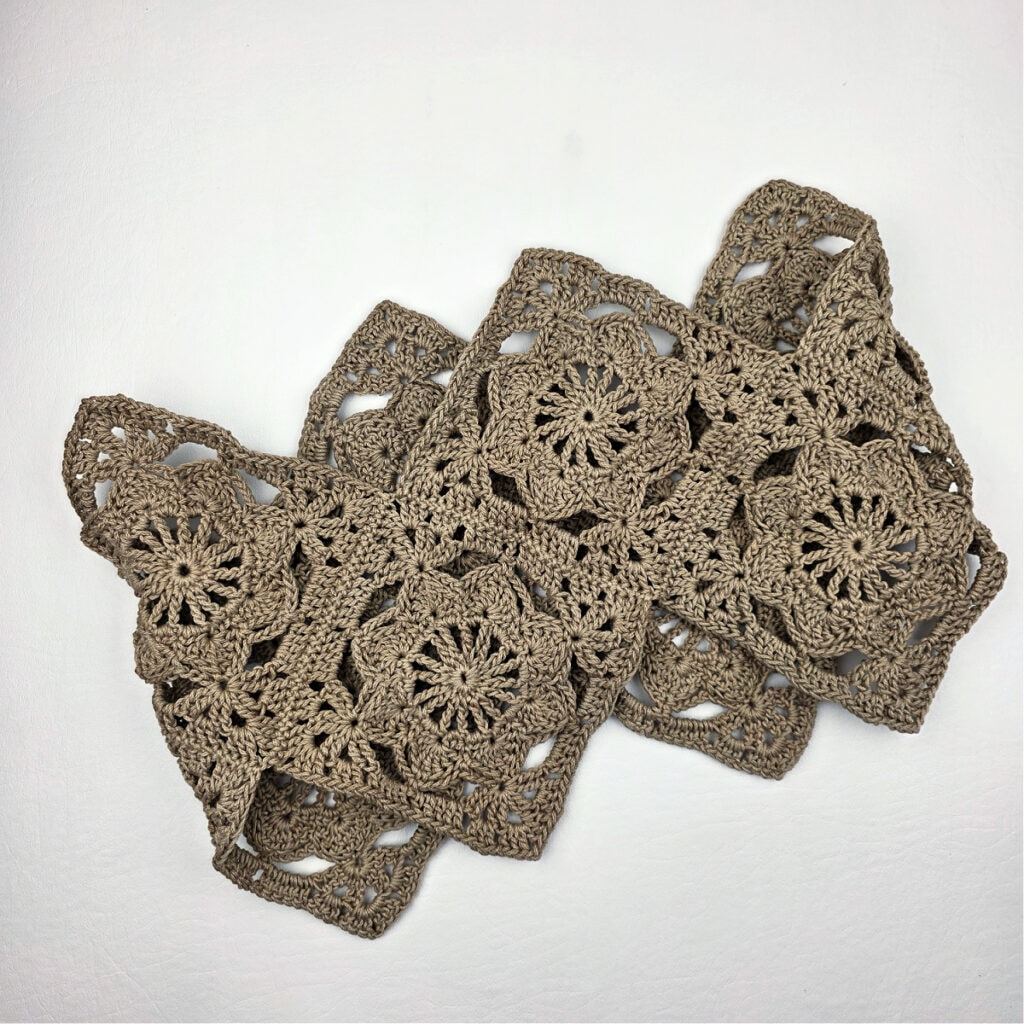
Fasten off. Weave in ends. Your motif square should measure just under 6″ x 6″, unblocked. Make a total of 8 crochet motif squares, then continue on to the 12″ Double Crochet Granny Square.
Progression Photos – 6″ Motif Square
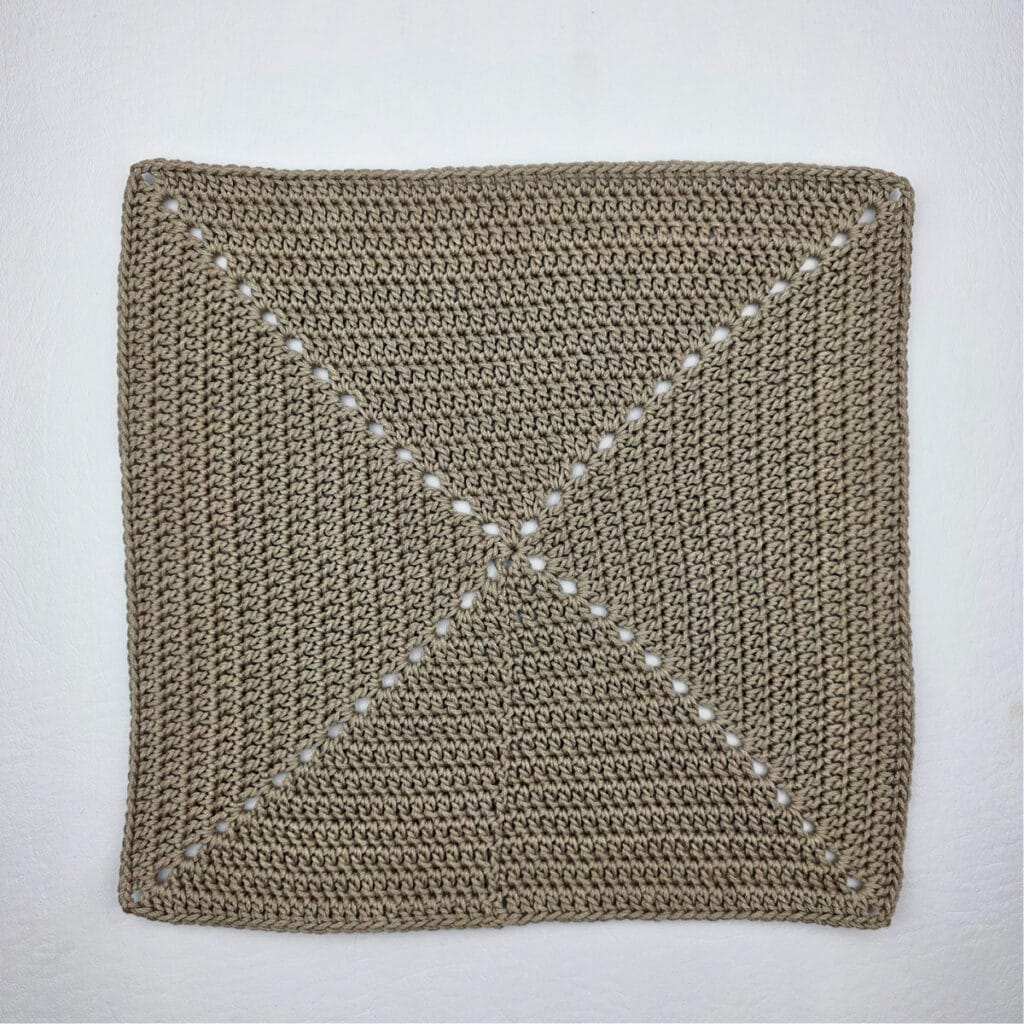
12″ Double Crochet Granny Square – Make 1
In this section, you’ll crochet a 12″ double crochet granny square that will later become the bottom of your granny squares bag.
Rnd 1 (RS): With yarn & a 4.00mm crochet hook, ch 3 (does not count as a st), into the 3rd ch from your hook work (2 dc, ch 2) 4 times. Join with a sl st to the 1st dc. (8 dc + 4 ch-2’s)
Rnd 2: Ch 2 (does not count as a st), dc in each of the first 2 sts, (2 dc, ch 2, 2 dc) into the next ch-2 sp, * dc in each of the next 2 sts, (2 dc, ch 2, 2 dc) into the next ch-2 sp, work from * 3 times. Join with a sl st to the 1st dc. (24 dc + 4 ch-2’s)
Rnd 3: Ch 2 (does not count as a st), * dc in each dc across to the next ch-2 sp, (2 dc, ch 2, 2 dc) into the next ch-2 sp, work from * 4 times, dc in each remaining dc. Join with a sl st to the 1st dc. (40 dc + 4 ch-2’s) Your square should measure approximately 2-3/4″ x 2-3/4″.
Rnds 4 – 14: Rep Rnd 3. Each round increases by 16 dc. (216 dc + 4 ch-2’s) at the end of Rnd 14.
Gauge Check: At the end of Rnd 7 your square should measure approximately 6″ x 6″.
Fasten off. Weave in ends. Your double crochet granny square should measure approximately 12″ x 12″. Continue on to Blocking Granny Squares.
Blocking Granny Squares
Is blocking granny squares mandatory? The short answer is no, and I did not block my crochet squares before I seamed them. However, I did regret that decision because I ultimately chose to block my granny squares bag after connecting granny squares. We’ll use this as a “do as I recommend, not as I do” moment because blocking squares is much easier than blocking an entire bag after it’s assembled.
So no, blocking is not mandatory, but it will add a nice professional finish to your bag.
If you’ve never blocked a crochet project before, I have a complete blocking tutorial with 3 different methods for you to choose from!
Continue on to Granny Square Bag Layout.
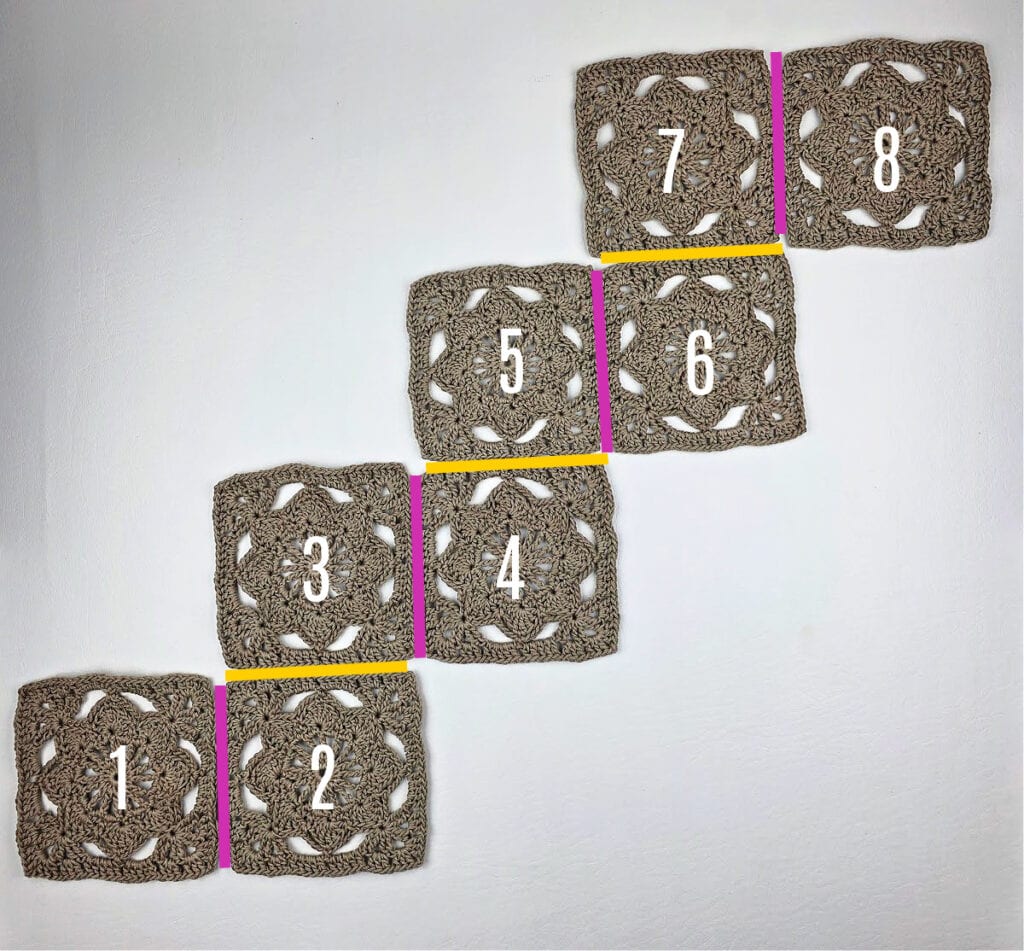
Granny Square Bag Layout
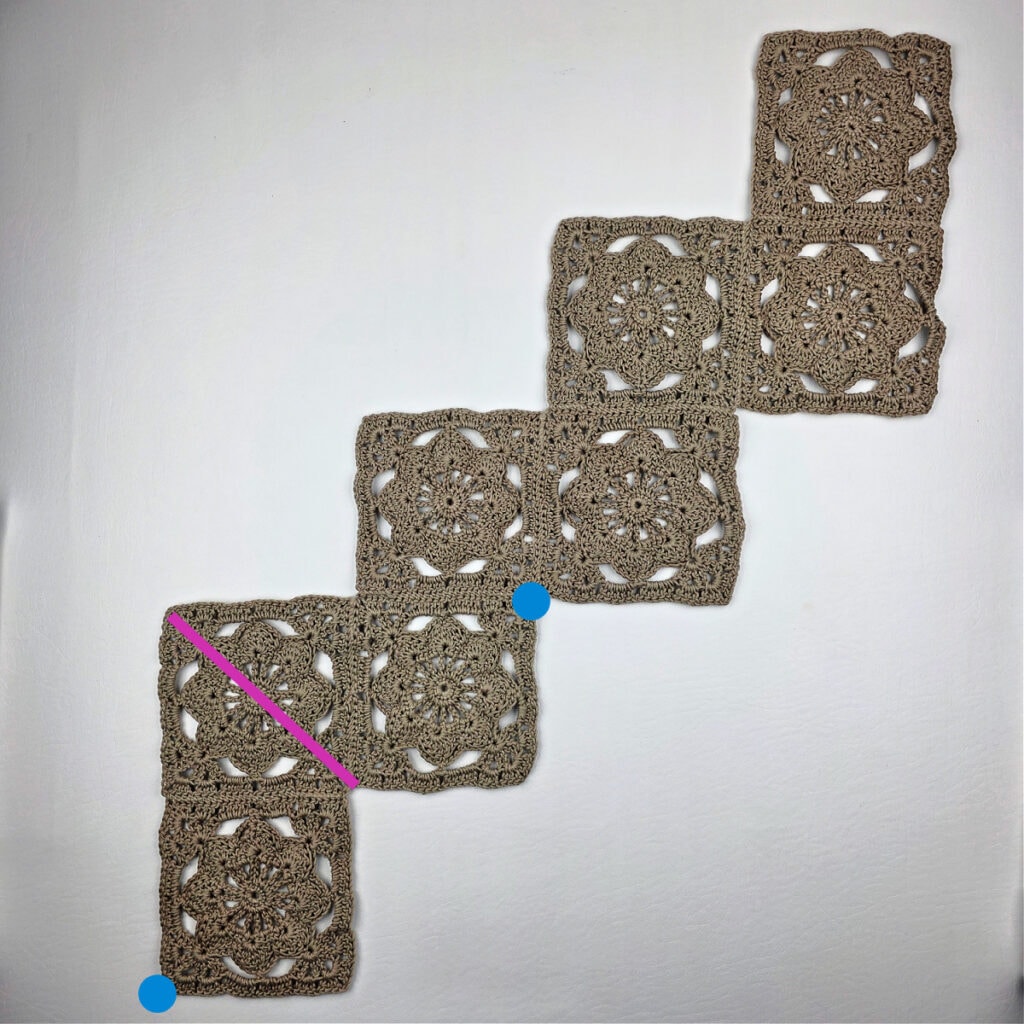
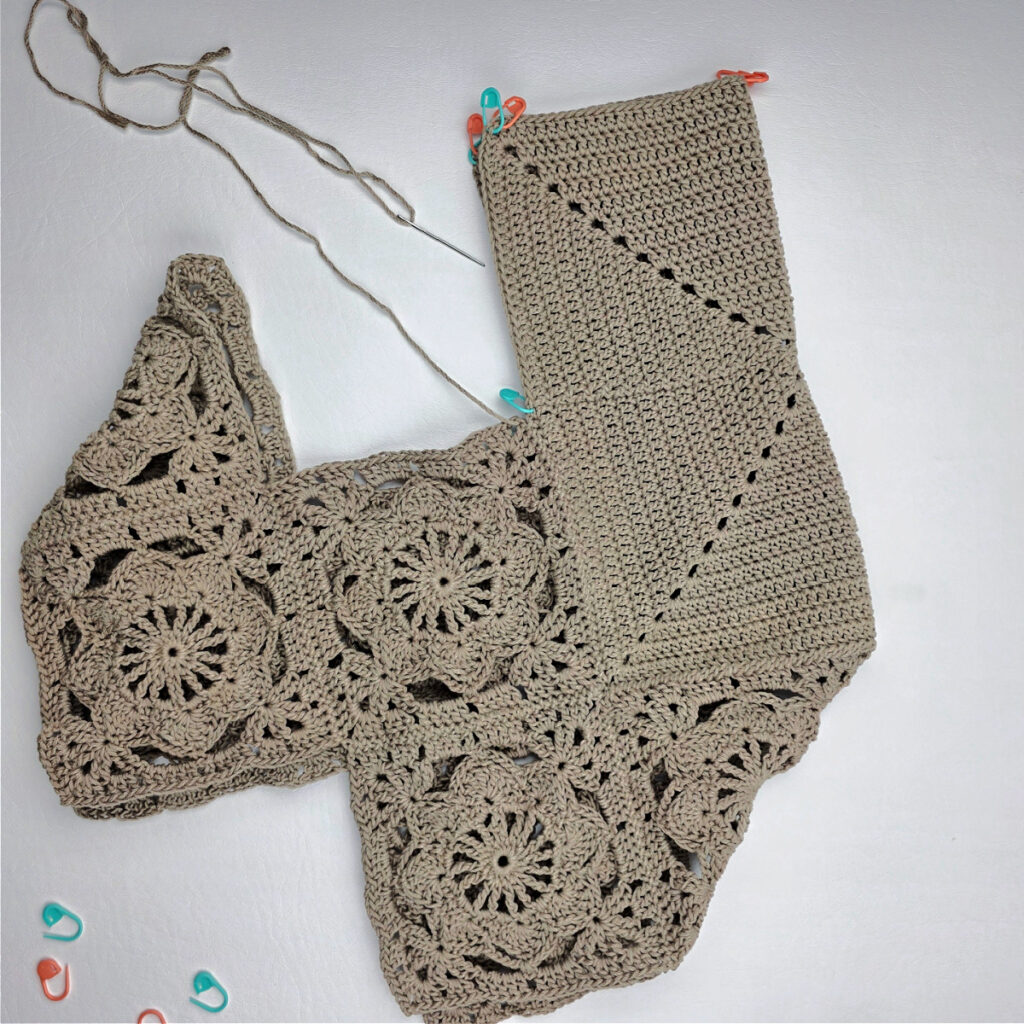
With all right sides facing up, lay out your eight crochet motif squares as shown in the photo below. Continue on to Joining Granny Squares.
Joining Granny Squares
Step 1: I prefer to use locking stitch markers to hold them together at the corners. Place locking stitch markers in the ch-1’s at each corner that are closest to the first and last dc’s of the edge you’re seaming.
Step 2: Begin by whipstitching squares 1 & 2 together as shown with the pink vertical line. Then, join square #3 to square #2 with a whipstitch seam as shown with the horizontal yellow line. Continue joining granny squares one at a time as numbered in the photo above.
After all eight squares have been seamed as shown above, continue on to Step 3.
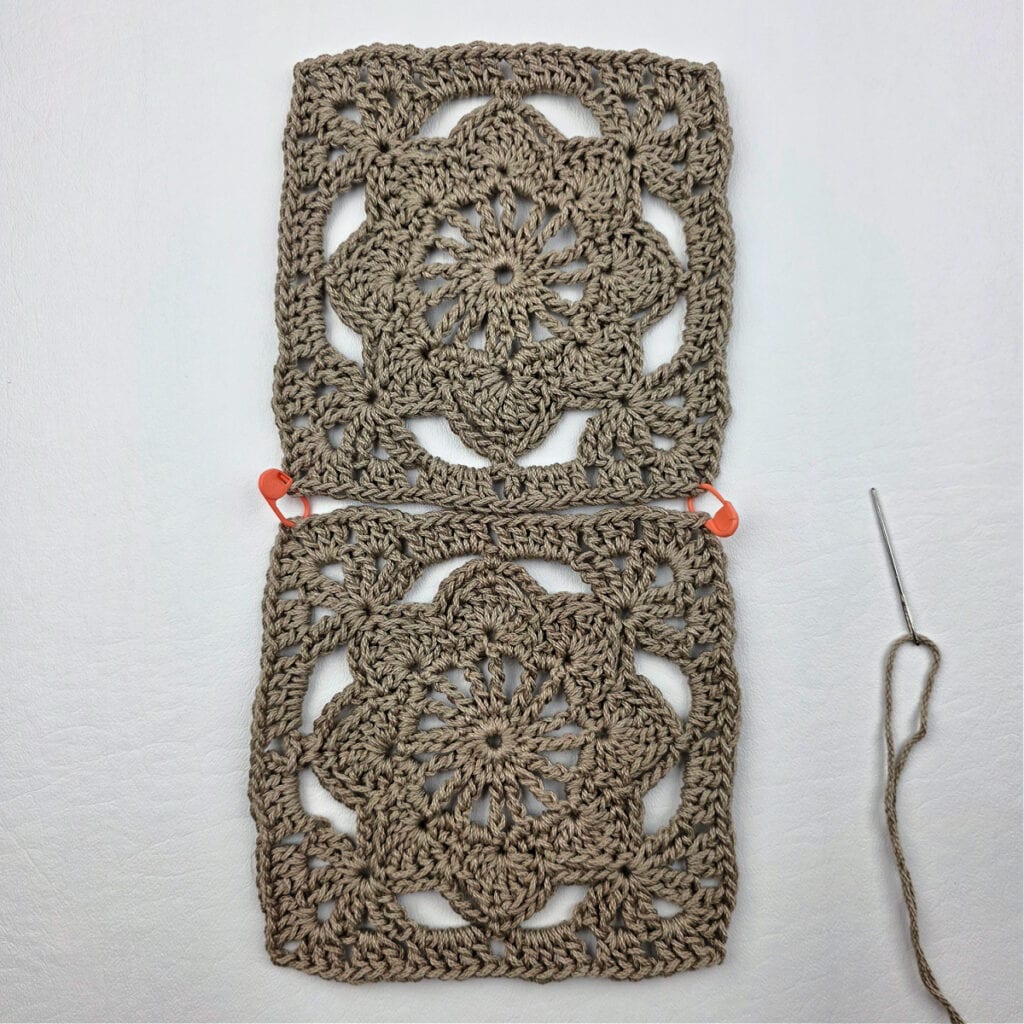
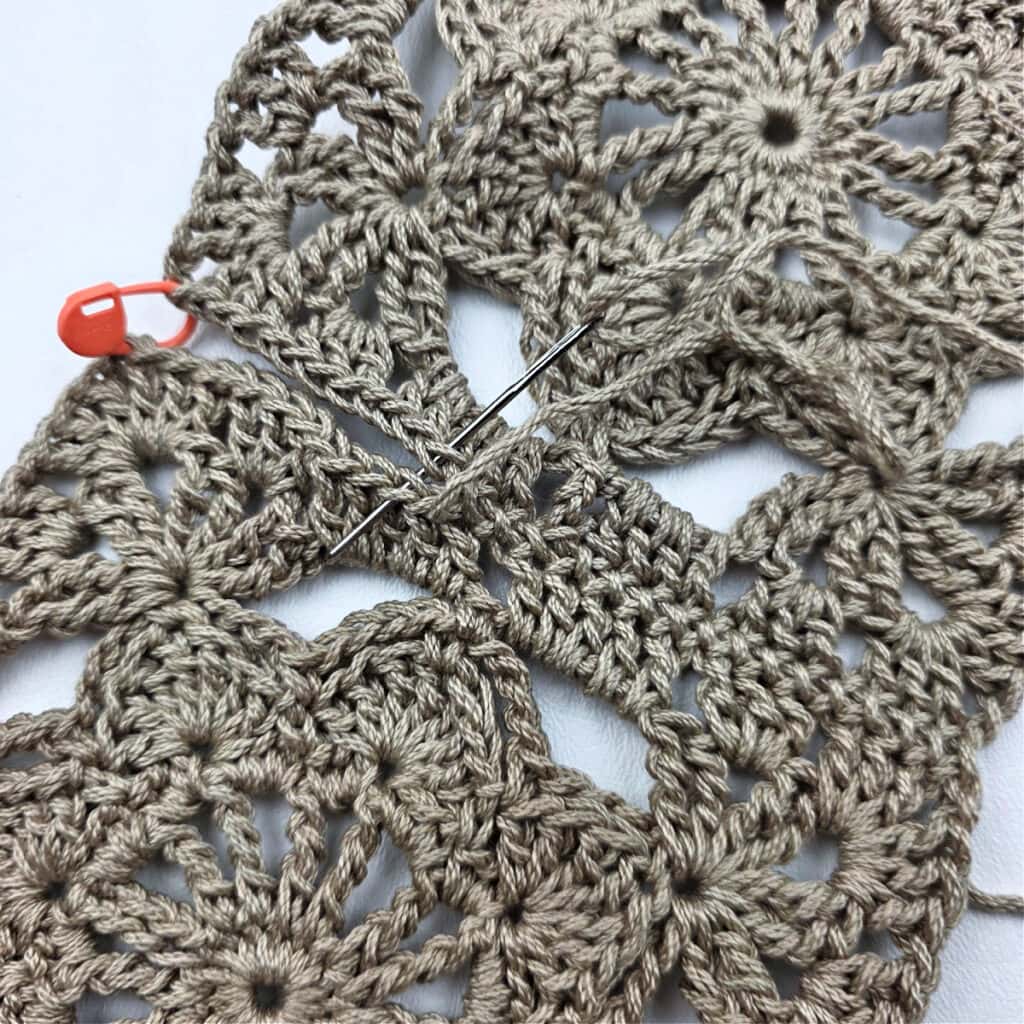
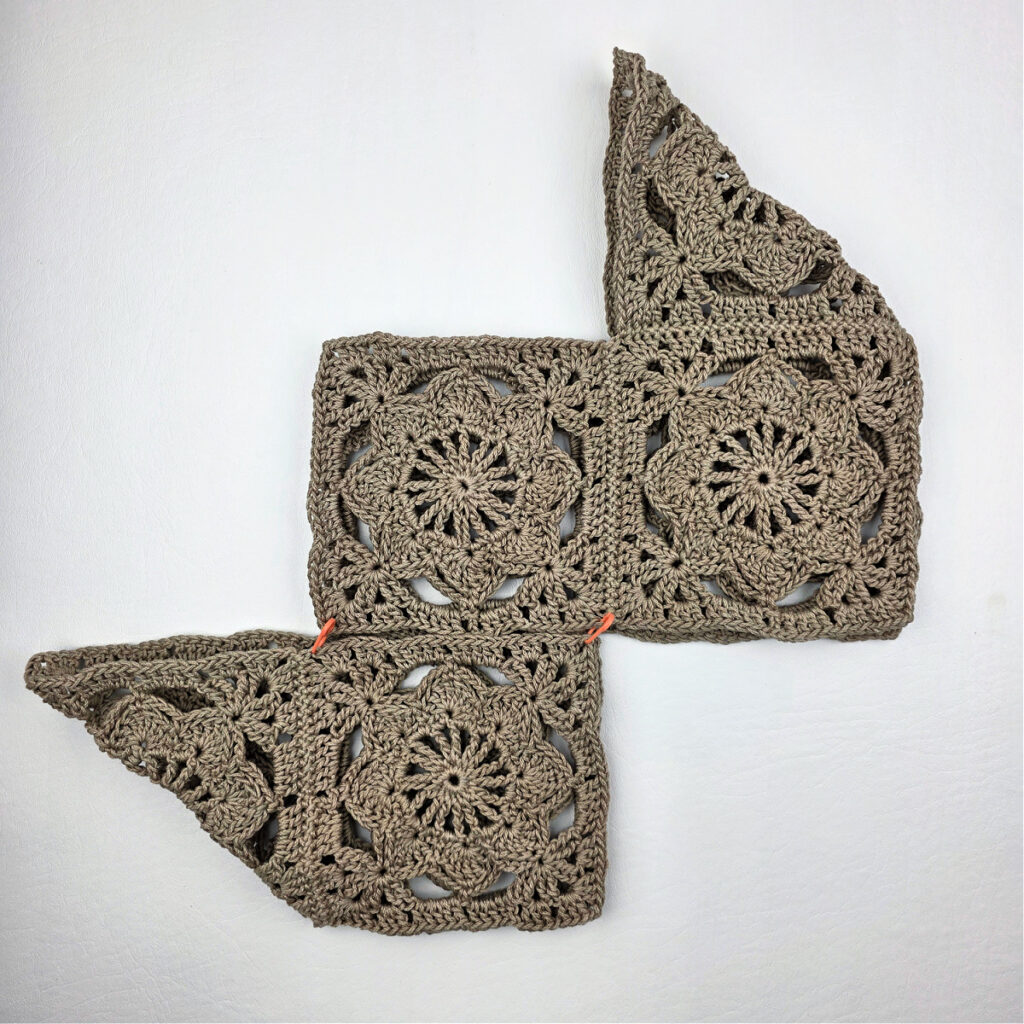
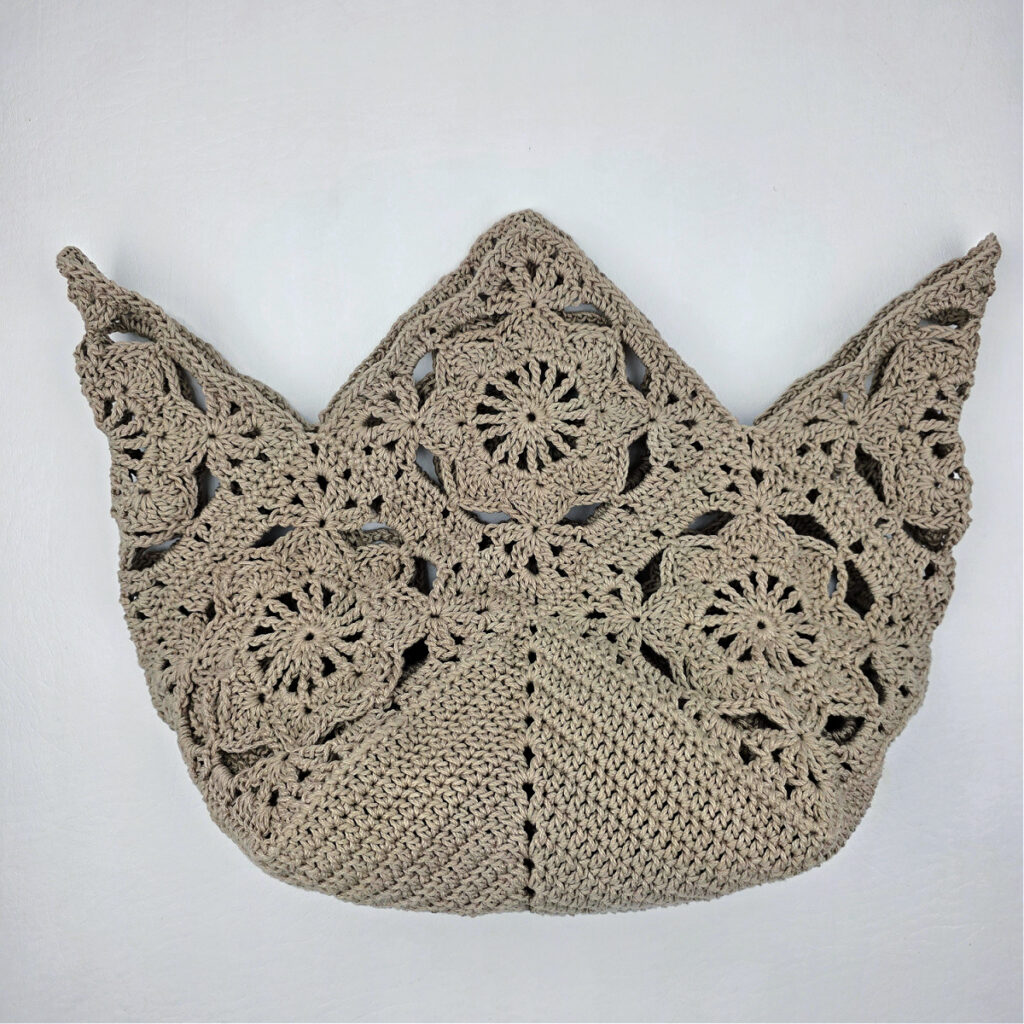
Step 3: With the wrong side facing up, lay your seamed squares in front of you as shown in the photo below, on the left. Fold the second from the bottom square on a diagonal, as shown by the pink line, matching the blue dots. Then, your squares should look like the photo below, on the right.
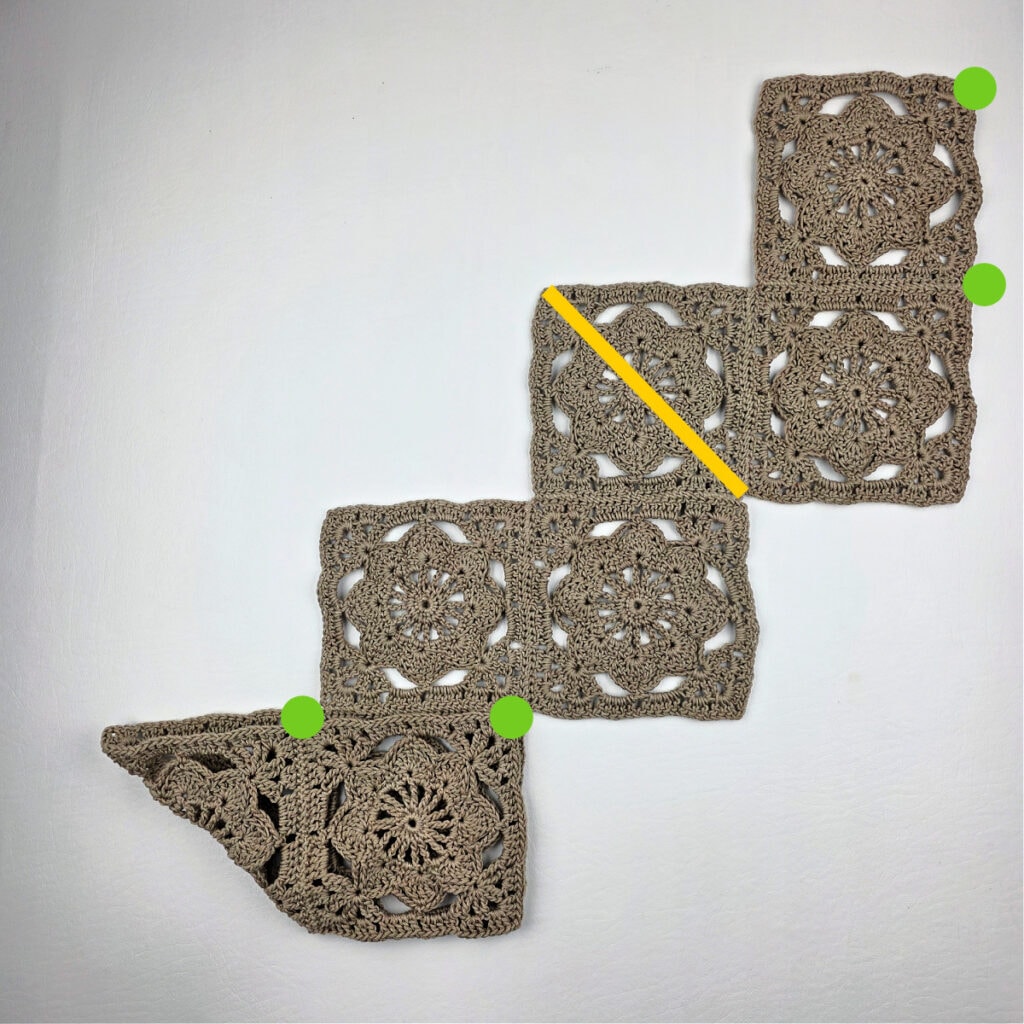
Step 4: Fold the third from the top square on a diagonal, as shown by the yellow line, matching the green dots. Then, your squares should look like the photos below. Whipstitch seam the last seam as shown with orange stitch markers in the photo below, on the left.
Weave in ends. Continue on to Joining the Bag Bottom.
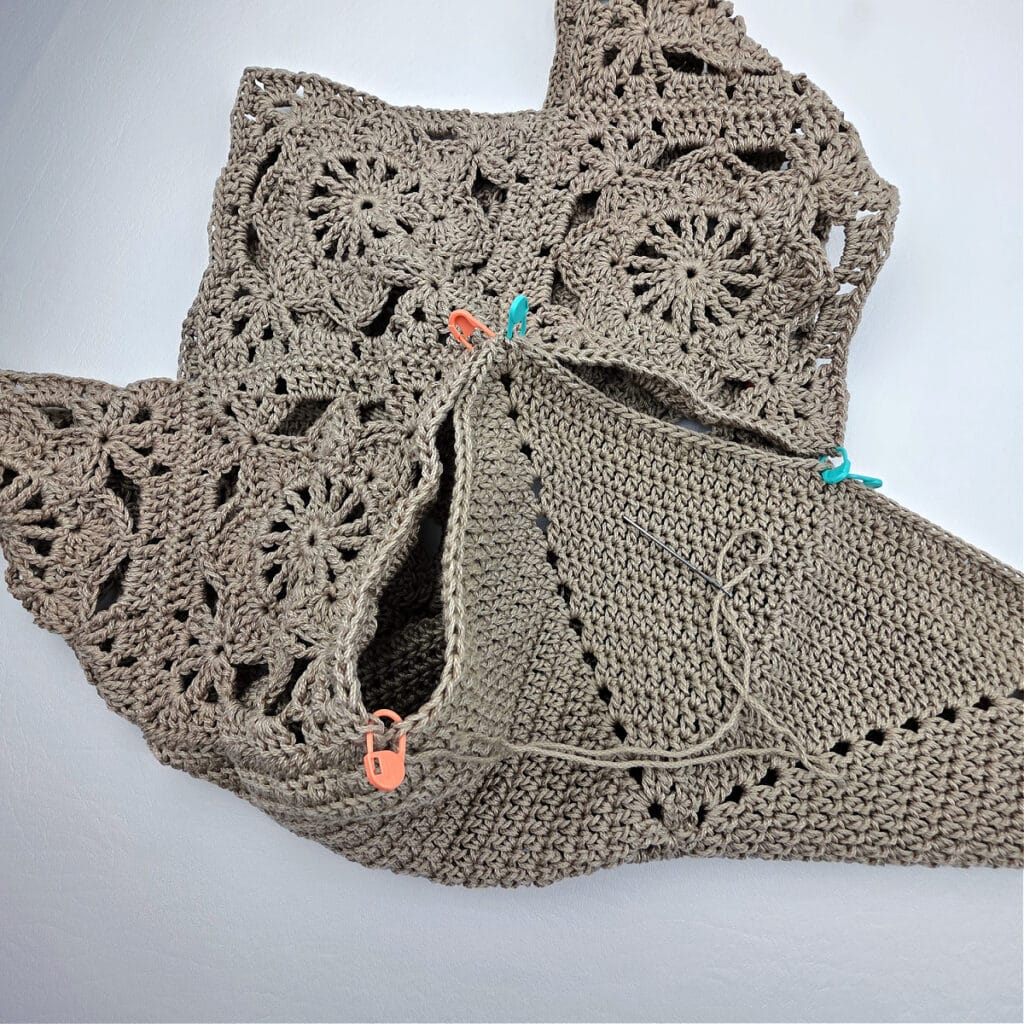
Joining Bag Bottom
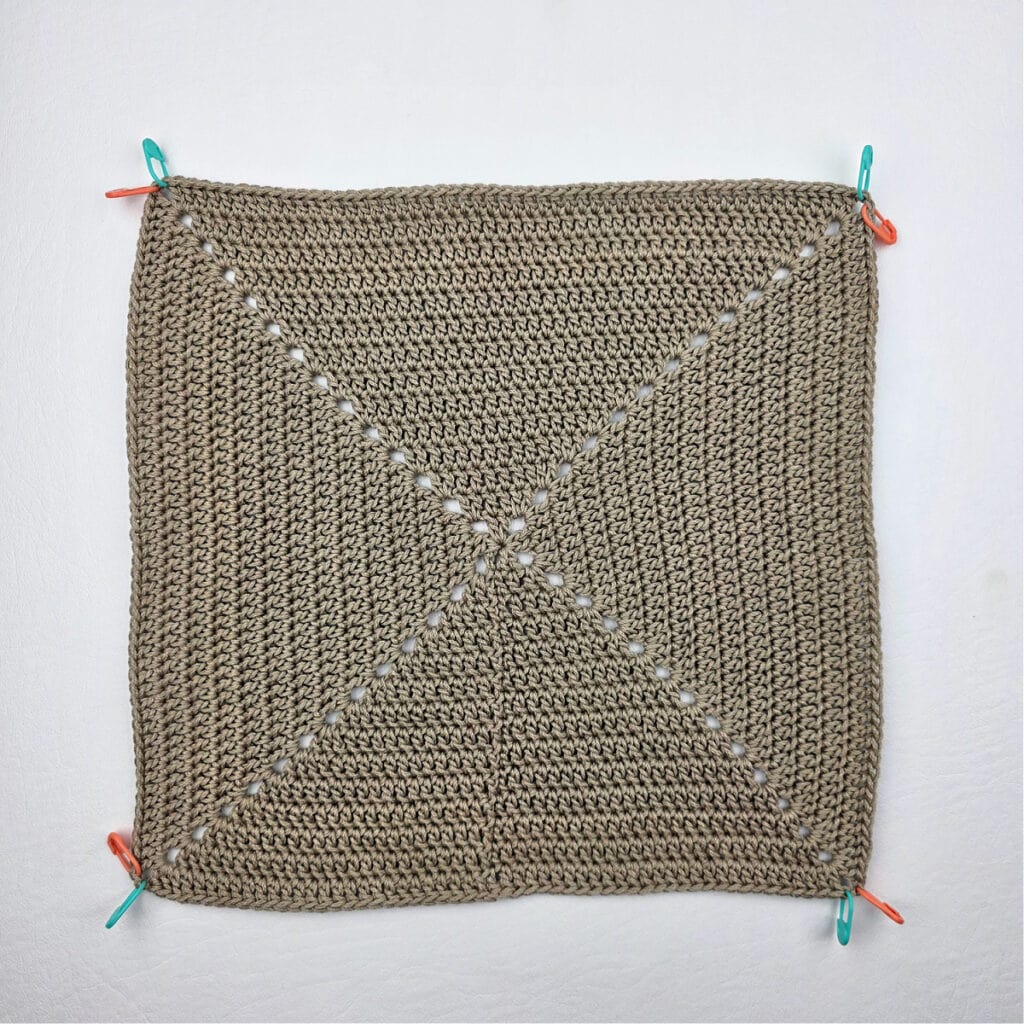
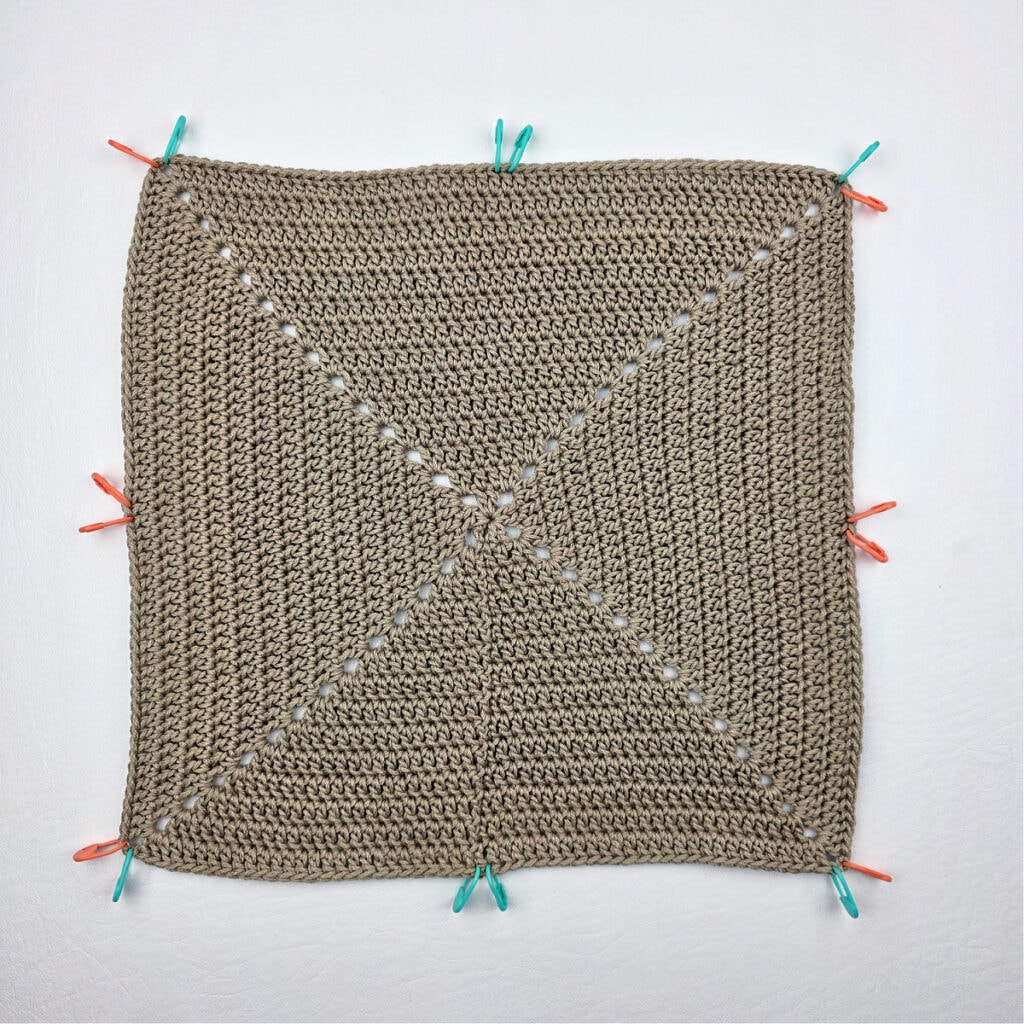
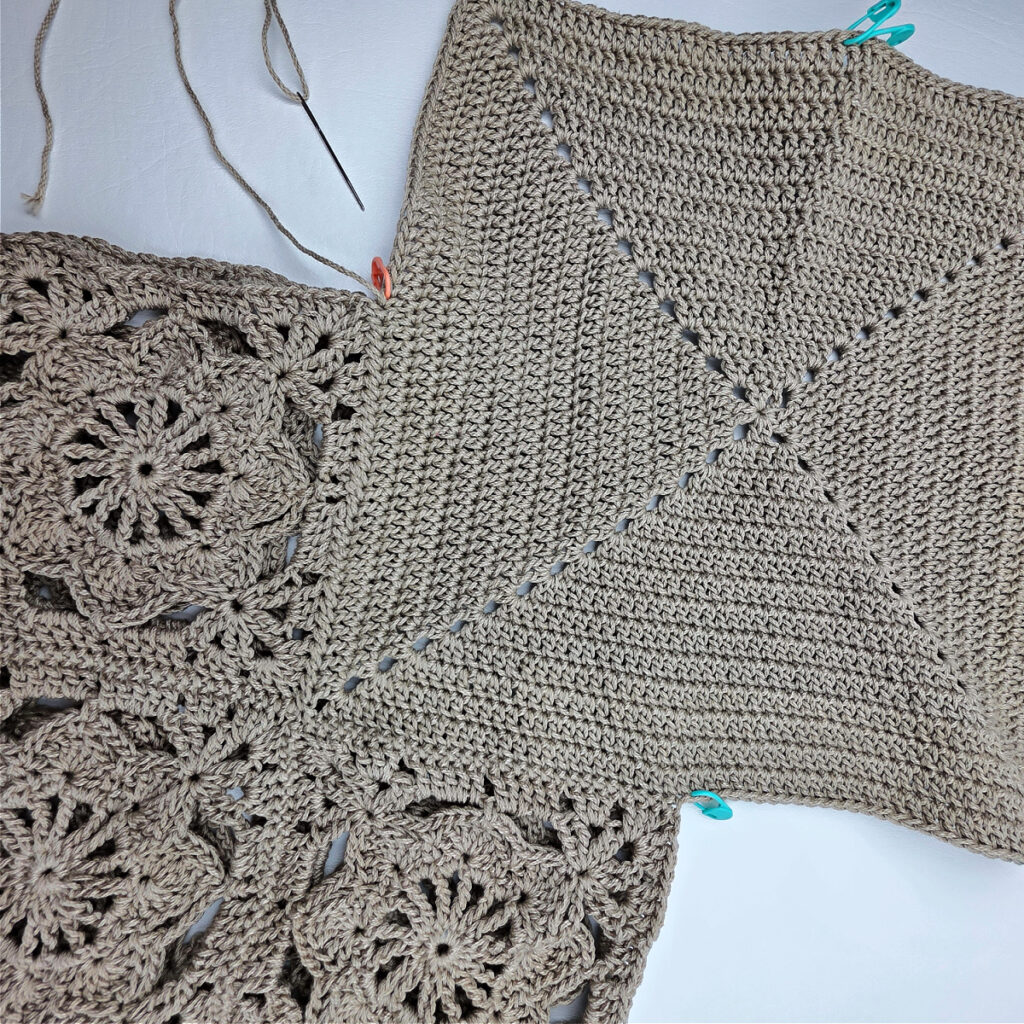
Step 1: First, place a locking stitch marker in both of the ch-1’s at each corner of your 12″ double crochet granny square, as shown in the photo below, on the left. Next, place a locking stitch marker in stitch numbers 28 & 29 along each of the four sides, as shown in the photo below, on the right. Remember to count the chains in the corners as stitches when marking stitches 28 & 29.
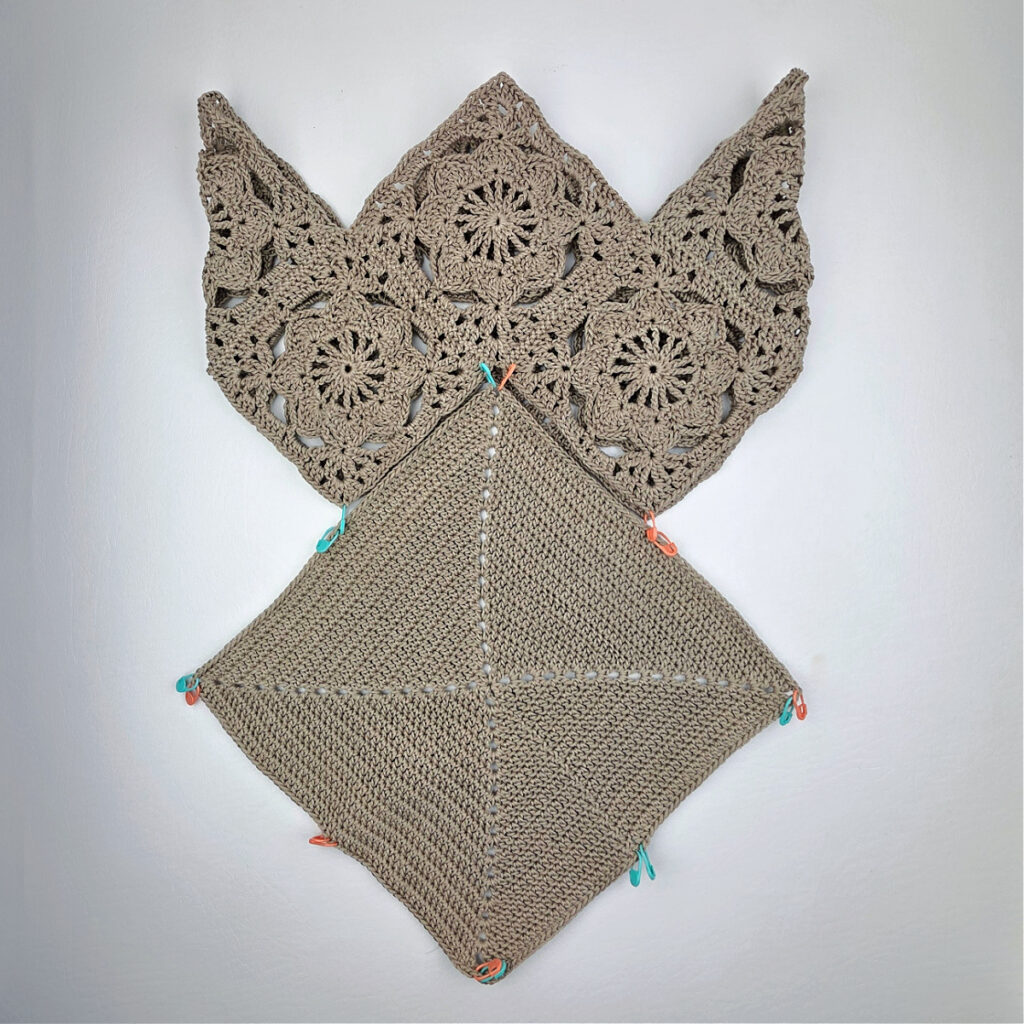
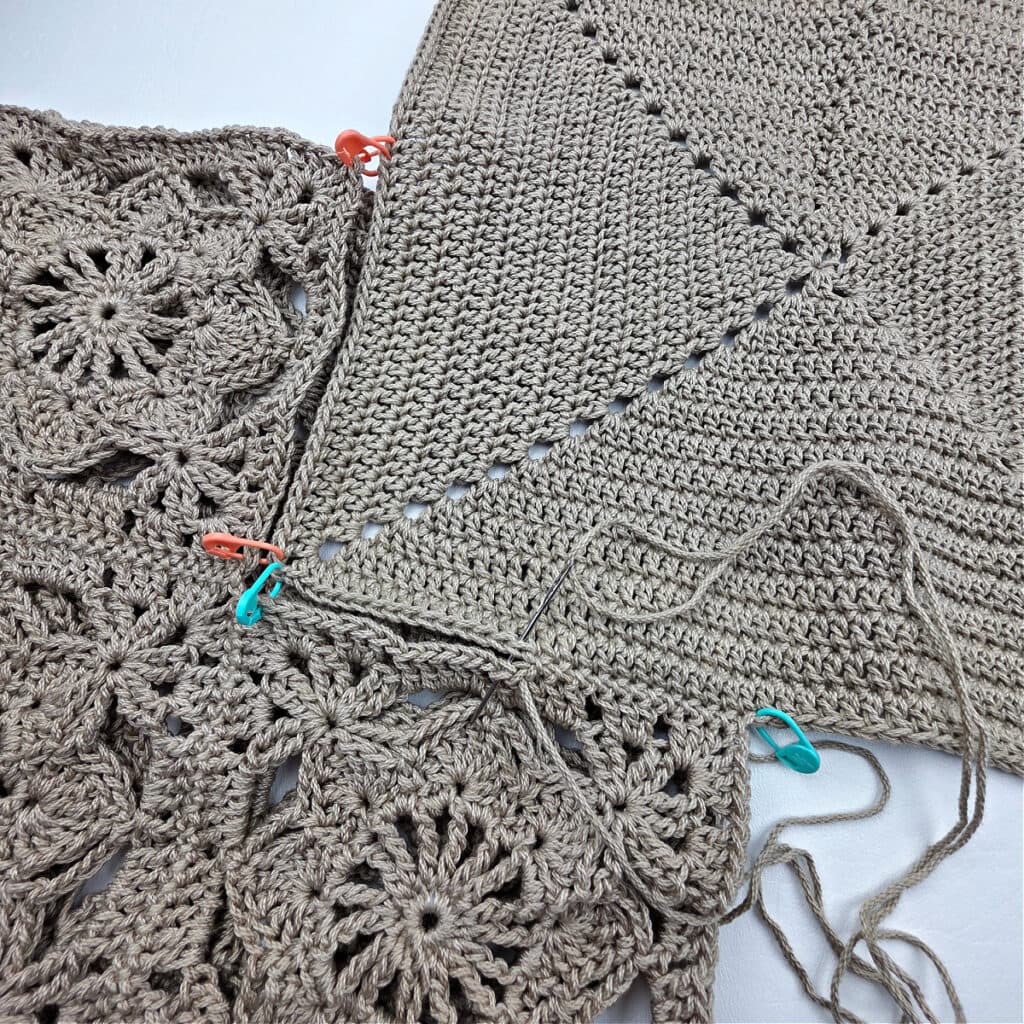
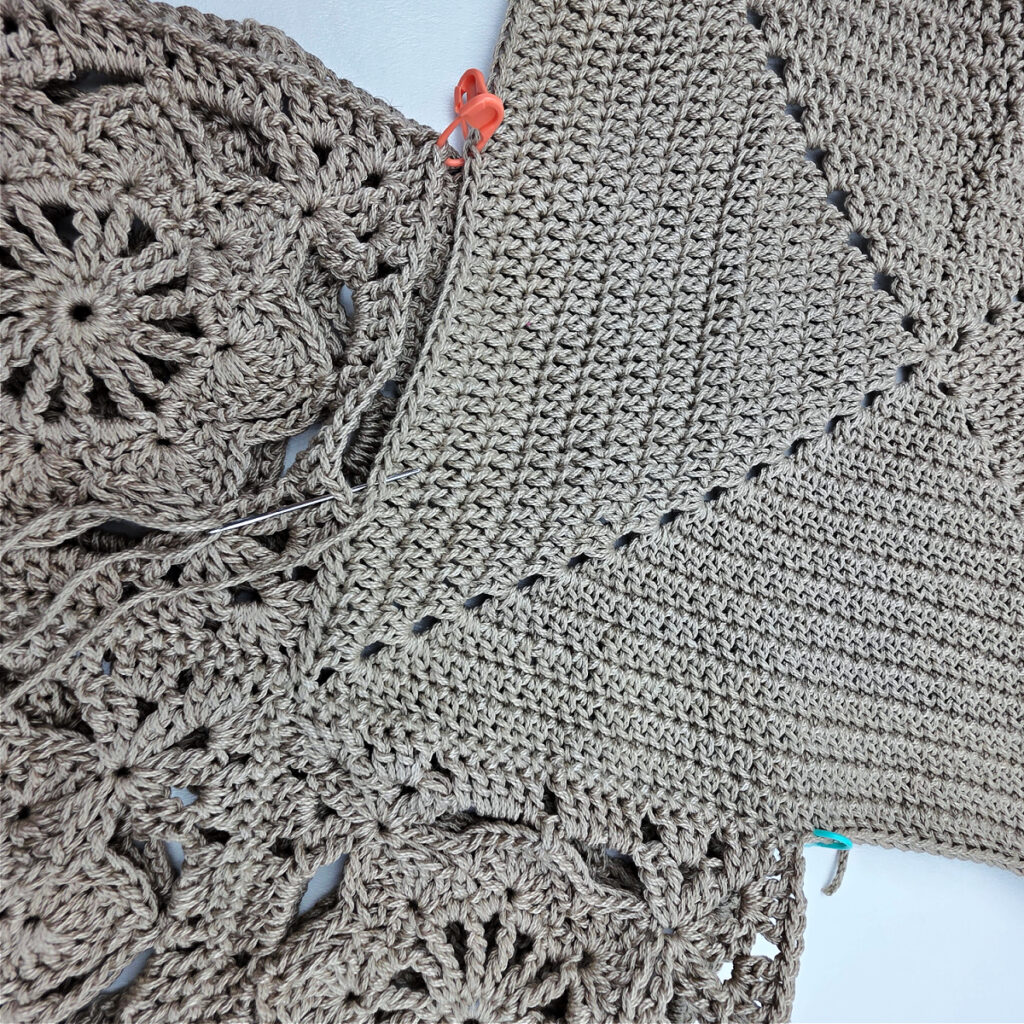
Step 2: With the right side facing out, lay your seamed motif squares and 12″ double crochet square in front of you as shown in the photo below. Use the previously placed locking stitch markers to connect the first corner of the large granny square to the seamed motifs as shown in the photo.
Step 3: Whipstitch the large crochet square to the smaller motifs. Crochet whipstitch from the green stitch marker on the left to the green stitch marker on the right. Then, whipstitch from the first orange stitch marker to the next orange stitch marker.
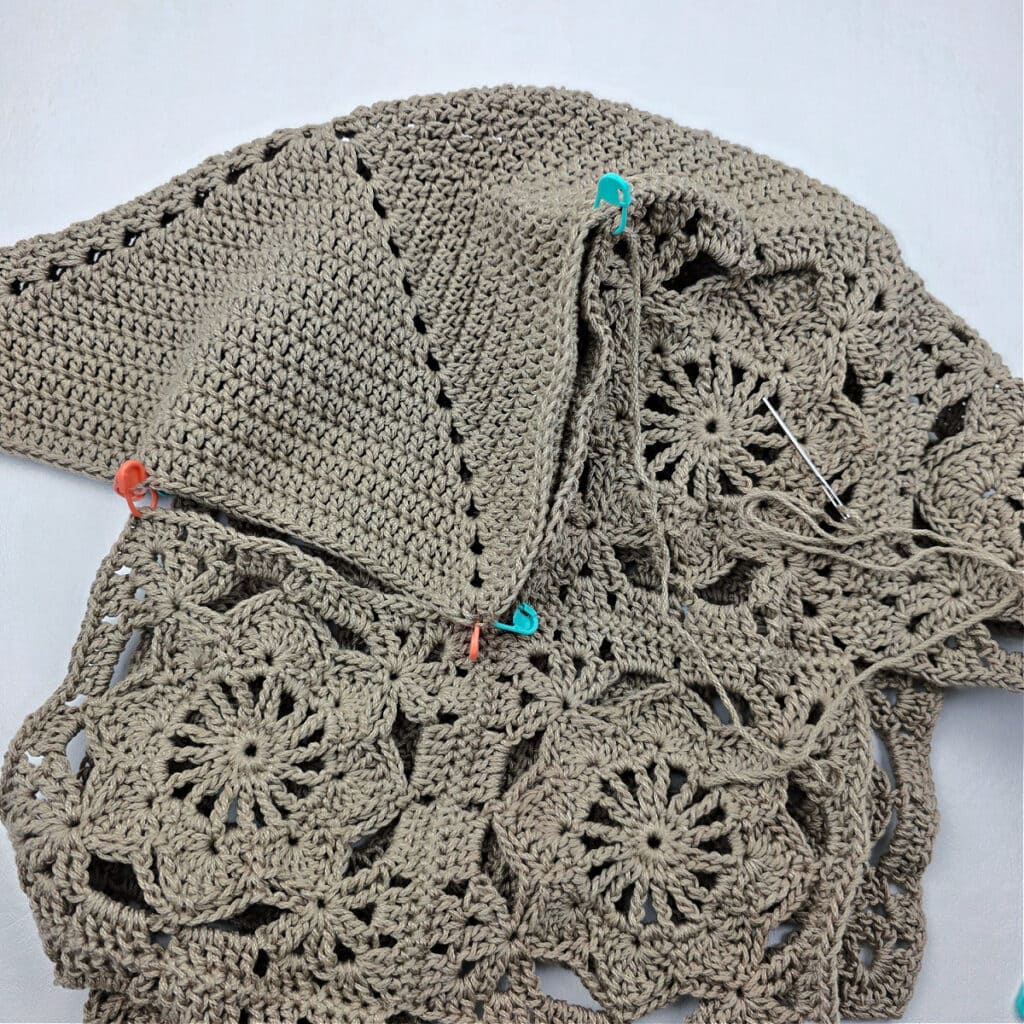
Step 4: Rotate your work and use the next 4 stitch markers to line up the next corner of the large granny square with the next two edges of the seamed motifs. Whipstitch seam the next two edges together. Continue to rotate and seam the large granny square to the smaller motifs until you’ve seamed all the way around the large granny square. Weave in ends.
Continue on to Top Edge & Bag Straps.
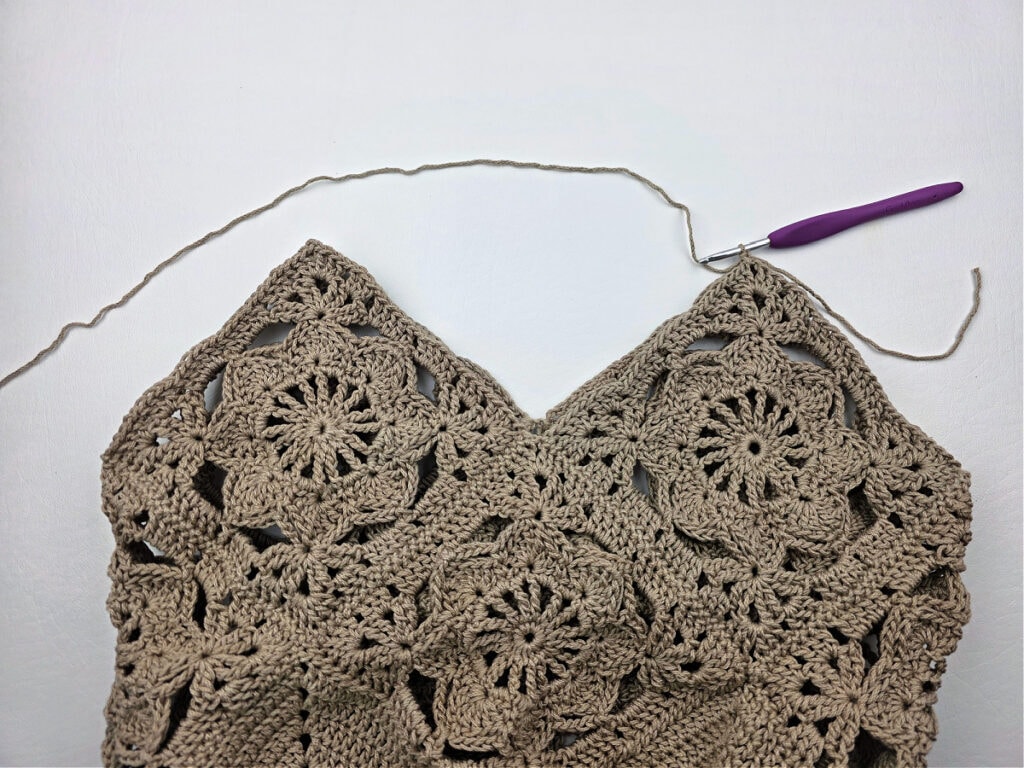
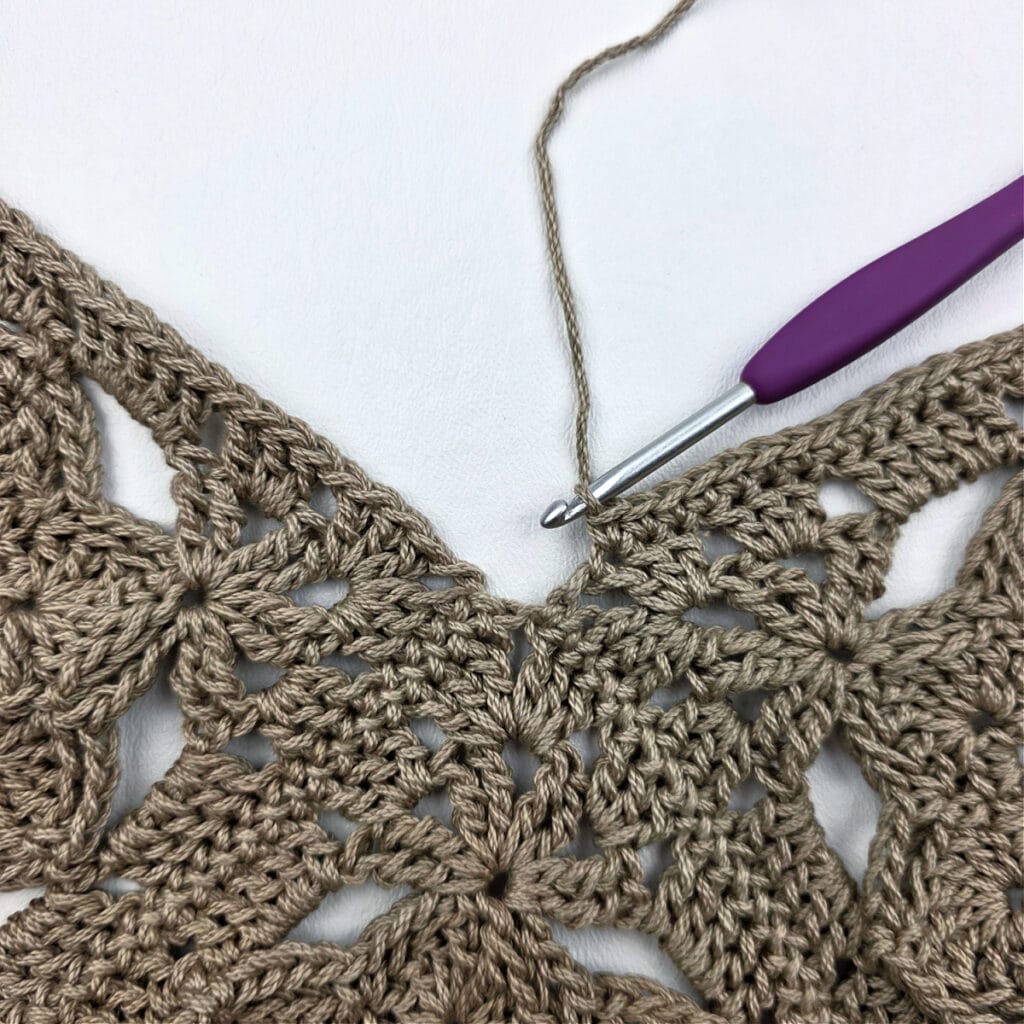
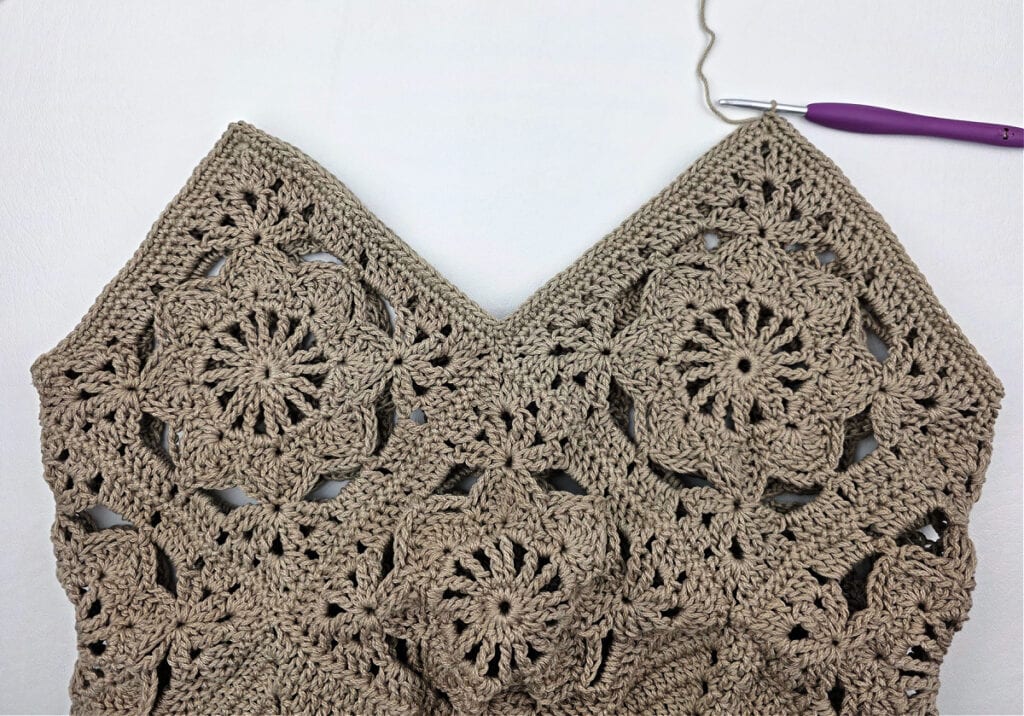
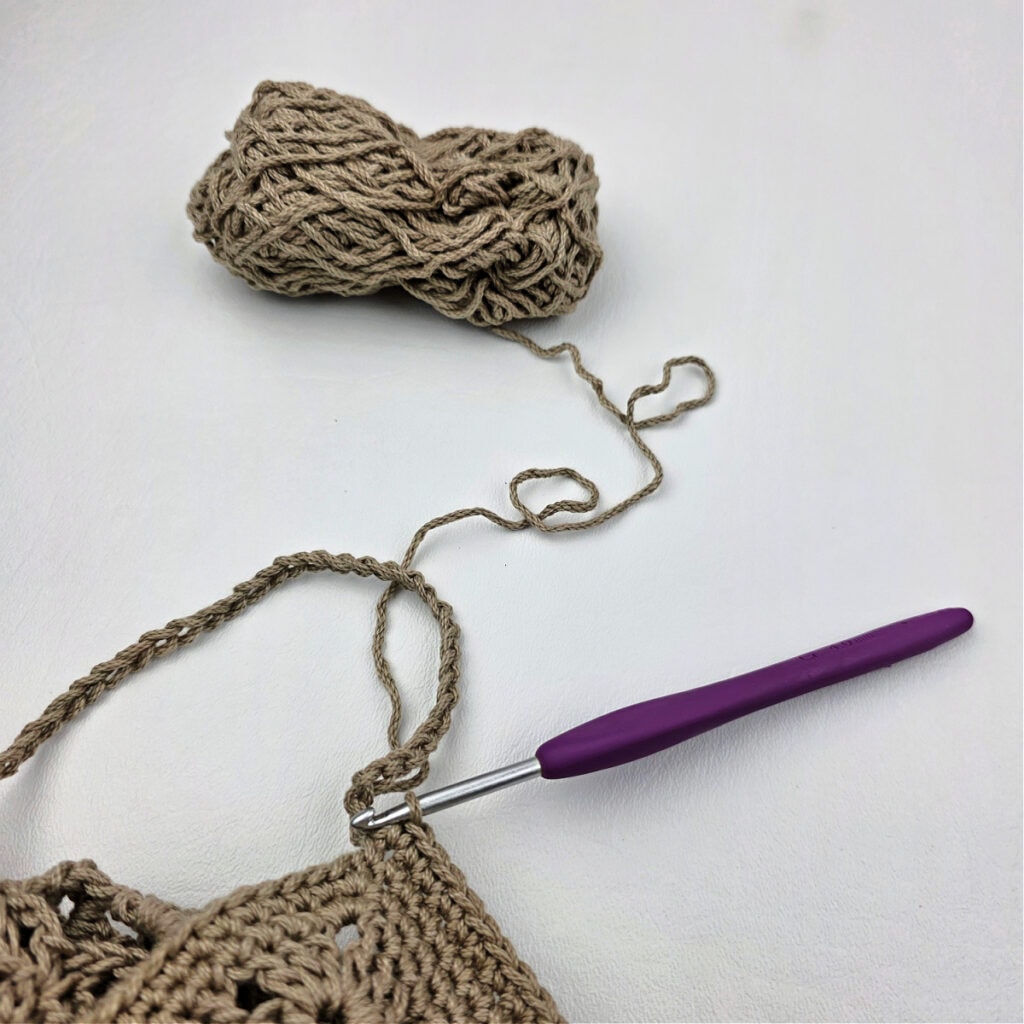
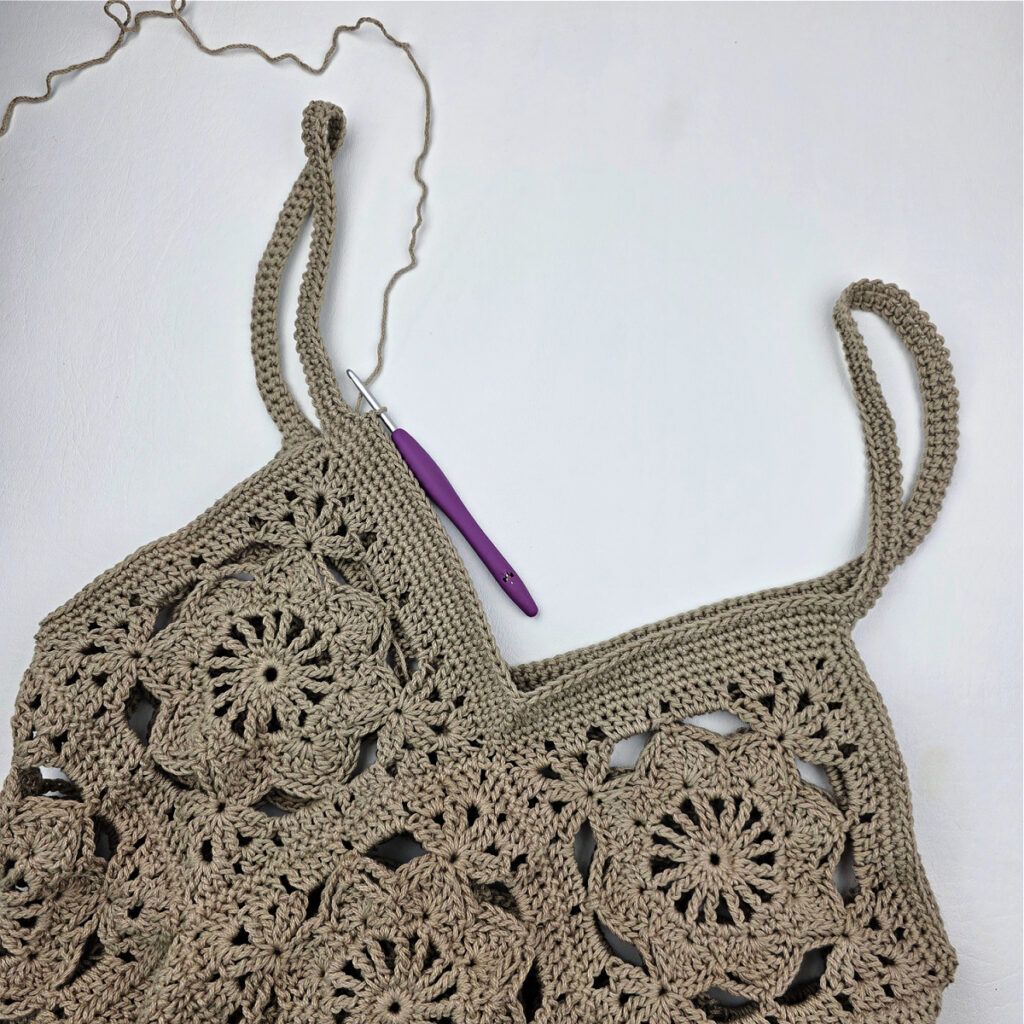
Top Edge & Bag Straps
In this section, you’ll crochet two rounds of single crochet around the entire top edge of your bag (working increases in the peaks and decreases in the valleys). While crocheting the third round, you’ll chain to create two straps. The fourth and fifth rounds are worked to complete the straps. Then, for the last round you’ll slip stitch in each stitch around to help reinforce the straps and keep them from stretching out.
Rnd 1 (RS): With yarn and a 4.00mm crochet hook, join yarn with a standing sc in a ch-2 sp on any of the motif corners, * sc in each of the next 27 sts, sc2tog in the next 2 ch-1’s in the valley, sc in each of the next 27 sts, 3 sc in the next ch-2 sp of the next peak, work from * 3 times, sc in each of the next 27 sts, sc2tog in the next 2 ch-1’s in the valley, sc in each of the next 27 sts, 2 sc in the first ch-2 sp. Join with a sl st to the 1st sc. (232 sts)
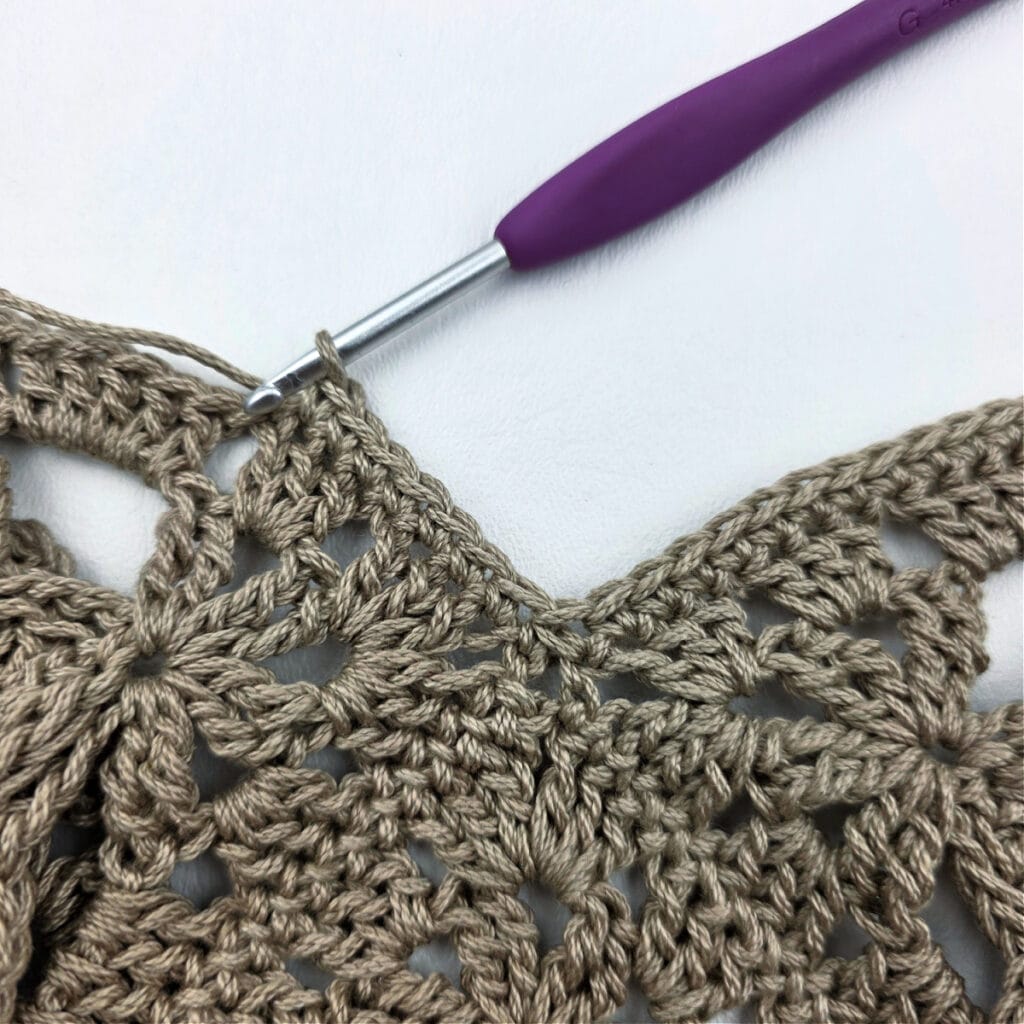
Rnd 2: Ch 1, sc in the first st, * sc in each st to the valley, skip the sc2tog in the valley, sc in each st to the middle sc of the next peak, 3 sc in the st, work from * 3 times, sc in each st to the valley, skip the sc2tog in the valley, sc in each st to the middle sc of the last peak, work 2 more sc in the same st as the first sc. Join with a sl st to the 1st sc. (232 sts)
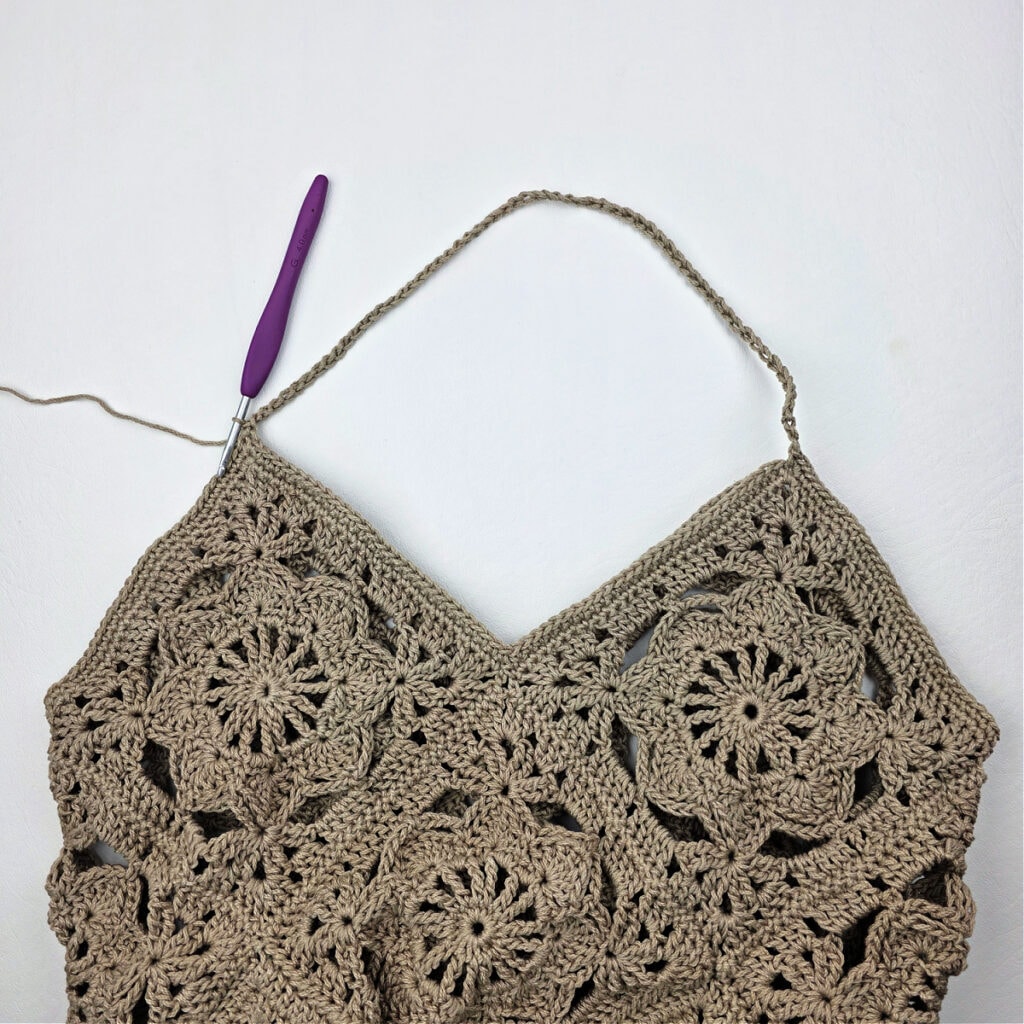
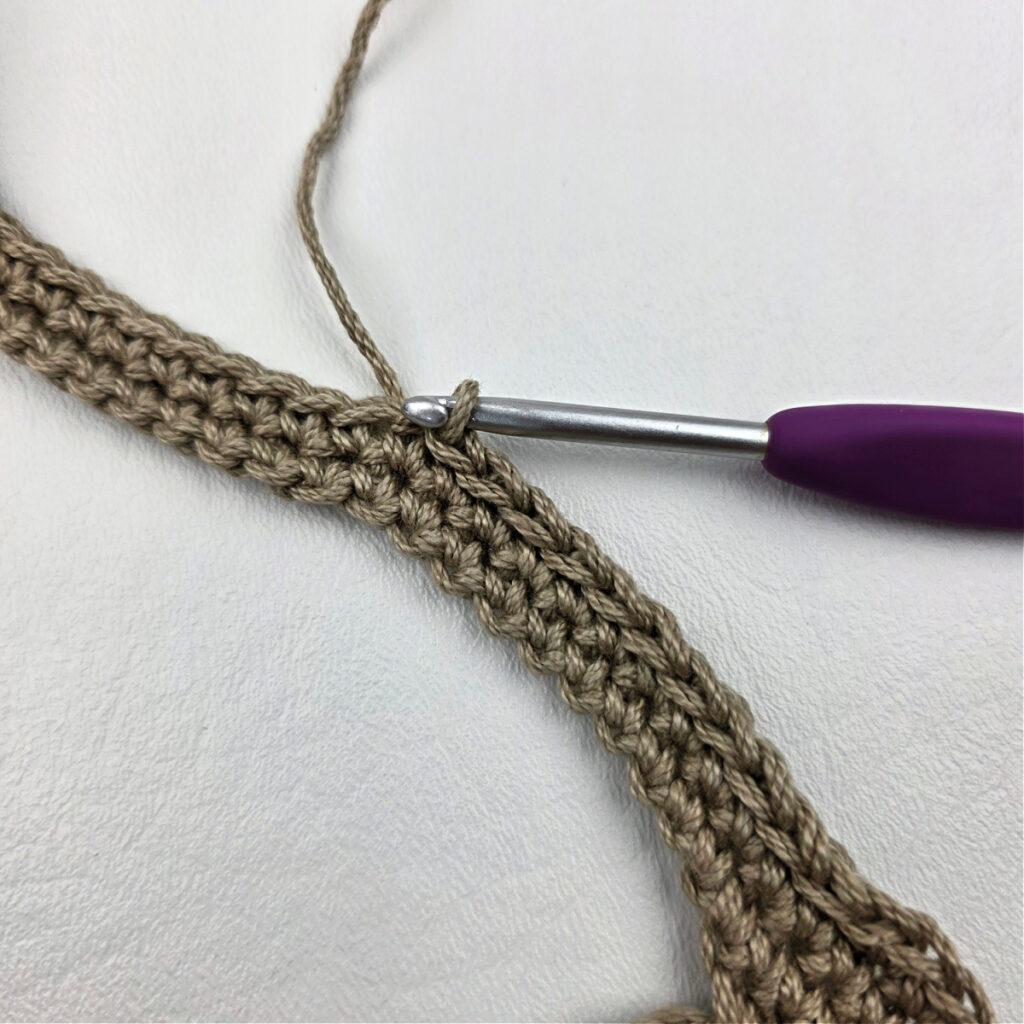
Adjusting Strap Length: To make a longer or shorter strap, in the next round, chain any number more or less than 60 for each strap. Make sure to chain the same number for both straps.
Rnd 3: * Loosely ch 60, skip across to the middle sc of the next peak, sc in the middle sc of the next peak, sc down to the next valley, sc2tog at the valley, sc in each st up to the middle sc of the next peak, rep from *. Do not join. From this point on, use a scrap piece of yarn to mark the beginning/end of each round and crochet in a spiral (aka continuous rounds). Move the scrap of yarn up as you complete each round. (stitch count isn’t crucial)
Rnd 4: Sc in each of the next 60 chs, sc in each st down to the next valley, sc2tog at the valley, sc in each st up to the next ch, sc in each of the next 60 chs, sc in each st down to the next valley, sc2tog at the valley, sc in each remaining st. Do not join. (stitch count isn’t crucial)
Rnd 5: Sc in each st around, except in the valleys, work a sc2tog in each valley. Do not join. (stitch count isn’t crucial)
Rnd 6: Sl st in each st around, except in the valleys, skip a st in each valley. Use the Special Join Technique to join the round. (stitch count isn’t crucial)
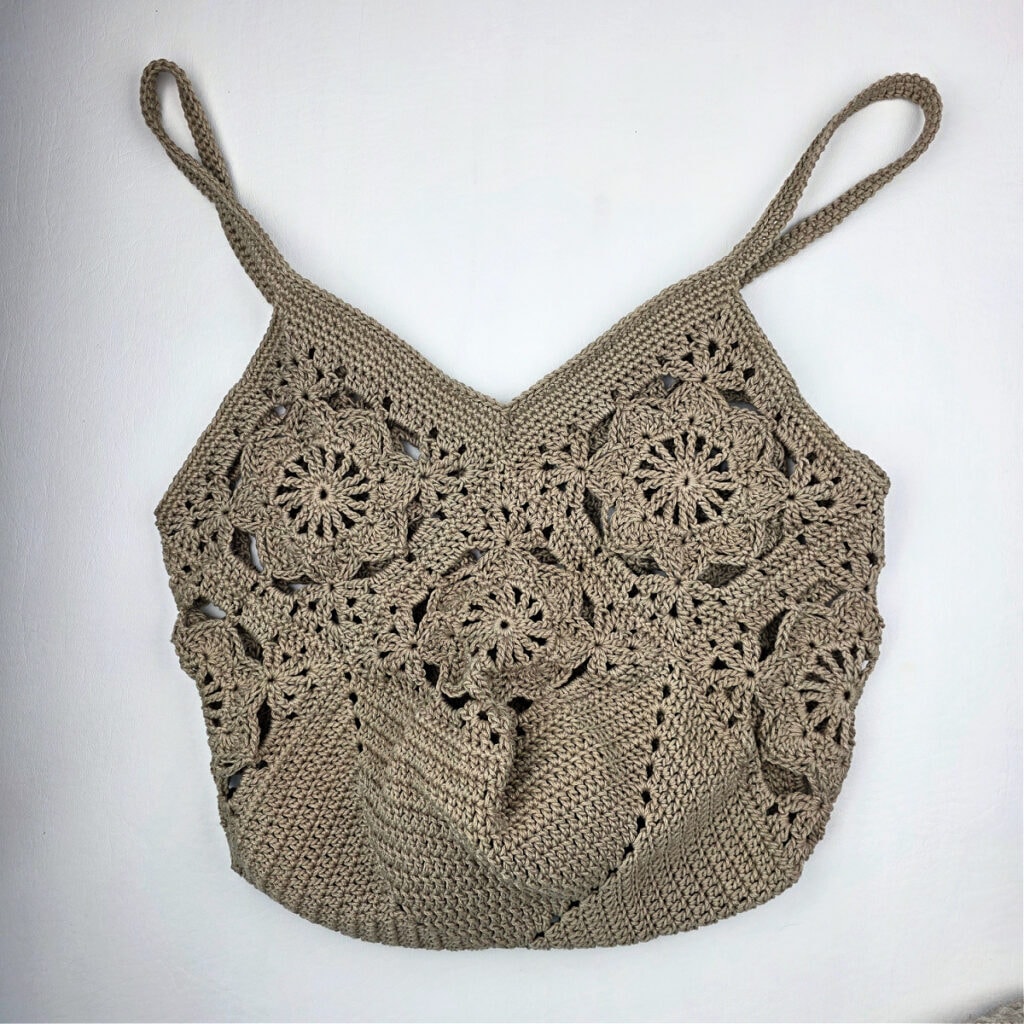
Weave in ends. Continue on to Beaded Tassels, if you’re adding them. If not, your granny squares bag is complete!
Beaded Tassels
Accessorise your granny squares bag by making and attaching beaded tassels using my beaded tassels tutorial.
Attach the beaded tassels to a strap on your granny squares bag (as shown in the beaded tassels tutorial) and your bag is complete!
If you prefer not to add tassels to your bag, that’s all right too!
I MADE IT! NOW WHAT?
Pin this post!: Save this crochet granny squares bag pattern to your Pinterest boards so that you can come back and make it again.
Leave a comment below: We love to hear your feedback.
Share Your Finished Projects on Facebook or Instagram: I love to see your finished projects! Share with us on social media and tag me @acrochetedsimplicity or use the hashtag #ACrochetedSimplicity so I can find your posts.
Join us in the Facebook Community Group!
Come share your finished projects with us in the A Crocheted Simplicity Crochet Community Group on Facebook. Join us for fun community events such as crochet alongs, join in on crochet conversations, ask questions, get advice, and share your love for crochet!

More Free Patterns for Crochet Bags & Pouches that use Granny Squares
More Crochet Patterns for Crochet Purses & Handbags
Are you looking for more crocheted purse patterns? We have several more free and premium crochet patterns for bags, backpacks, purses, and totes. We have a variety of free crochet bag patterns and premium crochet bag patterns.
maravillosa, muchas gracias por compartir.