Arden Slippers – Free Pattern for Crocheted Slippers
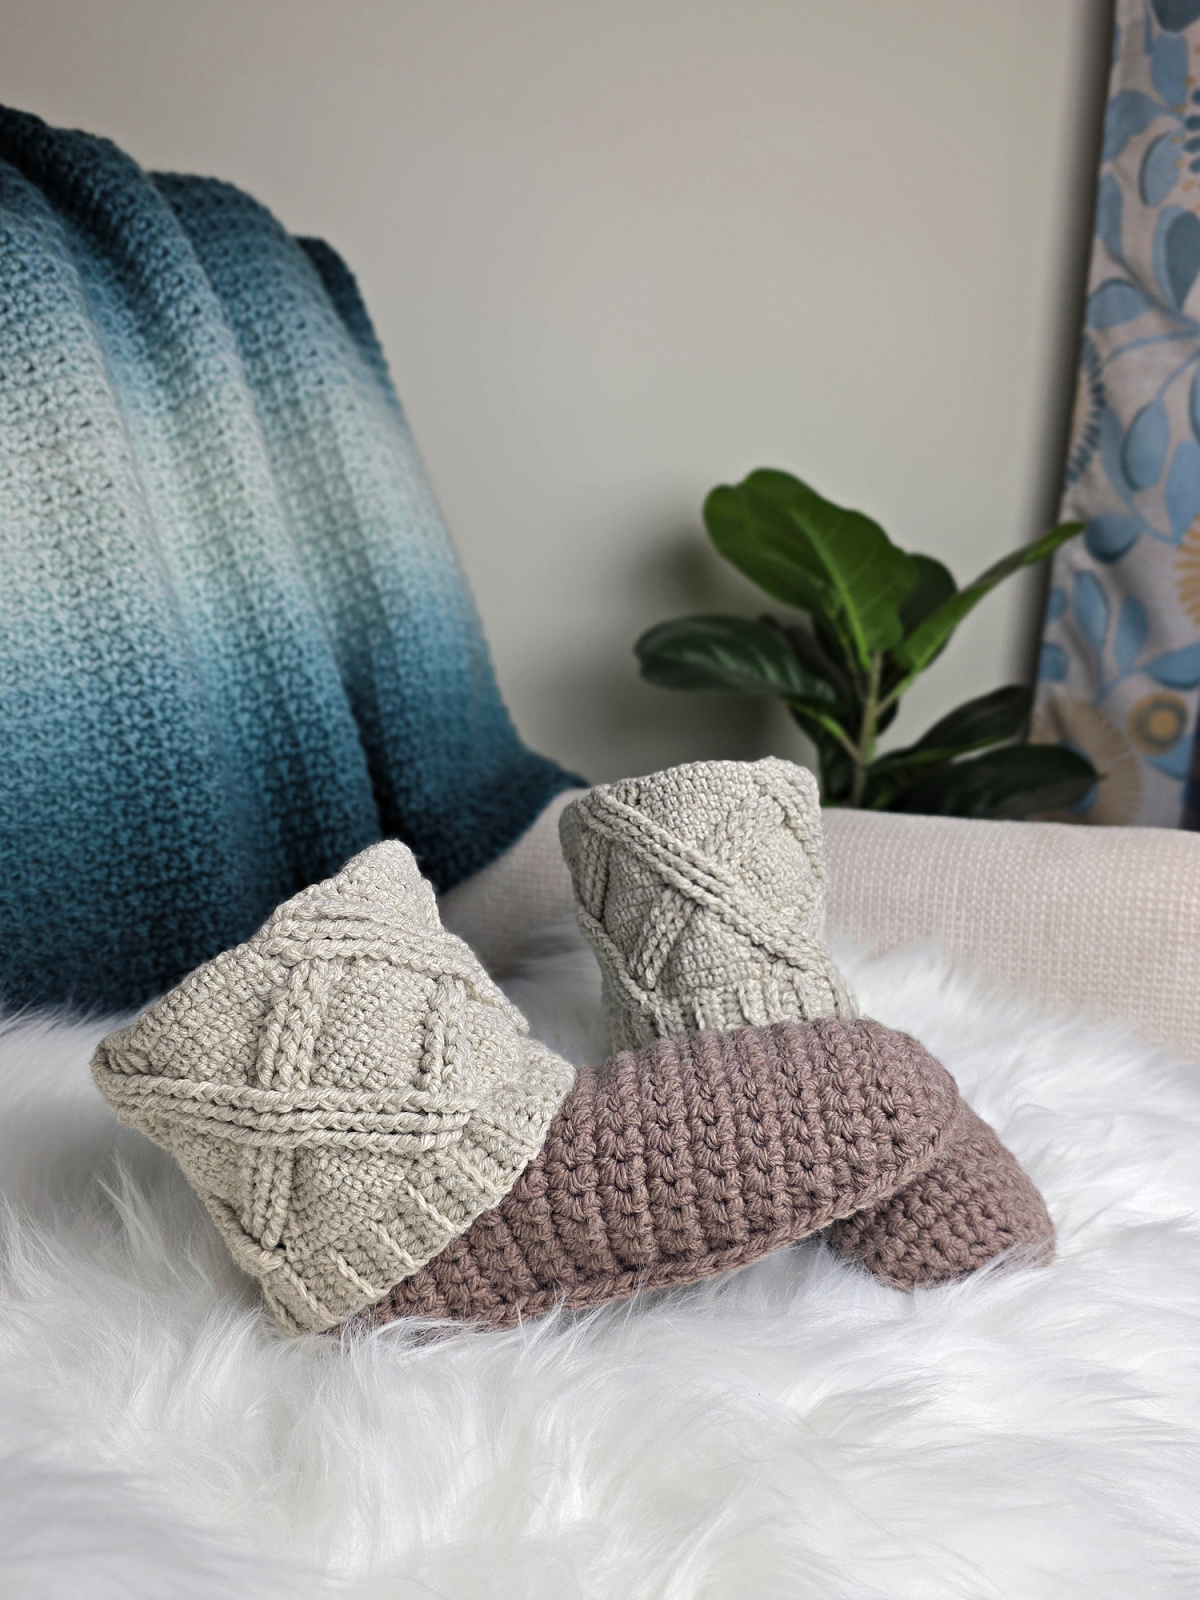
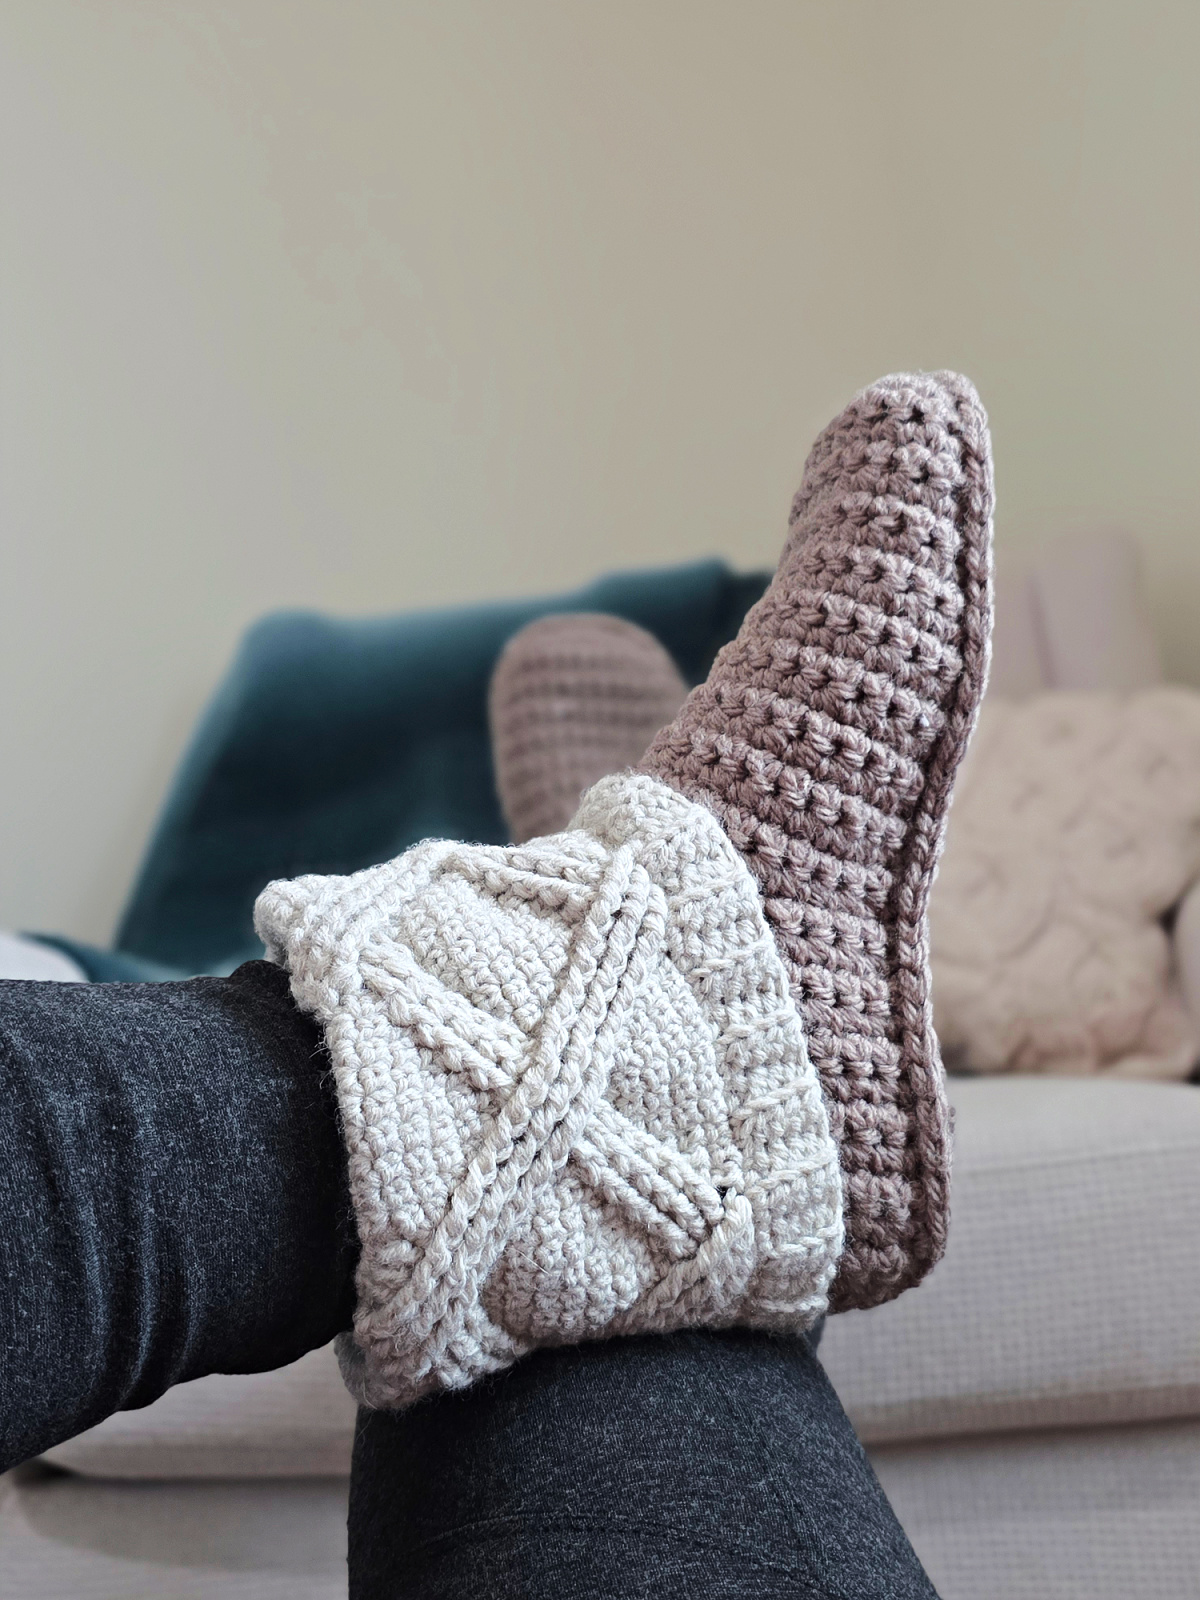
There’s no need to fret about winter footwear when you have this free pattern for crocheted slippers next on your to-crochet list! With their thick cuff, firm sole, and overall chic look, the Arden Slippers are all you need for warm and cozy feet throughout the colder months.
Did I mention they come in multiple sizes? This is not a one-size-fits-all pattern to ensure that your crochet slippers are truly yours and keep your feet snug within them. Make sure to get the measurements right though so you end up with the exact fit that you want!
You’ll find the free pattern for crocheted slippers in the post below, or you can find an ad-free printable PDF (that includes all photo tutorials), on Ravelry, or Etsy (aff).
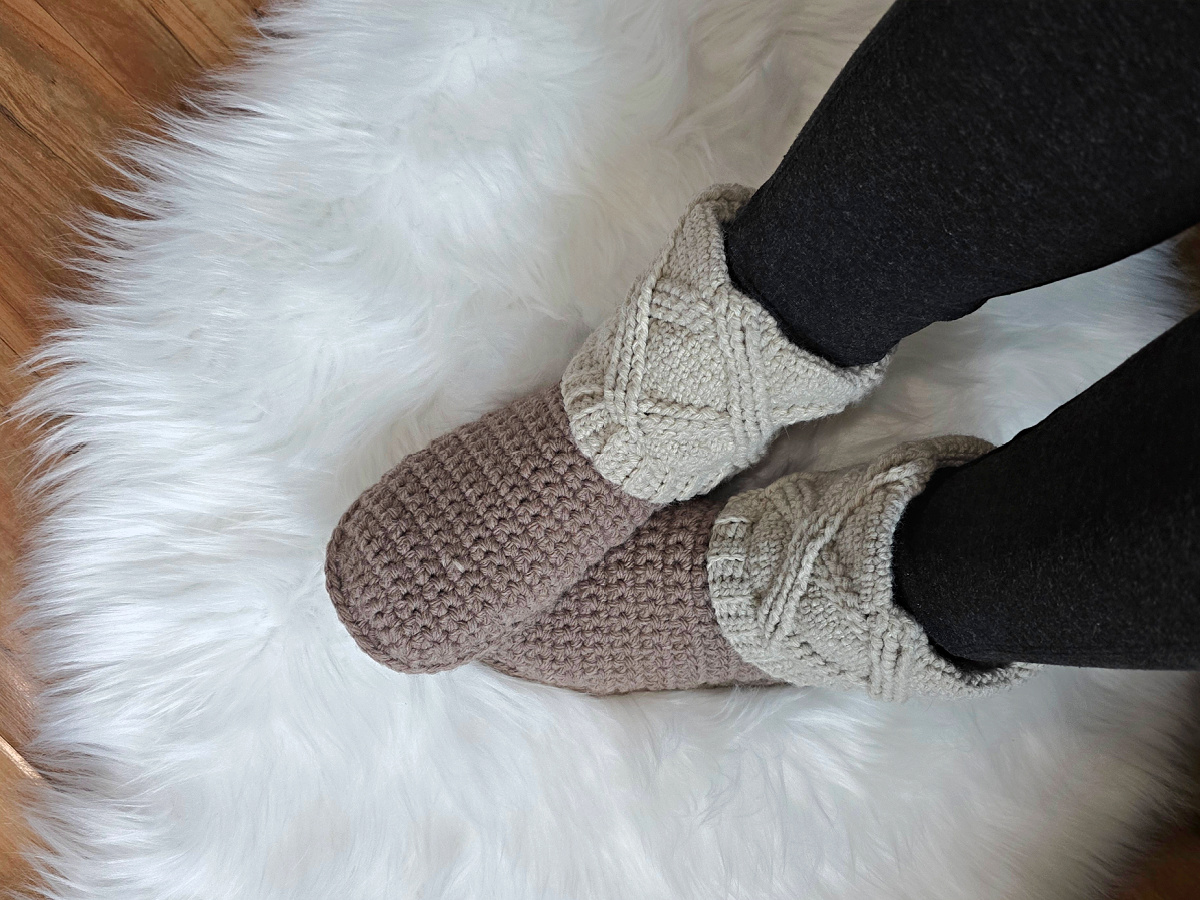
These womens crochet slippers are trendy while promising comfort. You’ll be adding a sturdy sole which takes these slippers to the next level in terms of durability and function. The boots hold their shape, so you won’t mind wearing them for a quick run to the patio or to grab garments from your clothing line.
Once your pair of crocheted slippers is ready and you’ve shown them off to your friends and family, you’re sure to get more than a few requests. The overall pattern is a breeze after you’ve gone through it the first time and you’ll enjoy working them up each time.
How to Crochet a Pair of Boots
This free pattern for crocheted slippers is made step-by-step in three pieces and crocheted together. First, you’ll crochet the soles, working two of them for each slipper, and uppers in rows. Next, you’ll join the soles to the uppers by working single crochet around the perimeter.
Once this is done, you’ll crochet the ankle onto the slipper. Lastly, you’ll crochet the cabled cuffs and whipstitch them securely onto the slipper. They’re now ready to be worn all around the house.
How to Wash Crochet Slippers
My youngest bought herself a pair of UGG slipper boots and loves them, but they aren’t as easy to care for as crocheted slippers are. I love the convenience of being able to toss my slippers in the washer!
Many crocheters will ask ‘Can you wash crochet in a washing machine?’
Depending on the yarn you used to crochet the slippers, yes, in most cases, you can simply toss your handmade slippers in the washing machine. Make sure to check the yarn label for care instructions first.
If the yarn you used is machine washable, I recommend washing them on a gentle cycle in cold or warm water. Then, lay them flat to dry.
Tip: If you have them handy, I like to wash my crochet slippers in mesh laundry bags.
How To Get The
Arden Slipper Boots
Option 1: Scroll down for the free pattern for crocheted slippers right here in this blog post.
Option 2: Purchase the ad-free printable PDF from one of my shops:
How to Make Crochet Slippers Non-Slip
Handmade slippers are great, but they can be super slippery on hard surfaces!
When my kids were little and we had hardwood floors and stairs, I was always worried about them slipping and falling. So, when I started crocheting slippers for them, I wanted a fun, quick, and easy way to make the soles non-slip.
That’s when I remembered making non-slip socks with my friends for a high school sock hop. We used Tulip Puff Paint for our socks so I figured why not try it on the kids slippers… it worked great!
My kids loved being able to choose their own colors and help paint shapes on the soles of their slippers. They made little stars, hearts, and squiggly lines and their favorite was the glow-in-the-dark puff paint.
Although there are many great options to keep crochet slippers from slipping, such as Plasti Dip or sewing non-slip fabric onto the soles, I’ve found that the easiest, most fun, and most cost effective is Tulip Puff Paint!
Choosing Which Size to Crochet
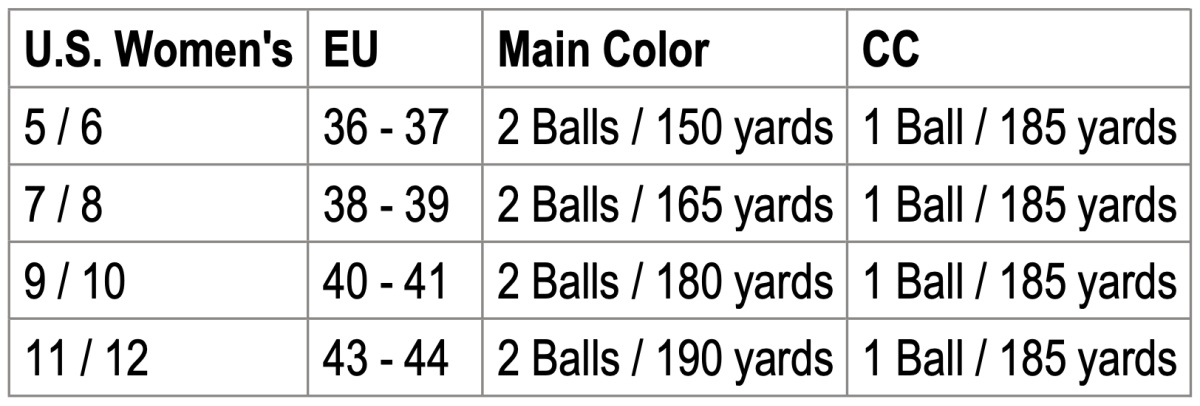
To choose your size, look over the size chart below.
- Main Color: Lion Brand Hue & Me in Warm Stone #617- 125AI
- CC: Lion Brand Wool Ease in Linen #620-096A
Size & Yardage Chart
The notes above refer to this size chart.
Yarn
For the Cable Crochet Slipper Boots, I chose Lion Brand Yarns Hue & Me and Wool Ease. Both of them have a percentage of acrylic and wool in them, giving them an extra ounce of warmth and comfort.
Acrylic yarn is a great choice for making crochet boots because it is durable, low-maintenance, and available in a variety of colors. It holds its shape well, which is important for boots that need structure and support, especially around the ankles and foot. The wool blend adds extra warmth to your slipper boots.
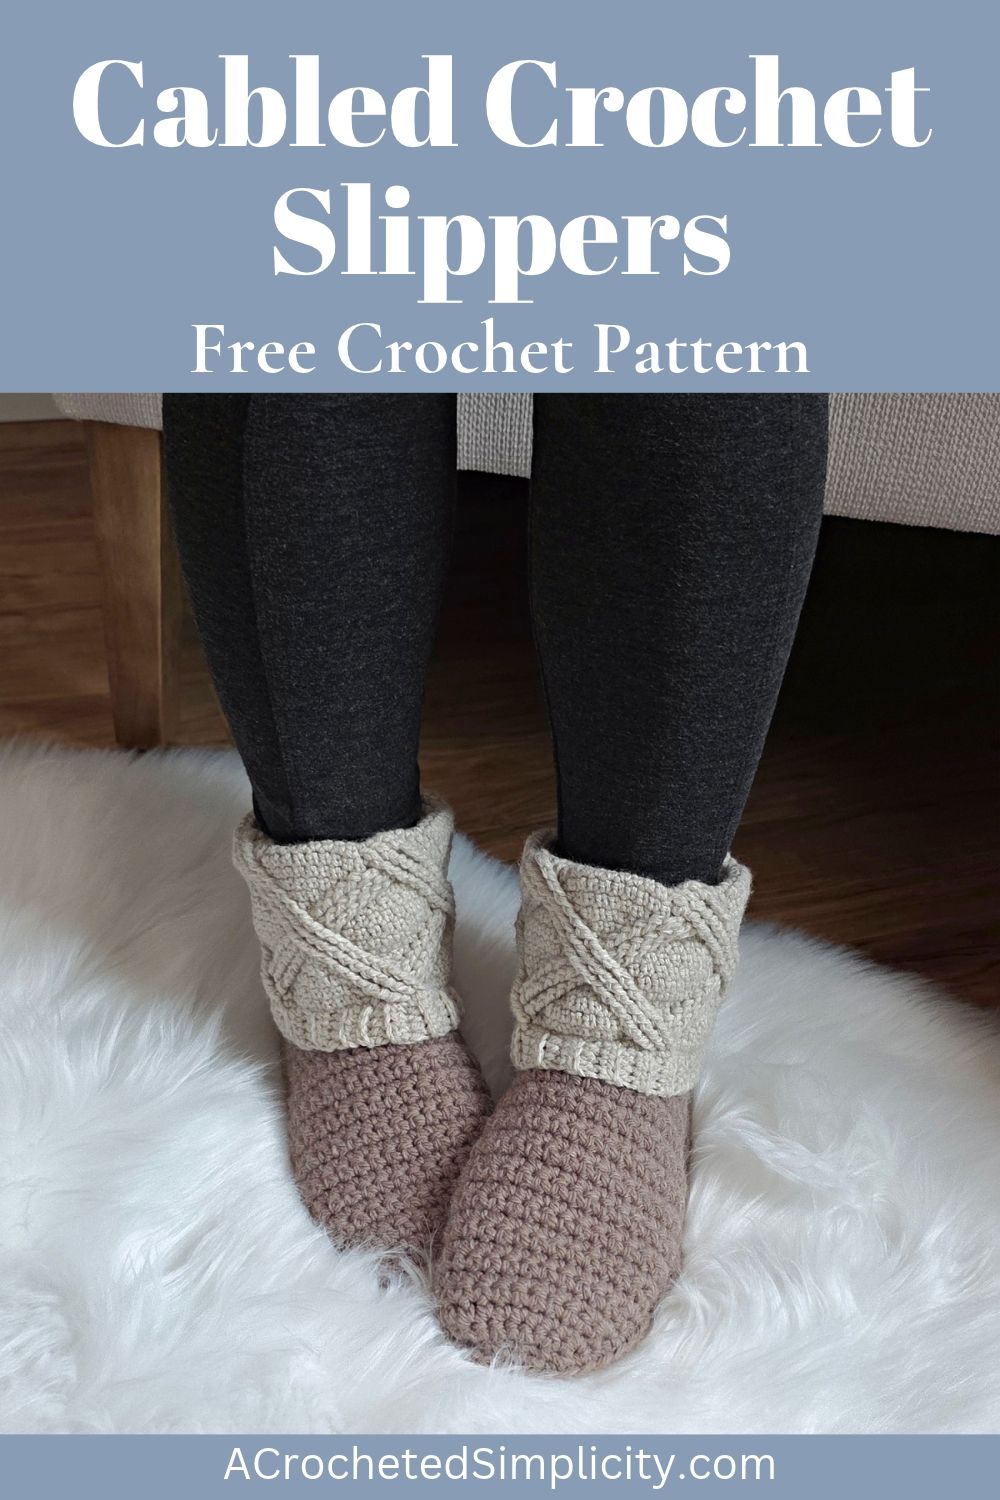
Arden Slipper Boots – Free Pattern
The free pattern for crocheted slippers is available below, but if you love to work offline, I’ve got a couple other great options for you.
Purchase the ad-free, printable PDF, (that includes all photo tutorials), on Ravelry, or on Etsy (aff).
Purchase the Crochet Kit (aff): Lion Brand has a full kit of the Arden Cabled Crochet Slipper Boots, available on their website. The kit includes your choice of color and a digital copy of the pattern.
This post contains affiliate links.
Materials
- Yarn: Bulky Weight / 5 and Worsted Weight / 4 Yarn, Lion Brand Yarns Hue & Me (80% Acrylic, 20% Wool / 137 yards / 125 m / 125 g / 4.4 oz) and Wool Ease (80% Acrylic, 20% Wool / 197 yds / 180 m / 85 g / 3 oz) were used for the sample.
- Yardage & Colors: See Size Chart Above
- Crochet Hook: I/9/5.50mm; G/6/4.00mm; or size needed to obtain gauge (My favorite crochet hooks are the Clover Amour Crochet Hooks, I’ve never had an ache in my hand since switching).
- Measuring Tape
- Locking Stitch Markers
- Scissors
- Yarn Needle
- Scrap piece of yarn
Abbreviations (US Terms)
- ch: chain
- sl st: slip stitch
- st(s): stitch(es)
- sp: space
- yo: yarn over
- sc: single crochet
- hdc: half double crochet
- dc: double crochet
- sc2tog: single crochet decrease
- FPdc: front post double crochet
- FPTrtr: Front Post Triple Treble
- BLO / FLO: back loop only / front loop only
- Rep: repeat
- Rnd: round
- SM: stitch marker
- MC: Main Color
- CC: Contrasting Color
- Join yarn with a standing sc
Experience Level
- Intermediate
Gauge
- See individual sections for gauge.
Sizes
- Women’s Sizes (US): 5/6, 7/8, 9/10, 11/12
Special Stitches
- Extended Single Crochet (ext sc): Insert hook into stitch indicated, yo, pull up a loop, yo, pull thru 1 loop on hook, yo, pull thru remaining two loops on hook.
- Front Post Double Crochet (fpdc): Yo, insert hook from front to back to front around the post of the designated stitch, yo, pull up a loop, yo, pull thru 2 loops, yo, pull thru remaining 2 loops.
- Front Post Triple Treble Crochet (FPTrtr): Insert your hook from front to back to front around the post of the indicated stitch, yo 4 times, insert hook into designated stitch, yo, pull up a loop, (yo, pull thru 2 loops) 5 times.
- Join yarn with a standing single crochet: Begin with a slip knot on your hook, insert your hook into the stitch or space indicated, yo, pull up a loop, yo and draw thru both loops on hook.
Pattern Notes
- Turning chains are not counted as stitches, unless specified otherwise.
- The first stitch of each row is worked into the same stitch as the turning chain, unless noted otherwise.
- Yarn Notes: Lion Brand Yarns Hue & Me and Wool Ease were used for the sample. Other comparable yarns may be used as long as gauge is met.
- Lion Brand Yarns Hue & Me, bulky weight / 5 yarn, 80% Acrylic / 20% Wool (137 yards / 125 m / 125 g / 4.4 oz)
- Lion Brand Yarns Wool Ease, worsted weight / 4 yarn, 80% Acrylic / 20% Wool (197 yds / 180 m / 85 g / 3 oz)
- Yardage & Colors:
- MC: Warm Stone #617- 125AI (2 balls) 150 (165, 180, 190)
- CC : Linen #620-096A (1 ball) 180 yards
- Slipper Boot Construction: This crochet slipper boot is made in three pieces and crocheted together. First, you’ll crochet the soles and uppers in rows. Next, you’ll join the soles to the uppers by working single crochet around the perimeter. Then you’ll crochet the ankle onto the slipper. Lastly, you’ll crochet the cabled cuffs and whipstitch them onto the slipper.
Crochet Slipper Boot Pattern – Construction Notes
Scroll down to the individual size for the slippers you’re making and crochet the Soles, Uppers, and Ankles. Then continue scrolling down to the Cuff section for all sizes.
All tutorial photos of the soles, uppers, ankles, and cuffs, for all sizes, can be seen below, just after the Slipper Cuff instructions.
Important Note About Sizing
The size of the slipper sole is intended to be approximately 1/2″ shorter and narrower than the finished slipper size stated by the heading for each size. This is because when joining the sole to the upper with single crochet stitches, you’re adding more stitches to the perimeter and also because the process of seaming stretches the yarn a bit. If you have wide feet, see the note at the end of the sole instructions for the size slipper you’re crocheting.
Arden Crochet Slippers – Written Pattern
Slipper Boot Size 5/6
Finished Size: Length: 9″ & Width: 3-1/2″
Yarn: Chunky / 5 / 150 yards
Gauge: 3 sc = 1″; 2.75 rows = 1″
Slipper Sole Size 5/6 – Make 2
Row 1: With MC yarn & a 5.50mm crochet hook, ch 3 (ch-2 counts as 1st dc), work 8 dc into the 3rd ch from your hook. Do not join. Turn. (9 sts)
Row 2: Ch 2 (counts as a st), dc in the next st (not the same st as ch 2), (2 dc in next st, dc in next 2 sts) twice, 2 dc in last st (last st is the top of ch 2 from beginning of Row 1). Turn. (12 sts)
Row 3: Ch 1, 2 sc in the first st, (sc in next st, 2 sc in next st) 5 times, 2 sc in last st (last st is the top of ch 2 from beginning of Row 2). Turn. (19 sts)
Row 4: Ch 1, rotate to work across the flat edge of the sole, work 1 sc in the side of each sc row and 2 sc in the side of each dc row. Turn. (10 sts)
Rows 5 – 10: Ch 1, sc in each st across. Turn. (10 sts)
Row 11: Ch 1, sc2tog, sc in each of the next 6 sts, sc2tog. Turn. (8 sts)
Rows 12 – 22: Ch 1, sc in each st across. Turn. (8 sts)
Row 23: Ch 1, sc2tog, sc in each of the next 4 sts, sc2tog. Turn. (6 sts)
Row 24: Ch 1, sc2tog, sc in each of the next 2 sts, sc2tog. (4 sts)
Note: If you have wide feet, you may get a better fit by working 1 sc in each stitch around your sole before continuing.
Fasten Off. Weave in ends.
Upper Size 5/6 – Make 2
Row 1: With MC yarn & a 5.50mm crochet hook, ch 6, working into the back hump of the ch, sc in the 2nd ch from your hook and in each ch across. Turn. (5 sts)
Row 2: Ch 1, work 2 sc in each st across. Turn. (10 sts)
Row 3: Ch 1, 2 sc in the first st, sc in each of the next 8 sts, 2 sc in last st. Turn. (12 sts)
Row 4: Ch 1, sc in each st across. Turn. (12 sts)
Row 5: Ch 1, 2 sc in the first st, sc in each of the next 10 sts, 2 sc in last st. Turn. (14 sts)
Row 6: Ch 1, sc in each st across. Turn. (14 sts)
Row 7: Ch 1, 2 sc in the first st, sc in each of the next 12 sts, 2 sc in last st. Turn. (16 sts)
Row 8: Ch 1, sc in each st across. Turn. (16 sts)
Row 9: Ch 1, 2 sc in the first st, sc in each of the next 14 sts, 2 sc in last st. Turn. (18 sts)
Row 10: Ch 1, sc in each st across. Turn. (18 sts)
Row 11: Ch 1, 2 sc in the first st, sc in each of the next 16 sts, 2 sc in last st. Turn. (20 sts)
Rows 12 – 20: Ch 1, sc in each st across. Turn. (20 sts)
Do not fasten off. Continue on to the Upper – Right Side.
Upper Size 5/6 – Right Side
Row 1: Ch 1, sc in the first st, sc in each of the next 5 sts. Before turning, skip each of the next 8 sts and place a SM in the 9th stitch to mark where to join yarn later for the Upper – Left Side. Turn. (6 sts)
Rows 2 – 11: Ch 1, sc in each st across. Turn. (6 sts)
Fasten Off. Continue on to the Upper – Left Side.
Upper Size 5/6 – Left Side
Row 1: With MC yarn & a 5.50mm crochet hook, join yarn with a standing sc in the st marked with a SM, sc in each of the next 5 sts. Turn. (6 sts)
Rows 2 – 12: Ch 1, sc in each st across. Turn. (6 sts)
Fasten off, leaving a tail of yarn. With a yarn needle and the tail of yarn you left, line up the last rows of the Upper Left & Right Sides and whipstitch them together. Weave in ends. Continue on to Join Sole & Upper.
Join Sole & Upper
Step 1: Lay the upper on top of the sole. Line up the center toe of the upper with the sole and use a locking stitch marker to hold the pieces together. Line up the center of each heel and use a locking stitch marker to hold them together.
Step 2: Place a few other locking stitch markers around the perimeter to hold the pieces in place while you seam them.
Step 3: With MC yarn & a 5.50mm crochet hook, join yarn with a standing sc in the back center of the heel (make sure to work through both layers of the sole & upper), sc evenly around the perimeter of the sole. Join yarn with a sl st to the 1st st. Stitch count is not crucial. Work as many sc around as needed to join the sole & upper.
Weave in ends. Continue on to the Ankle.
Ankle Size 5/6
Rnd 1: With MC yarn & a 5.50mm crochet hook, join yarn with a standing sc in the st nearest the center back of the heel, sc in each st and side of each row around. Join with a sl st to the 1st st. (31 sts)
Tip: Weave in the end of your joining stitch after working the first couple rounds. It’s easier to reach and weave in this end before you complete the entire ankle.
Rnds 2 – 12: Ch 1, sc in each st around. Join. (31 sts)
Fasten Off. Weave in ends. Continue on to the Cuff.
Slipper Boot Size 7/8
Finished Size: Length: 9-3/4″ & Width: 4″
Yarn: Chunky / 5 / 165 yards
Gauge: 3 sc = 1″; 2.75 rows = 1″
Slipper Sole Size 7/8 – Make 2
Row 1: With MC yarn & a 5.50mm crochet hook, ch 3 (ch-2 counts as 1st dc), work 8 dc into the 3rd ch from your hook. Do not join. Turn. (9 sts)
Row 2: Ch 2 (counts as a st), dc in the next st (not the same st as ch 2), (2 dc in next st, dc in next 2 sts) twice, 2 dc in last st (last st is the top of ch 2 from beginning of Row 1). Turn. (12 sts)
Row 3: Ch 1, 2 hdc in the first st, (hdc in next st, 2 hdc in next st) 5 times, 2 hdc in last st (last st is the top of ch 2 from beginning of Row 2). Turn. (19 sts)
Row 4: Ch 1, rotate to work across the flat edge of the sole, work 1 sc in the side of each hdc row and 2 sc in the side of each dc row. Turn. (10 sts)
Rows 5 – 10: Ch 1, sc in each st across. Turn. (10 sts)
Row 11: Ch 1, sc2tog, sc in each of the next 6 sts, sc2tog. Turn. (8 sts)
Rows 12 – 24: Ch 1, sc in each st across. Turn. (8 sts)
Row 25: Ch 1, sc2tog, sc in each of the next 4 sts, sc2tog. Turn. (6 sts)
Row 26: Ch 1, sc2tog, sc in each of the next 2 sts, sc2tog. (4 sts)
Note: If you have wide feet, you may get a better fit by working 1 sc in each stitch around your sole before continuing.
Fasten Off. Weave in ends.
Upper Size 7/8 – Make 2
Row 1: With MC yarn & a 5.50mm crochet hook, ch 6, working into the back hump of the ch, sc in the 2nd ch from your hook and in each ch across. Turn. (5 sts)
Row 2: Ch 1, work 2 sc in each st across. Turn. (10 sts)
Row 3: Ch 1, 2 sc in the first st, sc in each of the next 8 sts, 2 sc in last st. Turn. (12 sts)
Row 4: Ch 1, sc in each st across. Turn. (12 sts)
Row 5: Ch 1, 2 sc in the first st, sc in each of the next 10 sts, 2 sc in last st. Turn. (14 sts)
Row 6: Ch 1, sc in each st across. Turn. (14 sts)
Row 7: Ch 1, 2 sc in the first st, sc in each of the next 12 sts, 2 sc in last st. Turn. (16 sts)
Row 8: Ch 1, sc in each st across. Turn. (16 sts)
Row 9: Ch 1, 2 sc in the first st, sc in each of the next 14 sts, 2 sc in last st. Turn. (18 sts)
Row 10: Ch 1, sc in each st across. Turn. (18 sts)
Row 11: Ch 1, 2 sc in the first st, sc in each of the next 16 sts, 2 sc in last st. Turn. (20 sts)
Rows 12 – 15: Ch 1, sc in each st across. Turn. (20 sts)
Row 16: Ch 1, 2 sc in the first st, sc in each of the next 18 sts, 2 sc in last st. Turn. (22 sts)
Rows 17 – 22: Ch 1, sc in each st across. Turn. (22 sts)
Do not fasten off. Continue on to the Upper – Right Side.
Upper Size 7/8 – Right Side
Row 1: Ch 1, sc in the first st, sc in each of the next 5 sts. Before turning, skip each of the next 10 sts and place a SM in the 11th stitch to mark where to join yarn later for the Upper – Left Side. Turn. (6 sts)
Rows 2 – 11: Ch 1, sc in each st across. Turn. (6 sts)
Fasten Off. Continue on to the Upper – Left Side.
Upper Size 7/8 – Left Side
Row 1: With MC yarn & a 5.50mm crochet hook, join yarn with a standing sc in the st marked with a SM, sc in each of the next 5 sts. Turn. (6 sts)
Rows 2 – 12: Ch 1, sc in each st across. Turn. (6 sts)
Fasten off, leaving a tail of yarn. With a yarn needle and the tail of yarn you left, line up the last rows of the Upper Left & Right Sides and whipstitch them together. Weave in ends. Continue on to Join Sole & Upper.
Join Sole & Upper
Step 1: Lay the upper on top of the sole. Line up the center toe of the upper with the sole and use a locking stitch marker to hold the pieces together. Line up the center of each heel and use a locking stitch marker to hold them together.
Step 2: Place a few other locking stitch markers around the perimeter to hold the pieces in place while you seam them.
Step 3: With MC yarn & a 5.50mm crochet hook, join yarn with a standing sc in the back center of the heel (make sure to work through both layers of the sole & upper), sc evenly around the perimeter of the sole. Join yarn with a sl st to the 1st st. Stitch count is not crucial. Work as many sc around as needed to join the sole & upper.
Weave in ends. Continue on to the Ankle.
Ankle Size 7/8
Rnd 1: With MC yarn & a 5.50mm crochet hook, join yarn with a standing sc in the st nearest the center back of the heel, sc in each st and side of each row around. Join with a sl st to the 1st st. (33 sts)
Tip: Weave in the end of your joining stitch after working the first couple rounds. It’s easier to reach and weave in this end before you complete the entire ankle.
Rnds 2 – 12: Ch 1, sc in each st around. Join. (33 sts)
Fasten Off. Weave in ends. Continue on to the Cuff.
Slipper Boot Size 9/10
Finished Size: Length: 10-3/4″ & Width: 4″
Yarn: Chunky / 5 / 180 yards
Gauge: 3 sc = 1″; 2.75 rows = 1″
Sole Size 9/10 – Make 2
Row 1: With MC yarn & a 5.50mm crochet hook, ch 3 (ch-2 counts as 1st dc), work 8 dc into the 3rd ch from your hook. Do not join. Turn. (9 sts)
Row 2: Ch 2 (counts as a st), dc in the next st (not the same st as ch 2), (2 dc in next st, dc in next 2 sts) twice, 2 dc in last st (last st is the top of ch 2 from beginning of Row 1). Turn. (12 sts)
Row 3: Ch 1, 2 hdc in the first st, (hdc in next st, 2 hdc in next st) 5 times, 2 hdc in last st (last st is the top of ch 2 from beginning of Row 2). Turn. (19 sts)
Row 4: Ch 1, rotate to work across the flat edge of the sole, work 1 sc in the side of each hdc row and 2 sc in the side of each dc row. Turn. (10 sts)
Rows 5 – 11: Ch 1, sc in each st across. Turn. (10 sts)
Row 12: Ch 1, sc2tog, sc in each of the next 6 sts, sc2tog. Turn. (8 sts)
Rows 13 – 26: Ch 1, sc in each st across. Turn. (8 sts)
Row 27: Ch 1, sc2tog, sc in each of the next 4 sts, sc2tog. Turn. (6 sts)
Row 28: Ch 1, sc2tog, sc in each of the next 2 sts, sc2tog. (4 sts)
Note: If you have wide feet, you may get a better fit by working 1 sc in each stitch around your sole before continuing.
Fasten Off. Weave in ends.
Upper Size 9/10 – Make 2
Row 1: With MC yarn & a 5.50mm crochet hook, ch 6, working into the back hump of the ch, sc in the 2nd ch from your hook and in each ch across. Turn. (5 sts)
Row 2: Ch 1, work 2 sc in each st across. Turn. (10 sts)
Row 3: Ch 1, 2 sc in the first st, sc in each of the next 8 sts, 2 sc in last st. Turn. (12 sts)
Row 4: Ch 1, sc in each st across. Turn. (12 sts)
Row 5: Ch 1, 2 sc in the first st, sc in each of the next 10 sts, 2 sc in last st. Turn. (14 sts)
Row 6: Ch 1, sc in each st across. Turn. (14 sts)
Row 7: Ch 1, 2 sc in the first st, sc in each of the next 12 sts, 2 sc in last st. Turn. (16 sts)
Row 8: Ch 1, sc in each st across. Turn. (16 sts)
Row 9: Ch 1, 2 sc in the first st, sc in each of the next 14 sts, 2 sc in last st. Turn. (18 sts)
Row 10: Ch 1, sc in each st across. Turn. (18 sts)
Row 11: Ch 1, 2 sc in the first st, sc in each of the next 16 sts, 2 sc in last st. Turn. (20 sts)
Rows 12 – 15: Ch 1, sc in each st across. Turn. (20 sts)
Row 16: Ch 1, 2 sc in the first st, sc in each of the next 18 sts, 2 sc in last st. Turn. (22 sts)
Rows 17 – 22: Ch 1, sc in each st across. Turn. (22 sts)
Do not fasten off. Continue on to the Upper – Right Side.
Upper Size 9/10 – Right Side
Row 1: Ch 1, sc in the first st, sc in each of the next 5 sts. Before turning, skip each of the next 10 sts and place a SM in the 11th stitch to mark where to join yarn later for the Upper – Left Side. Turn. (6 sts)
Rows 2 – 12: Ch 1, sc in each st across. Turn. (6 sts)
Fasten Off. Continue on to the Upper – Left Side.
Upper Size 9/10 – Left Side
Row 1: With MC yarn & a 5.50mm crochet hook, join yarn with a standing sc in the st marked with a SM, sc in each of the next 5 sts. Turn. (6 sts)
Rows 2 – 13: Ch 1, sc in each st across. Turn. (6 sts)
Fasten off, leaving a tail of yarn. With a yarn needle and the tail of yarn you left, line up the last rows of the Upper Left & Right Sides and whipstitch them together. Weave in ends. Continue on to Join Sole & Upper.
Join Sole & Upper
Step 1: Lay the upper on top of the sole. Line up the center toe of the upper with the sole and use a locking stitch marker to hold the pieces together. Line up the center of each heel and use a locking stitch marker to hold them together.
Step 2: Place a few other locking stitch markers around the perimeter to hold the pieces in place while you seam them.
Step 3: With MC yarn & a 5.50mm crochet hook, join yarn with a standing sc in the back center of the heel (make sure to work through both layers of the sole & upper), sc evenly around the perimeter of the sole. Join yarn with a sl st to the 1st st. Stitch count is not crucial. Work as many sc around as needed to join the sole & upper.
Weave in ends. Continue on to the Ankle.
Ankle Size 9/10
Rnd 1: With MC yarn & a 5.50mm crochet hook, join yarn with a standing sc in the st nearest the center back of the heel, sc in each st and side of each row around. Join with a sl st to the 1st st. (35 sts)
Tip: Weave in the end of your joining stitch after working the first couple rounds. It’s easier to reach and weave in this end before you complete the entire ankle.
Rnds 2 – 12: Ch 1, sc in each st around. Join. (35 sts)
Fasten Off. Weave in ends. Continue on to the Cuff.
Slipper Boot Size 11/12
Finished Size: Length: 11-1/4″ & Width: 4-1/2″
Yarn: Chunky / 5 / 190 yards
Gauge: 3 sc = 1″; 2.75 rows = 1″
Slipper Sole Size 11/12- Make 2
Row 1: With MC yarn & a 5.50mm crochet hook, ch 3 (ch-2 counts as 1st dc), work 8 dc into the 3rd ch from your hook. Do not join. Turn. (9 sts)
Row 2: Ch 2 (counts as a st), dc in the next st (not the same st as ch 2), (2 dc in next st, dc in next 2 sts) twice, 2 dc in last st (last st is the top of ch 2 from beginning of Row 1). Turn. (12 sts)
Row 3: Ch 2 (does not count as a st), 2 dc in the first st, (dc in next st, 2 dc in next st) 5 times, 2 dc in last st (last st is the top of ch 2 from beginning of Row 2). Turn. (19 sts)
Row 4: Ch 1, rotate to work across the flat edge of the sole, work 2 sc in the side of each dc row. Turn. (12 sts)
Rows 5 – 12: Ch 1, sc in each st across. Turn. (12 sts)
Row 13: Ch 1, sc2tog, sc in each of the next 8 sts, sc2tog. Turn. (10 sts)
Rows 14 – 28: Ch 1, sc in each st across. Turn. (10 sts)
Row 29: Ch 1, sc2tog, sc in each of the next 6 sts, sc2tog. Turn. (8 sts)
Row 30: Ch 1, sc2tog, sc in each of the next 4 sts, sc2tog. (6 sts)
Note: If you have wide feet, you may get a better fit by working 1 sc in each stitch around your sole before continuing.
Fasten Off. Weave in ends.
Upper Size 11/12 – Make 2
Row 1: With MC yarn & a 5.50mm crochet hook, ch 6, working into the back hump of the ch, sc in the 2nd ch from your hook and in each ch across. Turn. (5 sts)
Row 2: Ch 1, work 2 sc in each st across. Turn. (10 sts)
Row 3: Ch 1, 2 sc in the first st, sc in each of the next 8 sts, 2 sc in last st. Turn. (12 sts)
Row 4: Ch 1, sc in each st across. Turn. (12 sts)
Row 5: Ch 1, 2 sc in the first st, sc in each of the next 10 sts, 2 sc in last st. Turn. (14 sts)
Row 6: Ch 1, sc in each st across. Turn. (14 sts)
Row 7: Ch 1, 2 sc in the first st, sc in each of the next 12 sts, 2 sc in last st. Turn. (16 sts)
Row 8: Ch 1, sc in each st across. Turn. (16 sts)
Row 9: Ch 1, 2 sc in the first st, sc in each of the next 14 sts, 2 sc in last st. Turn. (18 sts)
Row 10: Ch 1, sc in each st across. Turn. (18 sts)
Row 11: Ch 1, 2 sc in the first st, sc in each of the next 16 sts, 2 sc in last st. Turn. (20 sts)
Rows 12 – 15: Ch 1, sc in each st across. Turn. (20 sts)
Row 16: Ch 1, 2 sc in the first st, sc in each of the next 18 sts, 2 sc in last st. Turn. (22 sts)
Row 17: Ch 1, 2 sc in the first st, sc in each of the next 20 sts, 2 sc in last st. Turn. (24 sts)
Rows 18 – 24: Ch 1, sc in each st across. Turn. (24 sts)
Do not fasten off. Continue on to the Upper – Right Side.
Upper Size 11/12 – Right Side
Row 1: Ch 1, sc in the first st, sc in each of the next 6 sts. Before turning, skip each of the next 10 sts and place a SM in the 11th stitch to mark where to join yarn later for the Upper – Left Side. Turn. (7 sts)
Rows 2 – 12: Ch 1, sc in each st across. Turn. (7 sts)
Fasten Off. Continue on to the Upper – Left Side.
Upper Size 11/12 – Left Side
Row 1: With MC yarn & a 5.50mm crochet hook, join yarn with a standing sc in the st marked with a SM, sc in each of the next 6 sts. Turn. (7 sts)
Rows 2 – 13: Ch 1, sc in each st across. Turn. (67sts)
Fasten off, leaving a tail of yarn. With a yarn needle and the tail of yarn you left, line up the last rows of the Upper Left & Right Sides and whipstitch them together. Weave in ends. Continue on to Join Sole & Upper.
Join Sole & Upper
Step 1: Lay the upper on top of the sole. Line up the center toe of the upper with the sole and use a locking stitch marker to hold the pieces together. Line up the center of each heel and use a locking stitch marker to hold them together.
Step 2: Place a few other locking stitch markers around the perimeter to hold the pieces in place while you seam them.
Step 3: With MC yarn & a 5.50mm crochet hook, join yarn with a standing sc in the back center of the heel (make sure to work through both layers of the sole & upper), sc evenly around the perimeter of the sole. Join yarn with a sl st to the 1st st. Stitch count is not crucial. Work as many sc around as needed to join the sole & upper.
Weave in ends. Continue on to the Ankle.
Ankle Size 11/12
Rnd 1: With MC yarn & a 5.50mm crochet hook, join yarn with a standing sc in the st nearest the center back of the heel, sc in each st and side of each row around. Join with a sl st to the 1st st. (35 sts)
Tip: Weave in the end of your joining stitch after working the first couple rounds. It’s easier to reach and weave in this end before you complete the entire ankle.
Rnds 2 – 12: Ch 1, sc in each st around. Join. (35 sts)
Fasten Off. Weave in ends. Continue on to the Cuff.
Progression Photos – Slipper Boot
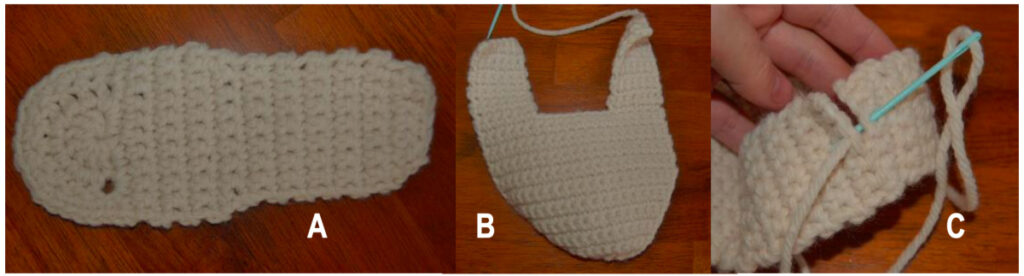
Photo A: Shows a completed sole.
Photo B: Shows a completed upper (with right and left sides).
Photo C: Shows the whip stitching of the back of the heel of the upper.
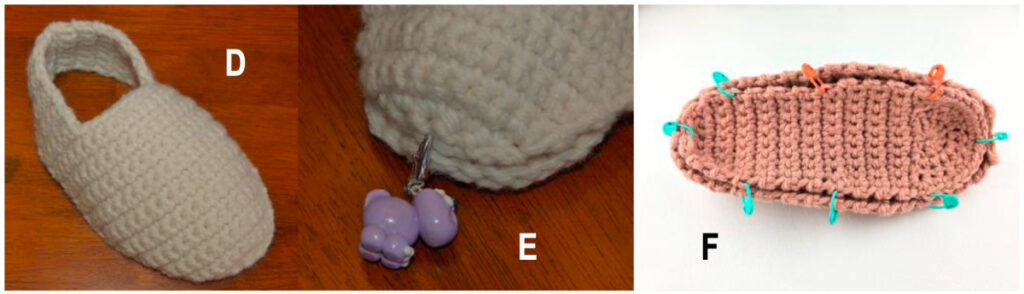
Photo D: Shows the upper after you’ve whip stitched the heel together.
Photo E: Shows the center of the toe being lined up and held together with a locking stitch marker for joining the sole and the upper.
Photo F: A view from the bottom of the sole that shows how I hold the sole and upper together with stitch markers during seaming.
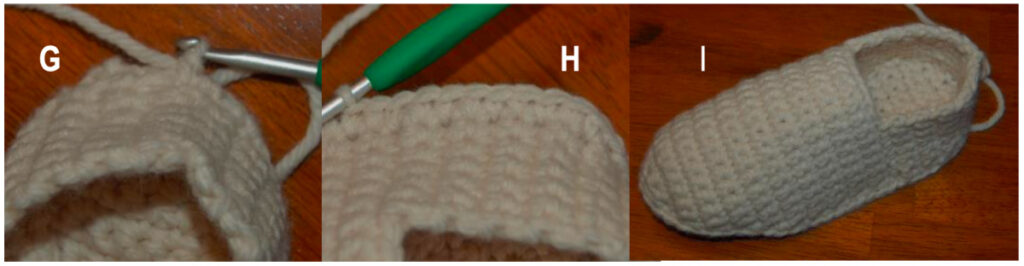
Photo G: Shows join with a standing sc (working thru both layers of the Upper and the Sole) in the back center of the heel.
Photo H: Shows sc around sole and upper of slipper boot.
Photo I: Shows your sole attached to the upper.
Cabled Slipper Cuff – All Sizes
Cuff Ribbing
Gauge: 4 sts = 1″; 10 rows = 3″
Row 1: With CC yarn & a 4.00mm crochet hook, ch 5, working into the back of your foundation ch, hdc into the 2nd ch from your hook and in each ch across. Turn. (4 sts)
Rows 2 – 40: Ch 1, BLO hdc in each st across. Turn. (4 sts)
Do not fasten off. Cuff Ribbing, unstretched, should measure approximately 1″ W x 12″ L.
Line up the first and last rows and slip stitch them together to form a ring. The ribbing is reversible so right side / wrong side does not matter for this step. Continue on to Prepare Edge for Cabled Cuff.
Prepare Edge for Cabled Cuff
Rnd 1 (RS): Ch 1, working around the edge of the ribbing, * 2 sc in each of the next 4 sts, (2 sc in the next st, sc in the next) 8 times, rep from *. Join with a sl st to the 1st st. (64 sts)
Do not fasten off. Continue on to Cabled Cuff.
Cabled Cuff
Gauge: In ext sc: 10 sts = 2″ ; 4.75 rows = 1.25″
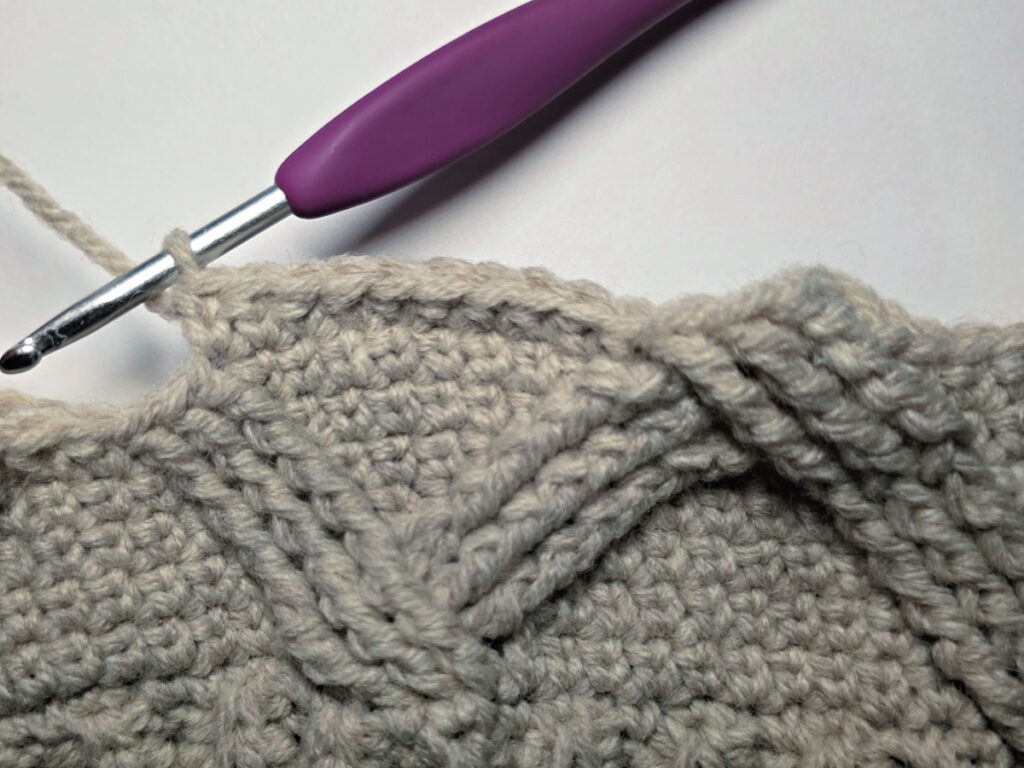
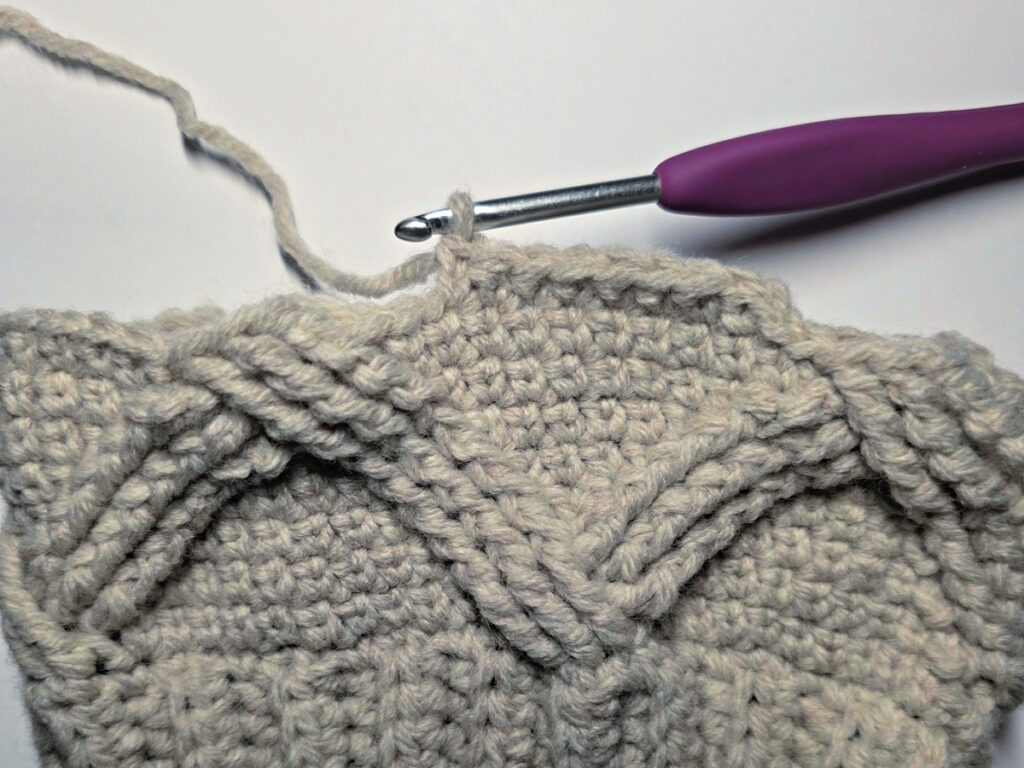
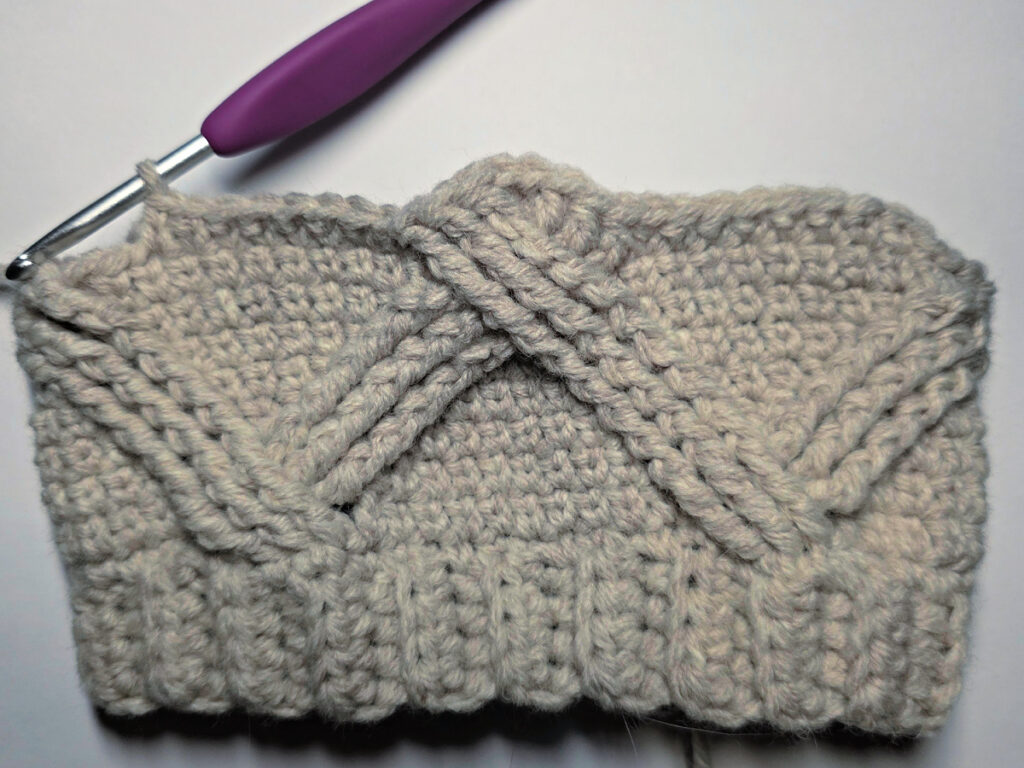
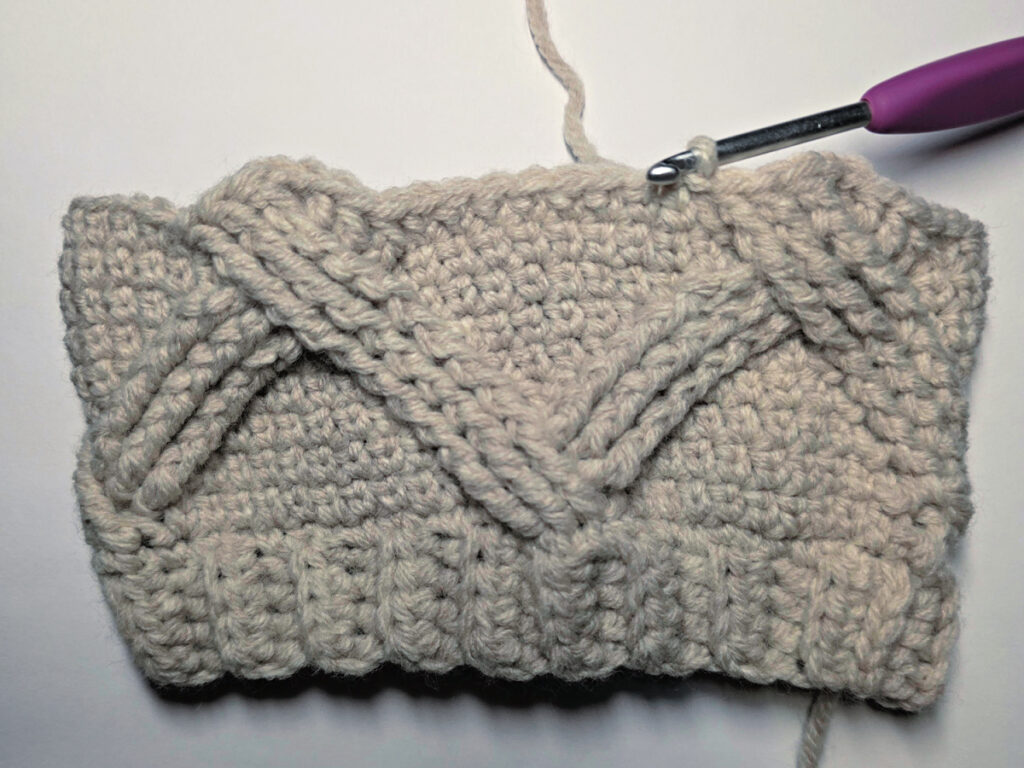
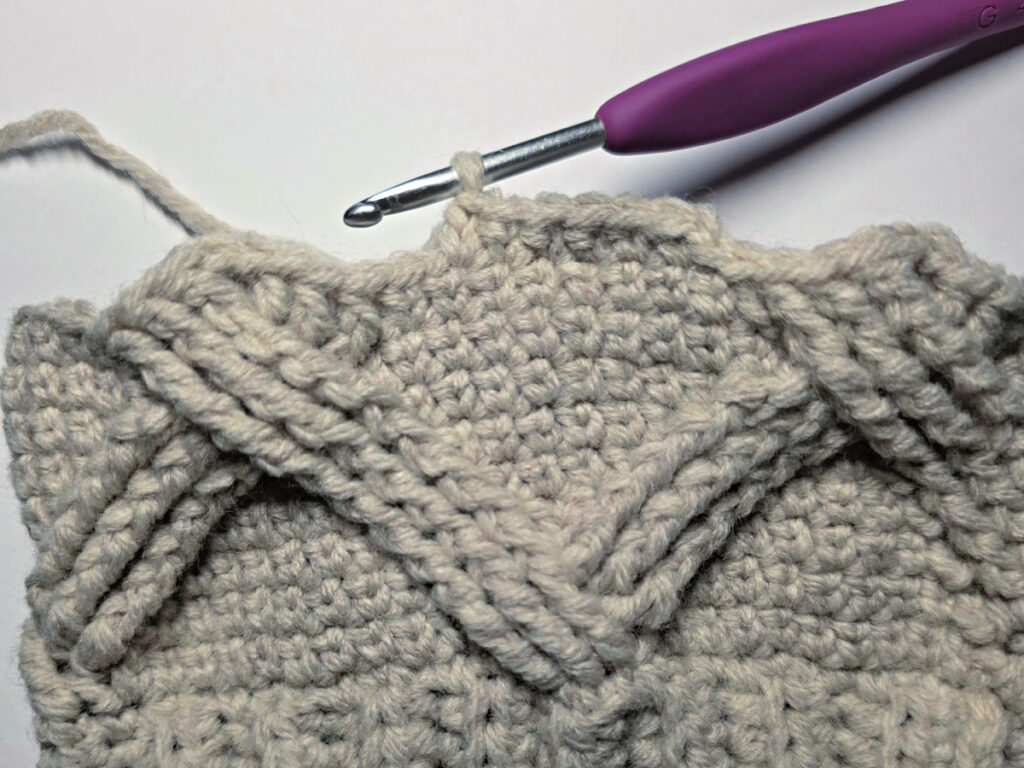
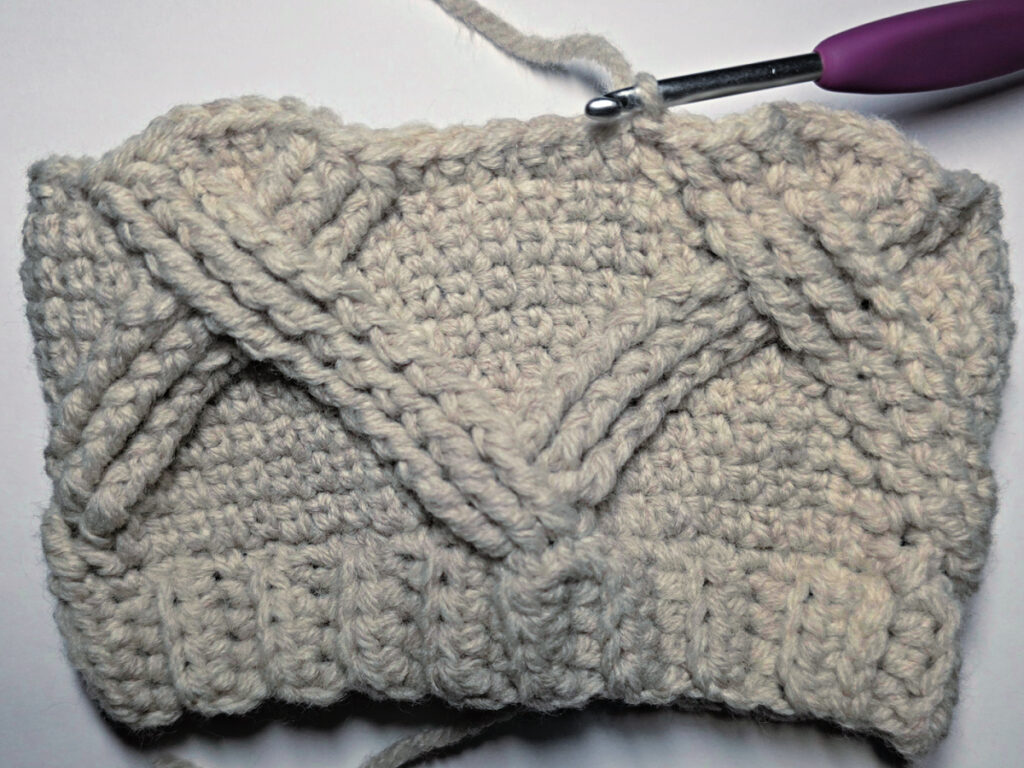
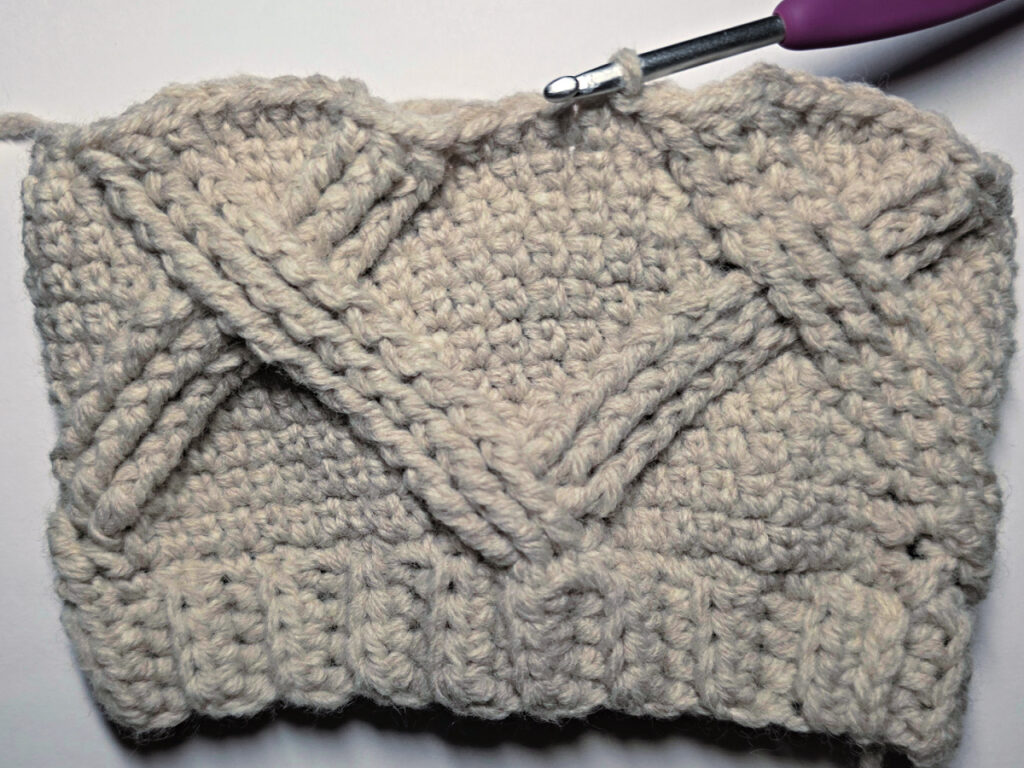
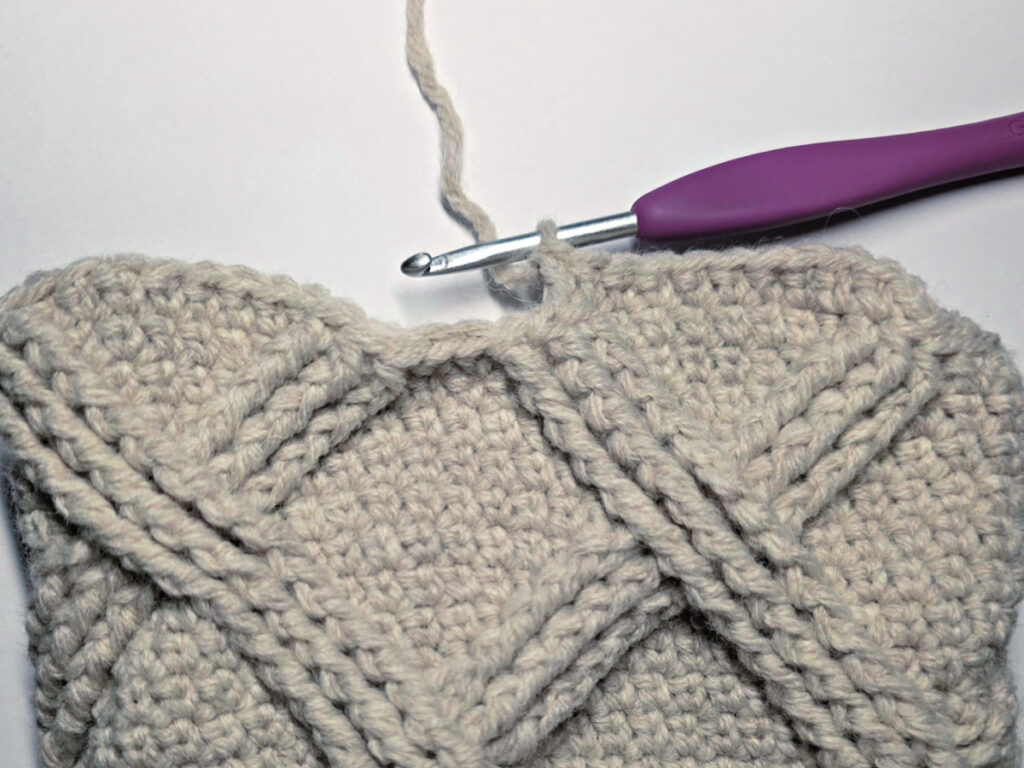
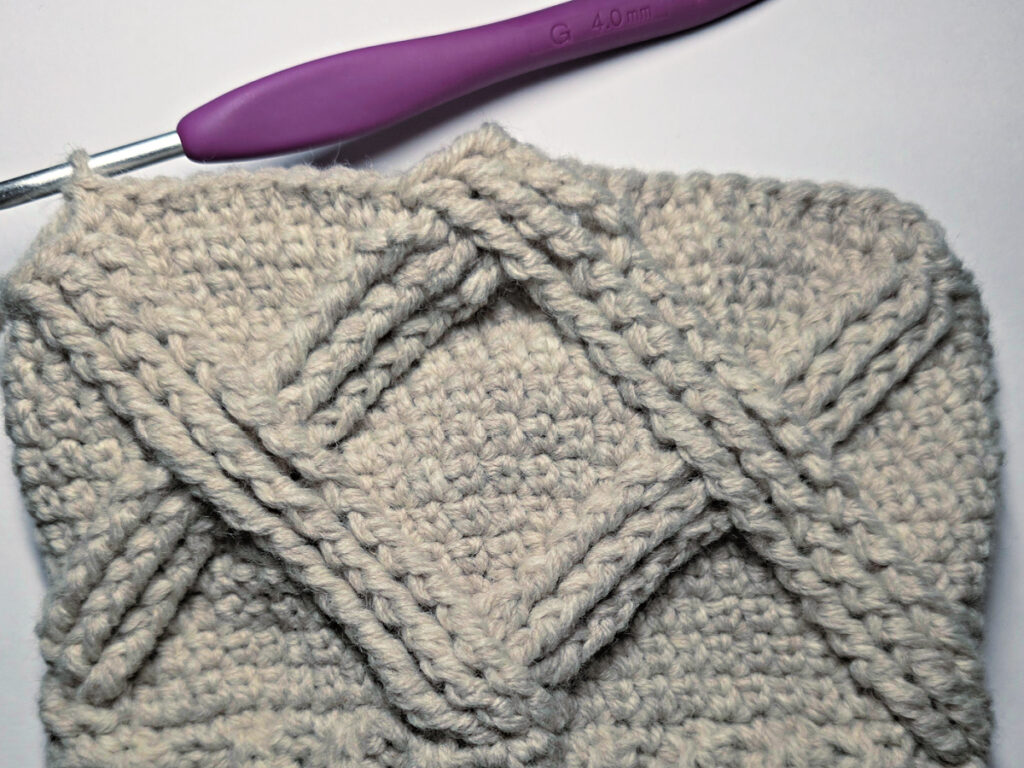
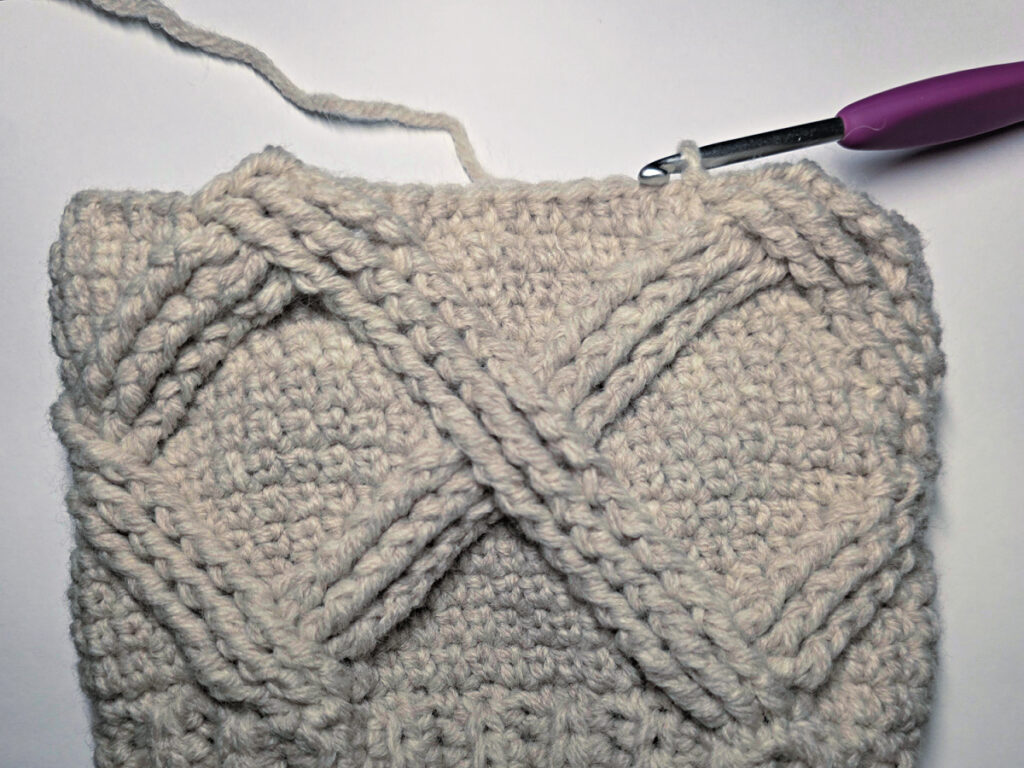
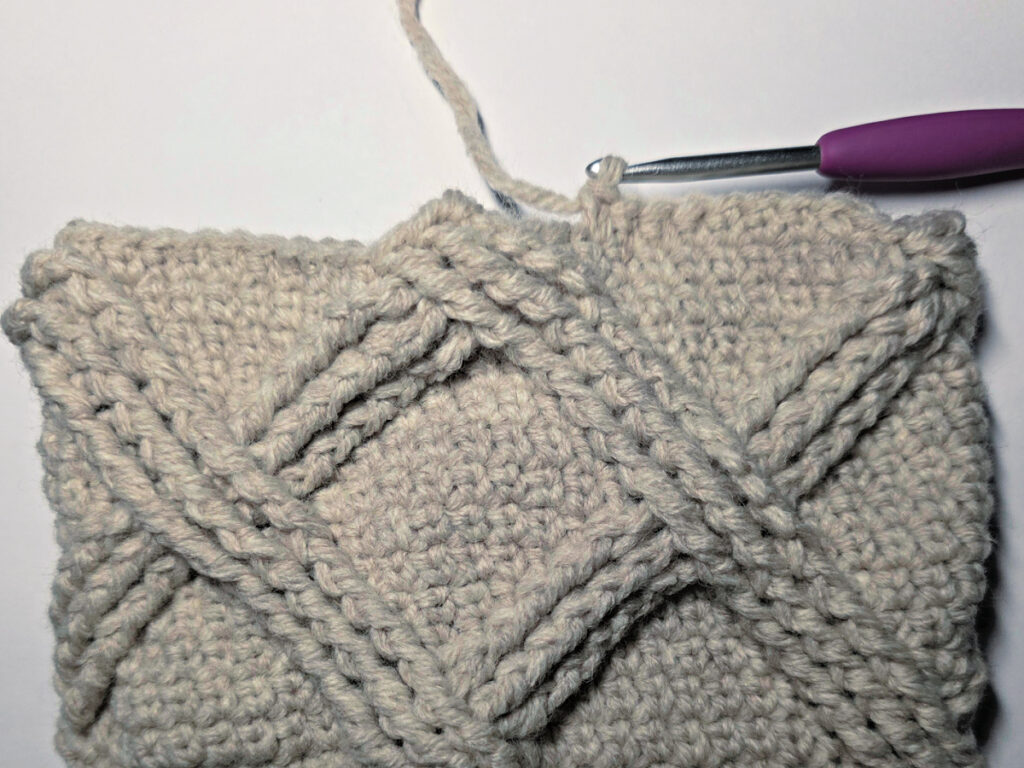
Note: Because the cables in this design move outward and inward, I’ve designed the pattern so that the “seam” moves to the left a little bit each round. This is intentional. I’ve done this so that there is no visible seam.
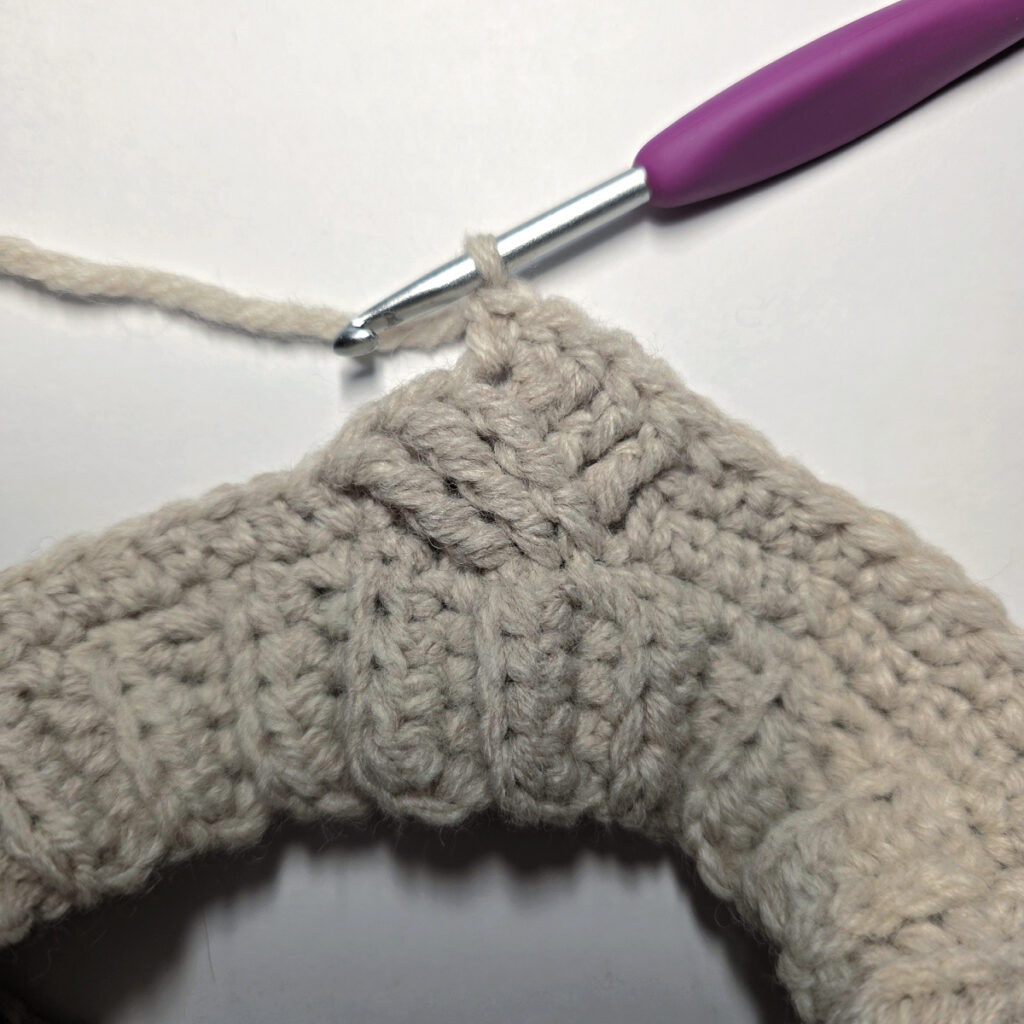
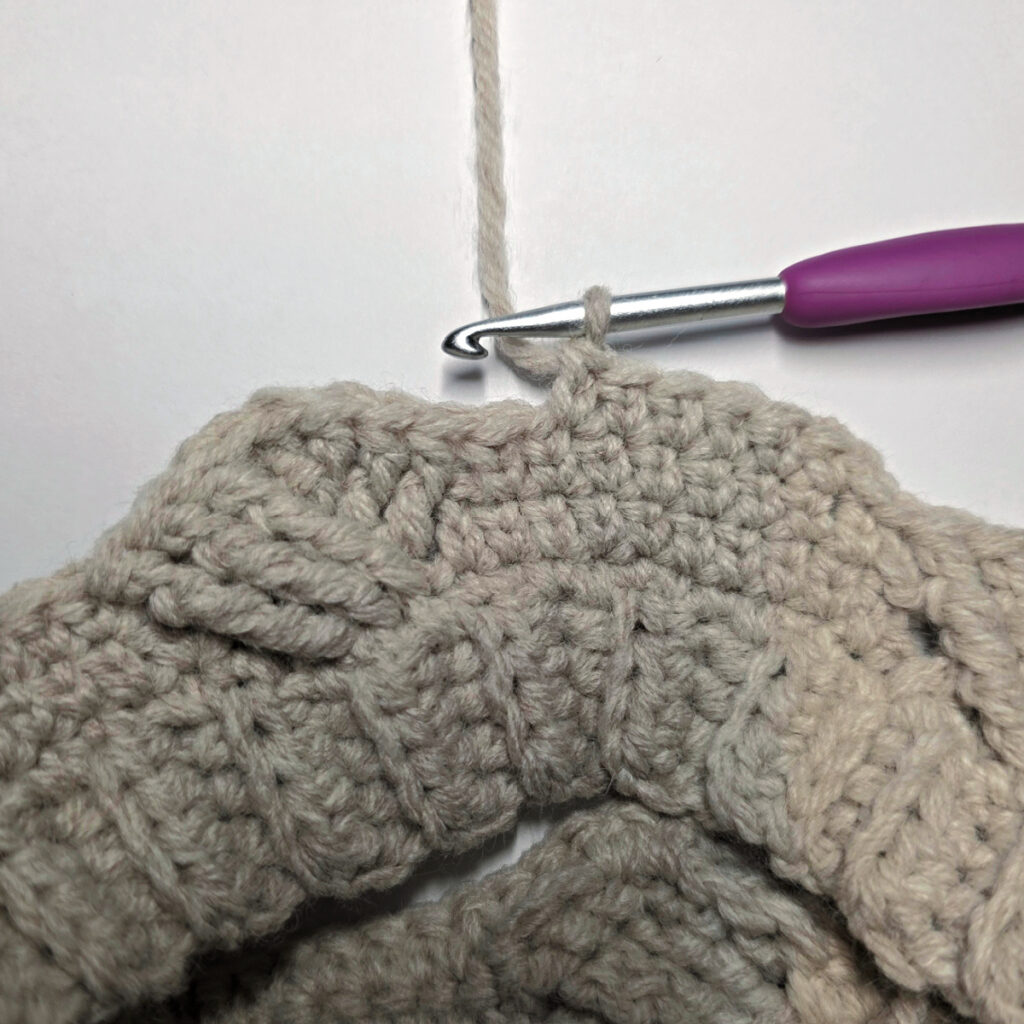
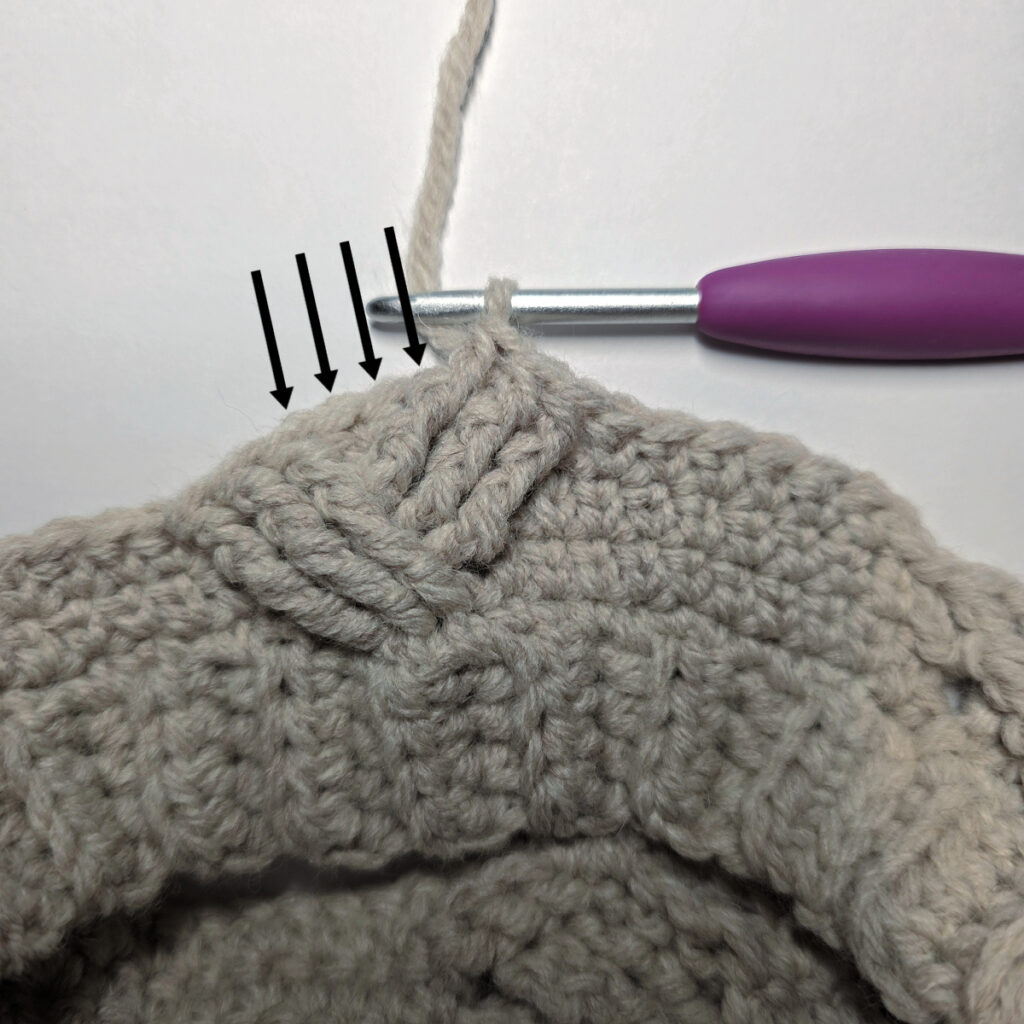
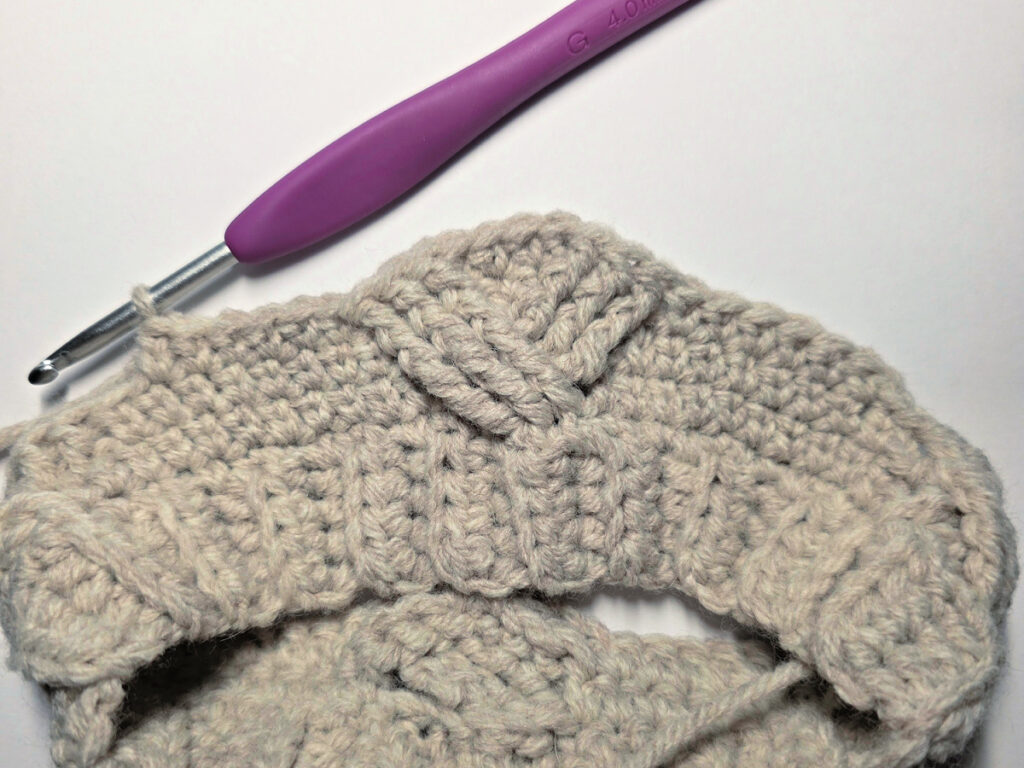
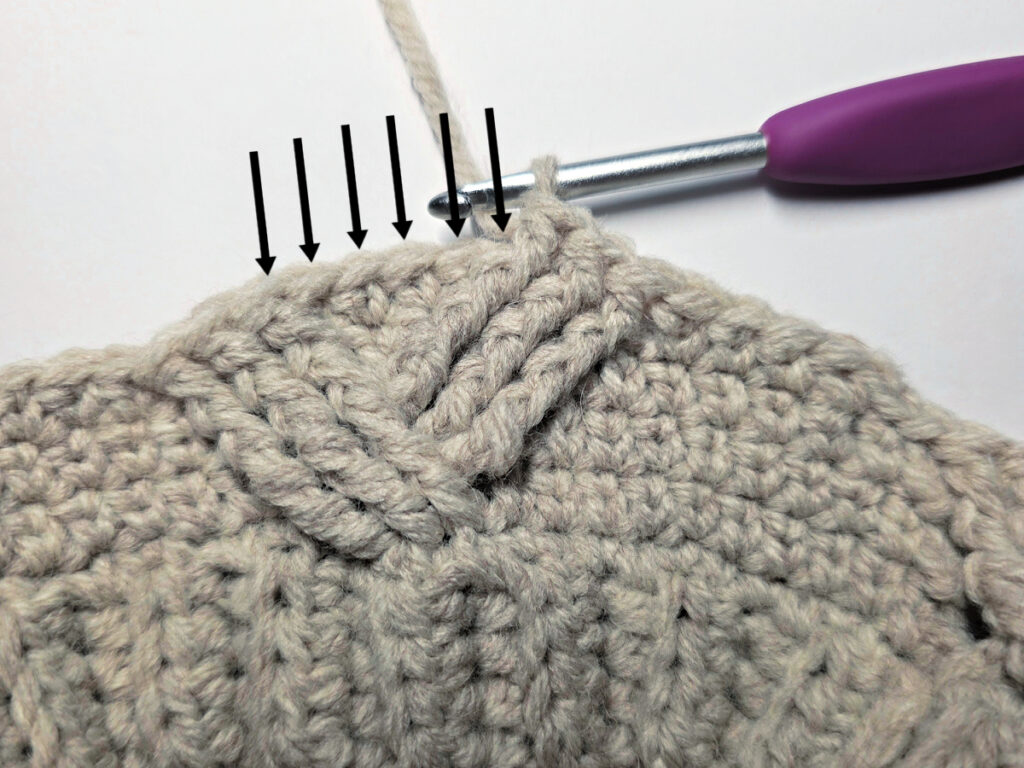
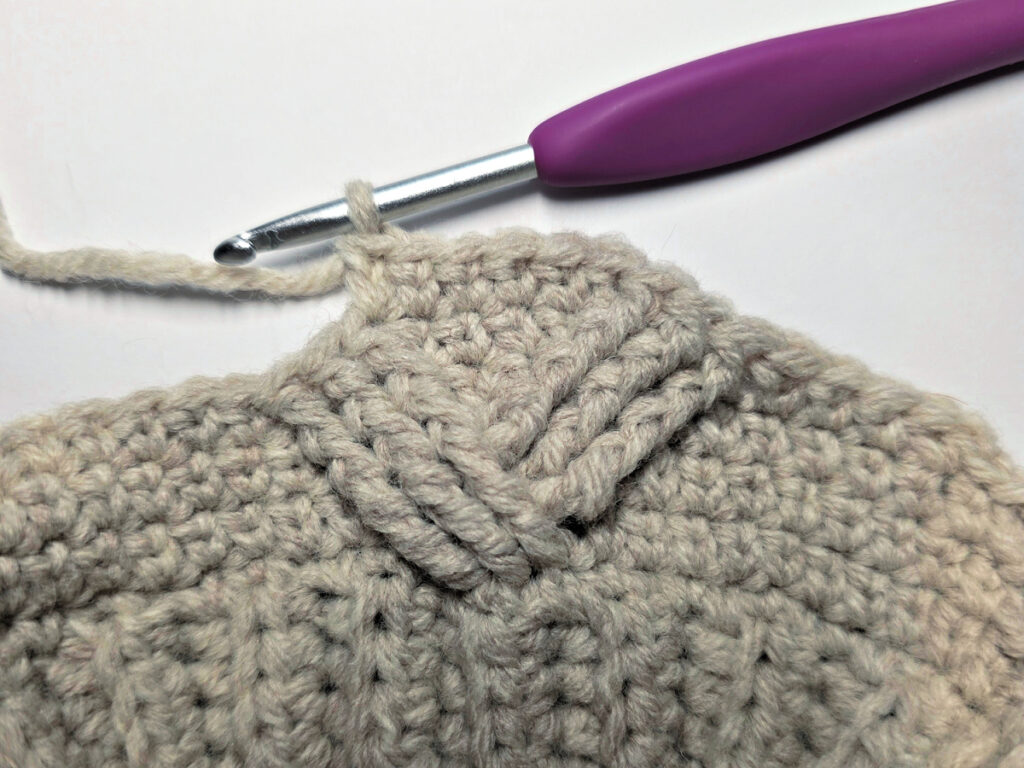
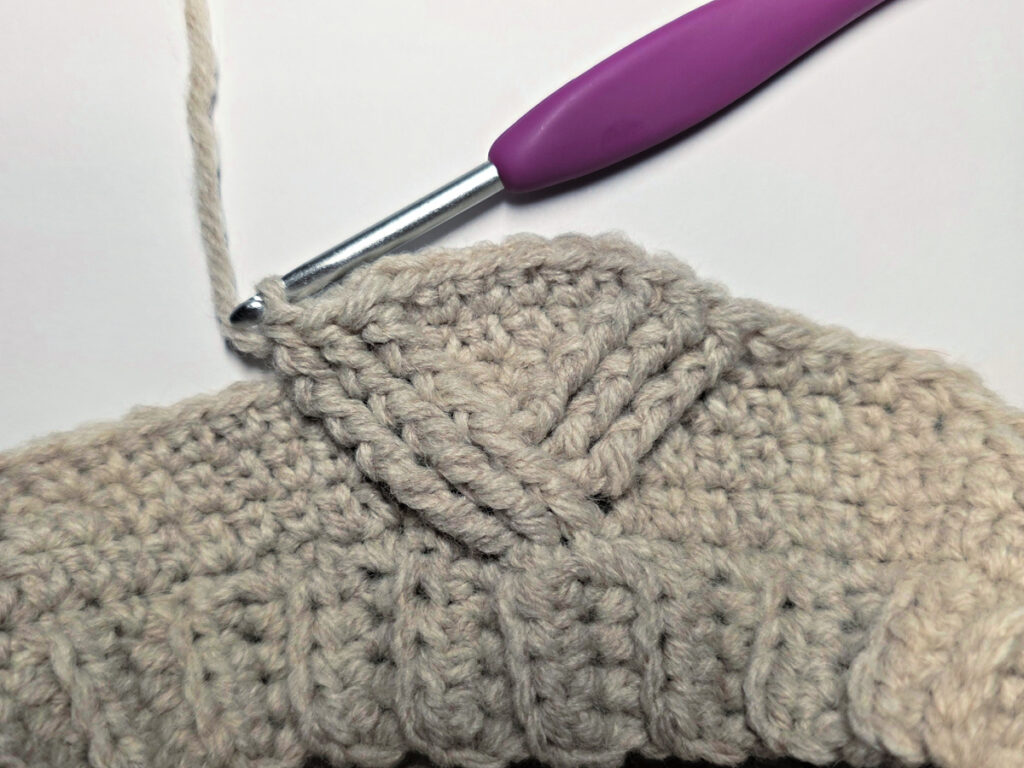
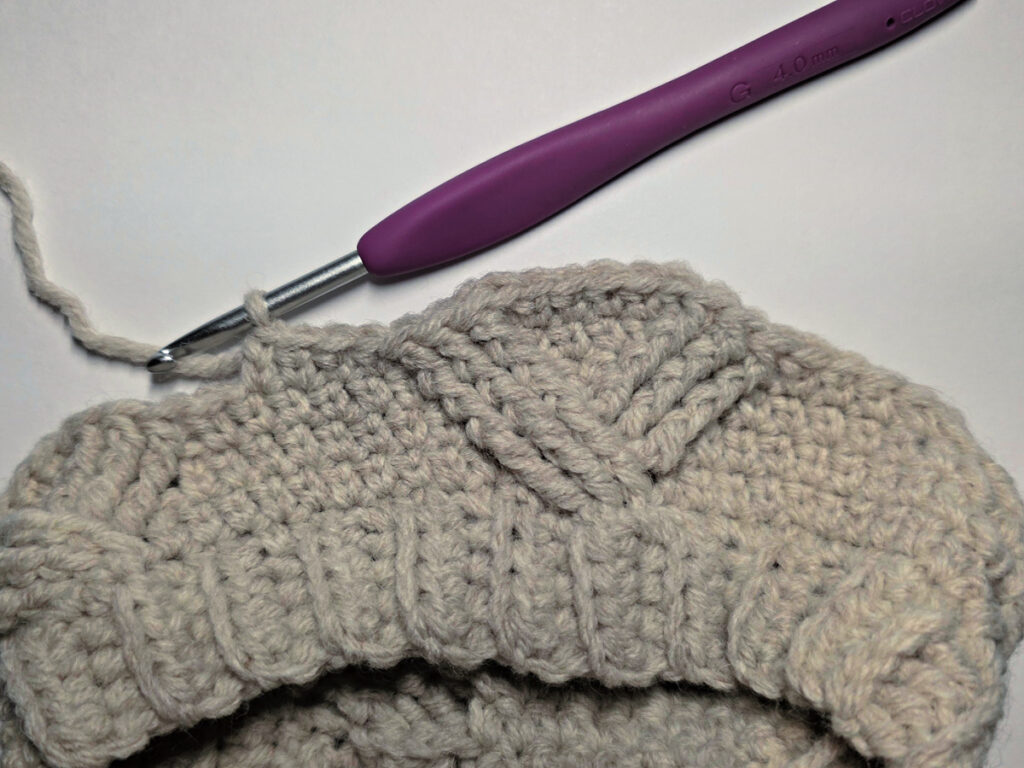
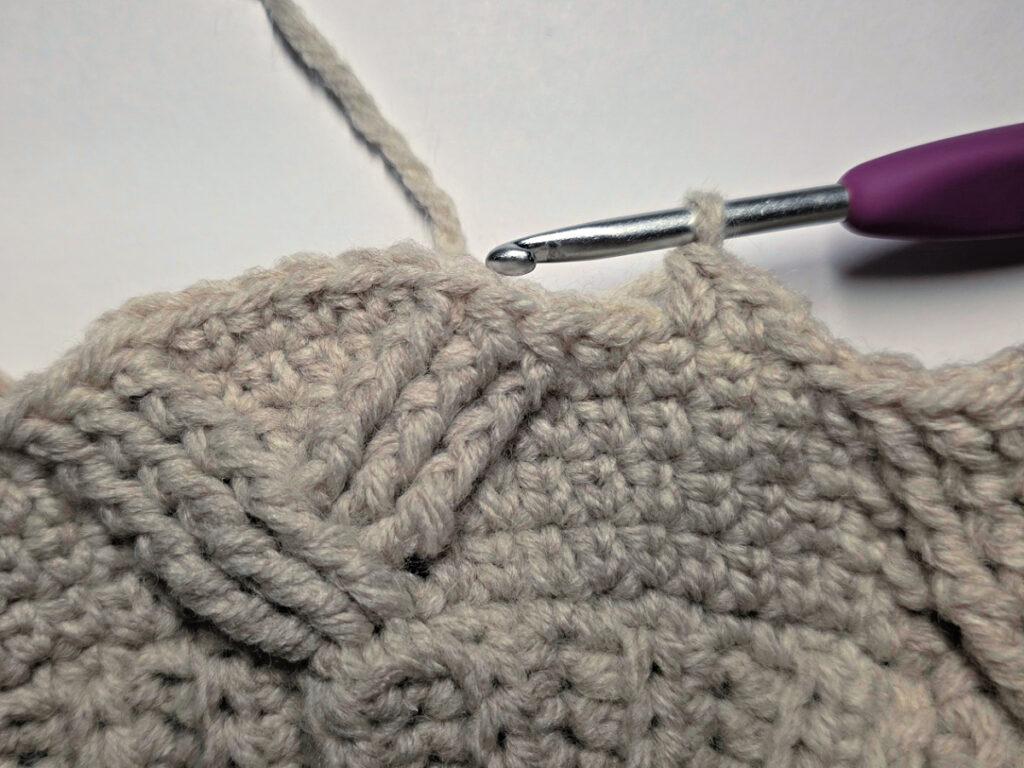
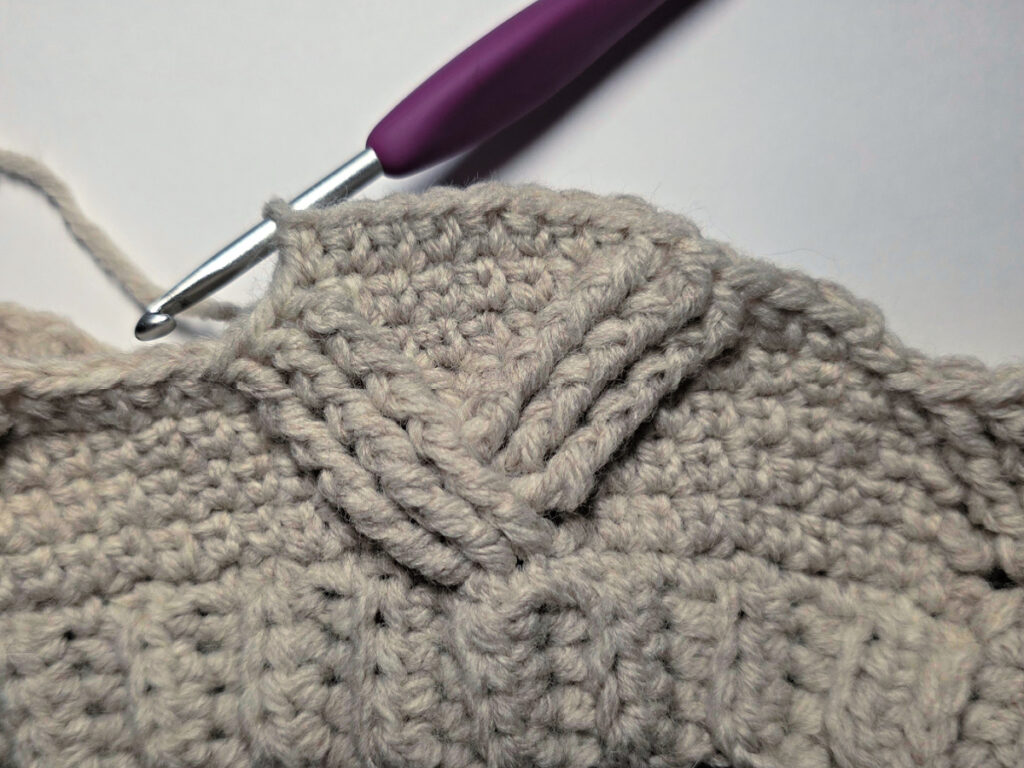
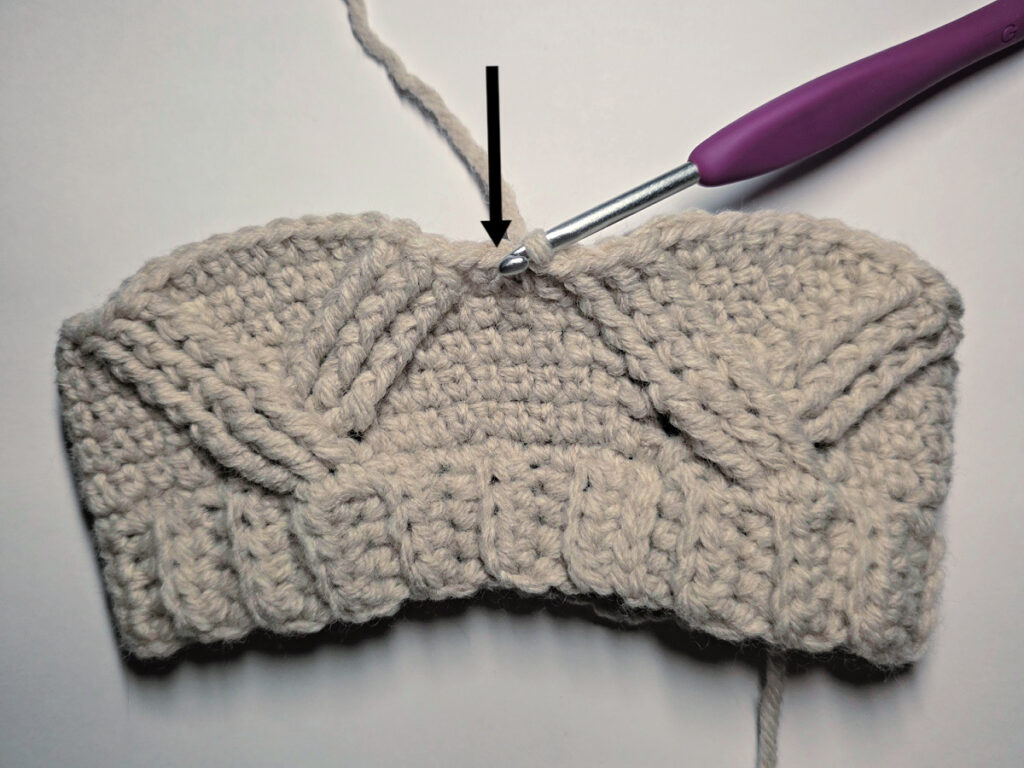
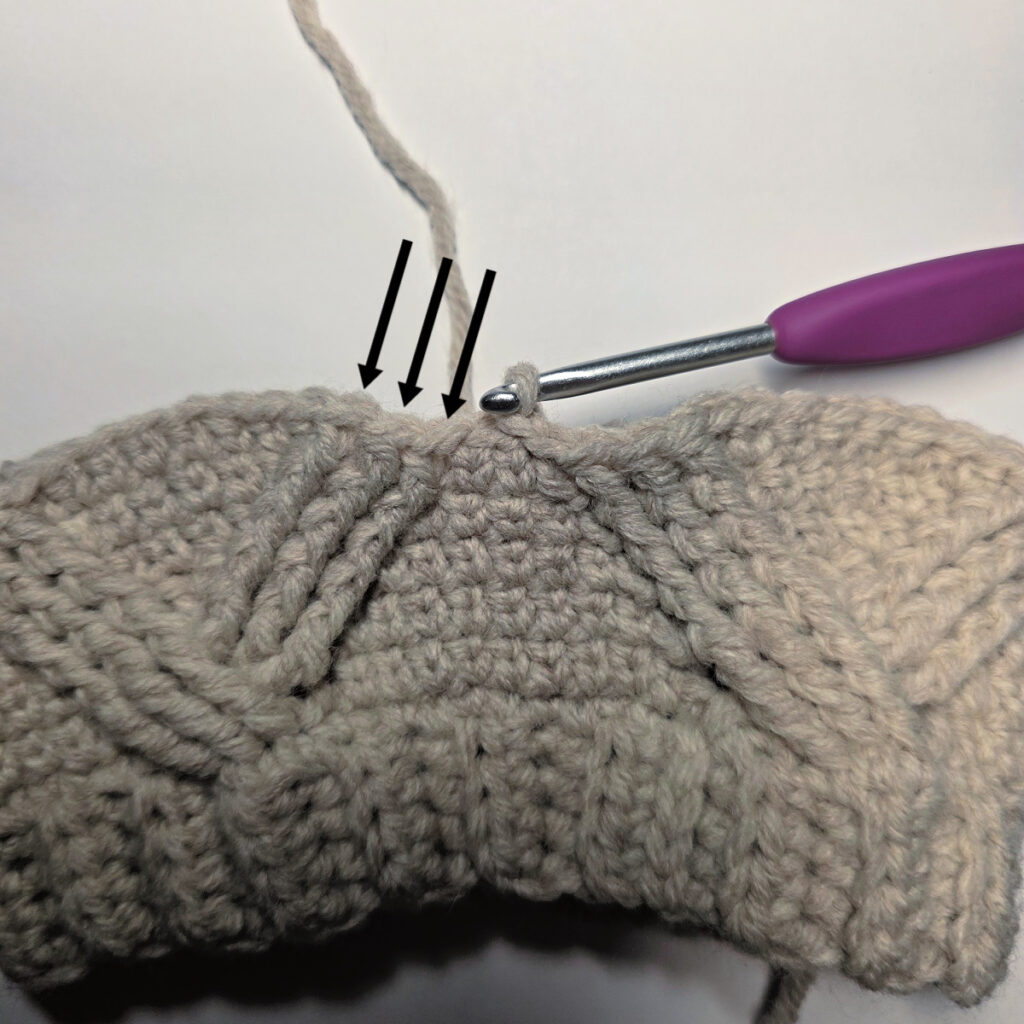
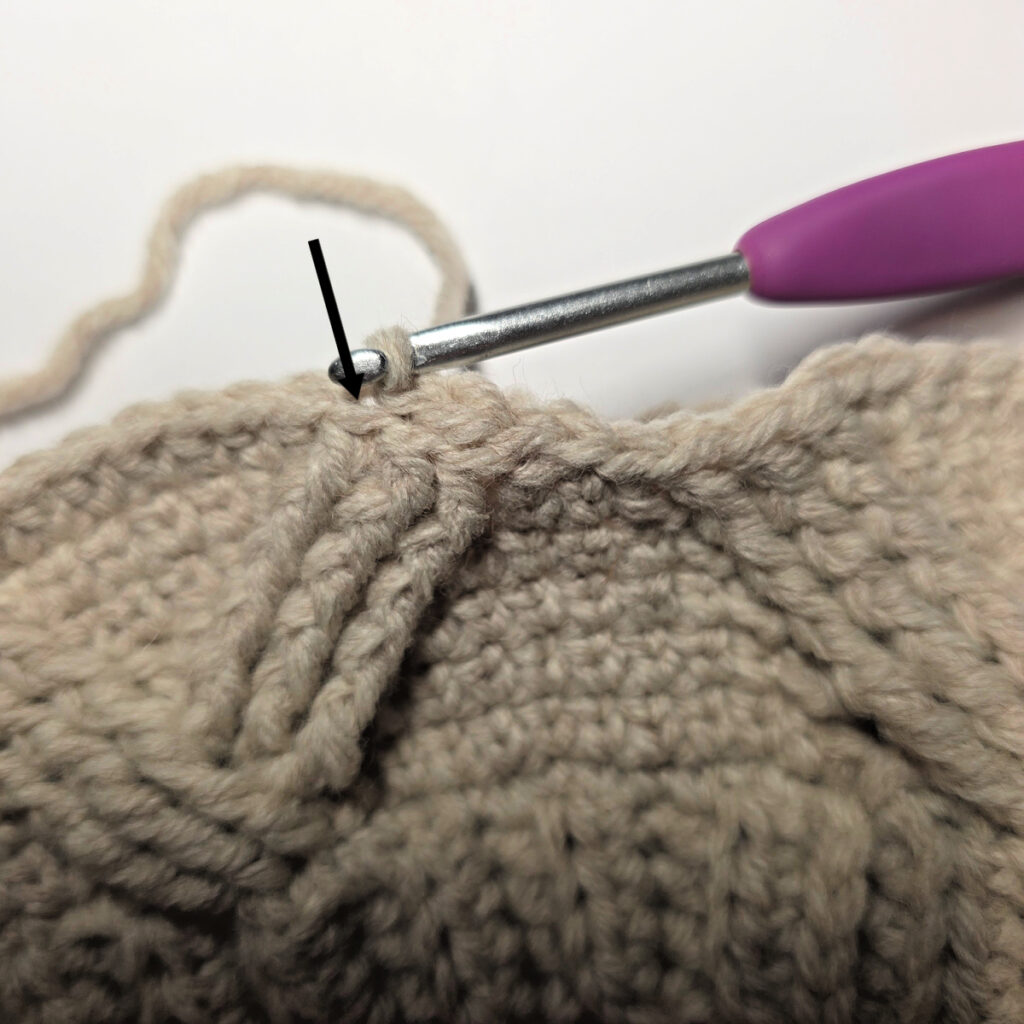
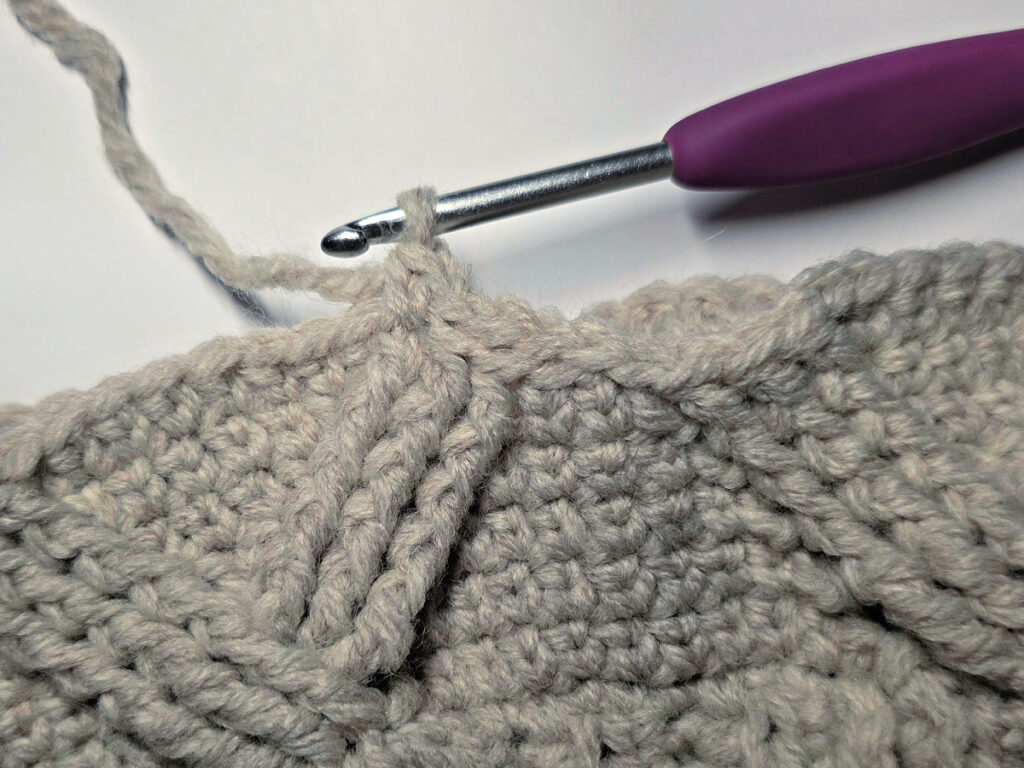
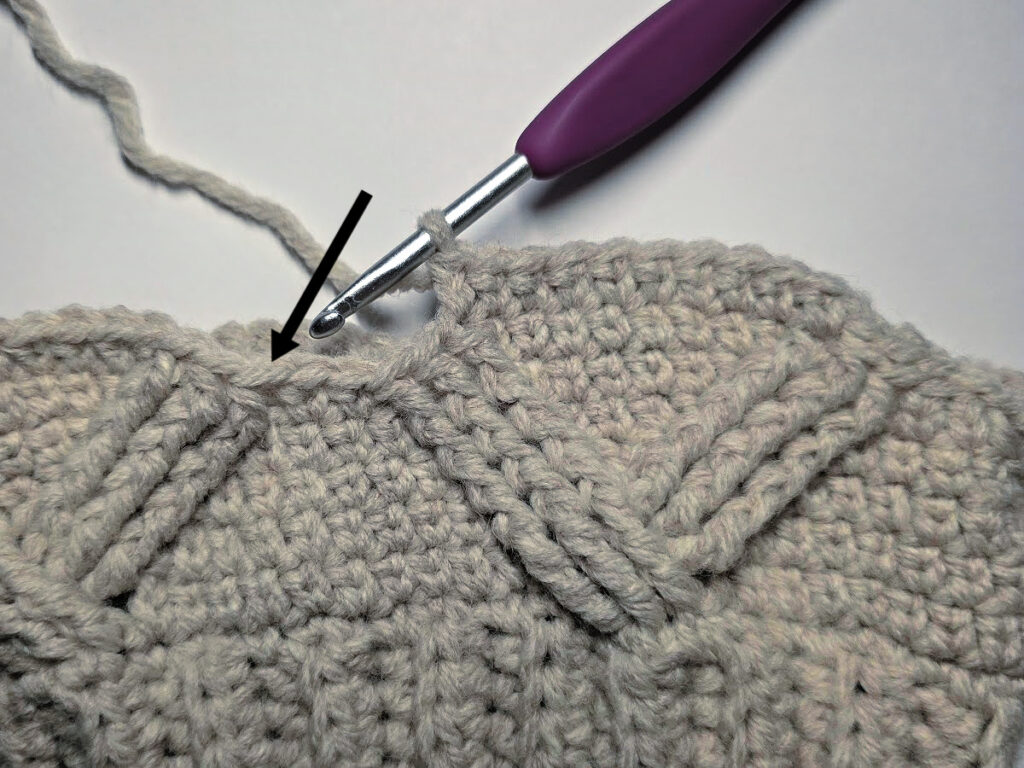
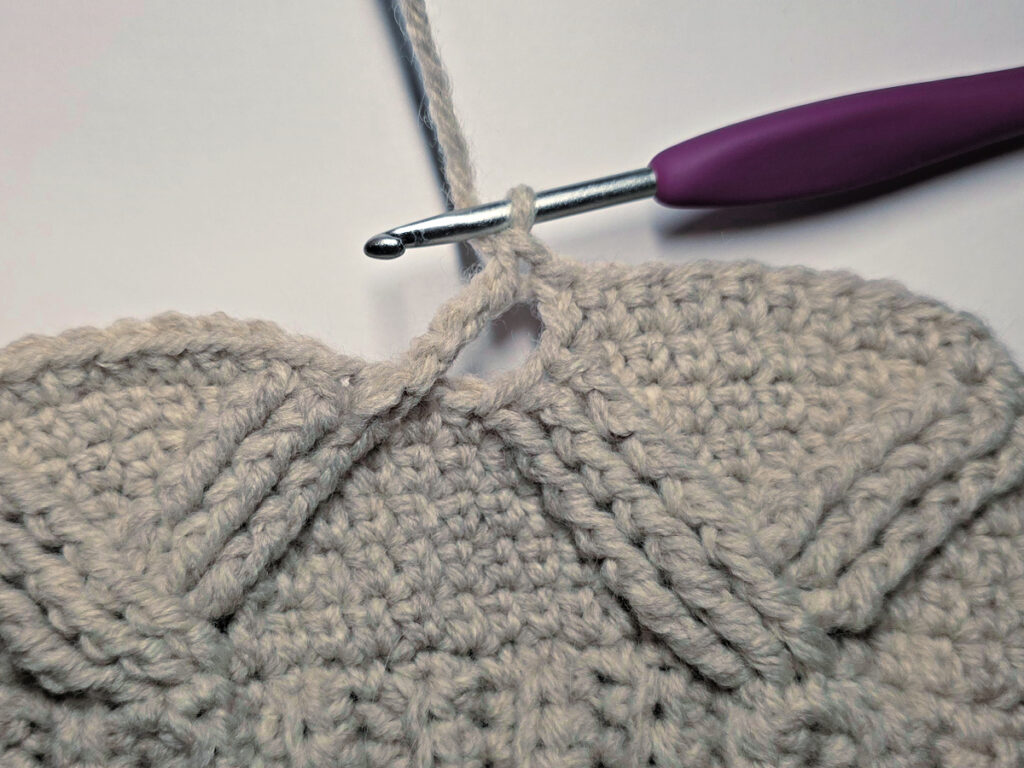
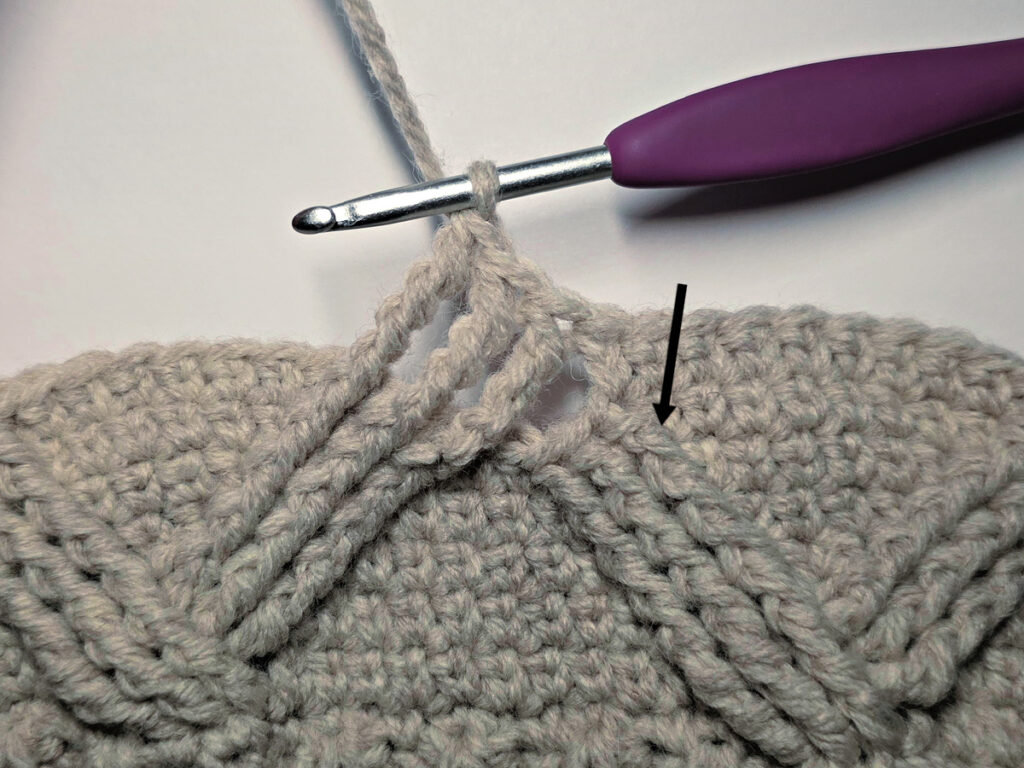
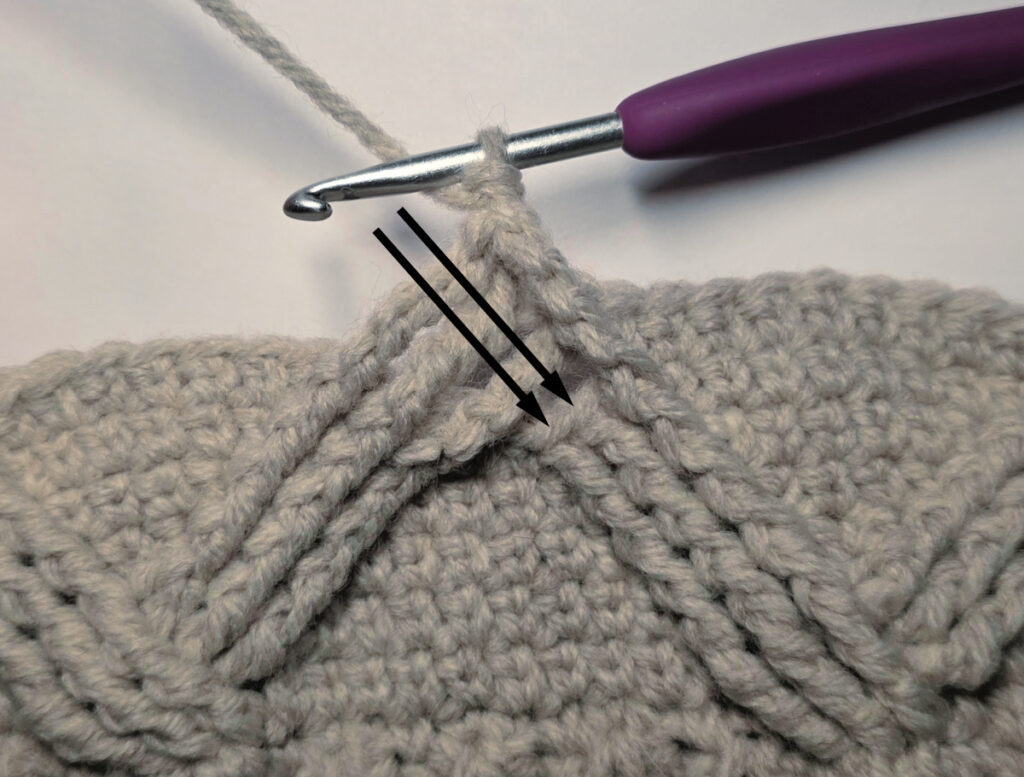
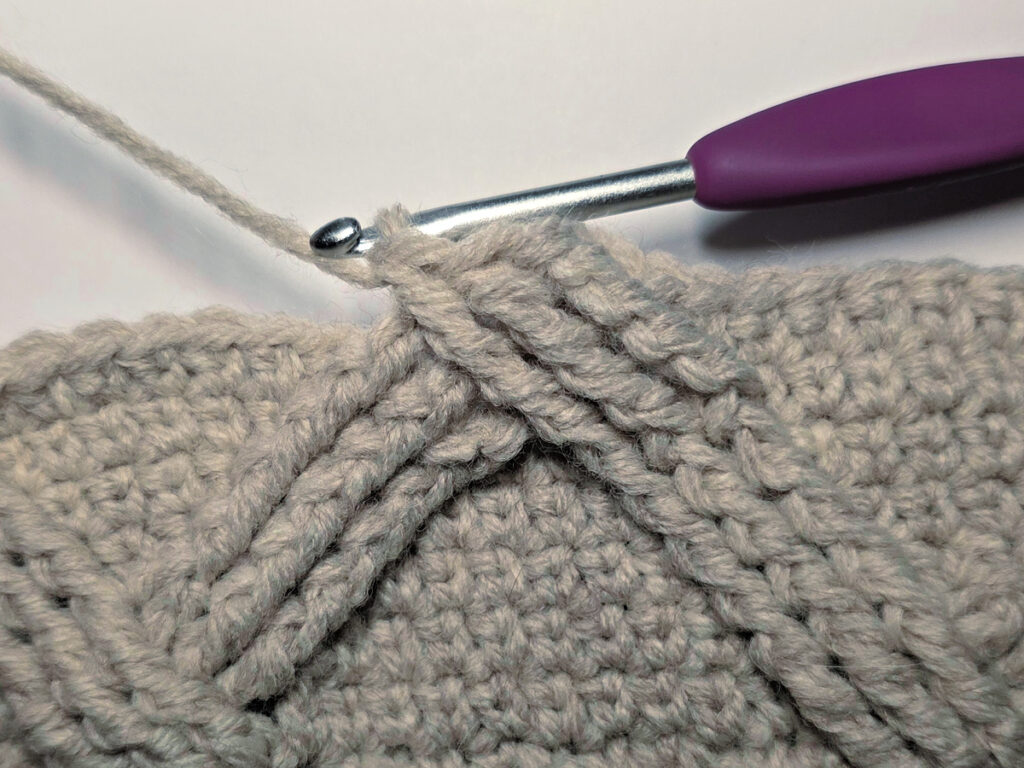
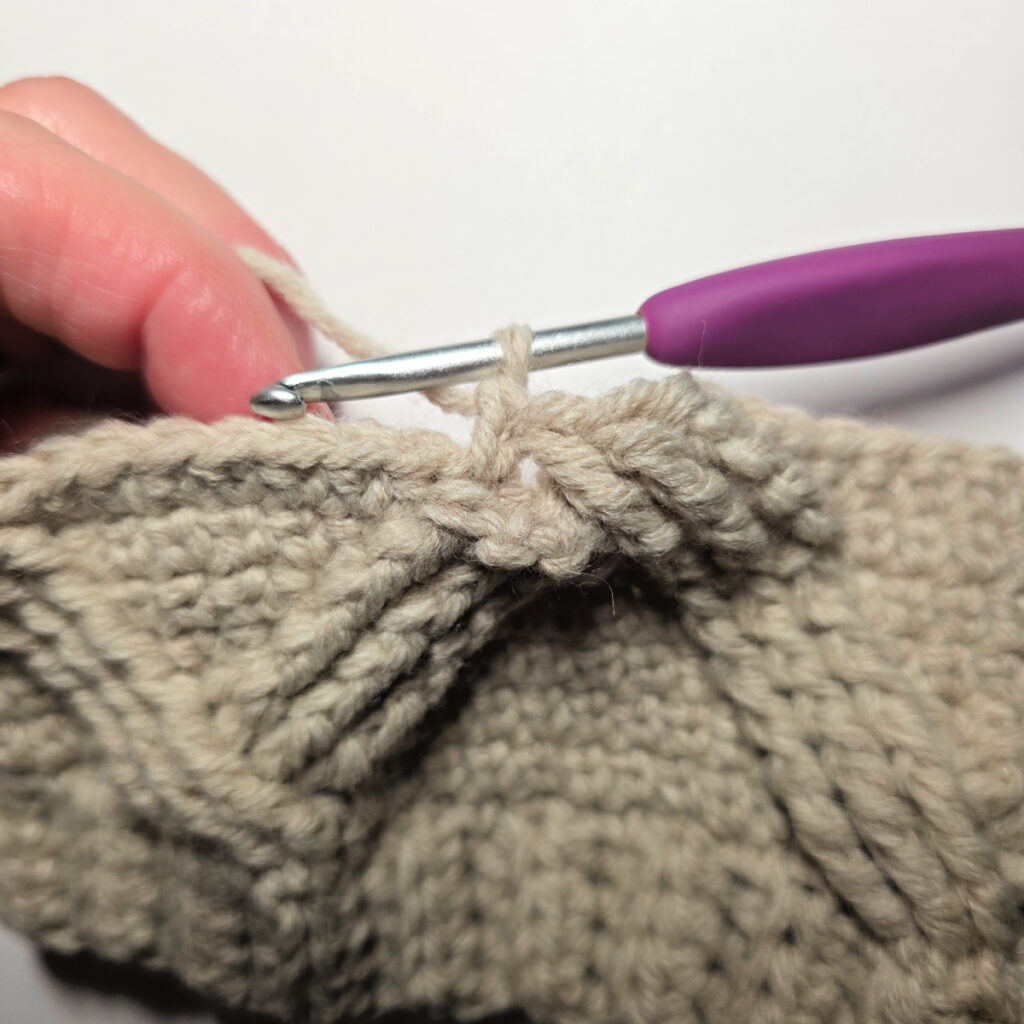
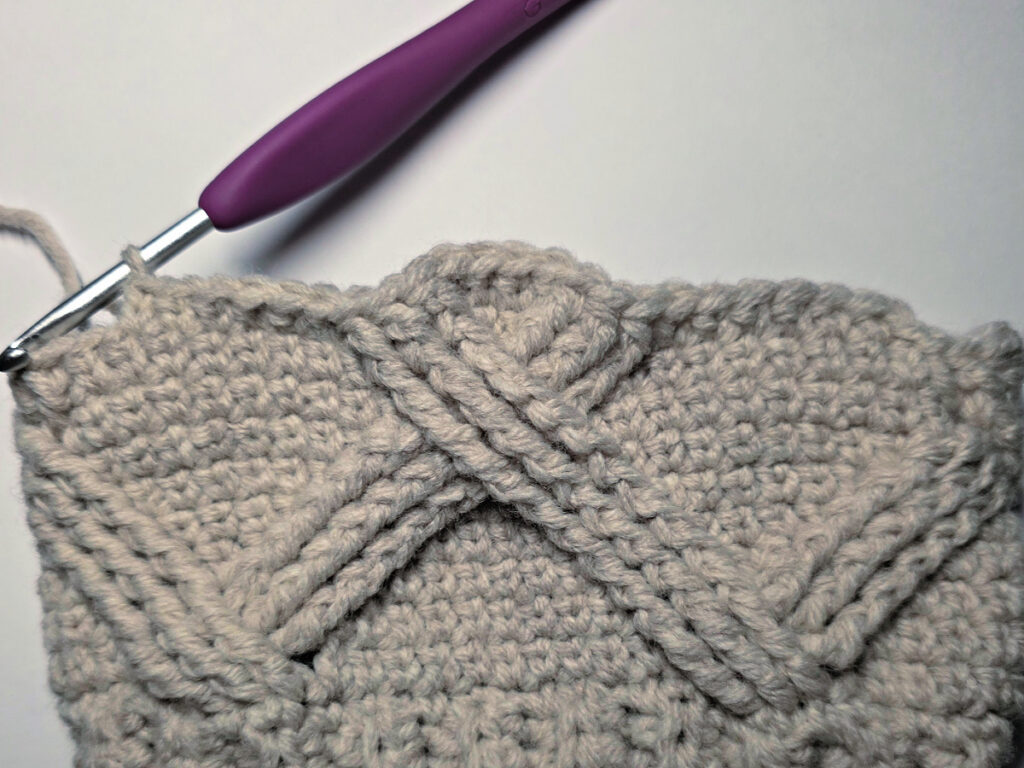
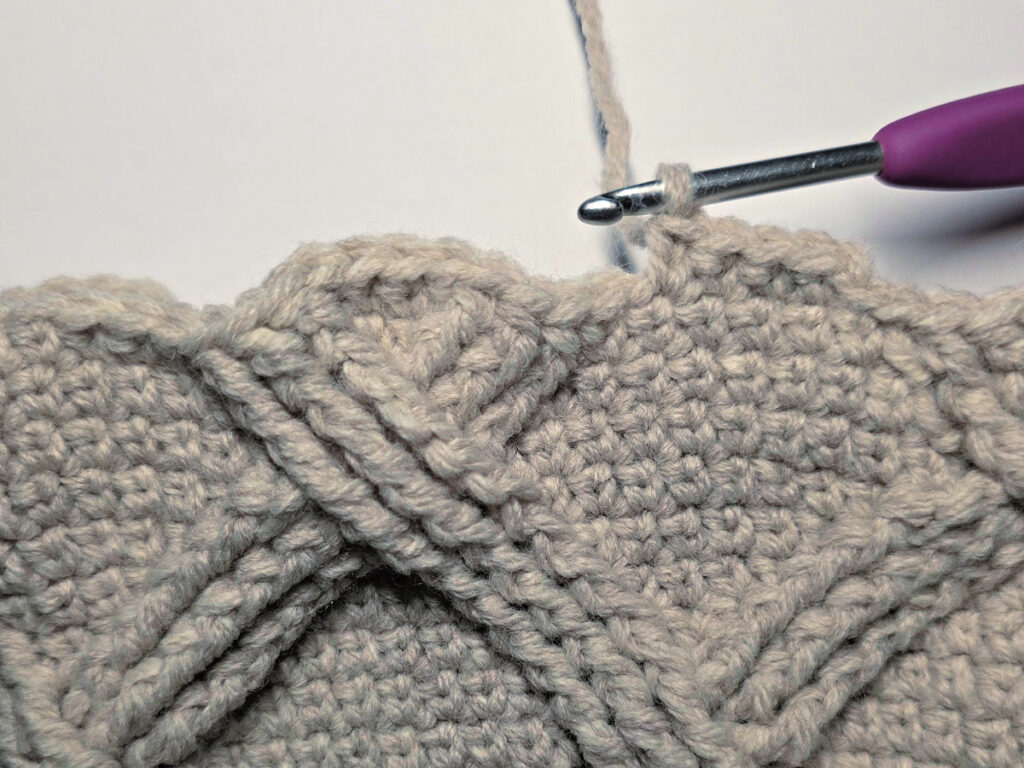
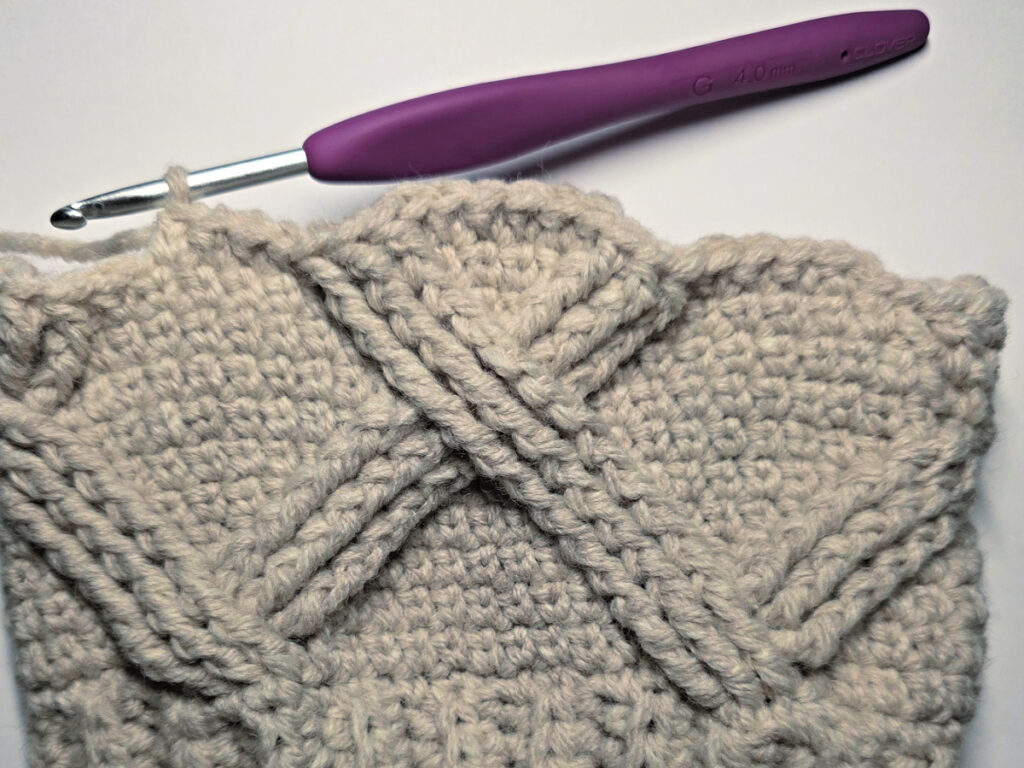
Rnd 1 (RS): Ch 1, ext sc in each of the first 10 sts, skip each of the next 3 sts, FPTrtr around each of the next 3 sts, FPTrtr around each of the 3 skipped sts, (ext sc in each of the next 10 sts, FPTrtr around each of the next 3 sts, FPT rtr around each of the 3 skipped sts) 3 times. Join with a sl st to the 1st ext sc. (64 sts)
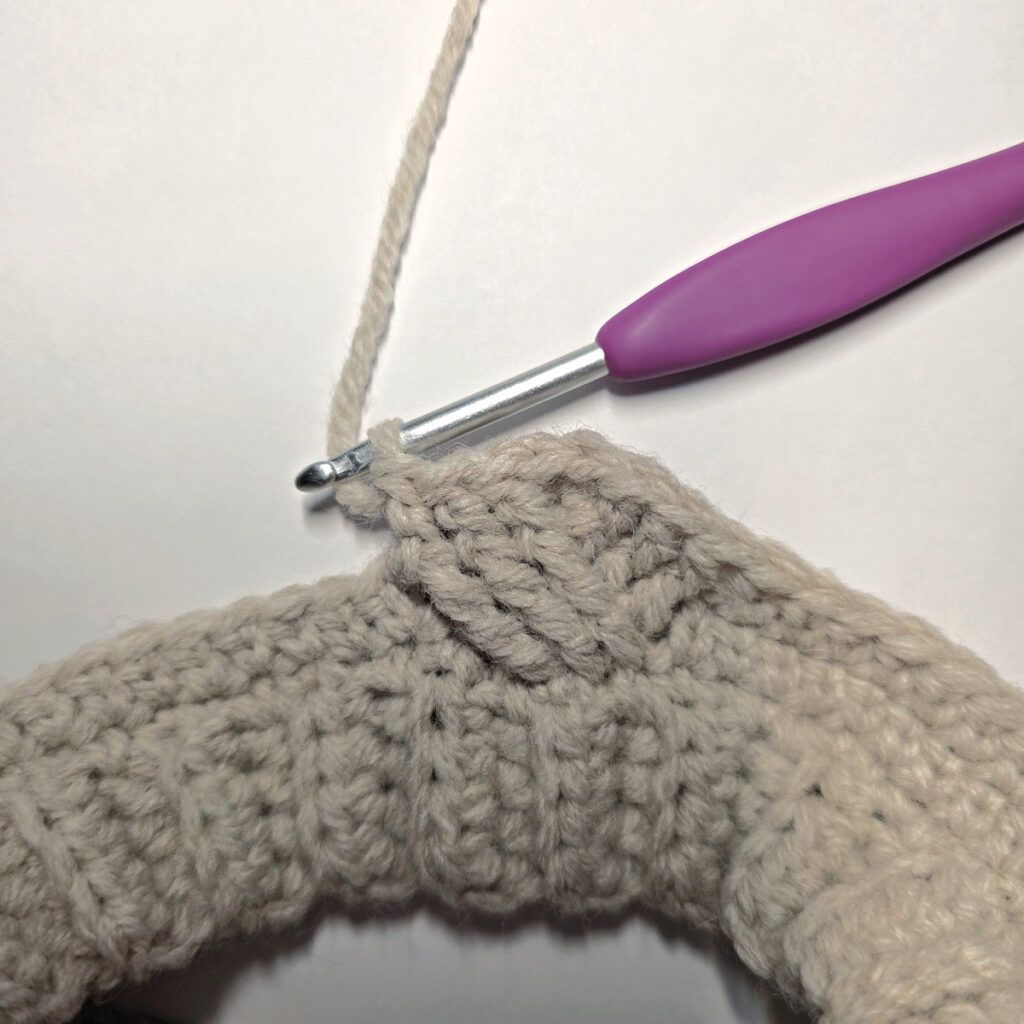
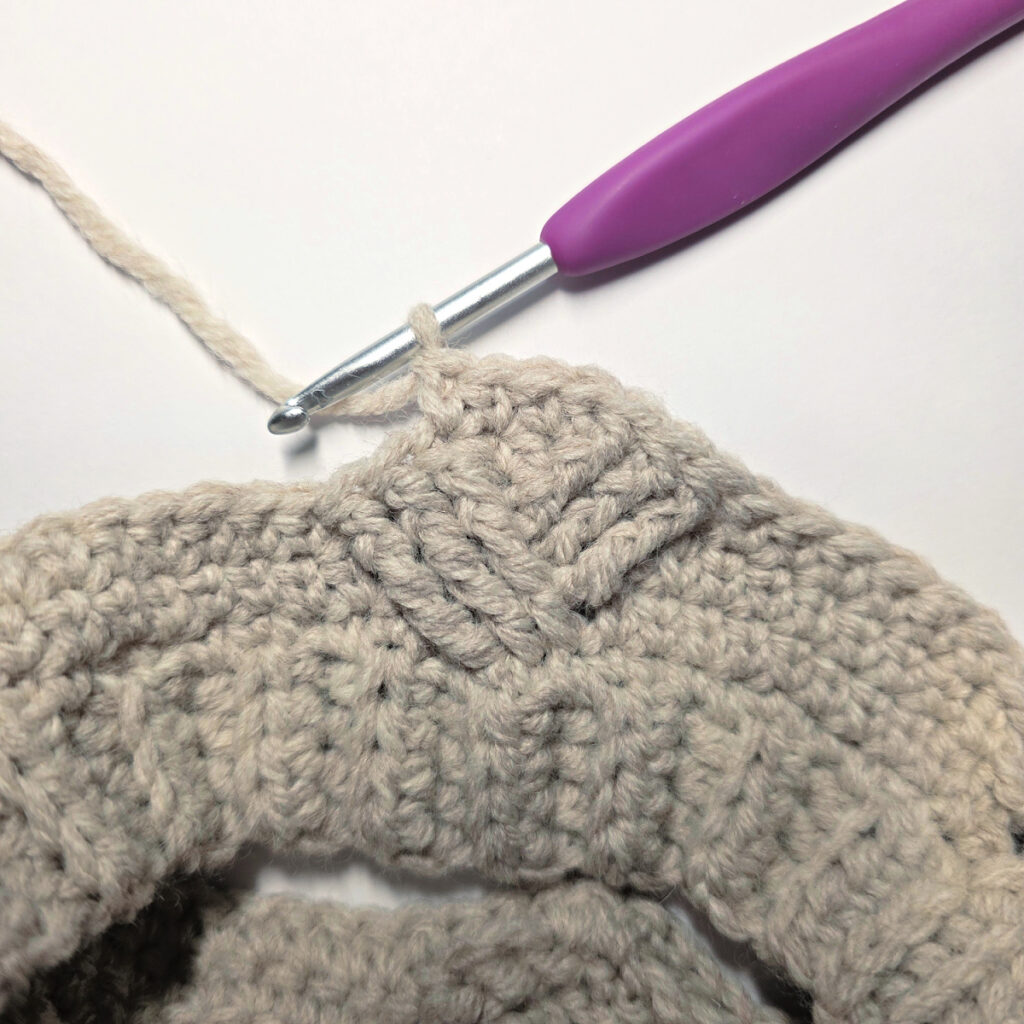
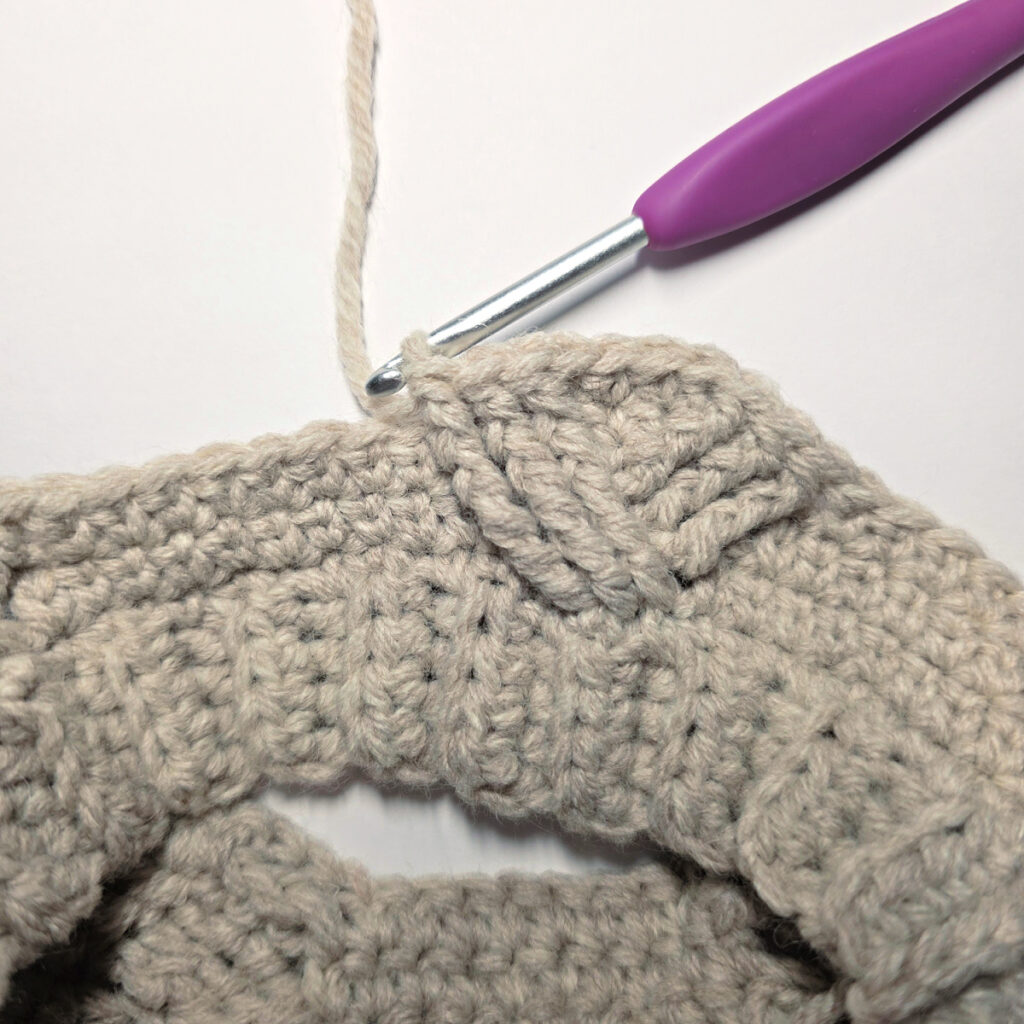
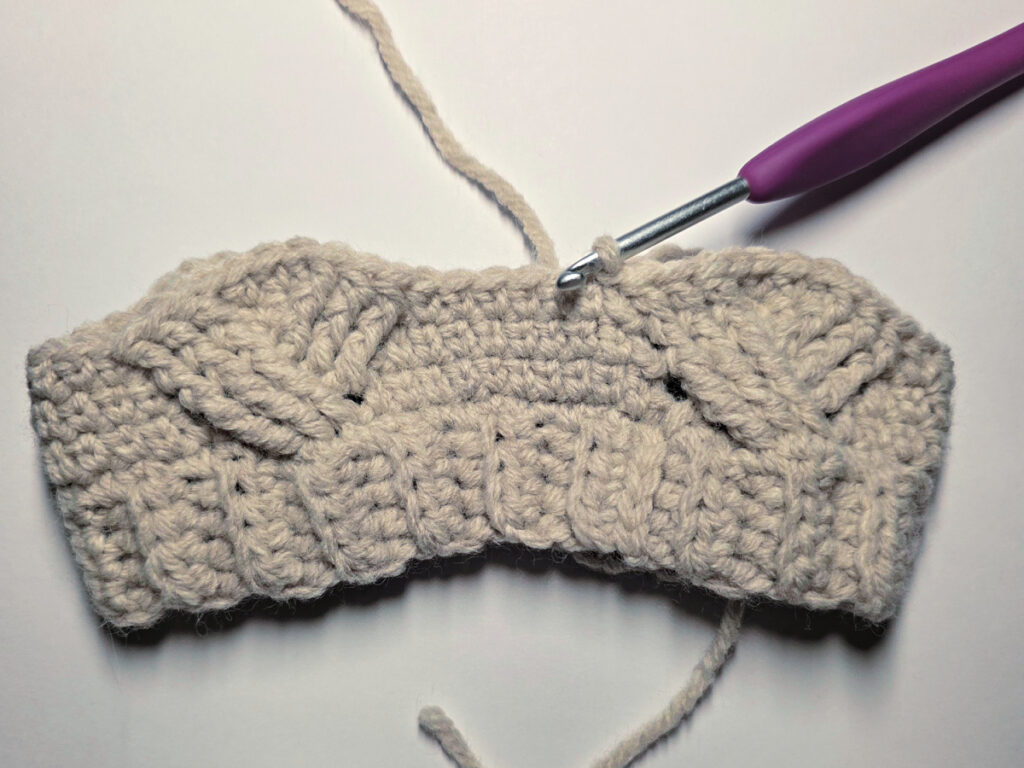
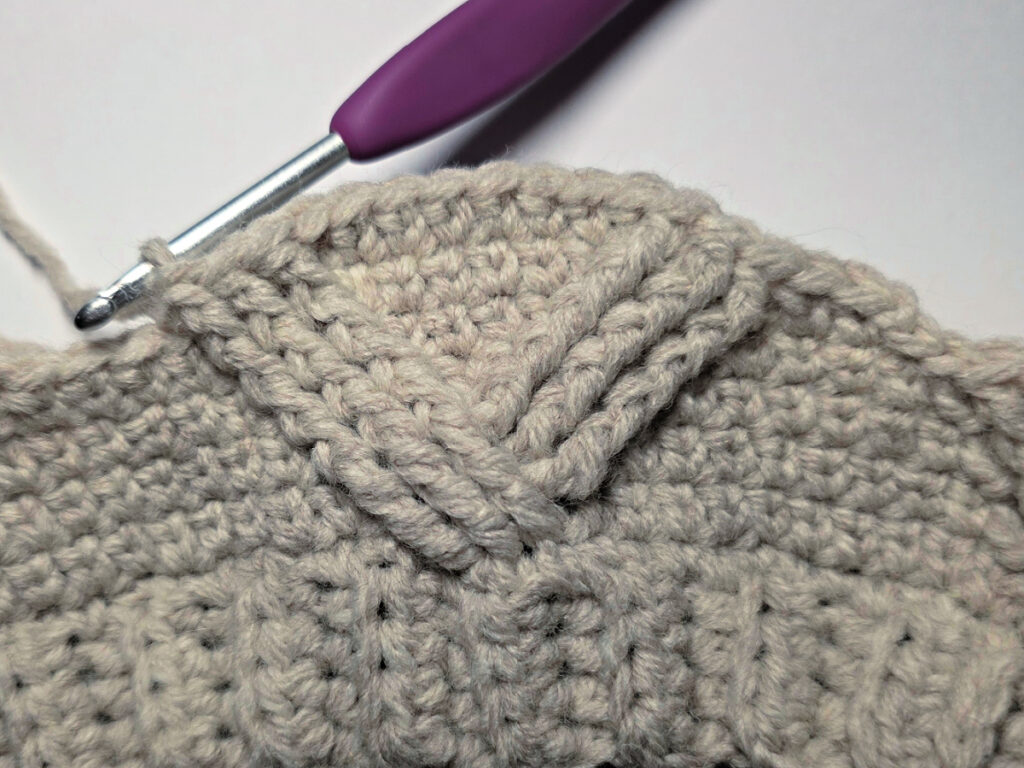
Rnd 2: BLO sl st into the next st (does not count as a st), ch 1, Both Loops ext sc in the same st, ext sc in each of the next 7 sts, (skip the next ext sc, FPdc around each of the next 3 post sts, ext sc in top of same post st as fpdc just worked, ext sc in top of next post st, fpdc around same st as last ext sc worked, fpdc around each of the next 2 post sts, skip the next ext sc, ext sc in each of the next 8 sts) work from ( to ) 3 times, then skip the next ext sc, FPdc around each of the next 3 post sts, ext sc in top of same post st as fpdc just worked, ext sc in top of next post st, fpdc around same st as last ext sc worked, fpdc around each of the next 2 post sts. Join with a sl st to the 1st ext sc. (64 sts)
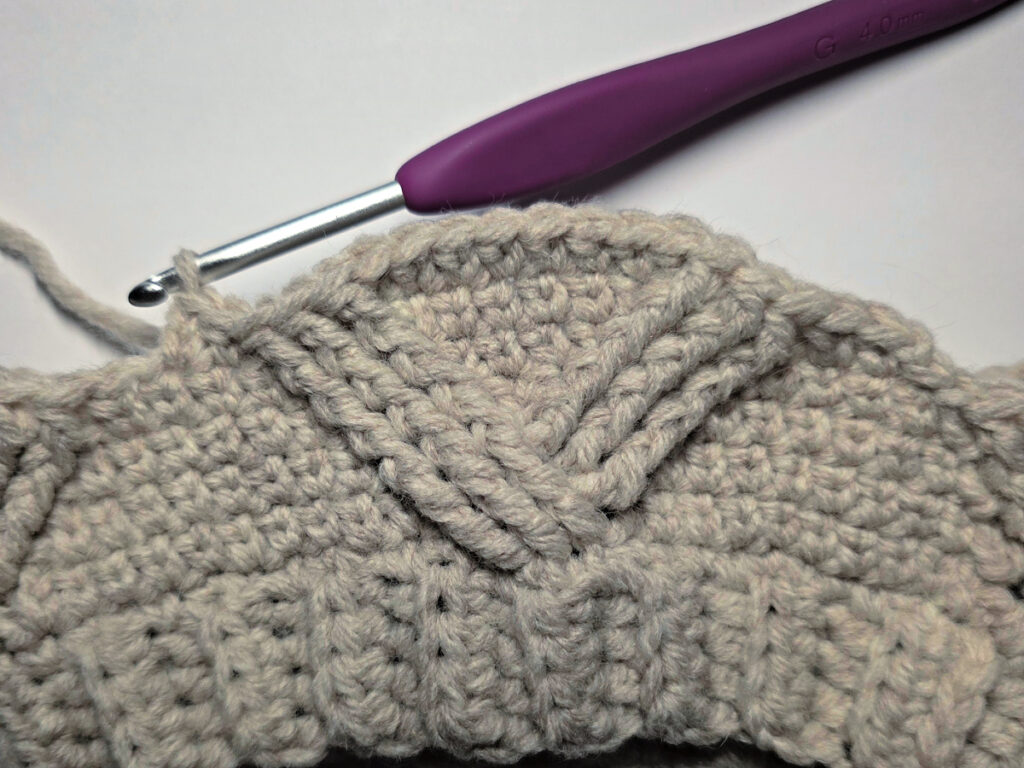
Rnd 3: BLO sl st into the next st (does not count as a st), ch 1, Both Loops ext sc in the same st, ext sc in each of the next 5 sts, (skip the next ext sc, FPdc around each of the next 3 post sts, ext sc in top of same post st as fpdc just worked, ext sc in each of the next 2 sts, ext sc in top of next post st, fpdc around same st as last ext sc worked, fpdc around each of the next 2 post sts, skip the next ext sc, ext sc in each of the next 6 sts) work from ( to ) 3 times, then skip the next ext sc, FPdc around each of the next 3 post sts, ext sc in top of same post st as fpdc just worked, ext sc in each of the next 2 sts, ext sc in top of next post st, fpdc around same st as last ext sc worked, fpdc around each of the next 2 post sts. Join with a sl st to the 1st ext sc. (64 sts)
Rnd 4: BLO sl st into the next st (does not count as a st), ch 1, Both Loops ext sc in the same st, ext sc in each of the next 3 sts, (skip the next ext sc, FPdc around each of the next 3 post sts, ext sc in top of same post st as fpdc just worked, ext sc in each of the next 4 sts, ext sc in top of next post st, fpdc around same st as last ext sc worked, fpdc around each of the next 2 post sts, skip the next ext sc, ext sc in each of the next 4 sts) work from ( to ) 3 times, then skip the next ext sc, FPdc around each of the next 3 post sts, ext sc in top of same post st as fpdc just worked, ext sc in each of the next 4 sts, ext sc in top of next post st, fpdc around same st as last ext sc worked, fpdc around each of the next 2 post sts. Join with a sl st to the 1st ext sc. (64 sts)
Rnd 5: BLO sl st into the next st (does not count as a st), ch 1, Both Loops ext sc in the same st, ext sc in the next st, (skip the next ext sc, FPdc around each of the next 3 post sts, ext sc in top of same post st as fpdc just worked, ext sc in each of the next 6 sts, ext sc in top of next post st, fpdc around same st as last ext sc worked, fpdc around each of the next 2 post sts, skip the next ext sc, ext sc in each of the next 2 sts) work from ( to ) 3 times, then skip the next ext sc, FPdc around each of the next 3 post sts, ext sc in top of same post st as fpdc just worked, ext sc in each of the next 6 sts, ext sc in top of next post st, fpdc around same st as last ext sc worked, fpdc around each of the next 2 post sts. Join with a sl st to the 1st ext sc. (64 sts)
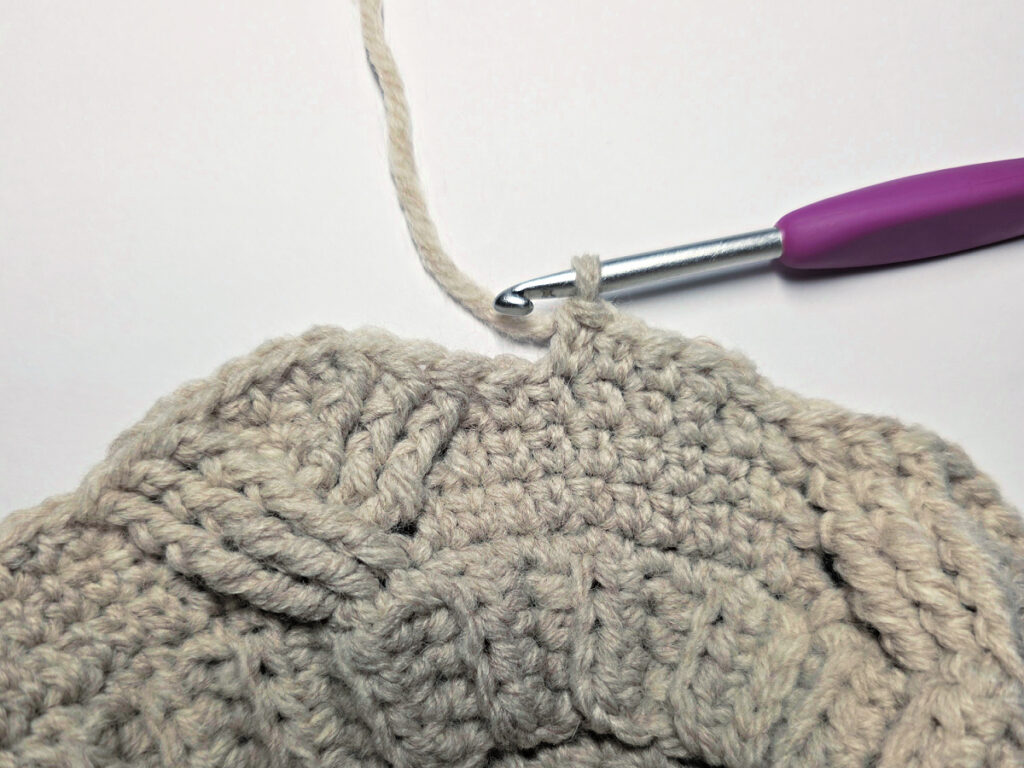
Rnd 6: BLO st st in the next ext sc (do not count as a st), BLO sl st in each of the next 3 post sts (do not count as sts), ch 1, Both Loops ext sc in the same post st as the last BLO sl st worked, (ext sc in each of the next 8 sts, ext sc in the top of the next post st, skip each of the next 3 post sts and 2 ext sc, FPTrtr around each of the next 3 post sts, FPTrtr around each of the 3 skipped post sts *, ext sc into the top of the post st that you worked the 3rd FPTrtr around) work from ( to ) 4 times, but end the 4th repeat at the *. Join with a sl st to the 1st ext sc. (64 sts)
Rnds 7 – 11: Rep Rnds 2 – 6.
Rnd 12: Rep Rnd 2.
Rnd 13: Ch 1, sc in each st around. Do not join. (64 sts)
Rnd 14: Sc in each st around. Join with a sl st to the 1st st. (64 sts)
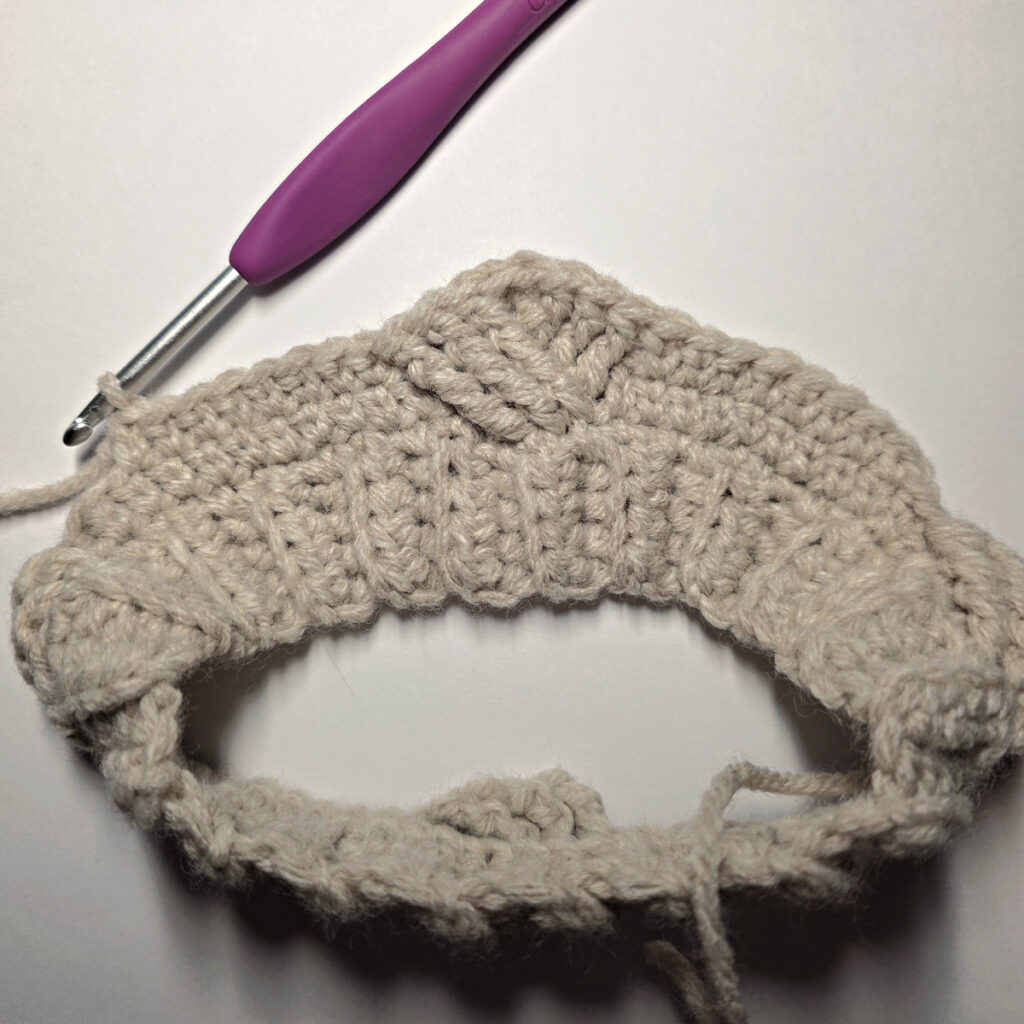
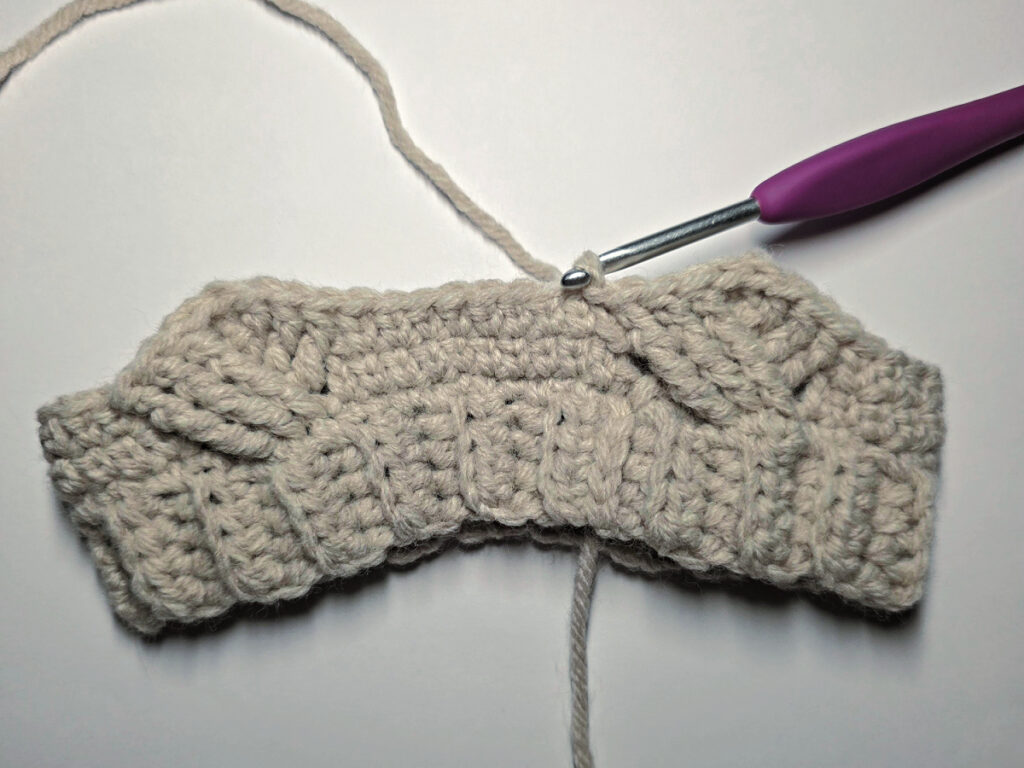
Fasten off leaving a length of yarn that is 3 – 4 times the diameter of the ankle. Continue on to Attaching the Cuff to the Ankle of the Slipper Boot.
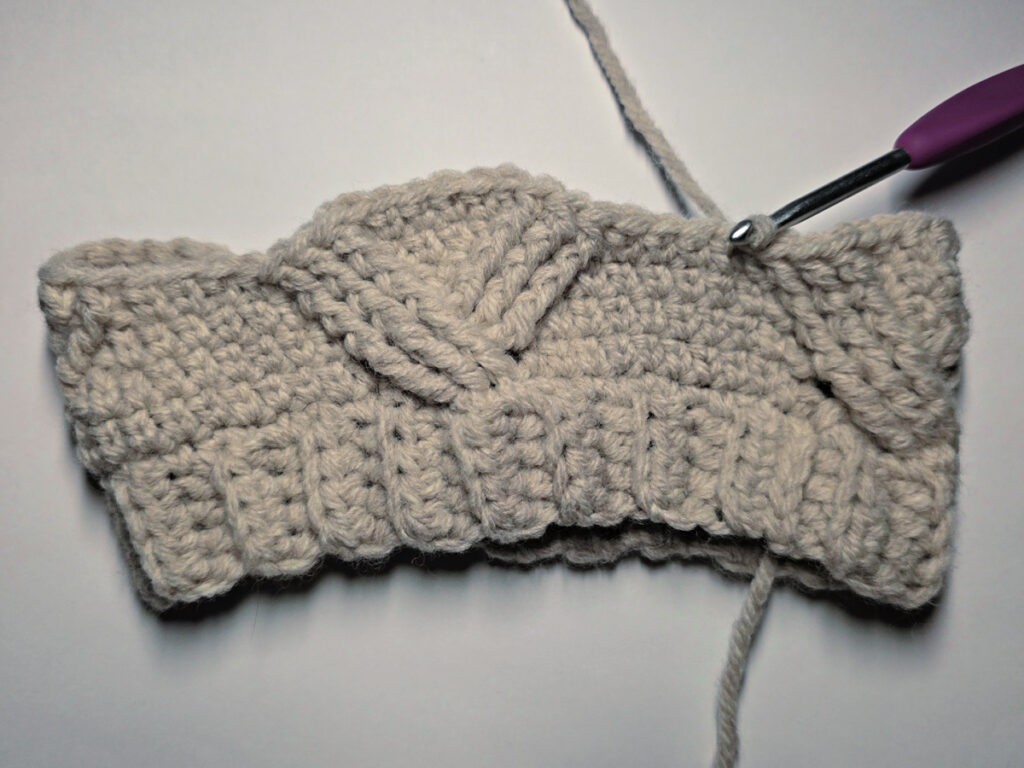
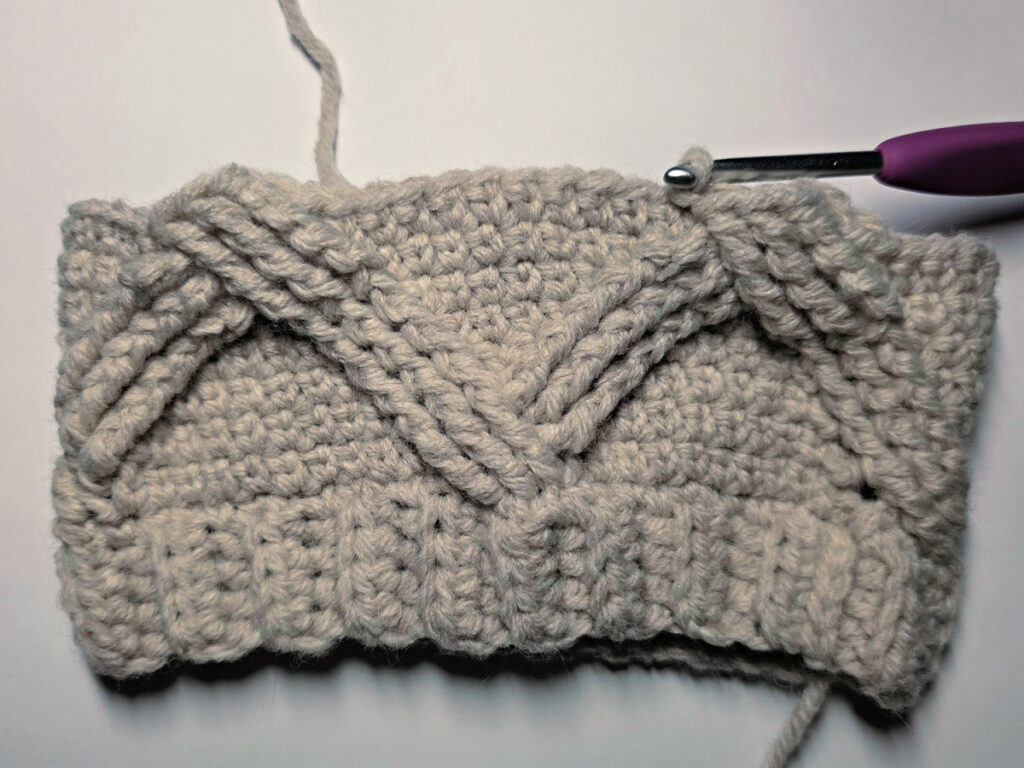
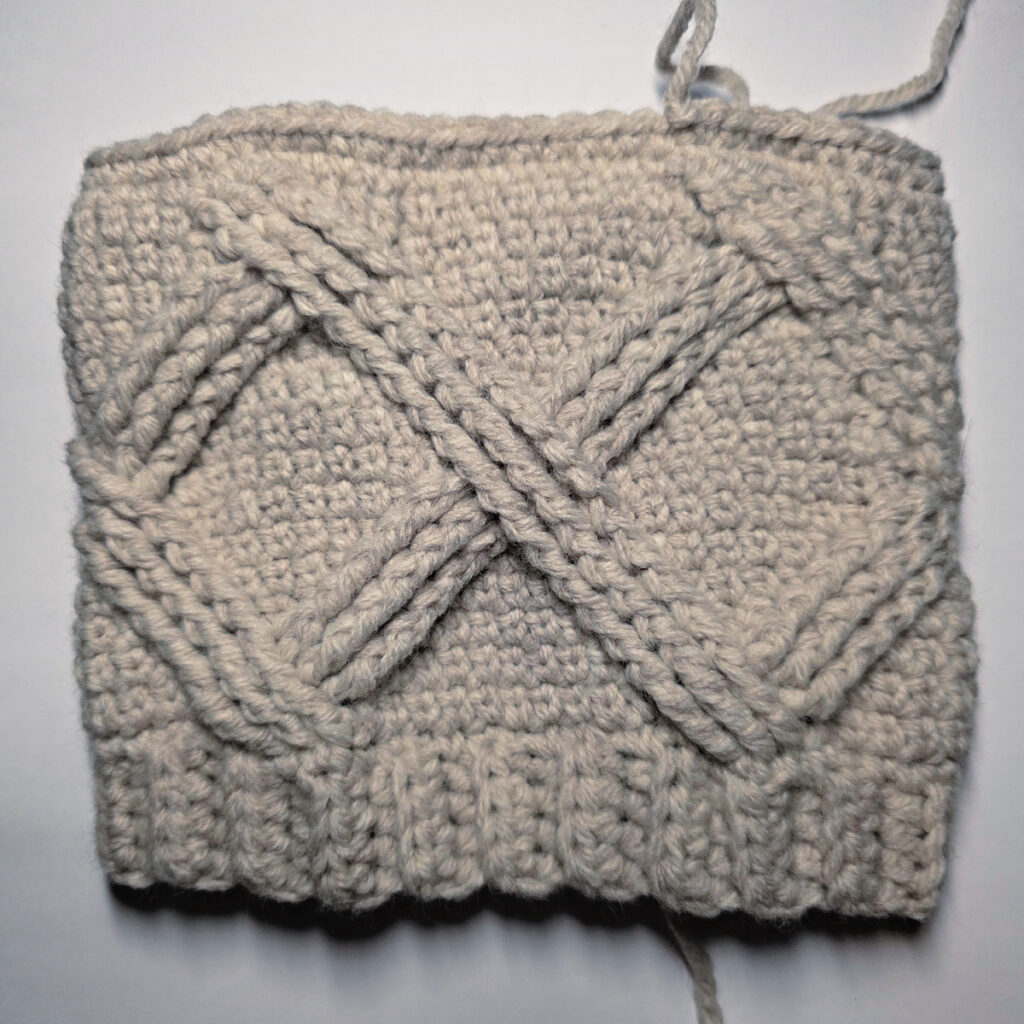
Cuff should measure approximately 6.5″ W x 5″ H (when laid flat).
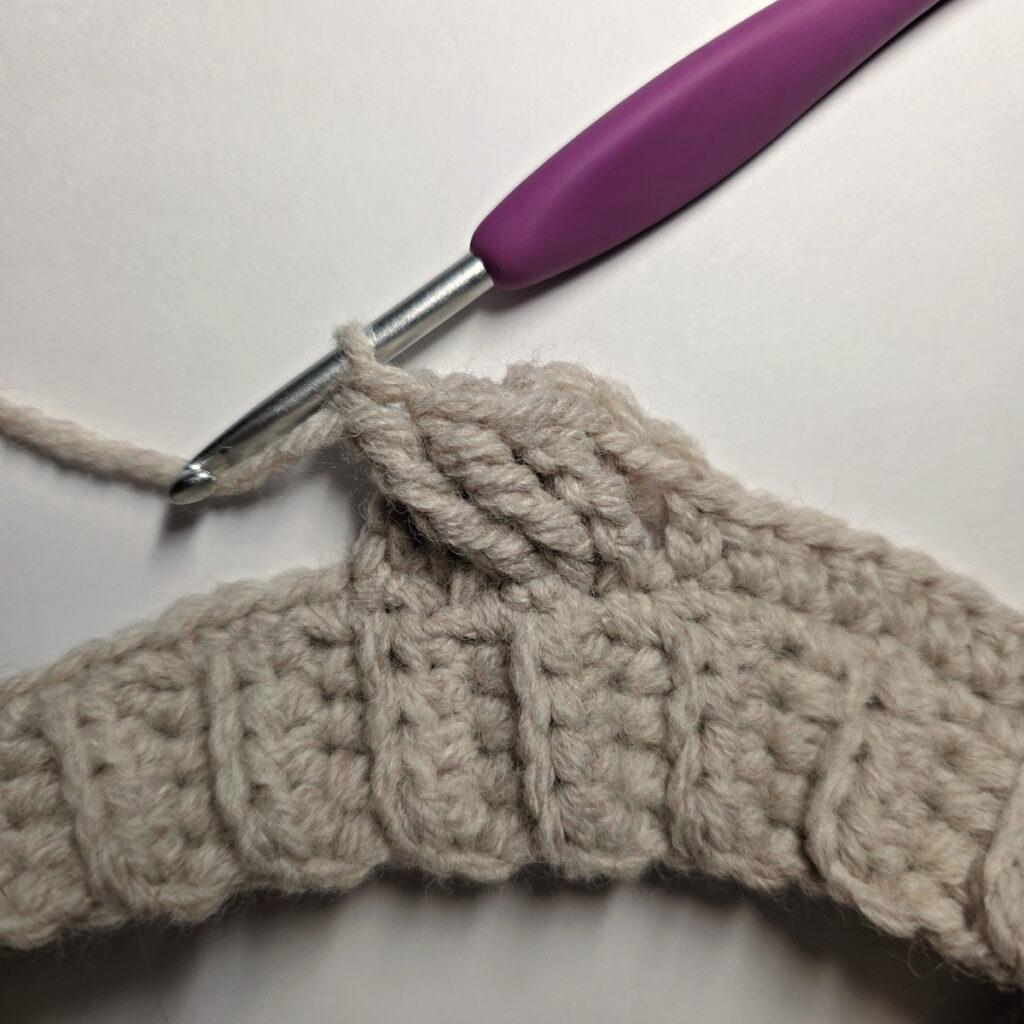
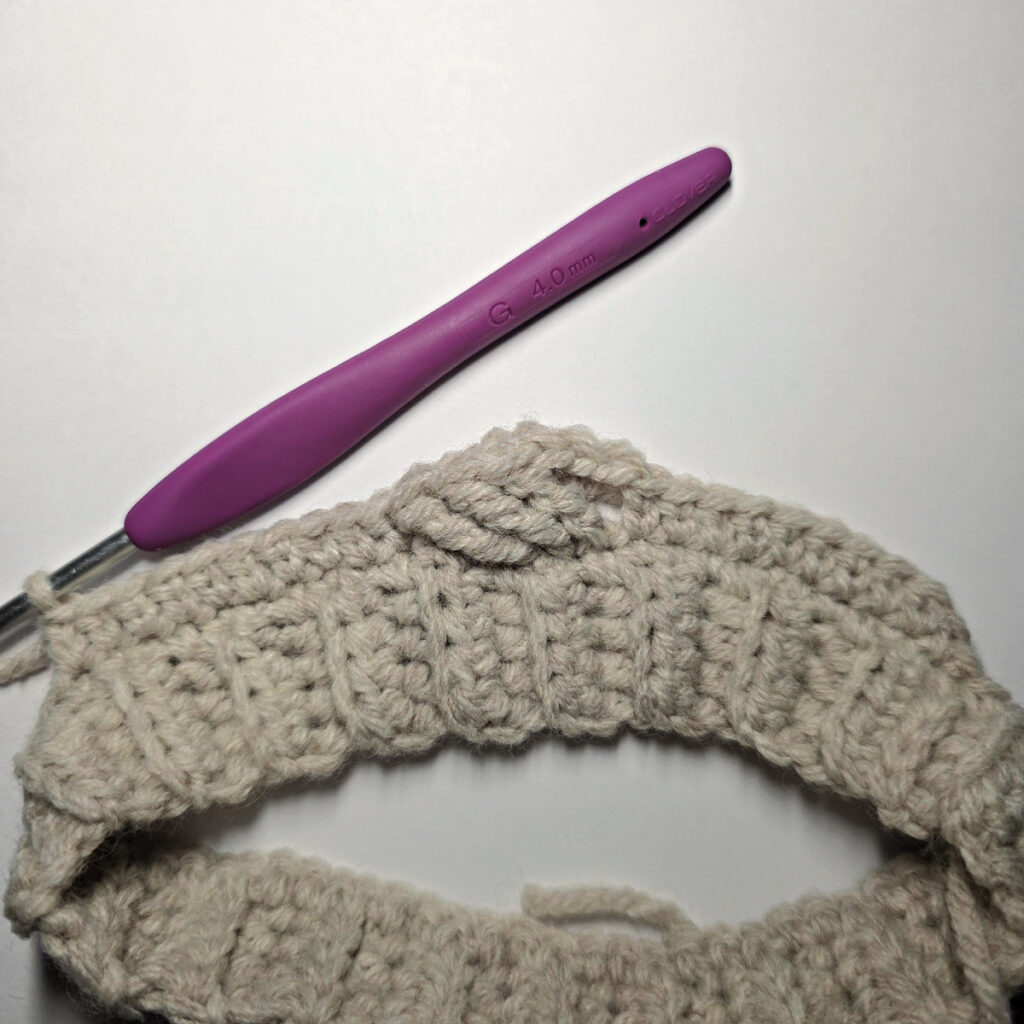
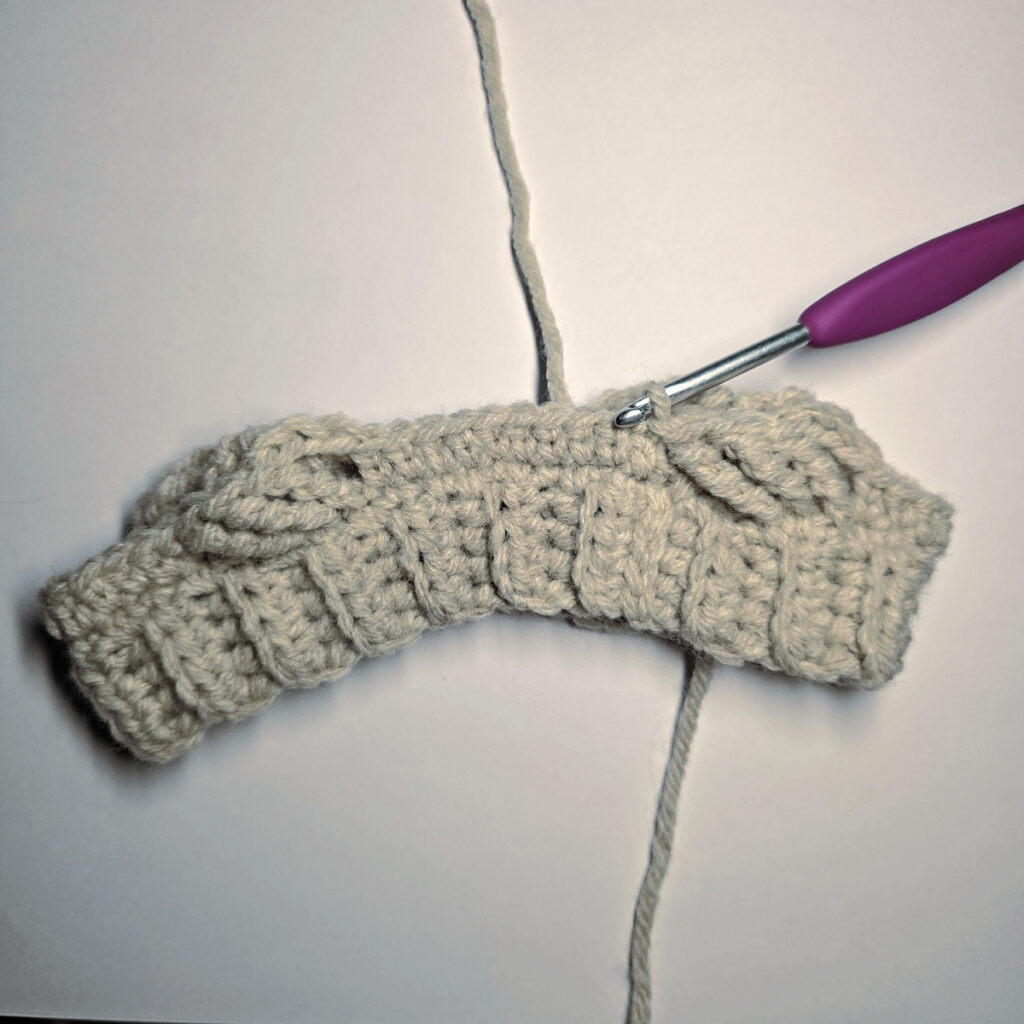
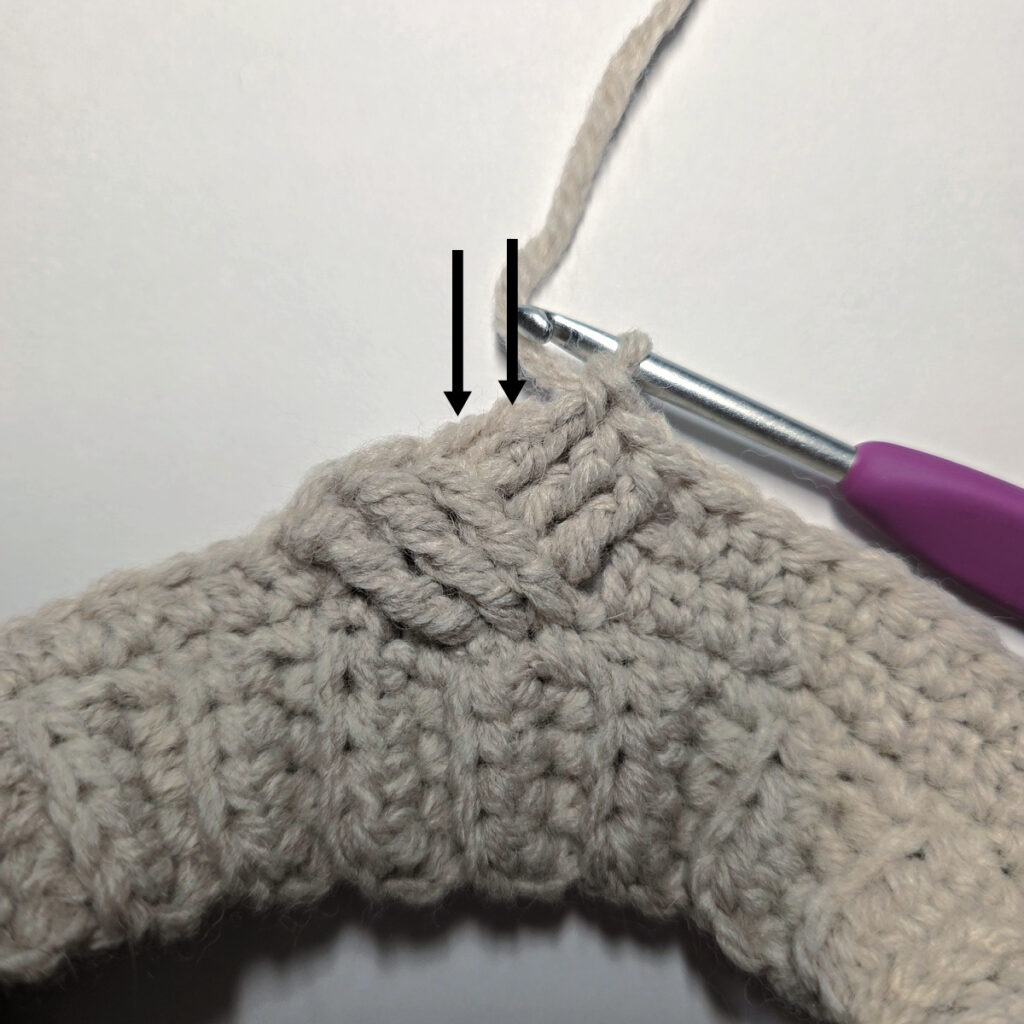
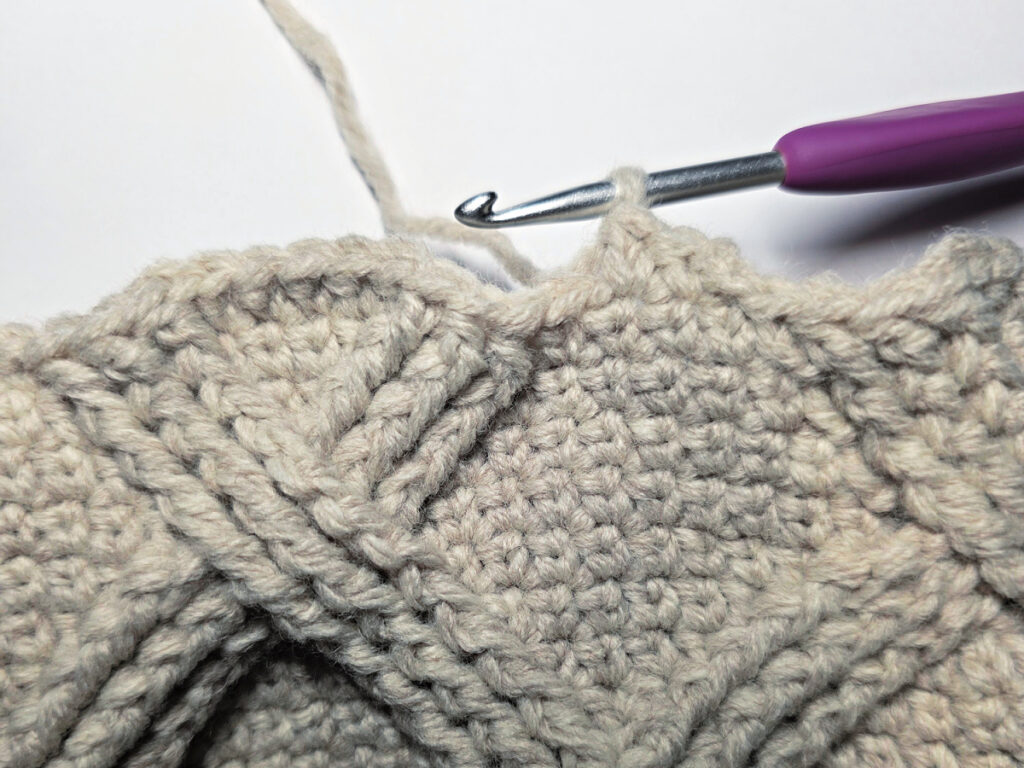
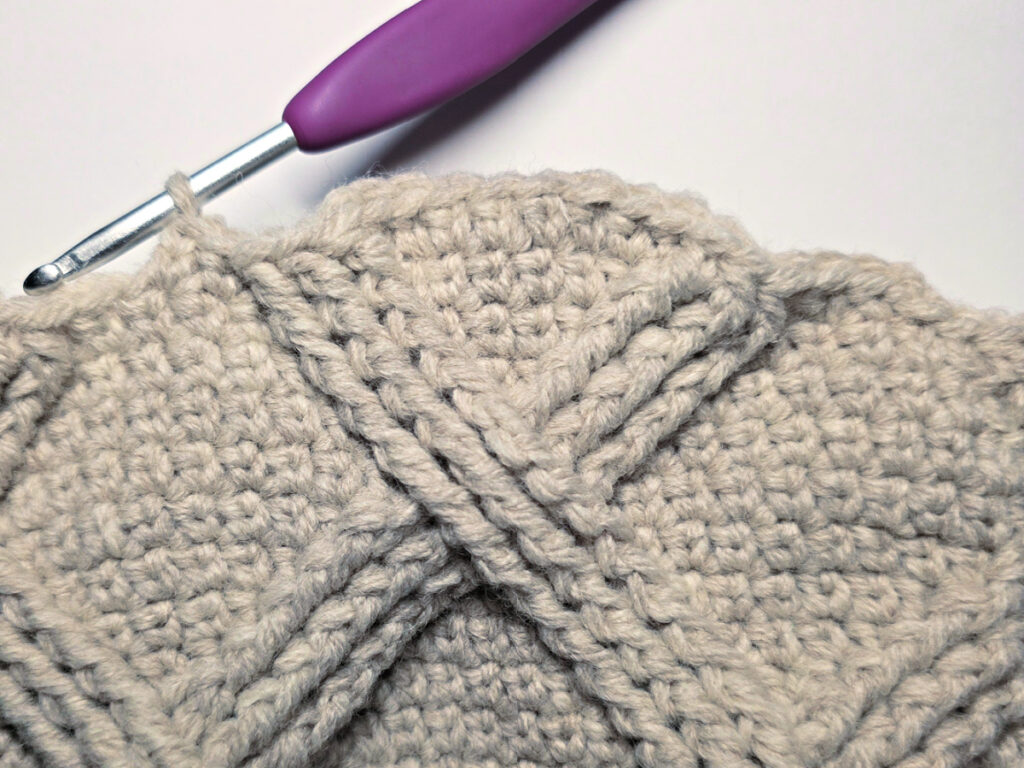
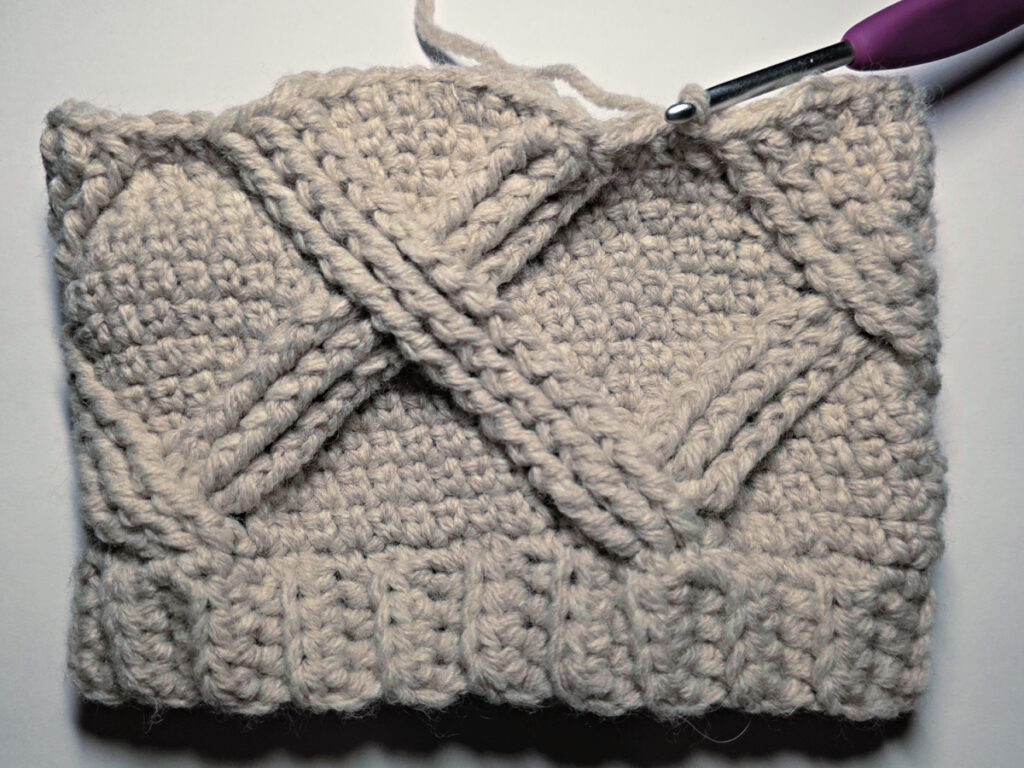
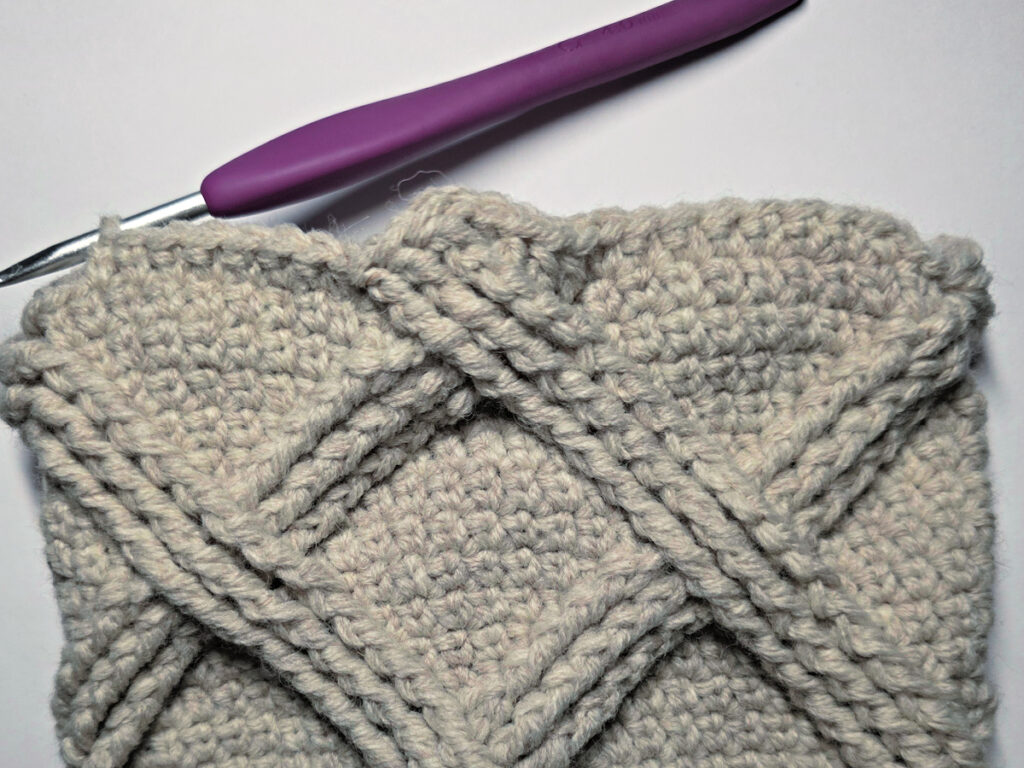
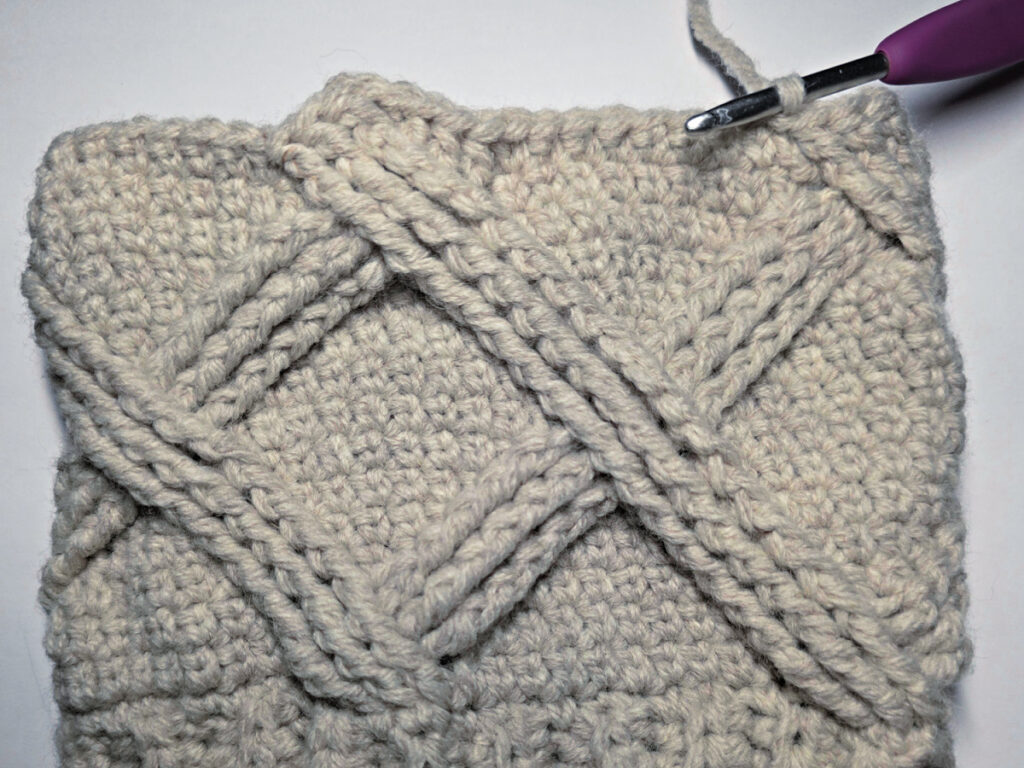
Progression Photos – Cabled Cuff
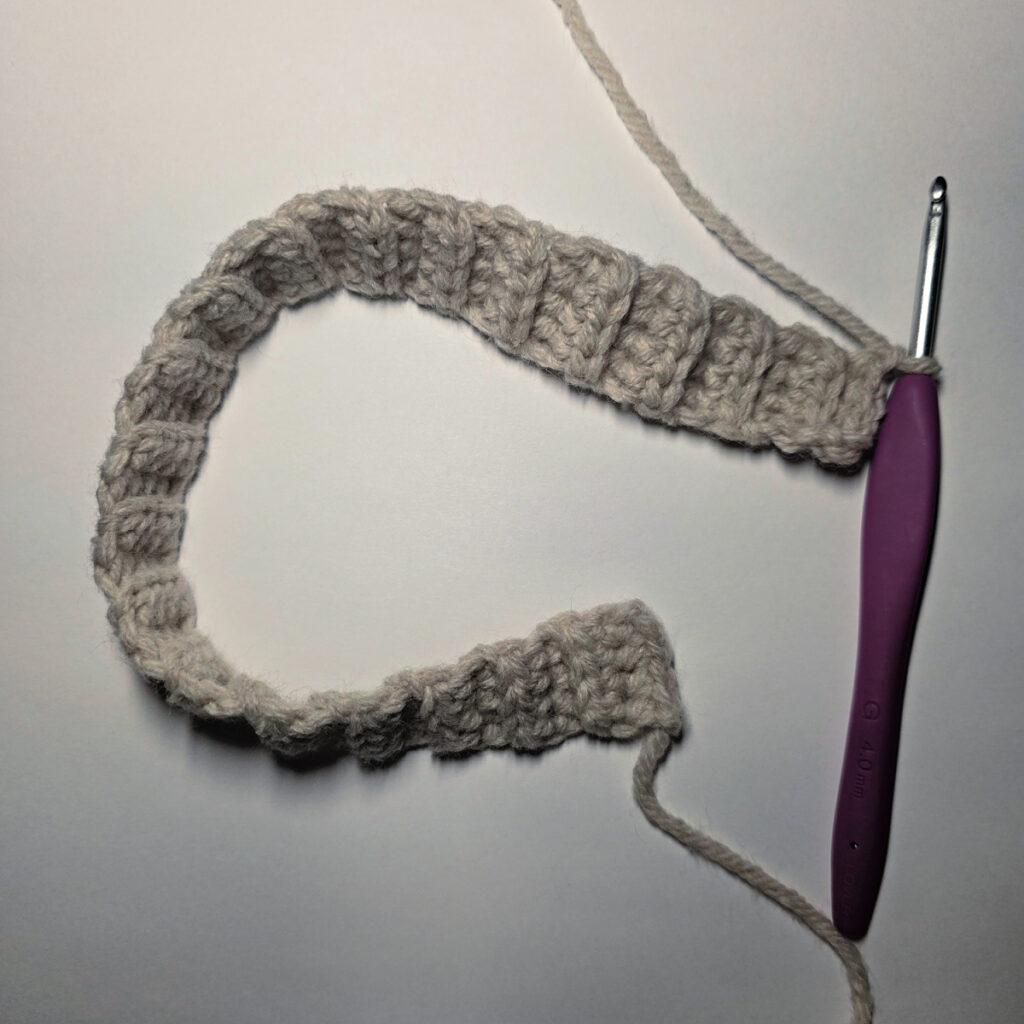
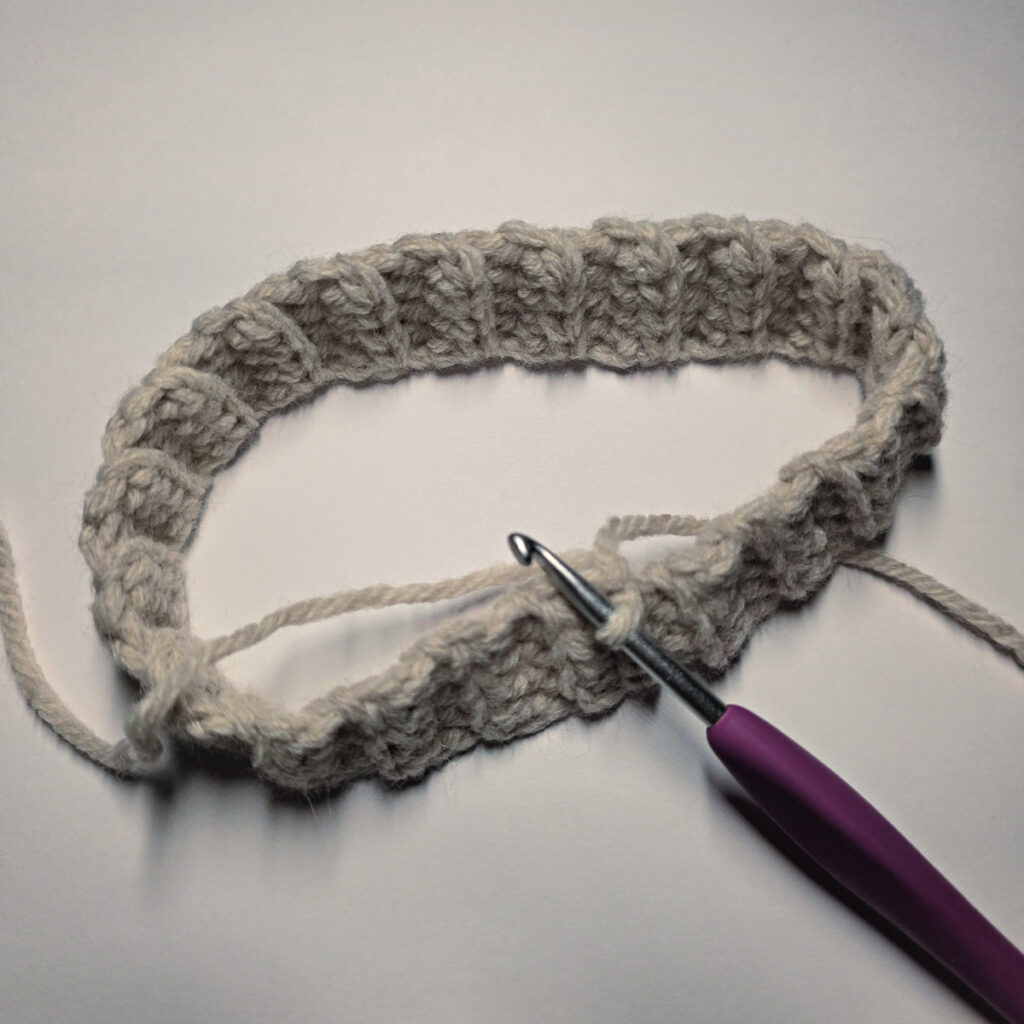
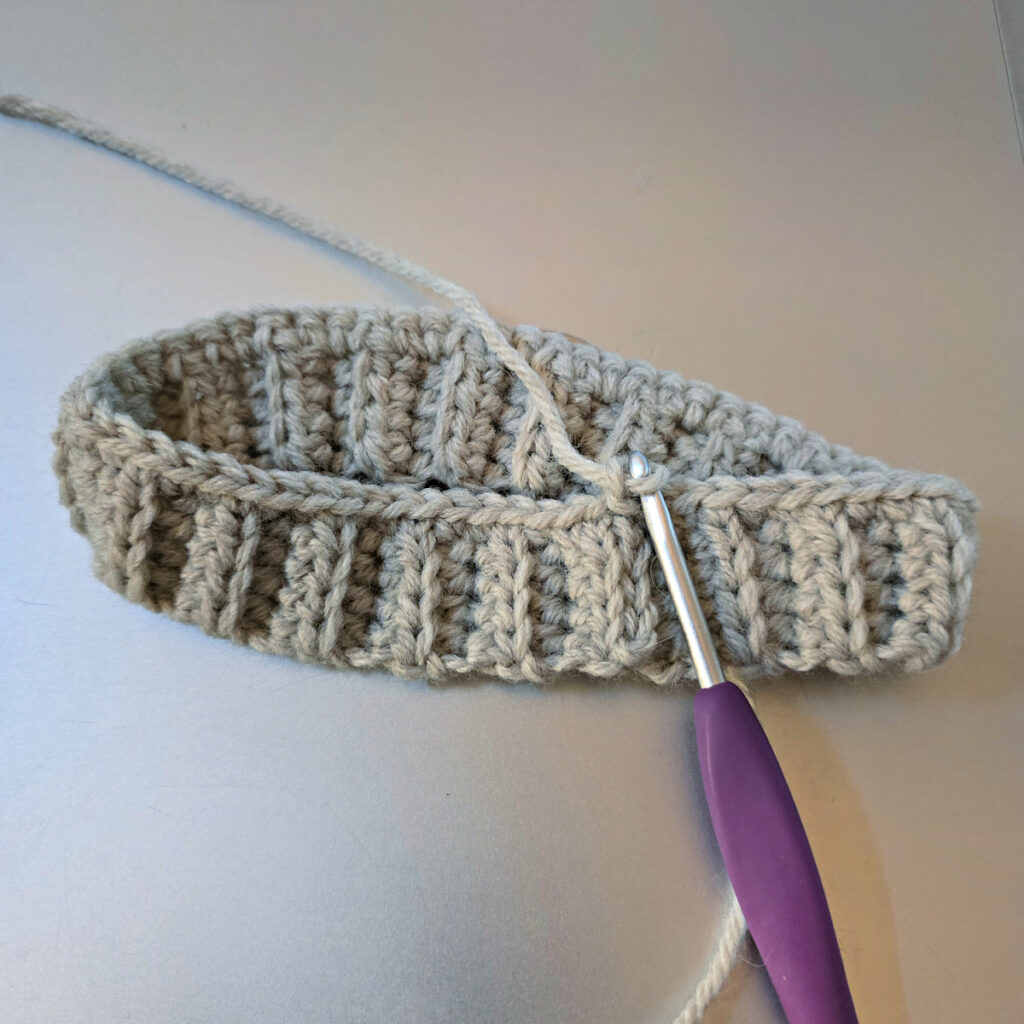
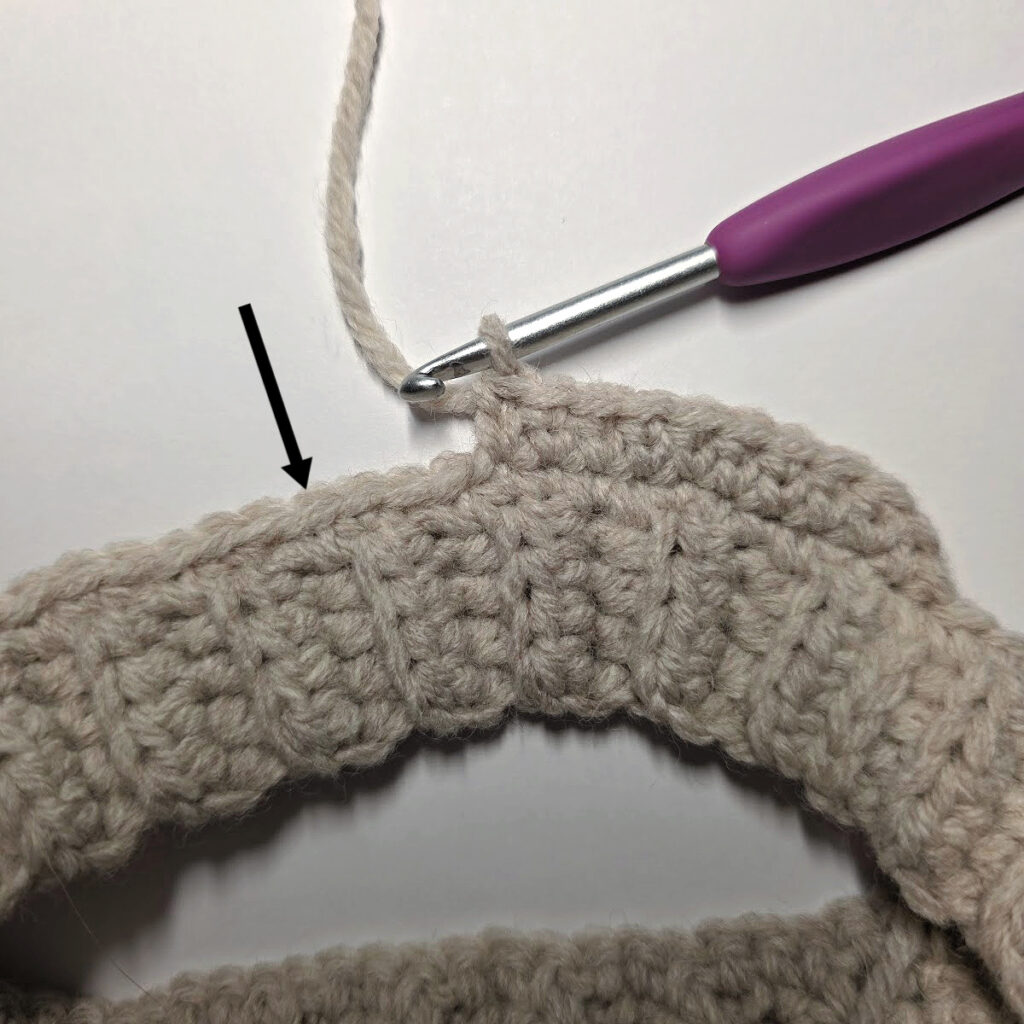
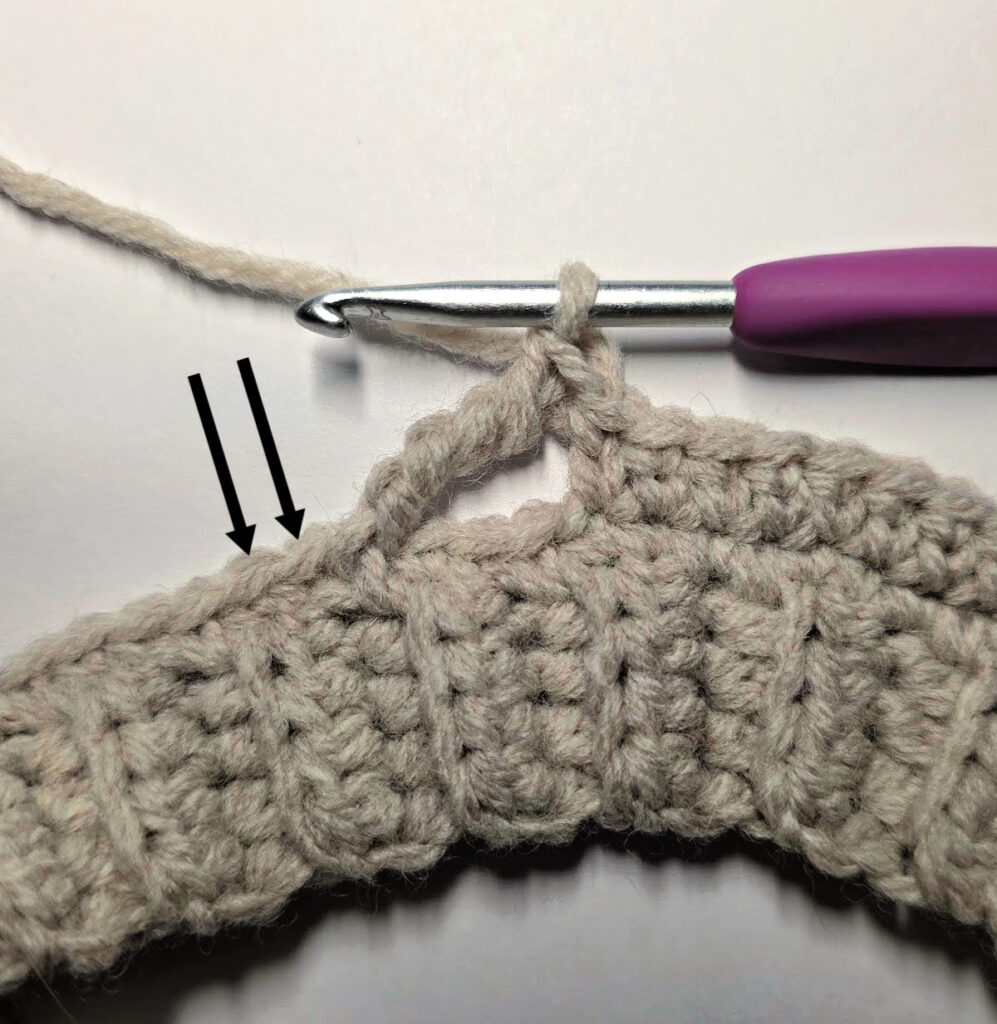
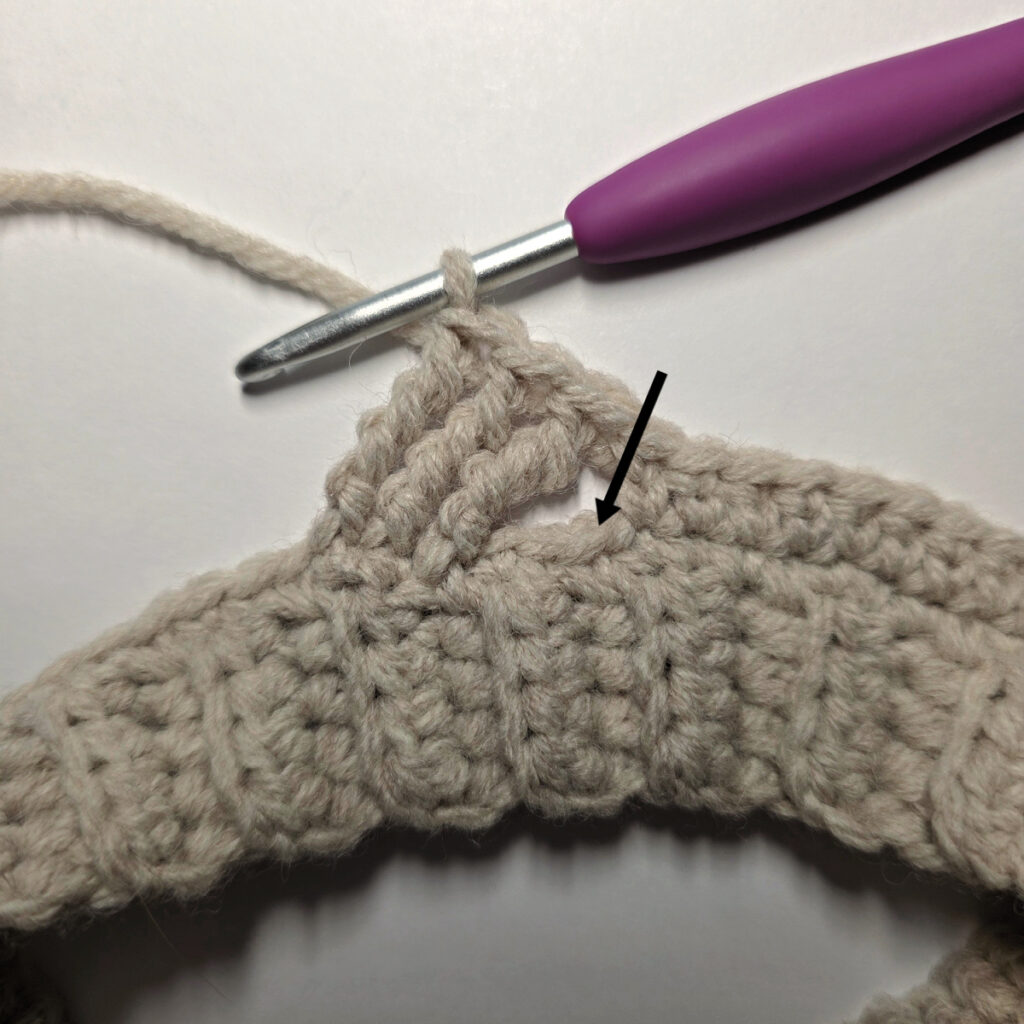
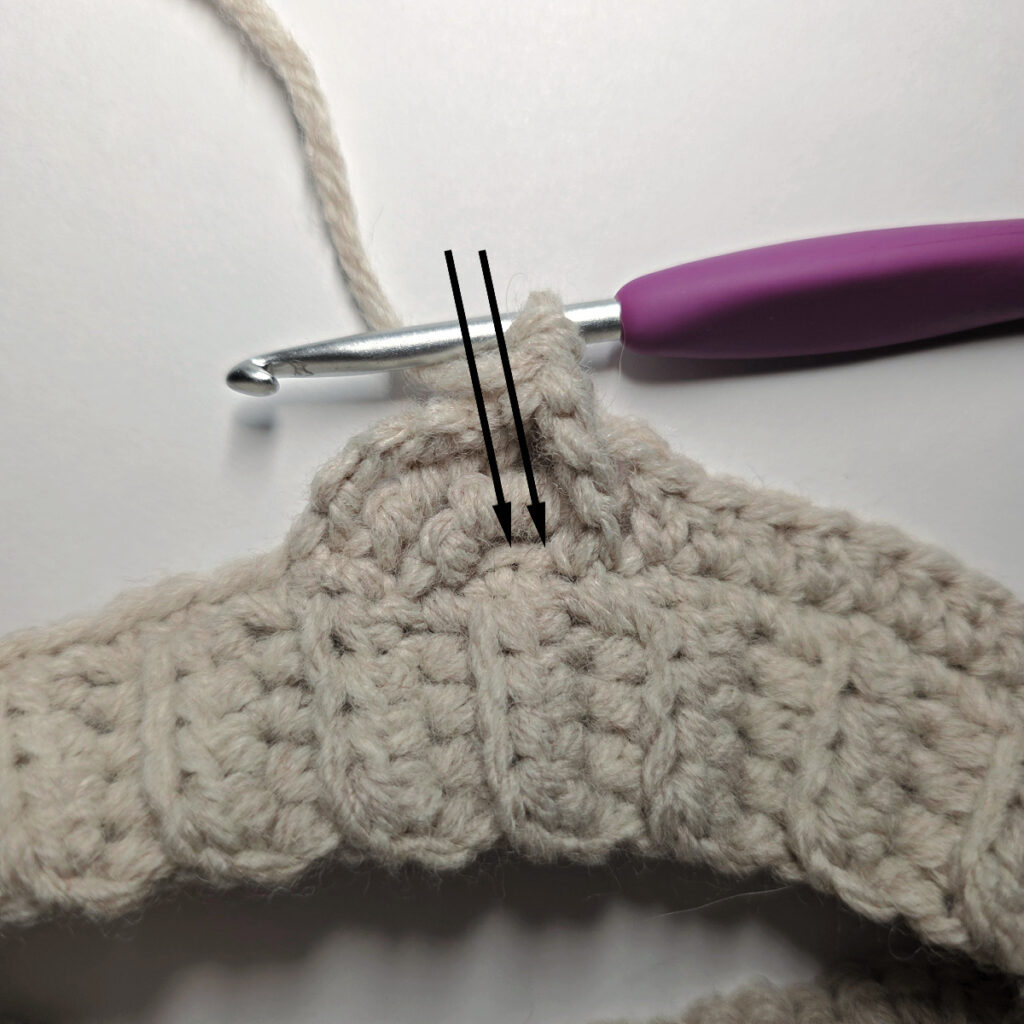
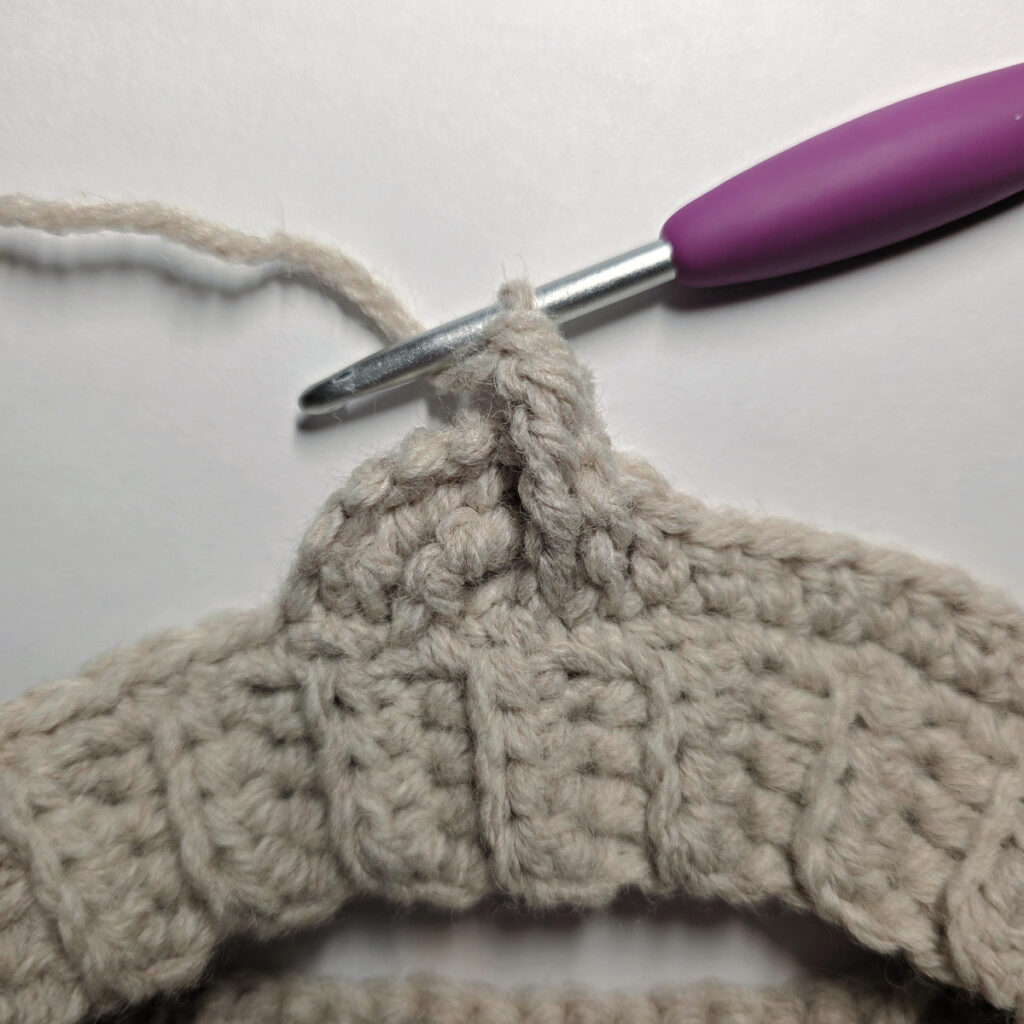
ext sc. Skip 3. The arrow is pointing at the stitch where you’ll work the first FPTrtr.
Attaching the Cuff to the Ankle of the Slipper Boot
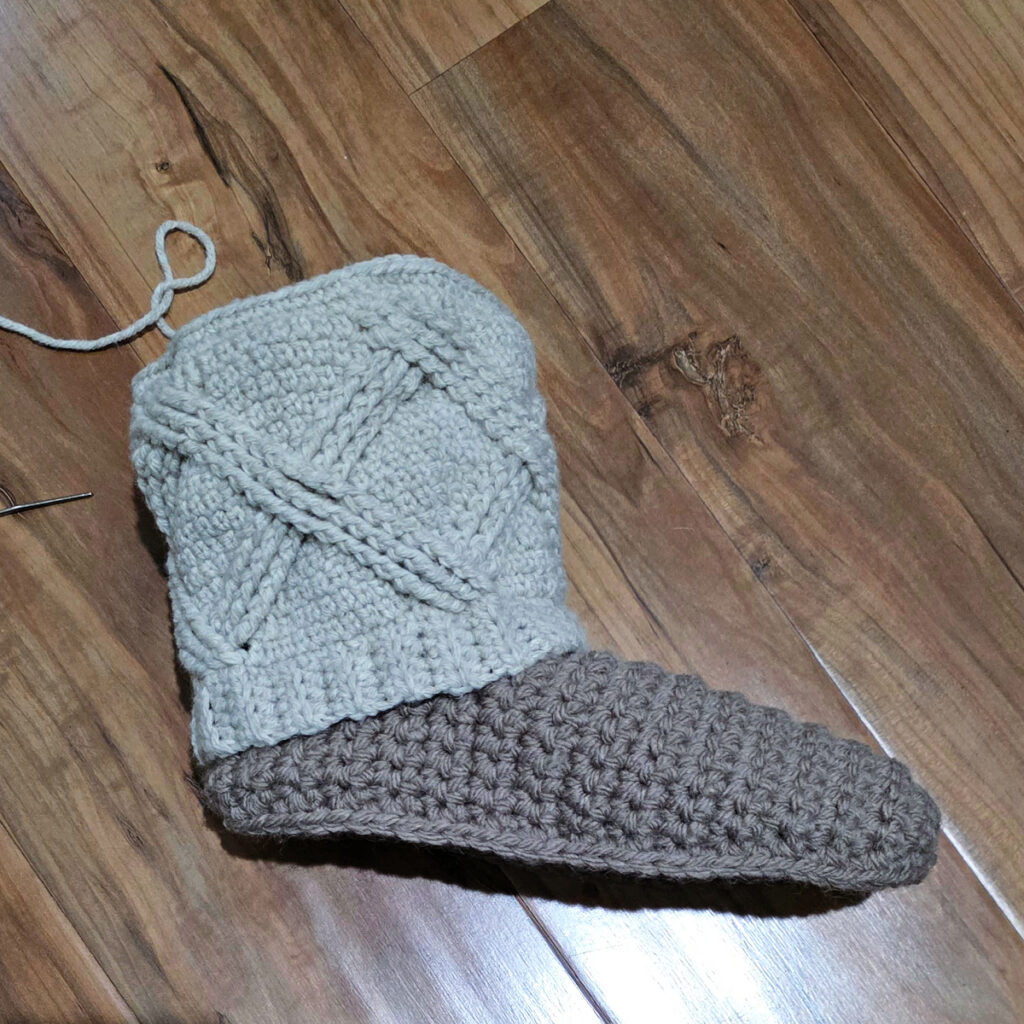
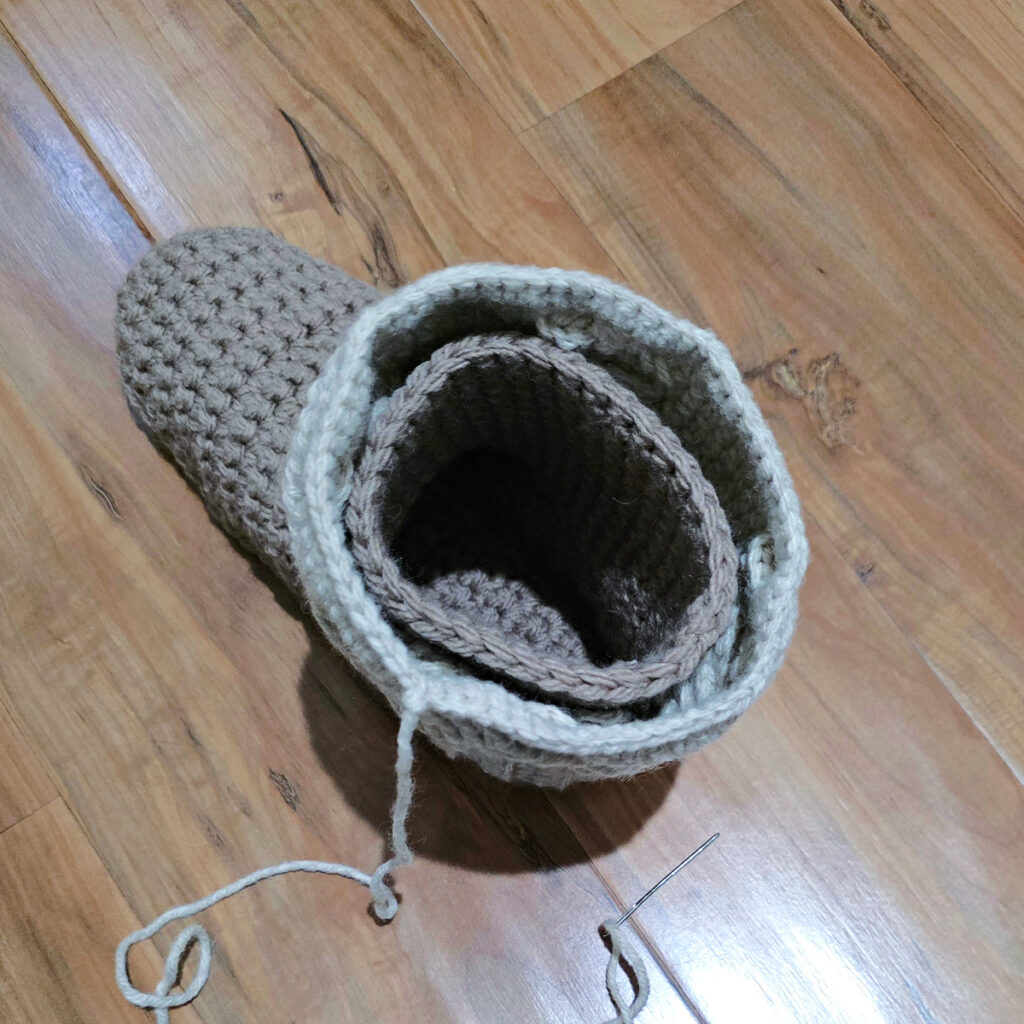
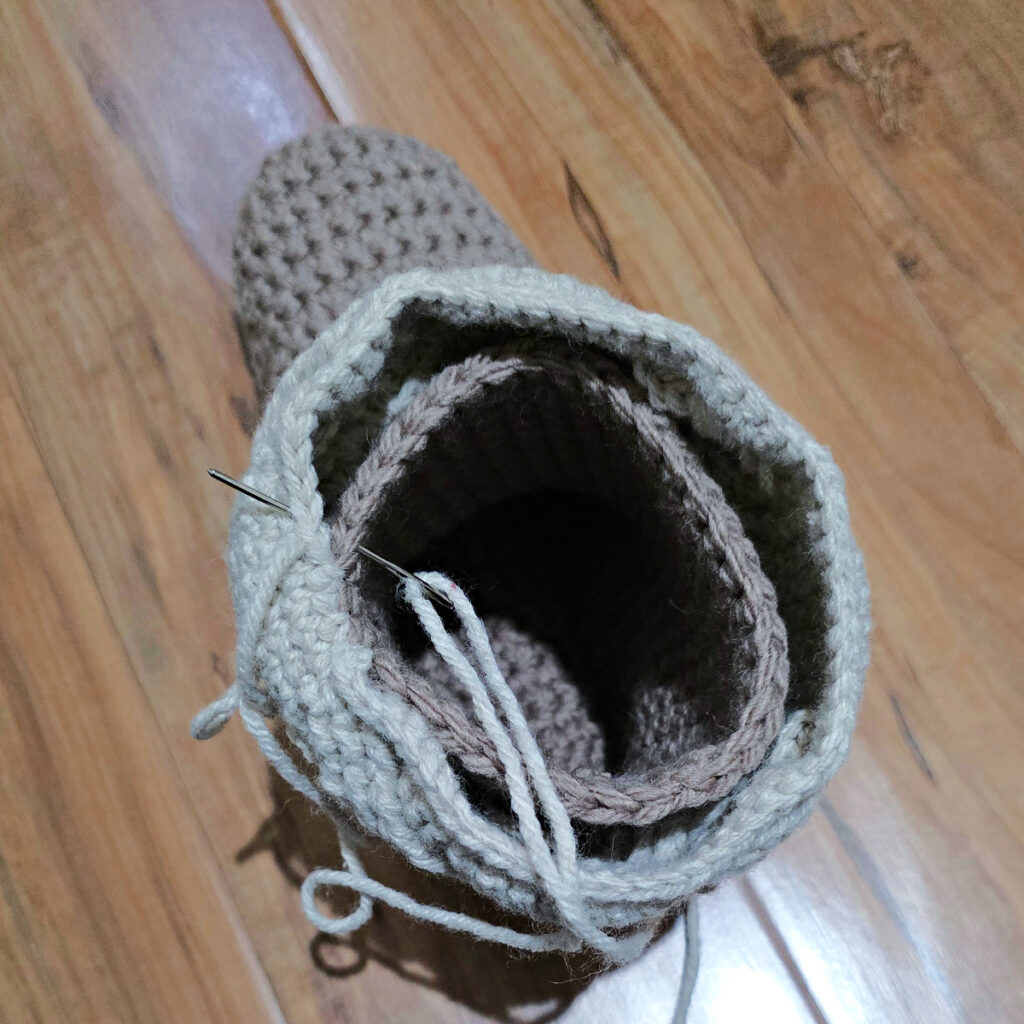
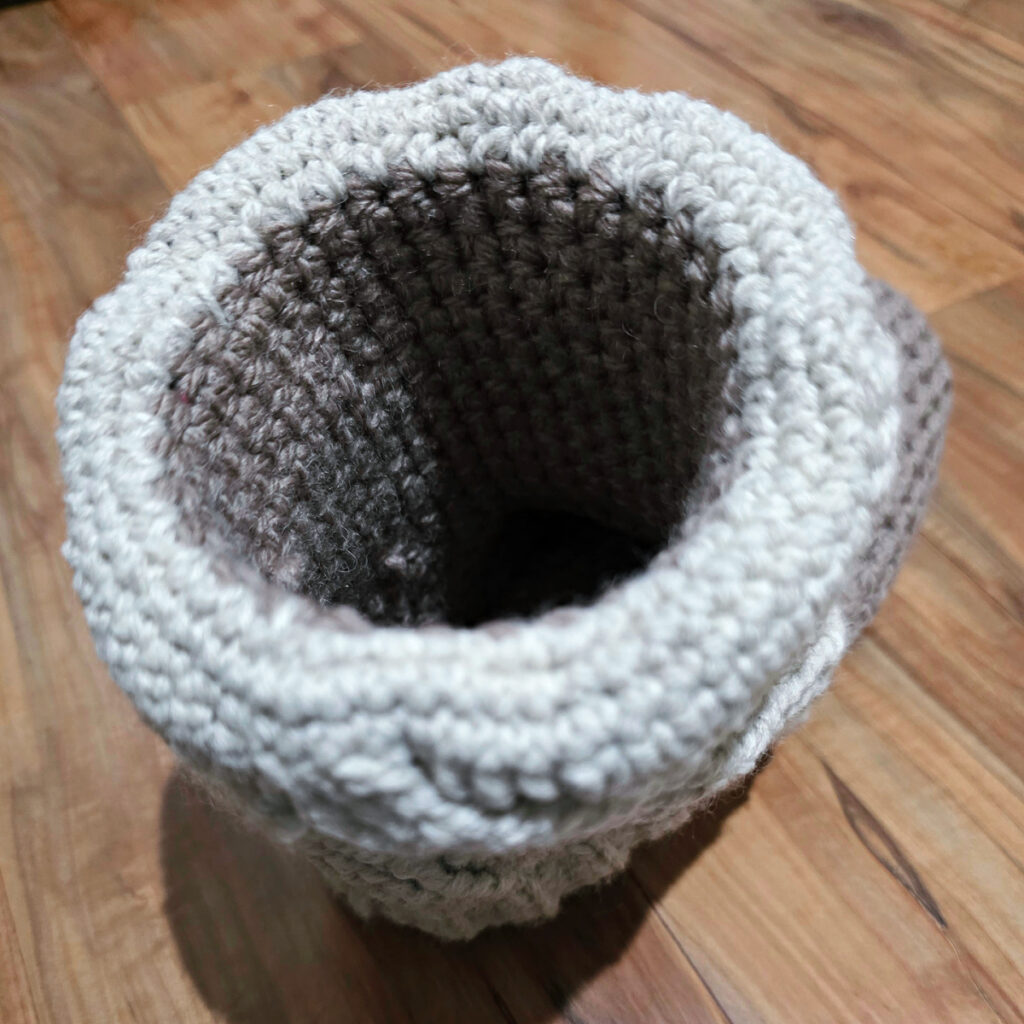
Step 1: Slip the finished cuff over the ankle of the slipper boot. Position the cuff on the ankle however you prefer.
Step 2: With the tail of yarn and a yarn needle, whipstitch the top edge of the cabled cuff to the top edge of the ankle. Stitch counts vary between the two openings, just position the stitches evenly around.
One slipper boot is complete. Repeat all steps to complete the second slipper boot.
I MADE IT! NOW WHAT?
Pin this post!: Save this free pattern for crocheted slippers to your Pinterest boards so that you can come back and make it again.
Leave a comment below: We love to hear your feedback.
Share Your Finished Projects on Facebook or Instagram: I love to see your finished projects! Share with us on social media and tag me @acrochetedsimplicity or use the hashtag #ACrochetedSimplicity so I can find your posts.
Join us in the Facebook Community Group!
Come share your finished projects with us in the A Crocheted Simplicity Crochet Community Group on Facebook. Join us for fun community events such as crochet alongs, join in on crochet conversations, ask questions, get advice, and share your love for crochet!

More Free Patterns for Crochet Slippers I Think You’ll Love
- Hibernation Slipper Boots
- Winter Waves Kimono Slippers
- Fireside Slipper Boots
- Willow Slippers
- Cable Crochet Slipper Boots
More Cozy Crochet Patterns
Are you looking for more cozy crochet patterns for fall and winter? We have several more patterns for crochet sweaters, mittens, beanies, and blankets.
We also have a few premium crochet slipper patterns as well.
