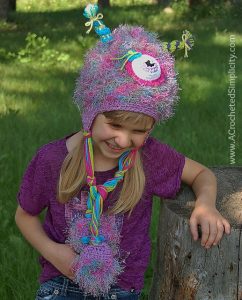
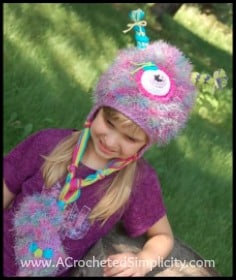
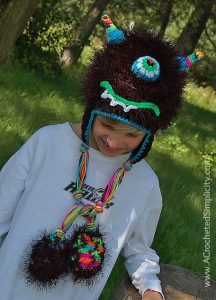
Free Crochet Pattern – Monster Mash Beanie or Earflap Hat
At first glimpse, I know you’re thinking, “Not another Fun Fur hat. I despise working with Fun Fur!” BUT in this case, you can’t judge the book by its cover! This pattern IS NOT written using 1 strand of Worsted Weight held together with 1 strand of Fun Fur! This pattern is written using a quick and easy technique that allows you to see your stitches with the fun fur and it also uses less fun fur. After working your hat using this technique, you’ll never work with fun fur the same again! 😀
Do you have little ones who like to pretend they’re furry monsters? If so, they’ll love the Monster Mash Beanie or Earflap. They’ll have fun helping you customize their monster’s face.
~Click HERE to sign-up to receive our newsletter!~

~Don’t lose it, add It To Your Ravelry Favorites or Queue.~
~Don’t forget to Pin It too!~
*Purchase an ad-free PDF of this pattern (including all photo tutorials) on Craftsy or Ravelry* Ad-Free version includes BOTH the Boy and Girl Monster versions (all sizes) in ONE file!
This post contains affiliate links.
Materials
- Yarn: Medium Worsted Weight Yarn / 4; Fun Fur Yarn *See Notes below for exact yarns used.
- Crochet Hooks: I/9/5.50mm; H/8/5.00mm; G/6/4.00mm; C/2.75mm
- Scissors
- Yarn Needle
 Lion Brand Yarn 320-206B Fu...Shop on Amazon
  Clover Amour Crochet Hook: ...Shop on Amazon
  Clover Amour Crochet Hook: ...Shop on Amazon
  Clover 1045/G Purple Amour ...Shop on Amazon
  Clover 1041/C Yellow Amour ...Shop on Amazon
  FISKARS All Purpose Scissor...Shop on Amazon
 ") Large-Eye Blunt Needles Ste...Shop on Amazon
Large-Eye Blunt Needles Ste...Shop on Amazon
Experience Level: Easy
Stitch Abbreviations
- ch(s): chain(s)
- st(s): stitch(es)
- sl st(s): slip stitch(es)
- sc: single crochet
- hdc: half double crochet
- hdc2tog: half double crochet decrease
- dc: double crochet
- trc: treble or triple crochet
- rep: repeat
- rnd: round
- BLO: back loop only
- FLO: front loop only
- RS: right side
- Join yarn w/ a single crochet: click HERE for tutorial
- Join yarn w/ a half double crochet: click HERE for tutorial
- Invisible Join Technique: click HERE for tutorial
Special Stitches
- Single Crochet Decrease (sc2tog): Insert hook in next st and draw up a loop, (two loops on hook), insert hook in next stitch, draw up a loop (3 loops on hook), yarn over and draw through all 3 loops.
- Half-Double Crochet Decrease (hdc2tog): [Yarn over, insert hook in next stitch, yarn over and pull up loop] 2 times, yarn over and draw through all loops on hook.
- Single Crochet Spike Stitch (spike sc): Insert hook in indicated st, a row below that of the st in the same round, yo, pull up a loop, yo, pull thru all loops on hook
Sizes
- Newborn, 0-3 months, 3-6 months, 6-12 months, 12-24 months, 3-5 years, 6-10 years, Teen/Adult Small, Adult Medium/Large
Yarn Notes
- Medium worsted weight yarn was used for the base of the hat, earflaps, paws, braids, and facial features. Approximately 250 yards for the largest size.
- Fun Fur: This yarn was used on the main part of the hat and the paws. You will need 2 balls.
Hat Instructions
Newborn Size (11″ circumference)
Hook: H/8/5.00mm
Gauge: In hdc, 3.25 sts X 2.75 rows = 1″
Note: The use of stitch markers is highly recommended as the hat is worked in a continuous spiral. You will be making the hat (working w/ 1 strand of WW yarn) and then adding the fun fur after that using 1 strand of fun fur.
Round 1: Beginning with 1 strand of worsted weight yarn and a Magic Ring, sl st into Magic Ring, work 6 hdc in Magic Ring. Do Not Join Round. Pull tail to tighten Magic Ring. 6 sts
Round 2: No Beginning Chain, BLO, work 2 hdc in each st around. 12 sts
Round 3: No Beginning Chain, BLO, *2 hdc in next st, hdc in next st, rep from * around. 18 sts
Round 4: No Beginning Chain, BLO, *2 hdc in next st, hdc in next 2 sts, rep from * around. 24 sts
Round 5: No Beginning Chain, BLO, *2 hdc in next st, hdc in next 3 sts, rep from * around. 30 sts
Round 6: No Beginning Chain, BLO, *2 hdc in next st, hdc in next 4 sts, rep from * around. 36 sts
Rounds 7 – 11: No Beginning Chain, BLO, hdc in each st around. 36 sts
Round 12: No Beginning Chain, BLO, sc in each st around. 36 sts
**Working in Both Loops for Rnds 13 – 14.
Round 13: No Beginning Chain, sc in each st around. 36 sts
Round 14: No Beginning Chain, sc in each st around. 36 sts
Fasten Off. Invisible Join Technique (click HERE for tutorial). Weave in ends. Continue on to Adding Fur to your Monster.
Adding Fur to your Monster – See photo tutorial below
Hook: H/8/5.00mm
Yarn: 1 strand of Fun Fur Join Fun Fur w/ a sc (click HERE for tutorial), in the Front Loops Only of the 1st hdc of Round 1, sc in the Front Loops Only of each st around the spiral to the beginning of Round 13.
Fasten Off. Weave in ends.
Note: To make a Beanie instead of an Earflap hat, work one final round of sc instead of earflaps.
Earflaps~ Place stitch markers in stitches # 5 & # 28
Right Earflap st # 5 / Left Earflap st # 28
Row 1: Join yarn w/ a hdc in st #5 / #28, hdc in the next 7 sts. 8 sts
Row 2: Ch 1, Turn, hdc in the same st as ch 1, hdc in each st across. 8 sts
Row 3: Ch 1, Turn, hdc in the same st as ch 1, hdc in each st across. 8 sts
Row 4: Ch 1, Turn, hdc2tog, hdc in next 4 sts, hdc2tog. 6 sts
Row 5: Ch 1, Turn, hdc2tog, hdc in next 2 sts, hdc2tog. 4 sts
Row 6: Ch 1, Turn, hdc2tog twice. 2 sts
Fasten off using Invisible Join Technique (click HERE for tutorial). Weave in ends.
Edging your hat
Join yarn w/ a sc in the center back st of your hat, sc in each st around the earflaps and hat. Join w/ as sl st to the 1st sc of the round. TIP: work 2 sc in each 2 sts at the bottom of earflaps for a more rounded look.
Fasten off using Invisible Join Technique. Weave in ends. Continue below to work the Braids and Furry Paws.
0 – 3 Months Size (15″ circumference)
Hook: I/9/ 5.50mm
Gauge: In hdc, 6.5 sts x 5 rows = 2″ & In SC, 3.75 sts x 4 rows = 1″
Note: The use of stitch markers is highly recommended as the hat is worked in a continuous spiral. You will be making the hat (working w/ 1 strand of WW yarn) and then adding the fun fur after that using 1 strand of fun fur.
Round 1: Beginning with 1 strand of worsted weight yarn and a Magic Ring, sl st into Magic Ring, work 8 hdc in Magic Ring. Do Not Join Round. Pull tail to tighten Magic Ring. 8 sts
Round 2: No Beginning Chain, BLO, work 2 hdc in each st around. 16 sts
Round 3: No Beginning Chain, BLO, *2 hdc in next st, hdc in next st, rep from * around. 24 sts
Round 4: No Beginning Chain, BLO, *2 hdc in next st, hdc in next 2 sts, rep from * around. 32 sts
Round 5: No Beginning Chain, BLO, *2 hdc in next st, hdc in next 3 sts, rep form * around. 40 sts
Round 6: No Beginning Chain, BLO, *2 hdc in next st, hdc in next 4 sts, rep from * around. 48 sts
Rounds 7 – 12: No Beginning Chain, BLO, hdc in each st around. 48 sts
Round 13: No Beginning Chain, BLO, sc in each st around. 48 sts
**Work in Both Loops for Rounds 14 – 16.
Round 14: No Beginning Chain, sc in each st around. 48 sts
Round 15: No Beginning Chain, sc in each st around. 48 sts
Round 16: No Beginning Chain, sc in each st around. 48 sts
Fasten off using Invisible Join Technique (click HERE for tutorial). Weave in ends.
Adding Fur to your Monster: See photo tutorial below
Hook: I/9/ 5.50mm
Yarn: 1 strand of Fun Fur Join Fun Fur w/ a sc (click HERE for tutorial), in the Front Loops Only of the 1st hdc of Round 1, sc in the Front Loops Only of each st around the spiral to the beginning of Round 14.
Fasten Off. Weave in ends.
Note: To make a Beanie instead of an Earflap hat, work one final round of sc instead of earflaps.
Earflaps~ Place stitch markers in stitches # 6 & # 36
Right Earflap st # 6 / Left Earflap st # 36
Row 1: Join yarn w/ a hdc in st #6 / #37, hdc in the next 9 sts. 10 sts
Row 2: Ch 1, Turn, hdc in the same st as ch 1, hdc in each st across. 10 sts
Row 3: Ch 1, Turn, hdc in the same st as ch 1, hdc in each st across. 10 sts
Row 4: Ch 1, Turn, hdc2tog, hdc in next 6 sts, hdc2tog. 8 sts
Row 5: Ch 1, Turn, hdc2tog, hdc in next 4 sts, hdc2tog. 6 sts
Row 6: Ch 1, Turn, hdc2tog, hdc in next 2 sts, hdc2tog. 4 sts
Row 7: Ch 1, Turn, hdc2tog twice. 2 sts
Fasten off using Invisible Join Technique. Weave in ends.
Edging your hat
Join yarn w/ a sc in the center back st of your hat, sc in each st around the earflaps and hat. Join w/ as sl st to the 1st sc of the round. TIP: work 2 sc in each 2 sts at the bottom of earflaps for a more rounded look.
Fasten off using Invisible Join Technique. Weave in ends. Continue below to work the Braids and Furry Paws.
3 – 6 Months Size (15″ circumference)
Hook: H/8/5.00mm
Gauge: In hdc, 3.25 sts X 2.75 rows = 1″
Note: The use of stitch markers is highly recommended as the hat is worked in a continuous spiral. You will be making the hat (working w/ 1 strand of WW yarn) and then adding the fun fur after that using 1 strand of fun fur.
Round 1: Beginning with 1 strand of worsted weight yarn and a Magic Ring, sl st into Magic Ring, work 6 hdc in Magic Ring. Do Not Join Round. Pull tail to tighten Magic Ring. 6 sts
Round 2: No Beginning Chain, BLO, work 2 hdc in each st around. 12 sts
Round 3: No Beginning Chain, BLO, *2 hdc in next st, hdc in next st, rep from * around. 18 sts
Round 4: No Beginning Chain, BLO, *2 hdc in next st, hdc in next 2 sts, rep from * around. 24 sts
Round 5: No Beginning Chain, BLO, *2 hdc in next st, hdc in next 3 sts, rep from * around. 30 sts
Round 6: No Beginning Chain, BLO, *2 hdc in next st, hdc in next 4 sts, rep from * around. 36 sts
Round 7: No Beginning Chain, BLO, *2 hdc in next st, hdc in next 5 sts, rep from * around. 42 sts
Round 8: No Beginning Chain, BLO, *2 hdc in next st, hdc in next 6 sts, rep from * around. 48 sts
Rounds 9 – 14: No Beginning Chain, BLO, hdc in each st around. 48 sts
Round 15: No Beginning Chain, BLO, sc in each st around. 48 sts
**Work in Both Loops for Rounds 16 – 18.
Round 16: No Beginning Chain, sc in each st around. 48 sts
Round 17: No Beginning Chain, sc in each st around. 48 sts
Round 18: No Beginning Chain, sc in each st around. 48 sts
Fasten off using Invisible Join Technique (click HERE for tutorial). Weave in ends.
Adding Fur to your Monster – See photo tutorial below
Hook: H/8/5.00mm
Yarn: 1 strand of Fun Fur Join Fun Fur w/ a sc (click HERE for tutorial), in the Front Loops Only of the 1st hdc of Round 1, sc in the Front Loops Only of each st around the spiral to the beginning of Round 16.
Fasten Off. Weave in ends.
Note: To make a Beanie instead of an Earflap hat, work one final round of sc instead of earflaps.
Earflaps~ Place stitch markers in stitches # 6 & # 36
Right Earflap st # 6 / Left Earflap st # 36
Row 1: Join yarn w/ a hdc in st #6 / #36, hdc in the next 9 sts. 10 sts
Row 2: Ch 1, Turn, hdc in the same st as ch 1, hdc in each st across. 10 sts
Row 3: Ch 1, Turn, hdc in the same st as ch 1, hdc in each st across. 10 sts
Row 4: Ch 1, Turn, hdc2tog, hdc in next 6 sts, hdc2tog. 8 sts
Row 5: Ch 1, Turn, hdc2tog, hdc in next 4 sts, hdc2tog. 6 sts
Row 6: Ch 1, Turn, hdc2tog, hdc in next 2 sts, hdc2tog. 4 sts
Row 7: Ch 1, Turn, hdc2tog twice. 2 sts
Fasten off using Invisible Join Technique. Weave in ends.
Edging your hat
Join yarn w/ a sc in the center back st of your hat, sc in each st around the earflaps and hat. Join w/ as sl st to the 1st sc of the round. TIP: work 2 sc in each 2 sts at the bottom of earflaps for a more rounded look.
Fasten off using Invisible Join Technique. Weave in ends. Continue below to work the Braids and Furry Paws.
6 – 12 Months Size (15″ circumference)
Hook: I/9/5.50mm
Gauge: In hdc, 6.5 sts x 5 rows = 2″ & In SC, 3.75 sts x 4 rows = 1″
Note: The use of stitch markers is highly recommended as the hat is worked in a continuous spiral. You will be making the hat (working w/ 1 strand of WW yarn) and then adding the fun fur after that using 1 strand of fun fur.
Round 1: Beginning with 1 strand of worsted weight yarn and a Magic Ring, sl st into Magic Ring, work 8 hdc in Magic Ring. Do Not Join Round. Pull tail to tighten Magic Ring. 8 sts
Round 2: No Beginning Chain, BLO, work 2 hdc in each st around. 16 sts
Round 3: No Beginning Chain, BLO, *2 hdc in next st, hdc in next st, rep from * around. 24 sts
Round 4: No Beginning Chain, BLO, *2 hdc in next st, hdc in next 2 sts, rep from * around. 32 sts
Round 5: No Beginning Chain, BLO, *2 hdc in next st, hdc in next 3 sts, rep from * around. 40 sts
Round 6: No Beginning Chain, BLO, *2 hdc in next st, hdc in next 4 sts, rep from * around. 48 sts
Rounds 7 – 14: No Beginning Chain, BLO, hdc in each st around. 48 sts
Round 15: No Beginning Chain, BLO, sc in each st around. 48 sts
**Working in Both Loops
Round 16: No Beginning Chain, sc in each st around. 48 sts
Round 17: No Beginning Chain, sc in each st around. 48 sts
Round 18: No Beginning Chain, sc in each st around. 48 sts
Fasten off using Invisible Join Technique (click HERE for tutorial). Weave in ends.
Adding Fur to your Monster – See photo tutorial below
Hook: I/9/5.50mm
Yarn: 1 strand of Fun Fur Join Fun Fur w/ a sc (click HERE for tutorial), in the Front Loops Only of the 1st hdc of Round 1, sc in the Front Loops Only of each st around the spiral to the beginning of Round 16.
Fasten Off. Weave in ends.
Note: To make a Beanie instead of an Earflap hat, work one final round of sc instead of earflaps.
Earflaps~ Place stitch markers in stitches # 7 & # 34
Right Earflap st # 7 / Left Earflap st # 34
Row 1: Join yarn w/ a hdc in st #7 / #34, hdc in the next 11 sts. 12 sts
Row 2: Ch 1, Turn, hdc in the same st as ch 1, hdc in each st across. 12 sts
Row 3: Ch 1, Turn, hdc in the same st as ch 1, hdc in each st across. 12 sts
Row 4: Ch 1, Turn, hdc2tog, hdc in next 8 sts, hdc2tog. 10 sts
Row 5: Ch 1, Turn, hdc in the same st as ch 1, hdc in each st across. 10 sts
Row 6: Ch 1, Turn, hdc2tog, hdc in next 6 sts, hdc2tog. 8 sts
Row 7: Ch 1, Turn, hdc2tog, hdc in next 4 sts, hdc2tog. 6 sts
Row 8: Ch 1, Turn, hdc2tog, hdc in next 2 sts, hdc2tog. 4 sts
Row 9: Ch 1, Turn, hdc2tog twice. 2 sts
Fasten off using Invisible Join Technique. Weave in ends.
Edging your hat
Join yarn w/ a sc in the center back st of your hat, sc in each st around the earflaps and hat. Join w/ as sl st to the 1st sc of the round. TIP: work 2 sc in each 2 sts at the bottom of earflaps for a more rounded look.
Fasten off using Invisible Join Technique. Weave in ends. Continue below to work the Braids and Furry Paws.
12 – 24 Months Size (17.25″ circumference)
Hook: I/9/5.50mm
Gauge: In hdc, 6.5 sts x 5 rows = 2″ & In SC, 3.75 sts x 4 rows = 1″
Note: The use of stitch markers is highly recommended as the hat is worked in a continuous spiral. You will be making the hat (working w/ 1 strand of WW yarn) and then adding the fun fur after that using 1 strand of fun fur.
Round 1: Beginning with 1 strand of worsted weight yarn and a Magic Ring, sl st into Magic Ring, work 8 hdc in Magic Ring. Do Not Join Round. Pull tail to tighten Magic Ring. 8 sts
Round 2: No Beginning Chain, BLO, work 2 hdc in each st around. 16 sts
Round 3: No Beginning Chain, BLO, *2 hdc in next st, hdc in next st, rep from * around. 24 sts
Round 4: No Beginning Chain, BLO, *2 hdc in next st, hdc in next 2 sts, rep from * around. 32 sts
Round 5: No Beginning Chain, BLO, *2 hdc in next st, hdc in next 3 sts, rep form * around. 40 sts
Round 6: No Beginning Chain, BLO, *2 hdc in next st, hdc in next 4 sts, rep from * around. 48 sts
Round 7: No Beginning Chain, BLO, *2 hdc in next st, hdc in next 5 sts, rep from * around. 56 sts
Rounds 8 – 15: No Beginning Chain, BLO, hdc in each st around. 56 sts
Round 16: No Beginning Chain, BLO, sc in each st around. 56 sts
**Work in Both Loops for Rounds 17 – 19.
Round 17: No Beginning Chain, sc in each st around. 56 sts
Round 18: No Beginning Chain, sc in each st around. 56 sts
Round 19: No Beginning Chain, sc in each st around. 56 sts
Fasten off using. Invisible Join Technique (click HERE for tutorial). Weave in ends.
Adding Fur to your Monster – See photo tutorial below
Hook: I/9/5.50mm
Yarn: 1 strand of Fun Fur Join Fun Fur w/ a sc (click HERE for tutorial), in the Front Loops Only of the 1st hdc of Round 1, sc in the Front Loops Only of each st around the spiral to the beginning of Round 17.
Fasten Off. Weave in ends.
Note: To make a Beanie instead of an Earflap hat, work one final round of sc instead of earflaps.
Earflaps~ Place stitch markers in stitches # 6 & # 42
Right Earflap st # 6 / Left Earflap st # 42
Row 1: Join yarn w/ a hdc in st #6 / #42, hdc in the next 11 sts. 12 sts
Row 2: Ch 1, Turn, hdc in the same st as ch 1, hdc in each st across. 12 sts
Row 3: Ch 1, Turn, hdc in the same st as ch 1, hdc in each st across. 12 sts
Row 4: Ch 1, Turn, hdc2tog, hdc in next 8 sts, hdc2tog. 10 sts
Row 5: Ch 1, Turn, hdc in the same st as ch 1, hdc in each st across. 10 sts
Row 6:RCh 1, Turn, hdc2tog, hdc in next 6 sts, hdc2tog. 8 sts
Row 7: Ch 1, Turn, hdc2tog, hdc in next 4 sts, hdc2tog. 6 sts
Row 8: Ch 1, Turn, hdc2tog, hdc in next 2 sts, hdc2tog. 4 sts
Row 9: Ch 1, Turn, hdc2tog twice. 2 sts
Fasten off using Invisible Join Technique. Weave in ends.
Edging your hat
Join yarn w/ a sc in the center back st of your hat, sc in each st around the earflaps and hat. Join w/ as sl st to the 1st sc of the round. TIP: work 2 sc in each 2 sts at the bottom of earflaps for a more rounded look.
Fasten off using Invisible Join Technique. Weave in ends. Continue below to work the Braids and Furry Paws.
3 – 5 Years Size (17.25″ circumference)
Hook: I/9/5.50mm
Gauge: In hdc, 6.5 sts x 5 rows = 2″ & In SC, 3.75 sts x 4 rows = 1″
Note: The use of stitch markers is highly recommended as the hat is worked in a continuous spiral. You will be making the hat (working w/ 1 strand of WW yarn) and then adding the fun fur after that using 1 strand of fun fur.
Round 1: Beginning with 1 strand of worsted weight yarn and a Magic Ring, sl st into Magic Ring, work 8 hdc in Magic Ring. Do Not Join Round. Pull tail to tighten Magic Ring. 8 sts
Round 2: No Beginning Chain, BLO, work 2 hdc in each st around. 16 sts
Round 3: No Beginning Chain, BLO, *2 hdc in next st, hdc in next st, rep from * around. 24 sts
Round 4: No Beginning Chain, BLO, *2 hdc in next st, hdc in next 2 sts, rep from * around. 32 sts
Round 5: No Beginning Chain, BLO, *2 hdc in next st, hdc in next 3 sts, rep from * around. 40 sts
Round 6: No Beginning Chain, BLO, *2 hdc in next st, hdc in next 4 sts, rep from * around. 48 sts
Round 7: No Beginning Chain, BLO, *2 hdc in next st, hdc in next 5 sts, rep from * around. 56 sts
Rounds 8 – 17: No Beginning Chain, BLO, hdc in each st around. 56 sts
Round 18: No Beginning Chain, BLO, sc in each st around. 56 sts
**Work in Both Loops for Rounds 19 – 21.
Round 19: No Beginning Chain, sc in each st around. 56 sts
Round 20: No Beginning Chain, sc in each st around. 56 sts
Round 21: No Beginning Chain, sc in each st around. 56 sts
Fasten off using Invisible Join Technique (click HERE for tutorial). Weave in ends.
Adding Fur to your Monster – See photo tutorial below
Hook: I/9/5.50mm
Yarn: 1 strand of Fun Fur Join Fun Fur w/ a sc (click HERE for tutorial), in the Front Loops Only of the 1st hdc of Round 1, sc in the Front Loops Only of each st around the spiral to the beginning of Round 19.
Fasten Off. Weave in ends.
Note: To make a Beanie instead of an Earflap hat, work one final round of sc instead of earflaps.
Earflaps~ Place stitch markers in stitches # 8 & # 41
Right Earflap st # 8 / Left Earflap st # 41
Row 1: Join yarn w/ a hdc in st #8 / #41, hdc in the next 11 sts. 12 sts
Row 2: Ch 1, Turn, hdc in the same st as ch 1, hdc in each st across. 12 sts
Row 3: Ch 1, Turn, hdc in the same st as ch 1, hdc in each st across. 12 sts
Row 4: Ch 1, Turn, hdc2tog, hdc in next 8 sts, hdc2tog. 10 sts
Row 5: Ch 1, Turn, hdc in the same st as ch 1, hdc in each st across. 10 sts
Row 6: Ch 1, Turn, hdc2tog, hdc in next 6 sts, hdc2tog. 8 sts
Row 7: Ch 1, Turn, hdc2tog, hdc in next 4 sts, hdc2tog. 6 sts
Row 8: Ch 1, Turn, hdc2tog, hdc in next 2 sts, hdc2tog. 4 sts
Row 9: Ch 1, Turn, hdc2tog twice. 2 sts
Fasten off using Invisible Join Technique. Weave in ends.
Edging your hat
Join yarn w/ a sc in the center back st of your hat, sc in each st around the earflaps and hat. Join w/ as sl st to the 1st sc of the round. TIP: work 2 sc in each 2 sts at the bottom of earflaps for a more rounded look.
Fasten off using Invisible Join Technique. Weave in ends. Continue below to work the Braids and Furry Paws.
6 – 10 Years Size (19.75″ circumference)
Hook: I/9/5.50mm
Gauge: In hdc, 6.5 sts x 5 rows = 2″ & In SC, 3.75 sts x 4 rows = 1″
Note: The use of stitch markers is highly recommended as the hat is worked in a continuous spiral. You will be making the hat (working w/ 1 strand of WW yarn) and then adding the fun fur after that using 1 strand of fun fur.
Round 1: Beginning with 1 strand of worsted weight yarn and a Magic Ring, sl st into Magic Ring, work 8 hdc in Magic Ring. Do Not Join Round. Pull tail to tighten Magic Ring. 8 sts
Round 2: No Beginning Chain, BLO, work 2 hdc in each st around. 16 sts
Round 3: No Beginning Chain, BLO, *2 hdc in next st, hdc in next st, rep from * around. 24 sts
Round 4: No Beginning Chain, BLO, *2 hdc in next st, hdc in next 2 sts, rep from * around. 32 sts
Round 5: No Beginning Chain, BLO, *2 hdc in next st, hdc in next 3 sts, rep from * around. 40 sts
Round 6: No Beginning Chain, BLO, *2 hdc in next st, hdc in next 4 sts, rep from * around. 48 sts
Round 7: No Beginning Chain, BLO, *2 hdc in next st, hdc in next 5 sts, rep from * around. 56 sts
Round 8: No Beginning Chain, BLO, *2 hdc in next st, hdc in next 6 sts, rep from * around. 64 sts
Rounds 9 – 18: No Beginning Chain, BLO, hdc in each st around. 64 sts
Round 19: No Beginning Chain, BLO, sc in each st around. 64 sts
**Work in Both Loops for Rounds 20 – 22.
Round 20: No Beginning Chain, sc in each st around. 64 sts
Round 21: No Beginning Chain, sc in each st around. 64 sts
Round 22: No Beginning Chain, sc in each st around. 64 sts
Fasten off using Invisible Join Technique (click HERE for tutorial). Weave in ends.
Adding Fur to your Monster – See photo tutorial below
Hook: I/9/5.50mm
Yarn: 1 strand of Fun Fur Join Fun Fur w/ a sc (click HERE for tutorial), in the Front Loops Only of the 1st hdc of Round 1, sc in the Front Loops Only of each st around the spiral to the beginning of Round 20.
Fasten Off. Weave in ends.
Note: To make a Beanie instead of an Earflap hat, work one final round of sc instead of earflaps.
Earflaps~ Place stitch markers in stitches # 9 & # 45
Right Earflap st # 9 / Left Earflap st # 45
Row 1: Join yarn w/ a hdc in st #9 / #45, hdc in the next 11 sts. 12 sts
Row 2: Ch 1, Turn, hdc in the same st as ch 1, hdc in each st across. 12 sts
Row 3: Ch 1, Turn, hdc in the same st as ch 1, hdc in each st across. 12 sts
Row 4: Ch 1, Turn, hdc2tog, hdc in next 8 sts, hdc2tog. 10 sts
Row 5: Ch 1, Turn, hdc in the same st as ch 1, hdc in each st across. 10 sts
Row 6: Ch 1, Turn, hdc2tog, hdc in next 6 sts, hdc2tog. 8 sts
Row 7: Ch 1, Turn, hdc2tog, hdc in next 4 sts, hdc2tog. 6 sts
Row 8: Ch 1, Turn, hdc2tog, hdc in next 2 sts, hdc2tog. 4 sts
Row 9: Ch 1, Turn, hdc2tog twice. 2 sts
Fasten off using Invisible Join Technique. Weave in ends.
Edging your hat
Join yarn w/ a sc in the center back st of your hat, sc in each st around the earflaps and hat. Join w/ as sl st to the 1st sc of the round. TIP: work 2 sc in each 2 sts at the bottom of earflaps for a more rounded look.
Fasten off using Invisible Join Technique. Weave in ends. Continue below to work the Braids and Furry Paws.
Teen / Adult Small (22.25″ circumference)
Hook: I/9/5.50mm
Gauge: In hdc, 6.5 sts x 5 rows = 2″ & In SC, 3.75 sts x 4 rows = 1″
Note: The use of stitch markers is highly recommended as the hat is worked in a continuous spiral. You will be making the hat (working w/ 1 strand of WW yarn) and then adding the fun fur after that using 1 strand of fun fur.
Round 1: Beginning with 1 strand of worsted weight yarn and a Magic Ring, sl st into Magic Ring, work 8 hdc in Magic Ring. Do Not Join Round. Pull tail to tighten Magic Ring. 8 sts
Round 2: No Beginning Chain, BLO, work 2 hdc in each st around. 16 sts
Round 3: No Beginning Chain, BLO, *2 hdc in next st, hdc in next st, rep from * around. 24 sts
Round 4: No Beginning Chain, BLO, *2 hdc in next st, hdc in next 2 sts, rep from * around. 32 sts
Round 5: No Beginning Chain, BLO, *2 hdc in next st, hdc in next 3 sts, rep from * around. 40 sts
Round 6: No Beginning Chain, BLO, *2 hdc in next st, hdc in next 4 sts, rep from * around. 48 sts
Round 7: No Beginning Chain, BLO, *2 hdc in next st, hdc in next 5 sts, rep from * around. 56 sts
Round 8: No Beginning Chain, BLO, *2 hdc in next st, hdc in next 6 sts, rep from * around. 64 sts
Round 9: No Beginning Chain, BLO, *2 hdc in next st, hdc in next 7 sts, rep from * around. 72 sts
Rounds 10 – 18: No Beginning Chain, BLO, hdc in each st around. 72 sts
Round 19: No Beginning Chain, BLO, sc in each st around. 72 sts
**Work in Both Loops for Rounds 20 – 22.
Round 20: No Beginning Chain, sc in each st around. 72 sts
Round 21: No Beginning Chain, sc in each st around. 72 sts
Round 22: No Beginning Chain, sc in each st around. 72 sts
Round 23: No Beginning Chain, sc in each st around. 72 sts
Fasten off using Invisible Join Technique (click HERE for tutorial). Weave in ends.
Adding Fur to your Monster – See photo tutorial below
Hook: I/9/5.50mm
Yarn: 1 strand of Fun Fur Join Fun Fur w/ a sc (click HERE for tutorial), in the Front Loops Only of the 1st hdc of Round 1, sc in the Front Loops Only of each st around the spiral to the beginning of Round 20.
Fasten Off. Weave in ends.
Note: To make a Beanie instead of an Earflap hat, work one final round of sc instead of earflaps.
Earflaps~ Place stitch markers in stitches # 10 & # 46
Right Earflap st # 10 / Left Earflap st # 46
Row 1: Join yarn w/ a hdc in st #10 / #46, hdc in the next 11 sts. 12 sts
Row 2: Ch 1, Turn, hdc in the same st as ch 1, hdc in each st across. 12 sts
Row 3: Ch 1, Turn, hdc in the same st as ch 1, hdc in each st across. 12 sts
Row 4: Ch 1, Turn, hdc2tog, hdc in next 8 sts, hdc2tog. 10 sts
Row 5: Ch 1, Turn, hdc in the same st as ch 1, hdc in each st across. 10 sts
Row 6: Ch 1, Turn, hdc2tog, hdc in next 6 sts, hdc2tog. 8 sts
Row 7: Ch 1, Turn, hdc2tog, hdc in next 4 sts, hdc2tog. 6 sts
Row 8: Ch 1, Turn, hdc2tog, hdc in next 2 sts, hdc2tog. 4 sts
Row 9: Ch 1, Turn, hdc2tog twice. 2 sts
Fasten off using Invisible Join Technique. Weave in ends.
Edging your hat
Join yarn w/ a sc in the center back st of your hat, sc in each st around the earflaps and hat. Join w/ as sl st to the 1st sc of the round. TIP: work 2 sc in each 2 sts at the bottom of earflaps for a more rounded look.
Fasten off using Invisible Join Technique. Weave in ends. Continue below to work the Braids and Furry Paws.
Adult Medium / Large (22.25″ circumference)
Hook: I/9/5.50mm
Gauge: In hdc, 6.5 sts x 5 rows = 2″ & In SC, 3.75 sts x 4 rows = 1″
Note: The use of stitch markers is highly recommended as the hat is worked in a continuous spiral. You will be making the hat (working w/ 1 strand of WW yarn) and then adding the fun fur after that using 1 strand of fun fur.
Round 1: Beginning with 1 strand of worsted weight yarn and a Magic Ring, sl st into Magic Ring, work 8 hdc in Magic Ring. Do Not Join Round. Pull tail to tighten Magic Ring. 8 sts
Round 2: No Beginning Chain, BLO, work 2 hdc in each st around. 16 sts
Round 3: No Beginning Chain, BLO, *2 hdc in next st, hdc in next st, rep from * around. 24 sts
Round 4: No Beginning Chain, BLO, *2 hdc in next st, hdc in next 2 sts, rep from * around. 32 sts
Round 5: No Beginning Chain, BLO, *2 hdc in next st, hdc in next 3 sts, rep from * around. 40 sts
Round 6: No Beginning Chain, BLO, *2 hdc in next st, hdc in next 4 sts, rep from * around. 48 sts
Round 7: No Beginning Chain, BLO, *2 hdc in next st, hdc in next 5 sts, rep from * around. 56 sts
Round 8: No Beginning Chain, BLO, *2 hdc in next st, hdc in next 6 sts, rep from * around. 64 sts
Round 9: No Beginning Chain, BLO, *2 hdc in next st, hdc in next 7 sts, rep from * around. 72 sts
Rounds 10 – 19: No Beginning Chain, BLO, hdc in each st around. 72 sts
Round 20: No Beginning Chain, BLO, sc in each st around. 72 sts
**Work in Both Loops for Rounds 21 – 24.
Round 21: No Beginning Chain, sc in each st around. 72 sts
Round 22: No Beginning Chain, sc in each st around. 72 sts
Round 23: No Beginning Chain, sc in each st around. 72 sts
Round 24: No Beginning Chain, sc in each st around. 72 sts
Fasten off using Invisible Join Technique (click HERE for tutorial). Weave in ends.
Adding Fur to your Monster – See photo tutorial below
Hook: I/9/5.50mm
Yarn: 1 strand of Fun Fur Join Fun Fur w/ a sc (click HERE for tutorial), in the Front Loops Only of the 1st hdc of Round 1, sc in the Front Loops Only of each st around the spiral to the beginning of Round 20.
Fasten Off. Weave in ends.
Note: To make a Beanie instead of an Earflap hat, work one final round of sc instead of earflaps.
Earflaps~ Place stitch markers in stitches # 10 & # 46
Right Earflap st # 10 / Left Earflap st # 46
Row 1: Join yarn w/ a hdc in st #10 / #46, hdc in the next 11 sts. 12 sts
Row 2: Ch 1, Turn, hdc in the same st as ch 1, hdc in each st across. 12 sts
Row 3: Ch 1, Turn, hdc in the same st as ch 1, hdc in each st across. 12 sts
Row 4: Ch 1, Turn, hdc2tog, hdc in next 8 sts, hdc2tog. 10 sts
Row 5: Ch 1, Turn, hdc in the same st as ch 1, hdc in each st across. 10 sts
Row 6: Ch 1, Turn, hdc2tog, hdc in next 6 sts, hdc2tog. 8 sts
Row 7: Ch 1, Turn, hdc2tog, hdc in next 4 sts, hdc2tog. 6 sts
Row 8: Ch 1, Turn, hdc2tog, hdc in next 2 sts, hdc2tog. 4 sts
Row 9: Ch 1, Turn, hdc2tog twice. 2 sts
Fasten off using Invisible Join Technique. Weave in ends.
Edging your hat
Join yarn w/ a sc in the center back st of your hat, sc in each st around the earflaps and hat. Join w/ as sl st to the 1st sc of the round. TIP: work 2 sc in each 2 sts at the bottom of earflaps for a more rounded look.
Fasten off using Invisible Join Technique. Weave in ends. Continue below to work the Braids and Furry Paws.
Adding Fur to Your Monster
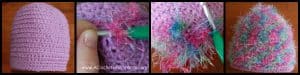
Photo Above Left: Shows what your hat will look like before adding fur. Note the ridges from working in the back loops.
Photo Above, 2nd from Left: Shows joining your fun fur w/ a sc to the 1st hdc of Round 1.
Photo Above, 2nd from Right: Shows fun fur being worked around the spiral.
Photo Above, far Right: Shows what your hat will look like after adding the fun fur.
After you’ve finished adding the fur yarn, fasten off and weave in ends. If needed, use a wire brush to fluff the fur yarn.
Knotty Braids
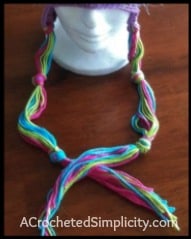
For the knotty braids pictured on the purple monster hat, I used 4 strands of 3 different colors per braid. I cut my strands of yarn at 36″ to give myself enough length to tie the knots. Obviously, 36″ is going to be overkill for a newborn hat so adjust your lengths of yarn accordingly.
Weave your yarn thru 2 stitches along the bottom edge of your earflap. Even out the lengths so that they’re folded in half thru the earflap. Secure the strands by knotting them close to the earflap. Then continue to knot in as many sections as you’d like. I added 2 additional knots to mine, the last one near the bottom of the strands (this is so that I have a knot to sew my Furry Paws onto later on). Trim ends to 1-1/2″ below your bottom knot.
Paws
Hook : I/9/5.50mm
Yarn: 1 strand of Worsted Weight Yarn
Small Paws~ Make 2
Round 1: Starting w/ a Magic Ring, sl st into Magic Ring then work 6 hdc in Magic Ring. Do Not Join. Pull tail to tighten Magic Ring. 6 sts
Round 2: No Beginning Chain, BLO, work 2 hdc in each st around. 12 sts
Round 3: No Beginning Chain, BLO, *2 hdc in next st, hdc in next st, rep from * around. 18 sts
Rounds 4 thru 7: No Beginning Chain, BLO, hdc in each st around. 18 sts
Round 8: No Beginning Chain, BLO, *hdc2tog, hdc in next st, rep from * around. 12 sts
Round 9: No Beginning Chain, Working in BOTH Loops, sc in each st around. 12 sts
Fasten off leaving a tail long enough to sew onto braid. Continue below to Paw Pads.
Large Paws~ Make 2
Round 1: Starting w/ a Magic Ring, sl st into Magic Ring then work 6 hdc in Magic Ring. Do Not Join. Pull tail to tighten Magic Ring. 6 sts
Round 2: No Beginning Chain, BLO, work 2 hdc in each st around. 12 sts
Round 3: No Beginning Chain, BLO, *2 hdc in next st, hdc in next st, rep from * around. 18 sts
Round 4: No Beginning Chain, BLO, *2 hdc in next st, hdc in next 2 sts, rep from * around. 24 sts
Rounds 5 thru 8: No Beginning Chain, BLO, hdc in each st around. 24 sts
Round 9: No Beginning Chain, Both Loops, *hdc2tog, hdc in next 2 sts, rep from * around. 18 sts
Round 10: No Beginning Chain, *hdc2tog, hdc in next st, rep from * around. 12 sts
Round 11: No Beginning Chain, Working in BOTH Loops, sc in each st around. 12 sts
Fasten off leaving a tail long enough to sew onto braid. Continue below to Paw Pads.
Paw Pads: Make 6 (3 per paw)
Hook: G/6/4.00mm
With 1 strand of WW yarn, begin w/ a Magic Ring, work 4 sc in in Magic Ring. Pull to tighten. 4 sts Fasten off leaving a tail to sew onto the paw. Sew 3 onto the paw as shown.
Continue on to Adding Fur to your Paws.
Adding Fur to Your Paws
You’re going to add fun fur to your paws in the same way as you added it to your hat except you won’t be covering the front of the paws with fun fur.
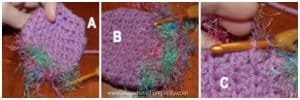
Round 1: Join yarn w/ a sc in the Front Loop of the 1st hdc of the paw, working in a continuous spiral and Working in Front Loops Only, sc in the next 44 sts. See photos A & B above.
Row 2: See Photo C Above, work sc in the Front Loops of a st in the round just below, Turn to work across the back side of the Paw, sc in the next 16 sts. See Photo D below.
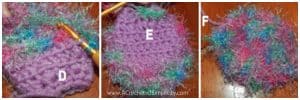
Rows 3 & 4: Repeat Row 2.
Row 5: Repeat Row 2 and then sc in each st around the front of the Paw. See Photo E above.
Fasten Off. Weave in ends. Fluff the fun fur.
Photo F shows what your work would look like (the back side) after Round 5 is complete.
Fasten Off. Weave in ends. Continue below to add paw prints and attach the paw to the braid.
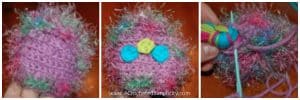
Photo above, left: shows the Front of the Paw after you’ve fluffed the Fun Fur.
Photo above, middle: attach the Paw Pads to the inner side of your paw using the yarn tail and a yarn needle. Only sew thru one layer of the paw.
Photo above, right: using a yarn needle and the tail of yarn left on the paw, sew the paw to the knotty braid. Insert the ends of the yarn on the braid into the paw then sew the paw around the braid. Make sure you complete at least 3 stitches “thru” the bottom of the knot so that it secures your paw to the braid.
Continue on to Boy or Girl Monster Features.

Girl Monster Features
Horns – Make 2 or 3
Hook: G6 / 4.00mm
Note: The horns are worked in a continuous spiral round starting from the tips. Do not join rounds. The use of stitch markers is highly recommended for these pieces.
Color Abbreviations~ MC: Main Color & AC: Alternate Color
Cluster Stitch: (this stitch is just like working a dc2tog but in one stitch only) [ YO, insert hook into stitch indicated/same st, YO, pull up a loop, YO, draw through 2 loops ] twice, YO, draw through all 3 loops on hook
Round 1: Beginning with MC and a Magic Ring, sl st in Magic Ring, ch 2, work 3 Clusters in Magic Ring. 3 Clusters *Drop MC from your hook and place it on a stitch marker.
Round 2: Join AC w/ a sl st to the 2nd ch of the ch 2 at the beginning of Round 1, 2 sc in “next” st (not the same st as ch 2), sc in next 2 sts. 4 sts *Drop AC from your hook and place it on a stitch marker.
Place loop of MC back on your hook. You will continue to switch colors in this fashion. This is why stitch markers are so important. You do not need a fancy stitch marker. I use a scrap piece of yarn.
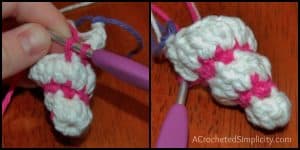
Note: Photos showing White & Pink yarn are not photos of the Monster Horn so do not count stitches in the photos. However, they do show the proper technique needed to complete Millie’s Horns.

Pull Magic Ring to tighten. Be sure to work the beginning of Round 3 tight to keep from having a gap.
Round 3: With MC, work 1 cluster in each sc from Round 2. 4 clusters
Round 4: With AC, [ 2 sc in next st, sc in next st ] twice. 6 sts
Round 5: With MC, work 1 cluster in each sc from Round 4. 6 clusters
Round 6: With AC, sc in next st, sc in next 5 sts. 6 sts *Fasten Off AC.
Round 7: With MC, work 1 cluster in each sc from Round 6. 6 clusters
Round 8: With MC, hdc2tog, sc in next. 2 sts
Leaves a small opening to stuff the horns. Fasten off leaving a tail of yarn to sew horns onto hat. Stuff horns with scrap pieces of yarn, if desired. Continue on to Horn Tassels.
Horn Tassels
Cut 18 pieces of yarn 6″ each. Each Tassel uses 6 pieces.
Using a crochet hook or a yarn needle, thread 6 pieces of yarn through a space near the top of a horn. Secure the pieces of yarn with a knot. Trim ends to desired length. Pull yarn apart to give it a fuzzy appearance, if desired.
If desired, tie a single strand of yarn around the tassel and tie in a bow. Continue on to Eye.

Eye – Make 1 or 2
Hook: G/6/4.00mm
Note: For sizes Newborn thru 12 months, you may want to go down a hook size when working the “Eye”.
Round 1: Using Black yarn, start with a Magic Ring, sl st into Magic Ring, work 6 sc into Magic Ring. Join w/ a sl st to the 1st sc of the round. **Change color to Purple on the last pull thru of the last sc of the round. 6 sts
Round 2: Using Purple, Ch 1, 2 sc in same st as ch 1, 2 sc in each st around. Join w/ a sl st to the 1st sc of the round. 12 sts
Round 3: Using Purple, ch 1, 2 sc in the same st as ch 1, sc in next st, *2 sc in next st, sc in next st, rep from * around. Join w/ a sl st to the 1st sc of the round. **Change color to White on the last pull thru of the last sc of the round. 18 sts
Round 4: Using White, Ch 1, 2 sc in the same st as ch 1, sc in next 2 sts, *2 sc in next st, sc in next 2 sts, rep from * around. Join w/ a sl st to the 1st sc of the round. 24 sts
Round 5: Using White, Ch 1, 2 sc in the same st as ch 1, sc in next 3 sts, *2 sc in next st, sc in next 3 sts, rep from * around. Join w/ a sl st to the 1st sc of the round. 30 sts
Round 6: Using White, Ch 1, sc in the same st as ch 1, sc in each st around. Join w/ a sl st to the 1st sc of the round. **Change color to Pink on the last pull thru of the last sc of the round. 30 sts
Round 7: Using Pink, **Note: Do not work this round too tightly or your eye will pucker too much, Ch 1, sl st in “next” st (not the same st as ch 1), sl st in each st around. Join w/ a sl st to the Back Loop of beginning Ch 1. 30 sts
Round 8: Using Pink, ***Working in Back Loops Only***, *ch 2, dc in the same st as ch 2, skip next st, sl st in next st, rep from * around. Join w/ a sl st to the 1st ch of beginning ch 2.
Fasten off leaving tail of yarn to sew your eye onto the hat later. Use Invisible Join Technique.
Using a yarn needle and white yarn, stitch a little “V” into the black portion of the eye. See photo below. Continue on to Heart.
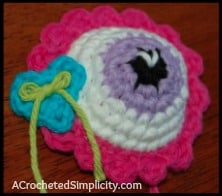
Heart – Make 1
Hook: C/2.75mm
Using Blue Yarn and a Magic Ring, (work all of the following stitches into the Magic Ring): sl st in Magic Ring, ch 2, dc, trc, 3 hdc, ch 3, 3 hdc, trc, dc, ch 3, sl st. Pull to tighten. Fasten Off. Use Invisible Join Technique. Leave a tail to sew onto Eye. Layout your Eye and Horns onto hood. Using a yarn needle and yarn tail, sew each piece onto your hat. Weave in ends. Using a contrasting yarn, add a little bow if desired.
Boy Monster Features
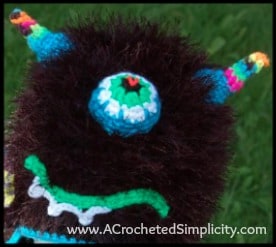
Eye – Make 1, 2 or 3
Hook: G/6/4.00mm
Round 1: Using Black yarn, start with a Magic Ring, sl st into Magic Ring, work 6 sc into Magic Ring. Join w/ a sl st to the 1st sc of the round. **Change color to Green (or desired color) on the last pull thru of the last sc of the round. 6 sts
Round 2: Using Green (or desired color), ch 1, 2 sc in same st as ch 1, 2 hdc in next st, 2 dc in next 3 sts, 2 hdc in next st. Join w/ a sl st to the 1st sc of the round. **Change color to White on the last pull thru of the last sc of the round. 12 sts
Round 3: Using White, ch 1, sc in same st as ch 1, 2 sc in next st, *sc in next st, 2 sc in next st, rep from * around. Join w/ a sl st to the 1st sc of the round. 18 sts
Round 4: Ch 1, sc in the same st as ch 1, sc in next st, 2 sc in next st, *sc in next 2 sts, 2 sc in next st, rep from * around. Join w/ a sl st to the 1st sc of the round. **Change color to Blue (or desired color) on the last pull thru of the last sc of the round. 24 sts
Round 5: Using Blue (or desired color), ch 1, sc in the same st as ch 1, sc in next st, spike sc in next st, [ sc in next 2 sts, spike sc in next st ] repeat around. Join w/ a sl st to the 1st sc of the round. 24 sts
Round 6: Ch 1, sc in the same st as ch 1, sc in each st around. Join w/ a sl st to the 1st sc of the round. 24 sts Fasten Off. Use Invisible Join Technique.
Round 7: Join yarn w/ a sc in the Back Loop of the 1st sc of the round, Working in Back Loops Only, sc in the next st, 2 sc in next st, *sc in next 2 sts, 2 sc in next st, rep from * around. Join w/ a sl st to the 1st sc of the round. 32 sts
Fasten Off. Use Invisible Join Technique. Leave a long tail to sew onto hat. Using a yarn needle and a contrasting piece of yarn, make a little “V” on the pupil of the eye.
Sew eye onto hat using a yarn needle and the yarn tails.
Mouth
Hook: G/6/4.00mm
Ch 30, sc in 2nd ch from hook, sc in each remaining ch.
Fasten Off. Leave long tail to sew onto hat.
Teeth
Hook: G/6/4.00mm
Decide where you’d like your teeth to be positioned on your mouth and join yarn w/ a sl st to an “Front Loop” of the mouth. The following is worked in “Front Loops Only” ( ch 4, sl st in 3rd ch from hook, ch 1, skip next st, sl st in next st, sl st in next 2 sts ) 3 times.
Fasten off. Leave tail to help secure teeth to hood so they’ll lay flat.
Sew mouth onto hat using a yarn needle and yarn tail. Bend mouth as you go to create the wavy line.
Horns – Make 2
Hook: G/6/4.00mm
Round 1: Using a Magic Ring, sl st into Magic Ring, work 4 sc in Magic Ring. Join w/ a sl st to the 1st sc of the round. 4 sts
Round 2: Ch 1, sc in same st as ch 1, sc in each st around. Join w/ a sl st to the 1st sc of the round. 4 sts
Round 3: Ch 1, sc in the same st as ch 1, 2 sc in next st, sc in next st, 2 sc in next st. Join w/ a sl st to the 1st sc of the round. 6 sts
Round 4: Ch 1, sc in same st as ch 1, sc in each st around. Join w/ a sl st to the 1st sc of the round. 6 sts
Round 5: Ch 1, sc in the same st as ch 1, 2 sc in next st, sc in next 2 sts, 2 sc in next st. Join w/ a sl st to the 1st sc of the round. **Change color to next desired color on the last pull thru of the last sc of the round. 8 sts
Round 6: Ch 1, hdc in the same st as ch 1, hdc in each st around. Join w/ a sl st to the 1st hdc of the round. **Change color to next desired color on the last pull thru of the last hdc of the round. 8 sts
Round 7: Ch 1, sc in the same st as ch 1, sc in next st, 2 sc in next st, sc in next 2 sts, 2 sc in next st, sc in next 2 sts. Join w/ a sl st to the 1st sc of the round. 10 sts
Round 8: Ch 1, sc in the same st as ch 1, sc in each st around. Join w/ a sl st to the 1st sc of the round. 10 sts
Round 9: Ch 1, 2 sc in the same st as ch 1, 2 sc in each st around. Join w/ a sl st to the 1st sc of the round. 20 sts
Rounds 10 – 12: Ch 1, sc in each st around. Join w/ a sl st to the 1st sc of the round. 20 sts
Fasten Off. Use Invisible Join Technique. Leave a long tail to sew onto hat.
**Use scraps of yarn to stuff horns, if desired. Sew horns onto hat using a yarn needle and the yarn tails.

Find all of my FREE crochet patterns HERE
Are you intimidated by crocheted cables? Would you love to learn? Take an Annies Video Class with me and let me ease your fears of crocheted cables! Click on the photo below to watch a free preview. You can also see the other 2 classes I have available! (affiliate link)
I hope you’ve enjoyed this free crochet pattern! Check out my Ravelry shop to see all of my designs!
I LOVE seeing your finished projects! Please feel free to share them in the A Crocheted Simplicity Crochet Community group on Facebook!
Happy Crocheting!

One Comment