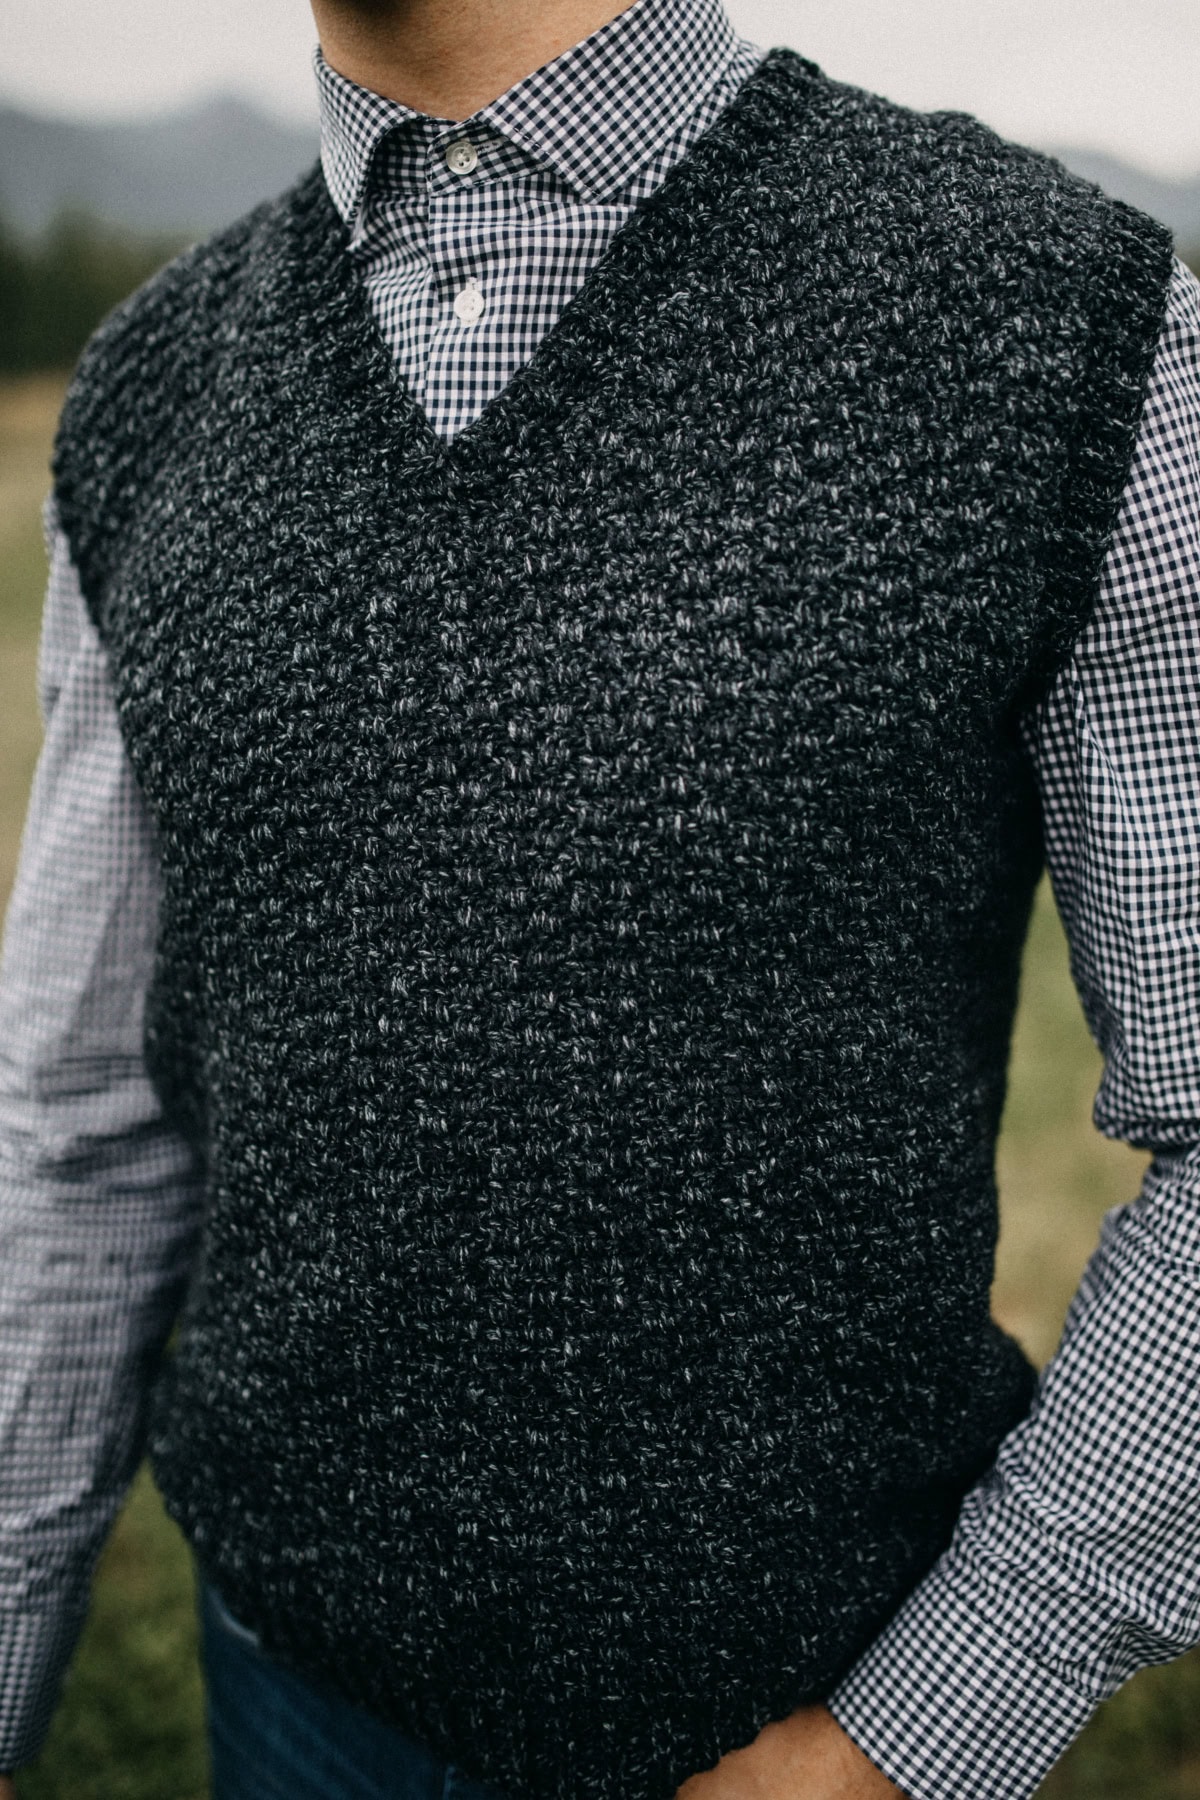
Summit Men’s Crochet Vest
This crochet vest is a classic piece that can worn to a formal dinner or a casual night out. The style is timeless and perfect for all occasions.
It’s not always easy finding the right Gifts for Him and if you’re looking for something thoughtful, classy, and comfortable, this is the pattern for you.
You’ll find the free crochet vest pattern in the post below, or you can find an ad-free printable PDF (that includes all photo tutorials + schematic), on Ravelry, or Etsy (aff).

Pair this crochet vest with dress slacks for a dressier look, or pair it with jeans for a more casual everyday vibe. Once you’ve made it and have it in your wardrobe, you’ll have endless styling options. It has a classic v-neck and there’s ribbing along the armholes and bottom to allow for a good fit.
If you’re an advanced beginner looking for a challenge, try your hand at this pattern and you’re sure to learn a few new things along the way. That’s the fun of expanding one’s crochet library!
How to Crochet a Vest
This crochet vest is constructed flat in one piece from the bottom up.
You’ll start by crocheting the bottom ribbing in rows. Then you’ll work the body of sweater onto the bottom ribbing from the bottom up.
Once you’ve reached a specific measurement according to the size that you’re making, you will split and work the upper front and back panels.
After both panels are made to this point, you’ll seam the shoulders and your vest will come together neatly. Lastly, you’ll add ribbing to the neck and armhole openings for that refined finish.

How To Get The
Summit Men’s Vest Pattern
Option 1: Scroll down for the free vest crochet pattern right here in this blog post.
Option 2: Purchase the ad-free printable PDF from one of my shops:
Best Yarn for Crochet Vests
For crochet vests, while there are many options to choose from, I used a 100% acrylic yarn. This type of yarn is easy to care for and it suits a practical, everyday garment. It also holds its shape well and has good stitch definition, which is especially great for patterns that have ribbing such as this one.
It’s also readily available and can come in a variety of colors which allows you to choose just the right one for whoever is receiving this crochet vest.
Choosing Which Size to Crochet
The model wears a men’s medium and is shown wearing a medium sample.
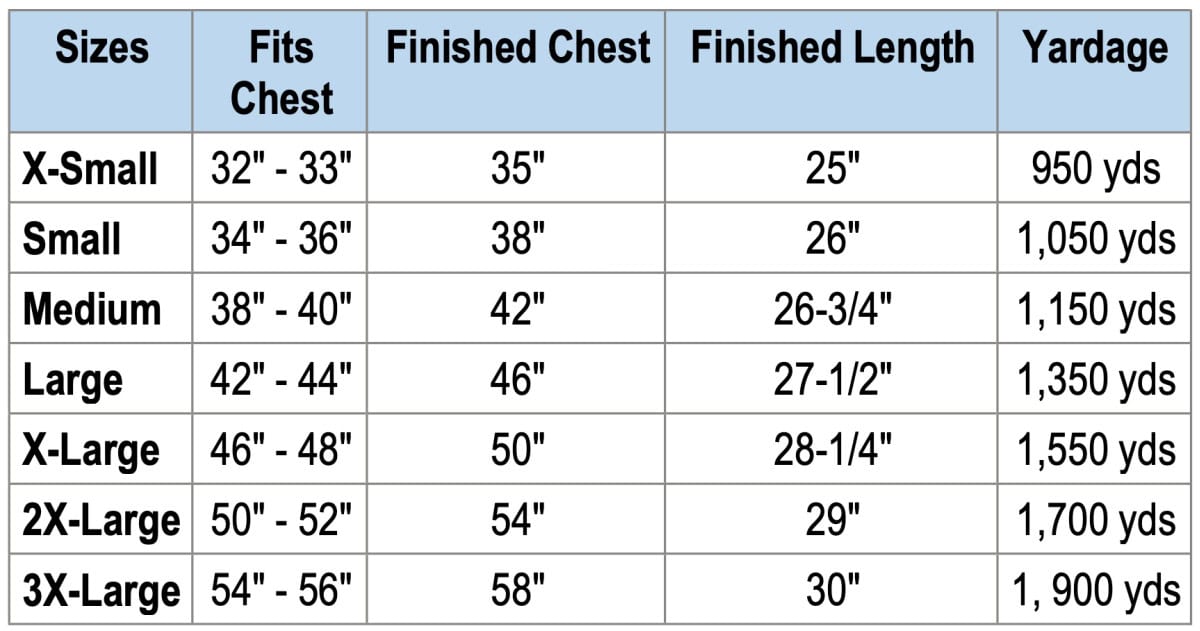
To choose your size, look over the size chart below.
- ‘Fits Chest’ measurement is the measurement of the intended wearer, not the garment’s finished measurement.
- Finished Chest and Finished Length are measurements of the finished garment.
- This crochet vest has 2 – 4″+ of positive ease built in for a slightly looser fit.
- If you prefer a more fitted look, I would suggest sizing down (as long as your chest size fits range of the smaller size).
- Finished length is measured from the top of the shoulder to the bottom edge of the top (including the bottom ribbing).
Size & Yardage Chart
The notes above refer to this size chart.
Lengthening the Torso
Do you have a guy who has a longer than average torso? No worries, simply use this guide to make your custom length sweater!
Step 1: Work the waist band as written.
Step 2: Work the Body of Sweater as written. This is where you will add more length to the torso. Continue repeating rounds 3- 4, ending with a round 4, until you’ve added the additional length you desire. Continue on to Front Upper Center Panel.
Yarn
This men’s crochet vest was designed with a worsted weight yarn to make sure it would be warm enough to be worn as an overcoat on sunny winter days. I chose not to use a bulky yarn for fear it would then be too thick to be worn as a layering piece under a winter coat.
I chose Lion Brand Yarns Jeans in Stovepipe for my crochet vest. This is a worsted weight / 4, acrylic yarn and it’s currently available in 7 colors. This yarn offers the softness and texture of denim without the stiffness, making it a great option for menswear.
Yarn Substitutions
Other medium weight yarns can be substituted as long as you meet gauge and you love the final result. These are some substitutions which I think would be great for making your crochet vest with:
- Lion Brand Yarns Wool Ease (197 yds / 180 m / 85 g / 3 oz) comes in amazing colors, especially with a wide range of neutrals, and is an 80% acrylic, 20% wool blend that has added warmth with the same ease of use as pure acrylic yarn.
- Lion Brand Yarns Basic Stitch (185 yds / 170 m / 100 g / 3.5 oz) is a premium 100% acrylic yarn that is machine-washable and anti-pilling, offering some variegated options as well as solids.
- Lion Brand Yarns Heartland (251 yds / 230 m / 142 g / 5 oz) offers a bit extra yardage in one ball compared to the others and has wonderful deep tones which are especially great for garments for men.

Summit Men’s Crochet Vest – Free Pattern
The crochet vest pattern is free below, but if you love to work offline, I’ve got a couple other great options for you.
Purchase the ad-free, printable PDF, (that includes all photo tutorials, + schematic), on Ravelry, or on Etsy (aff).
Purchase the crochet vest kit (aff): Lion Brand has a full kit of the Summit Men’s Crochet Vest, available on their website. The crochet men’s sweater kit includes your choice of colors and a digital copy of the crochet pattern.
This post contains affiliate links.
Materials
- Yarn: Worsted Weight / 4 / Yarn, Lion Brand Yarns Jeans in Stovepipe was used for the sample in the photos [100% Acrylic (246 yds / 225 m / 100 g / 3.5 oz)].
- Yardage: See Size Chart Above
- Crochet Hook: H/8/5.00mm; G/6/4.00mm or size needed to obtain gauge (My favorite crochet hooks are the Clover Amour Crochet Hooks, I’ve never had an ache in my hand since switching).
- Measuring Tape
- Locking Stitch Markers
- Scissors
- Yarn Needle
Abbreviations (US Terms)
- ch: chain
- sl st: slip stitch
- st(s): stitch(es)
- sc: single crochet
- hdc: half double crochet
- dc: double crochet
- ext sc: extended single crochet
- sc2tog: single crochet decrease
- extsc2tog: extended single crochet decrease
- RS: Right Side
- WS: Wrong Side
- Rnd(s): round(s)
- Rep: repeat
- beg: beginning
- BLO / FLO: back loop only, front loop only
- yo: yarn over
- SM: stitch marker
Experience Level
- Intermediate
Gauge
- Waistband: 9 sts = 2.25″; 10 rows = 2.60”
- Sweater: In ext sc, 10 sts X 9 rounds = 2.5”
Sizes
- Men’s Sizes: X-Small (Small, Medium, Large, X-Large, 2X-Large, 3X-Large)
- See Size & Yardage Chart above.
Special Stitches
- Extended Single Crochet (ext sc): Insert hook into stitch indicated, yo, pull up a loop, yo, pull thru 1 loop on hook, yo, pull thru remaining two loops on hook.
- Extended Single Crochet Decrease (extsc2tog): Insert hook into stitch indicated, yo, pull up a loop, yo, pull thru 1 loop on hook, insert hook into next st, yo, pull up a loop, yo, pull thru 1 loop on hook, yo, pull thru remaining loops on hook.
- Pattern Stitch Section on Front (patt st): Work around chs from the previous row and into the sts 2 rows below current row, (dc in each of the next 2 sts 2 rows below, ch 2, skip each of the next 2 sts). 1 Patt Stitch = 4 sts. *Scroll down to Swatch #2 in the pattern stitch photo tutorial.
Pattern Notes
- I tend to crochet on the tighter side. You may need to go down a hook size (or two) to meet gauge if you crochet on the looser side.
- The first stitch of a row/round is worked in the same stitch as the turning chain, unless otherwise specified.
- Yarn Notes: Lion Brand Yarns Jeans in Stovepipe was used for the sample. Another comparable worsted weight yarn may be used as long as gauge is met.
- TIP: After I get each section started, I prefer to work with my sweater inside out to minimize it rubbing on me as I work.
- Changes for sizes are written as follows: X-Small (Small, Medium, Large, X-Large, 2X-Large, 3X-Large)
- Model wears a men’s medium. Shown wearing a medium sample.
- Construction: This crochet sweater vest is constructed in one piece from the bottom up. First, you’ll crochet the bottom ribbing in rows. Then you’ll work the body of sweater onto the bottom ribbing from the bottom up. Once you’ve reached a specific measurement, you will split and work the upper front and back panels. After both panels are made to this point, you’ll seam the shoulders. Lastly, you’ll add ribbing to the neck and armhole openings.
Summit Men’s Crochet Vest – Written Pattern
Waistband
Gauge: In pattern stitch as written below, 9 sts = 2.25″; 10 rows = 2.60”
Row 1 (RS): With a 5.00mm crochet hook, ch 10, hdc in the 2nd ch from your hook, hdc in each ch across. Turn. (9 sts)
Row 2: Ch 1, BLO sl st in each st across. Turn. (9 sts)
Row 3: Ch 1, BLO hdc in each st across. Turn. (9 sts)
Rows (4- 100) (4 – 112) (4 – 126) (4 – 140) (4 – 158) (4 – 172) (4 – 188): Repeat Rows 2 – 3, ending with a Row 2 repeat.
Seam Waistband: With RS together, sl st Both Loops of Row 1 to the BLO of the last row. (9 sts)
Turn waistband RS out and continue on to the Body of Sweater.
Body of Sweater
Begin by working Round 1 for the size sweater you’re making. Then continue on to Round 2 under ‘All Sizes’.
Note: Round 1 stitches are worked into the sides of the rows of the waistband. Work these stitches into the hdc’s from the rows of hdc and into the sl sts from the rows of sl sts. This is an increase round and your waistband will flare out a bit. This is done purposely because of the stretch of the waistband.
Size X-Small
Rnd 1 (RS): Switch to a 4.00mm crochet hook, ch 1, [ ext sc in each of the next 5 sts, (ext sc in the next st, 2 ext sc in the next st) 10 times ] work from [ to ] 4 times. Join with a sl st to the 1st st. Turn. (140 sts)
Size Small
Rnd 1 (RS): Switch to a 4.00mm crochet hook, ch 1, [ ext sc in each of the next 8 sts, (ext sc in the next st, 2 ext sc in the next st) 10 times ] work from [ to ] 4 times. Join with a sl st to the 1st st. Turn. (152 sts)
Size Medium
Rnd 1 (RS): Switch to a 4.00mm crochet hook, ch 1, (2 ext sc in the next st, ext sc in each of the next 2 sts) 42 times. Join with a sl st to the 1st st. Turn. (168 sts)
Size Large
Rnd 1 (RS): Switch to a 4.00mm crochet hook, ch 1, [ ext sc in each of the next 2 sts, (ext sc in each of the next 2 sts, 2 ext sc in the next st) 11 times ] work from [ to ] 4 times. Join with a sl st to the 1st st. Turn. (184 sts)
Size X-Large
Rnd 1 (RS): Switch to a 4.00mm crochet hook, ch 1, [ ext sc in each of the next 8 sts, (ext sc in each of the next 2 sts, 2 ext sc in the next st) 10 times, ext sc in each of the next 8 sts, (ext sc in each of the next 2 sts, 2 ext sc in the next st) 11 times ] work from [ to ] 2 times. Join with a sl st to the 1st st. Turn. (200 sts)
Size 2X-Large
Rnd 1 (RS): Switch to a 4.00mm crochet hook, ch 1, [ ext sc in each of the next 10 sts, (ext sc in each of the next 2 sts, 2 ext sc in the next st) 11 times ] work from [ to ] 4 times. Join with a sl st to the 1st st. Turn. (216 sts)
Size 3X-Large
Rnd 1 (RS): Switch to a 4.00mm crochet hook, ch 1, [ ext sc in each of the next 3 sts, (ext sc in each of the next 3 sts, 2 ext sc in the next st) 11 times ] work from [ to ] 4 times. Join with a sl st to the 1st st. Turn. (232 sts)
All Sizes
Rnd 2: Ch 1, ext sc in each of the next 79 (86, 96, 106, 118, 128, 138) sts, (dc in each of the next 2 sts, ch 2, skip each of the next 2 sts) 13 (14, 15, 16, 16, 17, 18) times, ext sc in each of the remaining 9 (10, 12, 14, 18, 20, 22) sts. Join. Turn. (140, 152, 168, 184, 200, 216, 232 sts)
Rnd 3: Ch 1, ext sc in each of the next 9 (10, 12, 14, 18, 20, 22) sts, (patt st) 13 (14, 15, 16, 16, 17, 18) times, ext sc in each of the remaining 79 (86, 96, 106, 118, 128, 138) sts. Join. Turn. (140, 152, 168, 184, 200, 216, 232 sts)
Rnd 4: Ch 1, ext sc in each of the next 79 (86, 96, 106, 118, 128, 138) sts, (patt st) 13 (14, 15, 16, 16, 17, 18) times, ext sc in each of the remaining 9 (10, 12, 14, 18, 20, 22) sts. Join. Turn. (140, 152, 168, 184, 200, 216, 232 sts)
All Sizes: Rep Rnds 3 – 4, until work (including the waistband) measures 16″ (16.5″, 16.75″, 17″, 17.25″, 17.5″, 18″), ending with a Rnd 4 rep.
Do not fasten off. Continue on to Armhole Shaping for the size you’re making.
Lengthening the Torso
Do you have a guy who has a longer than average torso? No worries, simply use this guide to make your custom length sweater!
Step 1: Work the waist band as written.
Step 2: Work the Body of Sweater as written. This is where you will add more length to the torso. Continue repeating rounds 3- 4, ending with a round 4, until you’ve added the additional length you desire.
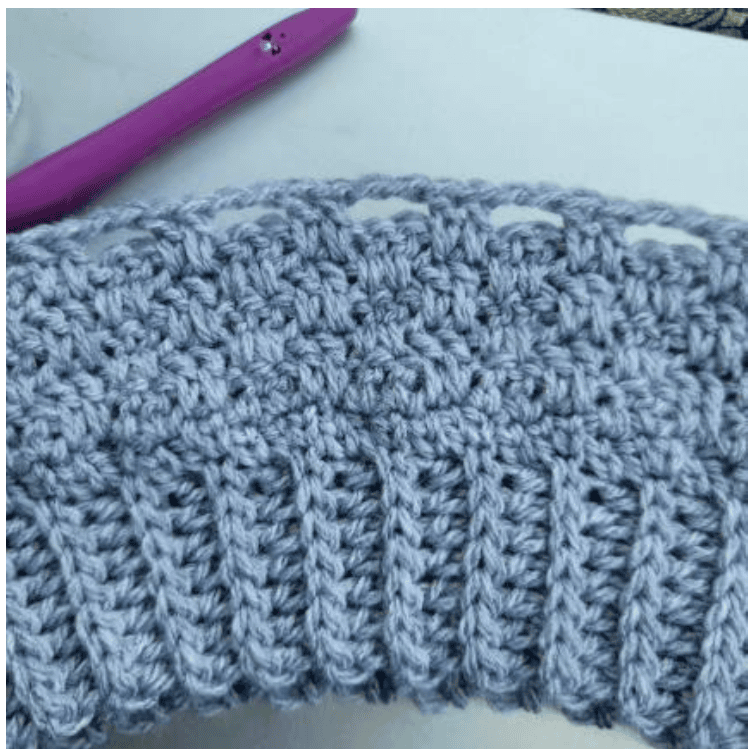
Pattern Stitch Tutorial
This step-by-step photo tutorial shows how to crochet the pattern stitch on the front of the sweater.
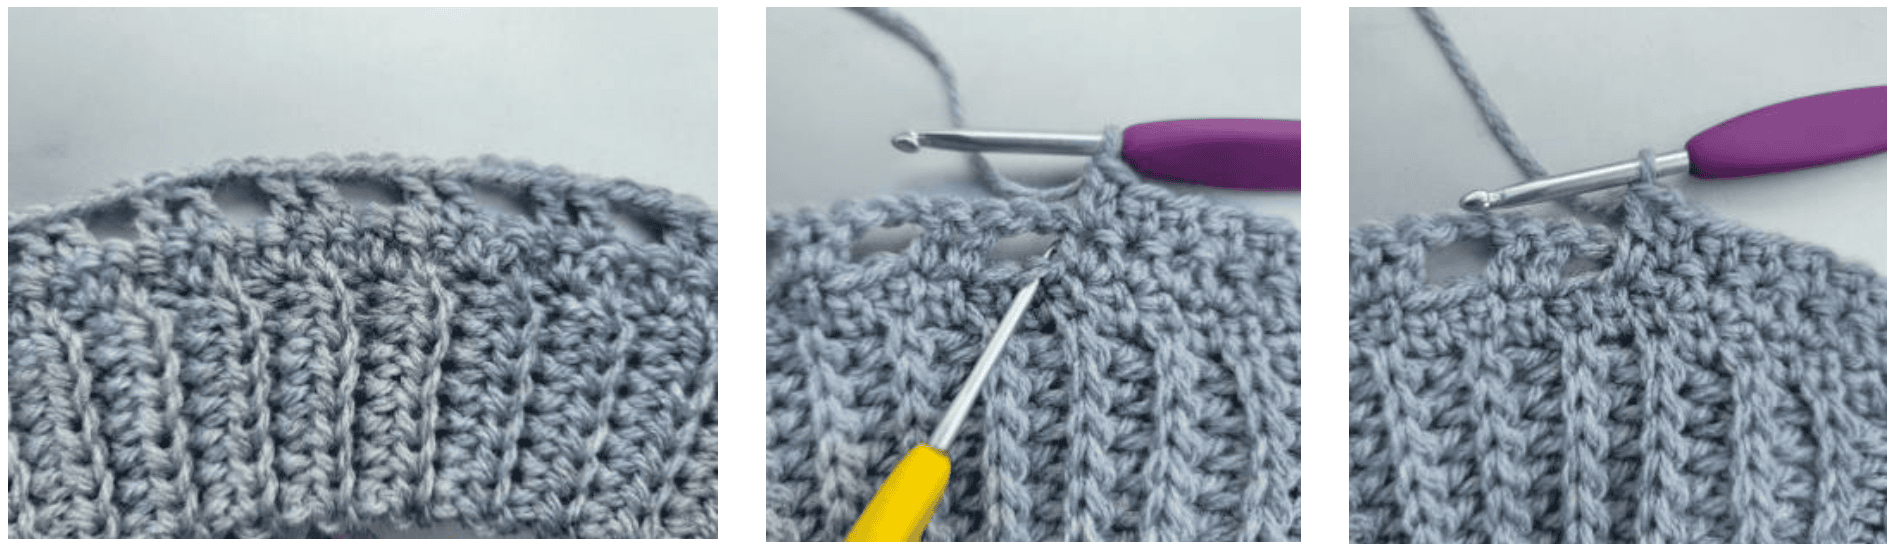
Photo Above Center: Continue the pattern stitch by working over the chains and into the unworked stitches from 2 rounds below (marked with the yellow crochet hook). When you work the dc into stitches from 2 rounds below, the chains will be enclosed in the dc.
Photo Above Right: Shows the first dc of the pattern stitch worked into the stitch from 2 rounds below.
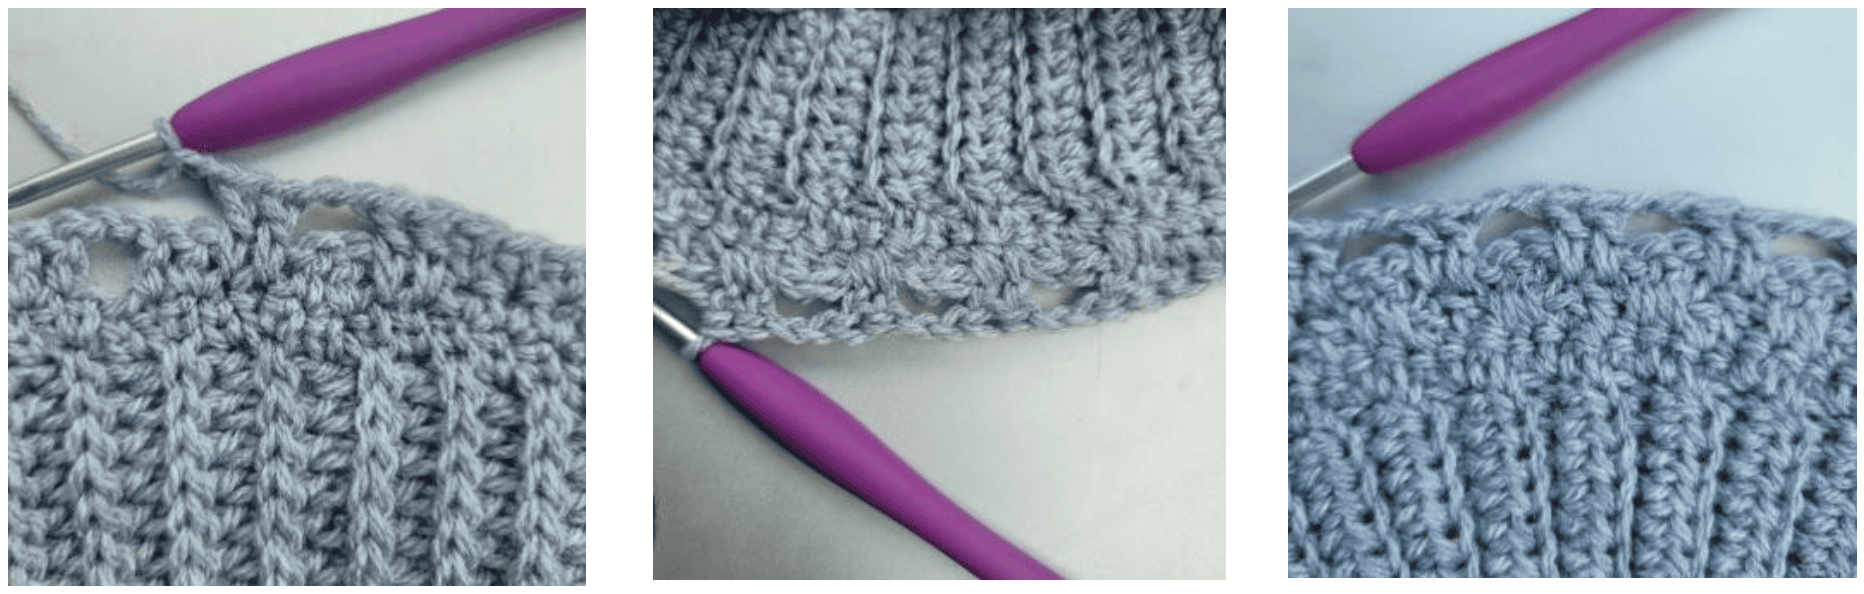
Photo Above Center: Shows the back side of Rnd 3 as it’s being worked.
Photo Above Right: Shows Rnd 3 stitches complete.
Armhole Shaping
Notes: Work the armhole shaping for the size you’re making, before you work Row 1 of the Front Upper Center Panel. The purpose of the armhole shaping is to move the working yarn over from the side seam to the front panel without having to cut the yarn and re-join.
X-Small Armhole Shaping: BLO sl st in next 7 sts, then continue to the Front Upper Center Panel and work Row 1. Skip 14 sts after Row 1 is complete, place a SM in 15th st to mark beginning of back panel. Then turn to continue with Row 2.
Small Armhole Shaping: BLO sl st in next 8 sts, then continue to the Front Upper Center Panel and work Row 1. Skip 16 sts after Row 1 is complete, place SM in 17th st to mark beginning of back panel. Then turn to continue with Row 2.
Medium Armhole Shaping: BLO sl st in next 10 sts, then continue to the Front Upper Center Panel and work Row 1. Skip 20 sts after Row 1 is complete, place SM in 21st st to mark beginning of back panel. Then turn to continue with Row 2.
Large Armhole Shaping: BLO sl st in next 12 sts, then continue to the Front Upper Center Panel and work Row 1. Skip 24 sts after Row 1 is complete, place SM in 25th st to mark beginning of back panel. Then turn to continue with Row 2.
XL Armhole Shaping: BLO sl st in next 15 sts, then continue to the Front Upper Center Panel and work Row 1. Skip 30 sts after Row 1 is complete, place SM in 31st st to mark beginning of back panel. Then turn to continue with Row 2.
2X Armhole Shaping: BLO sl st in next 18 sts, then continue to the Front Upper Center Panel and work Row 1. Skip 36 sts after Row 1 is complete, place SM in 37th st to mark beginning of back panel. Then turn to continue with Row 2.
3X Armhole Shaping: BLO sl st in next 20 sts, then continue to the Front Upper Center Panel and work Row 1. Skip 40 sts after Row 1 is complete, place SM in 41st st to mark beginning of back panel. Then turn to continue with Row 2.
Front Upper Center Panel
Rows (1) (1 – 3) (1 – 5) (1 – 5) (1 – 7) (1 – 5) (1 – 7): Ch 1, ext sc in each of the next 2 (2, 2, 2, 3, 2, 2) sts, (patt st) 13 (14, 15, 16, 16, 17, 18) times, ext sc in each of the next 2 (2, 2, 2, 3, 2, 2) sts. Turn. (56, 60, 64, 68, 70, 72, 76 sts)
Row 2 (4, 6, 6, 8, 6, 8): Ch 1, ext sc in each of the next 2 (2, 2, 2, 3, 2, 2) sts, (patt st) 4 (5, 5, 6, 6, 6, 7) times, (dc in each of the next 2 sts 2 rows below, ext sc in each of the next 2 sts) 5 (4, 5, 4, 4, 5, 4) times, (patt st) 4 (5, 5, 6, 6, 6, 7) times, ext sc in each of the last 2 (2, 2, 2, 3, 2, 2) sts. Turn. (56, 60, 64, 68, 70, 72, 76 sts)
Do not fasten off. Continue on to the Upper Left Panel for the size you’re making.
Upper Left Panel – Sizes: Small (L, XL, 3XL)
Note: This is the garment’s left side.
Row 1 (RS): Ch 1, ext sc in each of the next 2 (2, 3, 2) sts, (patt st) 6 (7, 7, 8) times, ext sc in each of the next 2 sts.*Skip each of the next 4 stitches & place a stitch marker in the 5th stitch to mark the beginning of the upper right panel. Turn. (28, 32, 33, 36 sts)
Row 2: Ch 1, extsc2tog, (patt st) across to the last 2 (2, 3, 2) sts, ext sc in each of the last 2 (2, 3, 2) sts. Turn. (27, 31, 32, 35 sts)
Row 3: Ch 1, ext sc in each of the next 2 (2, 3, 2) sts, (patt st) 5 (6, 6, 7) times, dc in each of the next 2 sts 2 rows below, ext sc in each of the next 3 sts. Turn. (27, 31, 32, 35 sts)
Row 4: Ch 1, extsc2tog, ext sc in the next st, ch 2, skip each of the next 2 sts, (patt st) across to the last 2 (2, 3, 2) sts, ext sc in each of the last 2 (2, 3, 2) sts. Turn. (26, 30, 31, 34 sts)
Row 5: Ch 1, ext sc in each of the next 2 (2, 3, 2) sts, (patt st) 5 (6, 6, 7) times, dc in each of the next 2 sts 2 rows below, ext sc in each of the next 2 sts. Turn. (26, 30, 31, 34 sts)
Row 6: Ch 1, extsc2tog, ch 2, skip each of the next 2 sts, (patt st) across to the last 2 (2, 3, 2) sts, ext sc in each of the last 2 (2, 3, 2) sts. Turn. (25, 29, 30, 33 sts)
Row 7: Ch 1, ext sc in each of the next 2 (2, 3, 2) sts, (patt st) 5 (6, 6, 7) times, dc in each of the next 2 sts 2 rows below, ext sc in the next st. Turn. (25, 29, 30, 33 sts)
Row 8: Ch 1, extsc2tog, ext sc in the next st, (patt st) across to the last 2 (2, 3, 2) sts, ext sc in each of the last 2 (2, 3, 2) sts. Turn. (24, 28, 29, 32 sts)
Row 9: Ch 1, ext sc in each of the next 2 (2, 3, 2) sts, (patt st) 5 (6, 6, 7) times, ext sc in each of the next 2 sts. Turn. (24, 28, 29, 32 sts)
Row 10: Ch 1, extsc2tog, (patt st) across to the last 2 (2, 3, 2) sts, ext sc in each of the last 2 (2, 3, 2) sts. Turn. (23, 27, 28, 31 sts)
Row 11: Ch 1, ext sc in each of the next 2 (2, 3, 2) sts, (patt st) 4 (5, 5, 6) times, dc in each of the next 2 sts 2 rows below, ext sc in each of the next 3 sts. Turn. (23, 27, 28, 31 sts)
Row 12: Ch 1, extsc2tog, ext sc in the next st, ch 2, skip each of the next 2 sts, (patt st) across to the last 2 (2, 3, 2) sts, ext sc in each of the last 2 (2, 3, 2) sts. Turn. (22, 26, 27, 30 sts)
Row 13: Ch 1, ext sc in each of the next 2 (2, 3, 2) sts, (patt st) 4 (5, 5, 6) times, dc in each of the next 2 sts 2 rows below, ext sc in each of the next 2 sts. Turn. (22, 26, 27, 30 sts)
Row 14: Ch 1, extsc2tog, ch 2, skip each of the next 2 sts, (patt st) across to the last 2 (2, 3, 2) sts, ext sc in each of the last 2 (2, 3, 2) sts. Turn. (21, 25, 26, 29 sts)
Row 15: Ch 1, ext sc in each of the next 2 (2, 3, 2) sts, (patt st) 4 (5, 5, 6) times, dc in each of the next 2 sts 2 rows below, ext sc in the next st. Turn. (21, 25, 26, 29 sts)
Row 16: Ch 1, extsc2tog, ext sc in the next st, (patt st) across to the last 2 (2, 3, 2) sts, ext sc in each of the last 2 (2, 3, 2) sts. Turn. (20, 24, 25, 28 sts)
Row 17: Ch 1, ext sc in each of the next 2 (2, 3, 2) sts, (patt st) 4 (5, 5, 6) times, ext sc in each of the next 2 sts. Turn. (20, 24, 25, 28 sts)
Row 18: Ch 1, extsc2tog, (patt st) across to the last 2 (2, 3, 2) sts, ext sc in each of the last 2 (2, 3, 2) sts. Turn. (19, 23, 24, 27 sts)
Row 19: Ch 1, ext sc in each of the next 2 (2, 3, 2) sts, (patt st) 3 (4, 4, 5) times, dc in each of the next 2 sts 2 rows below, ext sc in each of the next 3 sts. Turn. (19, 23, 24, 27 sts)
Row 20: Ch 1, extsc2tog, ext sc in the next st, ch 2, skip each of the next 2 sts, (patt st) across to the last 2 (2, 3, 2) sts, ext sc in each of the last 2 (2, 3, 2) sts. Turn. (18, 22, 23, 26 sts)
Row 21: Ch 1, ext sc in each of the next 2 (2, 3, 2) sts, (patt st) 3 (4, 4, 5) times, dc in each of the next 2 sts 2 rows below, ext sc in each of the next 2 sts. Turn. (18, 22, 23, 26 sts)
Row 22: Ch 1, extsc2tog, ch 2, skip each of the next 2 sts, (patt st) across to the last 2 (2, 3, 2) sts, ext sc in each of the last 2 (2, 3, 2) sts. Turn. (17, 21, 22, 25 sts)
Row 23: Ch 1, ext sc in each of the next 2 (2, 3, 2) sts, (patt st) 3 (4, 4, 5) times, dc in each of the next 2 sts 2 rows below, ext sc in the next st. Turn. (17, 21, 22, 25 sts)
Row 24: Ch 1, ext sc in the next st, ch 2, skip each of the next 2 sts, (patt st) across to the last 2 (2, 3, 2) sts, ext sc in each of the last 2 (2, 3, 2) sts. Turn. (17, 21, 22, 25 sts)
Rows (25 – 28) (25 – 30) (25 – 30) (25 – 34): Rep Rows 23 – 24.
Row 29 (31, 31, 35): Sl st in each of the next 2 (2, 3, 2) sts (do not count as sts), (patt st) 3 (4, 4, 5) times, dc in each of the next 2 sts 2 rows below, ext sc in the next st. Turn. (15, 19, 19, 23 sts)
Row 30 (32, 32, 36): Ch 1, ext sc in the next 3 sts, (dc in each of the next 2 sts 2 rows below, ext sc in next 2 sts) 2 (3, 3, 4) times, dc in each of the next 2 sts 2 rows below, sl st in the next st (does not count as a st). Leave remaining sts unworked. Turn. (13, 17, 17, 21 sts)
Fasten off leaving a 10″ tail for sewing shoulder seam. Continue on to Upper Right Panel.
Upper Right Panel – Sizes: Small (L, XL, 3XL)
Note: This is the garment’s right hand side.
Row 1 (RS): Join yarn with an ext sc in marked st, ext sc in the next st, (patt st) across to the last 2 (2, 3, 2) sts, ext sc in each of the last 2 (2, 3, 2) sts. Turn. (28, 32, 33, 36 sts)
Row 2: Ch 1, ext sc in each of the next 2 (2, 3, 2) sts, (patt st) 6 (7, 7, 8) times, extsc2tog. Turn. (27, 31, 32, 35 sts)
Row 3: Ch 1, ext sc in the next st, (patt st) across to the last 2 (2, 3, 2) sts, ext sc in each of the last 2 (2, 3, 2) sts. Turn. (27, 31, 32, 35 sts)
Row 4: Ch 1, ext sc in each of the next 2 (2, 3, 2) sts, (patt st) 5 (6, 6, 7) times, dc in each of the next 2 sts 2 rows below, ext sc in the next st, extsc2tog. Turn. (26, 30, 31, 34 sts)
Row 5: Ch 1, ext sc in each of the next 2 sts, ch 2, skip each of the next 2 sts, (patt st) across to the last 2 (2, 3, 2) sts, ext sc in each of the last 2 (2, 3, 2) sts. Turn. (26, 30, 31, 34 sts)
Row 6: Ch 1, ext sc in each of the next 2 (2, 3, 2) sts, (patt st) 5 (6, 6, 7) times, dc in each of the next 2 sts 2 rows below, extsc2tog. Turn. (25, 29, 30, 33 sts)
Row 7: Ch 1, ext sc in each of the next 3 sts, (patt st) across to the last 2 (2, 3, 2) sts, ext sc in each of the last 2 (2, 3, 2) sts. Turn. (25, 29, 30, 33 sts)
Row 8: Ch 1, ext sc in each of the next 2 (2, 3, 2) sts, (patt st) 5 (6, 6, 7) times, ext sc in the next st, extsc2tog. Turn. (24, 28, 29, 32 sts)
Row 9: Ch 1, ext sc in each of the next 2 sts, (patt st) across to the last 2 (2, 3, 2) sts, ext sc in each of the last 2 (2, 3, 2) sts. Turn. (24, 28, 29, 32 sts)
Row 10: Ch 1, ext sc in each of the next 2 (2, 3, 2) sts, (patt st) 5 (6, 6, 7) times, extsc2tog. Turn. (23, 27, 28, 31 sts)
Row 11: Ch 1, ext sc in the next st, (patt st) across to the last 2 (2, 3, 2) sts, ext sc in each of the last 2 (2, 3, 2) sts. Turn. (23, 27, 28, 31 sts)
Row 12: Ch 1, ext sc in each of the next 2 (2, 3, 2) sts, (patt st) 4 (5, 5, 6) times, dc in each of the next 2 sts 2 rows below, ext sc in the next st, extsc2tog. Turn. (22, 26, 27, 30 sts)
Row 13: Ch 1, ext sc in each of the next 2 sts, ch 2, skip each of the next 2 sts, (patt st) across to the last 2 (2, 3, 2) sts, ext sc in each of the last 2 (2, 3, 2) sts. Turn. (22, 26, 27, 30 sts)
Row 14: Ch 1, ext sc in each of the next 2 (2, 3, 2) sts, (patt st) 4 (5, 5, 6) times, dc in each of the next 2 sts 2 rows below, extsc2tog. Turn. (21, 25, 26, 29 sts)
Row 15: Ch 1, ext sc in each of the next 3 sts, (patt st) across to the last 2 (2, 3, 2) sts, ext sc in each of the last 2 (2, 3, 2) sts. Turn. (21, 25, 26, 29 sts)
Row 16: Ch 1, ext sc in each of the next 2 (2, 3, 2) sts, (patt st) 4 (5, 5, 6) times, ext sc in the next st, extsc2tog. Turn. (20, 24, 25, 28 sts)
Row 17: Ch 1, ext sc in each of the next 2 sts, (patt st) across to the last 2 (2, 3, 2) sts, ext sc in each of the last 2 (2, 3, 2) sts. Turn. (20, 24, 25, 28 sts)
Row 18: Ch 1, ext sc in each of the next 2 (2, 3, 2) sts, (patt st) 4 (5, 5, 6) times, extsc2tog. Turn. (19, 23, 24, 27 sts)
Row 19: Ch 1, ext sc in the next st, (patt st) across to the last 2 (2, 3, 2) sts, ext sc in each of the last 2 (2, 3, 2) sts. Turn. (19, 23, 24, 27 sts)
Row 20: Ch 1, ext sc in each of the next 2 (2, 3, 2) sts, (patt st) 3 (4, 4, 5) times, dc in each of the next 2 sts 2 rows below, ext sc in the next st, extsc2tog. Turn. (18, 22, 23, 26 sts)
Row 21: Ch 1, ext sc in each of the next 2 sts, ch 2, skip each of the next 2 sts, (patt st) across to the last 2 (2, 3, 2) sts, ext sc in each of the last 2 (2, 3, 2) sts. Turn. (18, 22, 23, 26 sts)
Row 22: Ch 1, ext sc in each of the next 2 (2, 3, 2) sts, (patt st) 3 (4, 4, 5) times, dc in each of the next 2 sts 2 rows below, extsc2tog. Turn. (17, 21, 22, 25 sts)
Row 23: Ch 1, ext sc in the next st, ch 2, skip each of the next 2 sts, (patt st) across to the last 2 (2, 3, 2) sts, ext sc in each of the last 2 (2, 3, 2) sts. Turn. (17, 21, 22, 25 sts)
Row 24 : Ch 1, ext sc in each of the next 2 (2, 3, 2) sts, (patt st) 3 (4, 4, 5) times, dc in each of the next 2 sts 2 rows below, ext sc in the next st. Turn. (17, 21, 22, 25 sts)
Rows (25 – 28) (25 – 30) (25 – 30) (25 – 34): Rep Rows 23 – 24.
Row 29 (31, 31, 35): Ch 1, ext sc in the next st, ch 2, skip each of the next 2 sts, (patt st) 2 (3, 3, 4) times, dc in each of the next 2 sts 2 rows below, sl st in the next st. Leave remaining sts unworked. Turn. (13, 17, 17, 21 sts)
Row 30 (32, 32, 36): Ch 1, ext sc in each of the next 2 sts, (dc in each of the next 2 sts 2 rows below, ext sc in next 2 sts) 2 (3, 3, 4) times, dc in each of the next 2 sts 2 rows below, ext sc in the last st. (13, 17, 17, 21 sts)
Fasten off leaving a 10″ tail for sewing shoulder seam. Continue on to Back Panel.
Upper Left Panel – Sizes: X-Small (Medium, 2 XL)
Note: This is the garment’s left side.
Row 1 (RS): Ch 1, ext sc in each of the next 2 sts, (patt st) 5 (6, 7) times, dc in each of the next 2 sts 2 rows below, ext sc in each of the next 2 sts. *Skip each of the next 4 stitches & place a stitch marker in the 5th stitch to mark the beginning of the upper right panel. Turn. (26, 30, 34 sts)
Row 2: Ch 1, extsc2tog, ch 2, skip each of the next 2 sts, (patt st) across to the last 2 sts, ext sc in each of the last 2 sts. Turn. (25, 29, 33 sts)
Row 3: Ch 1, ext sc in each of the next 2 sts, (patt st) 5 (6, 7) times, dc in each of the next 2 sts 2 rows below, ext sc in the next st. Turn. (25, 29, 33 sts)
Row 4: Ch 1, extsc2tog, ext sc in the next st, (patt st) across to the last 2 sts, ext sc in each of the last 2 sts. Turn. (24, 28, 32 sts)
Row 5: Ch 1, ext sc in each of the next 2 sts, (patt st) 5 (6, 7) times, ext sc in each of the next 2 sts. Turn. (24, 28, 32 sts)
Row 6: Ch 1, extsc2tog, (patt st) across to the last 2 sts, ext sc in each of the last 2 sts. Turn. (23, 27, 31 sts)
Row 7: Ch 1, ext sc in each of the next 2 sts, (patt st) 4 (5, 6) times, dc in each of the next 2 sts 2 rows below, ext sc in each of the next 3 sts. Turn. (23, 27, 31 sts)
Row 8: Ch 1, extsc2tog, ext sc in the next st, ch 2, skip each of the next 2 sts, (patt st) across to the last 2 sts, ext sc in each of the last 2 sts. Turn. (22, 26, 30 sts)
Row 9: Ch 1, ext sc in each of the next 2 sts, (patt st) 4 (5, 6) times, dc in each of the next 2 sts 2 rows below, ext sc in each of the next 2 sts. Turn. (22, 26, 30 sts)
Row 10: Ch 1, extsc2tog, ch 2, skip each of the next 2 sts, (patt st) across to the last 2 sts, ext sc in each of the last 2 sts. Turn. (21, 25, 29 sts)
Row 11: Ch 1, ext sc in each of the next 2 sts, (patt st) 4 (5, 6) times, dc in each of the next 2 sts 2 rows below, ext sc in the next st. Turn. (21, 25, 29 sts)
Row 12: Ch 1, extsc2tog, ext sc in the next st, (patt st) across to the last 2 sts, ext sc in each of the last 2 sts. Turn. (20, 24, 28 sts)
Row 13: Ch 1, ext sc in each of the next 2 sts, (patt st) 4 (5, 6) times, ext sc in each of the next 2 sts. Turn. (20, 24, 28 sts)
Row 14: Ch 1, extsc2tog, (patt st) across to the last 2 sts, ext sc in each of the last 2 sts. Turn. (19, 23, 27 sts)
Row 15: Ch 1, ext sc in each of the next 2 sts, (patt st) 3 (4, 5) times, dc in each of the next 2 sts 2 rows below, ext sc in each of the next 3 sts. Turn. (19, 23, 27 sts)
Row 16: Ch 1, extsc2tog, ext sc in the next st, ch 2, skip each of the next 2 sts, (patt st) across to the last 2 sts, ext sc in each of the last 2 sts. Turn. (18, 22, 26 sts)
Row 17: Ch 1, ext sc in each of the next 2 sts, (patt st) 3 (4, 5) times, dc in each of the next 2 sts 2 rows below, ext sc in each of the next 2 sts. Turn. (18, 22, 26 sts)
Row 18: Ch 1, extsc2tog, ch 2, skip each of the next 2 sts, (patt st) across to the last 2 sts, ext sc in each of the last 2 sts. Turn. (17, 21, 25 sts)
Row 19: Ch 1, ext sc in each of the next 2 sts, (patt st) 3 (4, 5) times, dc in each of the next 2 sts 2 rows below, ext sc in the next st. Turn. (17, 21, 25 sts)
Row 20: Ch 1, extsc2tog, ext sc in the next st, (patt st) across to the last 2 sts, ext sc in each of the last 2 sts. Turn. (16, 20, 24 sts)
Row 21: Ch 1, ext sc in each of the next 2 sts, (patt st) 3 (4, 5) times, ext sc in each of the next 2 sts. Turn. (16, 20, 24 sts)
Row 22: Ch 1, extsc2tog, (patt st) across to the last 2 sts, ext sc in each of the last 2 sts. Turn. (15, 19, 23 sts)
Row 23: Ch 1, ext sc in each of the next 2 sts, (patt st) 3 (4, 5) times, ext sc in the next st. Turn. (15, 19, 23 sts)
Row 24: Ch 1, ext sc in the next st, (patt st) across to the last 2 sts, ext sc in each of the last 2 sts. Turn. (15, 19, 23 sts)
Rows (25 – 28) (25 – 28) (25 – 34): Rep Rows 23 – 24.
Row 29 (29, 35): Sl st in each of the next 2 sts (do not count as sts), (patt st) 3 (4, 5) times, ext sc in the next st. Turn. (13, 17, 21 sts)
Row 30 (30, 36): Ch 1, ext sc in the next st, (dc in each of the next 2 sts 2 rows below, ext sc in next 2 sts) 2 (3, 4) times, dc in each of the next 2 sts 2 rows below, sl st in the next st (does not count as a st). Leave remaining sts unworked. (11, 15, 19 sts)
Fasten off leaving a 10″ tail for sewing shoulder seam. Continue on to Upper Right Panel.
Upper Right Panel – X-Small (Medium, 2 XL)
Note: This is the garment’s right hand side.
Row 1 (RS): Join yarn w/ an ext sc in marked st, ext sc in the next st, ch 2, skip each of the next 2 sts, (patt st) across to the last 2 sts, ext sc in each of the last 2 sts. Turn. (26, 30, 34 sts)
Row 2: Ch 1, ext sc in each of the next 2 sts, (patt st) 5 (6, 7) times, dc in each of the next 2 sts 2 rows below, extsc2tog. Turn. (25, 29, 33 sts)
Row 3: Ch 1, ext sc in each of the next 3 sts, (patt st) across to the last 2 sts, ext sc in each of the last 2 sts. Turn. (25, 29, 33 sts)
Row 4: Ch 1, ext sc in each of the next 2 sts, (patt st) 5 (6, 7) times, ext sc in the next st, extsc2tog. Turn. (24, 28, 32 sts)
Row 5: Ch 1, ext sc in each of the next 2 sts, (patt st) across to the last 2 sts, ext sc in each of the last 2 sts. Turn. (24, 28, 32 sts)
Row 6: Ch 1, ext sc in each of the next 2 sts, (patt st) 5 (6, 7) times, extsc2tog. Turn. (23, 27, 31 sts)
Row 7: Ch 1, ext sc in the next st, (patt st) across to the last 2 sts, ext sc in each of the last 2 sts. Turn. (23, 27, 31 sts)
Row 8: Ch 1, ext sc in each of the next 2 sts, (patt st) 4 (5, 6) times, dc in each of the next 2 sts 2 rows below, ext sc in the next st, extsc2tog. Turn. (22, 26, 30 sts)
Row 9: Ch 1, ext sc in each of the next 2 sts, ch 2, skip each of the next 2 sts, (patt st) across to the last 2 sts, ext sc in each of the last 2 sts. Turn. (22, 26, 30 sts)
Row 10: Ch 1, ext sc in each of the next 2 sts, (patt st) 4 (5, 6) times, dc in each of the next 2 sts 2 rows below, extsc2tog. Turn. (21, 25, 29 sts)
Row 11: Ch 1, ext sc in each of the next 3 sts, (patt st) across to the last 2 sts, ext sc in each of the last 2 sts. Turn. (21, 25, 29 sts)
Row 12: Ch 1, ext sc in each of the next 2 sts, (patt st) 4 (5, 6) times, ext sc in the next st, extsc2tog. Turn. (20, 24, 28 sts)
Row 13: Ch 1, ext sc in each of the next 2 sts, (patt st) across to the last 2 sts, ext sc in each of the last 2 sts. Turn. (20, 24, 28 sts)
Row 14: Ch 1, ext sc in each of the next 2 sts, (patt st) 4 (5, 6) times, extsc2tog. Turn. (19, 23, 27 sts)
Row 15: Ch 1, ext sc in the next st, (patt st) across to the last 2 sts, ext sc in each of the last 2 sts. Turn. (19, 23, 27 sts)
Row 16: Ch 1, ext sc in each of the next 2 sts, (patt st) 3 (4, 5) times, dc in each of the next 2 sts 2 rows below, ext sc in the next st, extsc2tog. Turn. (18, 22, 26 sts)
Row 17: Ch 1, ext sc in the next 2 sts, ch 2, skip each of the next 2 sts, (patt st) across to the last 2 sts, ext sc in each of the last 2 sts. Turn. (18, 22, 26 sts)
Row 18: Ch 1, ext sc in each of the next 2 sts, (patt st) 3 (4, 5) times, dc in each of the next 2 sts 2 rows below, extsc2tog. Turn. (17, 21, 25 sts)
Row 19: Ch 1, ext sc in each of the next 3 sts, (patt st) across to the last 2 sts, ext sc in each of the last 2 sts. Turn. (17, 21, 25 sts)
Row 20: Ch 1, ext sc in each of the next 2 sts, (patt st) 3 (4, 5) times, ext sc in the next st, extsc2tog. Turn. (16, 20, 24 sts)
Row 21: Ch 1, ext sc in each of the next 2 sts, (patt st) across to the last 2 sts, ext sc in each of the last 2 sts. Turn. (16, 20, 24 sts)
Row 22: Ch 1, ext sc in each of the next 2 sts, (patt st) 3 (4, 5) times, extsc2tog. Turn. (15, 19, 23 sts)
Row 23: Ch 1, ext sc in the next st, (patt st) across to the last 2 sts, ext sc in each of the last 2 sts. Turn. (15, 19, 23 sts)
Row 24: Ch 1, ext sc in each of the next 2 sts, (patt st) 3 (4, 5) times, ext sc in the next st. Turn. (15, 19, 23 sts)
Rows (25 – 28) (25 – 28) (25 – 34): Rep Rows 23 – 24.
Row 29 (29, 35): Ch 1, ext sc in the next st, (patt st) 2 (3, 4) times, dc in each of the next 2 sts 2 rows below, sl st in the next st (does not count as a st). Leave remaining sts unworked. Turn. (11, 15, 19 sts)
Row 30 (30, 36): Ch 1, ext sc in each of the next 2 sts, (dc in each of the next 2 sts 2 rows below, ext sc in next 2 sts) across to the last st, ext sc in the last st. (11, 15, 19 sts)
Fasten off leaving a 10″ tail for sewing shoulder seam. Continue on to Back Panel.
Back Panel
Row 1: On RS, join yarn with a sl st in the SM marking where to begin the back panel, ch 1, ext sc in the same stitch, ext sc in each of the next 55 (59, 63, 67, 69, 71, 75) sts. Turn. (56, 60, 64, 68, 70, 72, 76 sts)
Rows 2 – 30 (32, 34, 36, 38, 40, 42): Ch 1, ext sc in each st across. Turn. (56, 60, 64, 68, 70, 72, 76 sts)
Do not fasten off. Continue on to Shoulder Shaping.
Shoulder Shaping
Row 1: Sl st in each of the next 2 sts (do not count as sts), ext sc in each st across to the last 2 sts, sl st to the next st (does not count as a st). Leave the last st unworked. Turn. (52, 56, 60, 64, 66, 68, 72 sts)
Row 2: Sl st in each of the next 2 sts (do not count as sts), ext sc in each st across to the last 2 sts, sl st to the next st (does not count as a st). Leave the last st unworked. (48, 52, 56, 60, 62, 64, 68 sts)
Fasten off. Weave in ends. Continue to Shoulder Seams.
Shoulder Seams
Turn sweater vest inside out. Line up the outer corners of the back panel with the outer corners of the front panels. Using a tapestry needle and yarn, whipstitch 15 (17, 19, 21, 22, 23, 25) sts of each front panel to the corresponding stitches of the back panel. Weave in ends. Turn sweater vest right side out. Continue on to Armhole Ribbing.
Armhole Ribbing
Set-Up Rnd (RS): Join yarn with a sc near the center of the bottom of the armhole opening, sc in each st and the side of each row around armhole opening. Join with a sl st to the 1st st. (74, 80, 88, 96, 106, 116, 124 sts)
Row 1 (RS): Ch 6, working into the back hump of the ch, sc in the 2nd ch from your hook, sc in each of the next 3 chs, sc2tog in the next ch and same st as ch 6. (5 sts)
Row 2: Sl st in the next st along the edge of the armhole opening, turn, BLO sl st in each st across. (5 sts)
Row 3: Ch 1, turn, BLO, sc in each of the next 4 sts, sc2tog in the next st & next st along the edge of the armhole opening. (5 sts)
Rows 4 – 73 (79, 87, 95, 105, 115, 123): Rep Rows 2 – 3. (5 sts)
Row 74 (80, 88, 96, 106, 116, 124): Sl st in next st along edge of sleeve, turn, line up last row with Row 1, holding working yarn on the inside of the edging sl st FLO of 1st row to BLO of last row across. (5 sts)
Fasten off. Weave in ends. Repeat Armhole Ribbing for opposite armhole, then continue on to Neck Ribbing.
Neck Ribbing
Set-Up Rnd (RS): Join yarn with a sc in st furthest to the right at the bottom of the neck opening, sc in each st and the side of each row around neck opening. Join with a sl st to the 1st st. (90, 90, 90, 94, 94, 102, 102 sts)
Row 1 (RS): *Switch to a 5.00mm crochet hook*, Ch 1, FLO sc in each of the next 3 sts, FLO sc2tog in the next st and next st along edge of neck opening. (4 sts)
Row 2: Sl st in the next st along the edge of the neck opening, turn, BLO sl st in each st across. (4 sts)
Row 3: Ch 1, turn, BLO, sc in each of the next 3 sts, sc2tog in the next st & next st along the edge of the neck opening. (4 sts)
Rows 4 – 86 (86, 86, 90, 90, 98, 98): Rep Rows 2 – 3, ending with a Row 2. (4 sts)
Fasten off leaving an 8″ tail. Using a yarn needle, whipstitch the last row of the neck ribbing to the BLO of the stitches behind Row 1. Weave in ends.
I MADE IT! NOW WHAT?
Pin this post!: Save this crochet vest pattern to your Pinterest boards so that you can come back and make it again.
Leave a comment below: We love to hear your feedback.
Share Your Finished Projects on Facebook or Instagram: I love to see your finished projects! Share with us on social media and tag me @acrochetedsimplicity or use the hashtag #ACrochetedSimplicity so I can find your posts.
Join us in the Facebook Community Group!
Come share your finished projects with us in the A Crocheted Simplicity Crochet Community Group on Facebook. Join us for fun community events such as crochet alongs, join in on crochet conversations, ask questions, get advice, and share your love for crochet!

More Free Men’s Crochet Patterns I Think You’ll Love
Explore Free Knit-Look Crochet Patterns
Do you love the look of knitting, but you can’t knit a stitch to save your soul? Browse all of our free knit look crochet patterns. You’ll find a variety of knit-look crochet project ideas.
Hello Jennifer and All,
it’s really Gorgeus !
Thank you very much for sharing this pattern!
I’ve learned a new textured stitch and all product is perfect wearable.
I really apreciate your help in Crocheting!
Lelly 🙂
Hi Lelly,
Thank you so much!
Happy Crocheting,
Jennifer
Sorry if this is an annoying ask, but is there a video tutorial for this? I’m relatively new to crochet and am having some trouble with some of the techniques. The photos look really good, and I’m excited to see the final product.
Sorry for any bad English, I’m learning.
Hi Marten,
Please send me an e-mail so I can better help you: [email protected]
Jennifer
Is the instruction for Rnd1 for the medium sizing off? Doing the stc pattern 42 times only gets me to about 2/3 of the length of the ribbing. I am thoroughly confused…
Hi Archer,
The textured stitch pattern is only on the front center portion of the vest. It sounds like you’re on the right track. 🙂
Happy Crocheting,
Jennifer