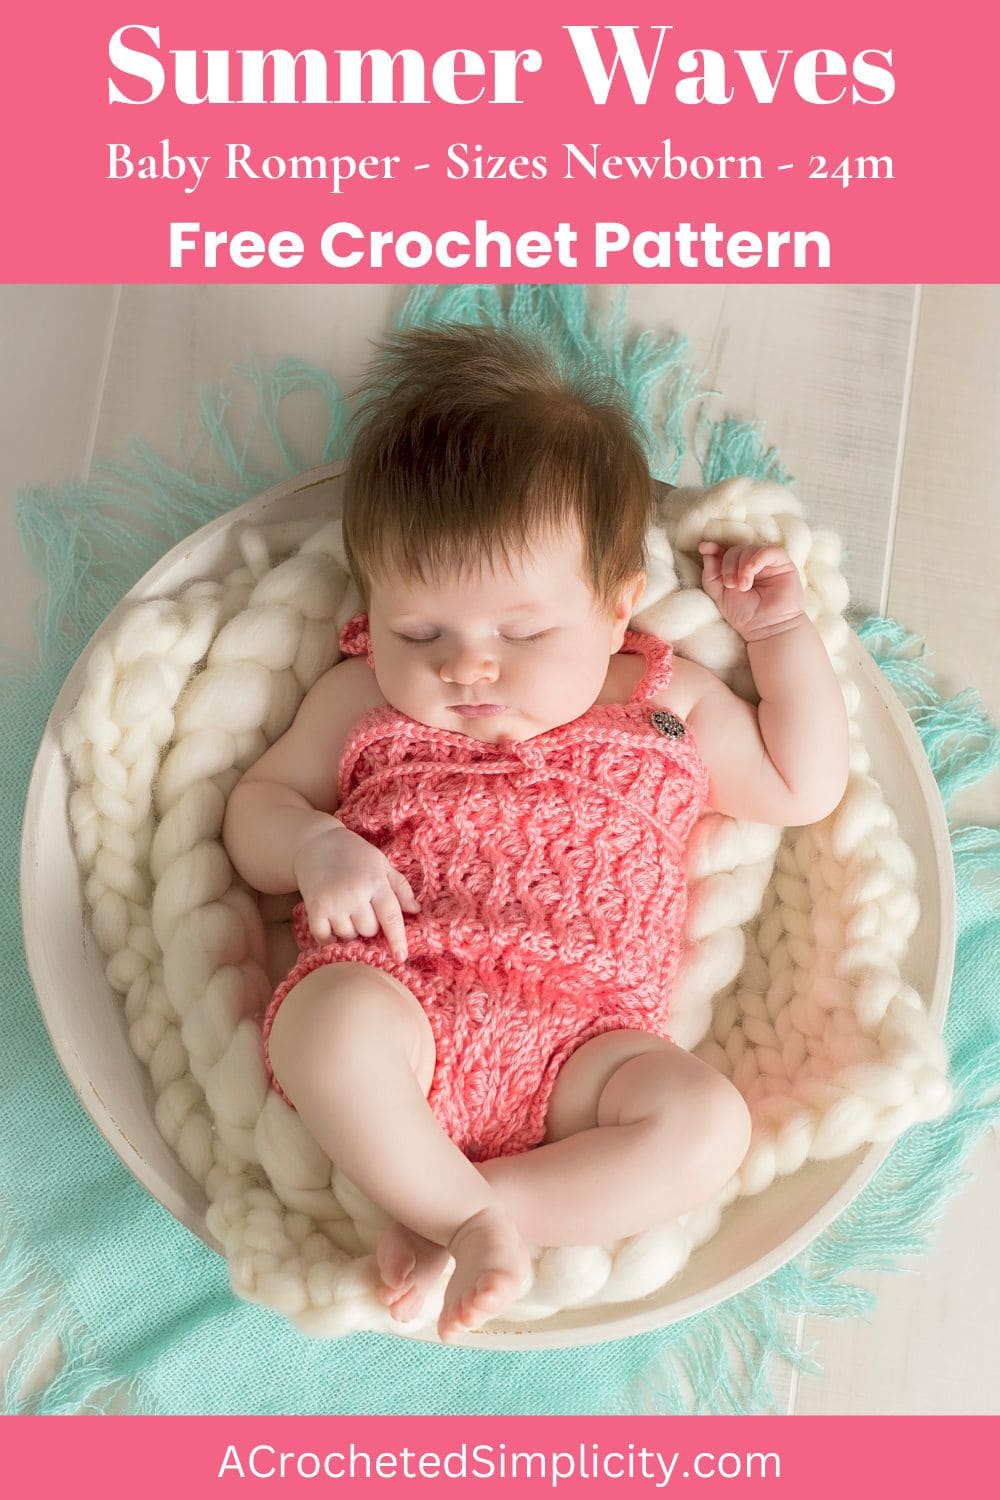
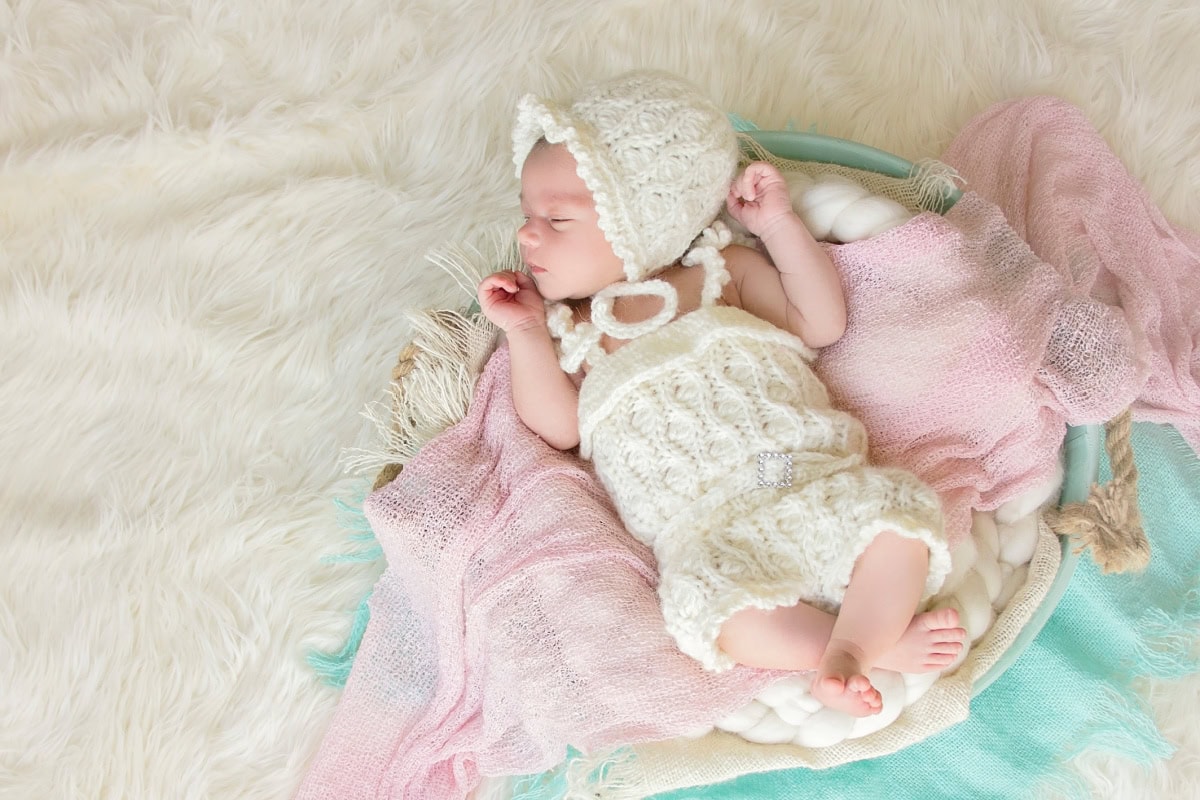
Summer Waves Crochet Baby Romper
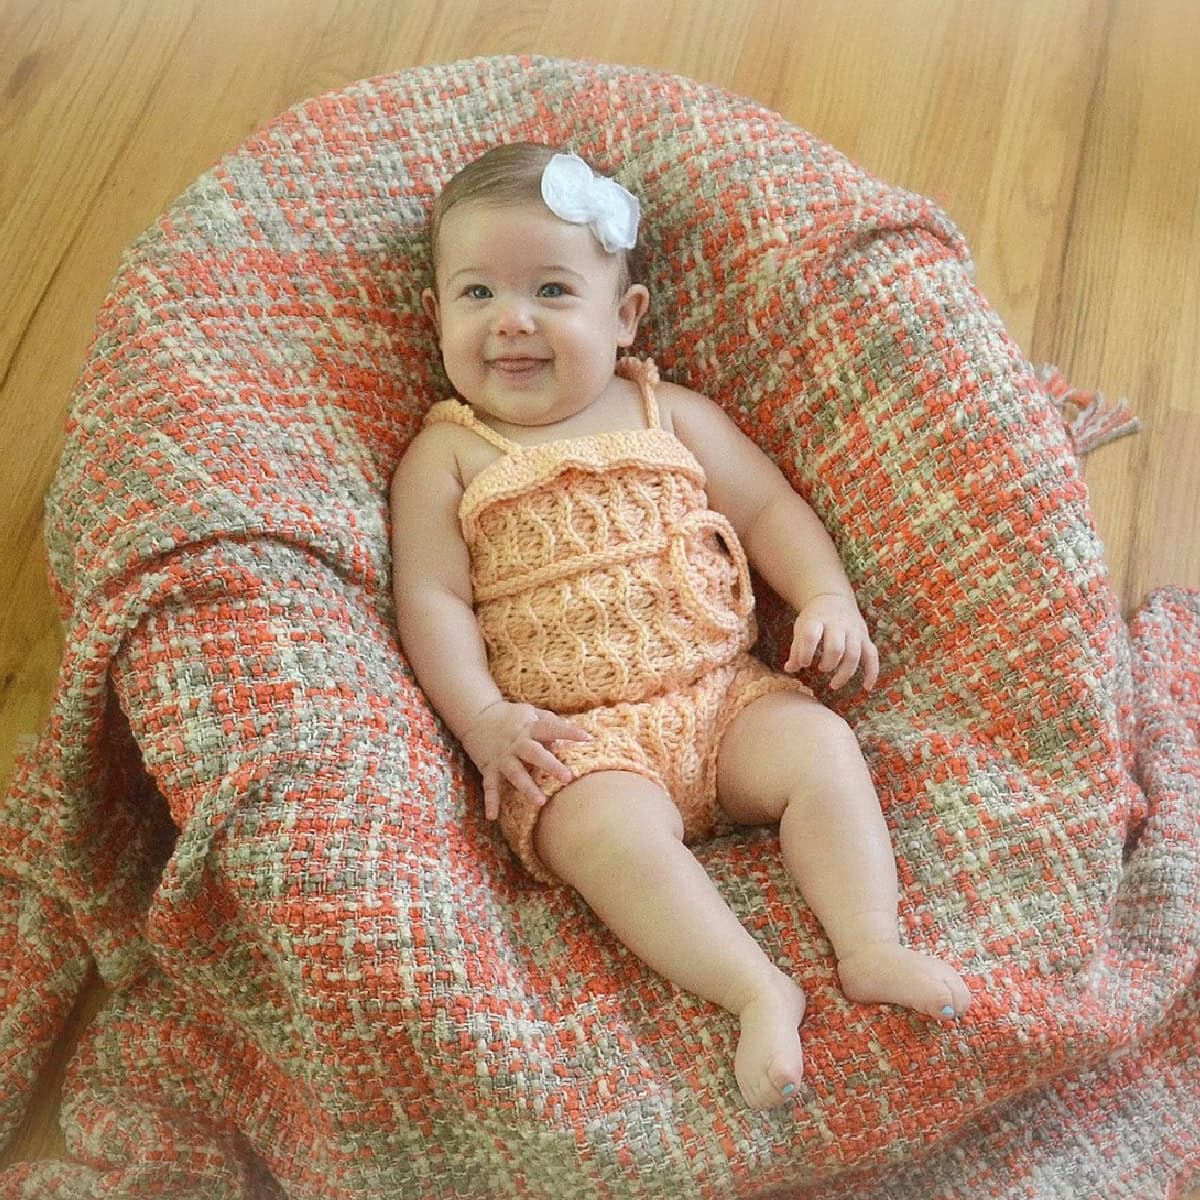
With a subtly textured waves pattern, this crochet baby romper is a trendy one-piece outfit any little fashionista would look adorable in.
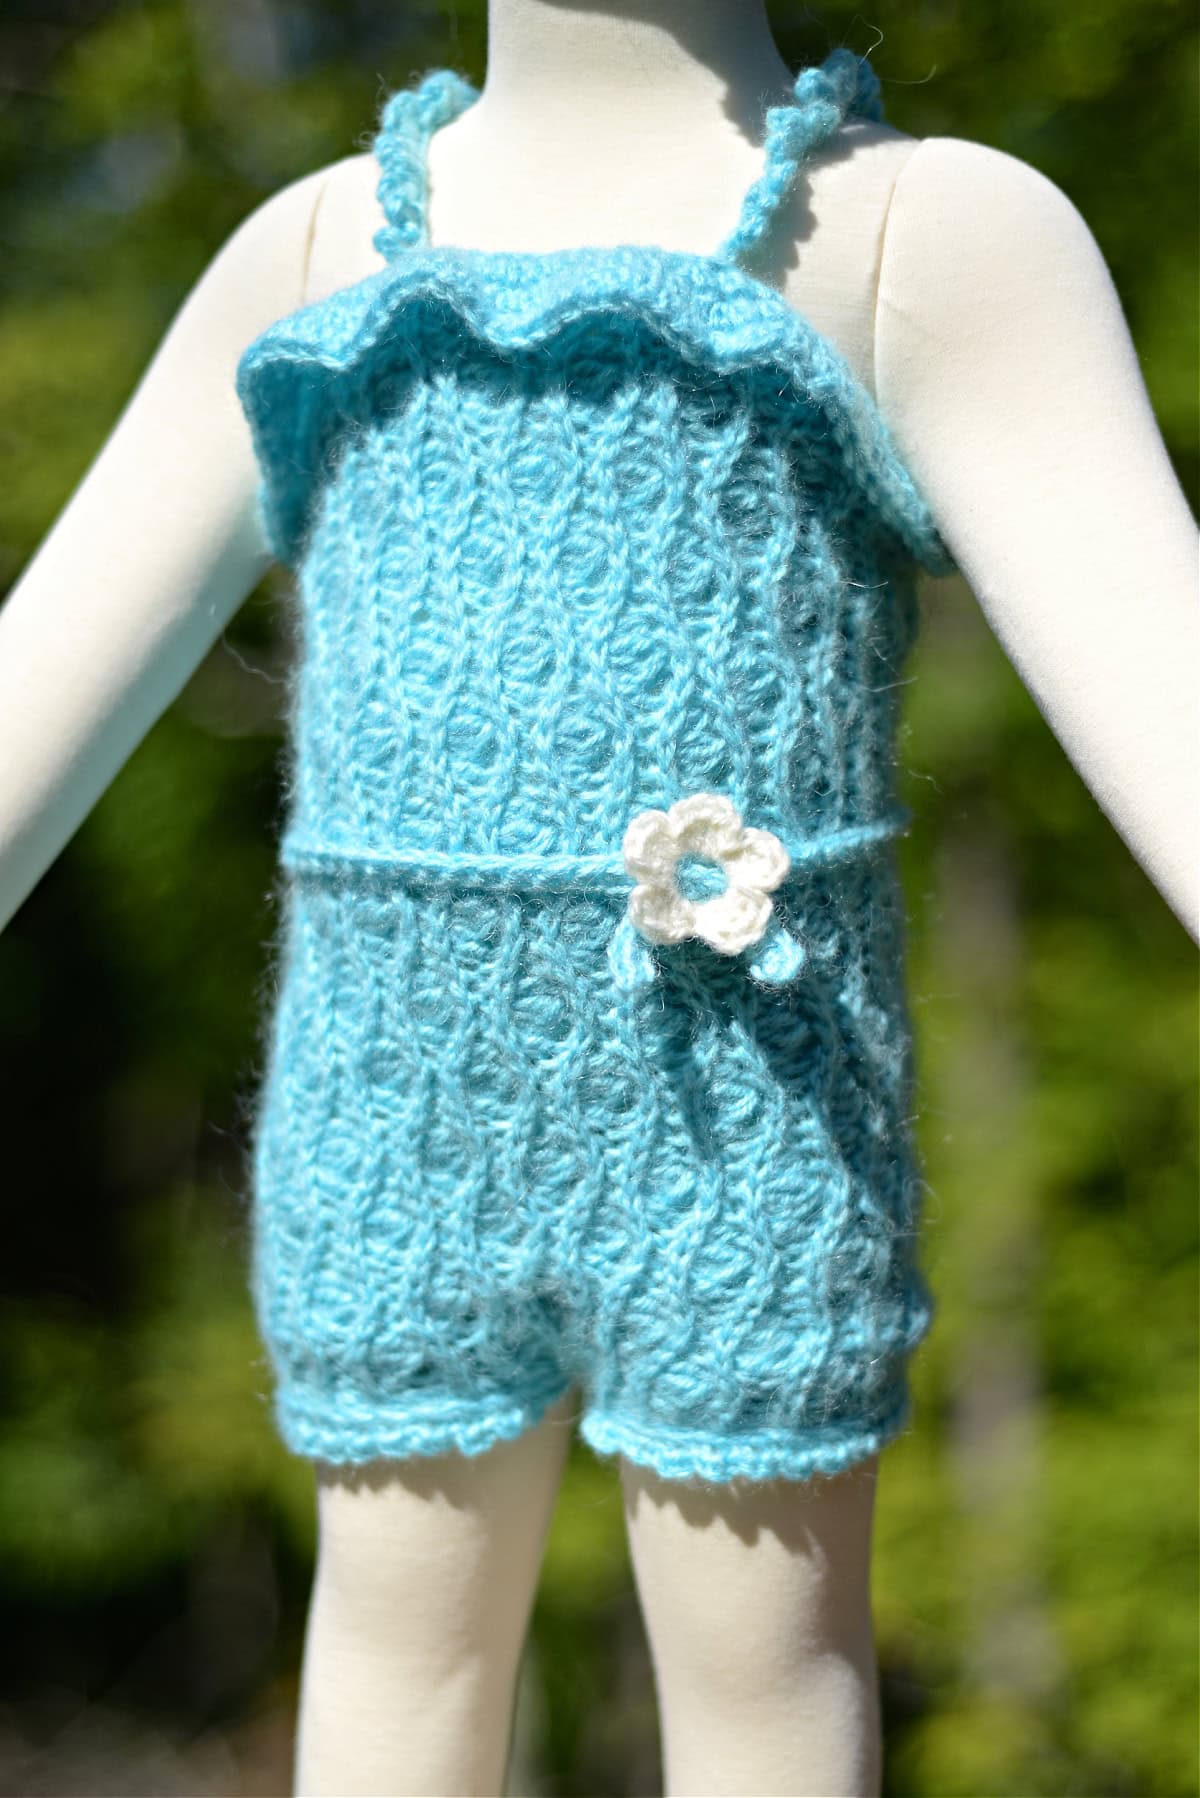
You can add a belt to it with a flower motif for extra personality or keep it as it is. Of course, since it’s handmade, you always have the option to add your little touches to it which is what sets apart your work from others. Belt or no belt, anyone who receives this romper is sure to love it!
You’ll find the free crochet tank top pattern in the post below, or you can find an ad-free printable PDF (that includes all photo tutorials) on Ravelry, or Etsy (aff).
The Summer Waves Romper is a practical garment designed for infants that can be used for a day out or photoshoot (it comes in multiple sizes). Made from soft, breathable yarn, these rompers are gentle on a baby’s skin and allow for easy movement, making them ideal for everyday wear. The one-piece design makes it easier for you to put it on anywhere, especially when baby needs a quick outfit change after a milk spill.
Personalize your crochet baby romper with different colors of yarn (maybe add an accent color) or motifs so that every baby has his or her own unique piece from you!
How to Crochet a Baby Romper
If you’re already envisioning your little one in this outfit, don’t worry about getting stuck anywhere because the construction is so easy.
You’ll start by crocheting up the crochet baby romper. It’s worked flat lengthwise, starting from the top edge to the bottom leg openings. Once the main body is ready, you’ll then seam the long edges to create a tube. This will keep your baby secure in their new romper.
After creating the leg openings, you’ll crochet a top edge ruffle and straps which bring it all together. There’s the option to add a belt and a flower motif at the end as the finishing touches.
How To Get The
Summer Waves Crochet Baby Romper Pattern
Option 1: Scroll down for the free crochet baby romper pattern right here in this blog post.
Option 2: Purchase the ad-free printable PDF from one of my shops:
Choosing Which Size to Crochet
I’ve given multiple sizes for you to choose from, between newborn to 24 months of age.
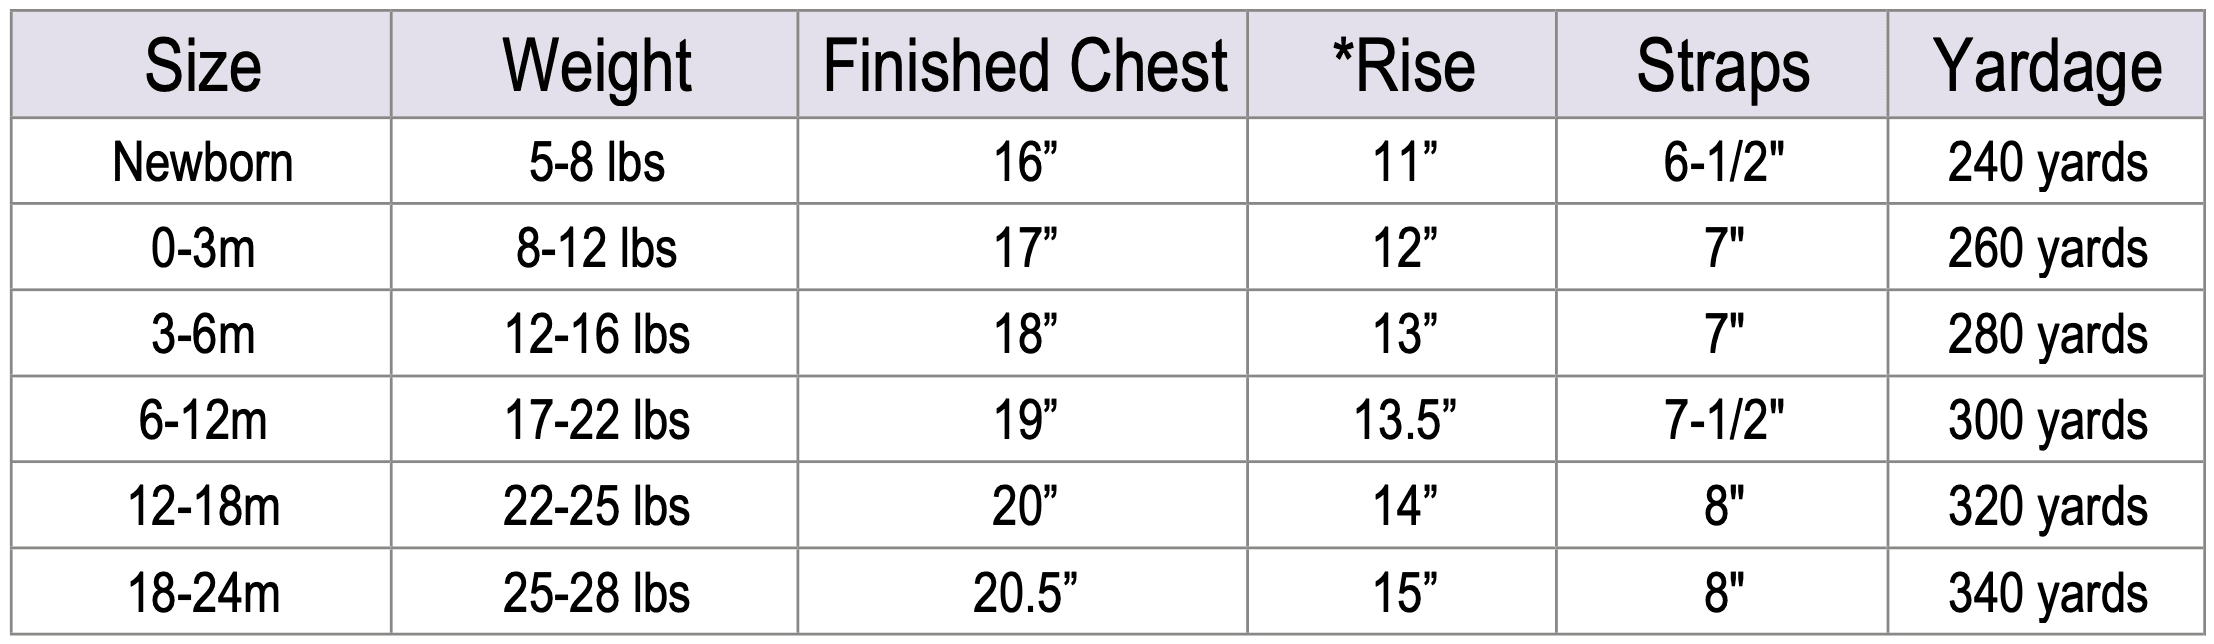
To choose the right size, look over the size chart below.
- The measurements given in the size chart are measured from the top edge of the romper, down around the diaper to the crotch.
- Please note this stitch pattern has A LOT of stretch to it. As you’re working it, you may feel like “it’ll never fit”, but don’t fret. The pattern is written based on the average size of each age, but it’s always best to go by the baby’s actual measurements when possible.
- The biggest piece of advice I can give you, that will make this pattern much more enjoyable, is to make sure you work your slip stitches loosely. If you do not, working the next row will be much harder than it needs to be.
Size & Yardage Chart
The notes above refer to this size chart.
Yarn
For the Summer Waves Romper, I used multiple yarns to crochet up the samples including Premier Alpaca Dance (which has been discontinued), Caron Simply Soft, and Lion Brand Wool Ease . You can use another worsted weight / 4 yarn as long as it’s similar in thickness and you match gauge.
Some great yarn substitutions are Lion Brand Basic Stitch (100% acrylic) and Lion Brand Touch of Alpaca (90% acrylic, 10% alpaca). Acrylic is generally a durable easy-care fiber that pairs well with garments.
Since this romper is very measurement-specific, it’s important to keep this in mind when selecting the yarn to crochet this up with. If you use a thicker worsted weight yarn, your romper will come out a little bigger and some stitches may not lay as nicely.
Summer Waves Romper – Free Crochet Pattern
The crochet baby romper pattern is free below, but if you love to work offline, I’ve got a couple other great options for you.
Purchase the ad-free, printable PDF, (that includes all photo tutorials), on Ravelry, or on Etsy (aff).
This post contains affiliate links.
Materials
- Yarn: Worsted Weight / 4 / Yarn, Premier Alpaca Dance, Caron Simply Soft, and Lion Brand Wool Ease were all used for samples.
- Yardage: See Size Chart Above
- Crochet Hooks: J/10/6.00mm; H/8/5.00mm; G/6/4.00mm; or size needed to obtain gauge (my favorite crochet hooks are the Clover Amour Crochet Hooks, I’ve never had an ache in my hand since switching).
- Scissors
- Yarn Needle
- Stitch Markers (2)
- Buttons (2): 1/4″ or 3/8″ diameter (optional)
- Slide for Belt: 3/4″ (optional)
Abbreviations (US Terms)
- ch(s): chain(s)
- sl st(s): slip stitch(es)
- st(s): stitch(es)
- sc: single crochet
- hdc: half double crochet
- ext sc: extended single crochet
- csc: chainless single crochet
- yo: yarn over
- FLO: front loop only
- BLO: back loop only
- RS: right side
- Rep: repeat
- SM: stitch marker
- cluster st
- Join yarn with a standing single crochet
- Special join technique
Experience Level
- Intermediate
Gauge
- See Gauge and Swatch Instructions below.
Sizes
- Newborn – 24 months
- See Size Chart above.
Special Stitches
- 3 DC Cluster Stitch (cluster st): yo, insert hook into designated st, yo, pull up a loop, yo, draw thru first 2 loops on hook (2 loops remaining), yo, insert hook into same st, yo, pull up a loop, yo, draw thru 2 loops on hook (3 loops remaining), yo, insert hook into same st, yo, pull up a loop, yo, draw thru 2 loops (4 loops remaining), yo, draw thru all 4 remaining loops.
- Extended Single Crochet (ext sc): Insert hook into stitch indicated, yo, pull up a loop, yo, pull thru 1 loop on hook, yo, pull thru remaining two loops on hook.
- Join yarn with a standing single crochet: Begin with a slip knot on your hook, insert your hook into the stitch or space indicated, yo, pull up a loop, yo and draw thru both loops on hook.
Pattern Notes
- Turning chains are not included in stitch count, unless noted otherwise.
- I tend to crochet more tightly. If you normally crochet loosely, I suggest going down at least a hook size to help you hit gauge.
- The first stitch of each row is worked into the same stitch as beginning chain, unless noted otherwise.
- Yarn Notes: Premier Alpaca Dance, Caron Simply Soft, and Lion Brand Wool Ease were used for samples. You can use another worsted weight / 4 yarn as long as it’s similar in thickness and you match gauge. If you use a thicker worsted weight yarn, your romper will come out a little bigger and some stitches may not lay as nicely.
- Yarn Substitutions: Premier Alpaca Dance has been discontinued and instead, you can use Lion Brand Basic Stitch (100% acrylic) or Lion Brand Touch of Alpaca (90% acrylic, 10% alpaca) which are both worsted weight yarns.
- Yardage: Refer to the size chart above.
- I strongly suggest working a gauge swatch.
- Romper Construction: This crochet baby romper is worked flat and crocheted lengthwise from the top edge to the bottom leg openings. You’ll then seam the long edges to create a tube. After creating leg openings, you’ll crochet a top edge ruffle and straps. Lastly, you’ll crochet an optional belt.
Gauge Swatch Instructions
I strongly recommend making a gauge swatch before you begin to make crochet baby rompers.
Gauge: In stitch pattern as written in the instructions below: 11 sts = 3″; 12 rows = 3″
Note: This gauge swatch is worked in the stitch pattern that comprises the majority of the romper.
Note: This entire section is worked in Back Loops Only and the first stitch of each row is worked in the same stitch as the chain 1. Make sure to double check your ending stitch count, especially on the rows of slip stitches as it’s easy to miss a stitch or two.
Tip: The biggest piece of advice I can give you, that will make this pattern much more enjoyable, is to make sure you work your slip stitches loosely. If you do not, working the next row will be much harder than it needs to be.
Row 1: With yarn & a 6.00mm crochet hook, ch 20, sl st in the 2nd ch from your hook, sl st in each of the next 4 chs, (hdc in the next ch, cluster st in the next ch, hdc in the next ch, sl st in each of the next 4 chs) work from ( to ) twice. Turn. (19 sts)
Row 2: Ch 1, working in BLO sl st in each st across. Turn. (19 sts)
Row 3: Ch 1, working in BLO for the entire row, sl st in the first st, (hdc in the next st, cluster st in the next st, hdc in the next st, sl st in each of the next 4 sts) work from ( to ) twice, hdc in the next st, cluster st in the next st, hdc in the next st, sl st in the last st. Turn. (19 sts)
Row 4: Repeat Row 2. (19 sts)
Row 5: Ch 1, working in BLO for the entire row, sl st in each of the first 5 sts, (hdc in the next st, cluster st in next st, hdc in the next st, sl st in each of the next 4 sts) work from ( to ) twice. (19 sts)
Row 6: Repeat Row 2. (19 sts)
Rows 7 – 10: Repeat Rows 3 – 6. (19 sts)
Rows 11 – 12: Repeat Rows 3 – 4. (19 sts)
Fasten off. Your swatch should measure approximately 5.25″ W x 3″ H.
Summer Waves Crochet Baby Romper Written Pattern
Newborn
Note: This stitch pattern has A LOT of stretch to it. As you’re working it, you may feel like “it’ll never fit”, but don’t fret. The pattern is written based on the average size of each age, but it’s always best to go by the baby’s actual measurements when possible.
Bodice – Newborn
In this section, you’ll crochet the bodice flat, working from the top edge to the leg openings.
Row 1 (RS): With yarn & a 6.00mm crochet hook, ch 41, sl st in the 2nd ch from your hook, sl st in each of the next 4 chs, (hdc in the next ch, cluster st in the next ch, hdc in the next ch, sl st in each of the next 4 chs) work from ( to ) 5 times. Turn. (40 sts) *Mark as Right Side.
Row 2: Ch 1, working in BLO sl st in each st across. Turn. (40 sts)
Row 3: Ch 1, working in BLO for the entire row, sl st in the first st, (hdc in the next st, cluster st in the next st, hdc in the next st, sl st in each of the next 4 sts) work from ( to ) 5 times, hdc in the next st, cluster st in the next st, hdc in the next st, sl st in the last st. Turn. (40 sts)
Row 4: Ch 1, working in BLO sl st in each st across. Turn. (40 sts)
Row 5: Ch 1, working in BLO for the entire row, sl st in each of the first 5 sts, (hdc in the next st, cluster st in the next st, hdc in the next st, sl st in each of the next 4 sts) work from ( to ) 5 times. Turn. (40 sts)
Row 6: Ch 1, working in BLO sl st in each st across. Turn. (40 sts)
Row 7: Ch 1, working in BLO for the entire row, sl st in the first st, (hdc in the next st, cluster st in the next st, hdc in the next st, sl st in each of the next 4 sts) work from ( to ) 5 times, hdc in the next st, cluster st in the next st, hdc in the next st, sl st in the last st. Turn. (40 sts)
Row 8: Ch 1, working in BLO sl st in each st across. Turn. (40 sts)
Rows 9 – 44: Rep Rows 5 – 8. (40 sts)
Rows 45 – 47: Rep Rows 5 – 7. (40 sts)
Do not fasten off. Work the seam. Do not fasten off. Continue on to the Legs.
Note: The seam will be referred to as Row 48 for the rest of the pattern for this size.
Legs – Newborn
In this section, you’ll be creating the leg openings. For round 1 of each leg, you’ll be working into the sides of the rows of the bodice.
Left Leg – Newborn
Rnd 1 (RS): Continuing on from the seam, ch 1, sc in the side of Row 48 (this is the seam row), sc in the side of the next 23 rows, leave remaining sts unworked. Join with a sl st to the first st. (24 sts)
Rnd 2: Ch 1, sl st in each st around. Join using the Special Join Technique. (24 sts)
Rnd 3: Switch to a 4.00mm crochet hook, working in the BLO of Rnd 1 sts, sc in the first st, (ch 2, sc in next st) rep around. Join with a sl st to the first st. (24 sc + 23 ch-2’s)
Fasten off. Weave in ends. Continue on to the Right Leg.
Right Leg – Newborn
Rnd 1 (RS): With yarn & a 6.00mm crochet hook, join yarn with a standing sc in the side of Row 1 (this is to the right of the seam), sc in side of the remaining 23 unworked rows from the bodice. Join with a sl st to the first st. (24 sts)
Rnd 2: Ch 1, sl st in each st around. Join using the Special Join Technique. (24 sts)
Rnd 3: Switch to a 4.00mm crochet hook, working in the BLO of Rnd 1 sts, sc in the first st, (ch 2, sc in the next st) rep around. Join with a sl st to the first st. (24 sc + 23 ch-2’s)
Fasten off. Weave in ends. Using a yarn needle and piece of yarn, sew closed the gap between the leg holes. Continue on to the Top Edge Ruffle.
Top Edge Ruffle – Newborn
Rnd 1 (RS): With yarn & a 5.00mm crochet hook, join yarn with a standing sc along the top edge, in the st to the left of the seam, sc in the side of each row around. Join. Turn. (48 sts)
Rnd 2: Ch 1, working in BLO for the entire rnd, (ext sc in each of the next 4 sts, 2 ext sc in the next st) rep from ( to ) around to the last 3 sts, ext sc in each of the last 3 sts. Join. (57 sts)
Rnd 3: Ch 1, ext sc in the first 2 sts, (ext sc in each of the next 4 sts, 2 ext sc in the next st) rep from ( to ) around. Join. (68 sts)
Rnd 4: Ch 1, (2 ext sc in the next st, ext sc in each of the next 4 sts) rep from ( to ) around to the last 3 sts, ext sc in each of the last 3 sts. Join. (81 sts)
Fasten off. Weave in ends. Continue on to the Straps.
Straps (approximate length 6-1/2”) – Newborn
Gauge: 4.25 sts = 1”
Left Strap: With yarn & a 4.00mm crochet hook, ch 31, sl st in the 2nd ch from your hook (place a SM in first st), sl st in each of the next 4 chs, (ch 4, sl st in the next ch) work from ( to ) 20 times, sl st in the next ch, skip each of the next 2 chs, sl st in the last ch. (28 sl sts + 21 ch-4s)
Fasten off. Weave in ends.
Right Strap: With yarn & a 4.00mm crochet hook, ch 31, sl st in the 2nd ch from your hook, skip each of the next 2 chs, sl st in each of the next 2 chs, (ch 4, sl st in next ch) work from ( to ) 20 times, sl st in each of the last 4 chs (place stitch marker in last st). (28 sl sts + 21 ch-4s)
Fasten off. Weave in ends.
Belt (Optional) – Newborn
Gauge: 7 sts = 2″
Option 1: With yarn & a 4.00mm crochet hook, ch 2, csc 66. Fasten off. Weave in ends. Continue on to Finishing.
Option 2: With yarn & a 4.00mm crochet hook, ch 67, sc in the 2nd ch from your hook, sc in each ch across. (66 sts) Fasten off. Weave in ends. Continue on to Finishing.
0-3 Months
Note: This stitch pattern has A LOT of stretch to it. As you’re working it, you may feel like “it’ll never fit”, but don’t fret. The pattern is written based on the average size of each age, but it’s always best to go by the baby’s actual measurements when possible.
Bodice – 0-3 Months
In this section, you’ll crochet the bodice flat, working from the top edge to the leg openings.
Row 1 (RS): With yarn & a 6.00mm crochet hook, ch 45, sl st in the 2nd ch from your hook, sl st in the next ch, (hdc in the next ch, cluster st in the next ch, hdc in the next ch, sl st in each of the next 4 chs) work from ( to ) 6 times. Turn. (44 sts) *Mark as Right Side.
Row 2: Ch 1, working in BLO sl st in each st across. Turn. (44 sts)
Row 3: Ch 1, working in BLO for the entire row, hdc in the first st, sl st in each of the next 4 sts, (hdc in the next st, cluster st in the next st, hdc in the next st, sl st in each of the next 4 sts) work from ( to ) 5 times, hdc in the next st, cluster st in the next st, hdc in the next st, sl st in the last st. Turn. (44 sts)
Row 4: Ch 1, working in BLO sl st in each st across. Turn. (44 sts)
Row 5: Ch 1, working in BLO for the entire row, sl st in the first 2 sts, (hdc in the next st, cluster st in the next st, hdc in the next st, sl st in each of the next 4 sts) work from ( to ) 6 times. Turn. (44 sts)
Row 6: Ch 1, working in BLO sl st in each st across. Turn. (44 sts)
Row 7: Ch 1, working in BLO for the entire row, hdc in the first st, sl st in each of the next 4 sts, (hdc in the next st, cluster st in the next st, hdc in the next st, sl st in each of the next 4 sts) work from ( to ) 5 times, hdc in the next st, cluster st in the next st, hdc in the next st, sl st in the last st. Turn. (44 sts)
Row 8: Ch 1, working in BLO sl st in each st across. Turn. (44 sts)
Rows 9 – 48: Rep Rows 5 – 8. (44 sts)
Rows 49 – 51: Rep Rows 5 – 7. (44 sts)
Do not fasten off. Work the seam. Do not fasten off. Continue on to the Legs.
Note: The seam will be referred to as Row 52 for the rest of the pattern for this size.
Legs – 0-3 Months
In this section, you’ll be creating the leg openings. For round 1 of each leg, you’ll be working into the sides of the rows of the bodice.
Left Leg – 0-3 Months
Rnd 1 (RS): Continuing on from the seam, ch 1, sc in the side of Row 52 (this is the seam row), sc in the side of next 25 rows, leave remaining sts unworked. Join with a sl st to the first st. (26 sts)
Rnd 2: Ch 1, sl st in each st around. Join using the Special Join Technique. (26 sts)
Rnd 3: Switch to a 4.00mm crochet hook, working in the BLO of Rnd 1 sts, sc in the first st, (ch 2, sc in the next st) rep around. Join with a sl st to first st. (26 sc + 25 ch-2’s)
Fasten off. Weave in ends. Continue on to the Right Leg.
Right Leg – 0-3 Months
Rnd 1 (RS): With yarn & a 6.00mm crochet hook, join yarn with a standing sc in the side of Row 1 (this is to the right of the seam), sc in side of the remaining 25 unworked rows from the bodice. Join with a sl st to the first st. (26 sts)
Rnd 2: Ch 1, sl st in each st around. Join using the Special Join Technique. (26 sts)
Rnd 3: Switch to a 4.00mm crochet hook, working in the BLO of Rnd 1 sts, sc in the first st, (ch 2, sc in the next st) rep around. Join with a sl st to the first st. (26 sc + 25 ch-2’s)
Fasten off. Weave in ends. Using a yarn needle and piece of yarn, sew closed the gap between the leg holes. Continue on to the Top Edge Ruffle.
Top Edge Ruffle – 0-3 Months
Rnd 1 (RS): With yarn & a 5.00mm crochet hook, join yarn with a standing sc along the top edge, in the st to the left of the seam, sc in the side of each row around. Join. Turn. (52 sts)
Rnd 2: Ch 1, working in BLO for the entire rnd, (ext sc in each of the next 4 sts, 2 ext sc in the next st) rep from ( to ) around to the last 2 sts, ext sc in each of the last 2 sts. Join. (62 sts)
Rnd 3: Ch 1, ext sc in the first 2 sts, (2 ext sc in the next st, ext sc in each of the next 4 sts) rep from ( to ) around. Join. (74 sts)
Rnd 4: Ch 1, (2 ext sc in the next st, ext sc in each of the next 4 sts) rep from ( to ) around to the last 4 sts, ext sc in each of the last 4 sts. Join. (88 sts)
Fasten off. Weave in ends. Continue on to the Straps.
Straps (approximate length 7”) – 0-3 Months
Gauge: 4.25 sts = 1”
Left Strap: With yarn & a 4.00mm crochet hook, ch 33, sl st in the 2nd ch from your hook (place a SM in first st), sl st in each of the next 6 chs, (ch 4, sl st in the next ch) work from ( to ) 20 times, sl st in the next ch, skip each of the next 2 chs, sl st in the last ch. (30 sl sts + 21 ch-4s)
Fasten off. Weave in ends.
Right Strap: With yarn & a 4.00mm crochet hook, ch 33, sl st in the 2nd ch from your hook, skip each of the next 2 chs, sl st in each of the next 2 chs, (ch 4, sl st in next ch) work from ( to ) 20 times, sl st in each of the last 6 chs (place stitch marker in last st). (30 sl sts + 21 ch-4s)
Fasten off. Weave in ends.
Belt (Optional) – 0-3 Months
Gauge: 7 sts = 2″
Option 1: With yarn & a 4.00mm crochet hook, ch 2, csc 75. Fasten off. Weave in ends. Continue on to Finishing.
Option 2: With yarn & a 4.00mm crochet hook, ch 76, sc in the 2nd ch from your hook, sc in each ch across. (75 sts) Fasten off. Weave in ends. Continue on to Finishing.
3-6 Months
Note: This stitch pattern has A LOT of stretch to it. As you’re working it, you may feel like “it’ll never fit”, but don’t fret. The pattern is written based on the average size of each age, but it’s always best to go by the baby’s actual measurements when possible.
Bodice – 3-6 Months
In this section, you’ll crochet the bodice flat, working from the top edge to the leg openings.
Row 1 (RS): With yarn & a 6.00mm crochet hook, ch 49, hdc in the 2nd ch from your hook, hdc in the next ch, sl st in each of the next 4 chs, (hdc in the next ch, cluster st in the next ch, hdc in the next ch, sl st in each of the next 4 chs) work from ( to ) 6 times. Turn. (48 sts) *Mark as Right Side.
Row 2: Ch 1, working in BLO sl st in each st across. Turn. (48 sts)
Row 3: Ch 1, working in BLO for the entire row, sl st in each of the first 2 sts, (hdc in the next st, cluster st in the next st, hdc in the next st, sl st in each of the next 4 sts) work from ( to ) 6 times, hdc in the next st, cluster st in the next st, hdc in the next st, sl st in the last st. Turn. (48 sts)
Row 4: Ch 1, working in BLO sl st in each st across. Turn. (48 sts)
Row 5: Ch 1, working in BLO for the entire row, hdc in each of the first 2 sts, sl st in each of the next 4 sts, (hdc in the next st, cluster st in the next st, hdc in the next st, sl st in each of the next 4 sts) work from ( to ) 6 times. Turn. (48 sts)
Row 6: Ch 1, working in BLO sl st in each st across. Turn. (48 sts)
Row 7: Ch 1, working in BLO for the entire row, sl st in each of the first 2 sts, (hdc in the next st, cluster st in the next st, hdc in the next st, sl st in each of the next 4 sts) work from ( to ) 6 times, hdc in the next st, cluster st in the next st, hdc in the next st, sl st in the last st. Turn. (48 sts)
Row 8: Ch 1, working in BLO sl st in each st across. Turn. (48 sts)
Rows 9 – 52: Rep Rows 5 – 8. (48 sts)
Rows 53 – 55: Rep Rows 5 – 7. (48 sts)
Do not fasten off. Work the seam. Do not fasten off. Continue on to the Legs.
Note: The seam will be referred to as Row 56 for the rest of the pattern for this size.
Legs – 3-6 Months
In this section, you’ll be creating the leg openings. For round 1 of each leg, you’ll be working into the sides of the rows of the bodice.
Left Leg – 3-6 Months
Rnd 1 (RS): Continuing on from the seam, ch 1, sc in the side of Row 56 (this is the seam row), sc in the side of next 27 rows, leave remaining sts unworked. Join with a sl st to the first st. (28 sts)
Rnd 2: Ch 1, sl st in each st around. Join using the Special Join Technique. (28 sts)
Rnd 3: Switch to a 4.00mm crochet hook, working in the BLO of Rnd 1 sts, sc in the first st, (ch 2, sc in the next st) rep around. Join with a sl st to first st. (28 sc + 27 ch-2’s)
Fasten off. Weave in ends. Continue on to the Right Leg.
Right Leg – 3-6 Months
Rnd 1 (RS): With yarn & a 6.00mm crochet hook, join yarn with a standing sc in the side of Row 1 (this is to the right of the seam), sc in side of the remaining 27 unworked rows from the bodice. Join with a sl st to the first st. (28 sts)
Rnd 2: Ch 1, sl st in each st around. Join using the Special Join Technique. (28 sts)
Rnd 3: Switch to a 4.00mm crochet hook, working in the BLO of Rnd 1 sts, sc in the first st, (ch 2, sc in the next st) rep around. Join with a sl st to the first st. (28 sc + 27 ch-2’s)
Fasten off. Weave in ends. Using a yarn needle and piece of yarn, sew closed the gap between the leg holes. Continue on to the Top Edge Ruffle.
Top Edge Ruffle – 3-6 Months
Rnd 1 (RS): With yarn & a 5.00mm crochet hook, join yarn with a standing sc along the top edge, in the st to the left of the seam, sc in the side of each row around. Join. Turn. (56 sts)
Rnd 2: Ch 1, working in BLO for the entire rnd, (ext sc in each of the next 4 sts, 2 ext sc in the next st) rep from ( to ) around to the last st, ext sc in the last st. Join. (67 sts)
Rnd 3: Ch 1, ext sc in the first 4 sts, (2 ext sc in the next st, ext sc in each of the next 4 sts) rep from ( to ) around. Join. (80 sts)
Rnd 4: Ch 1, (2 ext sc in the next st, ext sc in each of the next 4 sts) rep from ( to ) around to the last 4 sts, ext sc in each of the last 4 sts. Join. (96 sts)
Fasten off. Weave in ends. Continue on to the Straps.
Straps (approximate length 7”) – 3-6 Months
Gauge: 4.25 sts = 1”
Left Strap: With yarn & a 4.00mm crochet hook, ch 33, sl st in the 2nd ch from your hook (place a SM in first st), sl st in each of the next 6 chs, (ch 4, sl st in the next ch) work from ( to ) 20 times, sl st in the next ch, skip each of the next 2 chs, sl st in the last ch. (30 sl sts + 21 ch-4s)
Fasten off. Weave in ends.
Right Strap: With yarn & a 4.00mm crochet hook, ch 33, sl st in the 2nd ch from your hook, skip each of the next 2 chs, sl st in each of the next 2 chs, (ch 4, sl st in next ch) work from ( to ) 20 times, sl st in each of the last 6 chs (place stitch marker in last st). (30 sl sts + 21 ch-4s)
Fasten off. Weave in ends.
Belt (Optional) – 3-6 Months
Gauge: 7 sts = 2″
Option 1: With yarn & a 4.00mm crochet hook, ch 2, csc 80. Fasten off. Weave in ends. Continue on to Finishing.
Option 2: With yarn & a 4.00mm crochet hook, ch 81, sc in the 2nd ch from your hook, sc in each ch across. (80 sts) Fasten off. Weave in ends. Continue on to Finishing.
6-12 Months
Note: This stitch pattern has A LOT of stretch to it. As you’re working it, you may feel like “it’ll never fit”, but don’t fret. The pattern is written based on the average size of each age, but it’s always best to go by the baby’s actual measurements when possible.
Bodice – 6-12 Months
In this section, you’ll crochet the bodice flat, working from the top edge to the leg openings.
Row 1 (RS): With yarn & a 6.00mm crochet hook, ch 51, sl st in the 2nd ch from your hook, (hdc in the next ch, cluster st in the next ch, hdc in the next ch, sl st in each of the next 4 chs) work from ( to ) 7 times. Turn. (50 sts) *Mark as Right Side.
Row 2: Ch 1, working in BLO sl st in each st across. Turn. (50 sts)
Row 3: Ch 1, working in BLO for the entire row, sl st in each of the first 4 sts, (hdc in the next st, cluster st in the next st, hdc in the next st, sl st in the next 4 sts) work from ( to ) 6 times, hdc in the next st, cluster st in the next st, hdc in the next st, sl st in the last st. Turn. (50 sts)
Row 4: Ch 1, working in BLO sl st in each st across. Turn. (50 sts)
Row 5: Ch 1, working in BLO for the entire row, sl st in the first st, (hdc in the next st, cluster st in the next st, hdc in the next st, sl st in each of the next 4 sts) work from ( to ) 7 times. Turn. (50 sts)
Row 6: Ch 1, working in BLO sl st in each st across. Turn. (50 sts)
Row 7: Ch 1, working in BLO for the entire row, sl st in each of the first 4 sts, (hdc in the next st, cluster st in the next st, hdc in the next st, sl st in each of the next 4 sts) work from ( to ) 6 times, hdc in the next st, cluster st in the next st, hdc in the next st, sl st in the last st. Turn. (50 sts)
Row 8: Ch 1, working in BLO sl st in each st across. Turn. (50 sts)
Rows 9 – 56: Rep Rows 5 – 8. (50 sts)
Rows 57 – 59: Rep Rows 5 – 7. (50 sts)
Do not fasten off. Work the seam. Do not fasten off. Continue on to the Legs.
Note: The seam will be referred to as Row 60 for the rest of the pattern for this size.
Legs – 6-12 Months
In this section, you’ll be creating the leg openings. For round 1 of each leg, you’ll be working into the sides of the rows of the bodice.
Left Leg – 6-12 Months
Rnd 1 (RS): Continuing on from the seam, ch 1, sc in the side of Row 60 (this is the seam row), sc in the side of next 29 rows, leave remaining sts unworked. Join with a sl st to the first st. (30 sts)
Rnd 2: Ch 1, sl st in each st around. Join using the Special Join Technique. (30 sts)
Rnd 3: Switch to a 4.00mm crochet hook, working in the BLO of Rnd 1 sts, sc in the first st, (ch 2, sc in the next st) rep around. Join with a sl st to first st. (30 sc + 29 ch-2’s)
Fasten off. Weave in ends. Continue on to the Right Leg.
Right Leg – 6-12 Months
Rnd 1 (RS): With yarn & a 6.00mm crochet hook, join yarn with a standing sc in the side of Row 1 (this is to the right of the seam), sc in side of the remaining 29 unworked rows from the bodice. Join with a sl st to the first st. (30 sts)
Rnd 2: Ch 1, sl st in each st around. Join using the Special Join Technique. (30 sts)
Rnd 3: Switch to a 4.00mm crochet hook, working in the BLO of Rnd 1 sts, sc in the first st, (ch 2, sc in the next st) rep around. Join with a sl st to the first st. (30 sc + 29 ch-2’s)
Fasten off. Weave in ends. Using a yarn needle and piece of yarn, sew closed the gap between the leg holes. Continue on to the Top Edge Ruffle.
Top Edge Ruffle – 6-12 Months
Rnd 1 (RS): With yarn & a 5.00mm crochet hook, join yarn with a standing sc along the top edge, in the st to the left of the seam, sc in the side of each row around. Join. Turn. (60 sts)
Rnd 2: Ch 1, working in BLO for the entire rnd, (ext sc in each of the next 4 sts, 2 ext sc in the next st) rep from ( to ) around. Join. (72 sts)
Rnd 3: Ch 1, ext sc in the first 2 sts, (2 ext sc in the next st, ext sc in each of the next 4 sts) rep from ( to ) around. Join. (86 sts)
Rnd 4: Ch 1, (2 ext sc in the next st, ext sc in each of the next 4 sts) rep from ( to ) around to the last st, ext sc in the last st. Join. (103 sts)
Fasten off. Weave in ends. Continue on to the Straps.
Straps (approximate length 7-1/2”) – 6-12 Months
Gauge: 4.25 sts = 1”
Left Strap: With yarn & a 4.00mm crochet hook, ch 35, sl st in the 2nd ch from your hook (place a SM in first st), sl st in each of the next 6 chs, (ch 4, sl st in the next ch) work from ( to ) 22 times, sl st in the next ch, skip each of the next 2 chs, sl st in the last ch. (32 sl sts + 23 ch-4s)
Fasten off. Weave in ends.
Right Strap: With yarn & a 4.00mm crochet hook, ch 35, sl st in the 2nd ch from your hook, skip each of the next 2 chs, sl st in each of the next 2 chs, (ch 4, sl st in next ch) work from ( to ) 22 times, sl st in each of the last 6 chs (place stitch marker in last st). (32 sl sts + 23 ch-4s)
Fasten off. Weave in ends.
Belt (Optional) – 6-12 Months
Gauge: 7 sts = 2″
Option 1: With yarn & a 4.00mm crochet hook, ch 2, csc 90. Fasten off. Weave in ends. Continue on to Finishing.
Option 2: With yarn & a 4.00mm crochet hook, ch 91, sc in the 2nd ch from your hook, sc in each ch across. (90 sts) Fasten off. Weave in ends. Continue on to Finishing.
12-18 Months
Note: This stitch pattern has A LOT of stretch to it. As you’re working it, you may feel like “it’ll never fit”, but don’t fret. The pattern is written based on the average size of each age, but it’s always best to go by the baby’s actual measurements when possible.
Bodice – 12-18 Months
In this section, you’ll crochet the bodice flat, working from the top edge to the leg openings.
Row 1 (RS): With yarn & a 6.00mm crochet hook, ch 53, sl st in the 2nd ch from your hook, sl st in each of the next 2 chs, (hdc in the next ch, cluster st in the next ch, hdc in the next ch, sl st in each of the next 4 chs) work from ( to ) 7 times. Turn. (52 sts) *Mark as Right Side.
Row 2: Ch 1, working in BLO sl st in each st across. Turn. (52 sts)
Row 3: Ch 1, working in BLO for the entire row, hdc in each of the first 2 sts, sl st in each of the next 4 sts, (hdc in the next st, cluster st in the next st, hdc in the next st, sl st in each of the next 4 sts) work from ( to ) 6 times, hdc in the next st, cluster st in the next st, hdc in the next st, sl st in the last st. Turn. (52 sts)
Row 4: Ch 1, working in BLO sl st in each st across. Turn. (52 sts)
Row 5: Ch 1, working in BLO for the entire row, sl st in each of the first 3 sts, (hdc in the next st, cluster st in the next st, hdc in the next st, sl st in each of the next 4 sts) work from ( to ) 7 times. Turn. (52 sts)
Row 6: Ch 1, working in BLO sl st in each st across. Turn. (52 sts)
Row 7: Ch 1, working in BLO for the entire row, hdc in each of the first 2 sts, sl st in each of the next 4 sts, (hdc in the next st, cluster st in the next st, hdc in the next st, sl st in each of the next 4 sts) work from ( to ) 6 times, hdc in the next st, cluster st in the next st, hdc in the next st, sl st in the last st. Turn. (52 sts)
Row 8: Ch 1, working in BLO sl st in each st across. Turn. (52 sts)
Rows 9 – 60: Rep Rows 5 – 8. Turn. (52 sts)
Rows 61 – 63: Rep Rows 5 – 7. Turn. (52 sts)
Do not fasten off. Work the seam. Do not fasten off. Continue on to the Legs.
Note: The seam will be referred to as Row 64 for the rest of the pattern for this size.
Legs – 12-18 Months
In this section, you’ll be creating the leg openings. For round 1 of each leg, you’ll be working into the sides of the rows of the bodice.
Left Leg – 12-18 Months
Rnd 1 (RS): Continuing on from the seam, ch 1, sc in the side of Row 64 (this is the seam row), sc in the side of next 31 rows, leave remaining sts unworked. Join with a sl st to the first st. (32 sts)
Rnd 2: Ch 1, sl st in each st around. Join using the Special Join Technique. (32 sts)
Rnd 3: Switch to a 4.00mm crochet hook, working in the BLO of Rnd 1 sts, sc in the first st, (ch 2, sc in the next st) rep around. Join with a sl st to first st. (32 sc + 31 ch-2’s)
Fasten off. Weave in ends. Continue on to the Right Leg.
Right Leg – 12-18 Months
Rnd 1 (RS): With yarn & a 6.00mm crochet hook, join yarn with a standing sc in the side of Row 1 (this is to the right of the seam), sc in side of the remaining 31 unworked rows from the bodice. Join with a sl st to the first st. (32 sts)
Rnd 2: Ch 1, sl st in each st around. Join using the Special Join Technique. (32 sts)
Rnd 3: Switch to a 4.00mm crochet hook, working in the BLO of Rnd 1 sts, sc in the first st, (ch 2, sc in the next st) rep around. Join with a sl st to the first st. (32 sc + 31 ch-2’s)
Fasten off. Weave in ends. Using a yarn needle and piece of yarn, sew closed the gap between the leg holes. Continue on to the Top Edge Ruffle.
Top Edge Ruffle – 12-18 Months
Rnd 1 (RS): With yarn & a 5.00mm crochet hook, join yarn with a standing sc along the top edge, in the st to the left of the seam, sc in the side of each row around. Join. Turn. (64 sts)
Rnd 2: Ch 1, working in BLO for the entire rnd, (ext sc in each of the next 4 sts, 2 ext sc in the next st) rep from ( to ) around to the last 4 sts, ext sc in each of the last 4 sts. Join. (76 sts)
Rnd 3: Ch 1, ext sc in the first st, (2 ext sc in the next st, ext sc in each of the next 4 sts) rep from ( to ) around. Join. (91 sts)
Rnd 4: Ch 1, (2 ext sc in the next st, ext sc in each of the next 4 sts) rep from ( to ) around to the last st, ext sc in the last st. Join. (109 sts)
Fasten off. Weave in ends. Continue on to the Straps.
Straps (approximate length 8”) – 12-18 Months
Gauge: 4.25 sts = 1”
Left Strap: With yarn & a 4.00mm crochet hook, ch 37, sl st in the 2nd ch from your hook (place a SM in first st), sl st in each of the next 6 chs, (ch 4, sl st in the next ch) work from ( to ) 24 times, sl st in the next ch, skip each of the next 2 chs, sl st in the last ch. (34 sl sts + 25 ch-4s)
Fasten off. Weave in ends.
Right Strap: With yarn & a 4.00mm crochet hook, ch 37, sl st in the 2nd ch from your hook, skip each of the next 2 chs, sl st in each of the next 2 chs, (ch 4, sl st in next ch) work from ( to ) 24 times, sl st in each of the last 6 chs (place stitch marker in last st). (34 sl sts + 25 ch-4s)
Fasten off. Weave in ends.
Belt (Optional) – 12-18 Months
Gauge: 7 sts = 2″
Option 1: With yarn & a 4.00mm crochet hook, ch 2, csc 95. Fasten off. Weave in ends. Continue on to Finishing.
Option 2: With yarn & a 4.00mm crochet hook, ch 96, sc in the 2nd ch from your hook, sc in each ch across. (95 sts) Fasten off. Weave in ends. Continue on to Finishing.
18-24 Months
Note: This stitch pattern has A LOT of stretch to it. As you’re working it, you may feel like “it’ll never fit”, but don’t fret. The pattern is written based on the average size of each age, but it’s always best to go by the baby’s actual measurements when possible.
Bodice – 18-24 Months
In this section, you’ll crochet the bodice flat, working from the top edge to the leg openings.
Row 1 (RS): With yarn & a 6.00mm crochet hook, ch 57, hdc in the 2nd ch from your hook, cluster st in the next ch, hdc in the next ch, sl st in each of the next 4 chs, (hdc in the next ch, cluster st in the next ch, hdc in the next ch, sl st in each of the next 4 chs) work from ( to ) 7 times. Turn. (56 sts) *Mark as Right Side.
Row 2: Ch 1, working in BLO sl st in each st across. Turn. (56 sts)
Row 3: Ch 1, working in BLO for the entire row, sl st in each of the first 3 sts, (hdc in the next st, cluster st in the next st, hdc in the next st, sl st in each of the next 4 sts) work from ( to ) 7 times, hdc in the next st, cluster st in the next st, hdc in the next st, sl st in the last st. Turn. (56 sts)
Row 4: Ch 1, working in BLO sl st in each st across. Turn. (56 sts)
Row 5: Ch 1, working in BLO for the entire row, (hdc in the next st, cluster st in the next st, hdc in the next st, sl st in each of the next 4 sts) work from ( to ) 8 times. Turn. (56 sts)
Row 6: Ch 1, working in BLO sl st in each st across. Turn. (56 sts)
Row 7: Ch 1, working in BLO for the entire row, sl st in each of the first 3 sts, (hdc in the next st, cluster st in the next st, hdc in the next st, sl st in each of the next 4 sts) work from ( to ) 7 times, hdc in the next st, cluster st in the next st, hdc in the next st, sl st in the last st. Turn. (56 sts)
Row 8: Ch 1, working in BLO sl st in each st across. Turn. (56 sts)
Rows 9 – 64: Rep Rows 5 – 8. (56 sts)
Rows 65 – 67: Rep Rows 5 – 7. (56 sts)
Do not fasten off. Work the seam. Do not fasten off. Continue on to the Legs.
Note: The seam will be referred to as Row 68 for the rest of the pattern for this size.
Legs – 18-24 Months
In this section, you’ll be creating the leg openings. For round 1 of each leg, you’ll be working into the sides of the rows of the bodice.
Left Leg – 18-24 Months
Rnd 1 (RS): Continuing on from the seam, ch 1, sc in the side of Row 68 (this is the seam row), sc in the side of next 33 rows, leave remaining sts unworked. Join with a sl st to the first st. (34 sts)
Rnd 2: Ch 1, sl st in each st around. Join using the Special Join Technique. (34 sts)
Rnd 3: Switch to a 4.00mm crochet hook, working in the BLO of Rnd 1 sts, sc in the first st, (ch 2, sc in the next st) rep around. Join with a sl st to first st. (34 sc + 33 ch-2’s)
Fasten off. Weave in ends. Continue on to the Right Leg.
Right Leg – 18-24 Months
Rnd 1 (RS): With yarn & a 6.00mm crochet hook, join yarn with a standing sc in the side of Row 1 (this is to the right of the seam), sc in side of the remaining 33 unworked rows from the bodice. Join with a sl st to the first st. (34 sts)
Rnd 2: Ch 1, sl st in each st around. Join using the Special Join Technique. (34 sts)
Rnd 3: Switch to a 4.00mm crochet hook, working in the BLO of Rnd 1 sts, sc in the first st, (ch 2, sc in the next st) rep around. Join with a sl st to the first st. (34 sc + 33 ch-2’s)
Fasten off. Weave in ends. Using a yarn needle and piece of yarn, sew closed the gap between the leg holes. Continue on to the Top Edge Ruffle.
Top Edge Ruffle – 18-24 Months
Rnd 1 (RS): With yarn & a 5.00mm crochet hook, join yarn with a standing sc along the top edge, in the st to the left of the seam, sc in the side of each row around. Join. Turn. (68 sts)
Rnd 2: Ch 1, working in BLO for the entire rnd, (ext sc in each of the next 4 sts, 2 ext sc in the next st) rep from ( to ) around to the last 3 sts, ext sc in each of the last 3 sts. Join. (81 sts)
Rnd 3: Ch 1, ext sc in the first st, (2 ext sc in the next st, ext sc in each of the next 4 sts) rep from ( to ) around. Join. (97 sts)
Rnd 4: Ch 1, (2 ext sc in the next st, ext sc in each of the next 4 sts) rep from ( to ) around to the last 2 sts, ext sc in each of the last 2 sts. Join. (116 sts)
Fasten off. Weave in ends. Continue on to the Straps.
Straps (approximate length 8”) – 18-24 Months
Gauge: 4.25 sts = 1”
Left Strap: With yarn & a 4.00mm crochet hook, ch 37, sl st in the 2nd ch from your hook (place a SM in first st), sl st in each of the next 6 chs, (ch 4, sl st in the next ch) work from ( to ) 24 times, sl st in the next ch, skip each of the next 2 chs, sl st in the last ch. (34 sl sts + 25 ch-4s)
Fasten off. Weave in ends.
Right Strap: With yarn & a 4.00mm crochet hook, ch 37, sl st in the 2nd ch from your hook, skip each of the next 2 chs, sl st in each of the next 2 chs, (ch 4, sl st in next ch) work from ( to ) 24 times, sl st in each of the last 6 chs (place stitch marker in last st). (34 sl sts + 25 ch-4s)
Fasten off. Weave in ends.
Belt (Optional) – 18-24 Months
Gauge: 7 sts = 2″
Option 1: With yarn & a 4.00mm crochet hook, ch 2, csc 100. Fasten off. Weave in ends. Continue on to Finishing.
Option 2: With yarn & a 4.00mm crochet hook, ch 101, sc in the 2nd ch from your hook, sc in each ch across. (100 sts) Fasten off. Weave in ends. Continue on to Finishing.
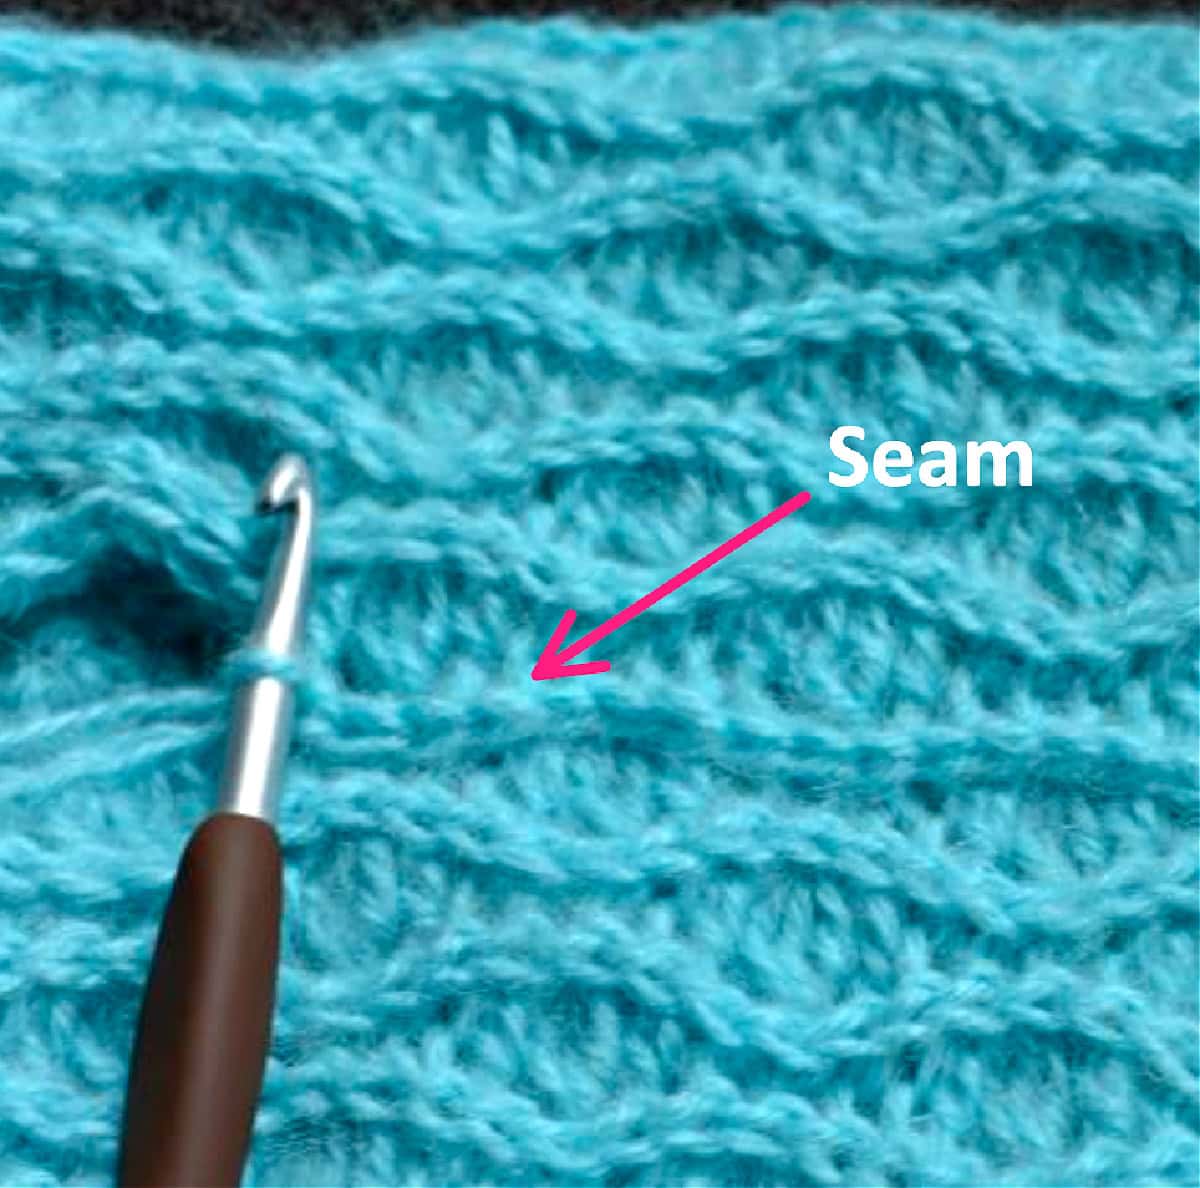
Barely There Seam – Written Instructions
Changes for sizes are written as follows: Newborn (0-3m, 3-6m, 6-12m, 12-18m, 18-24m)
Keep working yarn on the inside of the romper while seaming. With Right Side on the outside, bring Row 1 up to meet Row 47 ( 51, 55, 59, 63, 67). Sl st rows together by inserting your hook into the FLO (insert hook from front to back) of st from Row 1, then insert your hook into the BLO of a st from Row 47 ( 51, 55, 59, 63, 67) (insert hook from back to front), yo, pull thru all loops to complete sl st, repeat across. 40 ( 44, 48, 50, 52, 56) sts
Do Not Fasten Off. Continue on to legs.
Note: The seam row counts as a row in the bodice of your romper. Work into the side of the seam row just like you will for all other rows when working the legs and top edge ruffle.
Barely There Seam – Photo Tutorial
Changes for Sizes are written as follows: Newborn (0-3m, 3-6m, 6-12m, 12-18m, 18-24m)
The most important part of creating this seam is your hook placement. Read the instructions carefully and take a moment to identify each loop before starting. Once you work the first one properly, the rest are a piece of cake… or pie… or whatever suits your fancy.
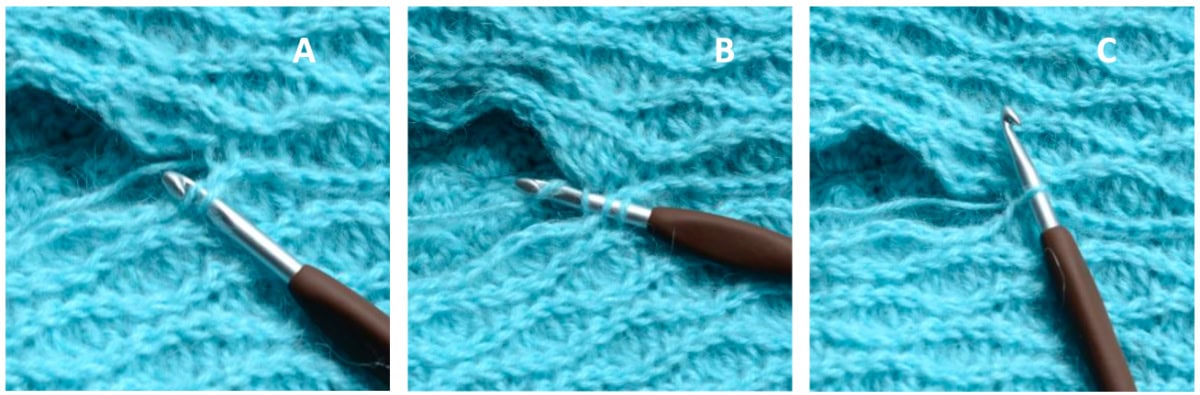
Photo B: Insert your hook into the BLO of a st from Row 47 ( 51, 55, 59, 63, 67) (insert hook from back to front).
Photo C: Yarn over, pull thru all loops to complete sl st, repeat across. 40 ( 44, 48, 50, 52, 56) sts
Finishing (All Sizes)
Changes for sizes are written as follows: Newborn (0-3m, 3-6m, 6-12m, 12-18m, 18-24m)
Attach Straps: Using a yarn needle and piece of yarn, sew the ends of the left & right shoulder straps (that have the stitch marker), to the front inside of romper. Attach the straps 2.5″ ( 2.75″, 3″, 3.25″, 3.5″, 3.75″) apart.
Attach Buttons: Position the buttons 2.25″ ( 2.50″, 2.75″, 3″, 3.25″, 3.50″) apart, on the inside of the back of the romper. Using a needle and thread, sew the buttons on to the inside of the back of the romper.
Belt and slide are both optional. You can work a longer belt (as written) and tie it in a bow if you prefer, or you can use a simple thin chain and tie it in a bow.
Attach Belt: Wrap belt around the bodice of the romper. Either add a slide or tie the romper how you’d like it. Position the tied belt where you’d like it (I prefer it off to one side). Using a yarn needle and piece of yarn, tack stitch the belt at each side of the romper.
Crochet a matching set! If you love the Summer Waves Crochet Baby Romper, you’ll want to check out my Summer Waves Crochet Baby Sandals, and Summer Waves Crochet Baby Bonnet patterns.
I MADE IT! NOW WHAT?
Pin this post!: Save this crochet baby romper pattern to your Pinterest boards so that you can come back and make it again.
Leave a comment below: We love to hear your feedback.
Share Your Finished Projects on Facebook or Instagram: I love to see your finished projects! Share with us on social media and tag me @acrochetedsimplicity or use the hashtag #ACrochetedSimplicity so I can find your posts.
Join us in the Facebook Community Group!
Come share your finished projects with us in the A Crocheted Simplicity Crochet Community Group on Facebook. Join us for fun community events such as crochet alongs, join in on crochet conversations, ask questions, get advice, and share your love for crochet!

More Free Crochet Baby Patterns I Think You’ll Love
- Textured Twist Cabled Beanie
- Fireside Crochet Blanket
- Abrielle Crochet Baby Blanket
- Bubblegum Kisses Baby Blanket
- Cuddly Soft Corner-to-Corner Baby Blanket
- Lacy Baby Blanket
More Crochet Baby Blanket Patterns
Are you looking for more crochet baby blanket patterns free? We have several great patterns that have a variety of color combinations, textures, and stitch repeats.