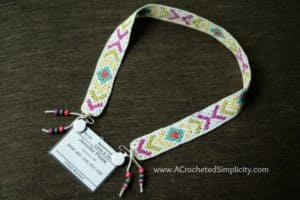
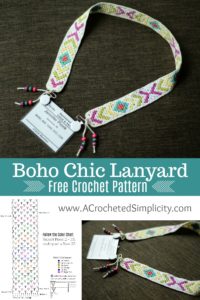
Boho Chic Crochet Lanyard – Free Crochet Pattern
I attended my very first CGOA Chainlink Conference in San Diego, CA, in July of 2015. If you’ve never attended a conference before, they typically give you a name badge and either a pin to pin it to your clothing, or a piece of elastic so that you can wear it around your neck. Without giving it much thought, I chose the elastic. Then over the next several days I came to regret that decision each time it got caught on something, pulled back, then smacked me in the face. At this point I doubt I need to explain more about where the inspiration for the Boho Chic Crochet Lanyard came from. 😉
~Click HERE to sign-up to receive our newsletter!~
The Boho Chic Lanyard is perfect for fiber arts festivals, teacher gifts, gifts for teens, & more! Make yours in your favorite colors and add your own artistic flare. They also work great as a place to pin all of those pins you collect from the various conferences you attend. Use the holes between the stitches and rearrange the pins as many times as you like. I hope you enjoy the pattern and learn a fun technique or two along the way.
~Don’t lose it, add It To Your Ravelry Favorites or Queue.~
~Don’t forget to Pin It too!~
*Purchase an ad-free PDF of this pattern (including all charts and photo tutorials) on Craftsy or Ravelry*
This post contains affiliate links.
Materials
- Yarn: Embroidery Floss and fingering weight yarns were both used in testing. The lanyard shown in the photos was made with embroidery floss. You’ll need approximately 85 yards of your main color and 20 yards of each contrasting color.
- Crochet Hooks: B/2.25mm (My favorite crochet hooks are the Clover Amour Hooks, I’ve never had an ache in my hand since switching)
- Scissors
- Yarn Needle
- Beads (12) 10mm (optional)
- Suspender Clips (2) 1″
Many of these materials are available for purchase through our affiliates below:
") Fuyit Embroidery Floss 144 ...Shop on Amazon
Fuyit Embroidery Floss 144 ...Shop on Amazon  Clover 1040/B Lime Green Am...Shop on Amazon
  Fiskars All Purpose Scissor...Shop on Amazon
Stitch Abbreviations
- ch(s): chain(s)
- sc: single crochet
- dc: double crochet
- sl st(s): slip stitch(es)
- Alt-ch3(1): alternate chain 3(1) click here for photo tutorial
- st(s): stitch(es)
- yo: yarn over
- RS/WS: right side / wrong side
- Rep: repeat
- MC: Main Color (white) (85 yards)
- CA, CB, CC, CD, CE: Contrasting colors listed on the chart. (20 yards of each color)
- Join w/ a sc: click here for photo tutorial
Gauge
- In Granny Stitch pattern: 13/14 sts = 1-7/16″; 8.75 rows = 2″
- See gauge swatch instructions below.
Size
- One Size: 1-5/8″ W x 31-1/2″ L (after edging)
Notes
- I tend to crochet on the tighter side, if you crochet more loosely, you may need to go down a hook size or two to meet gauge. However, this is a pattern for a lanyard and not a garment so gauge isn’t crucial.
- Beginning ch 3 are counted as a stitch and included in stitch count. Other beginning ch-1 are not included in stitch count, unless stated otherwise.
- First stitch of each row is worked into the same stitch as beginning chain, unless stated otherwise.
- Yarn Note: Embroidery floss and fingering weight yarns were both used in testing. I used 6 colors for my lanyard.
- Embroidery Floss Note: Hold all strands of the floss together as one.
- If you follow all color changes as written, you’ll need approximately 85 yards of your main color and 20 yards of each contrasting color.
- Color Changes & Floating Yarn: Work all color changes on the final pull thru of the last stitch you’re working before the new color. Example: If the last st you’re working before a color change is a double crochet, begin your double crochet by inserting your hook where indicated, yo, pull up a loop, yo, pull thru 2 loops, yo with the NEW color, pull thru remaining 2 loops to complete the stitch. Then continue on with your new color. *Click here for Color Change Photo Tutorial & Floating Yarn Tutorial.
- Floating Yarn: I did not carry more than 3 colors at the same time and I only carried them for approximately 4 rows at a time. After completing a section of a contrasting color, I cut the thread and wove my ends in as I worked.
Special Stitch
- Alternate Ch-3 (alt-ch3): Complete last st of previous row, take loop off hook, insert hook into the space between the last dc and last 3 dc of previous row, put loop back on hook and pull thru space, turn, ch 3. *Click here for photo tutorial.
Gauge Swatch Instructions
Gauge isn’t crucial for this project, but I’ve included gauge swatch instructions for those who love to check gauge to make sure they’re on the right track.
Using a 2.25mm crochet hook, work the following to check your gauge:
Row 1: Ch 14, sc in 2nd ch from hook and in each ch across. (13 sts)
Row 2 (RS): Ch 3 (counts as a st), turn, dc in the same st as ch 3, [ skip each of the next 2 sts, 3 dc in the next st ] work from [ to ] 3 times, skip each of the next 2 sts, 2 dc in the last st. (13 sts)
Row 3: Ch 3, turn, 3 dc in each of the next 4 sps, dc in the top of ch 3. (14 sts)
Row 4: Alt-ch3, dc in the same sp, 3 dc in each of the next 3 sps, 2 dc in the last sp. (13 sts)
Rows 5 – 10: Rep Rows 3 – 4.
Finished Dimensions: 1-7/16″ W X 2.3″ H
Crochet Lanyard Instructions
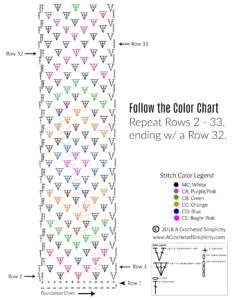
Follow the Color Chart Below
Row 1: Ch 14, sc in the 2nd ch from your hook and in each ch across. (13 sts)
Changing Colors: You’ll work your first color change in Row 2. See the color chart below. Also see the color change and yarn carrying tutorials (click HERE).
Row 2 (RS): Ch 3 (counts as a st), turn, dc in the same st as ch 3, [ skip each of the next 2 sts, 3 dc in the next st ] work from [ to ] 3 times, skip each of the next 2 sts, 2 dc in the last st. (13 sts)
Row 3: Ch 3, turn, 3 dc in each of the next 4 sps, dc in the top of ch 3. (14 sts)
Row 4: Alt-ch3, dc in the same sp, 3 dc in each of the next 3 sps, 2 dc in the last sp. (13 sts)
Rows 5 – 160: Rep Rows 3 – 4.
Note: If you find that your gauge height is too tall or too short, you can work more or less rows until you reach the desired length. Doing so will through off the stitch count of your Lanyard Edging round, but stitch count for this round isn’t crucial.
Do not fasten off. Continue on to Lanyard Edging.
Lanyard Edging
Note: The stitch count along each of the long edges is not crucial so if your edges begin to get wavy, or if they cinch inward, you can adjust the number of stitches you work along each of them to keep them nice and straight. However, make sure to work the stitch counts along each of the short edges exactly as written.
Rnd 1 (RS): (MC) In this round you will edge the perimeter of the lanyard, rotate to begin along the long edge, ch 1, work 2 sc into the side of each dc row and 1 sc into the side of each sc row (319 sts), ch 1, rotate, work 1 sc into bottom of each foundation ch from row 1 (13 sts), ch 1, rotate, work 1 sc into the side of each sc row and 2 sc into the side of each dc row (319 sts), ch 1, rotate, sc in each st across (13 sts). Join to 1st st of round. (664 sts)
Do not fasten off. Continue on to Loops for Beaded Ties.
Loops for Beaded Ties
First Short Edge
Row 1 (WS): Ch 1, turn, sc in the first st, [ ch 4, skip each of the next 3 sts, sc in the next st ] work from [ to ] twice, ch 4, skip each of the next 3 sts, sc in the last st. (22 sts)
Fasten off. Weave in ends. Continue on to add loops to the opposite short edge.
Opposite Short Edge
Row 1 (WS): With the WS facing you, join yarn w/ a sc in the st furthest to your right on the opposite short edge, [ ch 4, skip each of the next 3 sts, sc in the next st ] work from [ to ] twice, ch 4, skip each of the next 3 sts, sc in the last st. (22 sts)
Fasten off. Weave in ends. Continue on to Beaded Ties.
Beaded Ties (Make 2)
Using a 2.25mm crochet hook, create a chain approximately 10″ long. Fasten off.
Finishing
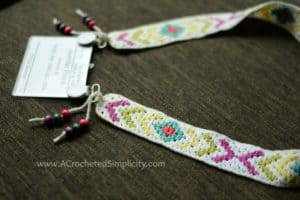
Step 1: With a short edge facing you, weave one end of a tie through the right loop, weave the other end of the same tie through the left loop, weave both ends through the center loop and around one of the suspender clips. Even out the ends of the ties to find the center and knot the ties near the edge of the lanyard. Make sure you are securing the suspender clip to the lanyard. The suspender clip will slide back and forth, but it causes no issues when wearing my lanyard.
Step 2: String 3 wooden beads on each end of the tie. Double knot each end of the tie to secure the beads.
Repeat for the opposite end of the lanyard and then you’re ready to clip it to your name badge & wear it!
Find all of my FREE crochet patterns HERE
Please share your finished ACS projects with me in the A Crocheted Simplicity Crochet Community Group on Facebook!
Happy Crocheting!

I’ve been looking for unusual small projects for a girl who wants to learn how to make small gifts – this looks perfect!