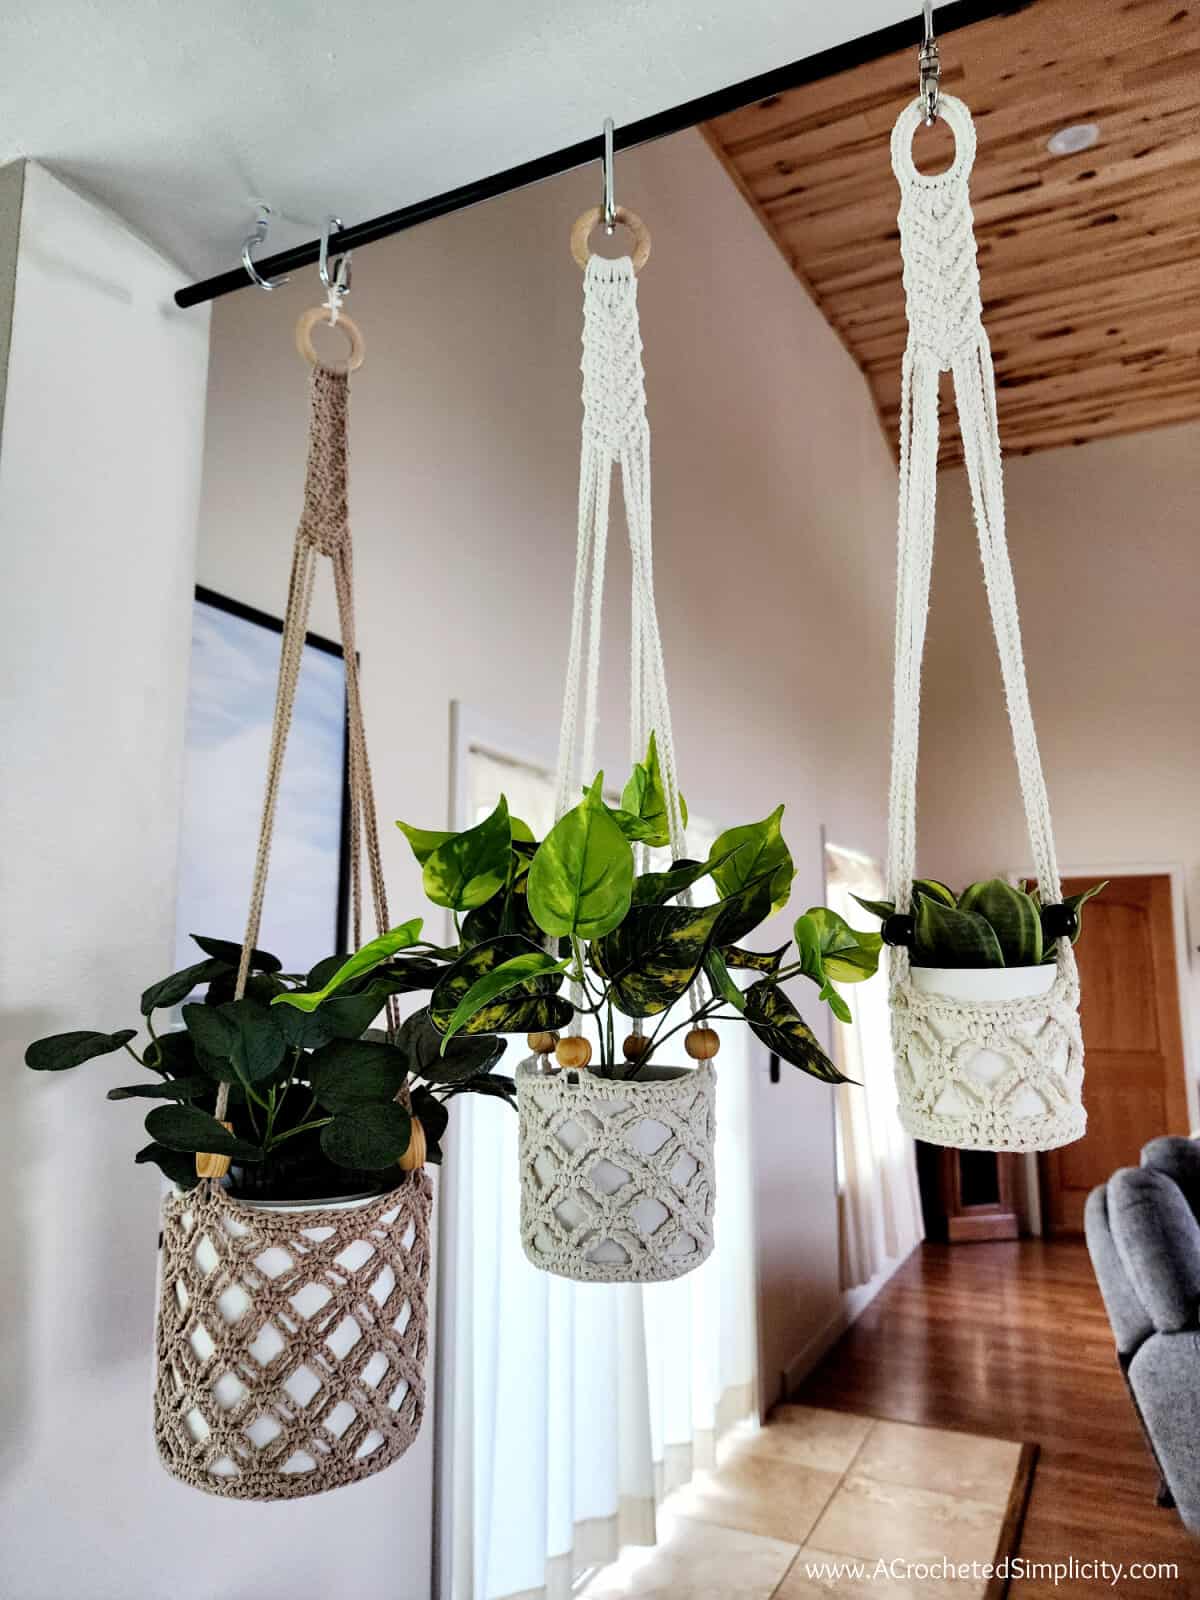
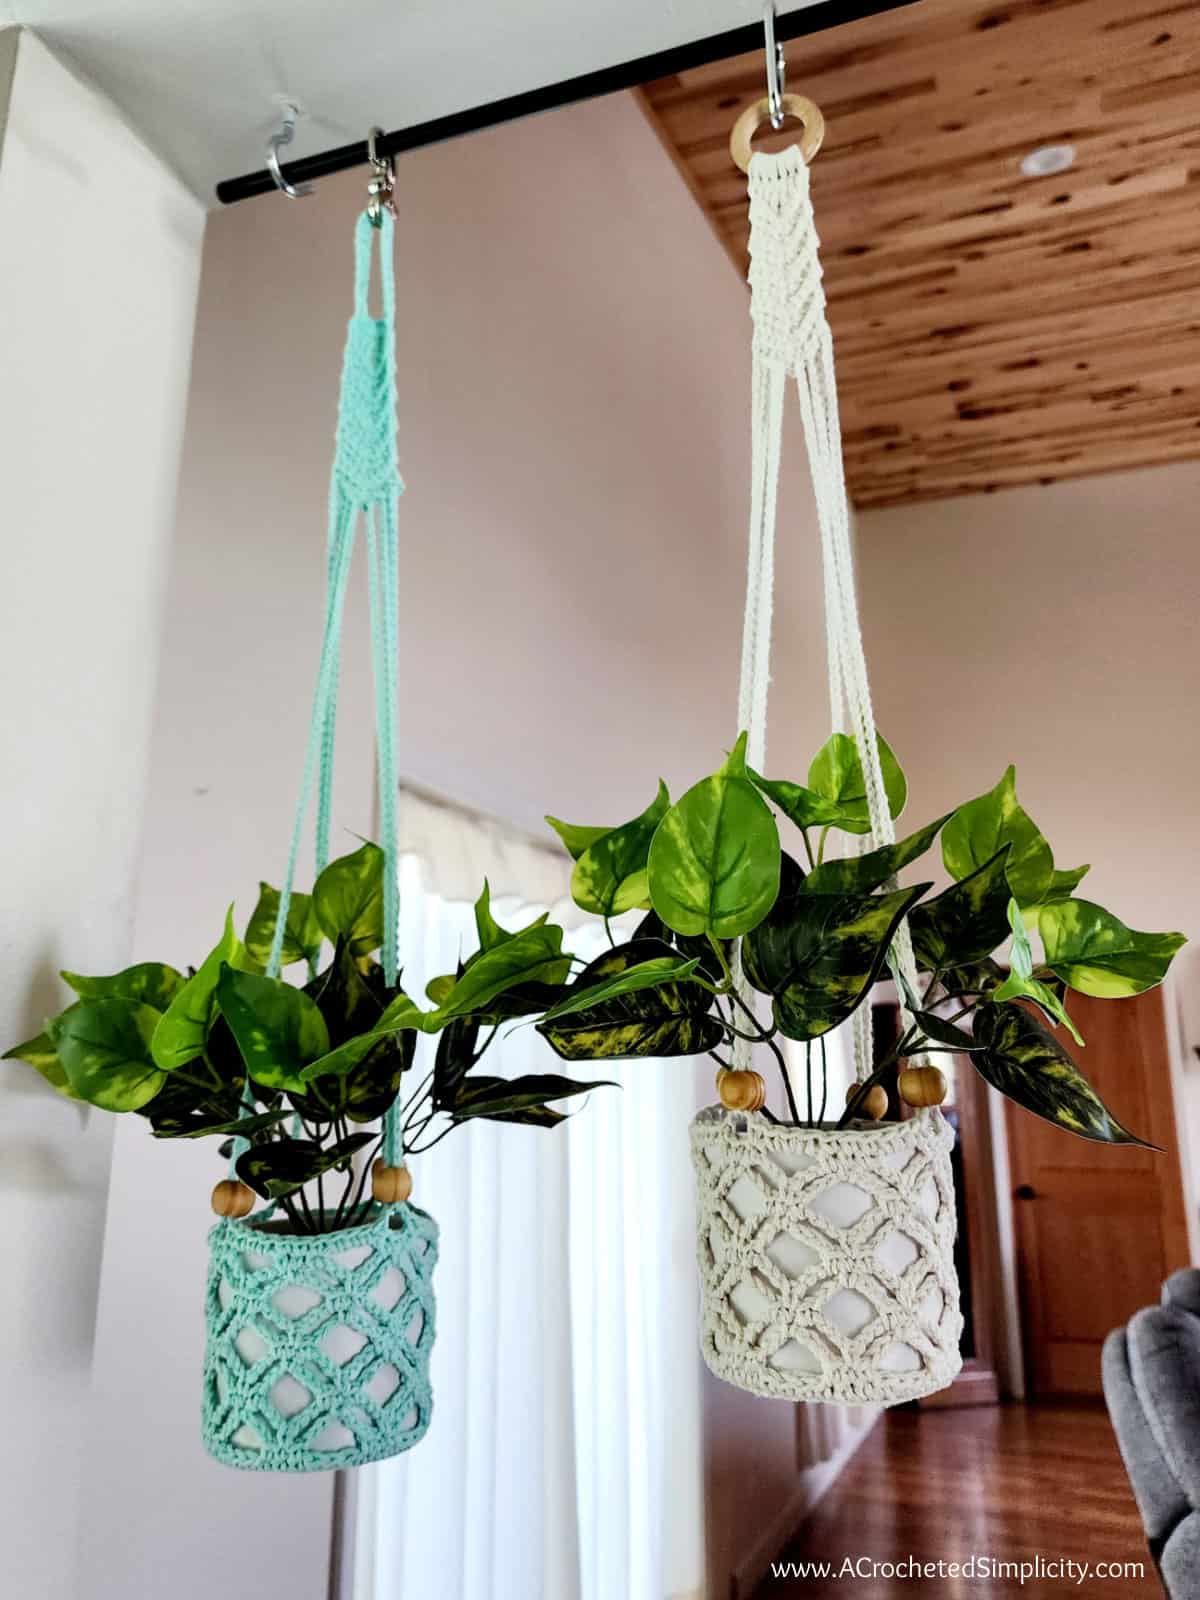
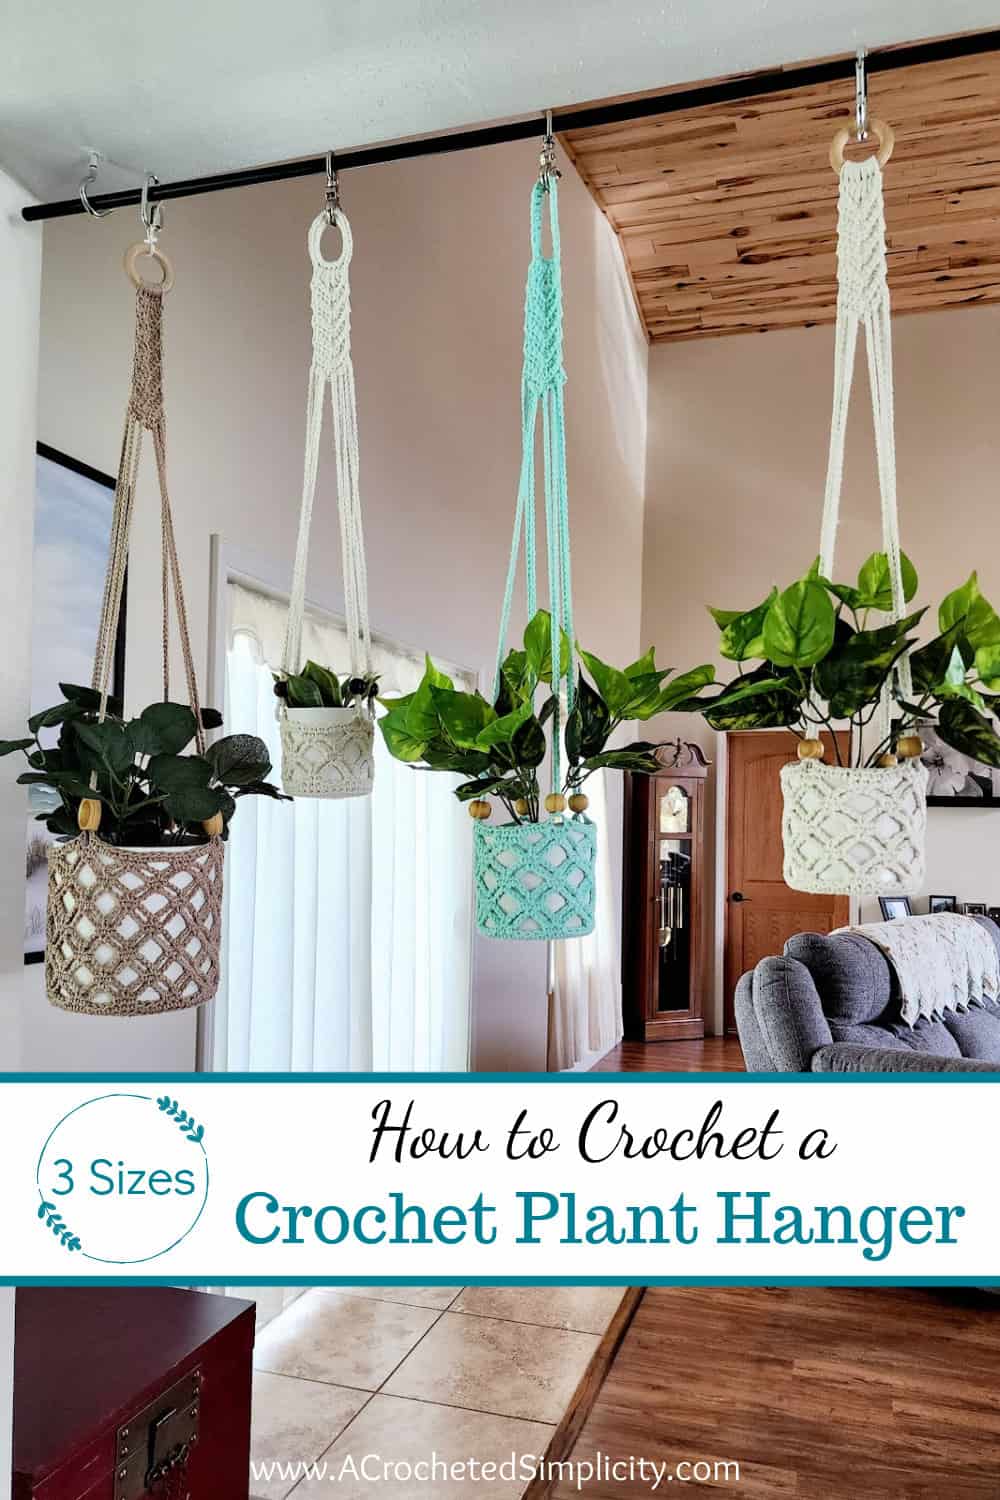
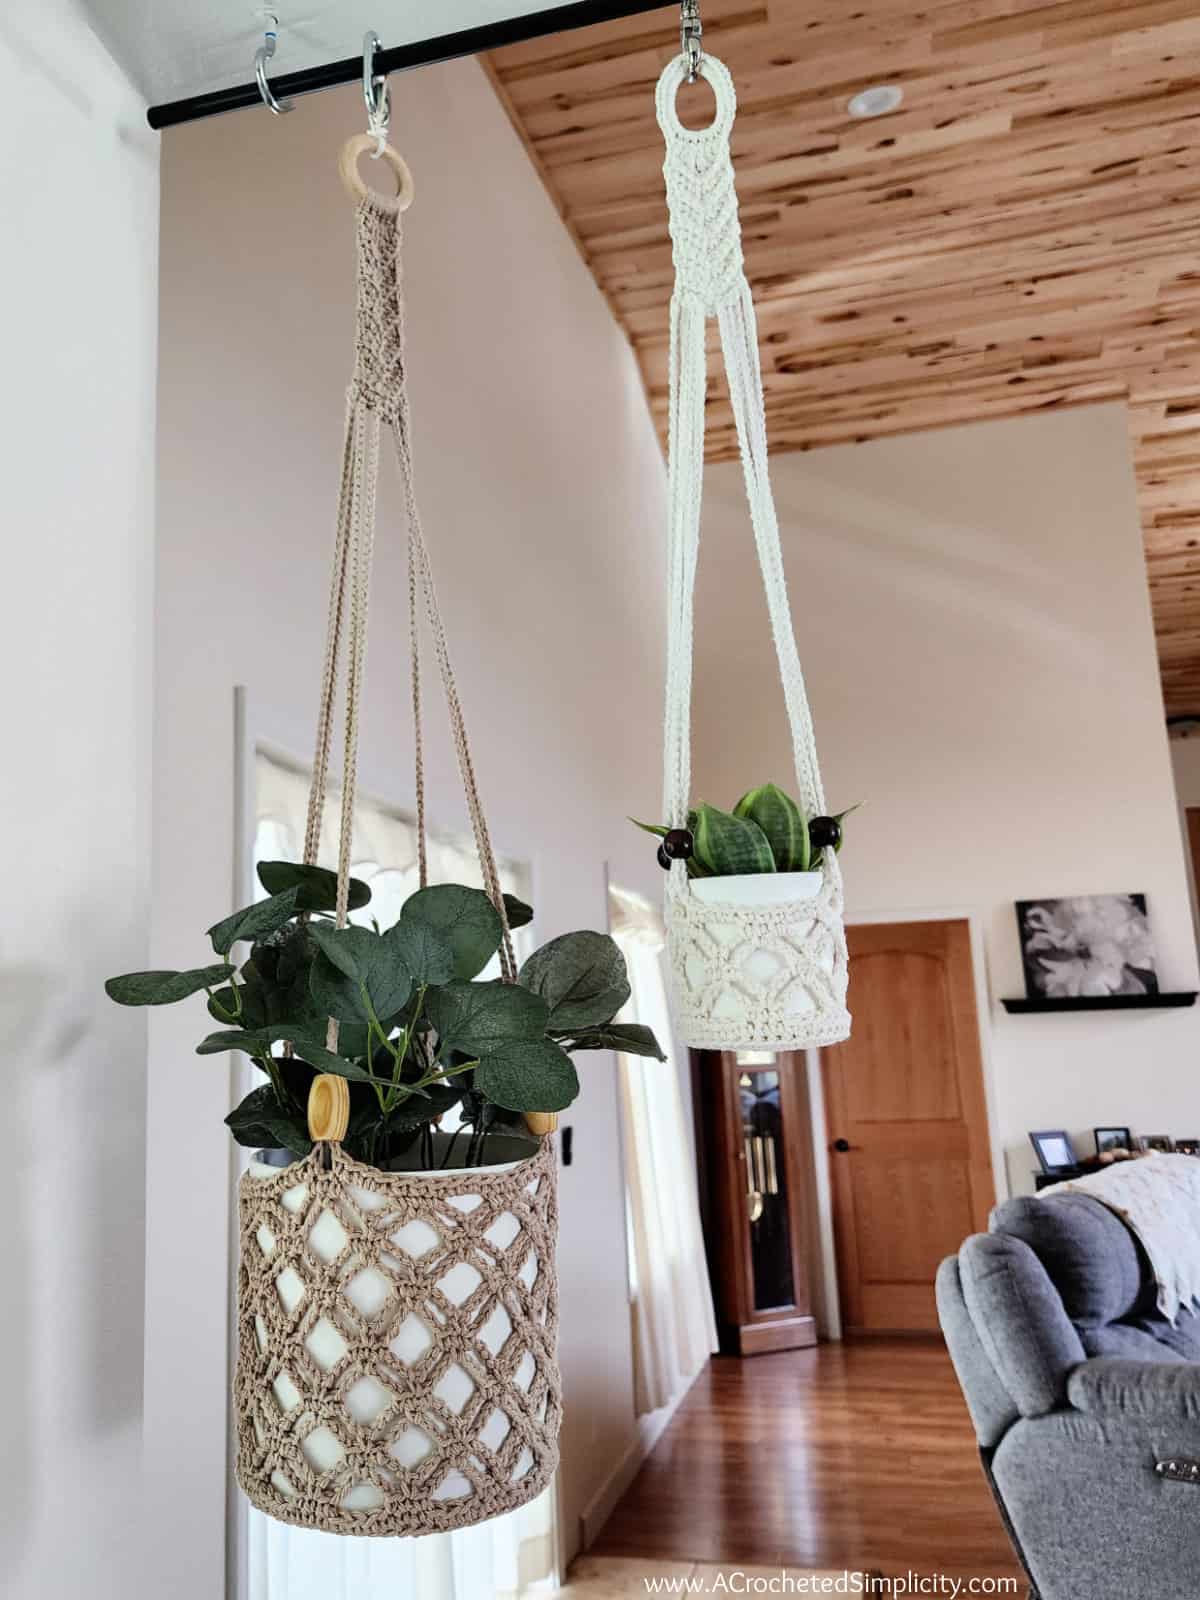
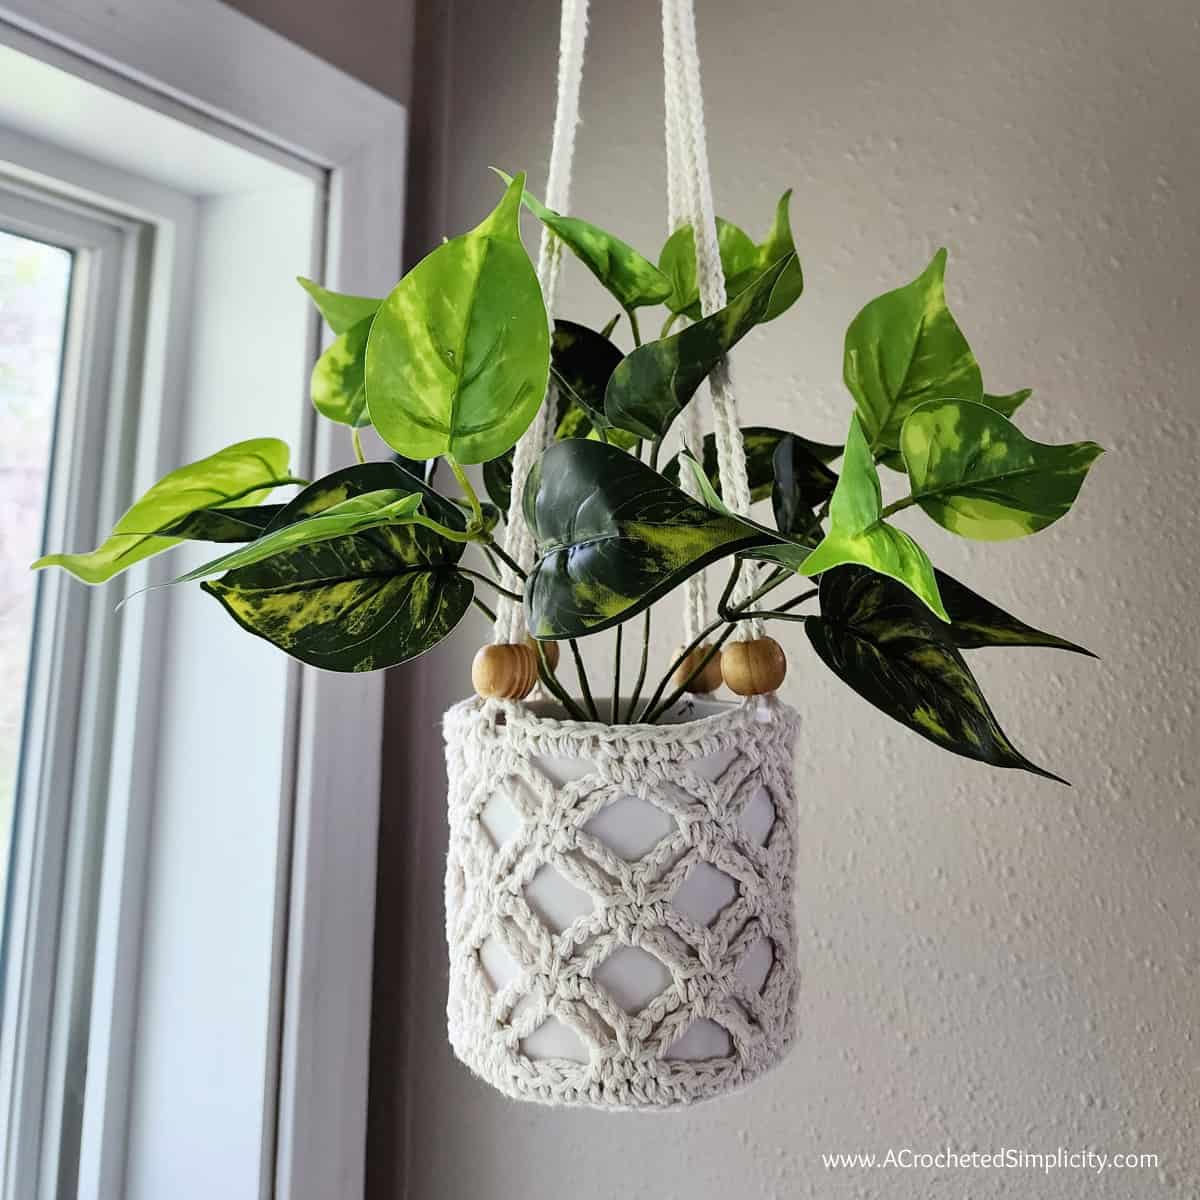
Crochet Plant Hanger – 3 Sizes
This crochet plant hanger pattern is a free crochet pattern that includes 3 sizes, uses only 1 – 2 balls of cotton yarn, and works up super duper fast!
If you’re looking to add to your boho decor, you can crochet several of these plant hangers in a weekend!
You can find the free plant hanger crochet pattern in this post below, or an ad-free print friendly version (including all photo tutorials) on Love Crafts, Ravelry, or on Etsy (aff).
Oh the Childhood Memories
When I was a little girl, I used to watch my mom work on her macrame projects. I watched in awe as she would create a beautiful macrame plant hanger.
She also made a macrame baby swing that used to hang from the ceiling in my grandparents living room. I have many fond memories pushing my cousins in the swing…. and wishing I could fit too. lol
I never learned how to do macrame as a young girl, but one day I’d love to learn more. I’ve only ever used simple knots to add a macrame accent to my On The Bias Tote Bag.
In the meantime, I decided to make my own crochet macrame plant hanger.
Many Great Uses!
Small enough and quick enough to work up in an evening or during a short car ride, this crochet plant hanger makes the perfect quick crochet gift for friends & family!
These DIY plant hangers also make a great crochet housewarming gift, especially for someone who loves boho decor or macrame… or plants.
I’ve decided to make several small ones to hold glass jars with citronella candles to add a little boho crochet to our campsite this summer and help keep the bugs away!
All 3 sizes of these crochet plant hangers use very little yarn and can be made in a very short amount of time – they’re great stash buster projects!
What yarn to use for a crochet plant hanger?
You’ll want to use a yarn that doesn’t have a lot of stretch to it.
I prefer to use 100% cotton yarns for my plant hanger, but twine and macrame rope would also be great alternatives.
Raffia and t-shirt yarn may also be fun yarn alternatives.
If all you have on hand is acrylic yarn, I would suggest crocheting a shorter hanging strap to accomodate for the stretchiness of the yarn. I’ve included instructions below for shortening and lengthening your hanging straps.
Yarn
Lily Sugar’n Cream Cotton yarn is a natural, 100% USA-grown cotton yarn. It’s a versatile worsted weight yarn, that’s great for small projects like dishcloths and hand towels, to home décor, and even accessories. I love to use it for crochet bags!
It’s the perfect cotton yarn for this free crochet plant hanger pattern!
Available in a wide variety of colors, including neutrals, brights, and pastels. It’s machine washable and dryable for easy care.
Skill Level
This pattern uses basic crochet stitches such as chain, single crochet, half double crochet, double crochet, and slip stitches.
I’ve included a couple different step-by-step photo tutorials with dozens of photos so that even a confident beginner can successfully make this crochet plant hanger!
Sizes
I’ve included 3 sizes in this free crochet plant hanger pattern.
The small and medium sizes both use less than 1 ball of cotton yarn. I LOVE a great one skein project!
The large size uses less than 2 balls of cotton yarn. I was able to use leftover scraps of yarn to make mine.
The small size fits pots that are 3″ – 3.5″ in diameter.
The medium size fits pots that are 3.5″ – 4″ in diameter.
The large size fits pots that are 6″ – 6.5″ in diameter.
I found a great set of plastic pots on Amazon that include all sorts of sizes!
Hanger Options
I’ve also included three different options for the chevron hangers: Wooden Rings, Milk Jug Rings, and Crochet Only Rings.
If you do not have wooden rings at home, no worries! I’ve got you covered with alternate options.
Wooden Beads
Wooden beads are completely optional and are decoration only.
You do not have to use the same wooden beads that I used.
Just make sure that the inner diameter is large enough to pass through a crochet chain twice. (refer to the assembly photos below if you need clarification)
CROCHET PLANT HANGER – FREE CROCHET PATTERN
The free pattern is below, but if you love to work offline, I’ve got a couple other great options for you.
Purchase the ad-free, printable PDF, including all photo tutorials, on Love Crafts, Ravelry, or on Etsy (aff).
This post contains affiliate links.
Materials
- Yarn: Worsted Weight / 4 / Yarn, I used Lily Sugar n’ Cream cotton yarn for the sample, 100% Cotton (120 yards / 109 m / 71 g / 2.5 oz).
- Yardage:
- Small: 100 yards (1 ball)
- Medium: 120 yards (1 ball)
- Large: 200 yards (2 balls)
- Crochet Hooks: H/8/5.00mm & G/6/4.00mm
- Notions: Yarn Needle; Scissors, Stitch Markers
- Optional Materials: (1) 50mm Wooden Ring; (4) Wooden Beads with 10mm inner hole
- Optional Pots: I found these on Amazon and they come in a variety of sizes!
Many of these materials are available for purchase through our affiliates below:
 Clover 1047/H Deep Blue Amo...Shop on Amazon
  Clover 1045/G Purple Amour ...Shop on Amazon
  HEOCAKR Natural Beech Wood ...Shop on Amazon
 ") WILLBOND 130 Pieces Macrame...Shop on Amazon
WILLBOND 130 Pieces Macrame...Shop on Amazon  D'vine Dev 10 Pack Plastic ...Shop on Amazon
Abbreviations (US Terms)
- ch(s): chain(s)
- st(s): stitch(es)
- sl st(s): slip stitch(es)
- sc: single crochet
- dc: double crochet
- tr: treble crochet
- sp: space
- BLO: back loop only
- RS: Right Side
- Rep: repeat
- Rnd: round
- yo: yarn over
Experience Level
- Confident Beginner / Easy
Gauge
- Gauge is listed throughout the pattern.
Sizes
- Small: Fits 3″ – 3.5″ pot
- Medium: Fits 3.5″ – 4″ pot
- Large: Fits 6″ – 6.5″ pot
Notes
- Turning chains are not included in stitch count, unless noted otherwise.
- Yarn Notes: Lily Sugar n’ Cream worsted weight cotton yarn was used for the sample, 100% Cotton (120 yards / 109 m / 71 g / 2.5 oz).
- Yardage
- Small: 100 yards (1 ball)
- Medium: 120 yards (1 ball)
- Large: 200 yards (2 balls)
- Colors Used: Ecru (cream), Jute (taupe); Beach Glass (green)
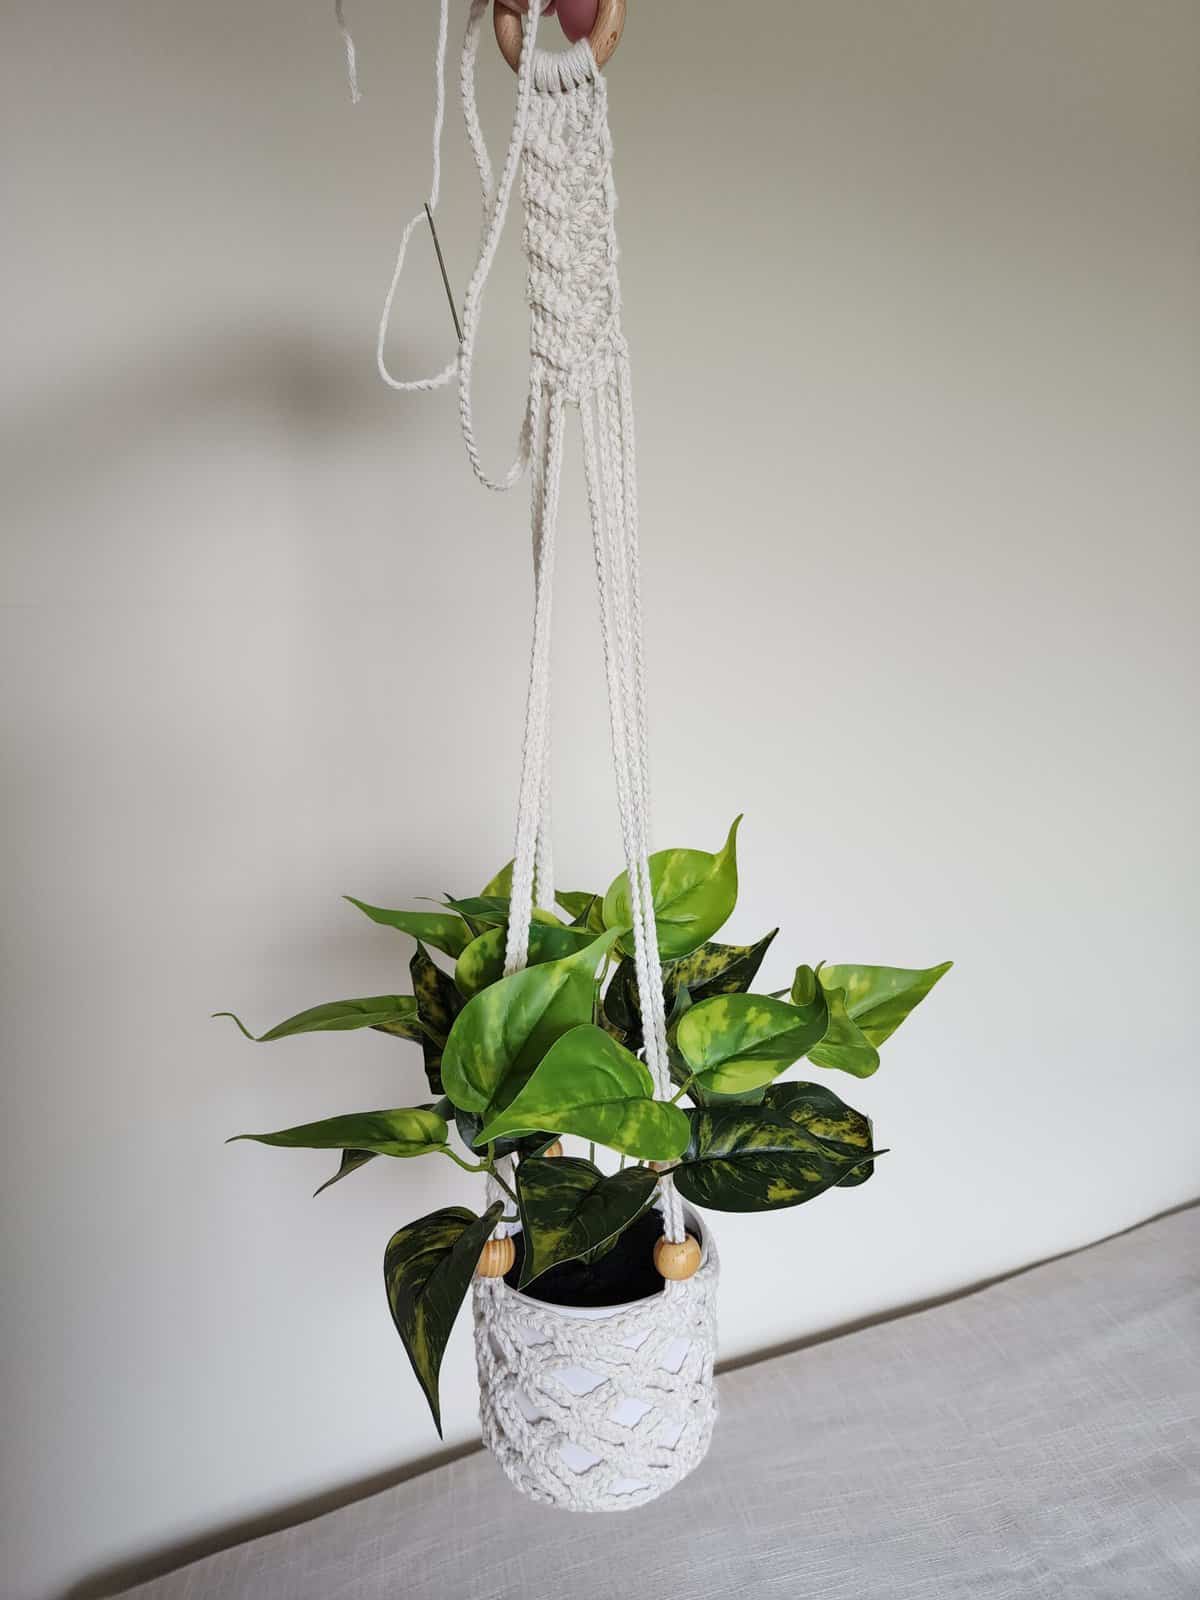
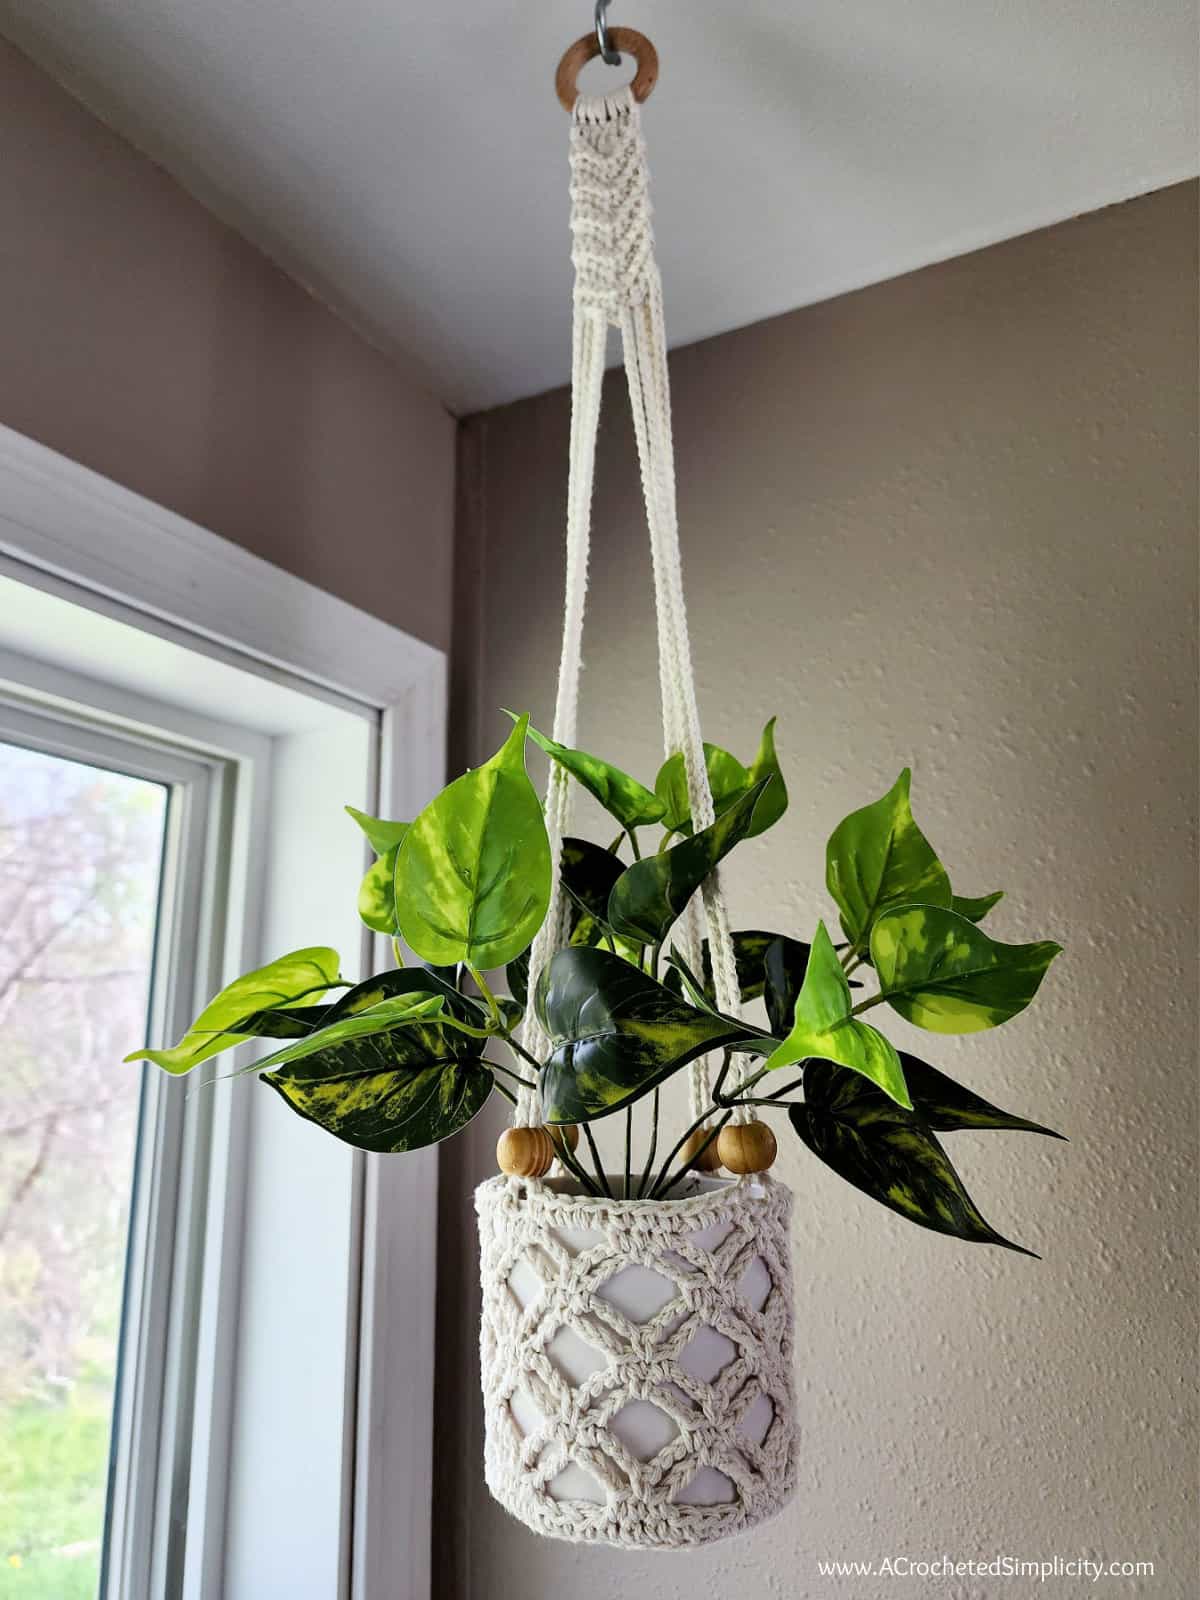
- Construction: This crochet plant hanger is constructed by first making a circle for the basket base. You’ll then work the openwork diamond stitch pattern onto the base to create the basket. Next, you’ll create the hanger and attach it to the basket.
- Instructions are included for adjusting the length of the hanging straps.
- Hanger Options: Instructions are included to use either a wooden ring, a plastic milk jug ring, or to crochet the ring using only yarn.
Small Size Plant Hanger Instructions
Progression Photos: Scroll down past the Basket Instructions for all sizes.
Small Basket Base
The section is worked in a spiral (continuous rounds). I strongly suggest using a scrap piece of yarn to keep track of the beginning and end of each round.
Rnd 1: With a 5.00mm crochet hook, ch 2, work 7 sc into the 2nd ch from your hook. Do not join. (7 sts)
Rnd 2: Sc in the first st, 2 sc in each remaining st. (13 sts)
Rnd 3: Sc in the first st, (2 sc in the next st, sc in the next st) rep from ( to ) around. (19 sts)
Rnd 4: Sc in the first st, (2 sc in the next st, sc in each of the next 2 sts) rep from ( to ) around. (25 sts)
Rnd 5: Sc in the first st, (2 sc in the next st, sc in each of the next 3 sts) rep from ( to ) around. (31 sts)
Rnd 6: Sc in the first st, (2 sc in the next st, sc in each of the next 4 sts) rep from ( to ) around. (37 sts)
Do not fasten off. Continue on to the Basket. Your basket base diameter should be 3-1/8″.
Small Basket
Rnd 1 (RS): Working in BLO, sc in each st around. Join with a sl st to the 1st st. (37 sts)
Rnd 2 (RS): Switch to a 4.00mm crochet hook, ch 1, sc in each of the first 2 sts, (ch 7, skip each of the next 3 sts, sc in each of the next 3 sts) work from ( to ) 5 times, ch 7, skip each of the next 3 sts, sc in each of the last 2 sts. Join. Turn. (19 sts + 6 ch-7’s)
Rnd 3 (WS): Ch 1, sc in the first st, (ch 4, sc in the middle of the next ch-7 sp, ch 4, sc in the middle sc of the next 3 sc group) work from ( to ) 5 times, ch 4, sc in the middle of the next ch-7 sp, ch 4, sc in the last st. Join. Turn. (13 sts + 12 ch-4’s)
Rnd 4: Ch 8, (counts as 1st tr & ch-4 sp), (sc in the next ch-4 sp, sc in the next sc, sc in the next ch-4 sp, ch 7) work from ( to ) 5 times, sc in the next ch-4 sp, sc in the next sc, sc in the next ch-4 sp, ch 4, tr in the last st. Join with a sl st in the 4th ch. Turn. (20 sts + 2 ch-4’s + 6 ch-7’s)
Rnd 5: Ch 1, sc in the first st, (ch 4, sc in the middle sc of the next 3 sc group, ch 4, sc in the middle of the next ch-7 sp) work from ( to ) 5 times, ch 4, sc in the middle sc of the next 3 sc group, ch 4, sc in the last st. Join. Turn. (13 sts + 12 ch-4’s)
Rnd 6 (RS): Switch to a 5.00mm crochet hook, ch 1, sc in the first st, sc in the next ch-4 sp, (ch 4, sc in the next ch-4 sp, sc in the next sc, sc in the next ch-4 sp) work from ( to ) 5 times, ch 4, sc in the next ch-4 sp, sc in the last st. Join. (19 sts + 6 ch-4’s)
Rnd 7: Ch 1, sc in each of the first 2 sts, (3 sc in the next ch-4 sp, sc in the next sc, ch 3, skip the next st, sc in the next sc) work from ( to ) 2 times, 3 sc in the next ch-4 sp, sc in each of the next 3 sc, (3 sc in the next ch-4 sp, sc in the next sc, ch 3, skip the next st, sc in the next sc) work from ( to ) 2 times, 3 sc in the next ch-4 sp, sc in each of the last 2 sc. Join. (33 sts + 4 ch-3’s)
Fasten off. Weave in ends. Continue on to Hanging Rings below. The height of the basket should be approximately 2.5″ H.
Medium Size Plant Hanger Instructions
Progression Photos: Scroll down past the Basket Instructions for all sizes.
Medium Basket Base
The section is worked in a spiral (continuous rounds). I strongly suggest using a scrap piece of yarn to keep track of the beginning and end of each round.
Rnd 1: With a 5.00mm crochet hook, ch 2, work 7 sc into the 2nd ch from your hook. Do not join. (7 sts)
Rnd 2: Sc in the first st, 2 sc in each remaining st. (13 sts)
Rnd 3: Sc in the first st, (2 sc in the next st, sc in the next st) rep from ( to ) around. (19 sts)
Rnd 4: Sc in the first st, (2 sc in the next st, sc in each of the next 2 sts) rep from ( to ) around. (25 sts)
Rnd 5: Sc in the first st, (2 sc in the next st, sc in each of the next 3 sts) rep from ( to ) around. (31 sts)
Rnd 6: Sc in the first st, (2 sc in the next st, sc in each of the next 4 sts) rep from ( to ) around. (37 sts)
Rnd 7: Sc in the first st, (2 sc in the next st, sc in each of the next 5 sts) rep from ( to ) around. (43 sts)
Do not fasten off. Continue on to the Basket. Your basket base diameter should be 3-3/4″.
Medium Basket
Rnd 1 (RS): Working in BLO, sc in each st around. Join with a sl st to the 1st st. (43 sts)
Rnd 2 (RS): Switch to a 4.00mm crochet hook, ch 1, sc in each of the first 2 sts, (ch 7, skip each of the next 3 sts, sc in each of the next 3 sts) work from ( to ) 6 times, ch 7, skip each of the next 3 sts, sc in each of the last 2 sts. Join. Turn. (22 sts + 7 ch-7’s)
Rnd 3 (WS): Ch 1, sc in the first st, (ch 4, sc in the middle of the next ch-7 sp, ch 4, sc in the middle sc of the next 3 sc group) work from ( to ) 6 times, ch 4, sc in the middle of the next ch-7 sp, ch 4, sc in the last st. Join. Turn. (15 sts + 14 ch-4’s)
Rnd 4: Ch 8, (counts as 1st tr & ch-4 sp), (sc in the next ch-4 sp, sc in the next sc, sc in the next ch-4 sp, ch 7) work from ( to ) 6 times, sc in the next ch-4 sp, sc in the next sc, sc in the next ch-4 sp, ch 4, tr in the last st. Join with a sl st in the 4th ch. Turn. (23 sts + 2 ch-4’s + 6 ch-7’s)
Rnd 5: Ch 1, sc in the first st, (ch 4, sc in the middle sc of the next 3 sc group, ch 4, sc in the middle of the next ch-7 sp) work from ( to ) 6 times, ch 4, sc in the middle sc of the next 3 sc group, ch 4, sc in the last st. Join. Turn. (15 sts + 14 ch-4’s)
Rnd 6: Ch 1, sc in the first st, sc in the next ch-4 sp, (ch 7, sc in the next ch-4 sp, sc in the next sc, sc in the next ch-4 sp) work from ( to ) 6 times, ch 7, sc in the next ch-4 sp, sc in the last st. Join. Turn. (22 sts + 7 ch-7’s)
Rnds 7 – 9: Rep Rnds 3 – 5.
Rnd 10 (RS): Switch to a 5.00mm crochet hook, ch 1, sc in the first st, sc in the next ch-4 sp, (ch 4, sc in the next ch-4 sp, sc in the next sc, sc in the next ch-4 sp) work from ( to ) 6 times, ch 4, sc in the next ch-4 sp, sc in the last st. Join. (22 sts + 7 ch-4’s)
Rnd 11: Ch 1, sc in each of the first 2 sts, 3 sc in the next ch-4 sp, (sc in the next sc, ch 3, skip the next st, sc in the next sc, 3 sc in the next ch-4 sp, sc in each of the next 3 sc, 3 sc in the next ch-4 sp) work from ( to ) 3 times, ch 3, sc in the last st. Join. (39 sts + 4 ch-3’s)
Fasten off. Weave in ends. Continue on to Hanging Rings. The height of the basket should be approximately 3.75″ H.
Large Size Plant Hanger Instructions
Progression Photos: Scroll down past the Basket Instructions for all sizes.
Large Basket Base
The section is worked in a spiral (continuous rounds). I strongly suggest using a scrap piece of yarn to keep track of the beginning and end of each round.
Rnd 1: With a 5.00mm crochet hook, ch 2, work 7 sc into the 2nd ch from your hook. Do not join. (7 sts)
Rnd 2: Sc in the first st, 2 sc in each remaining st. (13 sts)
Rnd 3: Sc in the first st, (2 sc in the next st, sc in the next st) rep from ( to ) around. (19 sts)
Rnd 4: Sc in the first st, (2 sc in the next st, sc in each of the next 2 sts) rep from ( to ) around. (25 sts)
Rnd 5: Sc in the first st, (2 sc in the next st, sc in each of the next 3 sts) rep from ( to ) around. (31 sts)
Rnd 6: Sc in the first st, (2 sc in the next st, sc in each of the next 4 sts) rep from ( to ) around. (37 sts)
Rnd 7: Sc in the first st, (2 sc in the next st, sc in each of the next 5 sts) rep from ( to ) around. (43 sts)
Rnd 8: Sc in the first st, (2 sc in the next st, sc in each of the next 6 sts) rep from ( to ) around. (49 sts)
Rnd 9: Sc in the first st, (2 sc in the next st, sc in each of the next 7 sts) rep from ( to ) around. (55 sts)
Rnd 10: Sc in the first st, (2 sc in the next st, sc in each of the next 8 sts) rep from ( to ) around. (61 sts)
Rnd 11: Sc in the first st, (2 sc in the next st, sc in each of the next 9 sts) rep from ( to ) around. (67 sts)
Do not fasten off. Continue on to the Basket. Your basket base diameter should be 6″.
Large Basket
Rnd 1 (RS): Working in BLO, sc in each st around. Join with a sl st to the 1st st. (67 sts)
Rnd 2 (RS): Switch to a 4.00mm crochet hook, ch 1, sc in each of the first 2 sts, (ch 7, skip each of the next 3 sts, sc in each of the next 3 sts) work from ( to ) 10 times, ch 7, skip each of the next 3 sts, sc in each of the last 2 sts. Join. Turn. (34 sts + 11 ch-7’s)
Rnd 3 (WS): Ch 1, sc in the first st, (ch 4, sc in the middle of the next ch-7 sp, ch 4, sc in the middle sc of the next 3 sc group) work from ( to ) 10 times, ch 4, sc in the middle of the next ch-7 sp, ch 4, sc in the last st. Join. Turn. (23 sts + 22 ch-4’s)
Rnd 4: Ch 8, (counts as 1st tr & ch-4 sp), (sc in the next ch-4 sp, sc in the next sc, sc in the next ch-4 sp, ch 7) work from ( to ) 10 times, sc in the next ch-4 sp, sc in the next sc, sc in the next ch-4 sp, ch 4, tr in the last st. Join with a sl st in the 4th ch. Turn. (35 sts + 2 ch-4’s + 10 ch-7’s)
Rnd 5: Ch 1, sc in the first st, (ch 4, sc in the middle sc of the next 3 sc group, ch 4, sc in the middle of the next ch-7 sp) work from ( to ) 10 times, ch 4, sc in the middle sc of the next 3 sc group, ch 4, sc in the last st. Join. Turn. (23 sts + 22 ch-4’s)
Rnd 6: Ch 1, sc in the first st, sc in the next ch-4 sp, (ch 7, sc in the next ch-4 sp, sc in the next sc, sc in the next ch-4 sp) work from ( to ) 10 times, ch 7, sc in the next ch-4 sp, sc in the last st. Join. Turn. (34 sts + 11 ch-7’s)
Rnds 7 – 13: Rep Rnds 3 – 6, ending with a Rnd 5.
Rnd 14 (RS): Switch to a 5.00mm crochet hook, ch 1, sc in the first st, sc in the next ch-4 sp, (ch 4, sc in the next ch-4 sp, sc in the next sc, sc in the next ch-4 sp) work from ( to ) 10 times, ch 4, sc in the next ch-4 sp, sc in the last st. Join. (34 sts + 11 ch-4’s)
Rnd 15: Ch 1, sc in each of the first 2 sts, 3 sc in the next ch-4 sp, * sc in the next sc, ch 3, skip the next st, sc in the next sc, (3 sc in the next ch-4 sp, sc in each of the next 3 sts) twice, 3 sc in the next ch-4 sp * work from * to * 3 times, ch 3, skip the next st, sc in the last st. Join. (57 sts + 4 ch-3’s)
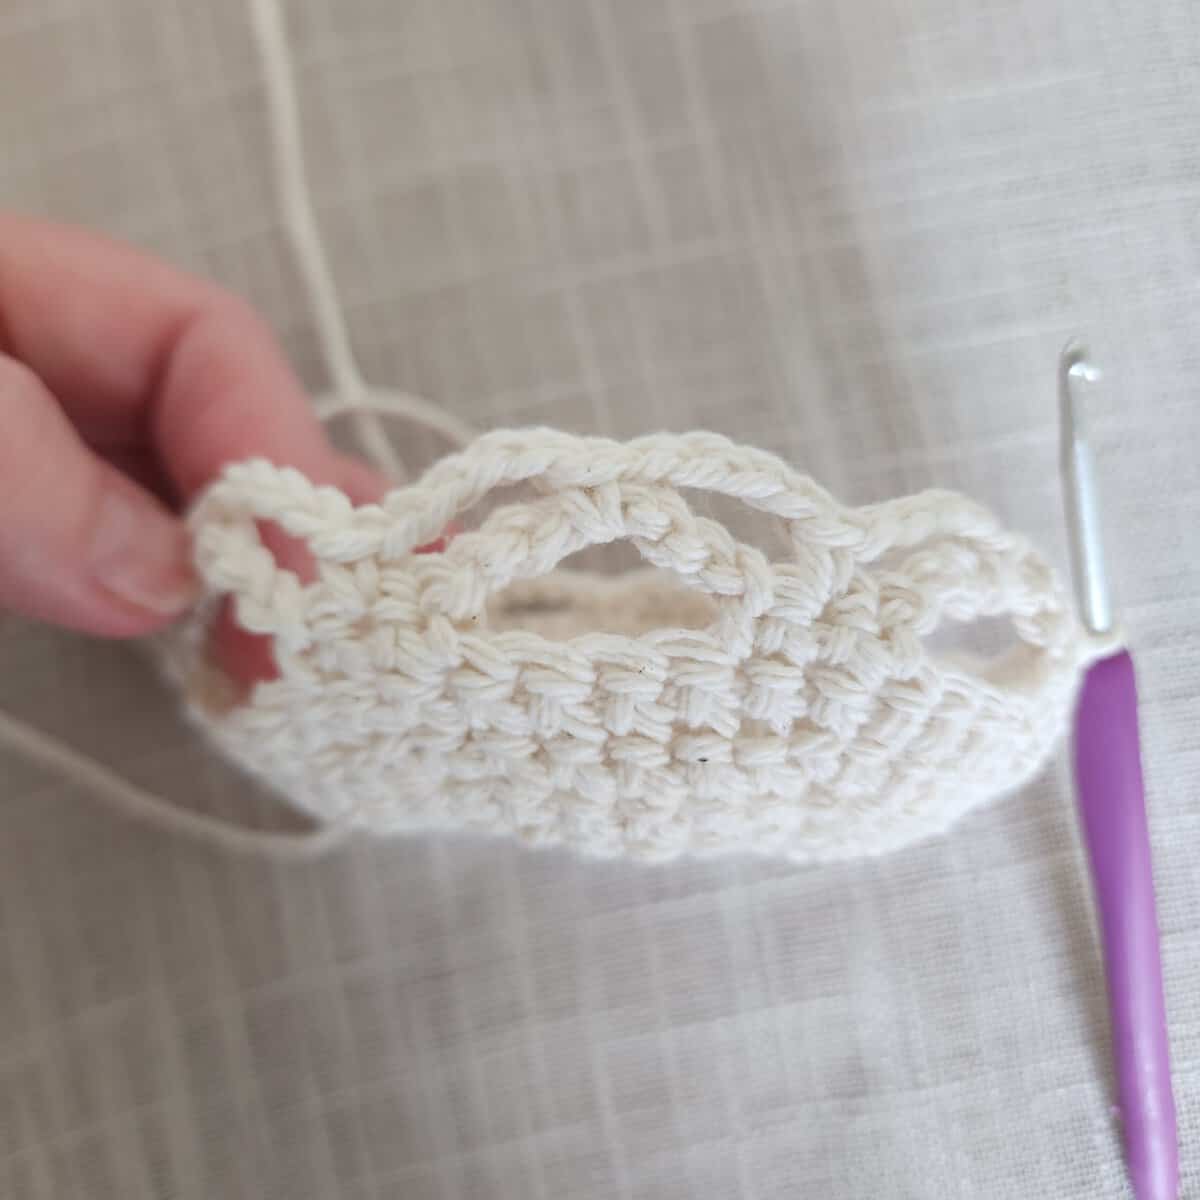
Fasten off. Weave in ends. Continue on to Hanging Rings. The height of the basket should be approximately 5.75″ H.
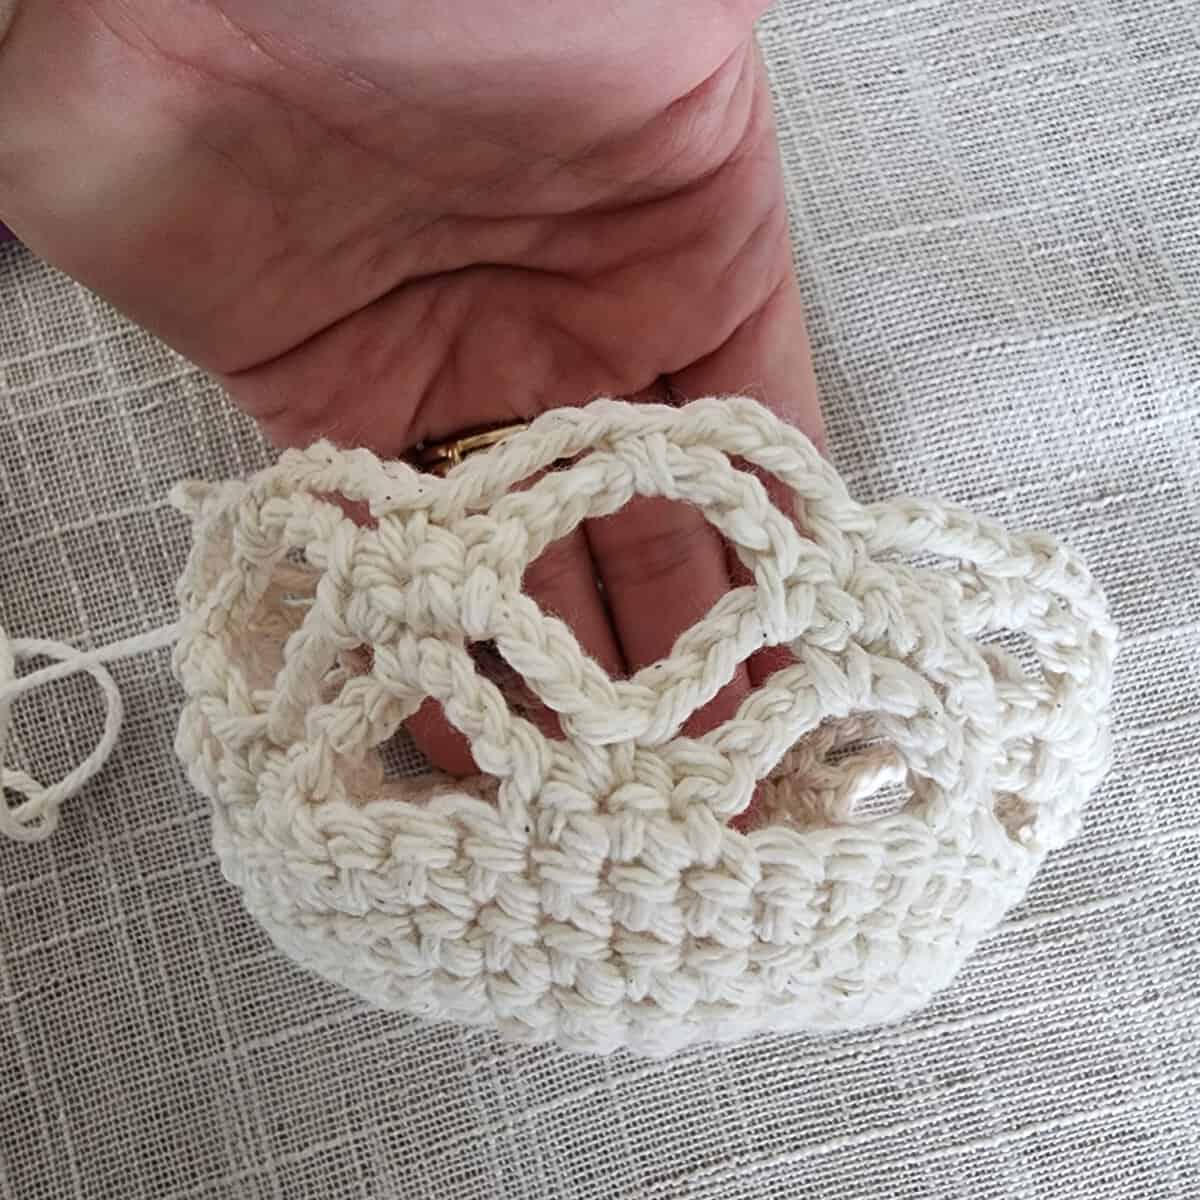
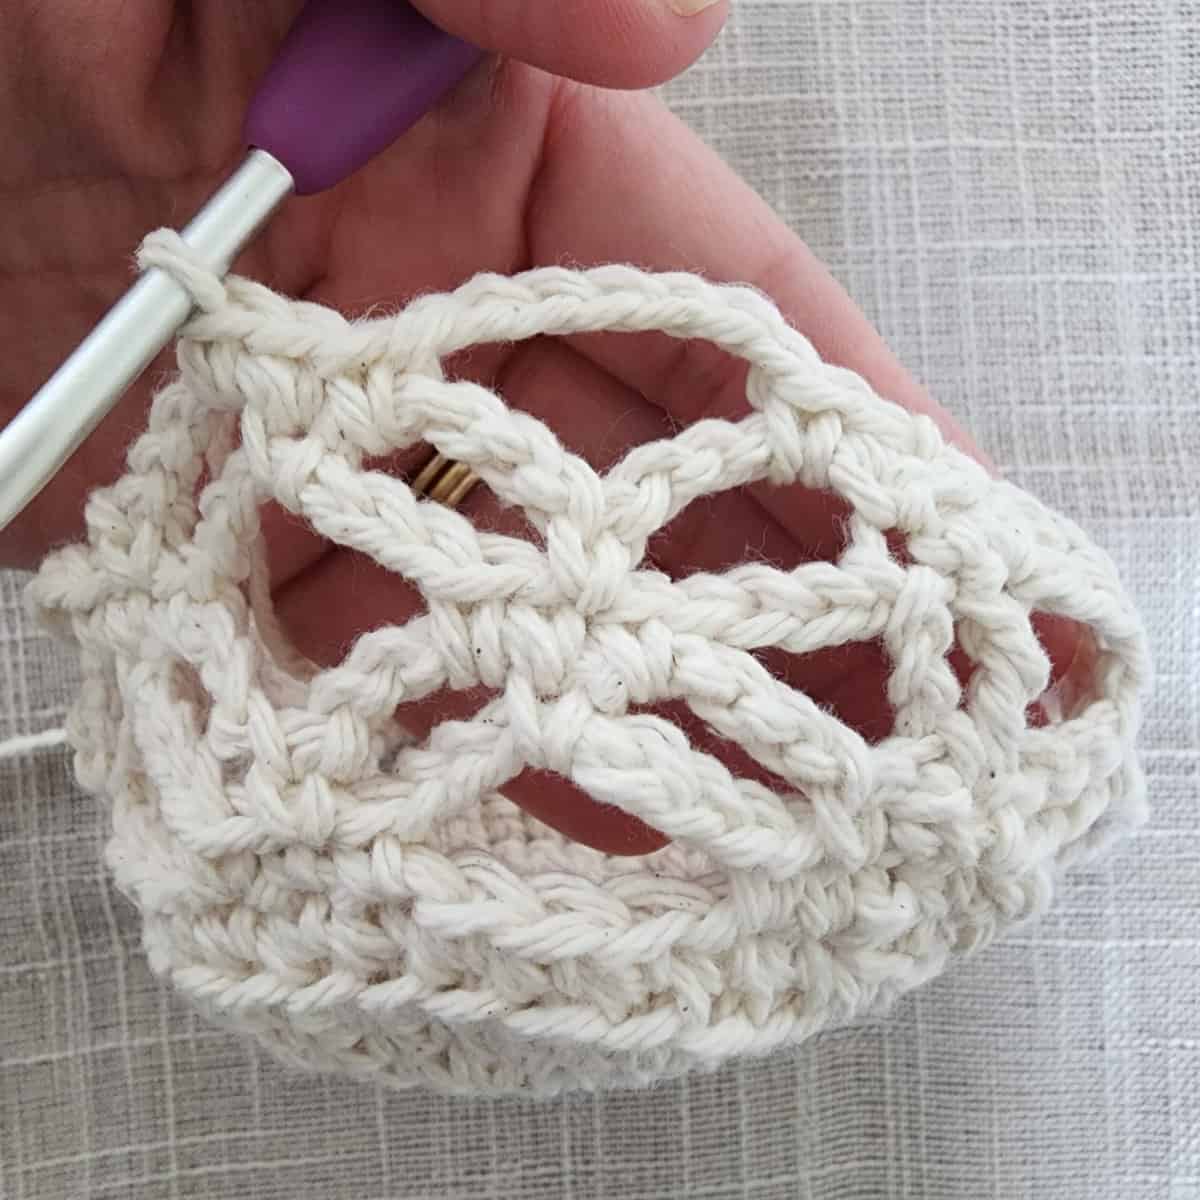
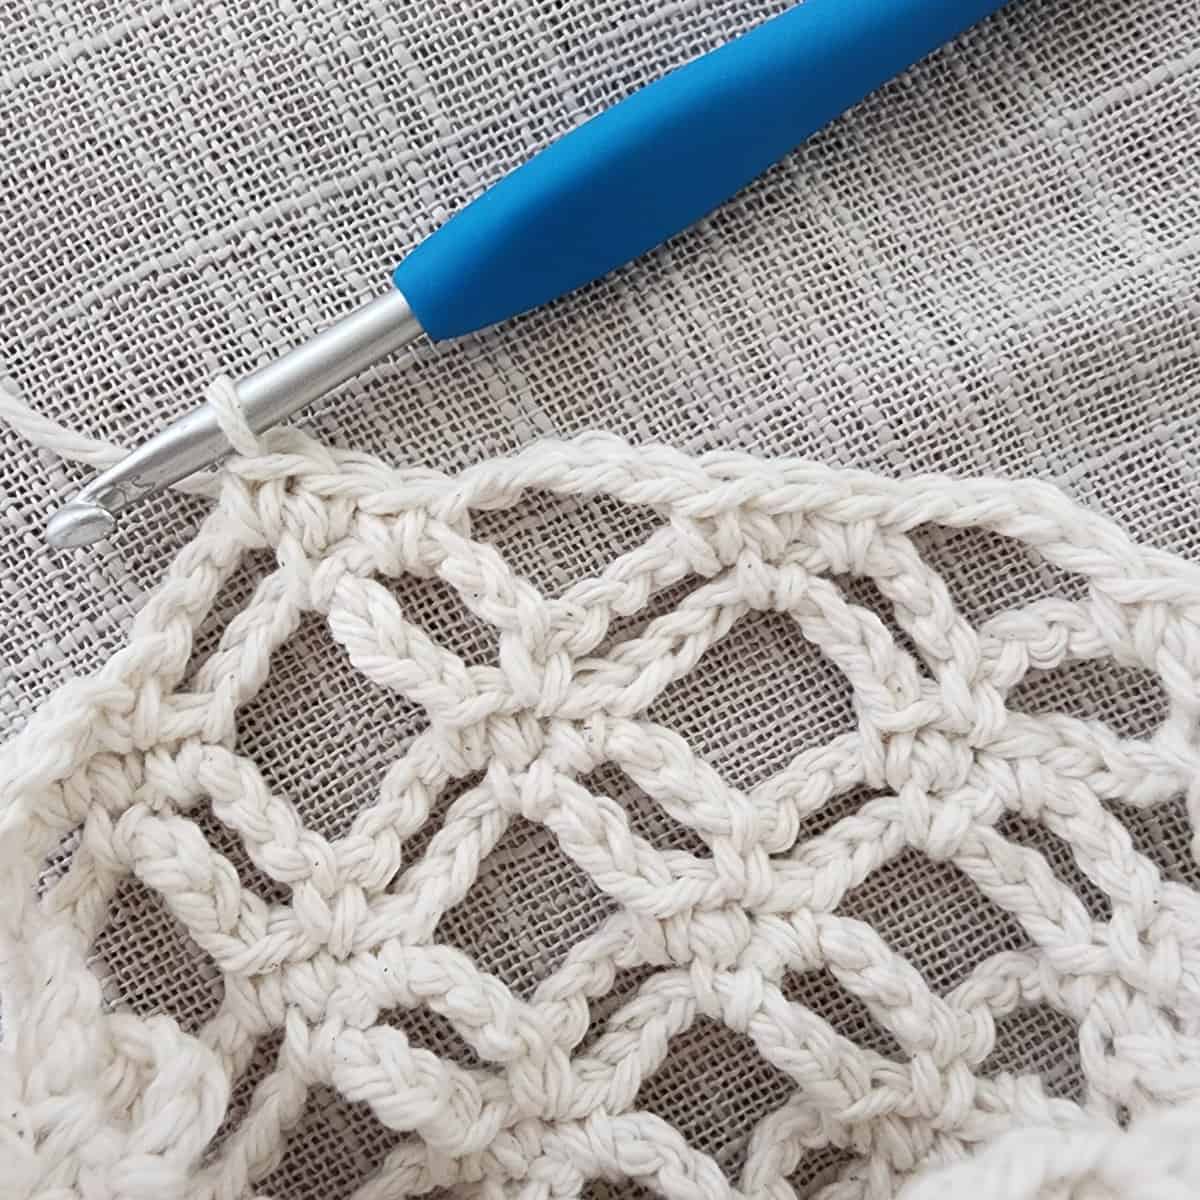
Progression Photos for Basket Base & Basket
The following progression photos show a size medium crochet plant hanger.
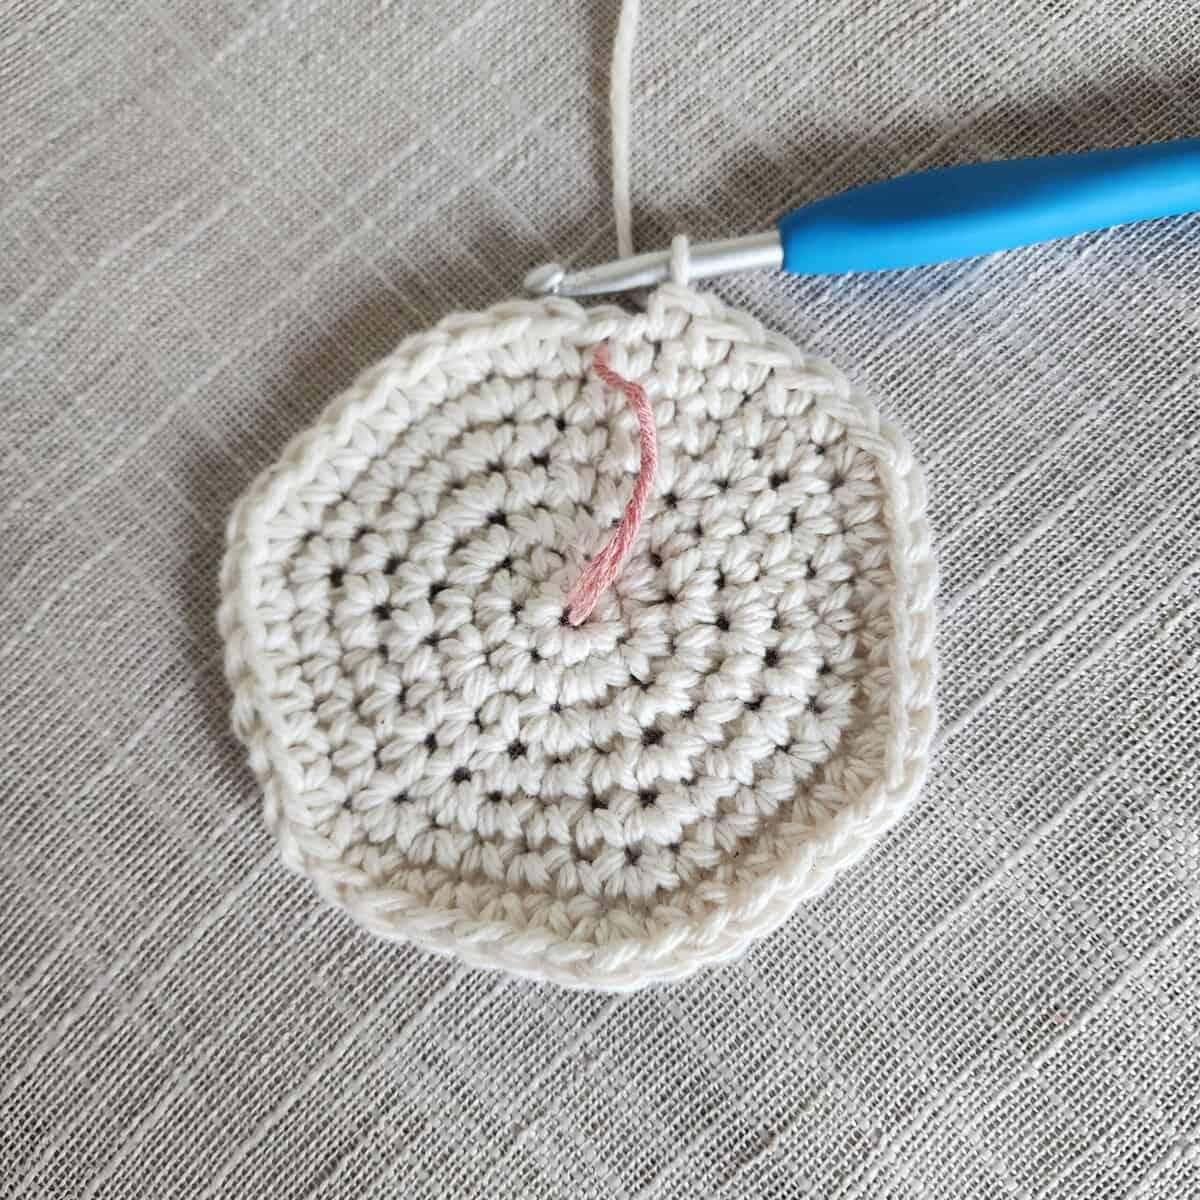
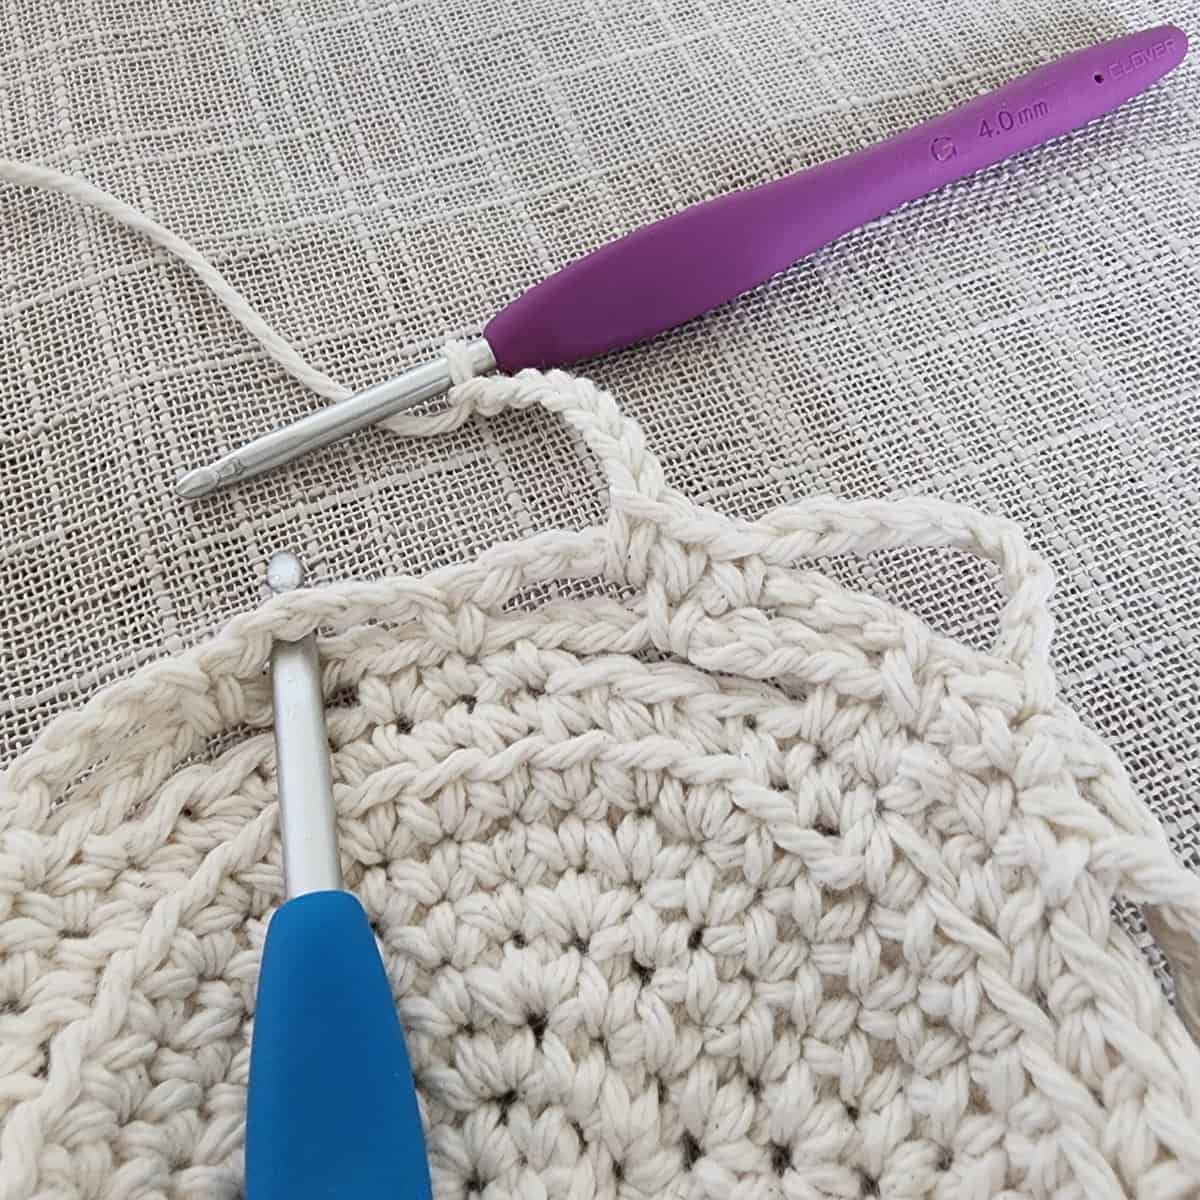
The photo above shows the last round of the basket base.
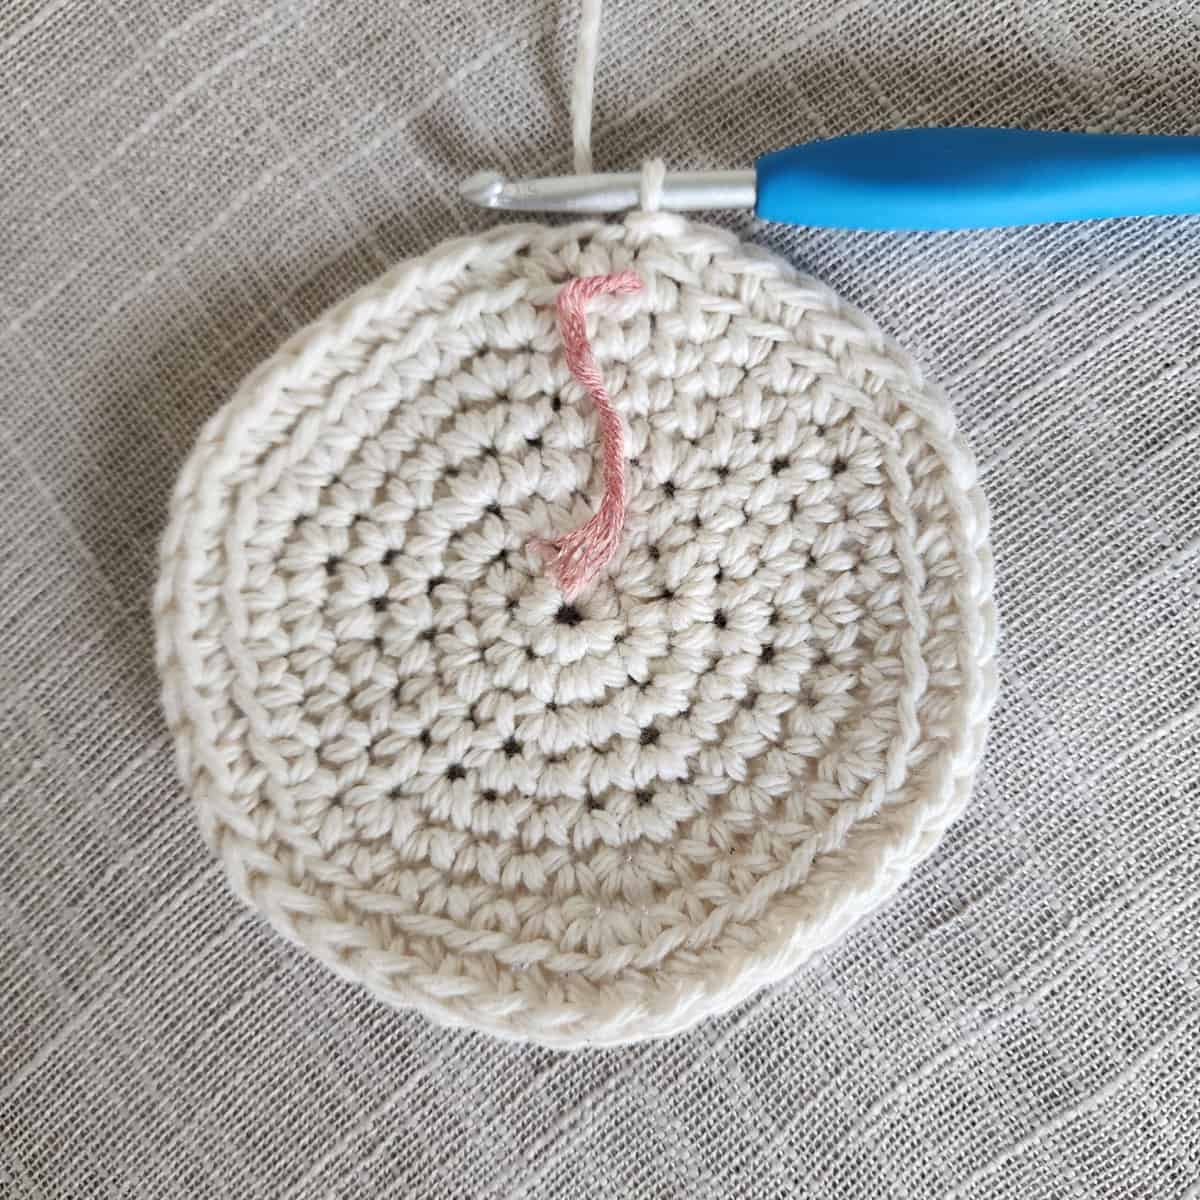
The photo above shows Rnd 1 of the basket complete.
The photo above shows the beginning of Rnd 2.
The photo above shows Rnd 2 complete.
The photo above shows the beginning of Rnd 3.
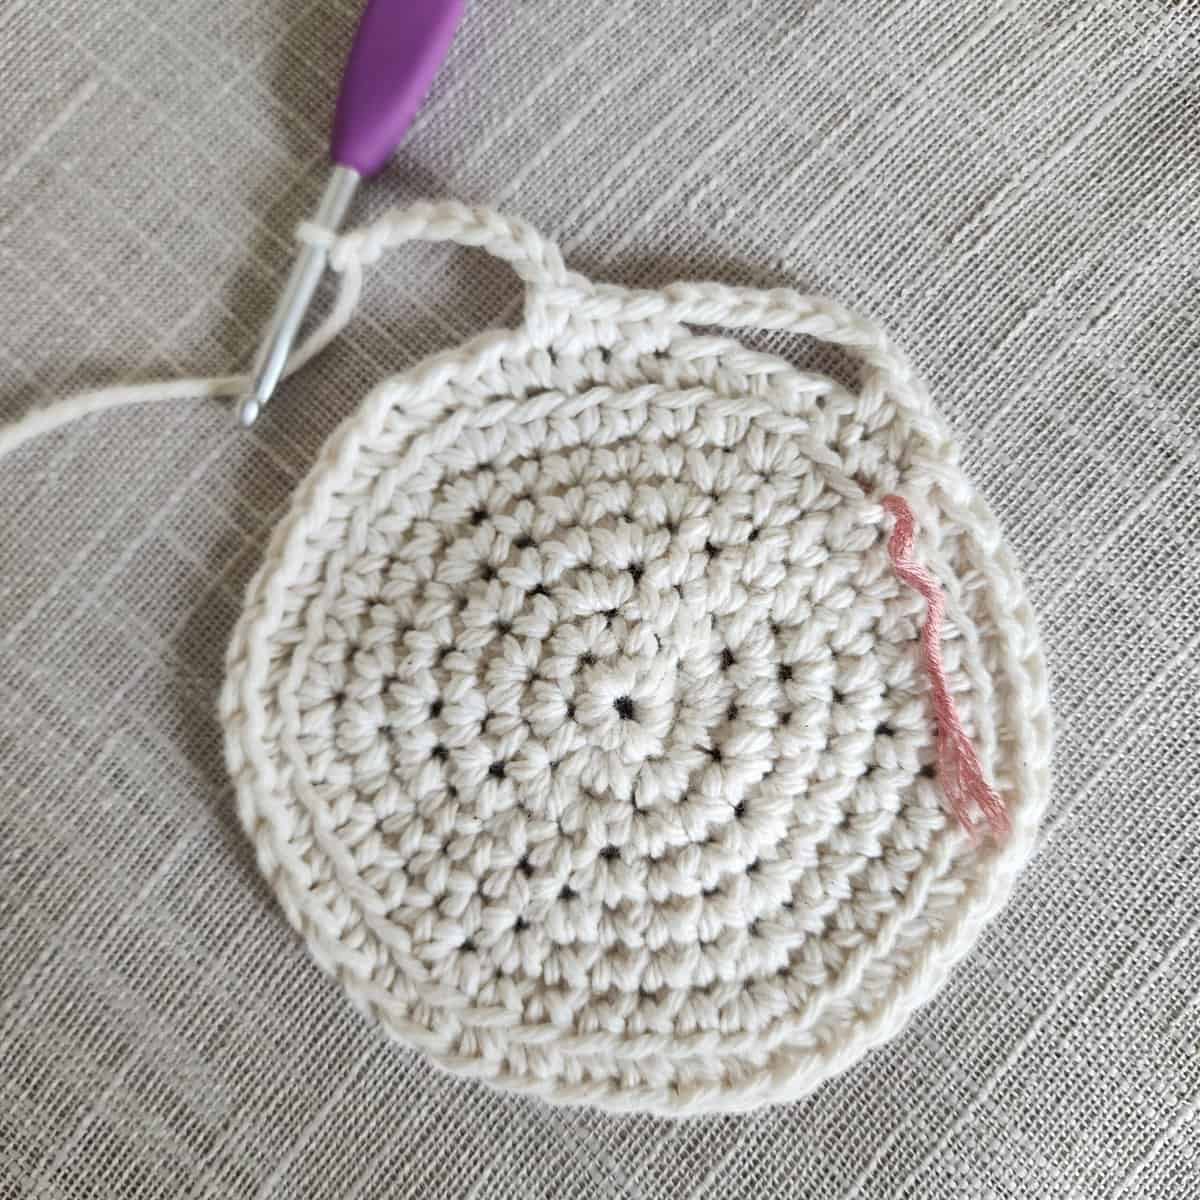
The photo above shows Rnd 3 in progress.
The photo above shows Rnd 3 complete.
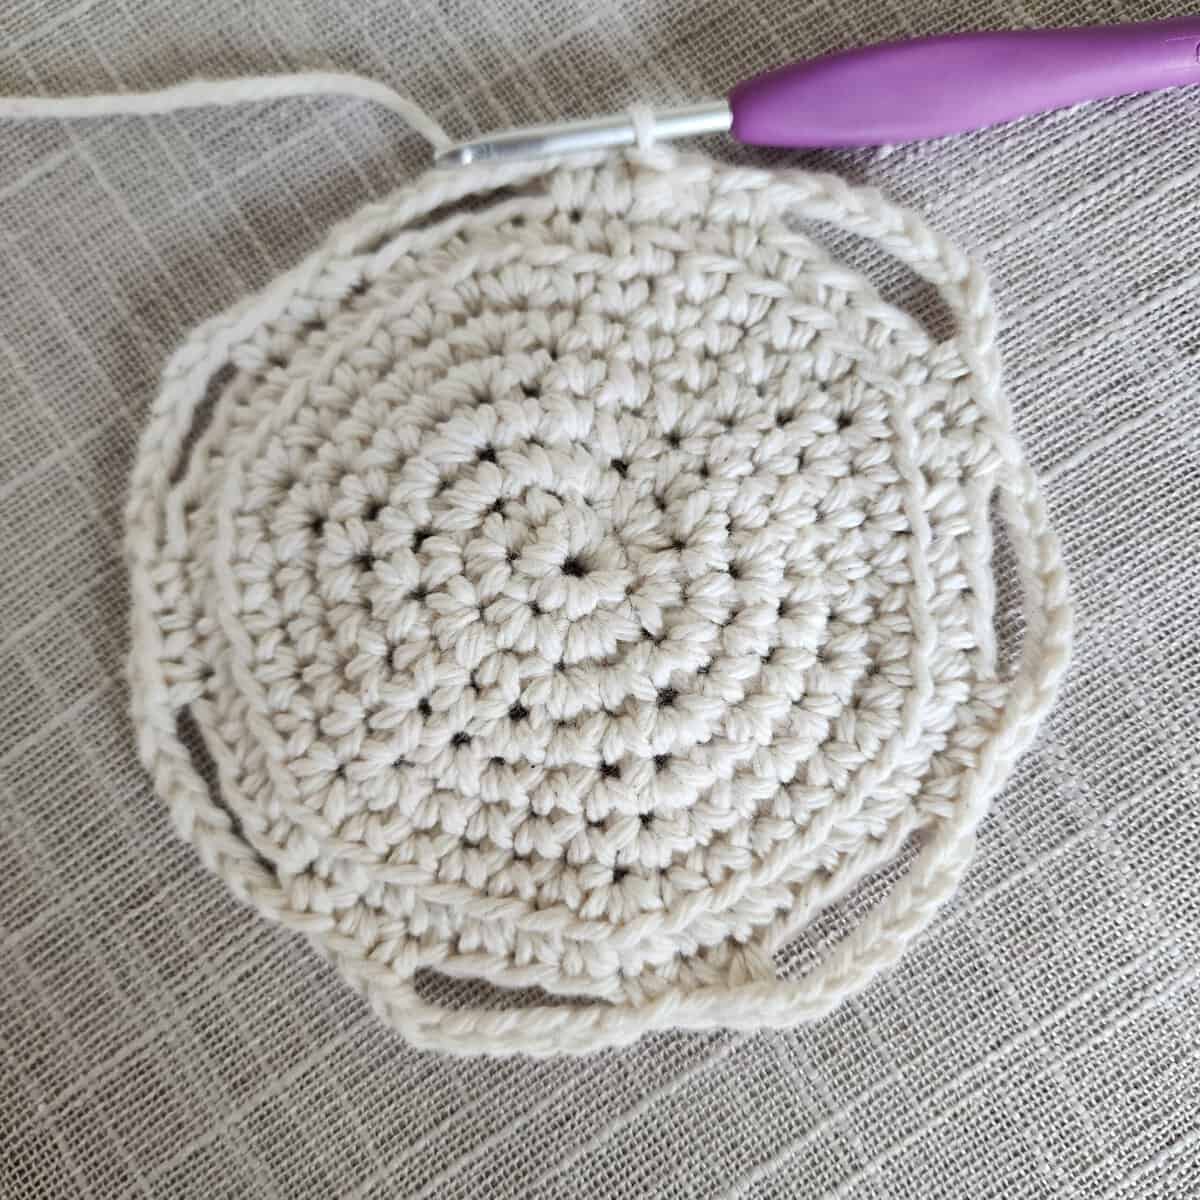
The photo above shows the beginning of Rnd 4.
The photo above shows Rnd 4 in progress.
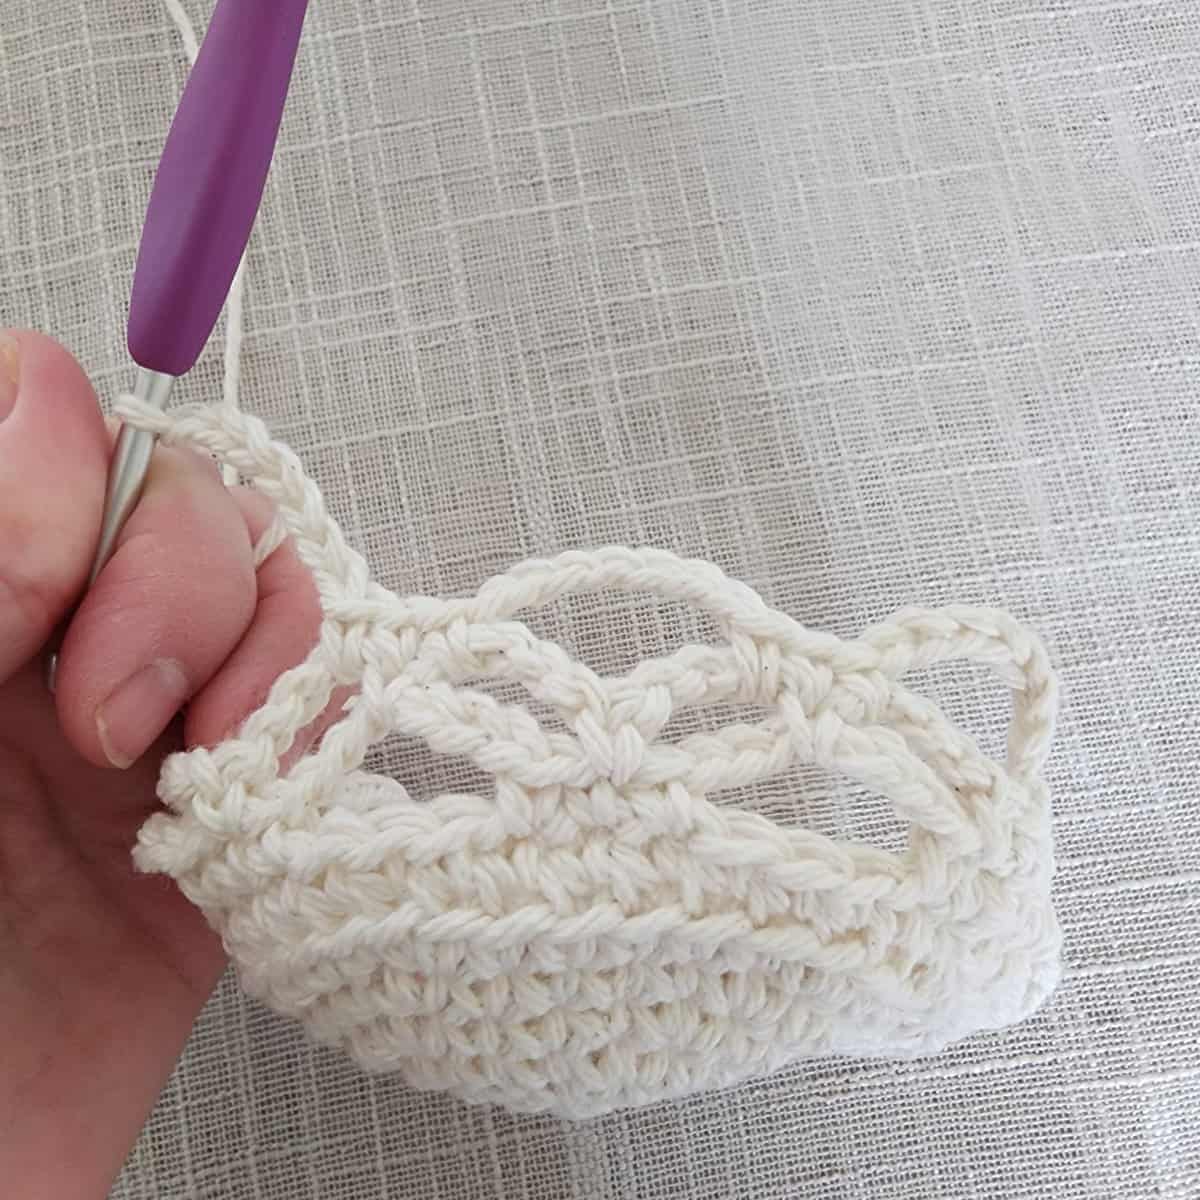
The photo above shows more of Rnd 4 in progress.
The photo above shows Rnd 4 complete.
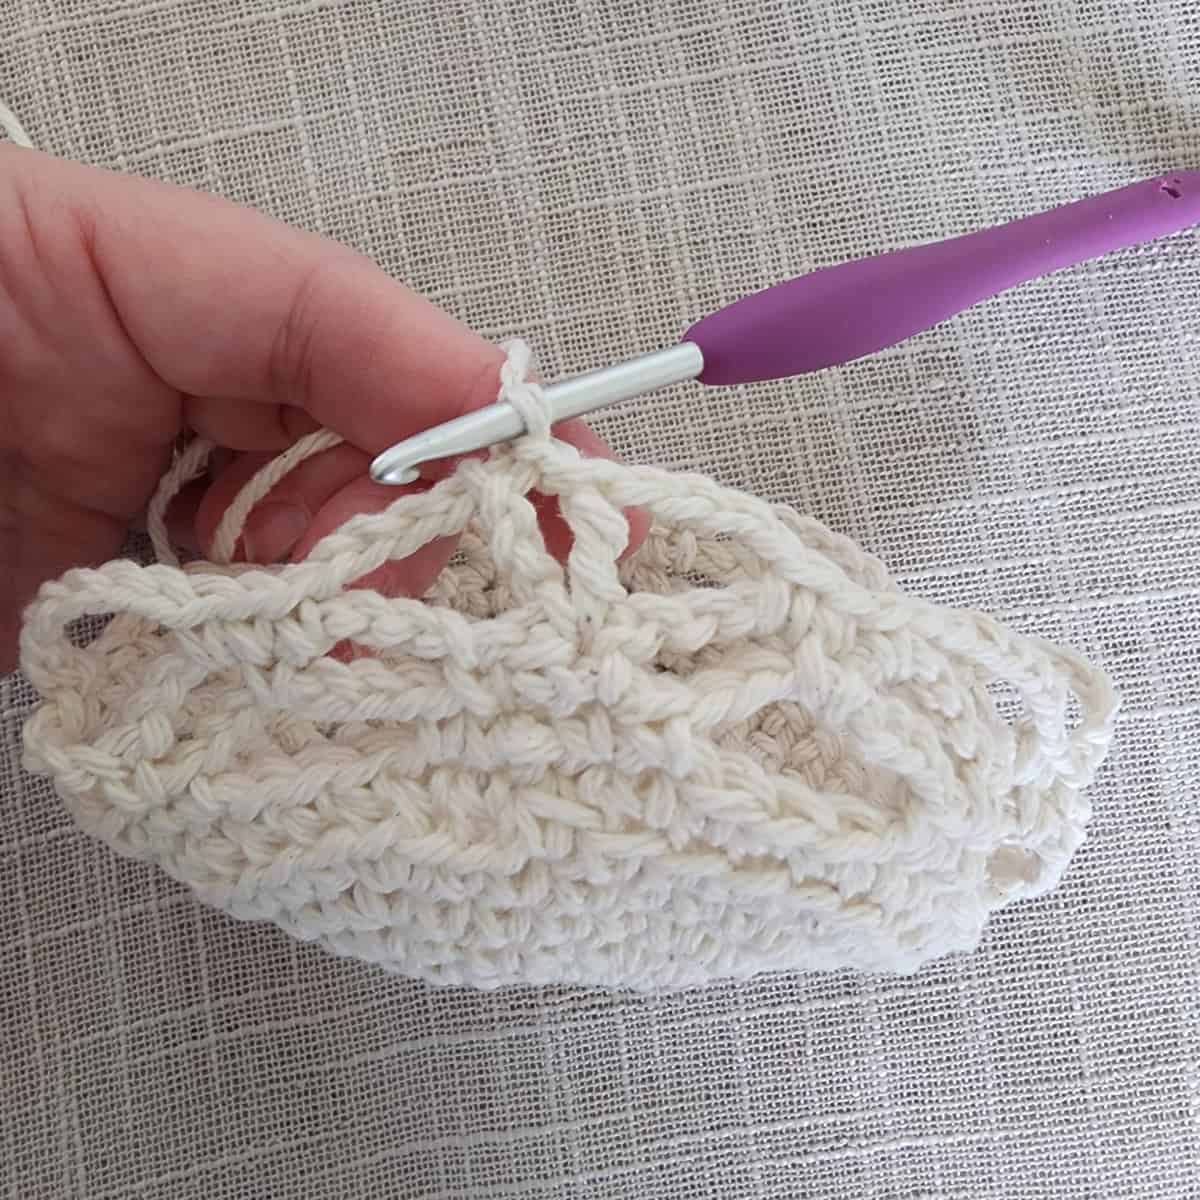
The photo above shows Rnd 5 in progress.
The photo above shows Rnd 5 complete.
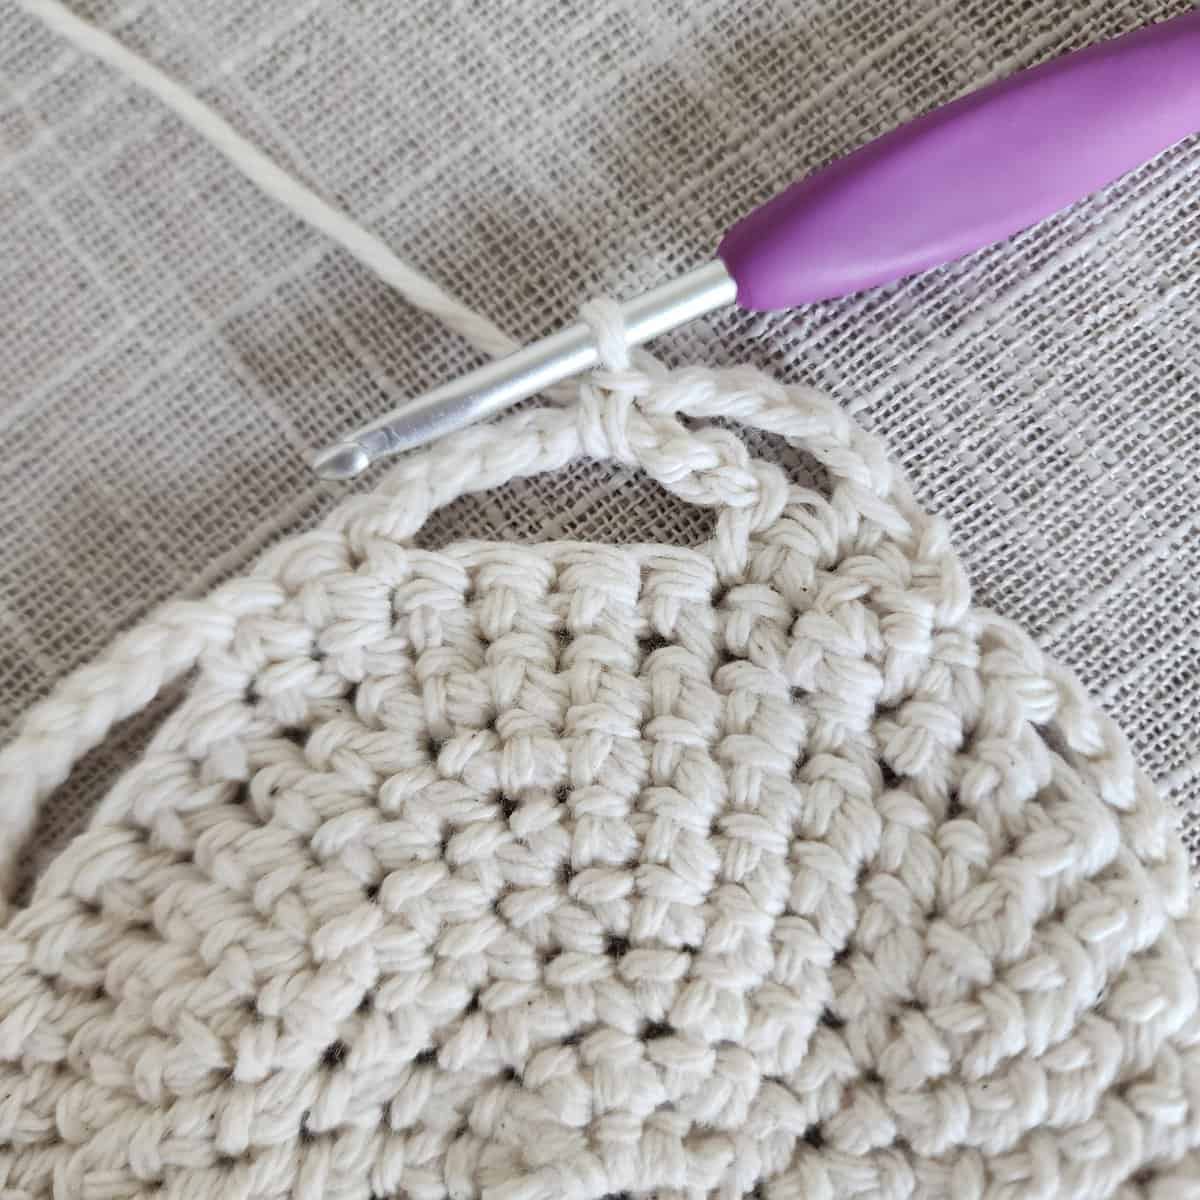
The photo above shows Rnd 6 in progress.
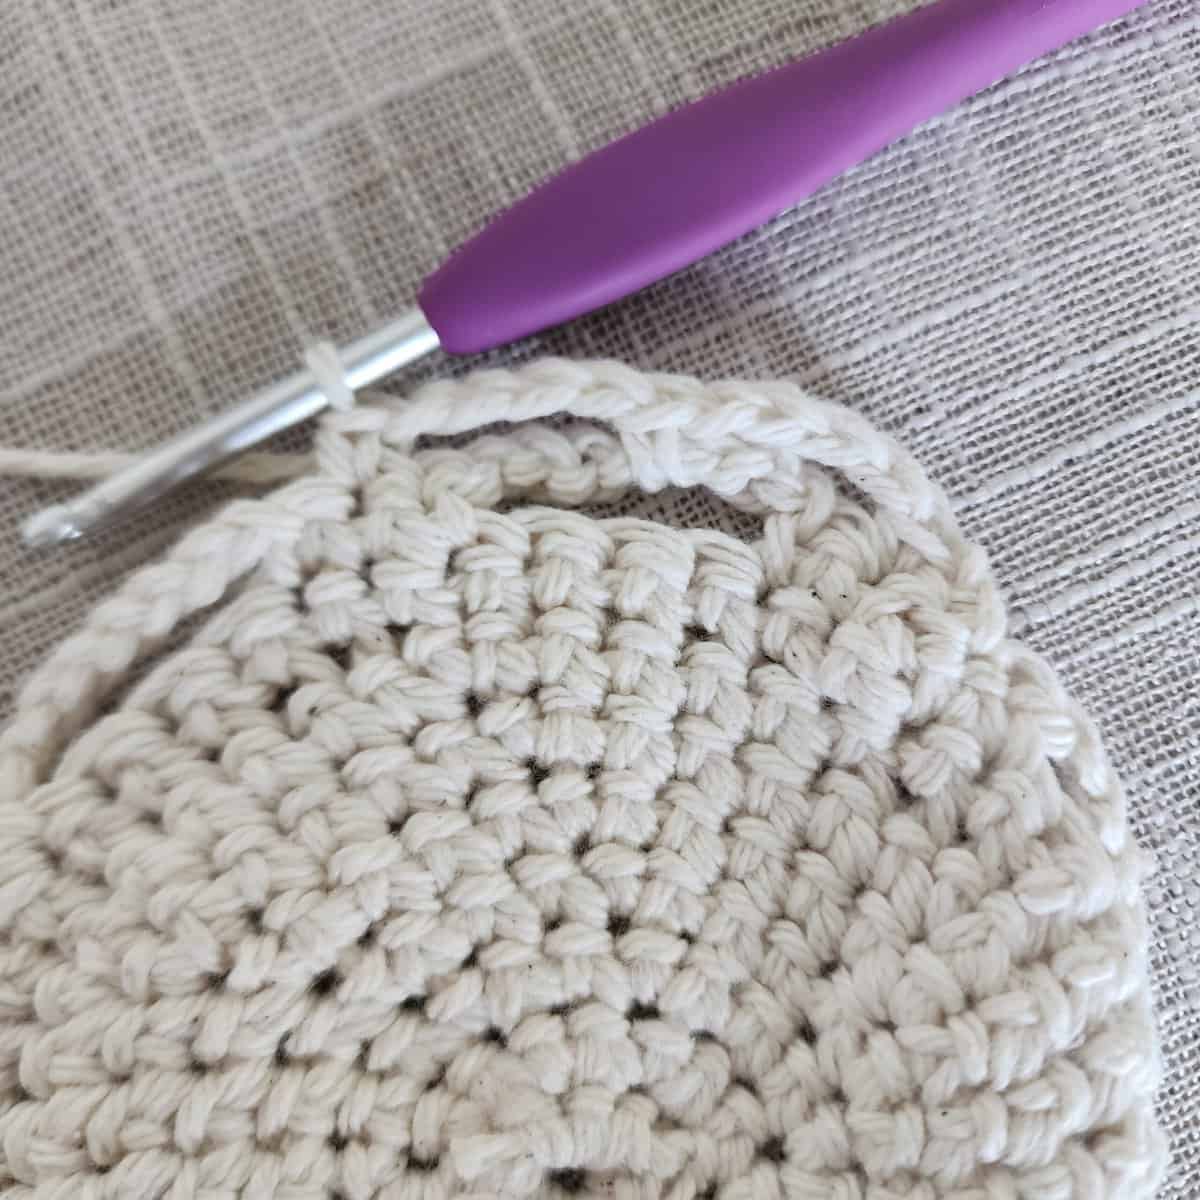
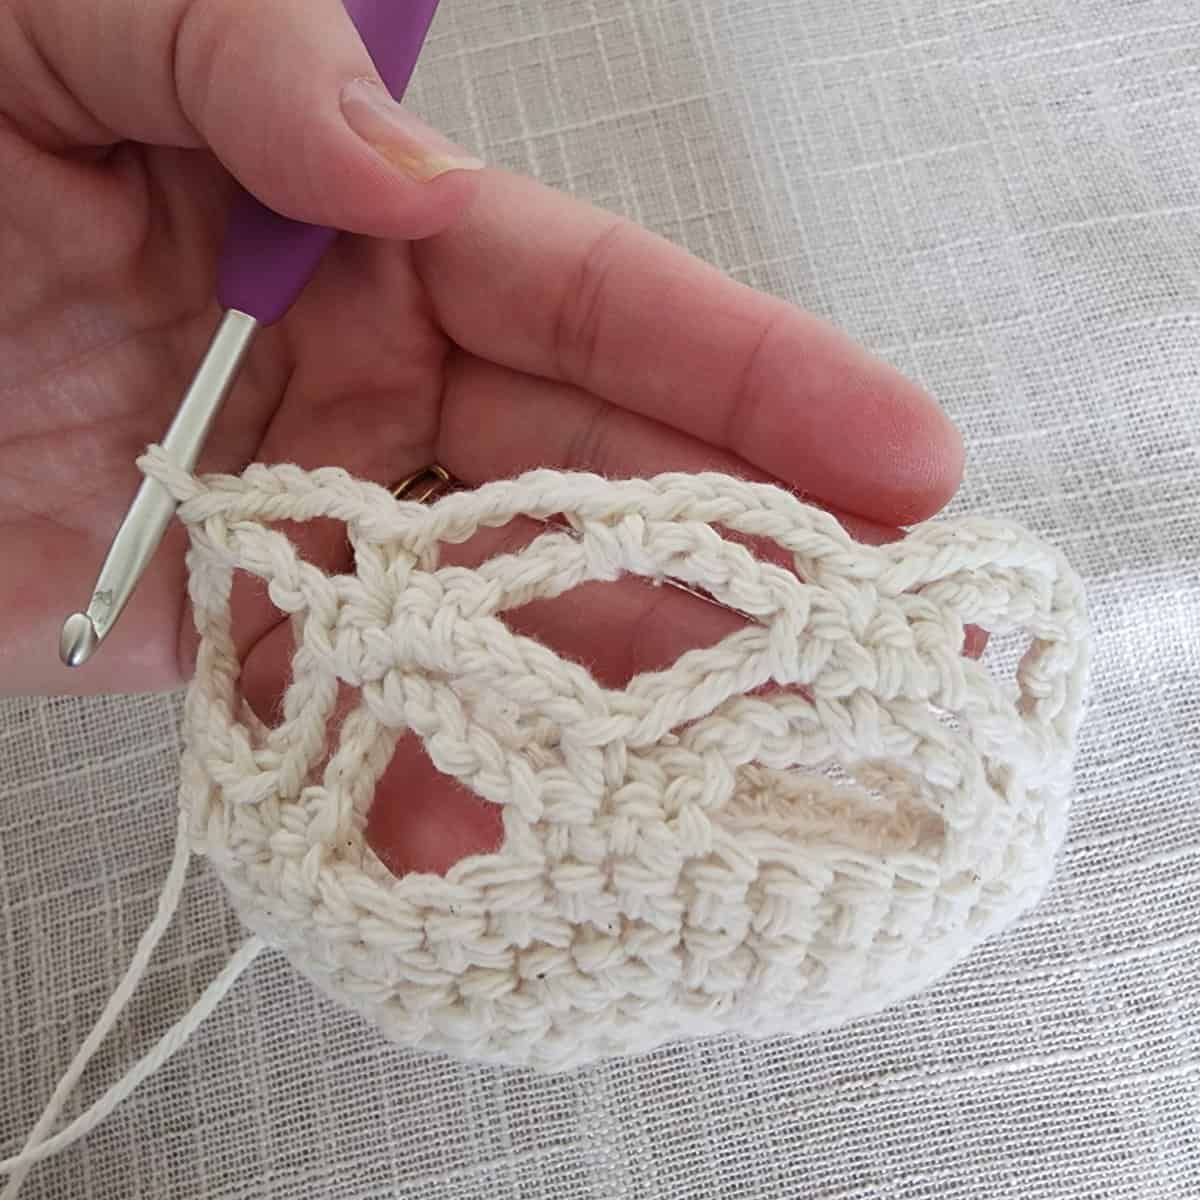
The photo above shows the first of the last 2 rounds in progress.
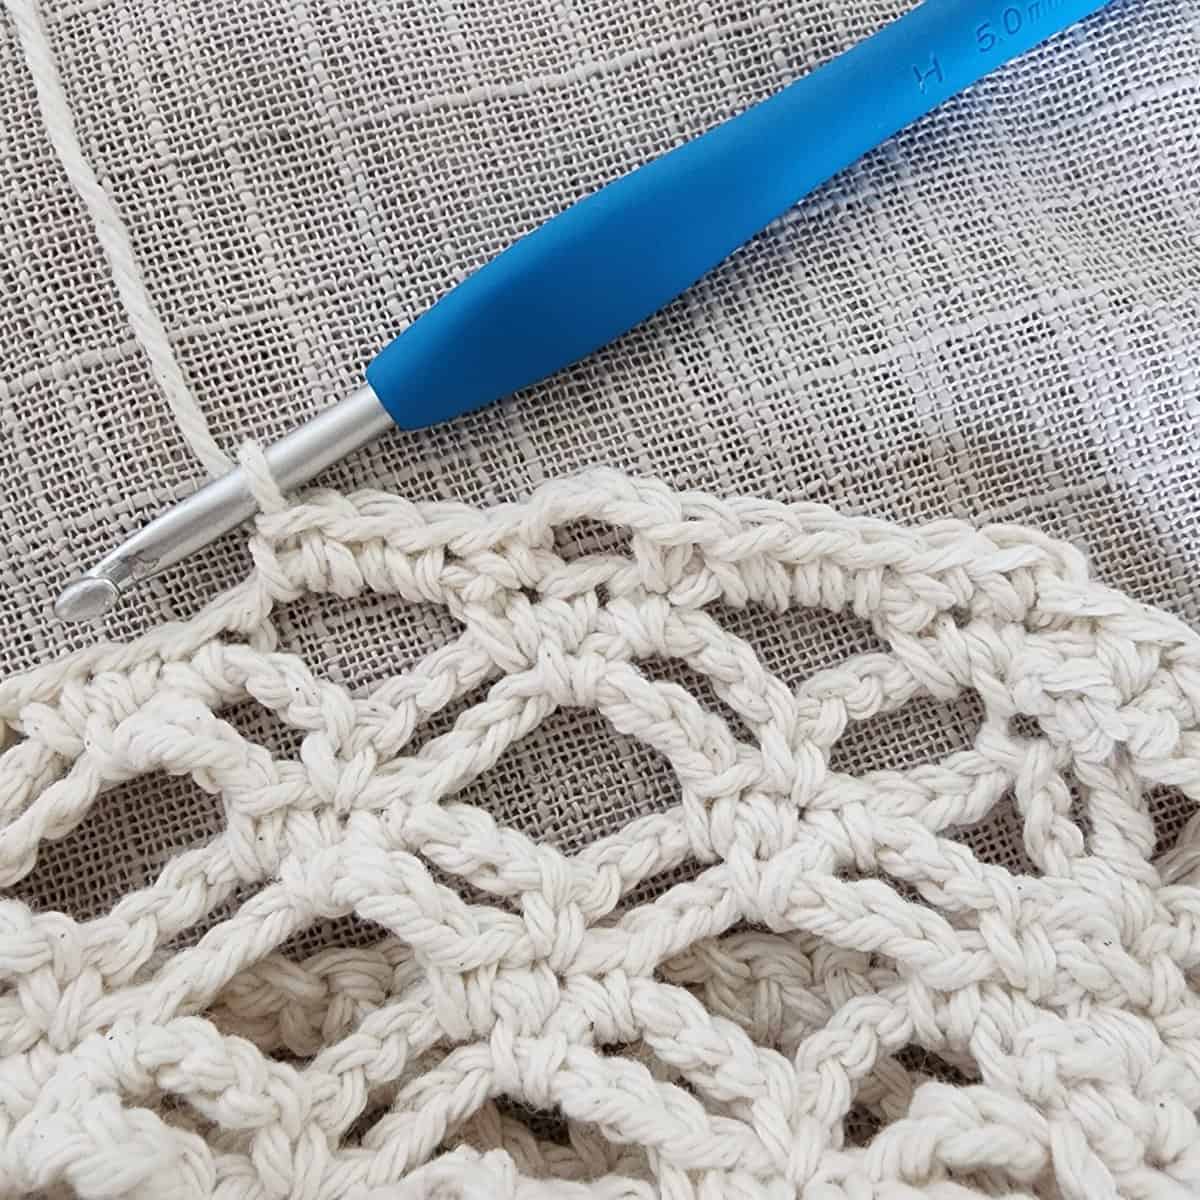
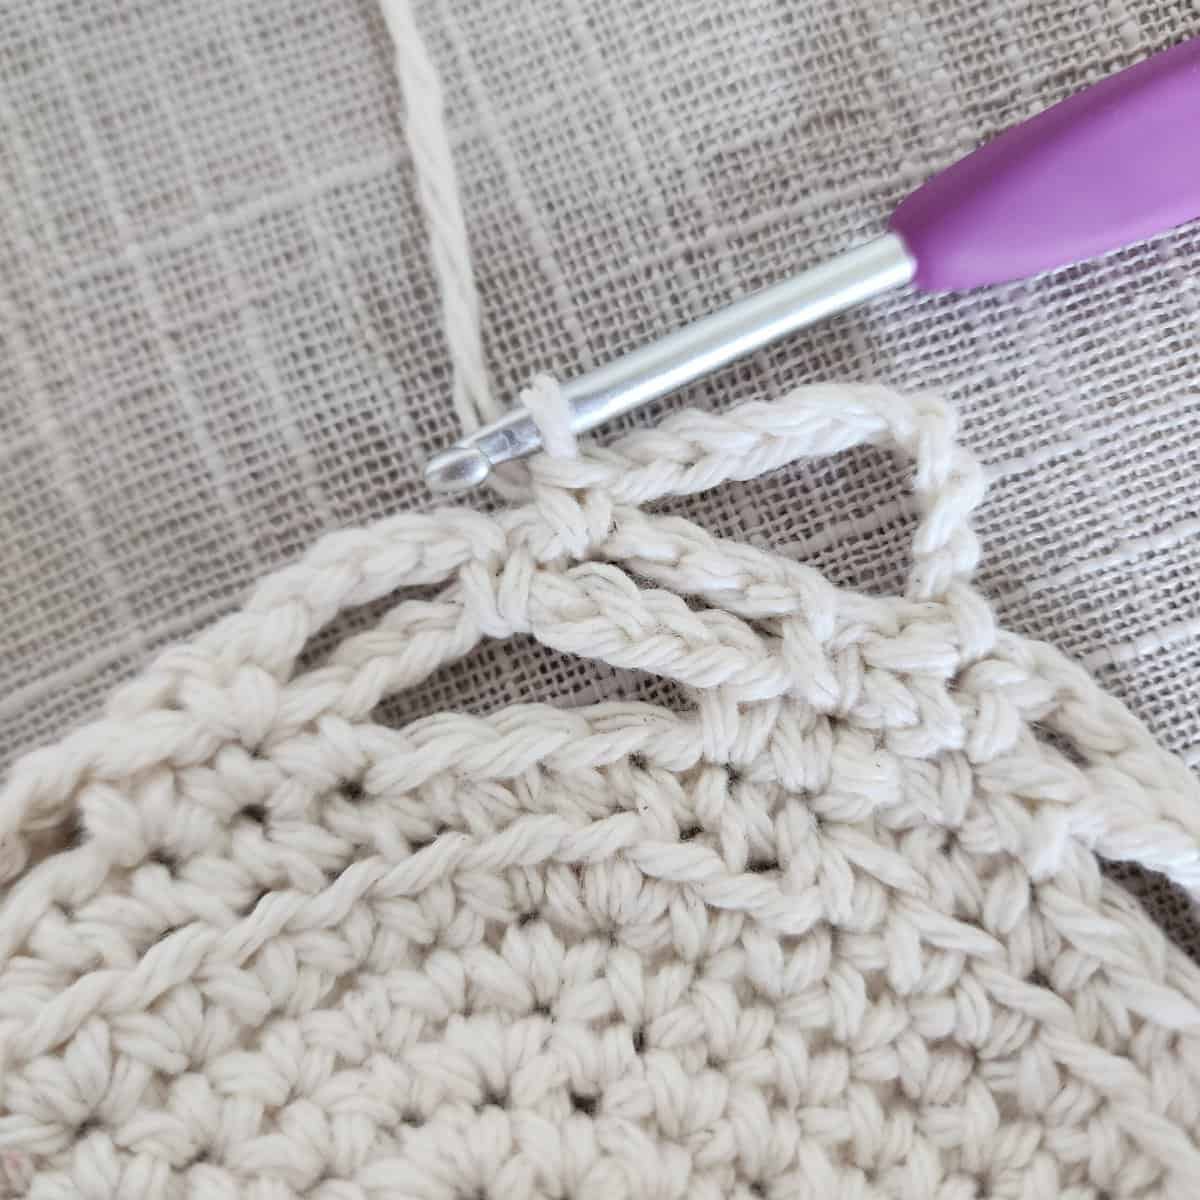
The photo above shows the last round in progress.
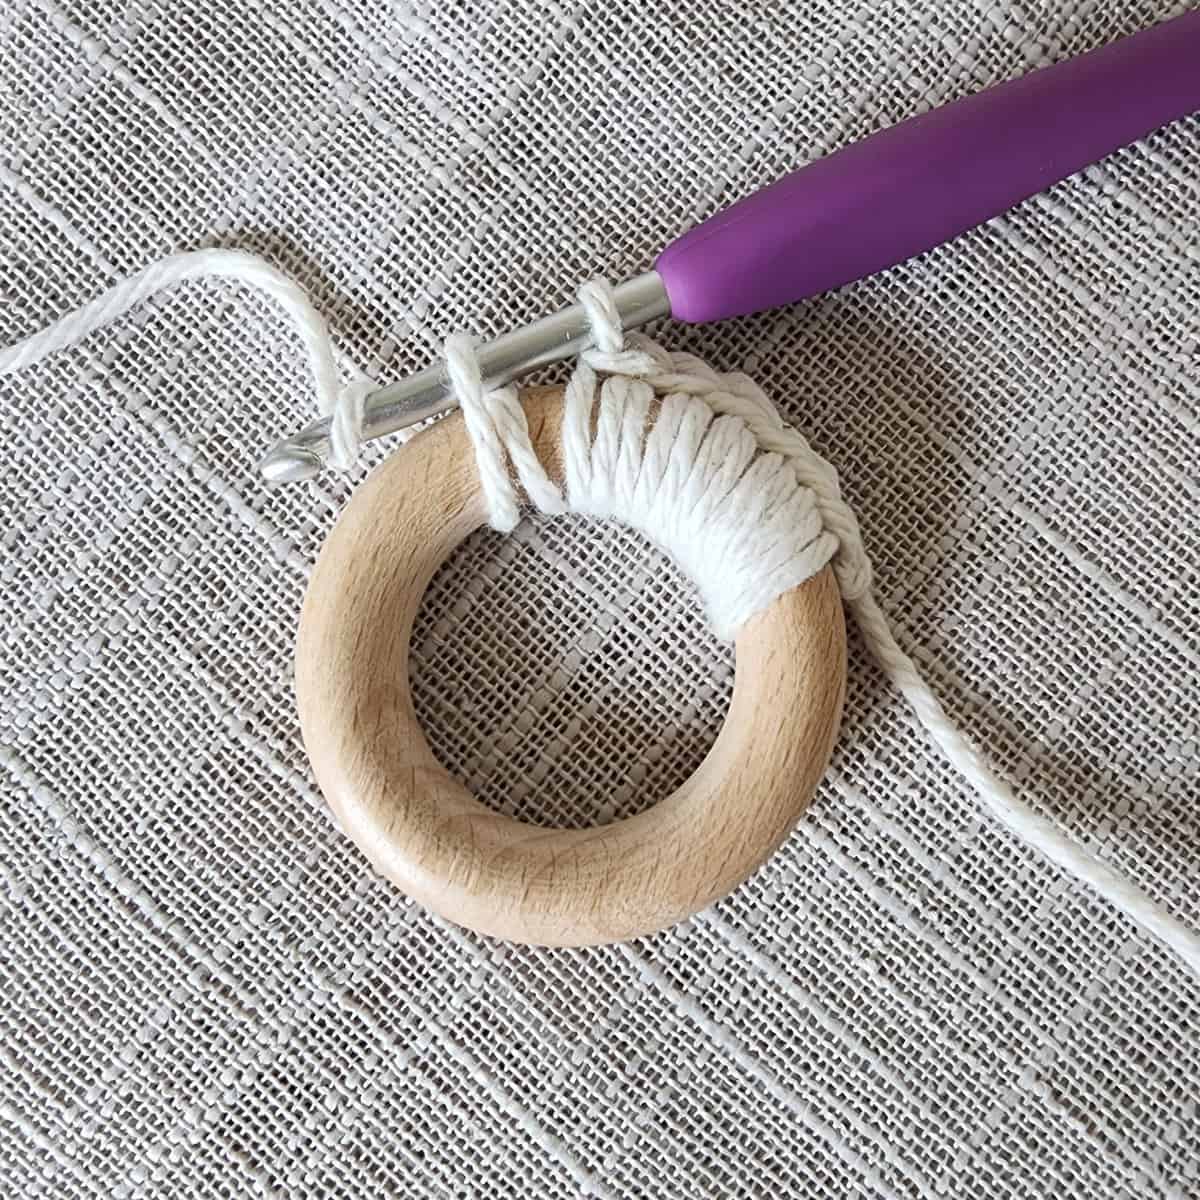
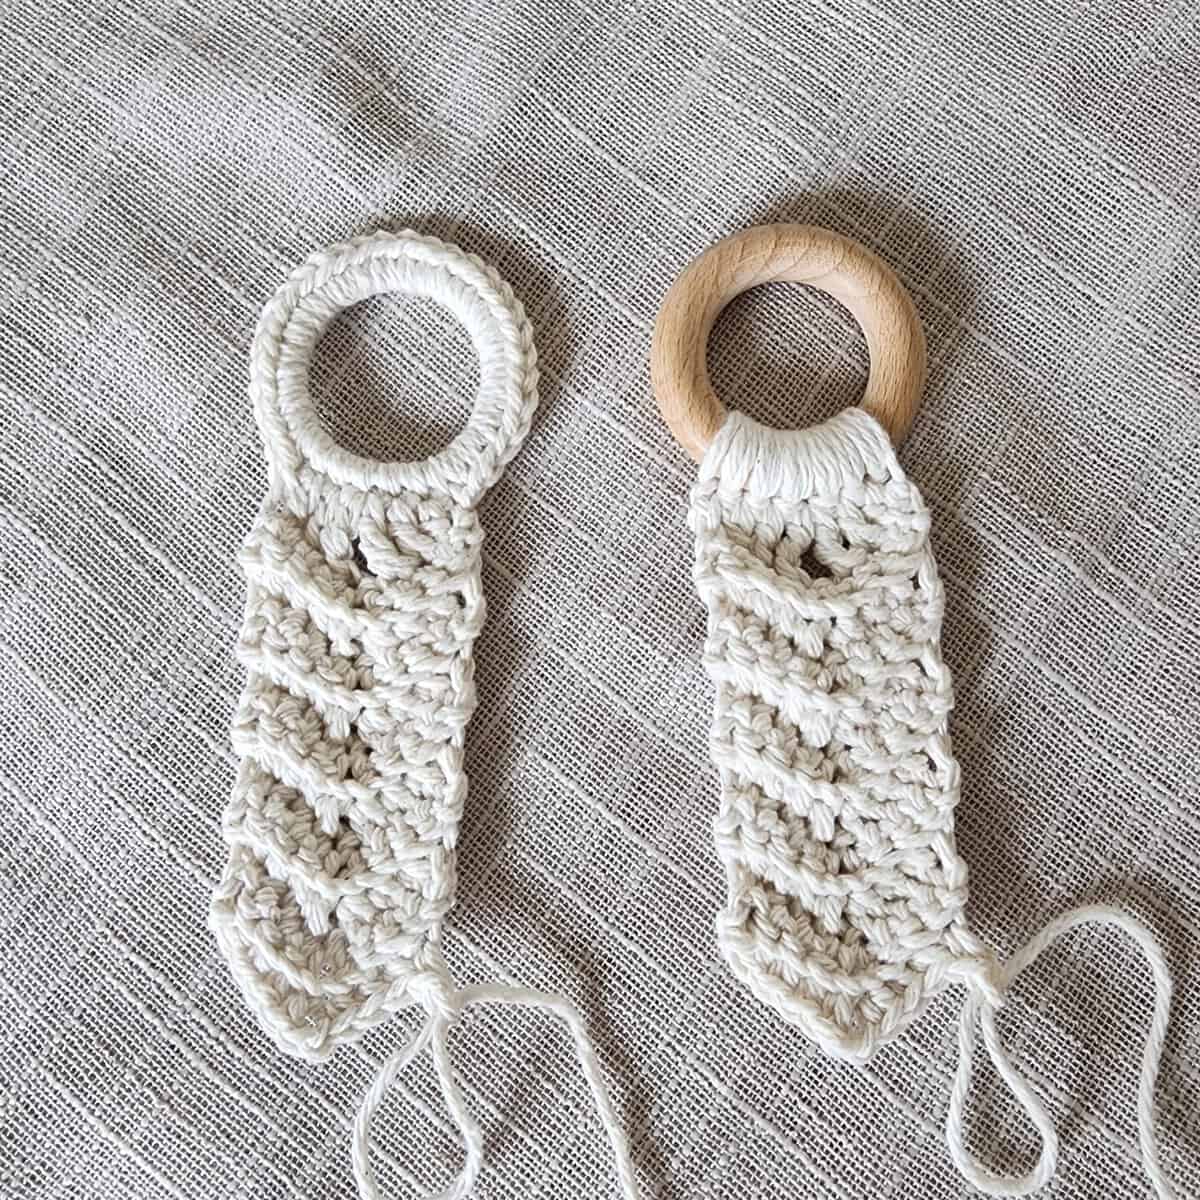
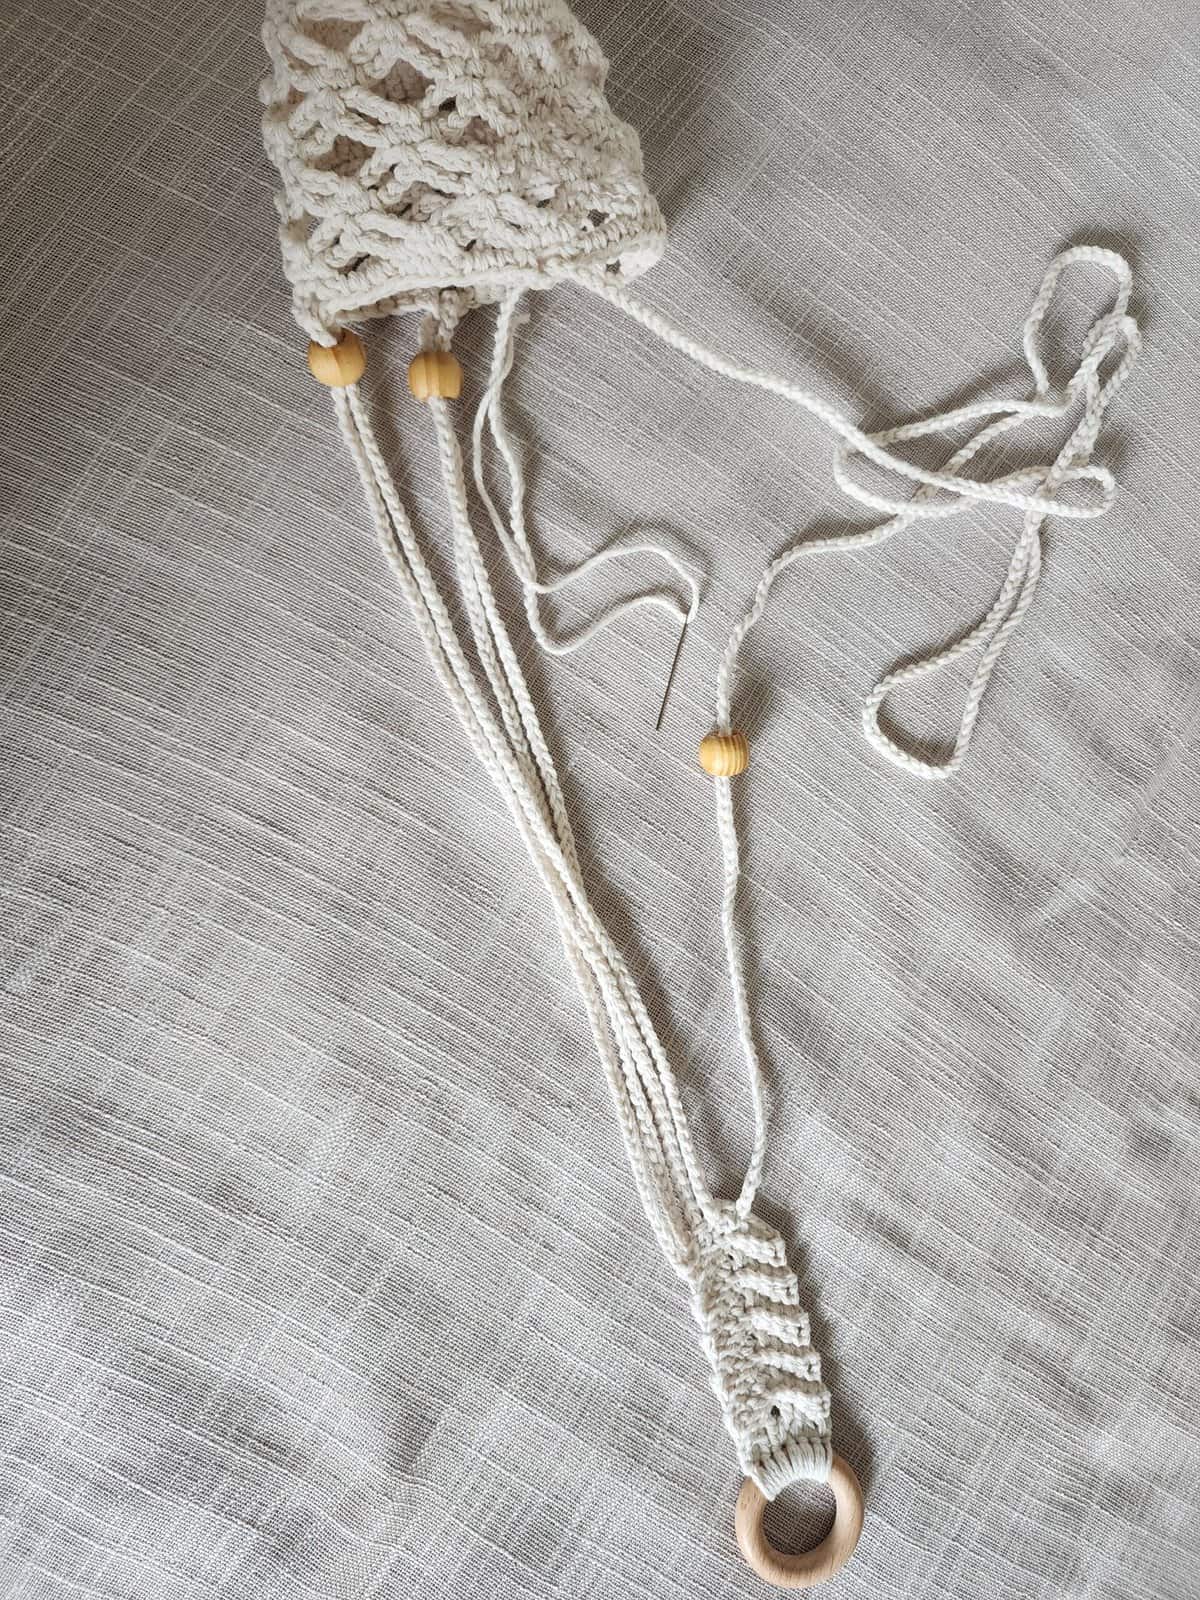
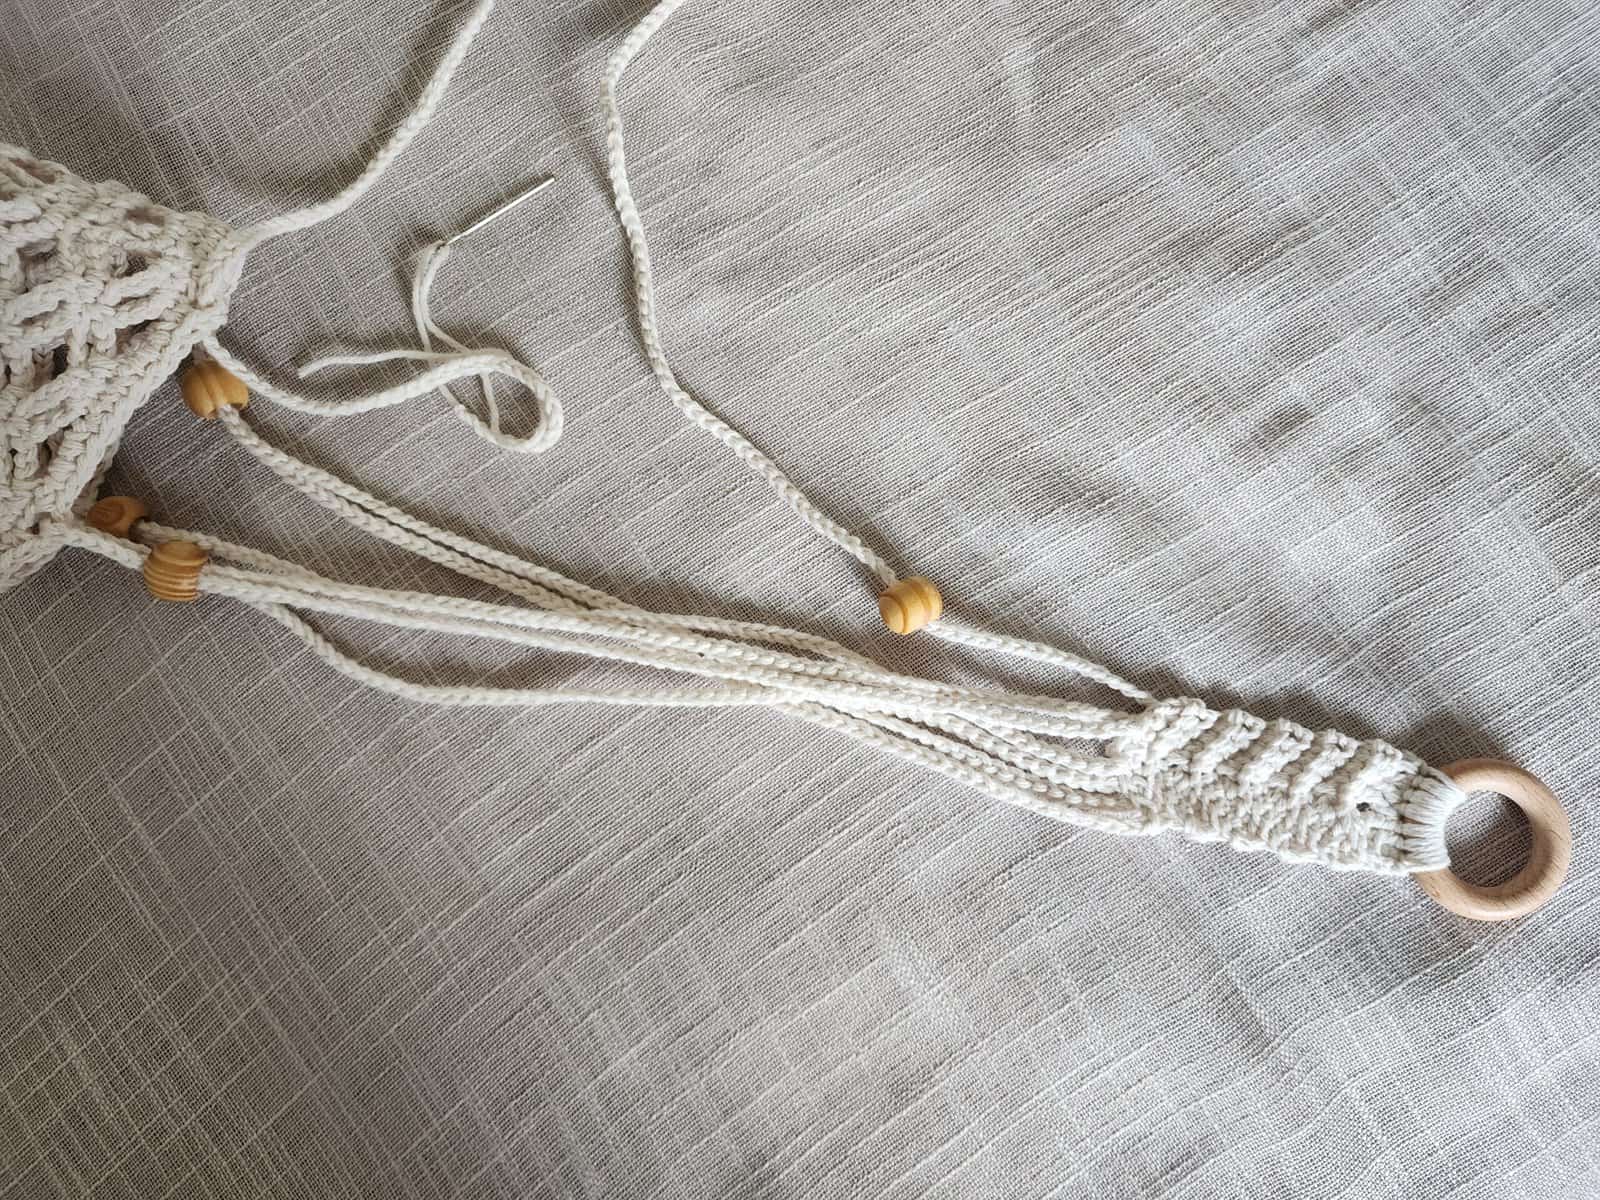
Hanging Rings
Choose 1 of 3 Options: Wooden Ring, Milk Jug Ring, or Crocheted Ring.
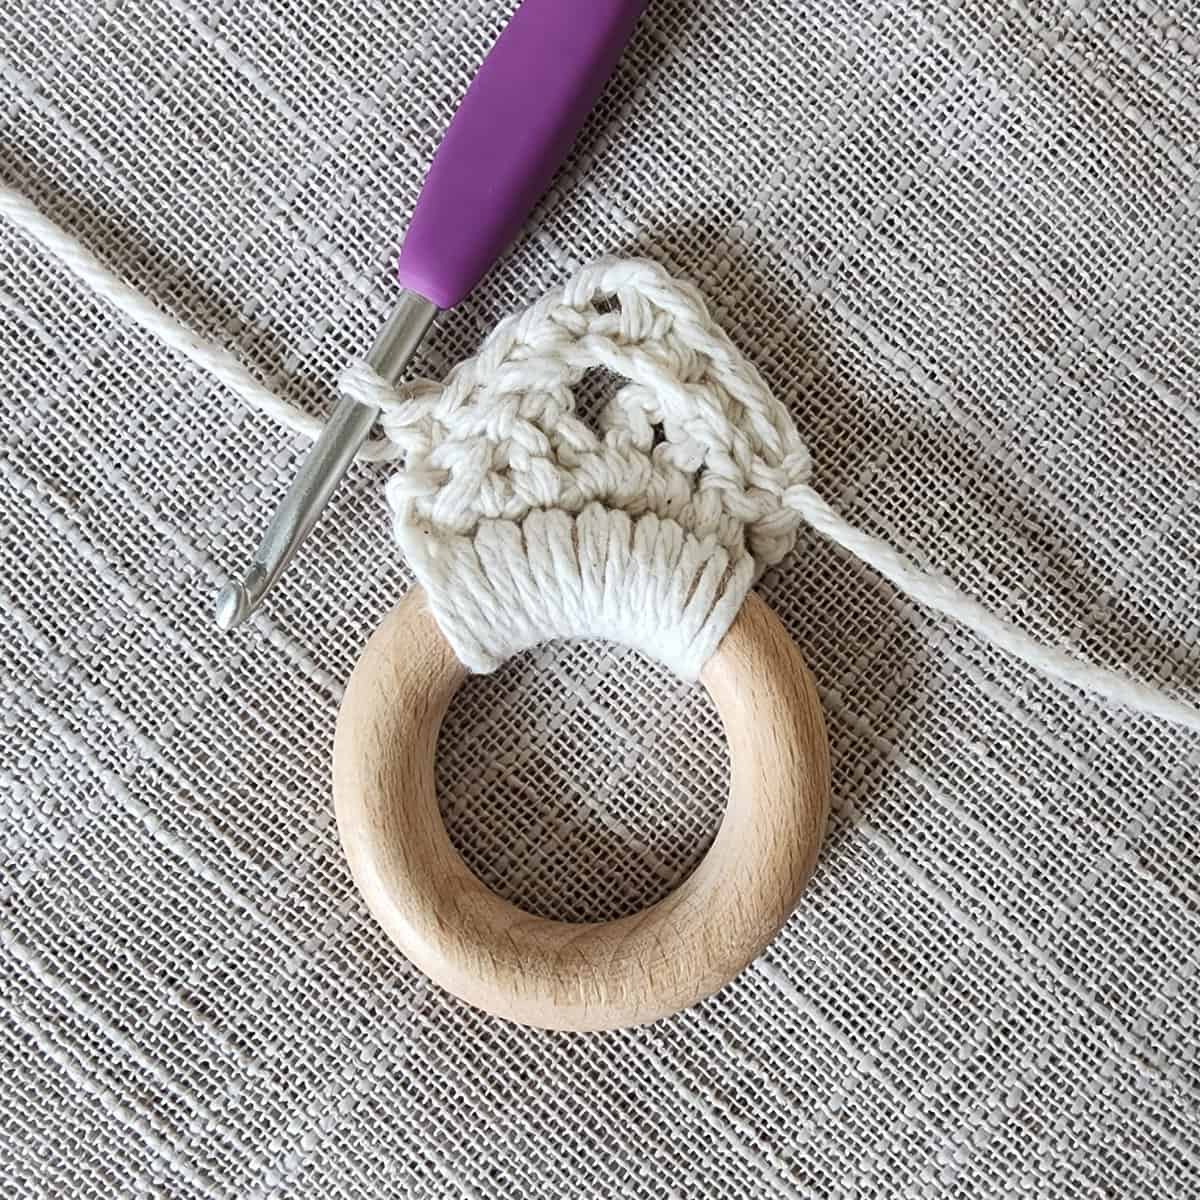
Wooden Ring
Row 1: With a 4.00mm crochet hook, work 7 sc around wooden ring. Turn. (7 sts) Do not fasten off. Continue on to Chevron Hanger.
Milk Jug Ring
Row 1: With a 4.00mm crochet hook, work 36 sc around a milk jug ring. Join with a sl st. (36 sts)
Do not fasten off. Continue on to Chevron Hanger.
*Stitch count isn’t crucial for Rnd 1. Work as many sc as it takes to completely cover the milk jug ring. I worked 24 sc around.

Crocheted Ring
Rnd 1: With a 4.00mm crochet hook, ch 24. Join with a sl st to the first ch. (24 sts)
Rnd 2: Ch 1, working into the back humps of the ch, sc in each ch around. Do not join. (24 sts)
Rnd 3: Work a spike sc around each sc from Rnd 2 and into the chains from Rnd 1. Join with a sl st. (24 sts)
Do not fasten off. Continue on to Chevron Hanger.
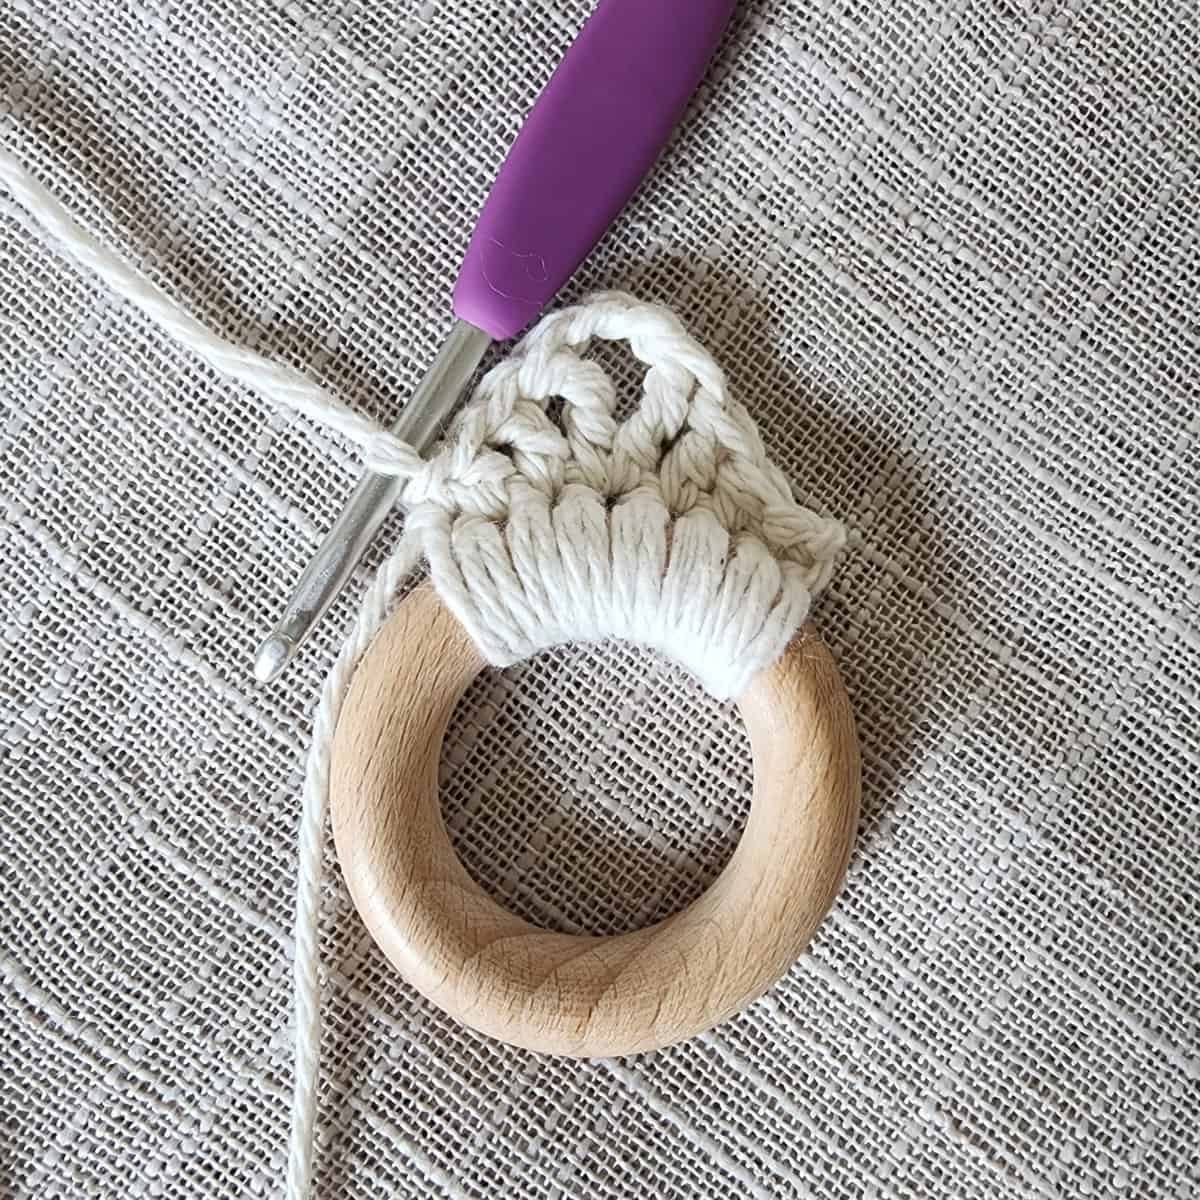
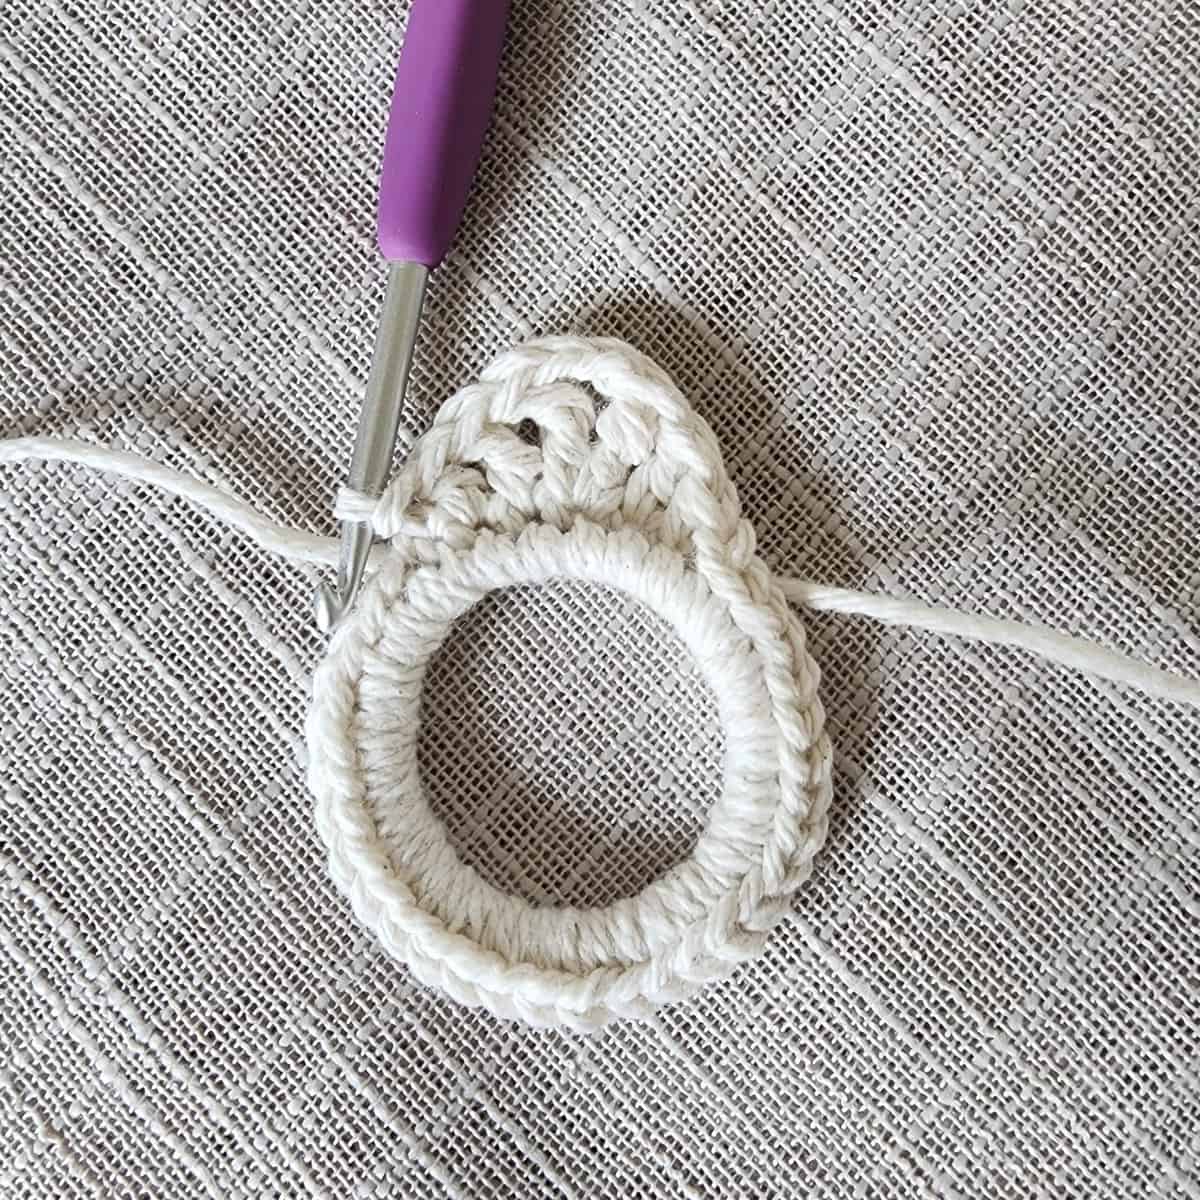
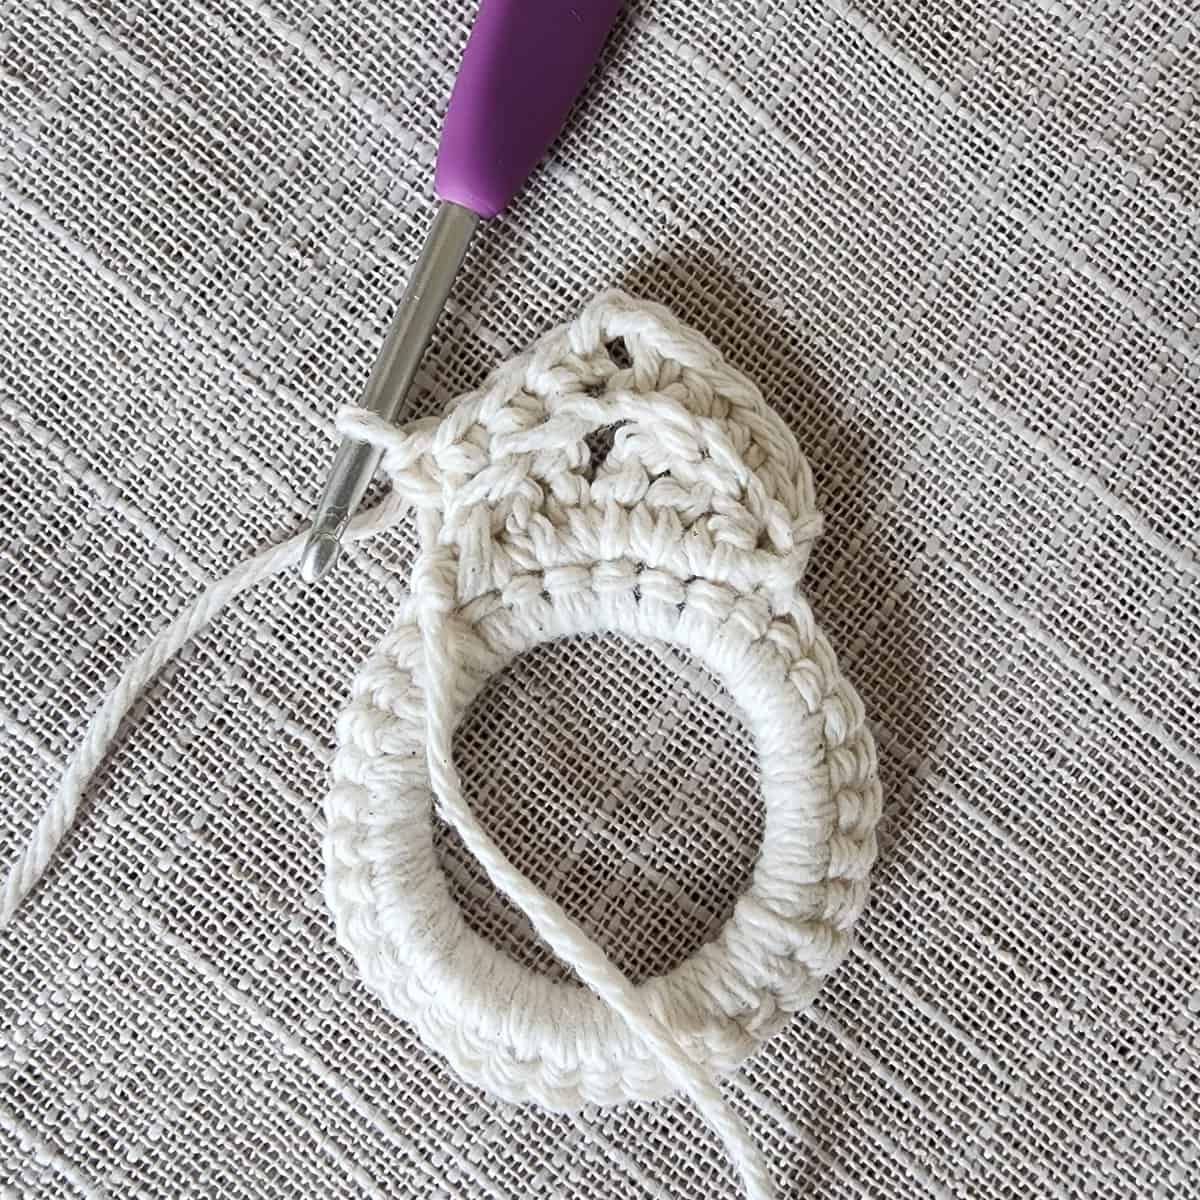
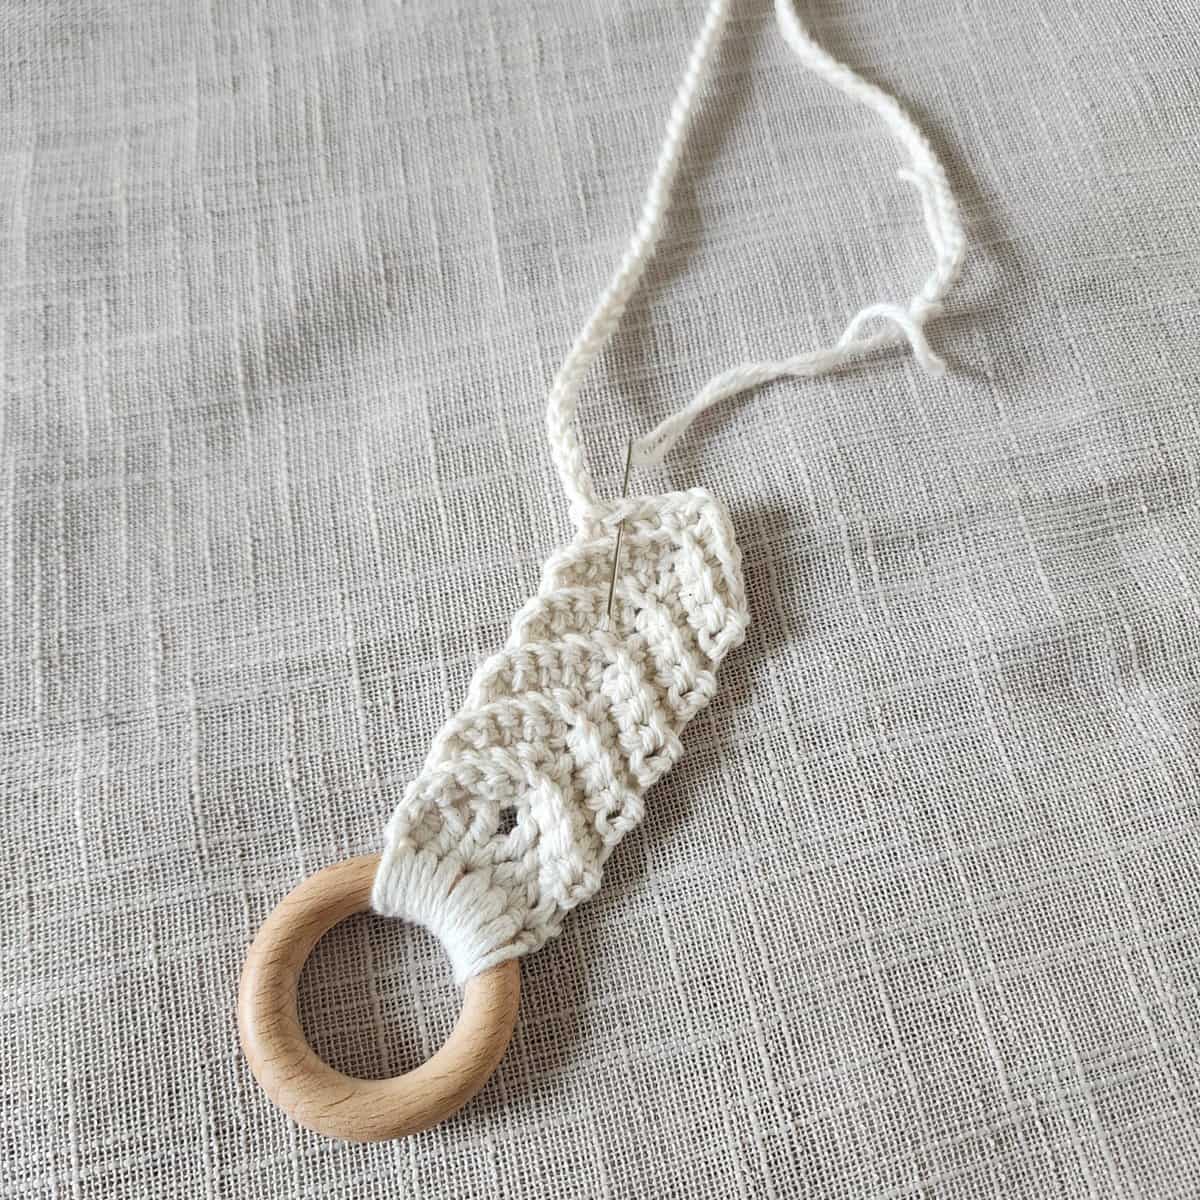
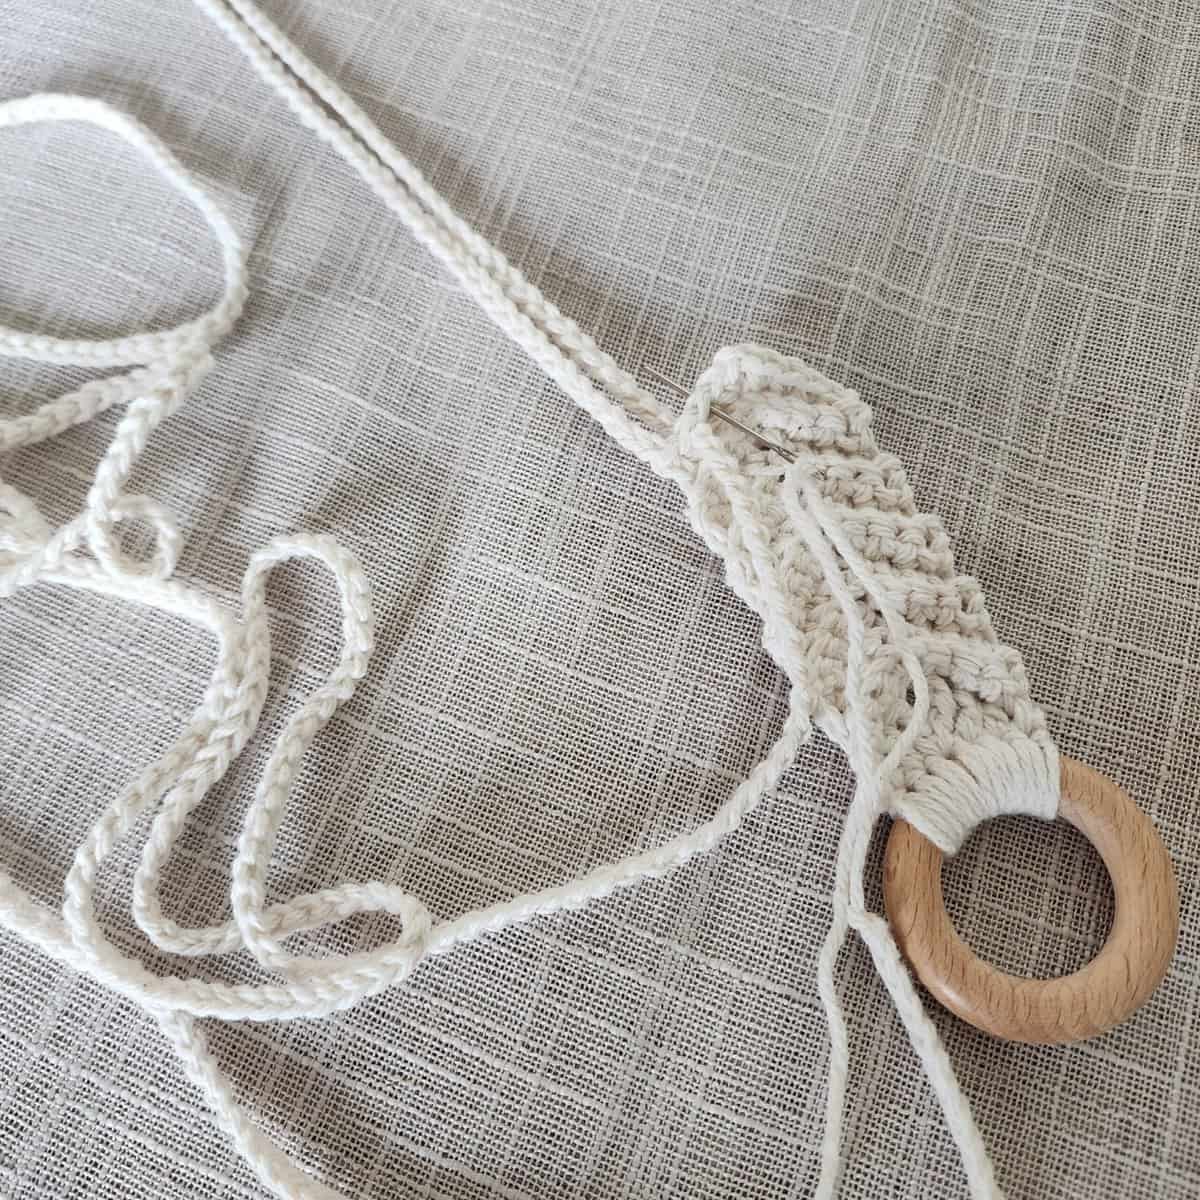
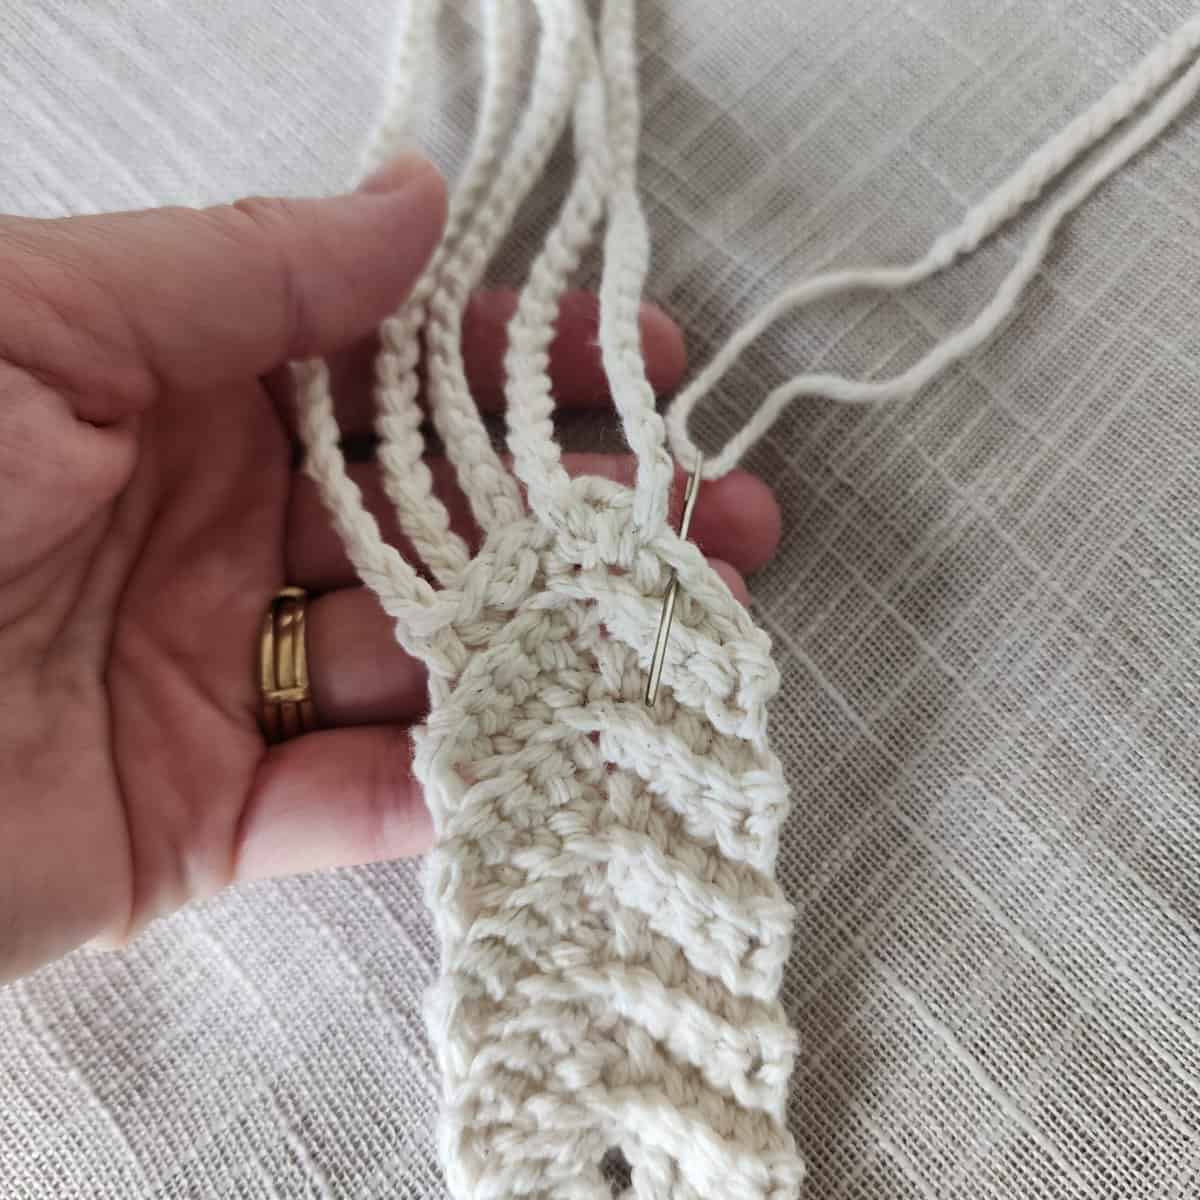
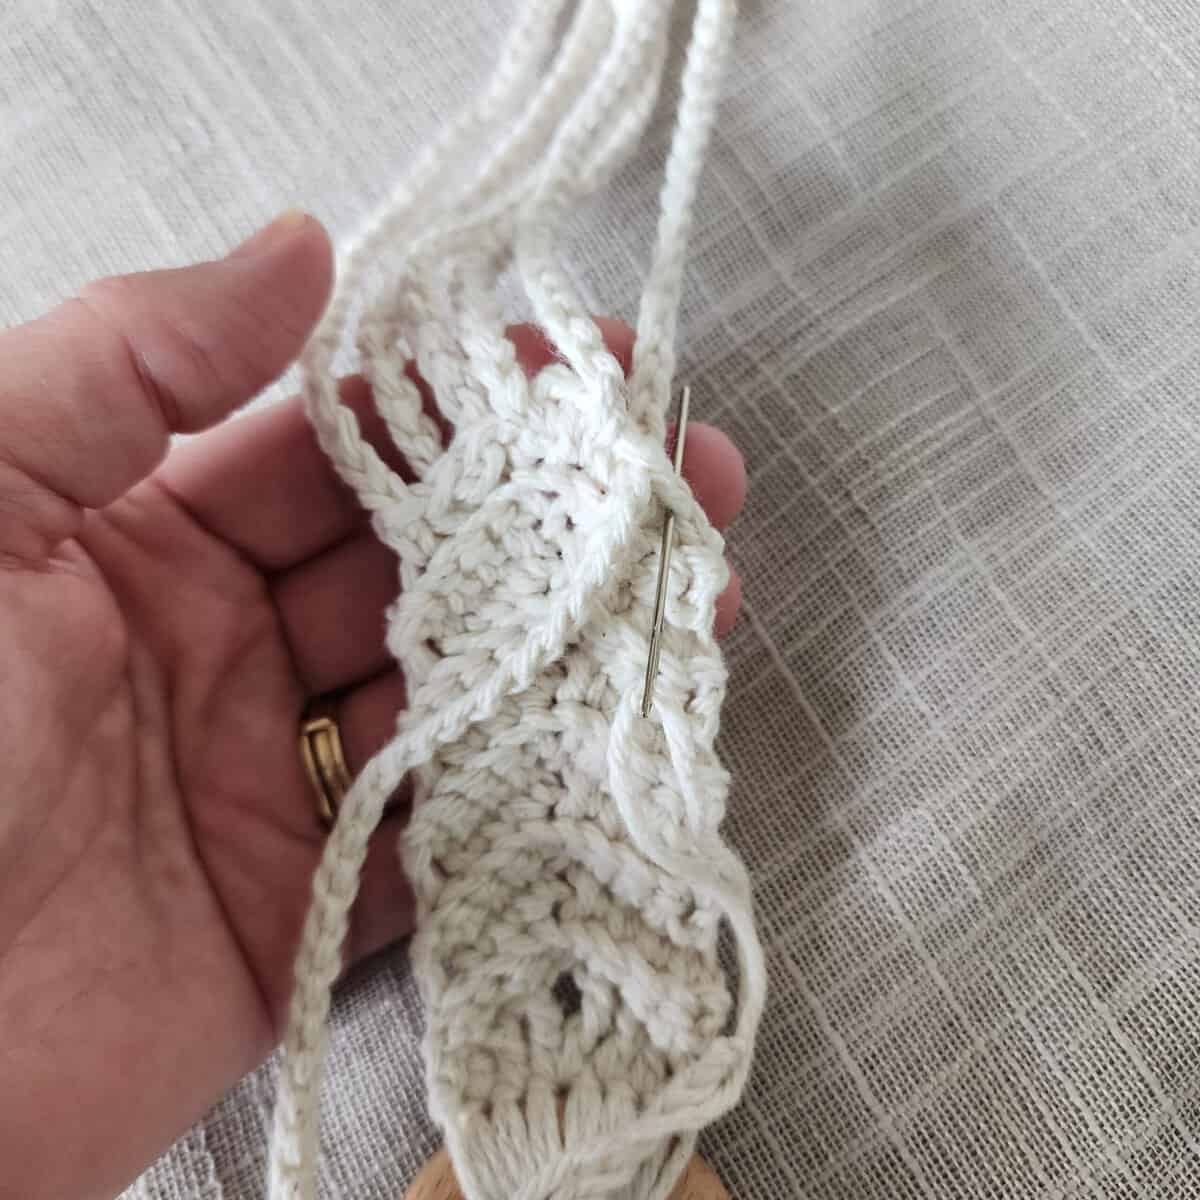
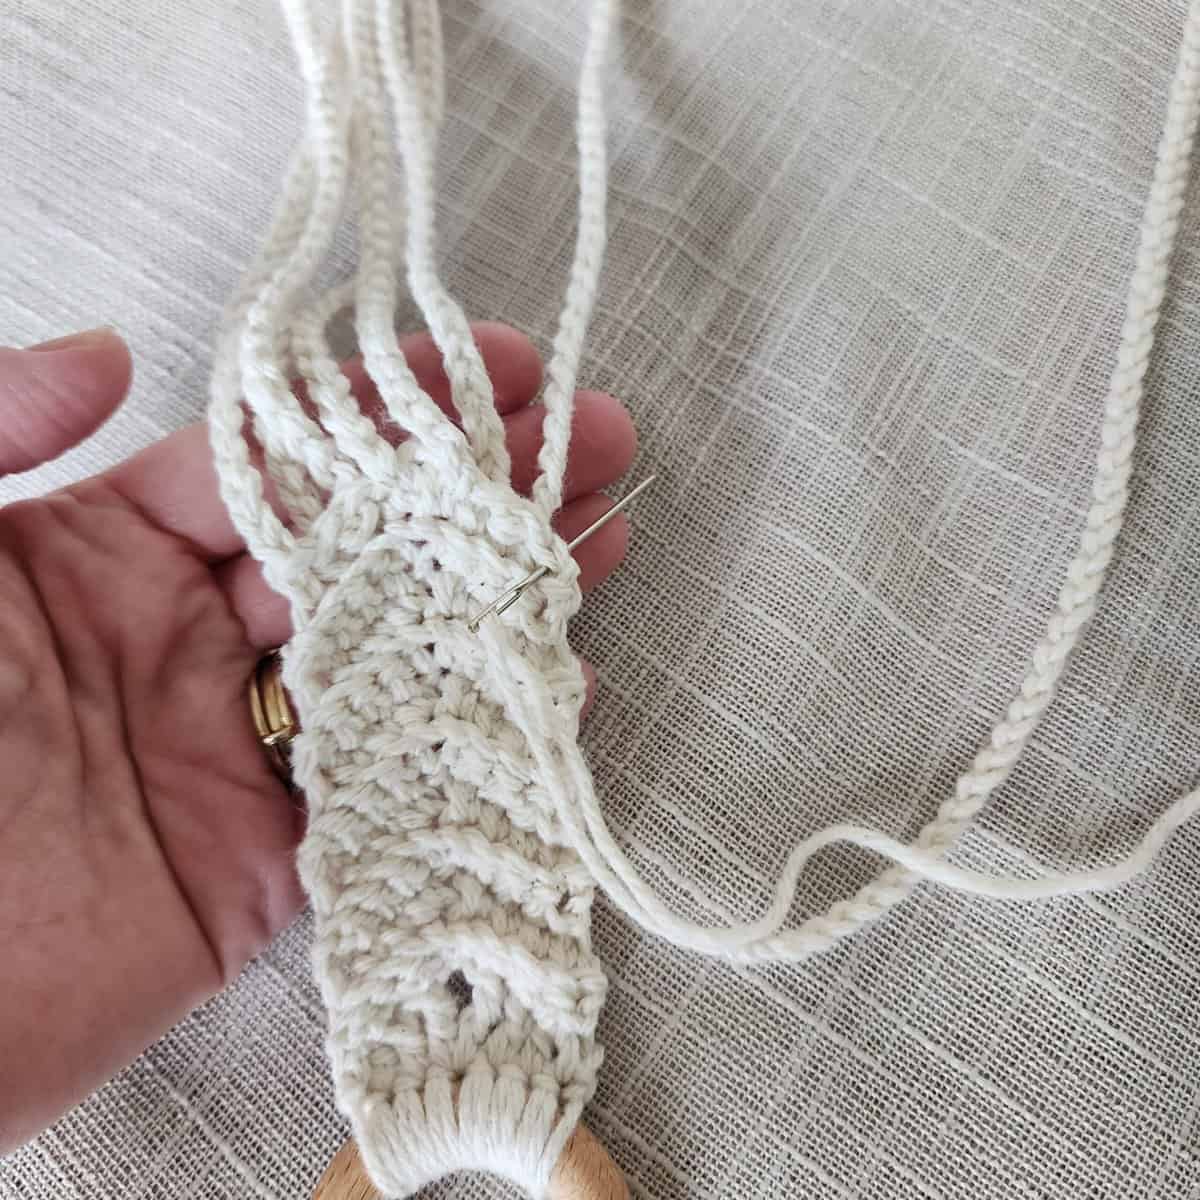
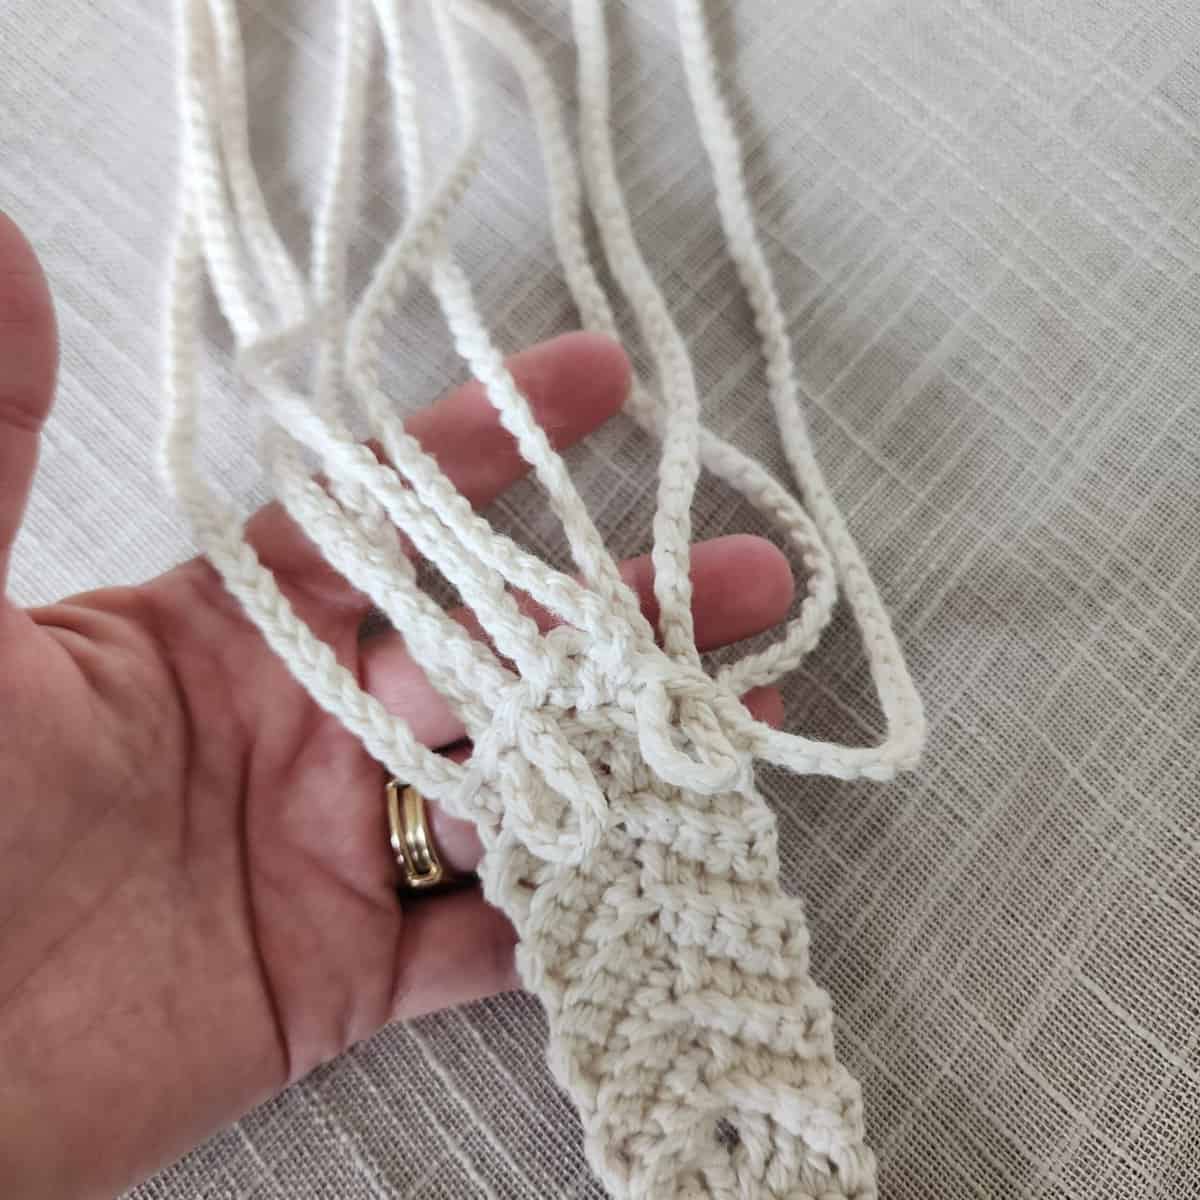
Chevron Hanger
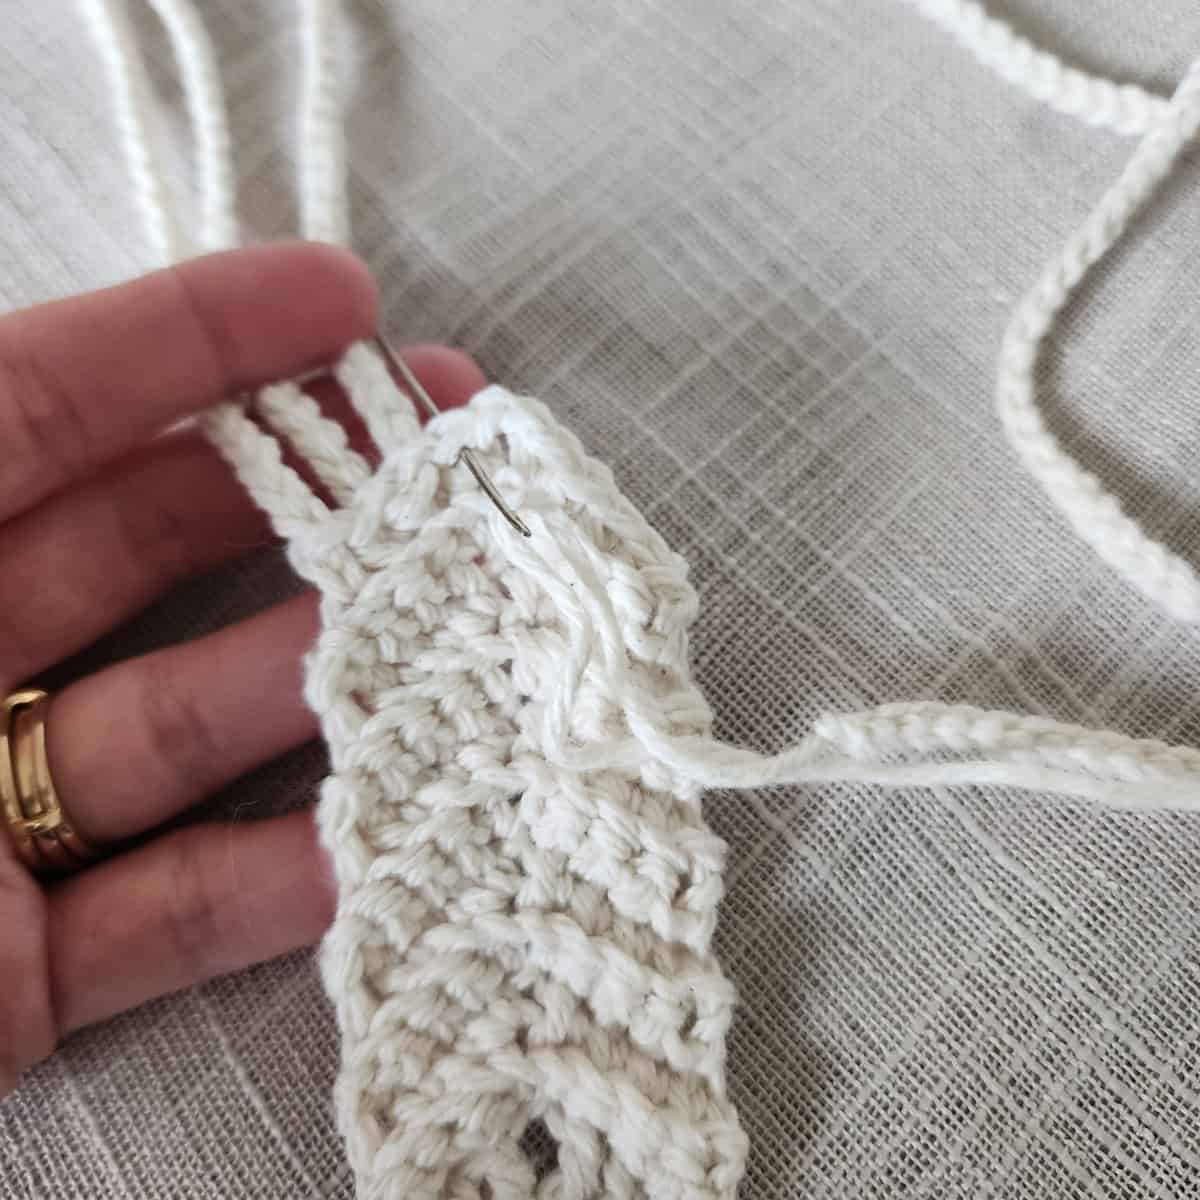
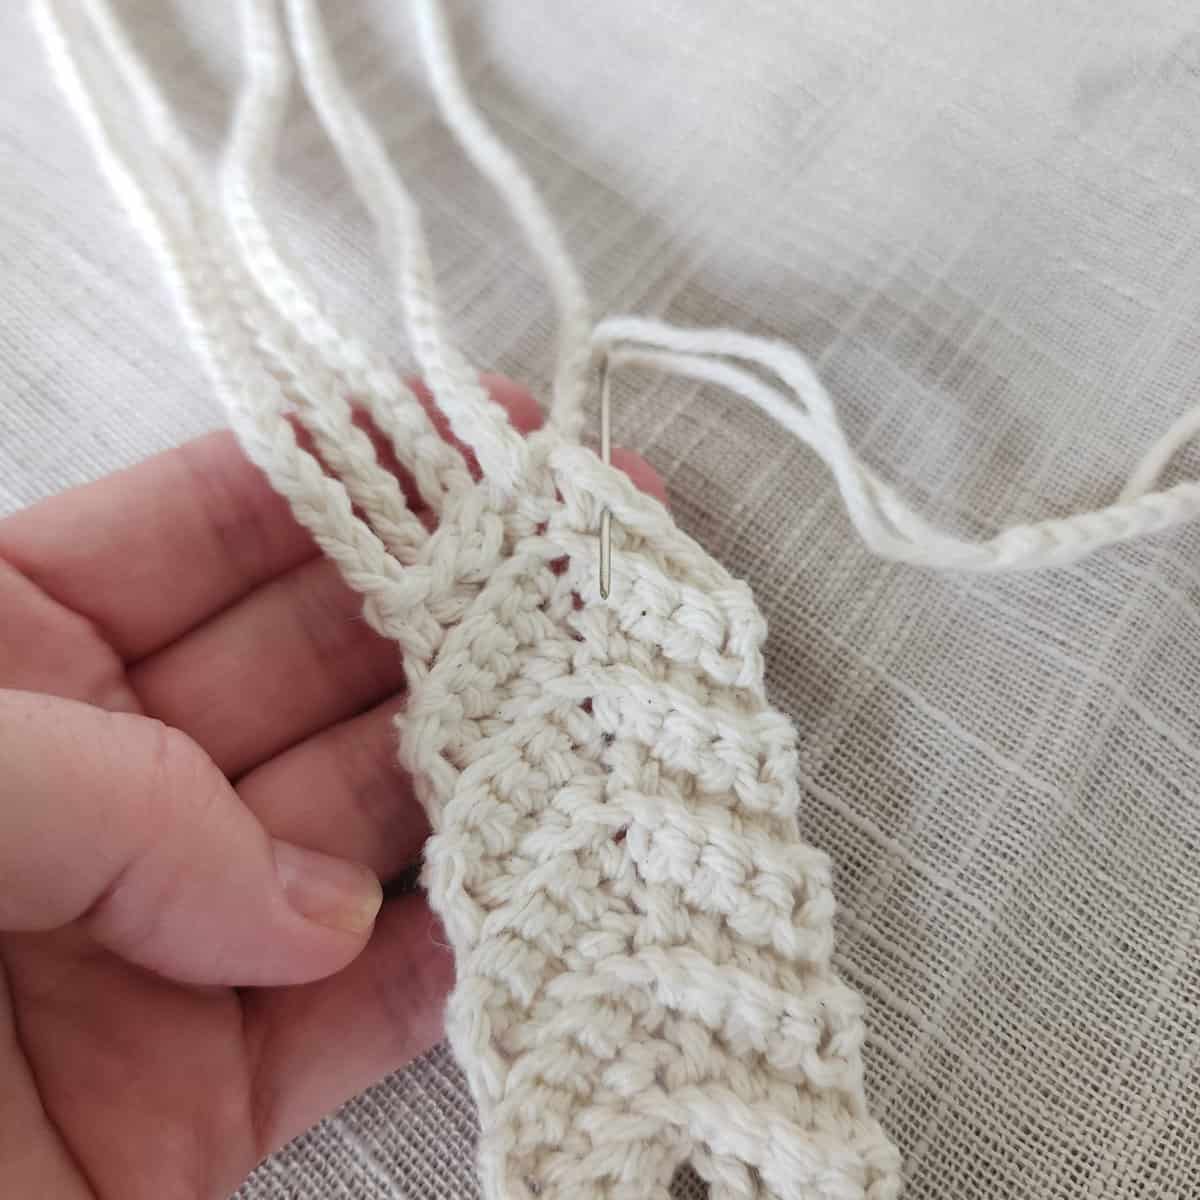
Row 1: With a 4.00mm crochet hook, ch 1, sl st into the first st (counts as a st), hdc in the next st, dc in the next st, (tr, ch 2, tr) in the next st, dc in the next st, hdc in the next st, sl st in the next st (counts as a st). Turn. (8 sts + ch-2)
Rows 2 – 11: Ch 1, skip the first st, working in the BLO, sc in each of the next 3 sts, sc in the next ch, ch 2, sc in the next ch, sc in each of the next 2 sts, skip the next st, sc in the last st. Turn. (8 sts + ch-2)
Do not fasten off. Continue on to Hanging Strap.
Hanging Strap
The lengths of the hanging straps on the crochet plant hangers shown in the photos are 14″ small (15″ medium, 15″ large).
To adjust the length of your straps, first determine how much longer or shorter you’d like your straps. Multiple that number by 8 and then add it to the length of your chain strap.
Example: If you want to increase the length by 1″, add 8″ to your chain strap.
14″ Straps: With a 4.00mm crochet hook, continue on from the chevron hanger, ch until you have a chain that is 104″ long. Fasten off leaving a 6″ tail of yarn. Continue on to Assembly.
15″ Straps: With a 4.00mm crochet hook, continue on from the chevron hanger, ch until you have a chain that is 120″ long. Fasten off leaving a 6″ tail of yarn. Continue on to Assembly.
Assembly

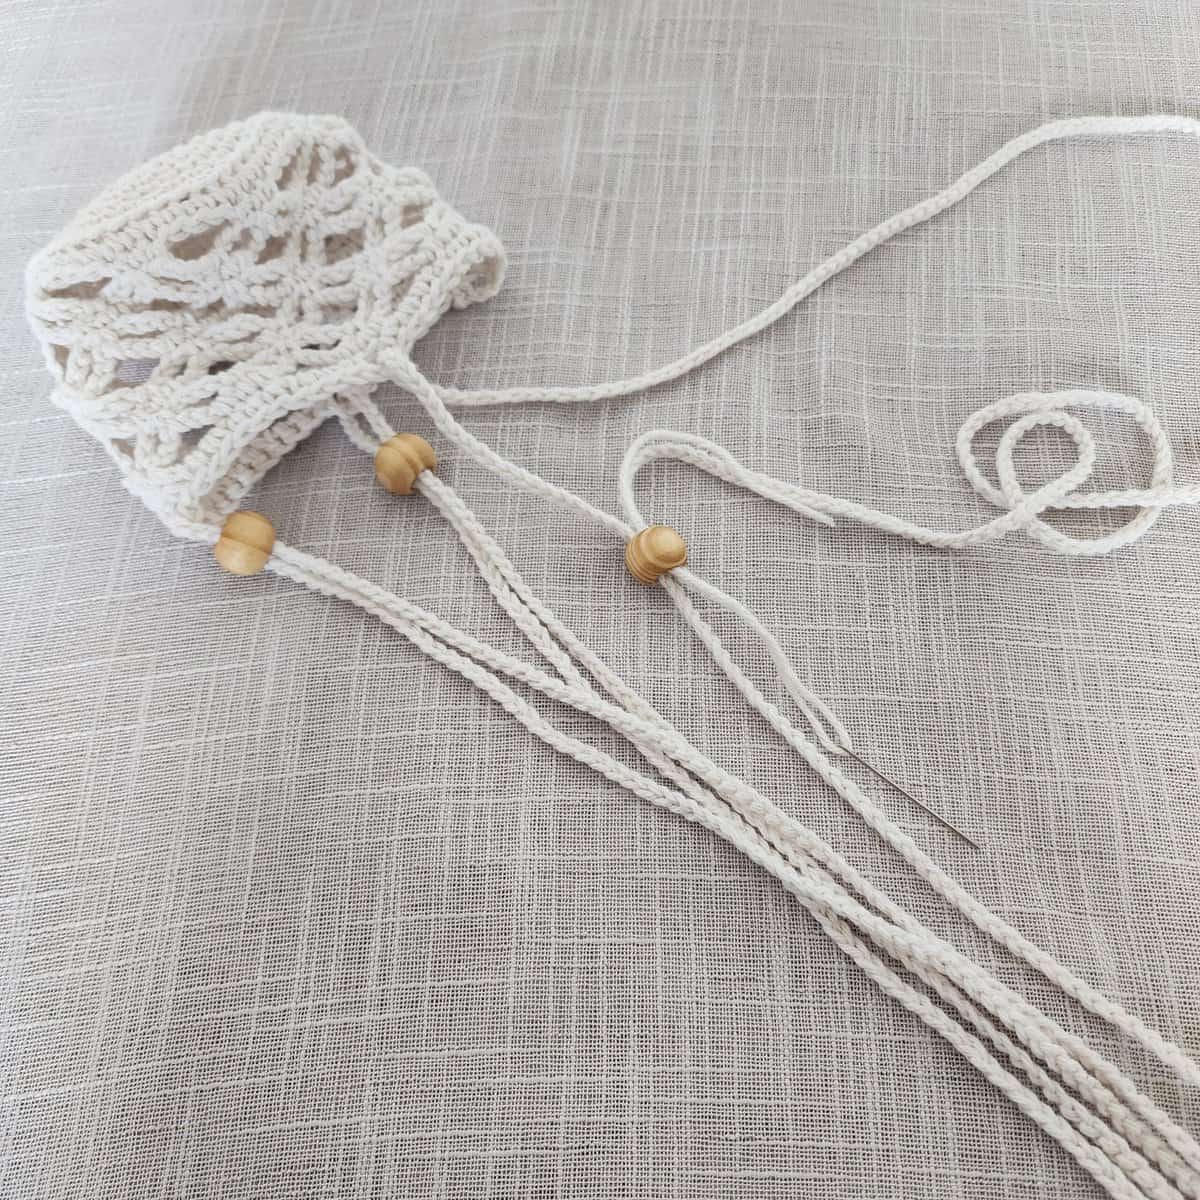
Place 1 wooden bead on the chain and a yarn needle on the tail hanging strap.
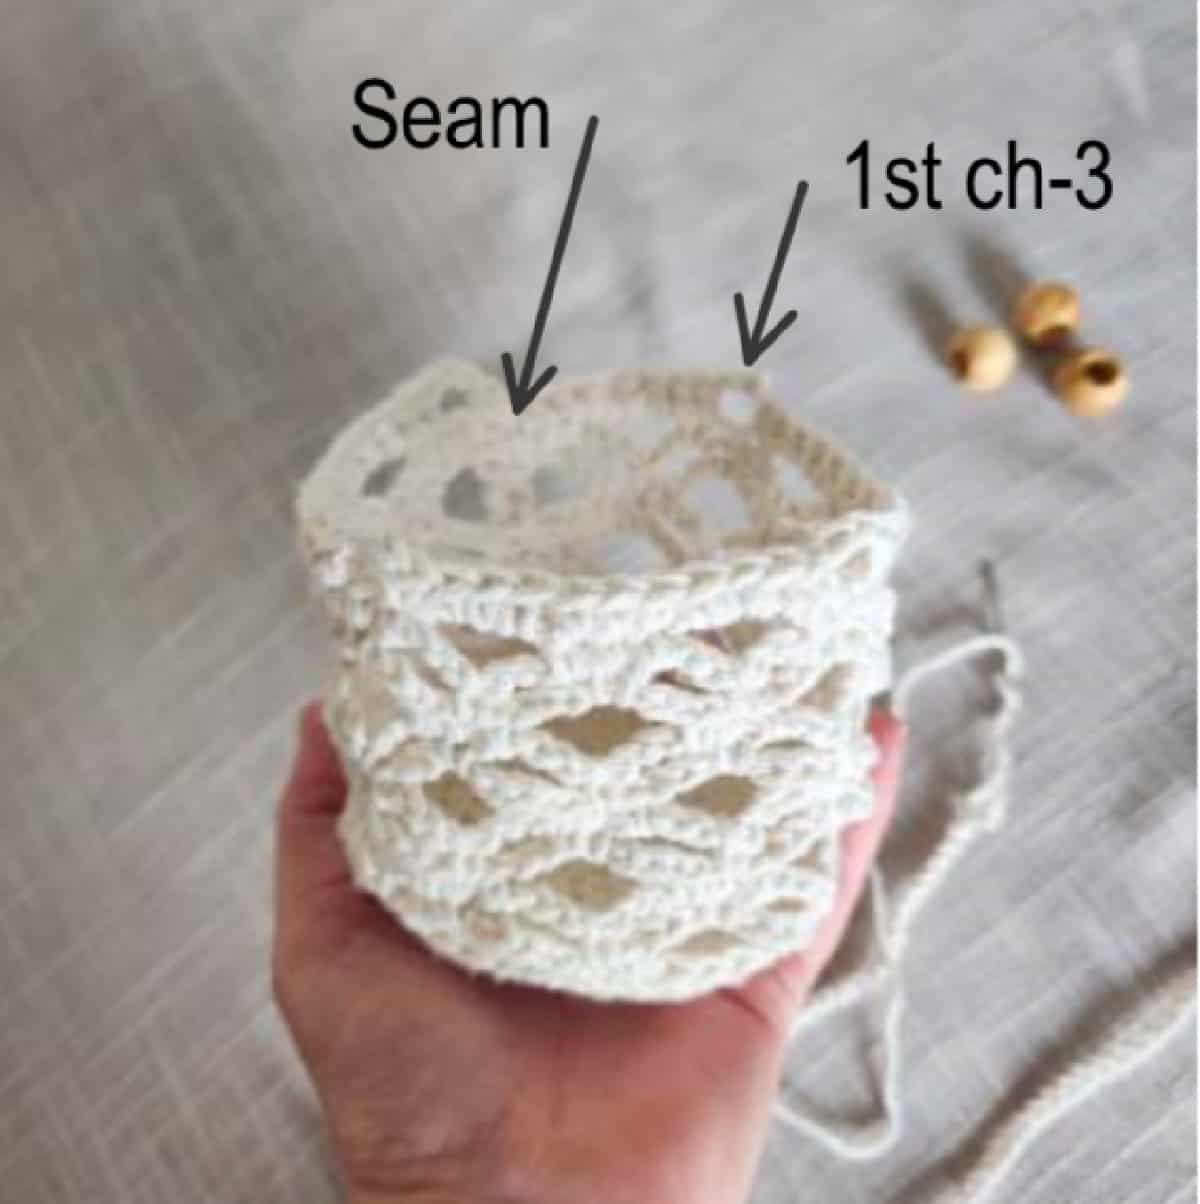
There are 4 ch-3 loops around the top of basket. You will begin in the loop to the left of the seam.
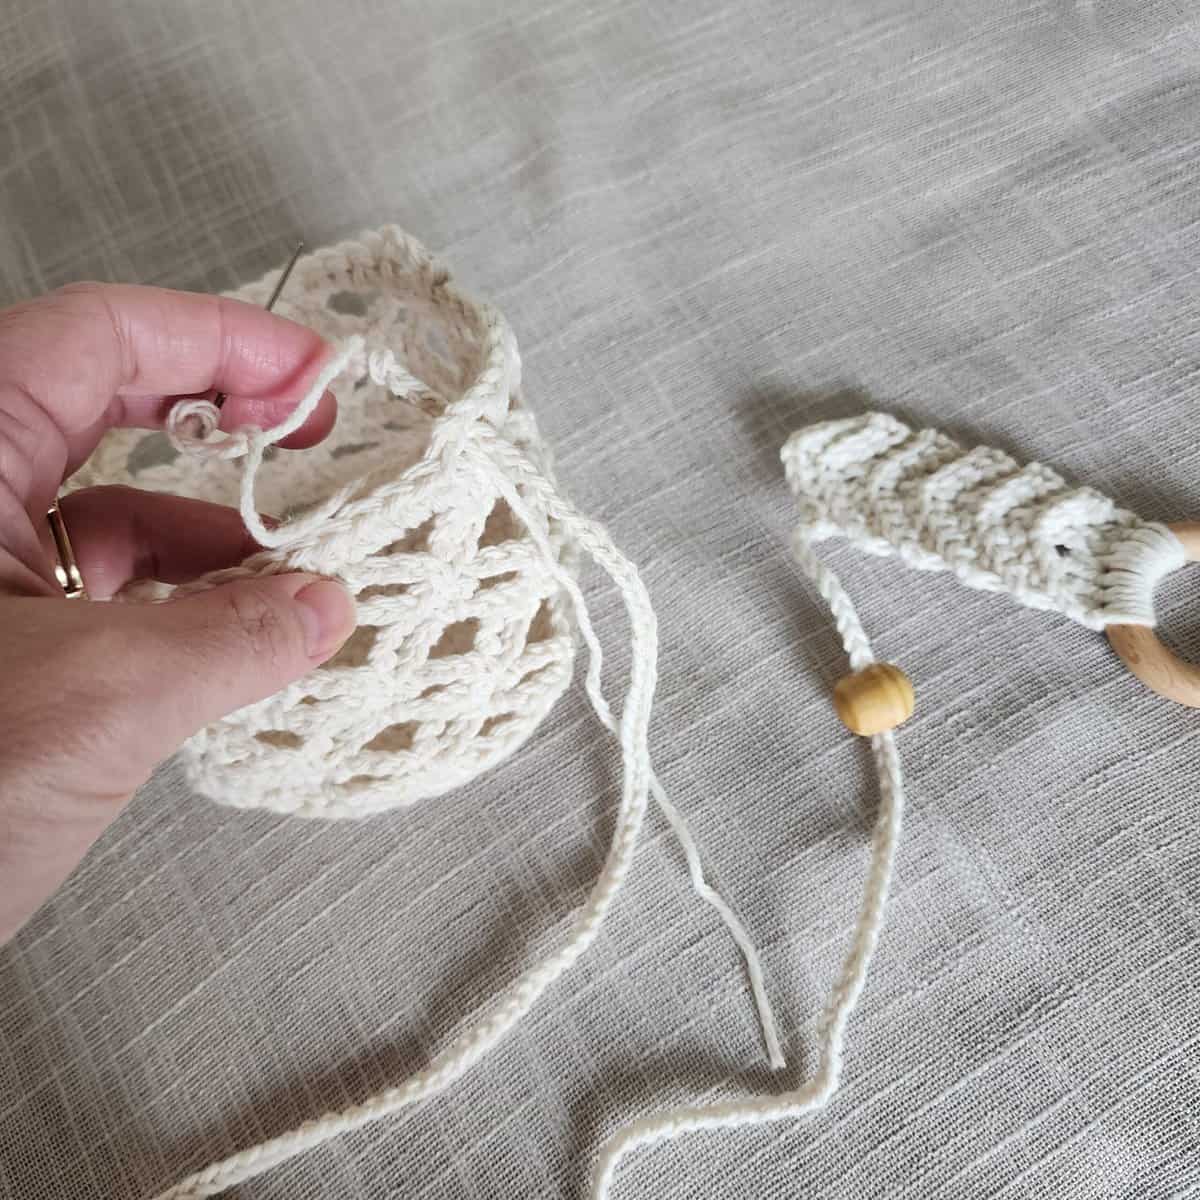
Insert the hanging strap through the first ch-3, from outside to inside.
Pull the hanging strap through until the distance from the basket to the hanger measures 15″ (or desired length of straps).
Slide the wooden bead down and insert the hanging strap through the bead from bottom to top.

Pull the hanging strap and slide the wooden bead down closer to the basket.
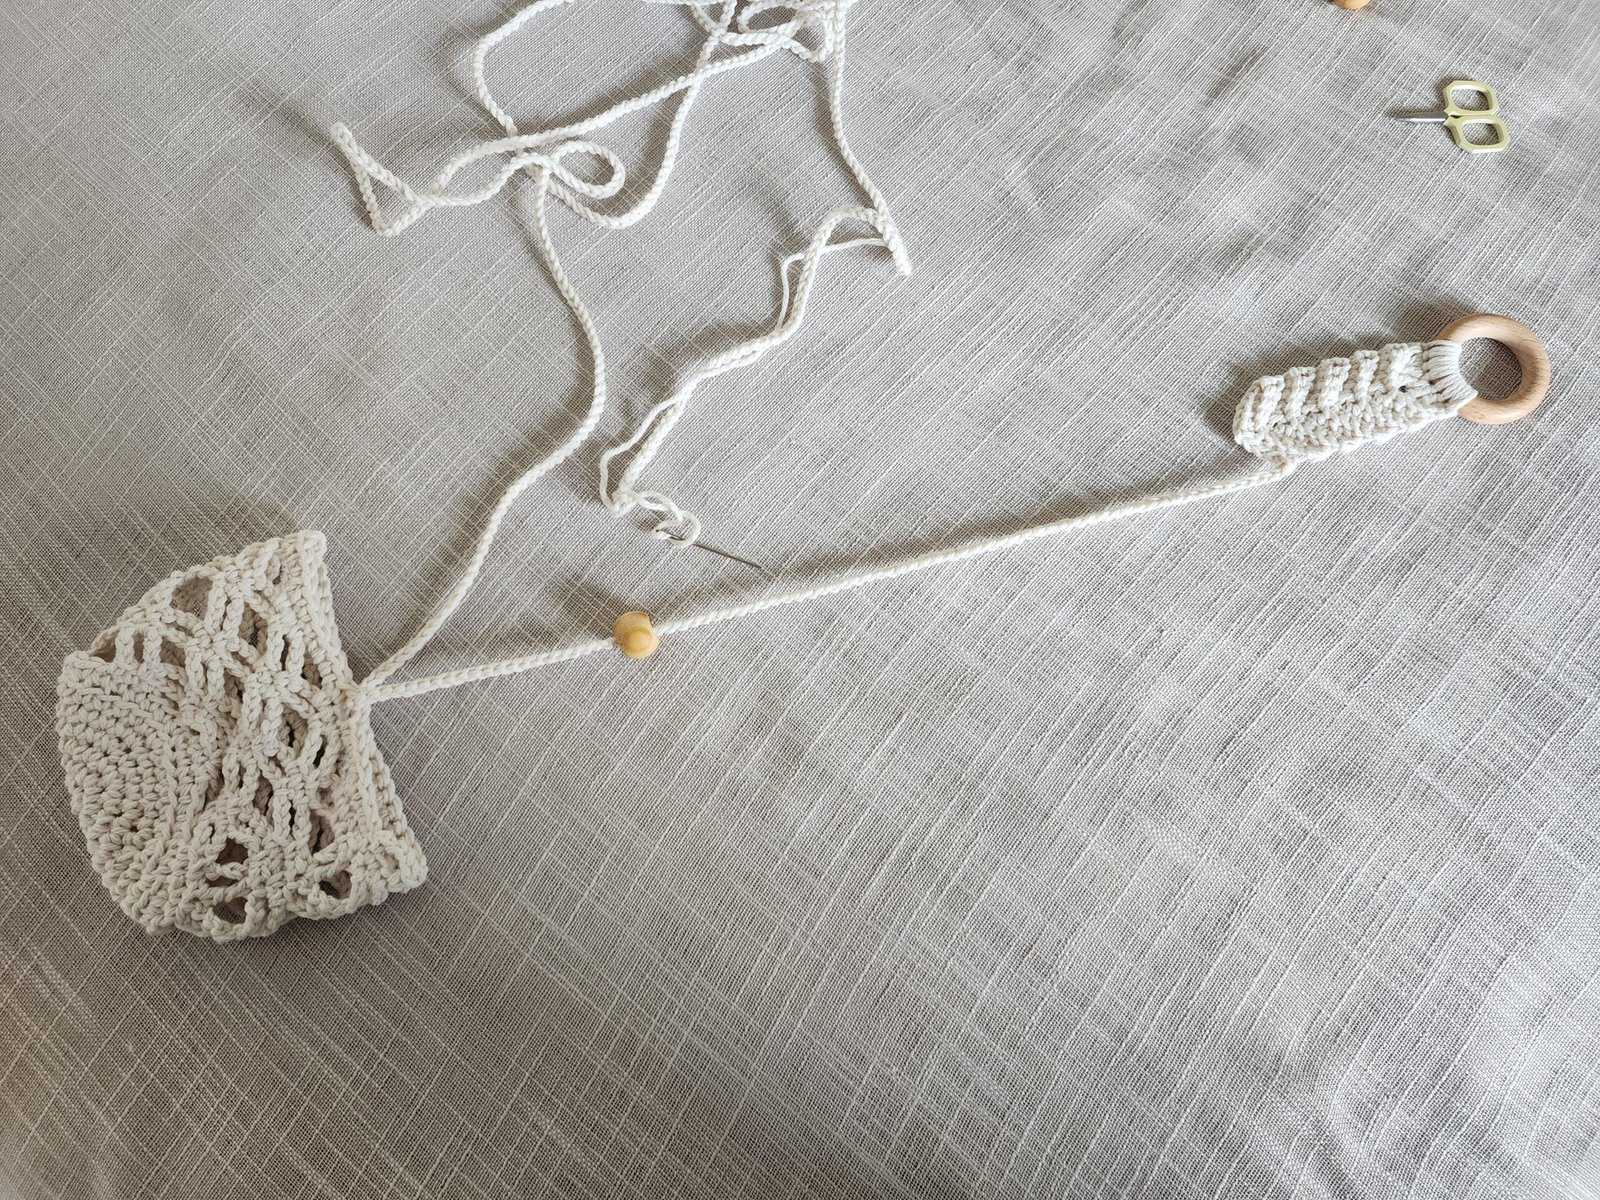
Insert the hanging strap, from back to front, into the next stitch from the hanger.
Next, insert the hanging strap, from front to back, into the next stitch from the hanger.
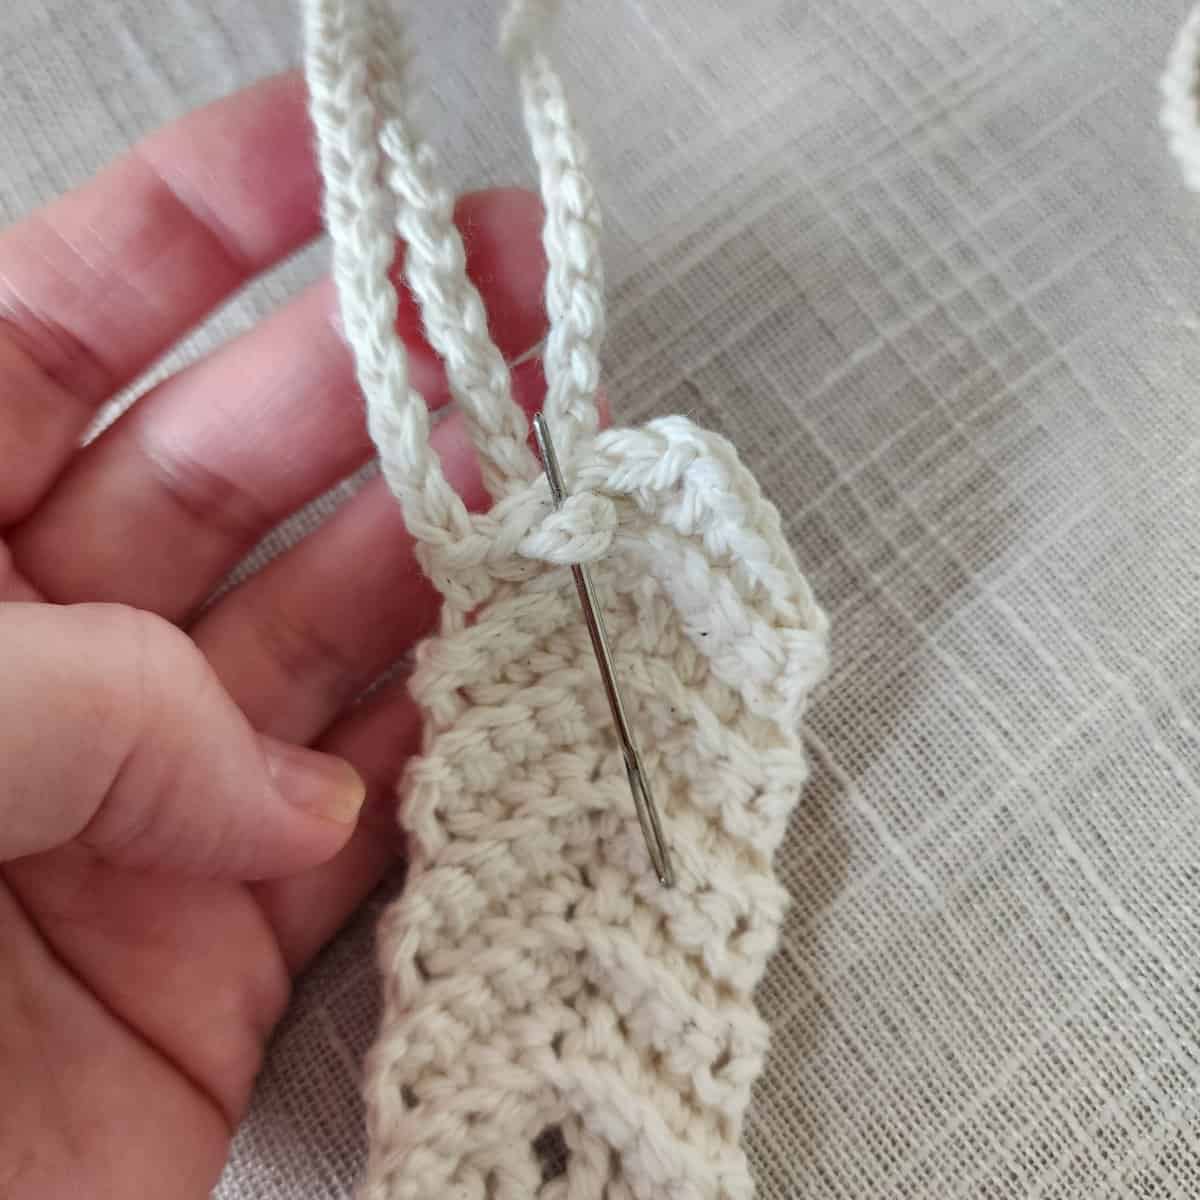
The yarn needle is showing a loop you can pull up to help adjust the lengths of the straps later, if needed.
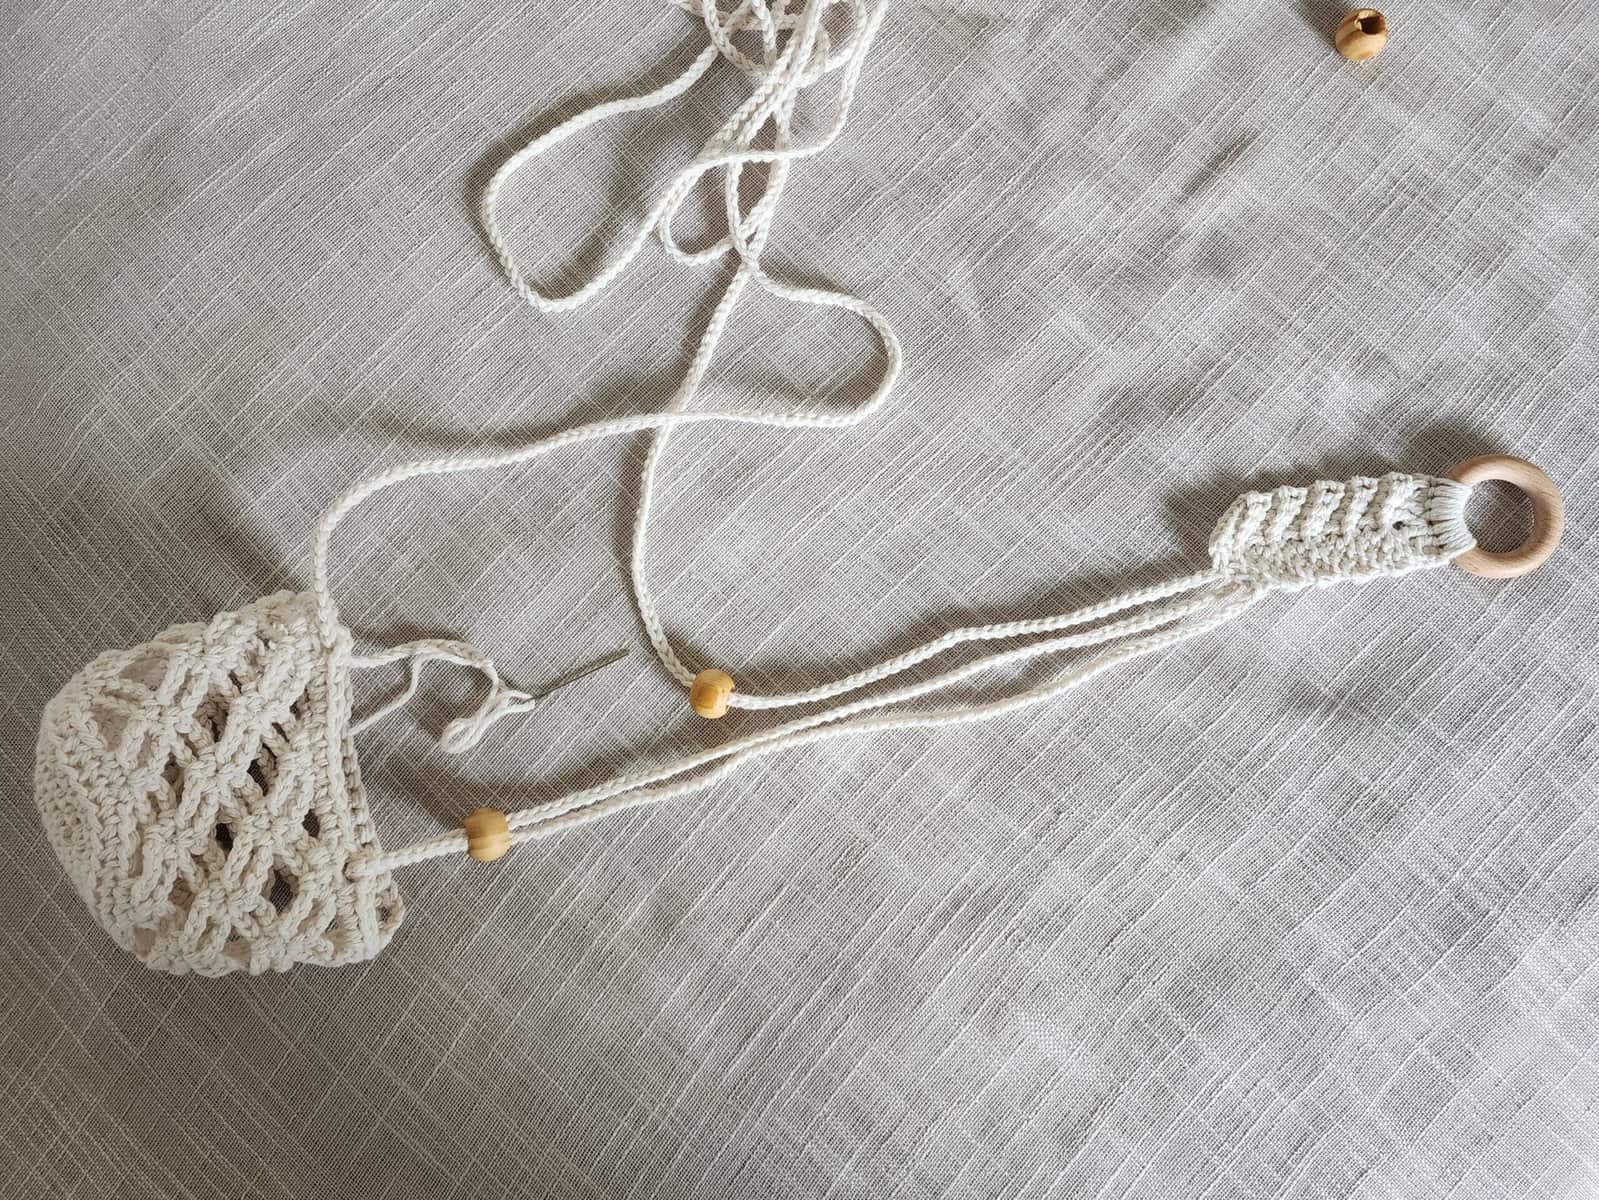
Place another wooden bead on the hanging strap.
Insert hanging strap into the next ch-3 on the basket, from outside to inside.
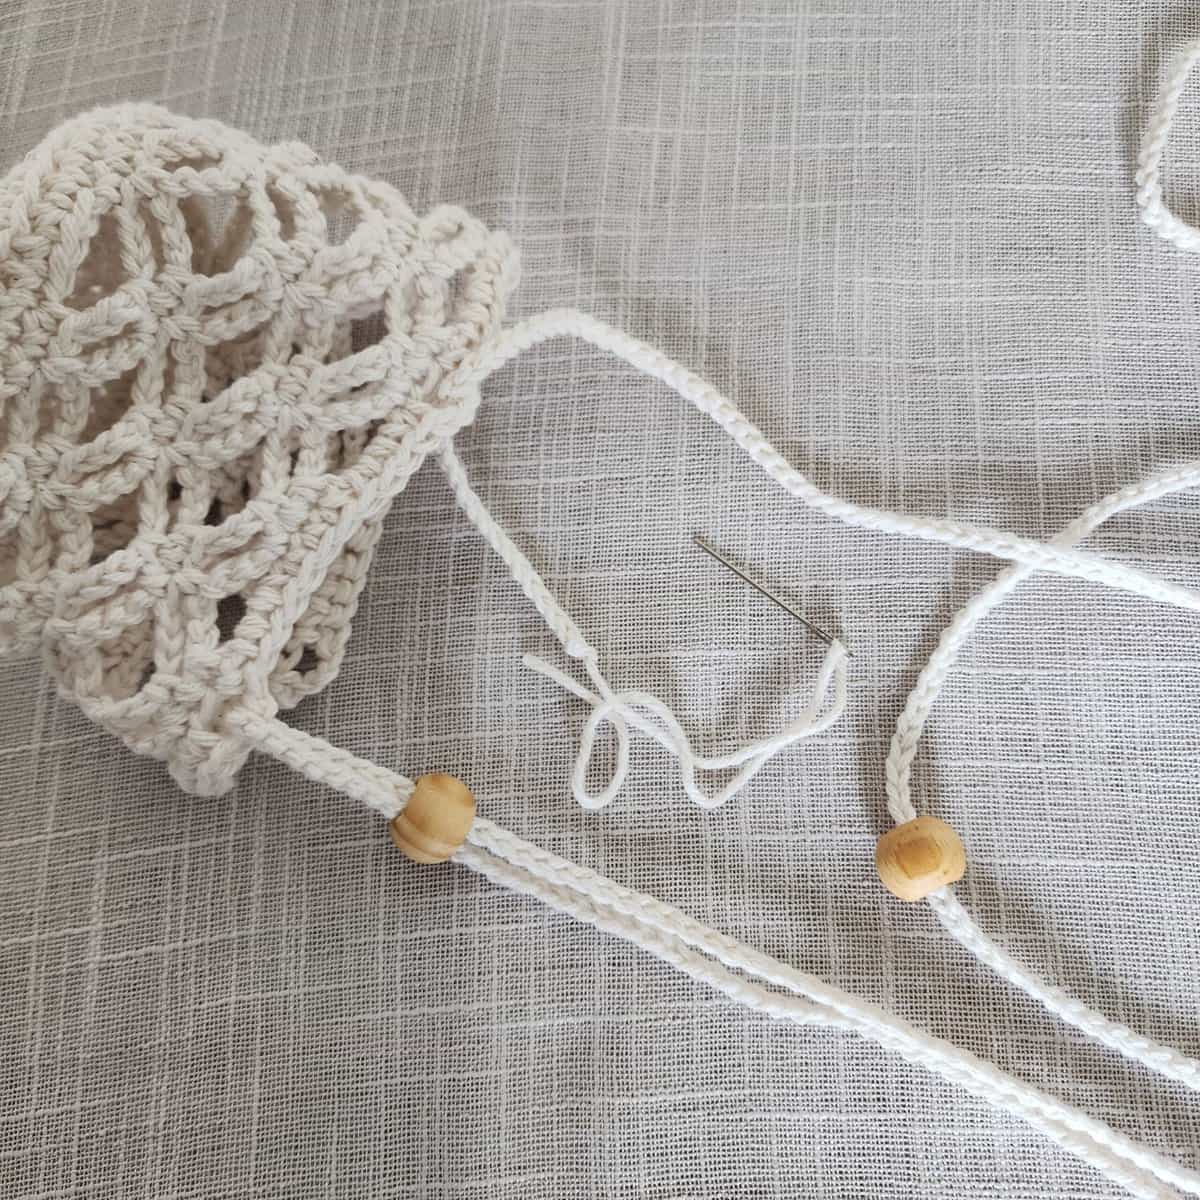
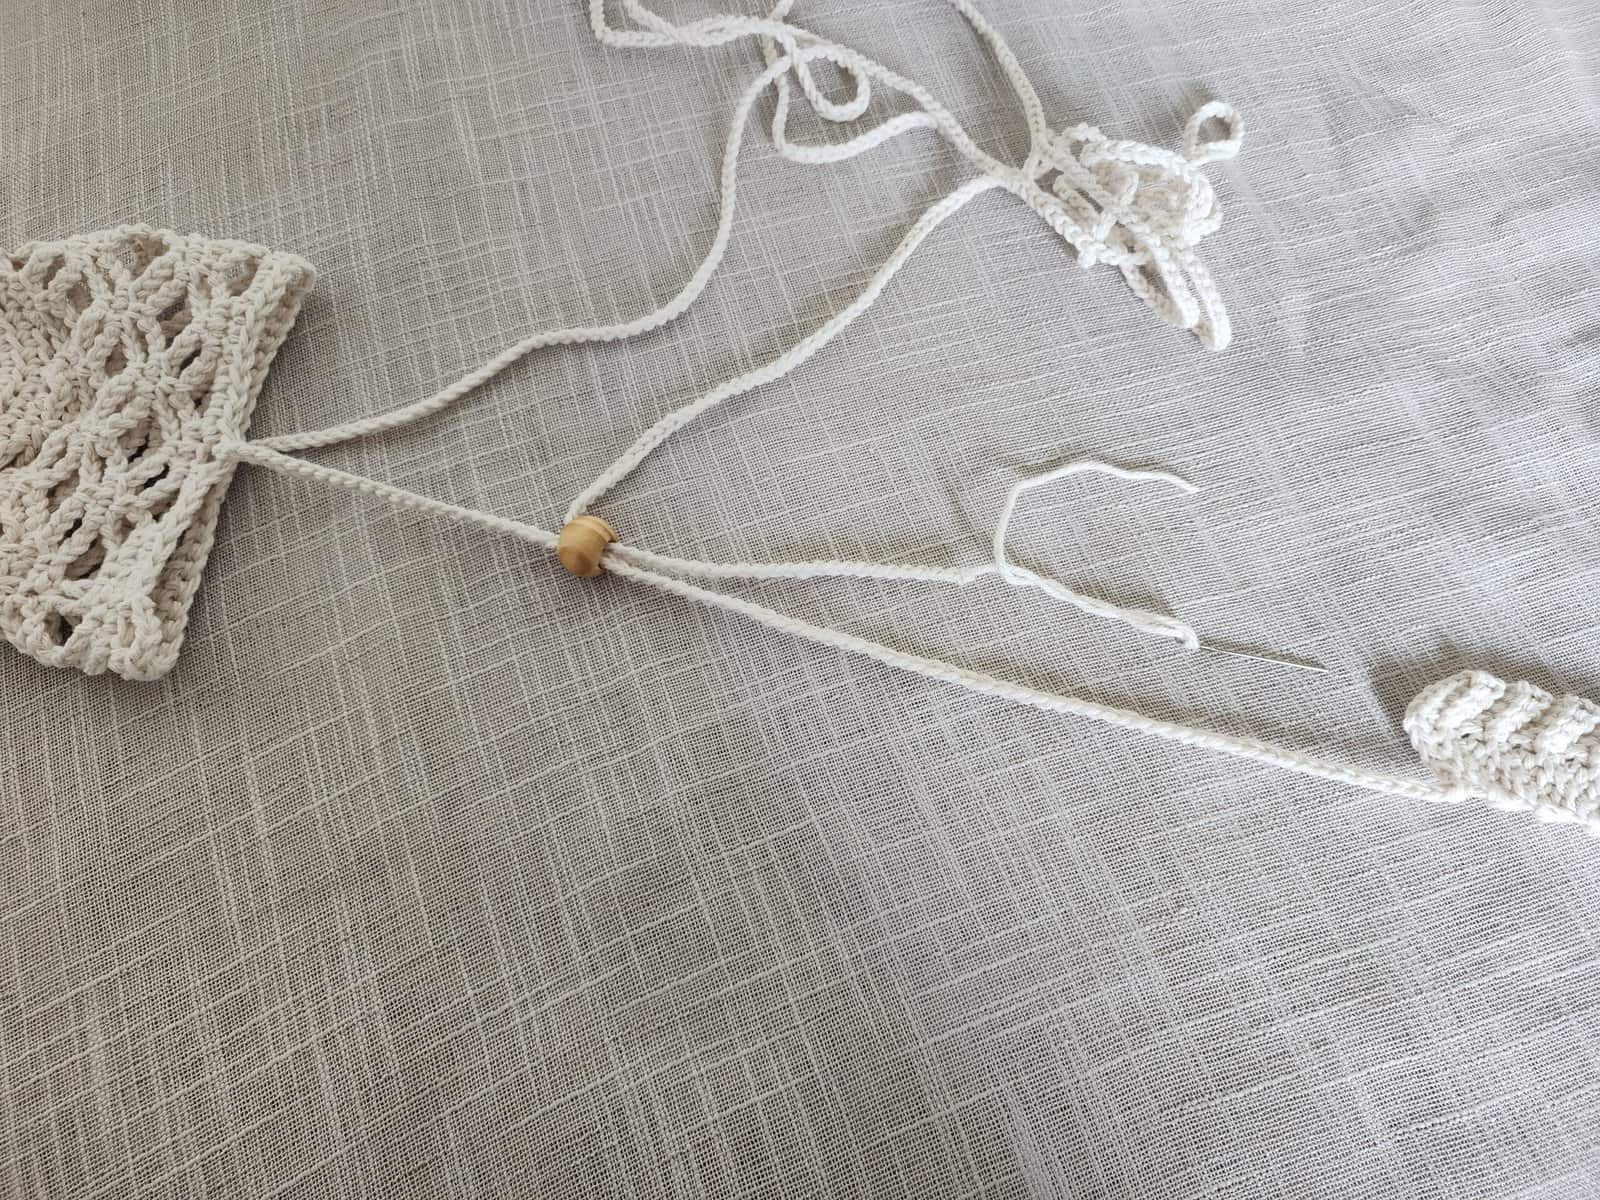
Pull the hanging strap through until the distance from the basket to the hanger measures 15″ (or desired length of straps).
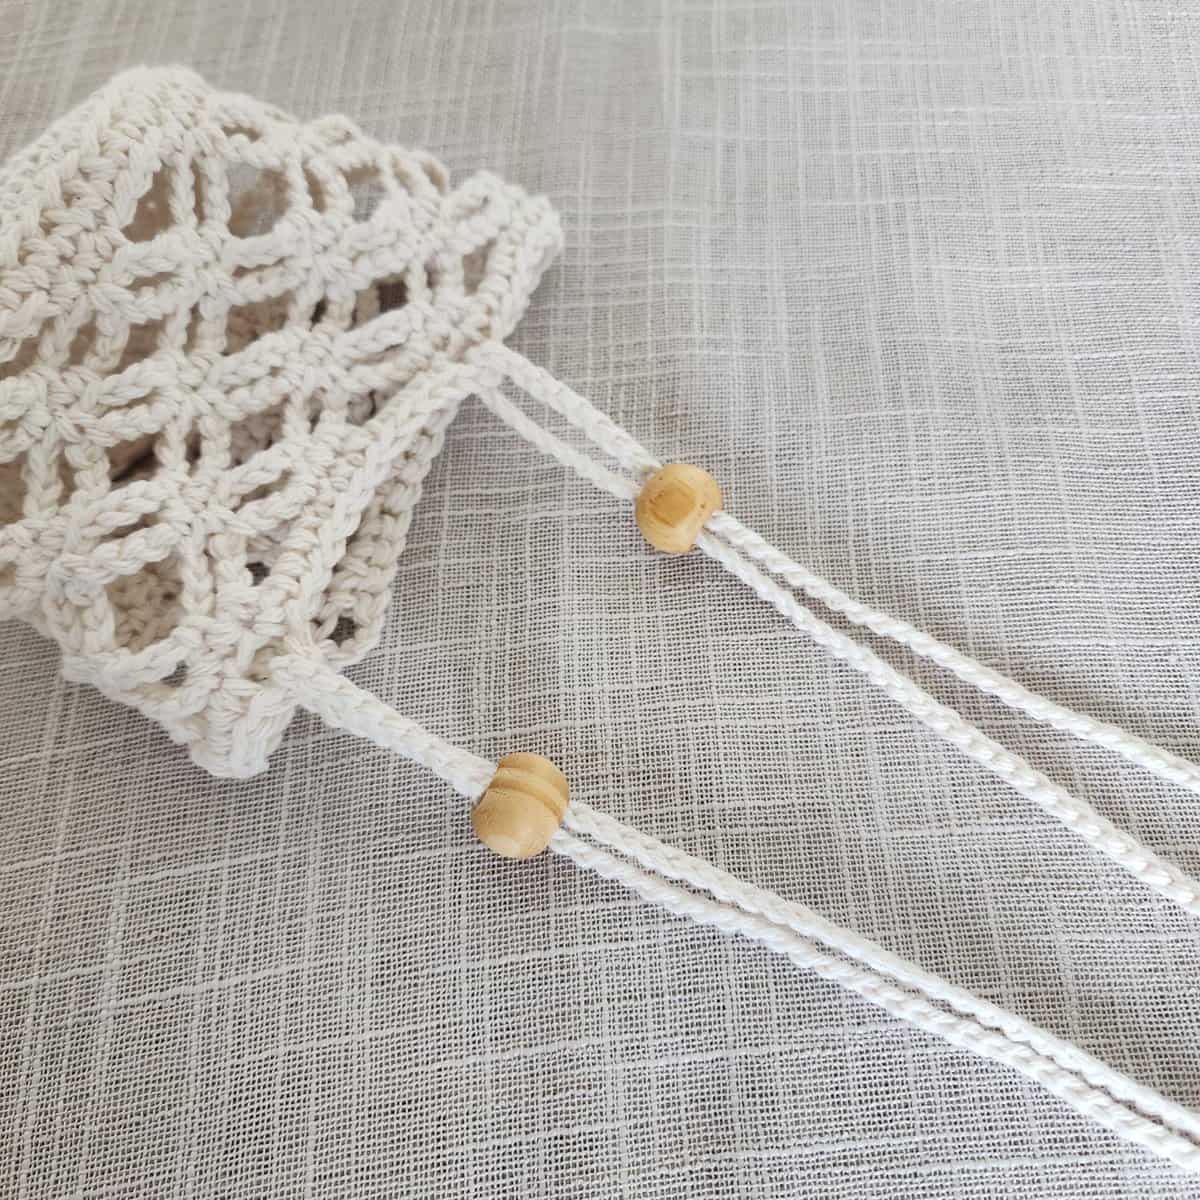
Slide the wooden bead down and insert the hanging strap through the bead from bottom to top. Slide bead down close to the top of the basket.
Insert the hanging strap, from front to back, into the next stitch from the hanger.
Next, insert the hanging strap, from back to front, into the next stitch from the hanger (skip the ch-2 space).
Place another wooden bead on the hanging strap.
Insert hanging strap into the next ch-3 on the basket, from outside to inside.
Pull the hanging strap through until the distance from the basket to the hanger measures 15″. Slide the wooden bead down and insert the hanging strap through the bead from bottom to top. Slide bead down close to the top of the basket.
Insert the hanging strap, from back to front, into the next stitch from the hanger.
Next, insert the hanging strap, from front to back, into the next stitch from the hanger.
Place another wooden bead on the hanging strap.
Insert hanging strap into the next ch-3 on the basket, from outside to inside.
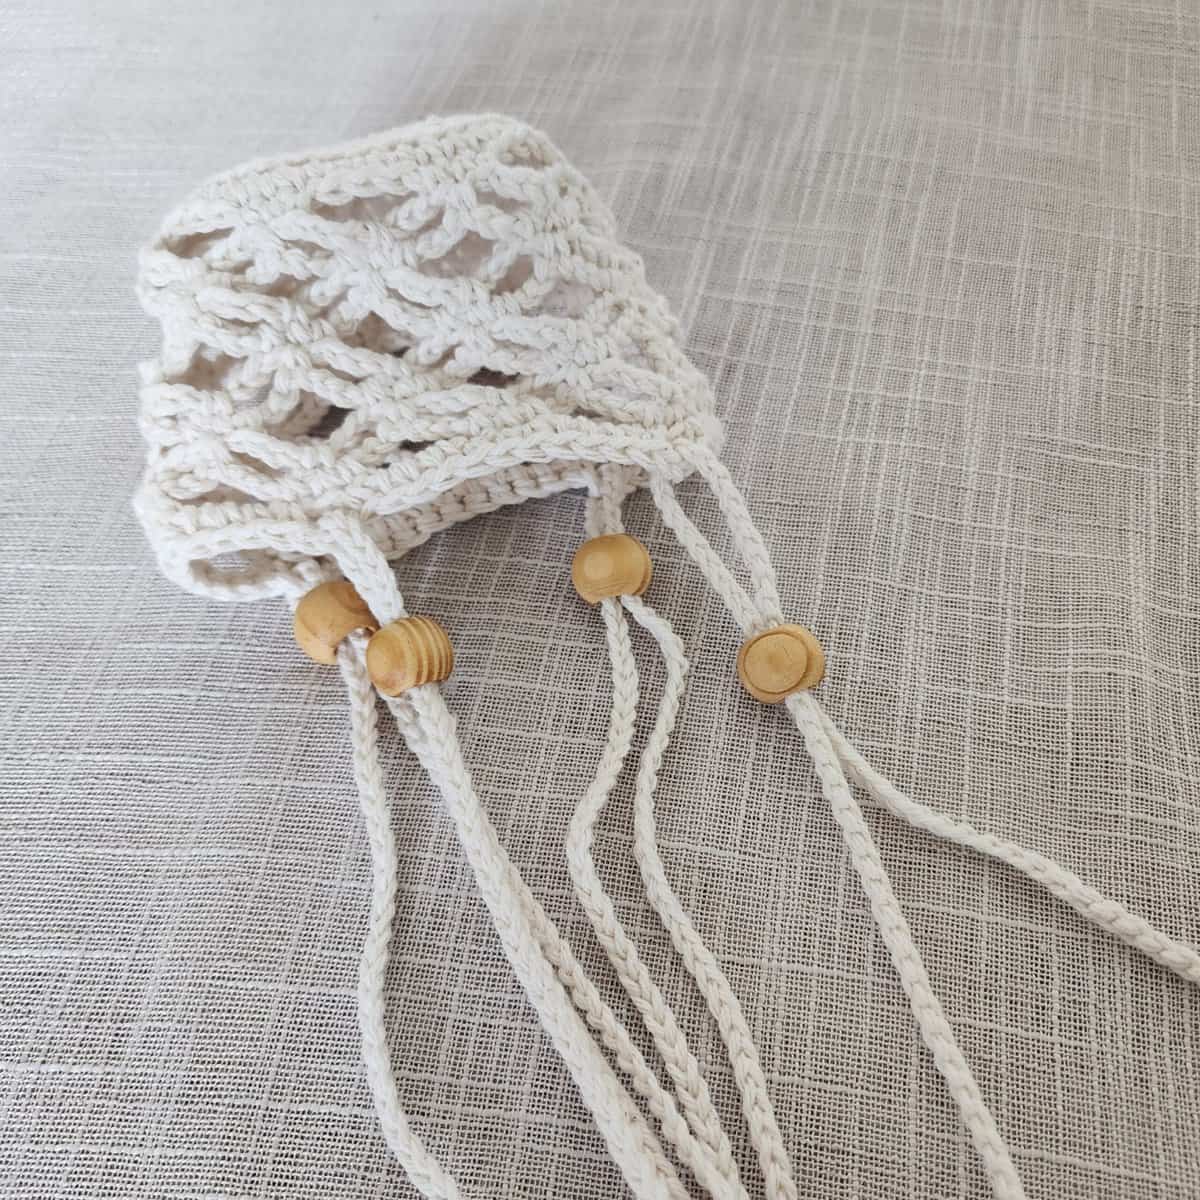
Pull the hanging strap through until the distance from the basket to the hanger measures 15″.
Slide the wooden bead down and insert the hanging strap through the bead from bottom to top.
Next, insert the hanging strap, from front to back, into the next stitch from the hanger.
Adjust the lengths of the hanging straps to make them even. Pull up loops as shown in the photo above if you need to lengthen or shorten any of the straps to make your plant hanger hang straight.
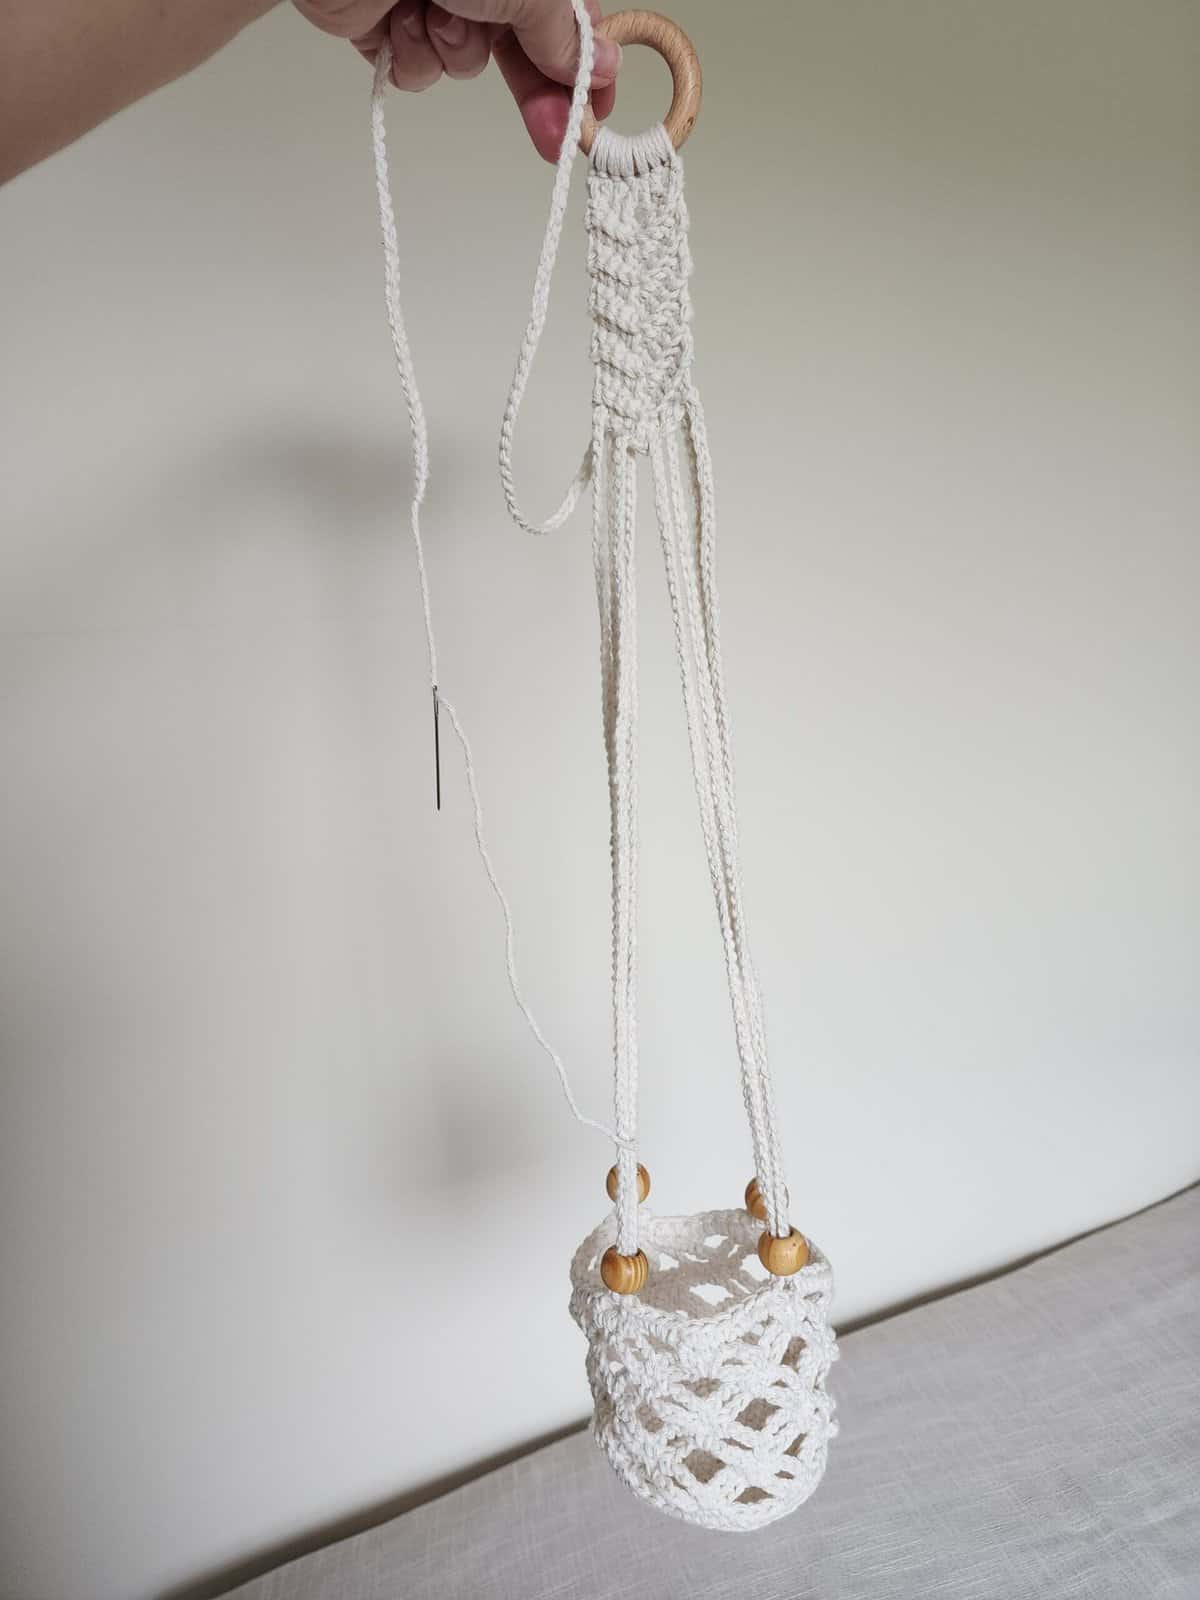
You may find it helpful to hold it from the hanging loop so you can see which straps need to be adjusted.
If you have a pot, you may find it helpful to put the pot in the hanger when adjusting the straps.
Finishing
After the length of the straps are close to even, secure the hanging strip in the last stitch of the hanger and weave in ends.
NOTE: Even after you’ve woven in your ends, you can continue to adjust the straps.
Please share your finished ACS projects with us in the A Crocheted Simplicity Crochet Community Group on Facebook! Use hashtag #ACrochetedSimplicity when sharing on social media so I can find your posts!

These plant hangers are stunning!
These look like so much fun & very useful! A different take on macrame. Can’t wait to try them.
I am going to make these today! They will go perfect in the arboretum I am creating. Your designs are well explained and written. Thanks so much!
I definitely have to make these since I actually have plants that I can hang now 💞
I am so enjoying making this hanger for my spider plant. needing to order wooden ring to finish it up.
Can’t wait to try these, thank you!!
I love this “confident beginner” project! 🤭
Definitely plan on making one of these in the new year.
Loved this pattern! Simple to make with clear instructions. I’ll be making more to gift to friends and family!