Free Crochet Pattern | “Knit-Look” Bulky Slouch (4 Sizes)
I’ve been trying to come up with ideas for super quick gifts this year and the “Knit-Look” Bulky Slouch is next on my list of things to make as gifts! It’s PERFECT for teacher gifts and gifts for family….even picky teenagers! ?
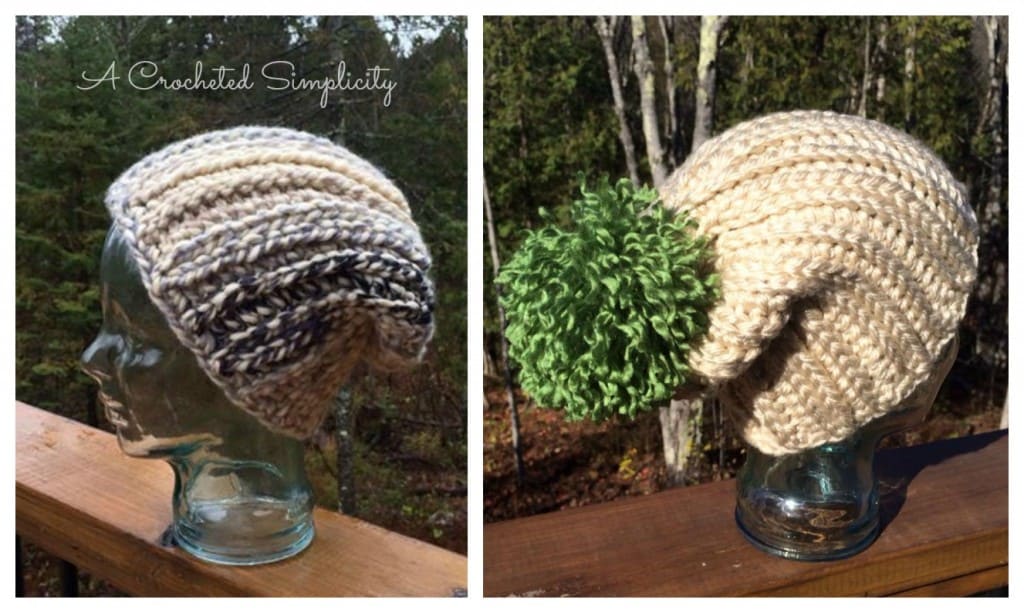
It’s also PERFECT for craft fairs! I used Lion Brand Wool Ease Thick & Quick (less than a skein). The BEST part about this slouch?!?! It took less than an hour to make, including making a pom! The combination of the cost and time to create makes it a PERFECT item for craft fairs! ?
“Knit-Look” Bulky Slouch
Materials: US Size 12.00mm crochet hook( My hook of choice can be purchased through our affiliates: Clover Amour Crochet Hook, 12 mm) (or proper hook to obtain gauge), yarn needle, scissors
Yarn: Bulky / 6 Weight (85 yards), Lion Brand Wool Ease Thick & Quick Stripes (Lion Brand Heartland Thick and Quick Yarn) was used for the slouch in the upper left photo, Lion Brand Hometown USA was used for the slouch in the upper right photo (just a tad more than a full skein since the yardage per skein is less)
Difficulty: Intermediate
Gauge: In pattern stitch (10 sts X 4.58″; 4 rows = 2″)
Sizes
- Toddler (18″ – 19″)
- Child (19″ – 20″)
- Teen / Adult Small (20″ – 22″)
- Adult Medium / Large (23″ – 24″)
Abbreviations
- ch(s): chain(s)
- sl st: slip stitch
- sc: single crochet
- st(s): stitch(es)
- yo: yarn over
- BLO: back loop only
- modified slst2tog: See Special Stitches
Special Stitches
- (Modified) Slip Stitch 2 Together (slst2tog): Insert hook into same st as previous st worked, yo, pull up a loop, insert hook into next st, yo, pull up loop and pull thru both loops on hook. **This st is modified because you begin each one in the previous st worked, therefore, your st count will not decrease. **Note: It will seem as though you’re working these sts along the backside of the previous row of sc.
- Click here for a complete photo and video tutorial.
Notes
- The ch-1 at the beginning of each row does not count as a stitch.
- First stitch of each row is worked into the same st as the beginning chain, unless noted otherwise.
- Changes for sizes are written as follows: Toddler (Child, Teen/Adult Small, Adult Medium/Large)
Shop our affiliates for additional yarn choices:
 Lion Brand Yarn Heartland Thick & Quick Bulky Yarn, Black Canyon") (1 Skein) Lion Brand Yarn H...Shop on Amazon
(1 Skein) Lion Brand Yarn H...Shop on Amazon
Instructions
Photo & Video Tutorial can be found here: Modified Slst2tog
All Sizes
Tip: The crown of this hat is worked in short rows. If you haven’t worked short rows before, I suggest placing a scrap of yarn in the 1st st of each row that is highlighted pink.
Row 1: Ch 21 (23, 25, 25), sc in 2nd ch from hook, sc in each ch across. – 20 (22, 24, 24) sts *Mark as Right Side.
Row 2: Ch 1, Turn, sl st in same st as ch 1, work 13 (15, 17, 17) modified slst2tog, BLO sl st in next 5 sts (leave last st unworked). – 19 (21, 23, 23) sts
Row 3: Ch 1, Turn, BLO sl st in next 5 sts, BLO sc in remaining sts. – 19 (21, 23, 23) sts
Row 4: Ch 1, Turn, skip 1st st, BLO sl st in next 16 (18, 20, 20) sts, BLO work 2 sl st in next st (leave last st unworked). – 18 (20, 22, 22) sts
Row 5: Ch 1, Turn, BLO sc in each st across. – 18 (20, 22, 22) sts
Row 6: Ch 1, Turn, sl st in same st as ch 1, work 13 (15, 17, 17) modified slst2tog, BLO sl st in next 3 sts (leave last st unworked). – 17 (19, 21, 21) sts
Row 7: Ch 1, Turn, BLO sl st in next 3 sts, BLO sc in remaining sts. – 17 (19, 21, 21) sts
Row 8: Ch 1, Turn, skip 1st st, BLO sl st in next 14 (16, 18, 18) sts, BLO work 2 sl st in next st (leave last st unworked). – 16 (18, 20, 20) sts
Row 9: Ch 1, Turn, BLO sc in each st across. – 16 (18, 20, 20)
Row 10: Ch 1, Turn, sl st in same st as ch 1, work 13 (15, 17, 17) modified slst2tog, BLO sl st in next st (leave last unworked). – 15 (17, 19, 19) sts
Row 11: Ch 1, Turn, BLO sl st in next st, BLO sc in remaining sts. – 15 (17, 19, 19) sts
Row 12: Ch 1, Turn, skip 1st st, BLO sl st in next (16, 18, 18) sts, BLO sl st in next 4 unworked sts, BLO work 2 sl sts in unworked st from Row 1. – 20 (22, 24, ) sts
Row 13: Ch 1, Turn, BLO sc in each st across. – (22, 24, 24) sts
Rows 14 thru 23: Repeat Rows 2 thru 11.
Row 24: Ch 1, Turn, skip 1st st, BLO sl st in next 14 (16, 18, 18) sts, BLO sl st in next 4 unworked sts, BLO 2 sl sts in unworked st from Row 13. – 20 (22, 24, 24) sts
Toddler & Child
Row 25: Ch 1, Turn, BLO sc in each st across. – 20 (22) sts
Rows 26 thru 31: Repeat Rows 2 thru 7.
Row 32: Ch 1, Turn, skip 1st st, BLO sl st in next 16 (18) sts, BLO sl st in next 2 unworked sts, BLO work 2 sl sts in unworked st from Row 25. – 20 (22) sts
Fasten off. Leave tail 2.5 times the length of your hat. Continue to the Seam below.
Teen/Adult Small & Adult Medium/Large
Row 25: Ch 1, Turn, BLO sc in each st across. – 24 (24) sts
Rows 26 thru 35: Repeat Rows 2 thru 11.
Row 36: Ch 1, Turn, skip 1st st, BLO sl st in next 18 (18) sts, BLO sl st in next 4 unworked sts, BLO work 2 sl sts in unworked st from Row 25. – 24 (24) sts
Fasten off. Leave tail 2.5 times the length of your hat. Continue to the Seam below.
Seam All Sizes
With Wrong Side facing out, line up Row 1 w/ Row 32 (32, 36, 36). Thread your yarn tail into your yarn needle and whipstitch each BLO of Row 1 to each BLO of Row 32 (32, 36, 36). – 20 (22, 24, 24) whip stitches
Fasten off. Using a 6-8″ piece of yarn and a yarn needle, weave yarn in and out of the ends of each row in the crown, pull tight to close hold in crown. Weave in all ends. Turn Right Side out. Continue below to Finishing.
Finishing: Toddler & Teen / Adult Small
Join yarn w/ a sc (Click here for tutorial) in the side of a row nearest the seam along the bottom edge of the hat, work a sc in the side of the next 27 (31) rows, work (sc2tog) twice over the last 4 rows. Join w/ a sl st to 1st st of round. – 30 (34) sts
Fasten off. Weave in ends. Note: If you’d like your hat a little more snug, work a couple of sc2tog near the end of your finishing round.
Finishing: Child & Adult Medium / Large
Join yarn w/ a sc (Click here for tutorial) in the side of a row nearest the seam along the bottom edge of the hat, work a sc in the side of each row around. Join w/ a sl st to 1st st of round. – 32 (36) sts
Fasten off. Weave in ends.
Note: If you’d like your hat a little more snug, work a couple of sc2tog near the end of your finishing round.
For an extra fun option, add a large yarn pom! Shop our affiliates for my favorite pom makers from Clover!
 Clover Pom-Pom Maker LargeShop on Amazon
Expand your skills by taking a class from our affiliates

I’d love to see your finished projects so feel free to post them on my Facebook page!
Options for saving this pattern:
- Bookmark this page!
- Use the print button and print out a free pattern version.
- PDF Instant Download, Ads-free version available for a nominal fee here.


One Comment