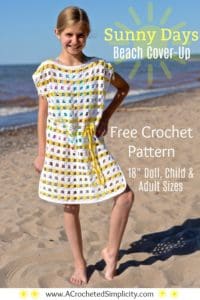
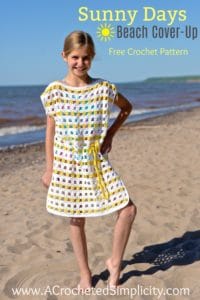
Sunny Days Crochet Beach Cover-Up – Free Crochet Pattern
As soon as I completed the Makin’ Lemonade Sunhat for Claire, she asked for a new crochet beach cover-up. The last one I made her was a “Friendly Lil’ Ladies” Swim Cover-Up and she outgrew that a couple years ago. She only gave me one request. She asked if I could sew the unicorn hood from her old cover-up onto her new cover-up. I promised to do so after we got pictures without it. 😉
I used Lion Brand Rewind yarn for her sunhat, but wanted to use a cotton for her cover-up. I chose Lion Brand Yarn’s 24/7 Cotton because the line also has a bright yellow and it compliments the sunhat perfectly!
You can find the free crochet pattern for the Sunny Days Beach Cover-Up in this post below, or an ad-free print friendly version on Love Crafts here, Ravelry here, or on Etsy here.
~Click HERE to sign-up to receive our newsletter!~
Although I used a worsted / 4 weight cotton yarn for Claire’s cover-up, I plan to use a sport or DK weight for my own. Because of this, I’ve added complete written instructions so that you can use ANY yarn you’d like for any of the sizes! These instructions are included in the Ad-Free PDF.
Lion Brand 24/7 Cotton is a 100% mercerized cotton. The mercerization process gives the yarn an incredible sheen. It is available in 24 wonderful colors that include brights (perfect for summer fun!) and neutrals (perfect for everyday wear). This yarn is great for a variety of projects ranging from garments to various home decor items. It is classified as a worsted/4 weight yarn.
Thank you Lion Brand for providing the yarn for this design.
~Don’t lose it, add It To Your Ravelry Favorites or Queue.~
~Don’t forget to Pin It too!~
*Purchase an ad-free PDF (including all 3 photo tutorials and a complete chart of all cover-up measurements) of this pattern on Craftsy or Ravelry*
This post contains affiliate links.
Materials
- Yarn: Lion Brand Yarns 24/7 Cotton in White & Lemon was used for the sample. Worsted (4) Weight 100% Mercerized Cotton Yarn (186 yards / 170 m / 3.5 oz / 100 g). Available for purchase on the Lion Brand Website or AMAZON
- Use ANY Weight of Yarn! Complete written instructions to use ANY weight of yarn (or thread) are included in the Ad-Free PDF that is available on Ravelry & Craftsy by clicking the links above.
- Crochet Hook: H/8/5.00mm; G/6/4.00mm, or size needed to obtain gauge (My favorite crochet hooks are the Clover Amour Hooks, I’ve never had an ache in my hand since switching)
- Scissors
- Yarn Needle
- Scrap Piece of Yarn to use as a stitch marker
- Pony Beads (optional)
Many of these materials are available for purchase through our affiliates below:
 Lion Brand 24/7 Cotton Yarn...Shop on Amazon
  Clover 1047/H Deep Blue Amo...Shop on Amazon
  Clover 1045/G Purple Amour ...Shop on Amazon
  Fiskars 154110-1001 Non-sti...Shop on Amazon
  Lion Brand Yarn 400-5-5002 ...Shop on Amazon
Abbreviations
- ch(s): chain(s)
- sl st(s): slip stitch(es)
- sc: single crochet
- dc: double crochet
- tr: treble crochet
- st(s): stitch(es)
- sp(s): space(s)
- Rep: repeat
- Rnd(s): round(s)
- yo: yarn over
- SM: stitch marker
- MC: White
- CC: Lemon
- Alt-dc: Alternate Double Crochet (click here for tutorial)
- Alt-tr: Alternate Treble Crochet (click here for tutorial)
- Mattress Stitch Seam: (click here for tutorial).
Finished Chest Sizes
- 18″ Doll – 15″
- Toddler – 27″
- Child Small (29.5″), Child Large (34″), Child X-Large (38.5″_
- Women’s XS/S (41″), M/L (50.5″), XL/2X (57.5″), 3X/4X (69.5″)
Gauge
- In dc, using a 5mm hook: 18 sts = 4.25″
- In Stitch Pattern as written Rows 1 – 5 = 3″ (not crucial)
Notes
- I tend to crochet on the tighter side. You may need to go down a hook size (or two) to meet gauge if you crochet on the looser side.
- Beginning chain(s) are not included in stitch count, unless noted otherwise.
- Beach cover-up is constructed by making 2 rectangular panels, partially seaming each side, and adding a lace tie to create each shoulder seam. Shoulders can be seamed instead of joined with a lace tie, if preferred.
- Row Height Gauge is not crucial for this project.
- Changes for sizes are written as follows: 18″ Doll / Toddler (Child Small, Child Large, Child X-Large) / Adult XS/S (Adult M/L, Adult XL/2X, Adult 3XL/4XL)
- Yardage for MC: 140 / 440 (520, 600, 720) / 840 (1,060, 1,280, 1,580) yards
- Yardage for CC: 60 / 180 (200, 220, 260) / 420 (520, 630, 790) yards
- Use ANY Weight of Yarn! Complete written instructions to use ANY weight of yarn (or thread) are included in the Ad-Free PDF that is available on Ravelry & Craftsy by clicking the links above.
- Ad-Free PDF Includes: Color coded size changes to make it easier on your eyes. All 3 photo tutorials. A complete chart that includes all measurements, sizes, yardages, etc. Complete instructions to use any weight of yarn for your cover-up.
Special Stitches
- Alternate Double Crochet (alt-dc): After turning your work, do not ch, instead, insert your hook into the first st, yo, pull up a loop, yo, pull thru both loops, insert your hook between the legs of the st just made, yo, pull up a loop, yo, pull through one loop, yo, pull through remaining loops.
- Alternate Treble Crochet (alt-tr): After turning your work, do not ch, instead, insert your hook into the first st, yo, pull up a loop, yo, pull thru both loops, insert your hook between the legs of the st just made, yo, pull up a loop, yo, pull thru both loops, insert your hook between the legs of the st just made, yo, pull up a loop, yo, pull through one loop, yo, pull thru remaining loops.

Crochet Beach Cover-Up Instructions
Note on Changing Colors: I chose to work 1 of every 4 rows in CC. I cut my yarn at the end of every color change and wove in ends as I worked.
Row 1 (RS): Using MC & a 5.00mm crochet hook, ch 34 / 59 (64, 74, 84) / 89 (109, 124, 149) switch to a 4.00mm crochet hook, working in the back hump of the foundation ch, dc in the 3rd ch from your hook, dc in each ch across. Turn. 32 / 57 (62,, 72, 82) / 87 (109 , 122, 147) sts
Row 2 (CC): Alt-tr, ch 1, skip the next 2 sts, 3 tr in next st, *ch 2, skip the next 4 sts, 3 tr in next st, rep from * across to the last 3 sts, ch 1, skip the next 2 sts, tr in the last st. Turn. *Chains count as stitches.
Row 3 (MC): Alt-dc, dc in the next ch-1 sp, dc in each of the next 3 sts, *2 dc in the next ch-2 sp, dc in each of the next 3 sts, rep from * across to the last ch-1 sp, dc in the next ch-1 sp, dc in the last st. Turn.
Row 4 (MC): Alt-tr, ch 1, skip the next 2 sts, 3 tr in next st, *ch 2, skip the next 4 sts, 3 tr in next st, rep from * across to the last 3 sts, ch 1, skip the next 2 sts, tr in the last st. Turn.
Row 5 (MC): Alt-dc, dc in the next ch-1 sp, dc in each of the next 3 sts, *2 dc in the next ch-2 sp, dc in each of the next 3 sts, rep from * across to the last ch-1 sp, dc in the next ch-1 sp, dc in the last st. Turn.
Rep Rows 2 – 5, ending w/ either a Row 3 or Row 5 rep, until work measures: 10″ / 17″ (21″, 26″, 29″) / 34″ (34″, 36″, 36″)
Do not fasten off. Continue on to Panel Edging. Complete edging then make the second panel.
Panel Edging
Note: Do not turn at the end of the last row of the panel. Instead, rotate your work to begin working the edging into the sides of the rows. Stitch count isn’t crucial for this part.
Tip: When working into the sides of the stitches on the two vertical edges, work your stitches into the middle of the stitches and not around them. Doing so will give your edging a cleaner look.
Rnd 1 (RS): Continuing on from panel, rotate to begin working into the sides of the rows along the first vertical edge, work 2 sc into the side of each dc and 3 sc into the side of each tr along edge, rotate to work into the bottom of the foundation ch from Row 1, sc in each st across bottom edge, rotate to work into the sides of the rows along the opposite vertical edge, work 2 sc into the side of each dc and 3 sc into the side of each tr along edge, rotate to work into the top edge, sc in each st across. Join w/ a sl st to the 1st st.
Fasten off. Weave in ends. Complete second panel then continue on to Side Seams.
Side Seams
Step 1: Measure down from the top edge for armhole depth and place a SM. 3″ / 6.5″ (7.25″, 8.25″, 9.25″) / 9.25″ (10.25″, 11.25″, 12.25″)
Step 2: Measure up from the bottom edge for split hem height and place a SM. 2.5″ / 5.5″ (6.5″, 8″, 8.5″) / 9″ (9″, 10″, 10″)
Step 3: Seam side of cover-up between the 2 SM using a mattress stitch seam. Click HERE for Mattress Stitch Seam Tutorial.
Weave in ends. Continue on to Shoulder Tie, or seam shoulders using mattress stitch seam.
Shoulder Tie (Make 2)
The shoulder seams of the beach cover-up in the photos are created using chain ties. The ties lace the shoulders together.
Doll Size: Do not use a chain tie, use only a single strand of yarn as a tie.
Tie: Using a 4.00mm crochet hook, ch until tie measures: XX / 19″ (22″, 27″, 33″) / 33″ (44″, 50″, 61″)
Fasten off.
Lace each shoulder the following width: 2″ / 3.5″ (4″, 5″ 6″) / 6″ (8″, 9″, 11″)
After lacing, add 3 beads to both ends of each tie, if desired. Knot tie ends to secure beads. Continue on to Belt, if desired.

Belt
Belt: Using a 4.00mm crochet hook, ch a length that is double the width of your cover-up plus 18-24″ to give you enough to tie into a bow, sc in the 2nd ch from your hook and in each ch across.
Fasten off. Weave in ends. Weave belt in and out of every ch-2 sp in a Row 2 or 4 repeat.

Sunhat pictured above is the Makin’ Lemonade Sunhat.
Do you enjoy making crochet garments? My favorite top I made this spring is My Favorite Summer Top!
Are you intimidated by crocheted cables? Would you love to learn? Take an Annies Video Class with me and let me ease your fears of crocheted cables! Click on the photo below to watch a free preview. You can also see the other 2 classes I have available! (affiliate link)

Please share your finished ACS projects with me in the A Crocheted Simplicity Crochet Community Group on Facebook!
Happy Crocheting!

Very good
Very nice! I am in love with this crochet beach cover-ups. I can’t wait to try this. Thanks for sharing the great article.