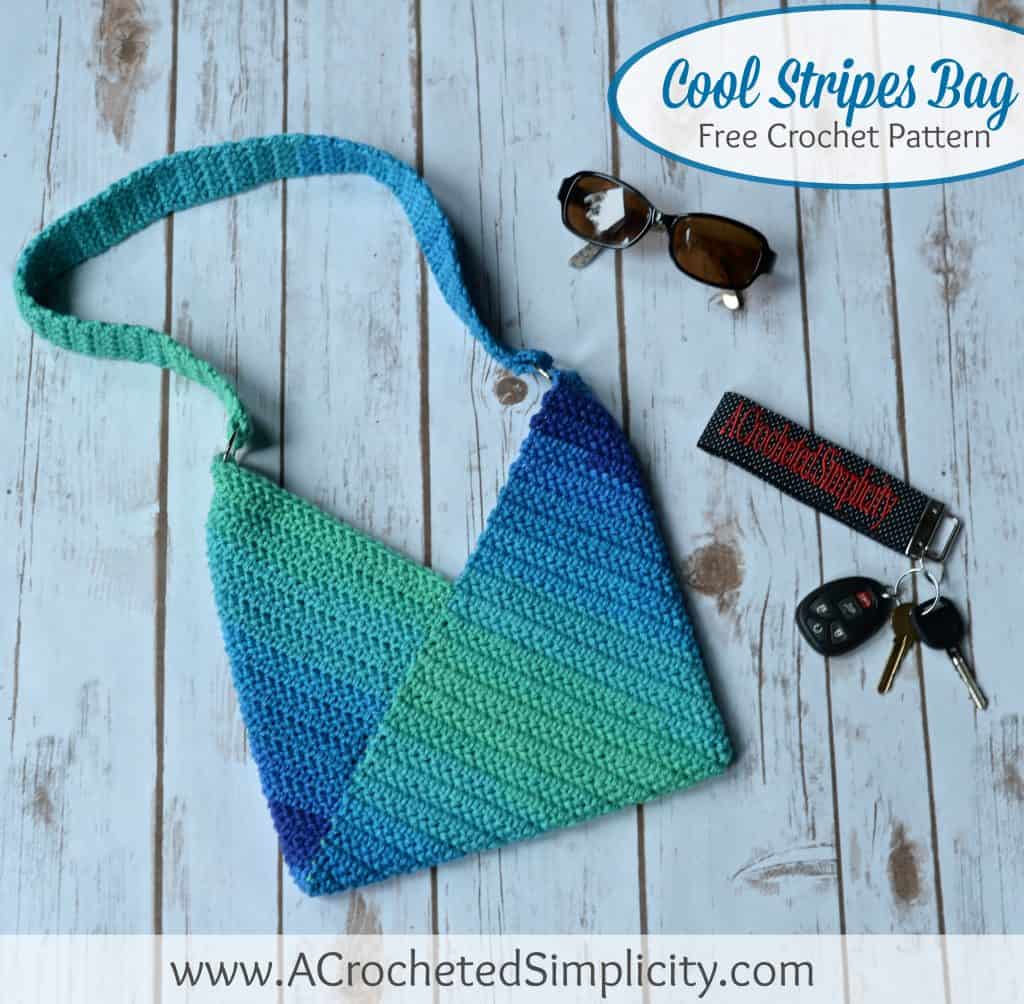
Free Crochet Pattern – Cool Stripes Bag
Do you love to use striped or variegated yarns in your crochet, or are you more like me and tend to stick with solids, heathers, and tweeds?
As much as I love the beautifully colored yarns (there’s plenty of proof of this in my yarn stash;) ), I have always had a hard time finding just the right design for them. I was beginning to believe that these yarns with shorter color changes were designed by the yarn companies for knitters, not crocheters!
I recently received an e-mail from Red Heart Yarns asking if they could send me a skein of their newest yarns to play with and Red Heart Super Saver Stripes was one of them. Who am I to turn down free yarn??? But then the anxiety set in… “What on earth am I going to make with this? STRIPES?!?!?! The color changes aren’t long enough for crochet. Am I going to disappoint them?” Eek!
Then the box came and I was super excited that the colorways they sent were hues of blue…my favorite!!! I laid them on a table where they could stare at me for a few days until they finally told me what they wanted to become (no, I wasn’t expecting the yarn to talk…I haven’t lost my marbles 😉 ). Then one day it hit me…of course it was when I was on a 10 hour drive back from my daughter’s and I couldn’t crochet. So I did the next best thing. The next time I stopped for gas I drew a quick sketch and a note with my idea so I wouldn’t forget. The very next day, the Cool Stripes Bag was born and the rest is history! I hope you enjoy this free crochet pattern!
Moral of the story (as you’ll see), self-striping yarn is also made for crocheters. 😉
> Click HERE to sign-up to receive our newsletter <
> Don’t lose it, add It To Your Ravelry Favorites or Queue <
> Don’t forget to Pin It too <
*Purchase an ad-free PDF on Ravelry that includes the Mattress Stitch Seam Tutorial*
This post contains affiliate links.
Materials
- Yarn: Red Heart Yarns Super Saver Stripes (stripes 5 oz / 141 g / 236 yds / 215 m / 100% acrylic) (If you’re making your bag the size shown, you’ll need only 1 skein.) Colorway shown: Cool Stripe
- Crochet Hook: I/9/5.50mm, H/8/5.00mm (My favorite crochet hooks are the Clover Amour Hooks, I’ve never had an ache in my hand since switching)
- Scissors
- Yarn Needle
- Locking Stitch Marker
- D-Rings (2) 1.5″ (optional)
Many of these materials are available for purchase through our affiliates below:
 Clover Amour Crochet Hook: ...Shop on Amazon
  Clover Amour Crochet Hook: ...Shop on Amazon
  Fiskars 154110-1001 Non-sti...Shop on Amazon
  Clover Lock Ring Markers, 2...Shop on Amazon
  ljdeals Metal D Ring 1.5" x...Shop on Amazon
Gauge
-
In herringbone hdc: 11.25 sts X 9.5 rows = 3″
Difficulty Level
- Easy
Finished Size
-
One Size: 10.5″ W x 10.5″ H (does not include strap)
Stitch Abbreviations
- ch: chain
- sl st: slip stitch
- sc: single crochet
- Hhdc: Herringbone Half Double Crochet Stitch (click here for photo & video tutorial)
- yo: yarn over
- st(s): stitch(es)
- RS: right side
- WS: wrong side
- SM: stitch marker
Special Stitches
- Herringbone Half Double Crochet (Hhdc): Yo, insert hook into stitch indicated, yo, pull up a loop and pull it thru 1 loop on hook, yo, pull thru remaining loops. Click HERE for video tutorial & 2 quick tips for working this stitch more quickly!
Notes
- I tend to crochet on the tighter side. You may need to go down a hook size (or two) to meet gauge if you crochet on the looser side.
- The first stitch of each row is worked in the same stitch as the turning chain, unless stated otherwise.
- Beginning chains are not counted as a stitch.
- Custom Sizing Instructions are included if you’d like to make a smaller or larger bag. If you choose to make a larger bag, you’ll need 2 skeins of Red Heart Super Saver Stripes.
Custom Sizing Instructions
Would you like to make a smaller or larger bag? If your answer is ‘yes’, then follow these simple instructions!
Step One: Simply increase or decrease the number of chains in your foundation chain in multiples of 2.
Step Two: Follow Row 1 of the Bag Instructions using your new stitch count.
Step Three: Repeat Row 2 in multiples of 2 until the length of your rectangle measures 3 times its’ width.
- For example, Row 1 as originally written is 8″ wide so you would repeat Row 2 until it measures 24″ in length.
Cool Stripes Bag Instructions
Row 1 (RS): Using a 5.5mm crochet hook, ch 29, switch to a 5mm crochet hook, Hhdc in the 2nd ch from your hook and in each ch across. Turn. (28 sts)
Rows 2 – 74: Ch 1, Hhdc in each st across. Turn.
Fasten off. Weave in all ends. Continue on to Forming the Bag.
Forming the Bag

Photo A: Lay your bag out in front of you as shown in the photo.
Photo B: Bring the bottom left corner up to meet the upper long edge (as shown in the photo). Bring the upper right corner down to meet the lower long edge (as shown in the photo).
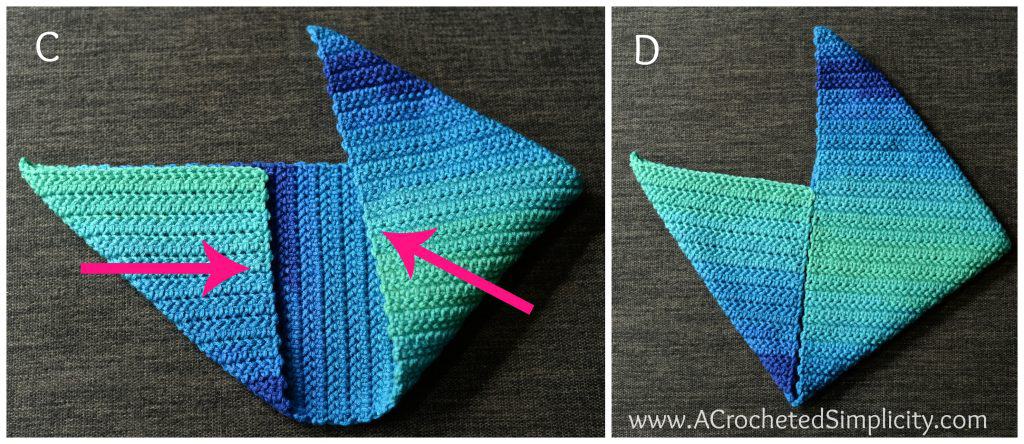
Photos C & D: Bring the lower edge up to meet the edge created in photo B. See pink arrows.
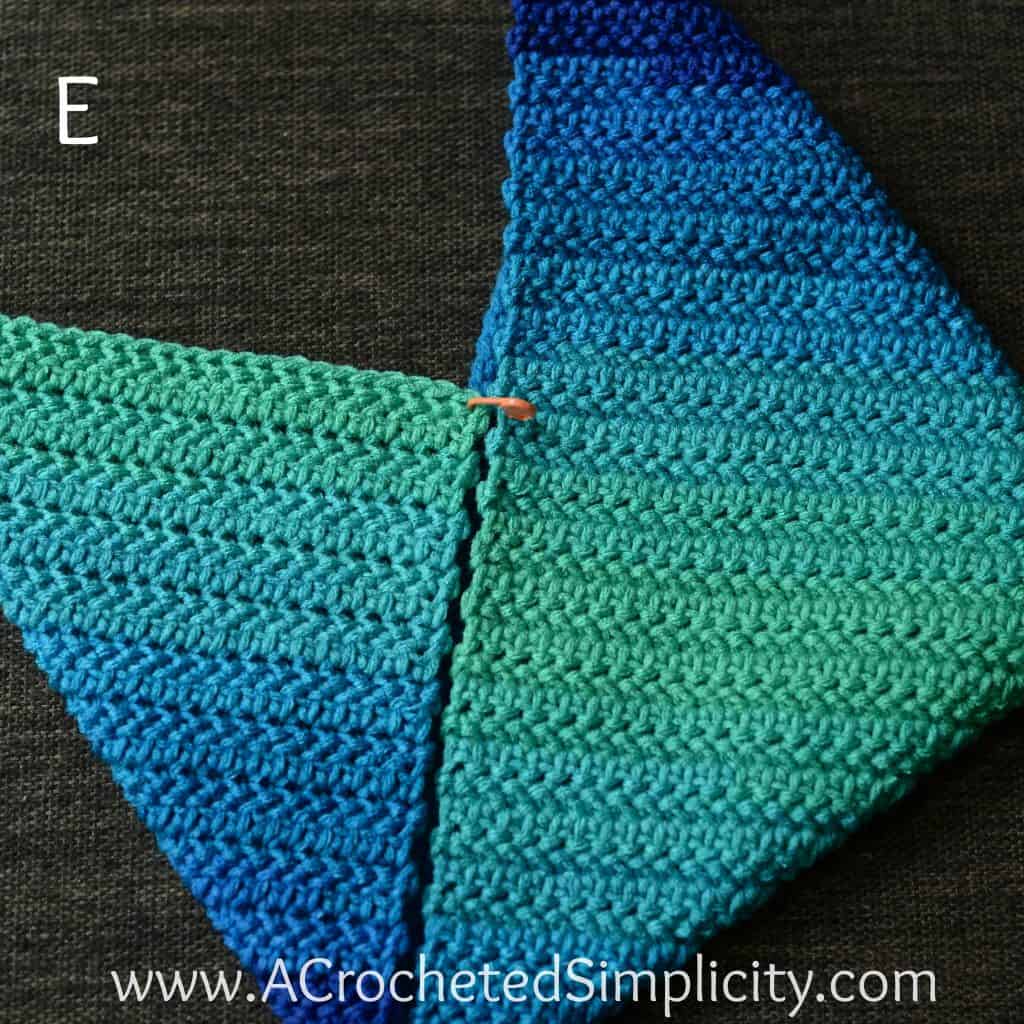
Photo E: After completing photo D, make sure that your rows are lined up. Next, use a stitch marker to hold the pieces together.
Now it’s time to seam your bag! Use the Mattress Stitch Seam to seam your bag. Click HERE for my Mattress Stitch Seam Tutorial.
Repeat the seam for the opposite side of the bag, then continue on to the Strap Instructions below.
Strap Instructions
Row 1 (RS): Using a 5.5mm crochet hook, ch 6, switch to a 5mm crochet hook, Hhdc in the 2nd ch from your hook and in each ch across. Turn. (5 sts)
Rows 2 – 88: Ch 1, Hhdc in each st across. Turn. *To customize the length of your strap simply increase or decrease the number of rows you work, by multiples of 2. Remember that yarn straps will stretch over time so make it shorter than you’d like it to be.
Fasten off. Weave in all ends. Continue on to Attaching the Strap.
Attaching the Strap
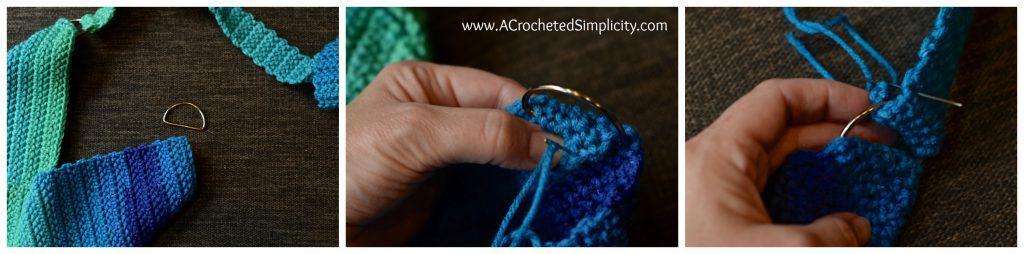
First, attach one D-ring to each of the two upper corners of the bag. Place the D-ring near the corner, fold the corner over approximately 1-1/4″ and through the center of the D-ring, then secure it by sewing with a yarn needle and 8″ length of yarn. Weave in ends. Repeat for the second side.
Next, attach the strap by inserting one end of the strap through the D-ring (from outside to inside). Insert it just far enough through so that it folds around the D-ring. Using a yarn needle and 8″ length of yarn, sew the short end of the strap to the strap to secure it. Weave in ends. Repeat for the second side.
Note: If you’ve chosen not to use D-rings, simply sew one short edge of your strap to each side of your bag.
Find all of my FREE crochet patterns HERE
Are you intimidated by crocheted cables? Would you love to learn more? Take an Annies Video Class with me and let me ease your fears of crocheted cables! Click on the photo below to watch a free preview. You can also see the other 2 classes I have available! (affiliate link)

Please share your finished ACS projects with me in the A Crocheted Simplicity Crochet Community Group on Facebook!
Happy Crocheting!


Cute bag!!!
I just finished mine and I love it. Thanks soooooooooo much for the free patterns!!!
I’m so glad you love it!! 🙂
It is such a cute bag, I dropped everything to start it. I’m still crocheting but it seems as if I’m going to run out of yarn. Do you have an approximate length after you complete the last row (#74)?
Thank you
This is super cute and I can’t wait to make it.
I love the colours on this bag x