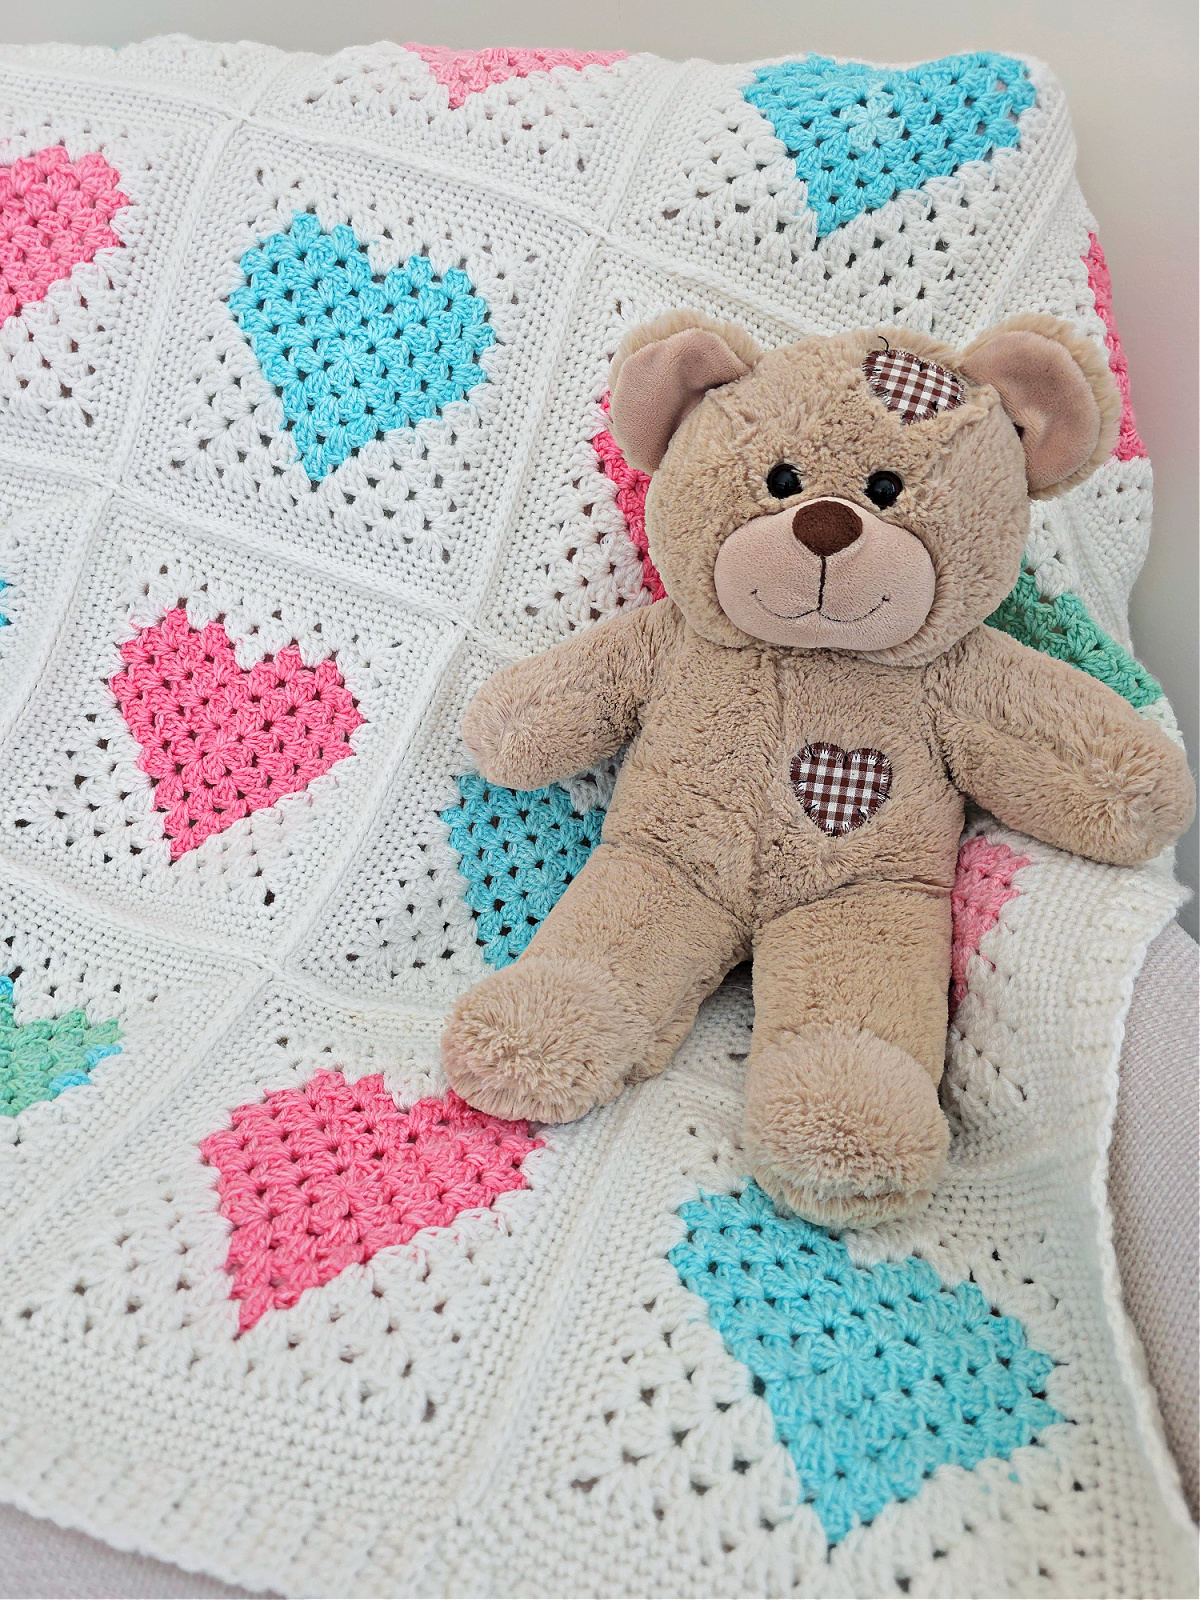
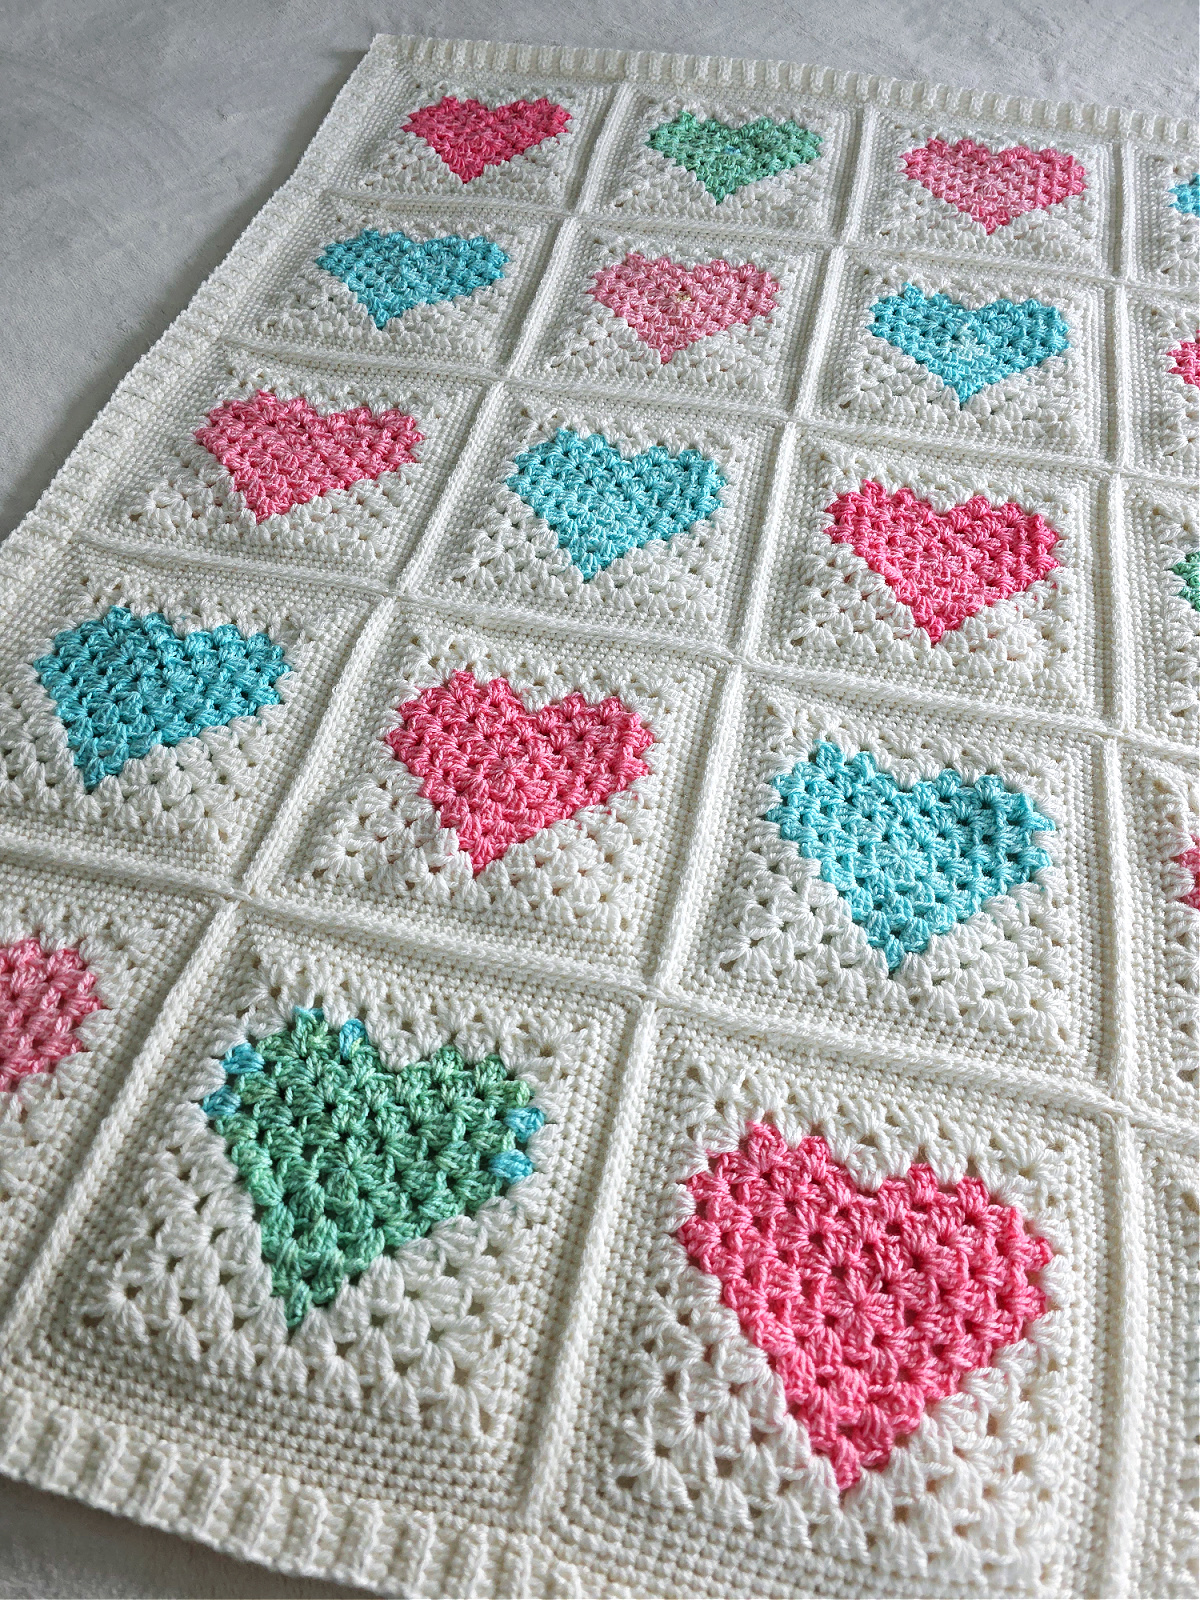
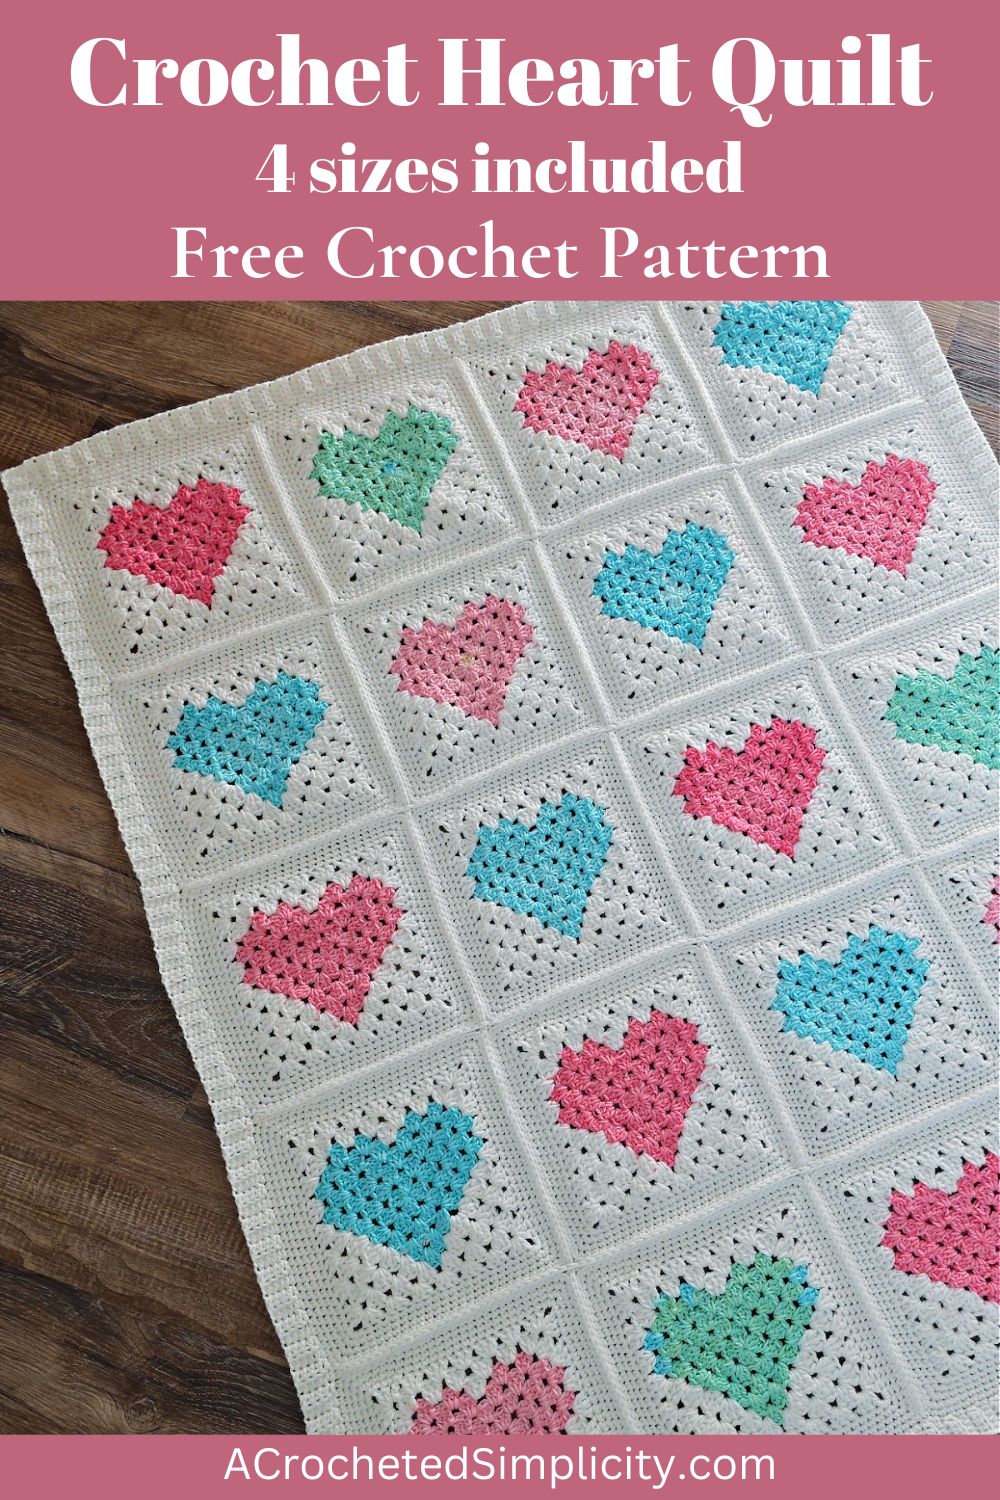
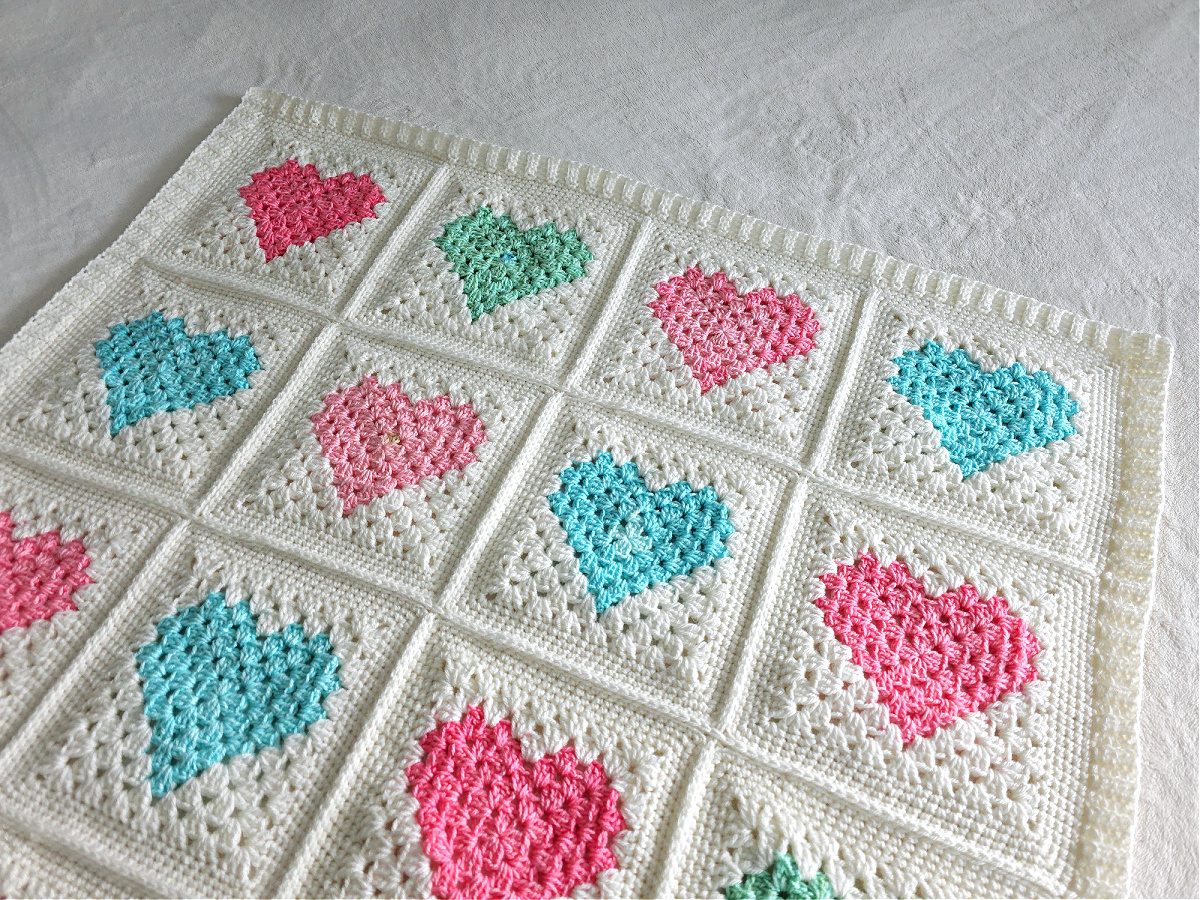
Heart Crochet Quilt
There’s an entire world of crochet that opens for you when you learn the classic granny stitch or how to crochet motifs. You can put those squares into so many different items including a crochet quilt, tote bag, runner, wall hanging, and much more.
With strategic color changes, you can achieve a whole new look from the simple granny square and that’s what you’ll learn today in this beginner-friendly crochet blanket pattern that’s perfect for spreading the message of love, care, and affection with your near and dear ones. Let’s dive into it!
You’ll find the crochet quilt pattern free below, or you can find an ad-free printable PDF (that includes all photo tutorials + BONUS stitch chart) on Ravelry, or on Etsy (aff).
This breathable blanket is made from seaming together crochet squares and the pattern includes everything you need to go about it. The step-by-step detailed instructions will walk you through every step so that this is a stress-free, fun, and memorable crochet journey for you as you make this blanket for yourself or a loved one.
If you use up your scrap yarn to make this and it ends up being a vibrant piece, you can add it to any space to use as a throw, lapghan, or baby blanket. There are multiple sizes to choose from when making this crochet granny square blanket.
Related: If you want to make another easy crochet blanket from squares, you should check out the Scattered Pixels Block Stitch Blanket.
How to Crochet a Granny Square Blanket
There’s nothing complicated about this crochet quilt and once you go through the instructions, you’ll be itching to get started on it.
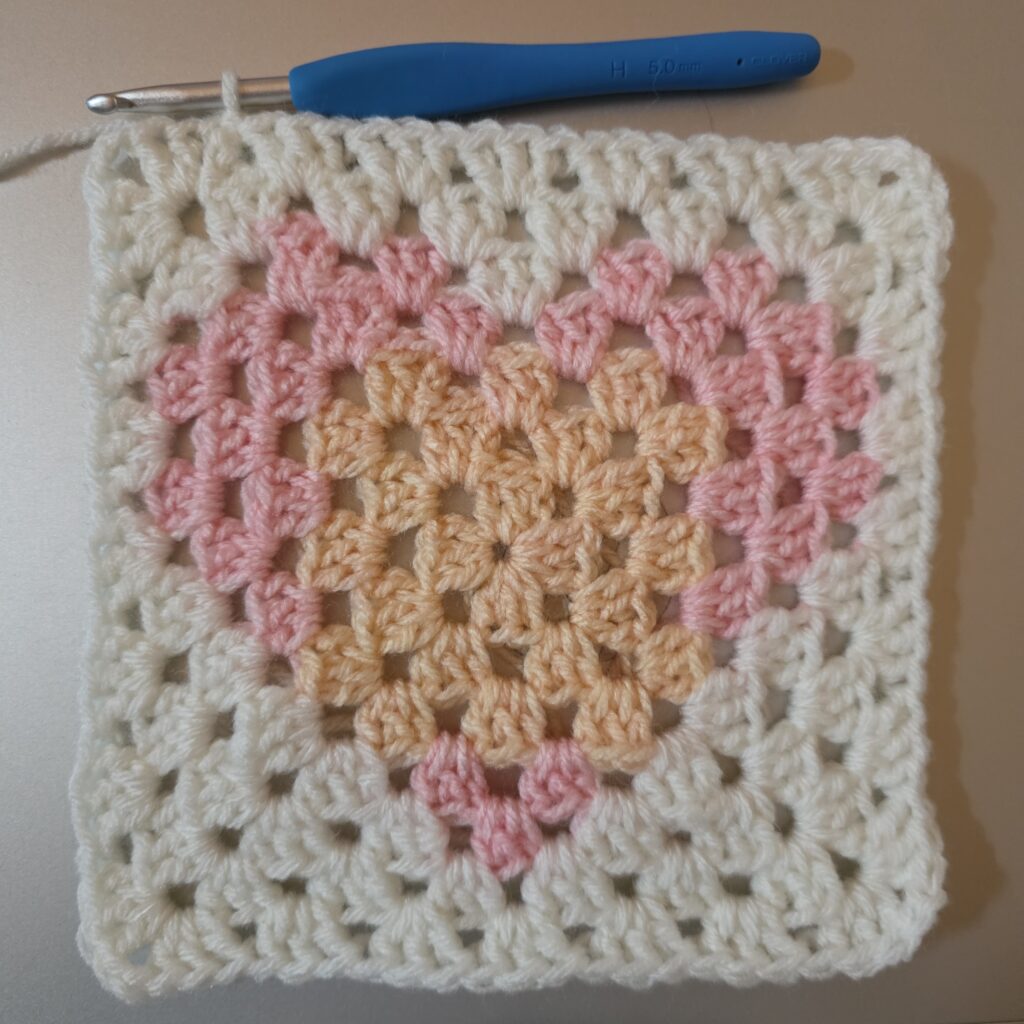
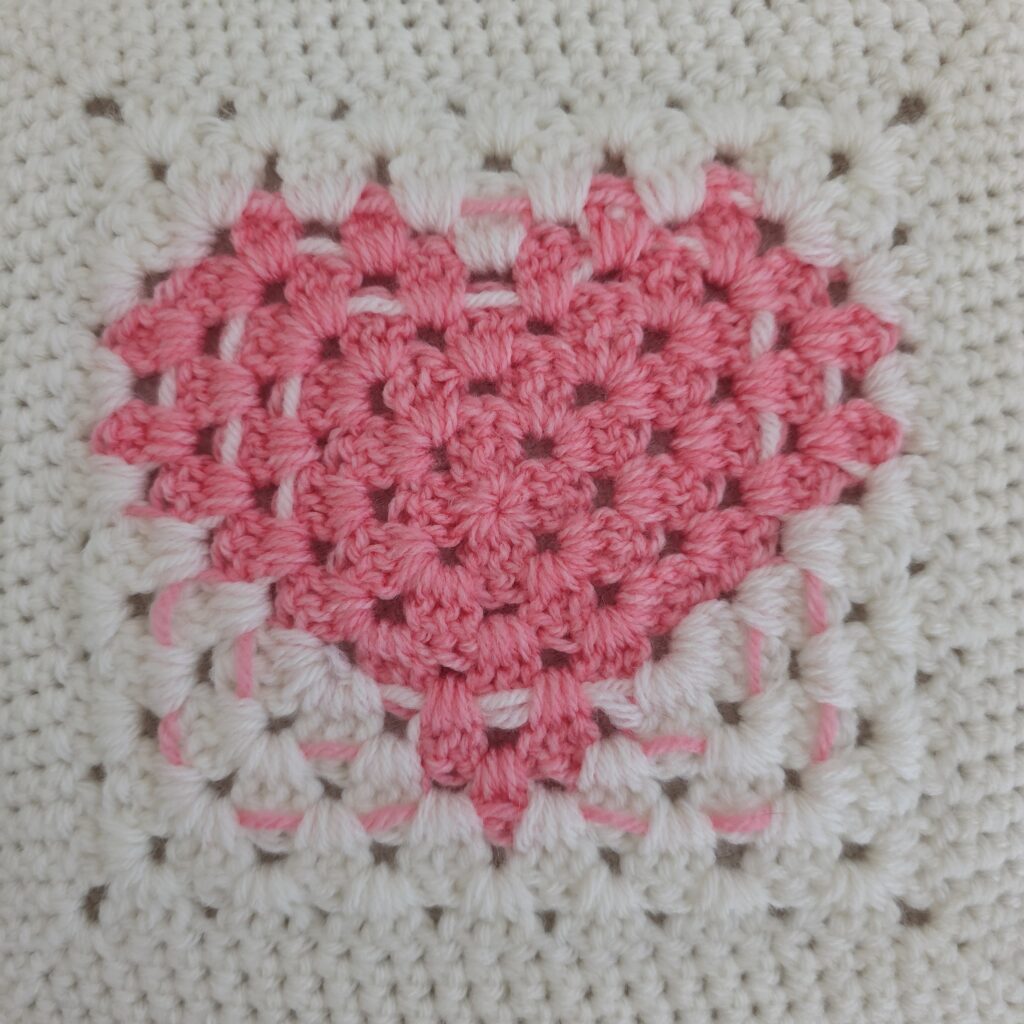
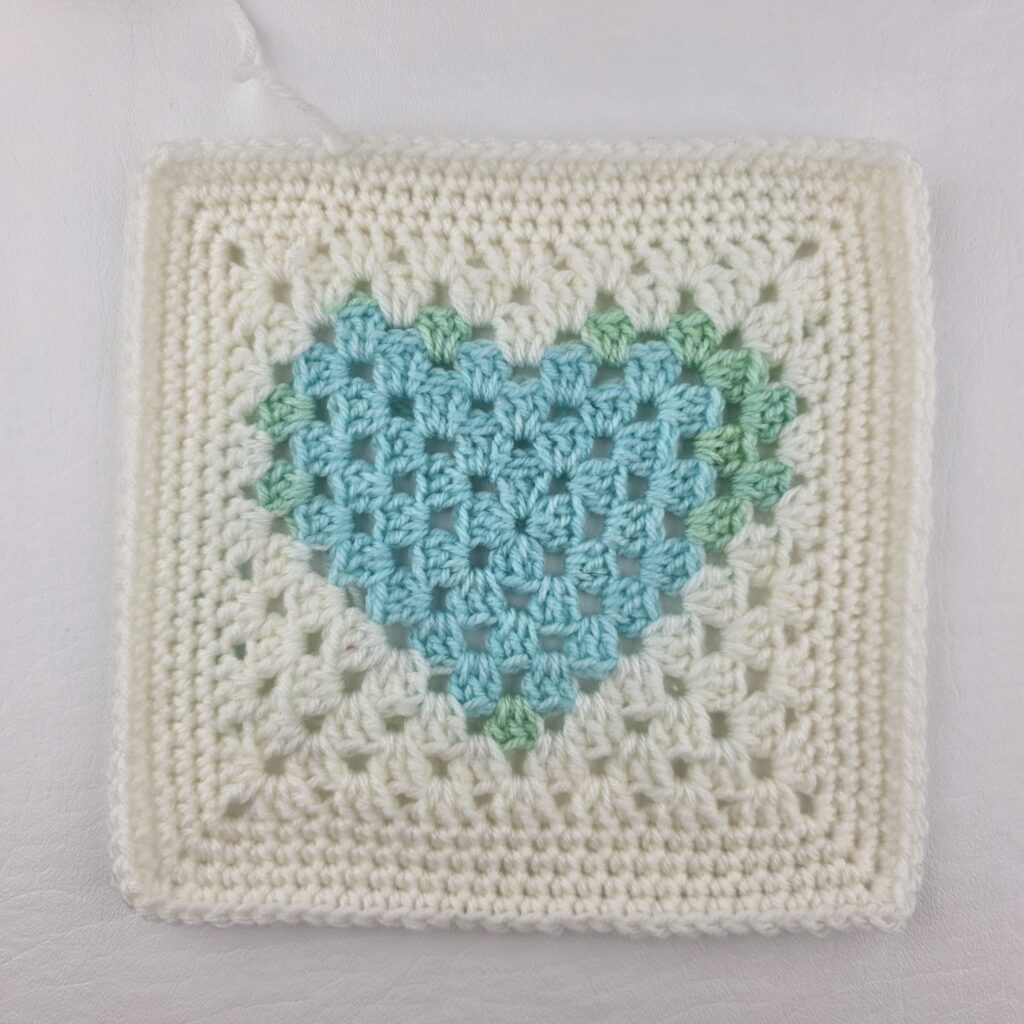
This granny squares blanket is made using 8″ granny heart squares. You’ll first select which size you want then crochet squares accordingly. After you’ve crocheted them, block your squares (if needed), then lay them out according to the notes for the specific size you’re making.
Next, you’ll seam the squares together using the flat slip stitch seam and then bring it all to a finish with a nice border.
How To Get The
Heart Crochet Quilt Pattern
Option 1: Scroll down for the free crochet motif blanket pattern right here in this blog post.
Option 2: Purchase the ad-free printable PDF from one of my shops:
Adjusting the Size of Your Blanket
The written crochet pattern includes instructions to make a crochet baby blanket, lapghan, small throw, and large throw. You’ll easily be able to decide from among these sizes which one you prefer to make.
Be sure to check the number of squares and the layout before you finalize the size because you’ll be buying materials accordingly. If this is a stashbusting crochet project, the final result is sure to be very bright and colorful!
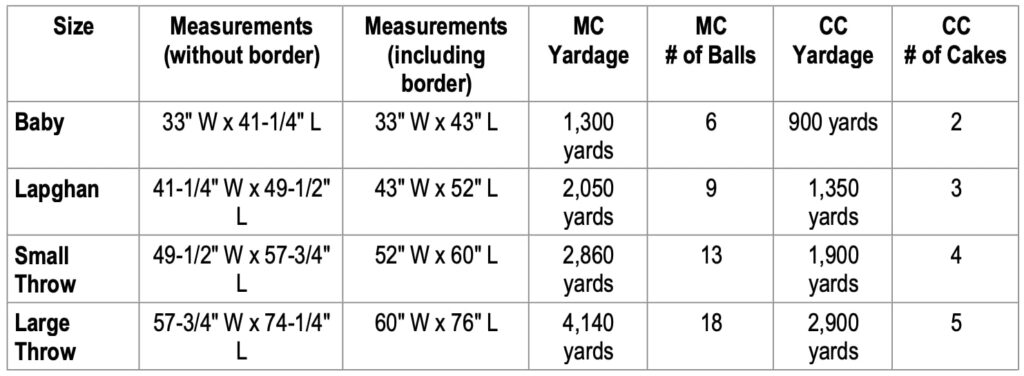
Size Chart
Use this chart to make a blanket in the size you’d like.
Yarn
For the Heart Crochet Quilt, I chose Lion Brand Yarns Wool Ease DK and Mandala Baby. Both of these have acrylic content with Wool Ease offering solids while Mandala Baby comes in bright self-striping cakes. These yarns are machine-washable and highly-durable, ideal for blankets that have a lot of wear in them.
Both of these yarns are readily available and if you have some shades in your stash already, this is a great project to use them up. And if you’re aiming for brightly colored blanket without changing your yarn throughout, a variegated cake of yarn like Mandala Baby is perfect.
I chose Mandala Baby Yarn in Narnia for the sample shown in the photos. This colorway includes a cream and pale yellow. I cut apart my cakes to remove these two colors. I used the remaining colors in the yarn cakes.
If you choose a different colorway, or simply use scraps of yarn you have leftover, keep in mind that the colors should have enough contrast to your main color so the hearts show clearly.
How to Style a Crochet Blanket
- Living Room: Drape it over the back of your sofa or an armchair for a chic yet inviting look.
- Bedroom: Layer it at the foot of your bed for added warmth and a luxurious aesthetic.
- Reading Nook: Pair it with a comfy chair, a good book, and a cup of tea for the ultimate cozy corner.
- Seasonal Decor: Use crochet blankets in warm, earthy tones for fall and winter or light pastels for spring and summer.
Heart Quilt – Free Crochet Pattern
The granny square crochet blanket pattern is free below, but if you love to work offline, I’ve got a couple other great options for you.
Purchase the ad-free, printable PDF, (including all photo tutorials + BONUS stitch chart) on Ravelry, or on Etsy (aff).
Purchase the Crochet Heart Quilt Blanket Kit: Lion Brand has a full kit of the Crochet Heart Quilt, available on their website. The includes your choice of colors and a digital copy of the crochet pattern.
This post contains affiliate links.
Materials
- Yarn: DK Weight / 3 / Yarn, Lion Brand Yarns Wool Ease DK and Lion Brand Yarns Mandala Baby was used for the heart crochet quilt shown in the photos.
- Yardage: See Size Chart Above
- Crochet Hooks: H/8/5.00mm; or size needed to obtain gauge (My favorite crochet hooks are the Clover Amour Crochet Hooks, I’ve never had an ache in my hand since switching).
- Scissors
- Yarn Needle
- Measuring Tape
- Locking Stitch Markers
Abbreviations (US Terms)
- ch(s): chain(s)
- sl st(s): slip stitch(es)
- st(s): stitch(es)
- sc: single crochet
- dc: double crochet
- yo: yarn over
- sp: space
- Rep: repeat
- RS: right side
- Rnd: Round
- BLO: back loop only
- Join yarn with a standing single crochet
Special Stitches
- Join yarn with a standing single crochet: Begin with a slip knot on your hook, insert your hook into the stitch or space indicated, yo, pull up a loop, yo and draw thru both loops on hook.
Experience Level
- Easy
Gauge
- Gauge check is included at the end of rounds 4, 7, & 11, of the crochet square.
- See Ribbed Border for border gauge note.
Sizes
- 4 Sizes: Baby, Lapghan, Small Throw, Large Throw (see size chart above)
- Easily adjust to make ANY size blanket.
Pattern Notes
- Turning chains are not included in stitch count.
- Yarn Notes: Lion Brand Yarns Wool Ease DK in Cream and Lion Brand Yarns Mandala Baby in Narnia were used for the sample shown in the photos. The sample shown in the photos is baby blanket size.
- Lion Brand Yarns Wool Ease DK: 80% Acrylic, 20% Wool (232 yards / 85 g / 3 oz / 212 m).
- Lion Brand Yarns Mandala Baby: 100% Acrylic, (590 yards / 150 g / 5.3 oz / 540 m).
- Yardage & Color
- Cream (MC): #636-098D 6 (9, 13, 18) balls
- Narnia (CC): #526-216R 2 (3, 4, 5) cakes
- Changes for Sizes as Follows: Baby (Lapghan, Small Throw, Large Throw)
- Construction Notes: This granny squares blanket is made using 8″ granny heart squares. After you’ve crocheted the squares for the size blanket you’re making, block your squares (if needed), then lay them out according to the notes for the specific size you’re making. Next, you’ll seam the squares together using the flat slip stitch seam. Lastly, you’ll finish the blanket by crocheting a ribbed border.
Working with Mandala Yarn
I chose Mandala Baby Yarn in Narnia for the sample shown in the photos. This colorway includes a cream and pale yellow. I cut apart my cakes to remove these two colors. I used the remaining colors in the yarn cakes.
If you choose a different colorway, or simply use scraps of yarn you have leftover, keep in mind that the colors should have enough contrast to your main color so the hearts show clearly.
Crochet Heart Quilt – Written Pattern
Granny Heart Square
The granny heart square is worked in joined rounds working color changes to create the heart shape. I did not fasten off yarn for each color change. Instead, I carried the unused yarn behind my work and worked over it with the current color so that I could pick it back up again when needed. If you prefer to cut the yarn for each color change, you can. I just preferred to work over the unused yarn to save on the number of ends that needed to be woven in.
Working with Mandala Yarn: If you’re using Mandala yarn, see above for notes about how to work with it.
Rnd 1 (RS): With CC yarn & a 5.00mm crochet hook, ch 4 (3 chs count as 1 dc), work 2 dc into the 4th ch from your hook, work the following in the same ch, (ch 2, 3 dc) 3 times, ch 2. Join with a sl st in the 4th ch of the beg ch 4. BLO sl st into each of the next 2 dc and into the next ch-2 sp. This moves the yarn over to the ch-2 sp to begin the next round. (12 dc + 4 ch-2’s)
Rnd 2 (CC): Ch 3 (counts as the 1st dc), (2 dc, ch 2, 3 dc) in the first ch-2 sp, * (3 dc, ch 2, 3 dc) in each remaining ch-2 sp around. Join with a sl st to the top of the ch 3. BLO sl st into each of the next 2 dc and into the next ch-2 sp. (24 dc + 4 ch-2’s)
Rnd 3 (CC): Ch 3 (counts as the 1st dc), (2 dc, ch 2, 3 dc) in the first ch-2 sp, * 3 dc in the sp between the next two 3-dc groups from the previous round, (3 dc, ch 2, 3 dc) in the next ch-2 sp, work from * 3 times, then 3 dc in the sp between the next two 3-dc groups from the previous round. Join with a sl st to the top of the ch 3. BLO sl st into each of the next 2 dc and into the next ch-2 sp. (36 dc + 4 ch-2’s)
Note: I’ve broken the next few rounds apart because of the color changes worked within the round. Carry the unused yarn with you and work over it as you go. Work all color changes on the last pull through of a stitch.
Rnd 4:
Continuing with CC (Mandala) yarn: Ch 3 (counts as the 1st dc), (2 dc, ch 2, 3 dc) in the first ch-2 sp, (3 dc in the sp between the next two 3-dc groups from the previous round) 2 times,
With MC (cream): (3 dc, ch 2, 3 dc) in the next ch-2 sp,
With CC (Mandala) yarn: (3 dc in the sp between the next two 3-dc groups from the previous round) 2 times,
With MC (cream): (3 dc, ch 2, 3 dc) in the next ch-2 sp,
With CC (Mandala) yarn: (3 dc in the sp between the next two 3-dc groups from the previous round) 2 times, (3 dc, ch 2, 3 dc) in the next ch-2 sp, (3 dc in the sp between the next two 3-dc groups from the previous round) 2 times. Join with a sl st to the top of the ch 3. BLO sl st into each of the next 2 dc and into the next ch-2 sp. (48 dc + 4 ch-2’s)
Size at this point should be approximately 3.75″ square.
Rnd 5:
Continuing with CC (Mandala) yarn: Ch 3 (counts as the 1st dc), (2 dc, ch 2, 3 dc) in the first ch-2 sp, (3 dc in the sp between the next two 3-dc groups from the previous round) 2 times,
With MC (cream): 3 dc in the sp between the next two 3-dc groups from the previous round, (3 dc, ch 2, 3 dc) in the next ch-2 sp, 3 dc in the sp between the next two 3-dc groups from the previous round,
With CC (Mandala) yarn: 3 dc in the sp between the next two 3-dc groups from the previous round,
With MC (cream): 3 dc in the sp between the next two 3-dc groups from the previous round, (3 dc, ch 2, 3 dc) in the next ch-2 sp, 3 dc in the sp between the next two 3-dc groups from the previous round,
With CC (Mandala) yarn: (3 dc in the sp between the next two 3-dc groups from the previous round) 2 times, (3 dc, ch 2, 3 dc) in the next ch-2 sp, 3 dc in the sp between the next two 3-dc groups from the previous round,
With MC (cream) yarn: 3 dc in the sp between the next two 3-dc groups from the previous round,
With CC (Mandala) yarn: 3 dc in the sp between the next two 3-dc groups from the previous round. Join with a sl st to the top of the ch 3. BLO sl st into each of the next 2 dc and into the next ch-2 sp. (60 dc + 4 ch-2’s)
Rnd 6:
With MC (cream) yarn: Ch 3 (counts as the 1st dc), (2 dc, ch 2, 3 dc) in the first ch-2 sp,
With CC (Mandala) yarn: (3 dc in the sp between the next two 3-dc groups from the previous round) 2 times,
With MC (cream) yarn: (3 dc in the sp between the next two 3-dc groups from the previous round) 2 times, (3 dc, ch 2, 3 dc) in the next ch-2 sp, (3 dc in the sp between the next two 3-dc groups from the previous round) 4 times, (3 dc, ch 2, 3 dc) in the next ch-2 sp, (3 dc in the sp between the next two 3-dc groups from the previous round) 2 times,
With CC (Mandala) yarn: (3 dc in the sp between the next two 3-dc groups from the previous round) 2 times,
You can fasten off CC at this point.
With MC (cream) yarn: (3 dc, ch 2, 3 dc) in the next ch-2 sp, (3 dc in the sp between the next two 3-dc groups from the previous round) 4 times. Join with a sl st to the top of the ch 3. BLO sl st into each of the next 2 dc and into the next ch-2 sp. (72 dc + 4 ch-2’s)
Rnd 7 (MC): Ch 3 (counts as the 1st dc), (2 dc, ch 2, 3 dc) in the first ch-2 sp, * (3 dc in the sp between the next two 3-dc groups from the previous round) 5 times, (3 dc, ch 2, 3 dc) in the next ch-2 s p, work from * 3 times, (3 dc in the sp between the next two 3-dc groups from the previous round) 5 times. Join with a sl st to the top of the ch 3. (84 dc + 4 ch-2’s)
Size at this point should be approximately 6.5″ square.
Rnd 8 (MC): Ch 1, work 1 sc in each st and 3 sc in each ch-2 corner sp around. Do not join. Instead begin working continuous rounds (aka a spiral). Use a scrap piece of yarn to mark the beginning and end of each round. (92 dc) Place a locking SM in the middle sc at each corner.
Rnds 9 – 10 (MC): Work 1 sc in each st and 3 sc in each corner st around. Do not join. (108 sts) at the end of Rnd 10.
Rnd 11 (MC): Work 1 sc in each st and 3 sc in each corner st around. Join with a sl st to the first st of the round. (116 sts)
Fasten off. Weave in ends. Finished square should be approximately 8.25″ x 8.25″.
Baby Blanket: Complete 20 squares.
Lapghan: Complete 30 squares.
Small Throw Blanket: Complete 42 squares.
Large Throw Blanket: Complete 63 squares.
After completing the number of squares required for the size blanket you’re making, continue on to Granny Square Layout & Seaming.
Granny Square Layout & Seaming
After you’ve crocheted and blocked all of your crochet squares, arrange your squares in the layout noted below for the size blanket you’re making.
Baby Blanket: 4 squares Wide x 5 squares High
Lapghan: 5 squares Wide x 6 squares High
Small Throw: 6 squares Wide x 7 squares High
Large Throw: 7 squares Wide x 9 squares High
Seaming
With MC yarn & a 5.00mm crochet hook, seam all granny heart crochet squares together using the Flat Slip Stitch Seam. You can use any seaming method you prefer, just know that it will alter the look of your finished blanket a little bit, if you use a different method than I used.
Note: This seam is worked into the BLO (or inside loops).
After you have seamed all of your granny squares together and woven in all ends, place a stitch marker into each of the 4 corner stitches of the seamed blanket. Continue on to Prepare Edge for Ribbed Border.
Prepare Edge for Ribbed Border
Make sure you have a locking stitch marker in each corner stitch.
Rnd 1 (RS): With a 5.50mm crochet hook, join yarn with a standing sc in any corner, work 2 more sc in the same corner, * sc in each st and (and add 1 sc into each seam row) across to the next corner, work 3 sc into the next corner st, work from * 3 times, then working along the last edge, work 1 sc into each st (and add 1 sc into each seam row) across to the first corner.
Join with a sl st to the 1st st. Stitch count is not crucial, but you should have the same number of stitches along opposite sides.
Move stitch markers up to the middle sc in each corner.
Do not fasten off. Continue on to the Ribbed Border Edge #1.
Ribbed Border – Edge #1
Gauge Note & Tip: Exact gauge is not crucial. Simply adjust your hook size so that your ribbed edge lays flat. As you’re working the Ribbed Border, if your ribbed edge becomes wavy, this means that your row height is too tall. Try going down a hook size or two.
Ribbing is approximately 1″ wide.
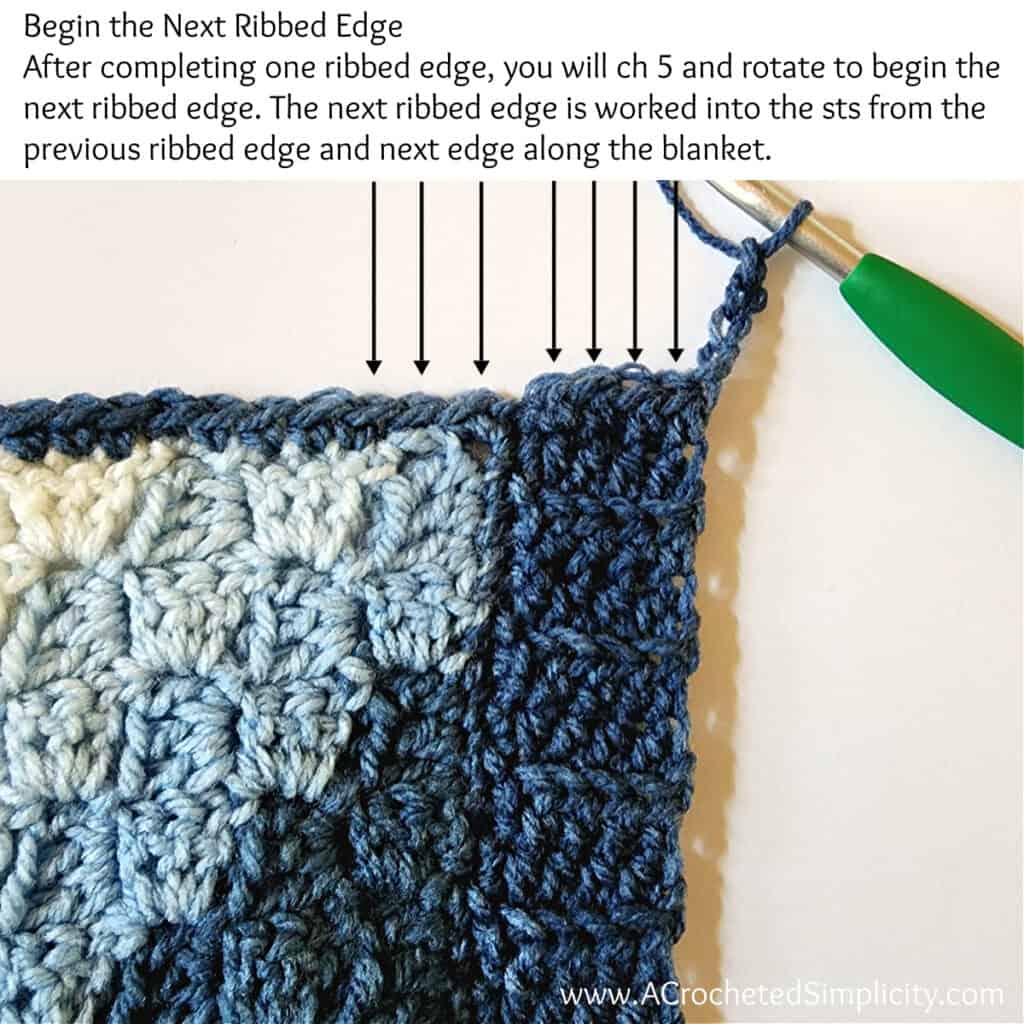
Set-up: Continuing on from Preparing the Edge for Ribbed Border, sl st over to the next corner st.
Row 1 (RS): Ch 5, working into the back hump of the ch, hdc in the 2nd ch from your hook, hdc in each of the next 2 chs, hdc2tog in the next ch & same st as ch 5. Do not turn. (4 sts)
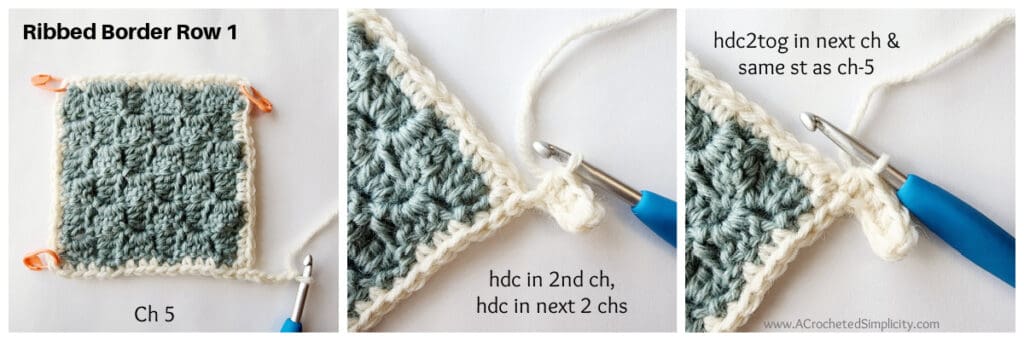
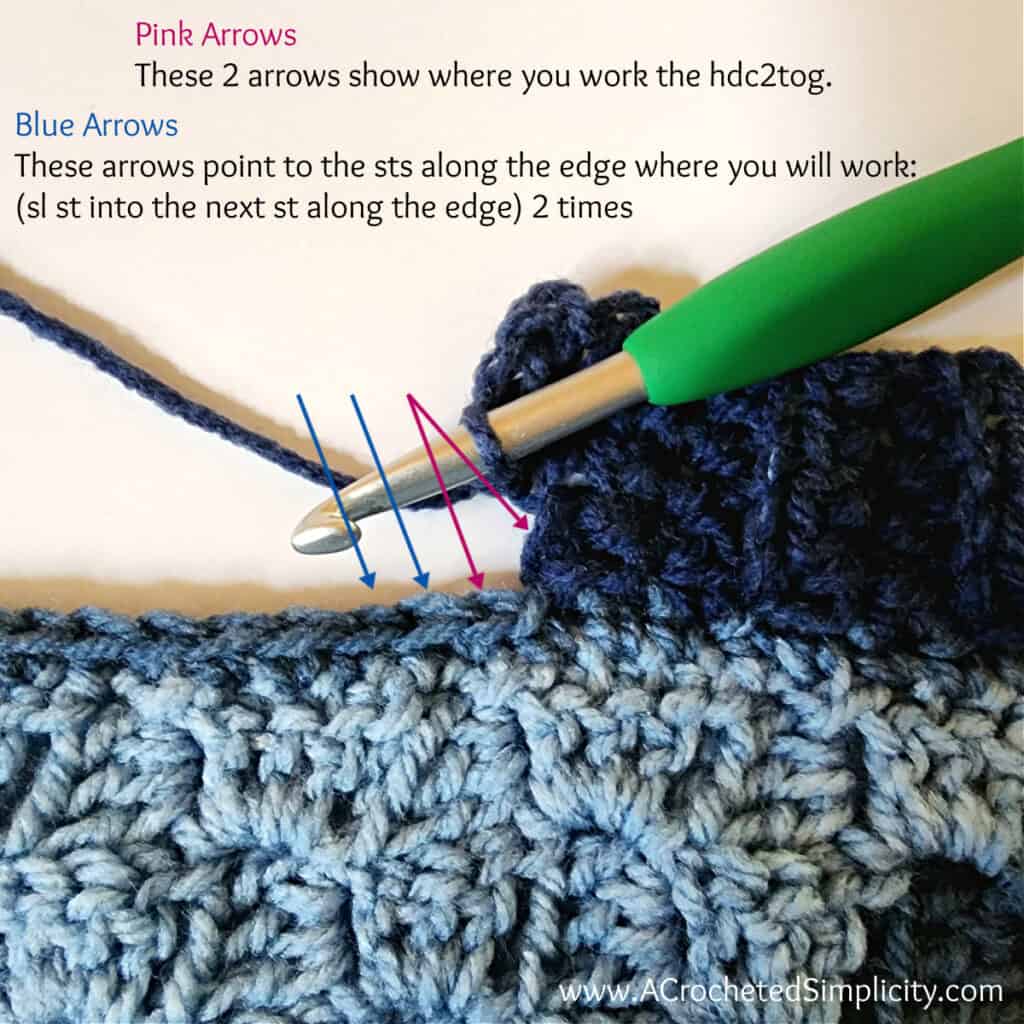
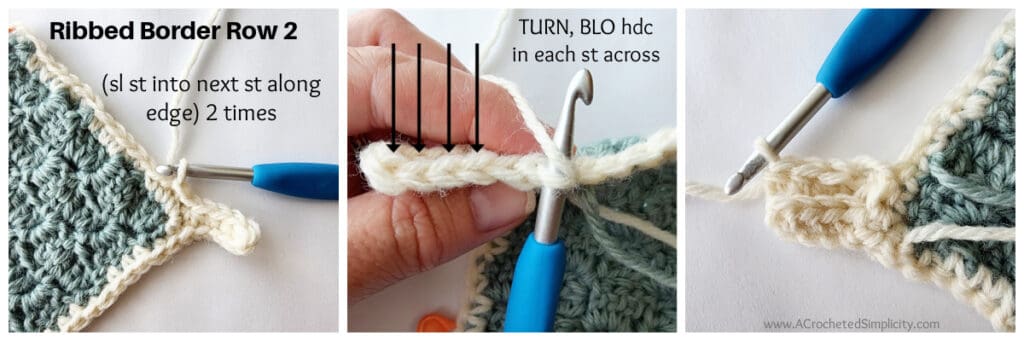
Row 2: ( sl st into the next st along the edge of the blanket ) 2 times (these 2 sl sts do not count as sts), TURN, BLO hdc in each st across the previous row. Turn. (4 sts)
Row 3: Ch 1, BLO hdc in the first st, BLO hdc in each of the next 2 sts, hdc2tog in the BLO of the next st and both loops of the next st along the edge of the blanket. Do not turn. (4 sts)
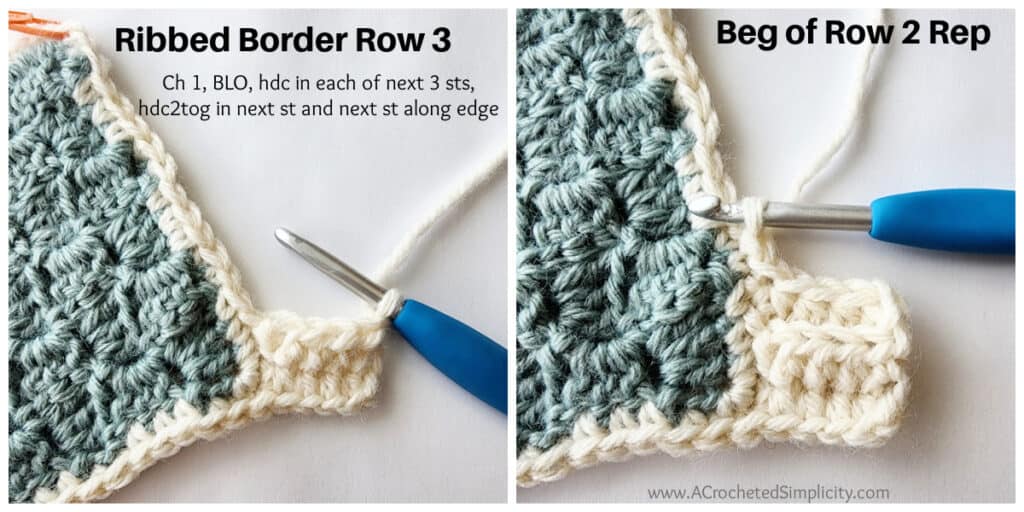
Rep Rows 2 – 3 across the edge of the blanket until you reach the next corner marked with a SM.
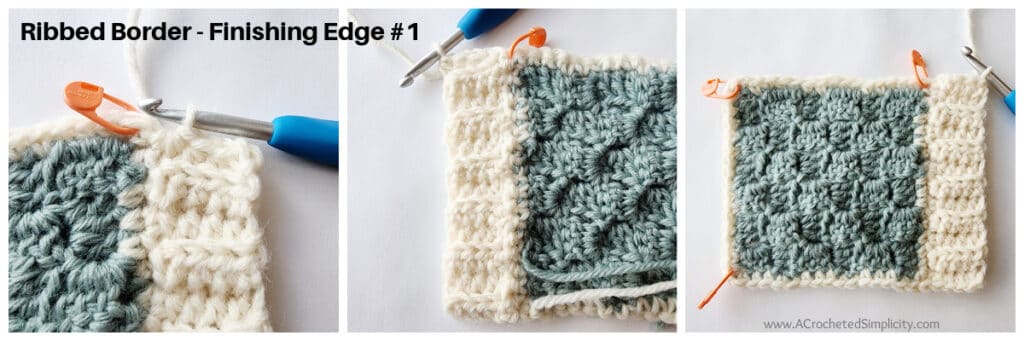
If you end with 1, 2, or 3 stitches before the corner SM, read the following for completing the ribbing for that edge.
Continue on to Ribbed Border Edges #2, #3, & #4.
Working the Final Rows of Ribbing along any Edge:
- 1 Stitch Remaining: If you repeat Rows 2 – 3 all the way across an edge of the blanket and have 1 stitch remaining after the last Row 3 repeat, work a Modified Row 2 (see instructions below). Continue to work ribbing along the next edge of the blanket. If this is your final edge, fasten off, weave in ends and block, if desired.
- 2 Stitches Remaining: If you repeat Rows 2 – 3 all the way across an edge of the blanket and have 2 stitches remaining after the last Row 3 repeat, simply repeat Row 2 one more time. Continue to work ribbing along the next edge of the blanket. If this is your final edge, fasten off, weave in ends and block, if desired.
- 3 Stitches Remaining: If you repeat Rows 2 – 3 all the way across an edge of the blanket and have 3 stitches remaining after the last Row 3 repeat, work the following:
- Modified Row 2 (see instructions below)
- Row 3 repeat
- Modified Row 2
Continue to work ribbing along the next edge of the blanket. If this is your final edge, fasten off, weave in ends and block, if desired.
Modified Row 2: sl st into the next st along the edge of the blanket (1 time) (this sl st does not count as a st), TURN, BLO hdc in each st across the previous row. Turn. (4 sts)
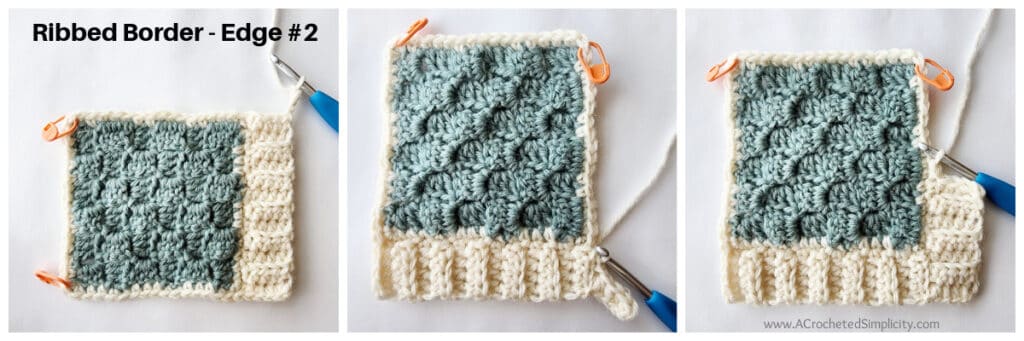
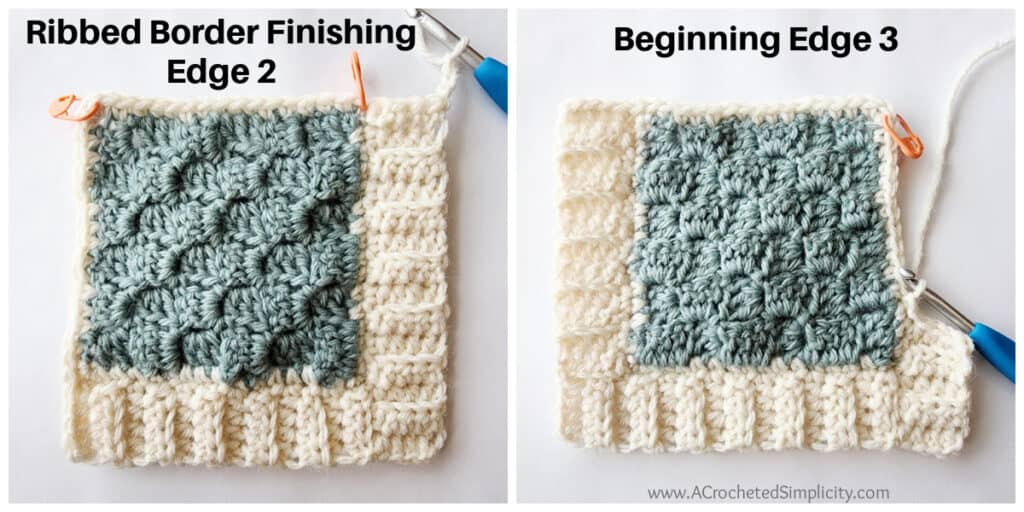
Ribbed Border – Edges #2, #3 & #4
Repeat Ribbed Border Instructions Rows 1 – 3, then repeat Rows 2 – 3 across the edge of the blanket until you reach the next corner marked with a SM.
If you end with 1, 2, or 3 stitches before the corner SM, read the notes above for completing the ribbing for that edge.

This is my favorite ribbed blanket border! I also used it on my Caspian Blanket.
Sometimes, you feel like there’s something missing in your living room or den. A crochet throw blanket is the perfect add to any room because it’s functional (you can cozy up with it during the colder months) and adds the right colors. That’s one of the best parts about crocheting! You can make things in whichever colors you need to pull a space together.
I Made It! Now What?
Pin this post! Save this crochet heart quilt to your Pinterest boards so that you can come back and make it again.
Leave a comment below: We love to hear your feedback.
Share Your Finished Projects on Facebook or Instagram: I love to see your finished projects! Share with us on social media and tag me @acrochetedsimplicity or use the hashtag #ACrochetedSimplicity so I can find your posts.
Join us in the Facebook Community Group!
Come share your finished projects with us in the A Crocheted Simplicity Crochet Community Group on Facebook. Join us for fun community events such as crochet alongs, join in on crochet conversations, ask questions, get advice, and share your love for crochet!

More Crochet Blanket Patterns I Think You’ll Love
More Crochet Blanket Patterns Free
Are you looking for more free crochet blanket patterns? We have several more free crochet patterns for a crochet throw blanket pattern, hexagon crochet blanket, crochet baby blanket patterns, and more.
If you’re looking for how to crochet a granny square, you’ll also find several crochet squares for blanket.