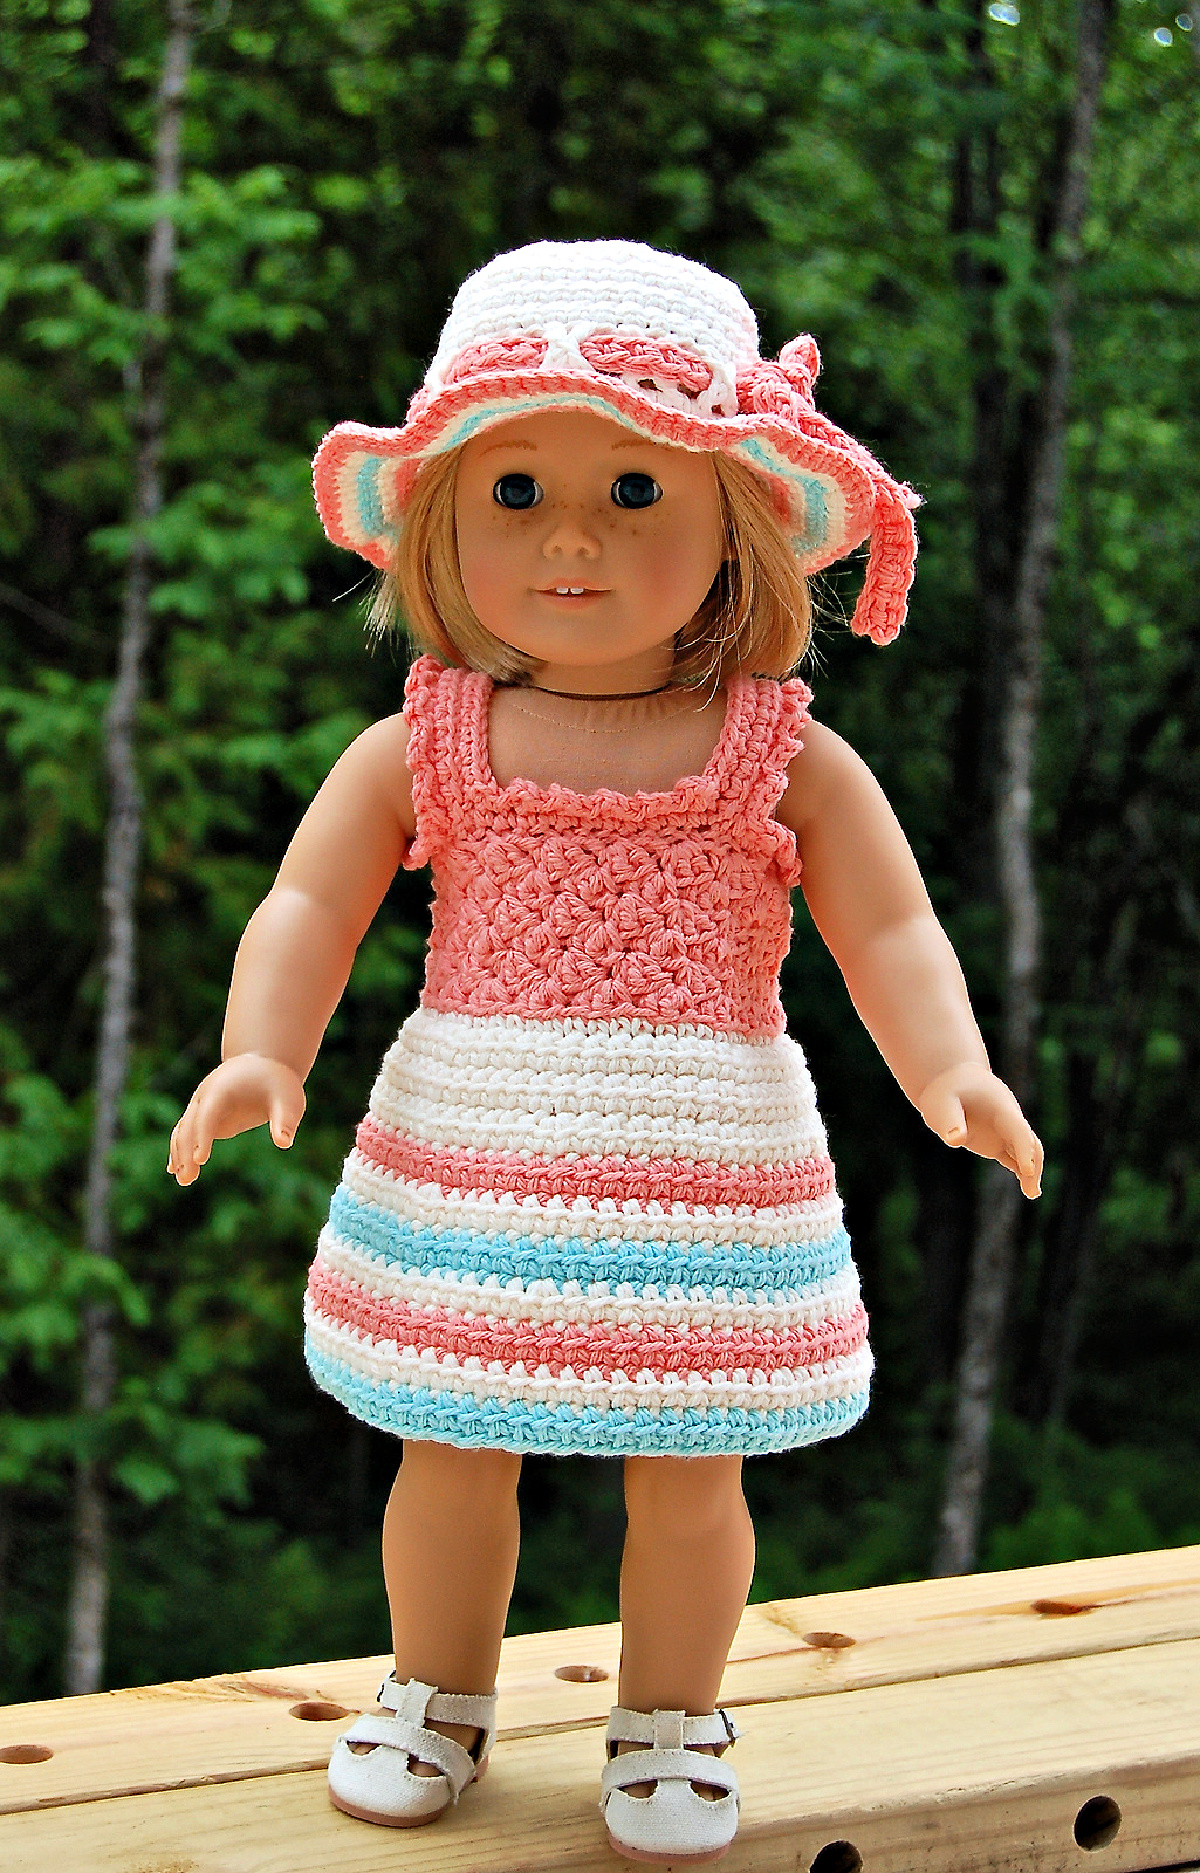
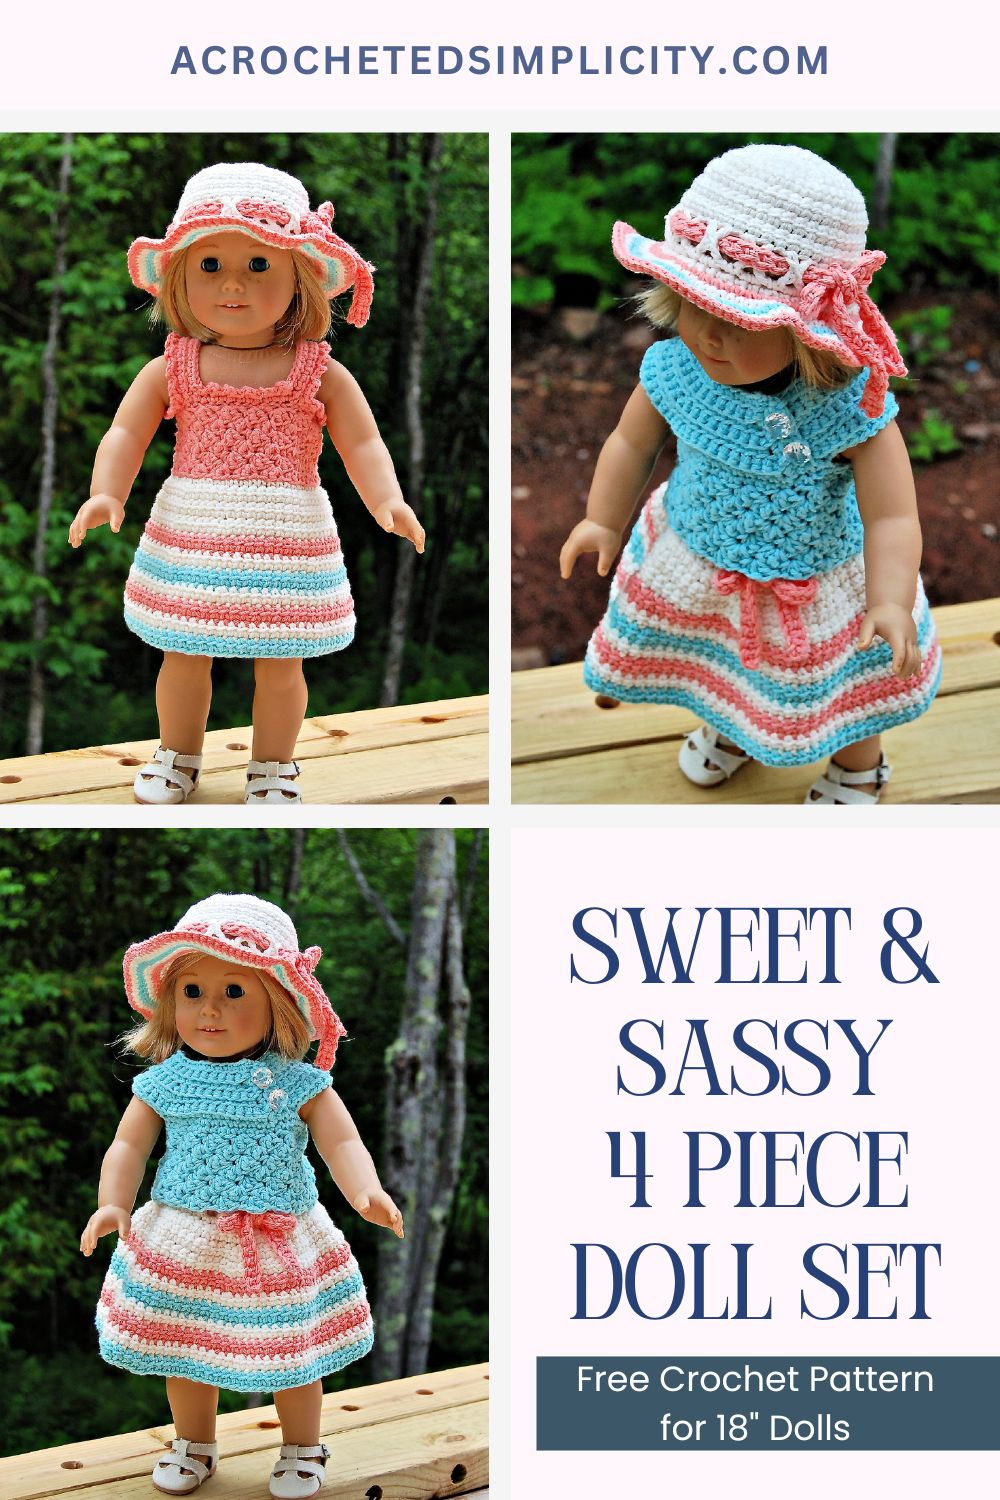
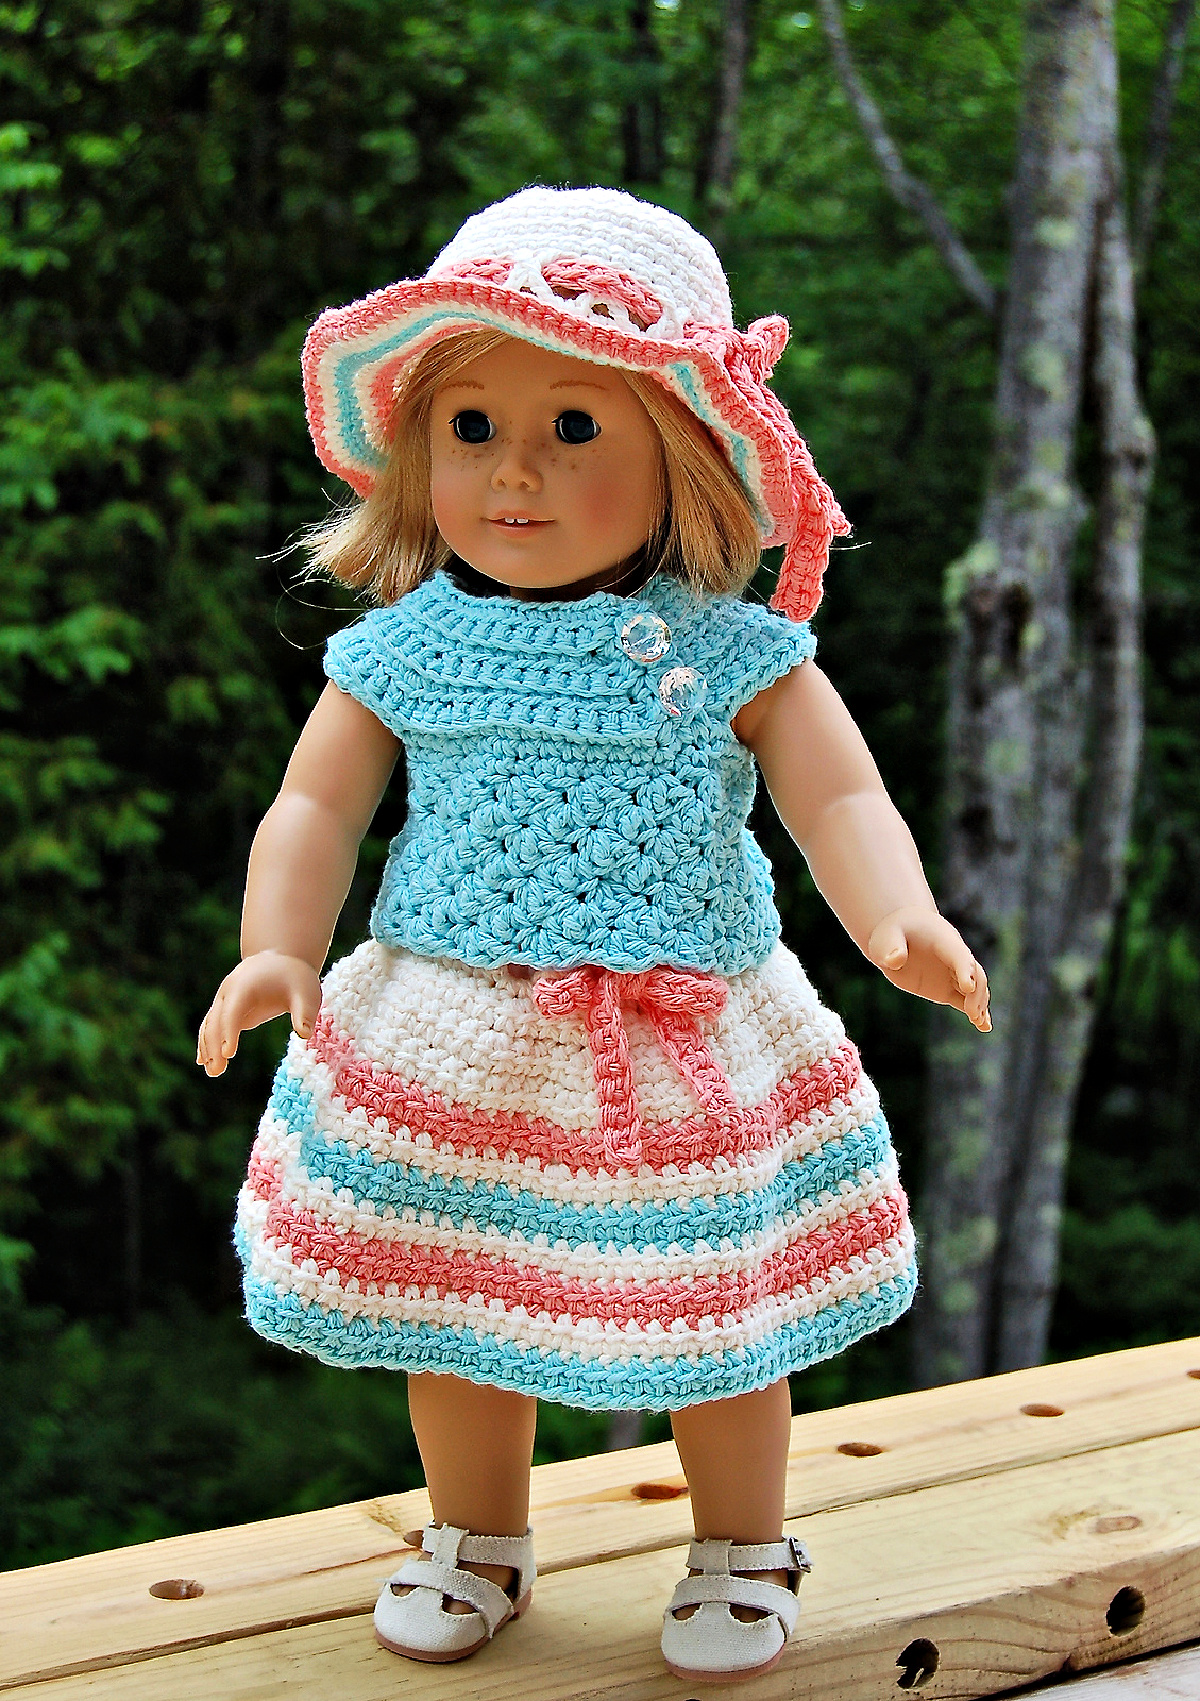
Sweet & Sassy Crochet Doll Dress, Top, Skirt & Sun Hat for 18″ Doll
It’s summertime and while you’re crocheting up human-sized items, add a few trendy crochet doll dress patterns to the mix too! Because your child will definitely think there’s nothing cooler than having a doll in a handmade outfit that’s unlike anyone else’s.
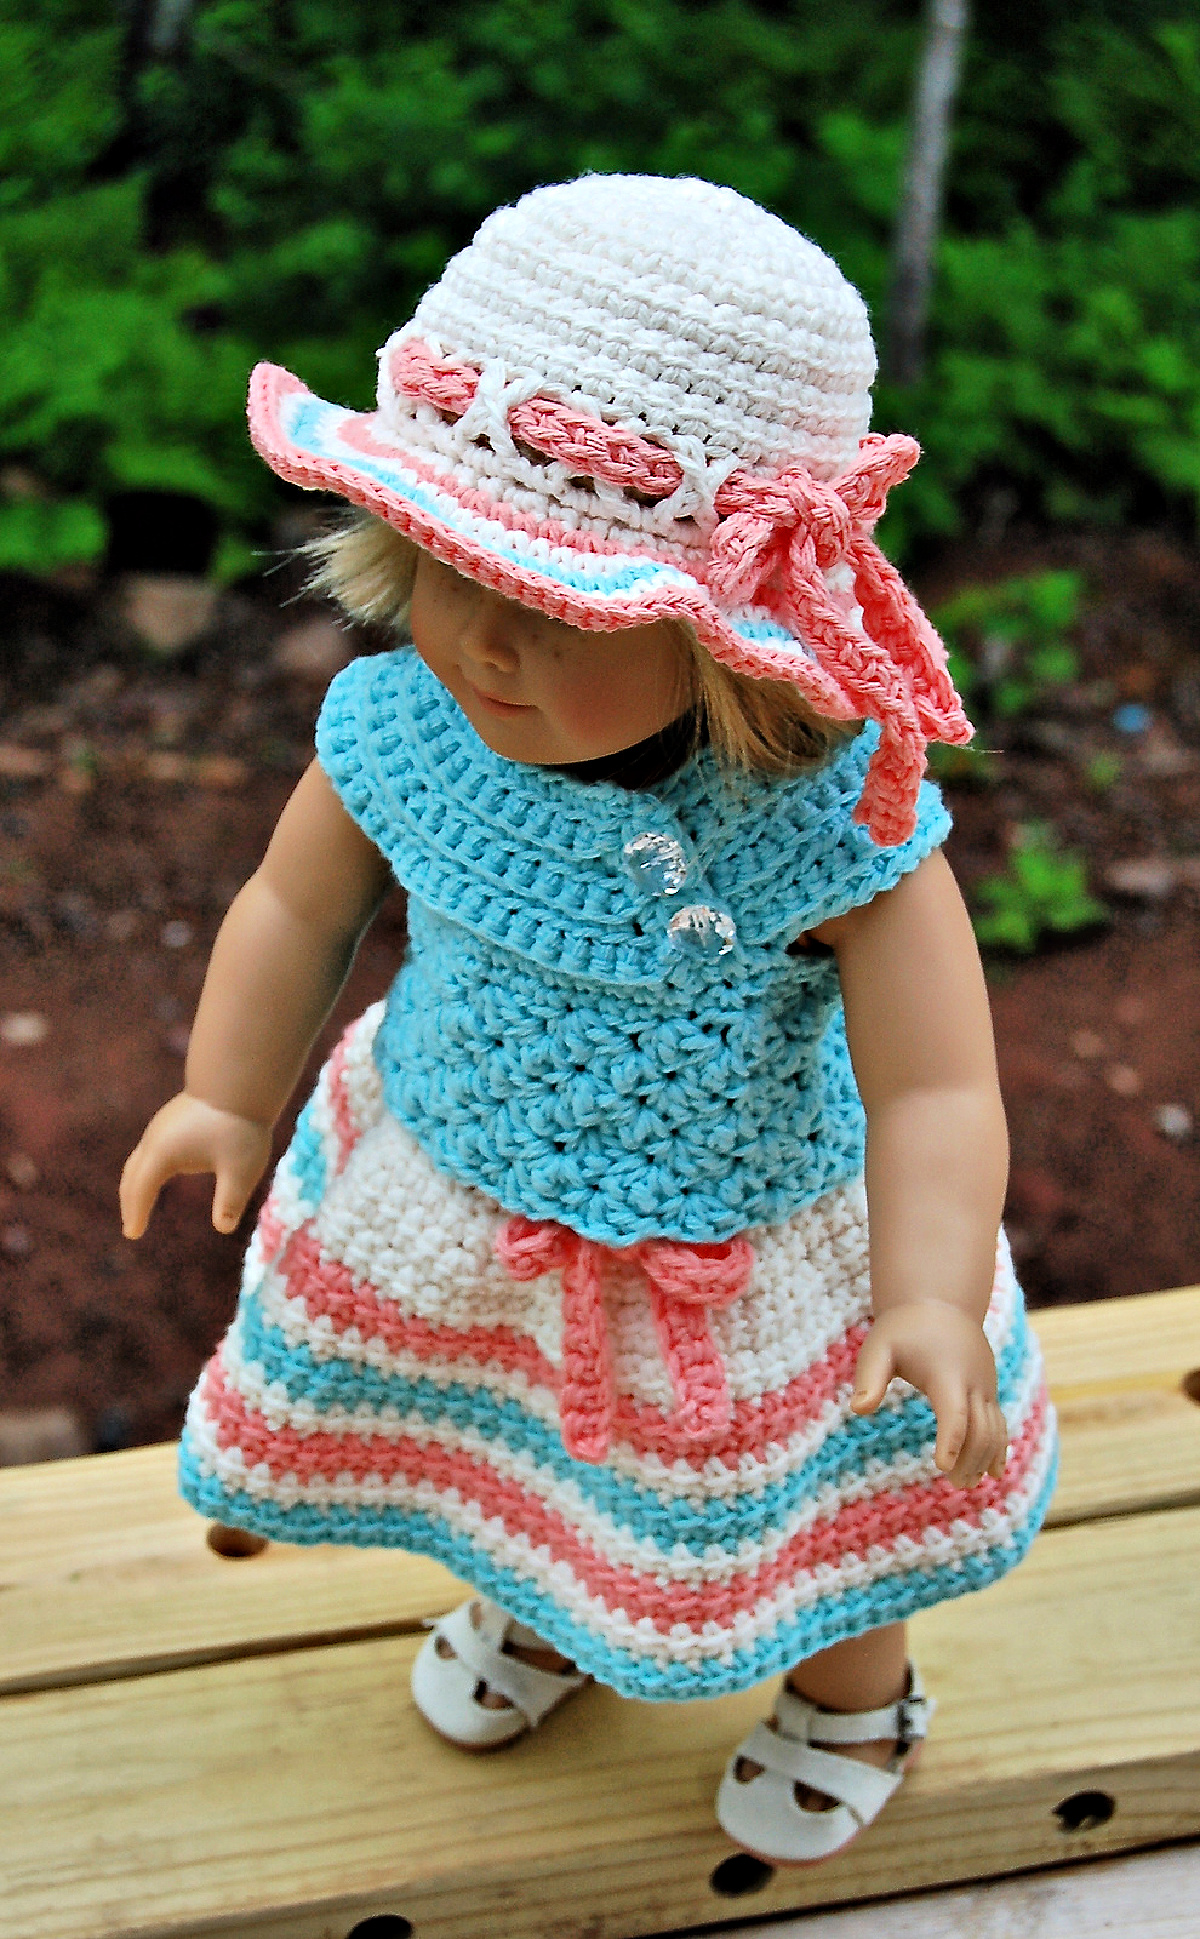
The Sweet & Sassy Outfit includes a crochet doll dress, crochet doll hat, crochet doll top, and crochet doll skirt. You can switch them around to get different looks (especially if you choose to work them up in a variety of colors). Because the items are literally made for a doll, they don’t take that much time to make either.
You’ll find the crochet doll patterns in the post below for free, or you can find an ad-free printable PDF on Ravelry, or Etsy (aff).
For those who are making such a pattern for the first time, simply put, crochet doll clothes are handmade miniature outfits crafted using crochet techniques. They allow for customization, making each doll unique with stylish dresses, sweaters, hats, and accessories. Your children will love picking out colors for their doll’s new wardrobe additions and this can also become a wholesome mommy-and-me activity.
Why Crochet Doll Clothes?
Making a crochet doll dress or outfit is a fantastic way to use up leftover yarn, experiment with new stitches, and craft unique looks. The following are a few reasons why I like making crochet doll clothes:
- Customization: Create one-of-a-kind outfits tailored to your doll’s style, or make matching dolly-and-me outfits for girls and their dolls.
- Eco-Friendly: Reduce waste by using yarn scraps.
- Perfect Gift Idea: Handmade doll clothes make thoughtful and personalized gifts.
- Great for Practice: Small projects help improve crochet skills without a huge time commitment.
How To Get The
Sweet & Sassy 18″ Doll Outfit
Option 1: Scroll down for the crochet doll dress patterns free right here in this blog post.
Option 2: Purchase the ad-free printable PDF from one of my shops:
What is the Best Yarn for Doll Clothes?
Acrylic and cotton yarns work best for crochet doll clothes. Not only are they the most economical, but they also hold up to repeated washes.
Wool or wool blends are another great option since the finished pieces will be worn by dolls and you don’t have to worry about, but they are more pricey.
Related: If you enjoy this outfit, you’ll also love working up the My Love 18″ Doll Set.
Yarn
For the Sweet & Sassy 18″ Crochet Doll Dress Pattern, I chose Lily Sugar ‘n Cream. This is a 100% cotton yarn. It is available in so many wonderful colors that include plenty of vibrant options that are perfect for summertime as well as pastels for softer looks. This yarn can be used for a variety of projects ranging from garments to home decor.
Because it’s a cotton yarn, it’s durable and easy-to-wash, making it ideal for projects that get a lot of use out of them or will be in the outdoors.
Free Crochet Doll Dress Pattern
The free crochet doll dress pattern is below, but if you love to work offline, I’ve got a couple other great options for you.
Purchase the ad-free, printable PDF, on Ravelry, or on Etsy (aff).
This post contains affiliate links.
Materials
- Yarns: Worsted Weight / 4 / Yarn, Lily Sugar n’ Cream Yarn (2.5 oz / 71 g / 120 yds / 109 m / 100% cotton) was used for the crochet doll patterns shown in the photos.
- Yardage & Colors:
- Soft Ecru (MC): 2 balls (180 yards)
- Tea Rose (CC1) : 1 ball (120 yards)
- Robin’s Egg (CC2): 2 balls (160 yards)
- Crochet Hook: I/9/5.50mm; H/8/5.00mm; G/6/4.00mm; or size needed to obtain gauge (My favorite crochet hooks are the Clover Amour Crochet Hooks, I’ve never had an ache in my hand since switching).
- Locking Stitch Markers
- Scissors
- Yarn Needle
- Measuring Tape
- Buttons: (4) 1/2″ (2 for top & 2 for sundress)
- Needle & Thread to attach buttons
Abbreviations (U.S. Terms)
- ch(s): chain(s)
- sl st(s): slip stitch(es)
- st(s): stitch(es)
- sc: single crochet
- dc: double crochet
- tr: treble crochet
- linked dc: linked double crochet
- Rep: repeat
- SM: stitch marker
- yo: yarn over
- BLO: back loop only; FLO: front loop only
- MC: Main Color
- CC1 / CC2: Contrasting Colors 1 & 2
Experience Level
- Easy
Gauge
- See individual pieces for gauge.
Size
- Fits 18″ Dolls
Special Stitches
- Linked Double Crochet (linked dc): See here for detailed instructions and a photo tutorial.
- Chainless Single Crochet (csc): See here for detailed instructions and a photo tutorial.
- Join yarn with a standing single crochet: Begin with a slip knot on your hook, insert your hook into the stitch or space indicated, yo, pull up a loop, yo and draw thru both loops on hook.
Pattern Notes
- Turning chains are not counted as stitches, unless noted otherwise.
- Yarn Notes: Lily Sugar n’ Cream Yarn (2.5 oz / 71 g / 120 yds / 109 m / 100% cotton) was used for the crochet doll patterns shown in the photos. Other comparable yarns may be used as long as gauge is met.
- Yardage & Colors:
- Soft Ecru (MC): 2 balls (180 yards)
- Tea Rose (CC1) : 1 ball (120 yards)
- Robin’s Egg (CC2): 2 balls (160 yards)
- Linked DC Color Changes: I worked all linked dc color changes after the linked dc join is complete.
- All Other Color Changes: I worked all other color changes on the last pull through of the last stitch of the round before the new color.
- Doll Clothes Construction: Sundress is worked from the top of the bodice down and then straps and edging are added. Skirt, top, and sun hat are also worked from the top down.
Sweet & Sassy 18″ Doll Clothes Patterns – 4 Piece Set
4 Piece Set Includes:
- Sun Hat
- Sundress
- Top
- Skirt
Sweet & Sassy Sundress
18″ Doll Finished Chest Size: 12-3/4″
Sundress Bodice
Hook: G/6/4.00mm
Gauge: 16 sts = 4″; 13 rows = 4″ (In the shell stitch pattern as written below. Measure after the first few rounds.)
Rnd 1: With CC1 yarn & a 4.00mm crochet hook, work 51 csc. Being careful not to twist your work, join to the 1st csc with a (sc, 2 dc) shell. *Place a SM in the 1st sc of the joining shell. (51 sts)
Rnd 2: No beginning ch, [ skip next 2 sts, (sc, 2 dc) in next st ] rep from [ to ] around to last 2 sts, skip last 2 sts. Join with a (sc, 2 dc) shell in the same st as your SM. (51 sts)
Note: From this point on, place your SM in the 1st stitch of the 1st shell of the next round. This will create a diagonal seam that will blend in to appear seamless.
Rnd 3: No Beginning ch, [ skip next 2 sts, (2 dc, sc) in next st ] rep from [ to ] around to last 2 sts, skip 2 sts. Join with a (2 dc, sc) shell in the same st as your SM. (51 sts)
Rnds 4 – 7: Rep Rnds 2 – 3. (51 sts)
Skip 2 sts, sl st in next st. Fasten Off. Weave in ends. When laid flat, the bodice should be 6″ W x 2-1/4″ H (without the straps).
Sundress Skirt
Hook: H/8/5.00mm
Gauge in linked dc: 14 sts = 4″; 8 rows = 4″
Stripe Pattern: I’ve noted color changes for the striped sundress skirt as shown in the photos. If you prefer to create your own striped pattern, you might find this Random Stripe Generator useful.
Joining Rounds: All rounds of linked dc are joined using the linked dc join technique.
Rnd 1: With MC yarn & a 5.00mm crochet hook and working in BLO, join yarn with a standing sc in the st closest to where you fastened off the bodice, work 1 sc in each remaining st around. Join with sl st to 1st st of the rnd. (51 sts)
Note: The first linked dc of the round is worked as follows: Ch 2, insert hook in 2nd ch from hook, pull up a loop, insert hook in same st as ch 2, pull up a loop, yo, pull thru 2 loops, yo, pull thru remaining 2 loops. See detailed tutorial here.
Rnd 2 (MC): Working in BOTH Loops, Ch 2, linked dc in same st as ch 2, linked dc in next 5 sts, 2 linked dc in next st, [ linked dc in next 12 sts, 2 linked dc in next st ] work from [ to ] 3 times, linked dc in last 5 sts. Join. (55 sts)
Rnd 3 (MC): Ch 2, linked dc in the same st as ch 2, linked dc in each st around. Join. (55 sts)
Rnd 4 (MC): Ch 2, linked dc in the same st as ch 2, linked dc in next 11 sts, 2 linked dc in next st, [ linked dc in next 13 sts, 2 linked dc in next st ] work from [ to ] 3 times. Join. (59 sts)
Rnd 5 (CC1): Ch 2, linked dc in the same st as ch 2, linked dc in each st around. Join. (59 sts)
Rnd 6 (MC): Ch 2, linked dc in same st as ch 2, linked dc in next 6 sts, 2 linked dc in next st, [ linked dc in next 14 sts, 2 linked dc in next st ] work from [ to ] 3 times, linked dc in last 6 sts. Join. (63 sts)
Rnd 7 (CC2): Ch 2, linked dc in the same st as ch 2, linked dc in each st around. Join. (63 sts)
Rnd 8 (MC): Ch 2, linked dc in the same st as ch 2, linked dc in next 13 sts, 2 linked dc in next st, [ linked dc in next 15 sts, 2 linked dc in next st ] work from [ to ] 3 times. Join. (67 sts)
Rnd 9 (CC1): Ch 2, linked dc in the same st as ch 2, linked dc in each st around. Join. (67 sts)
Rnd 10 (MC): Ch 2, linked dc in same st as ch 2, linked dc in next 7 sts, 2 linked dc in next st, [ linked dc in next 16 sts, 2 linked dc in next st ] work from [ to ] 3 timfes, linked dc in last 7 sts. Join. (71 sts)
Rnd 11 (CC2): Ch 2, linked dc in the same st as ch 2, linked dc in each st around. Join. (71 sts)
Fasten off using the invisible join technique. Weave in ends. Continue on to Sundress Straps & Edging.
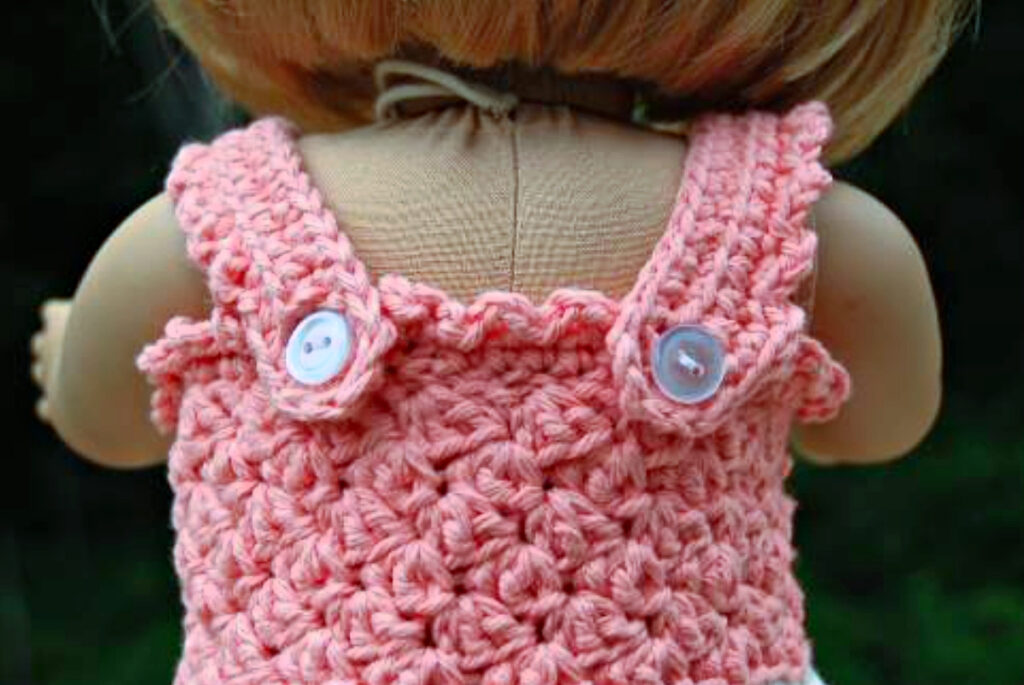
Sundress Straps & Edging
Hook: G/6/4.00mm
Gauge: 16 sts = 4″
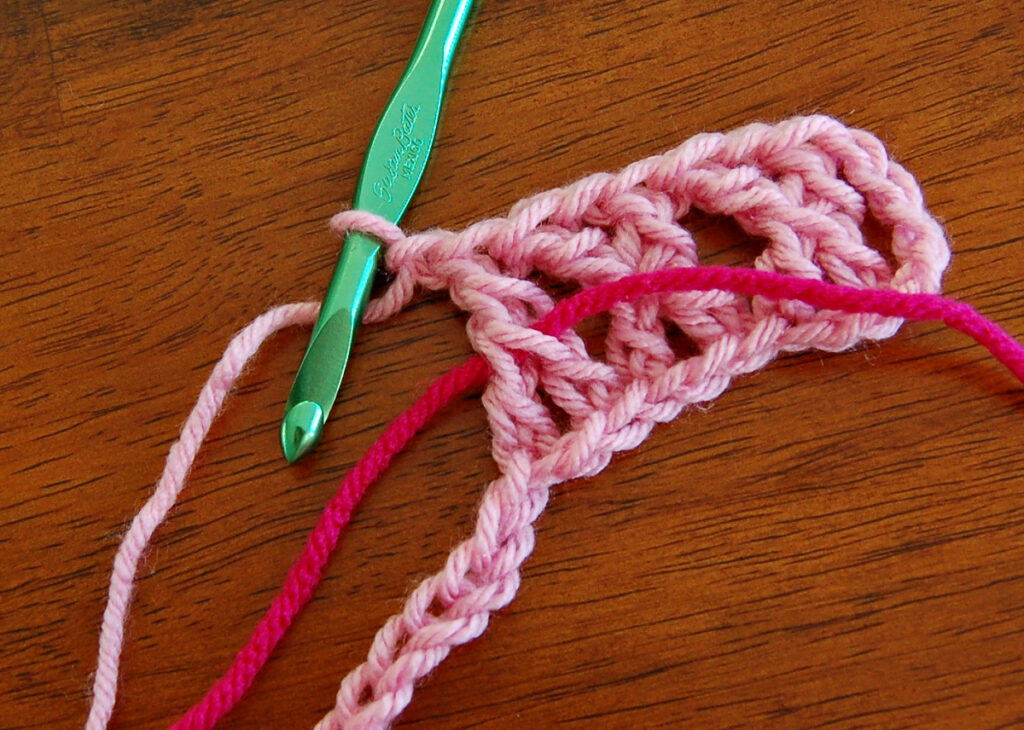
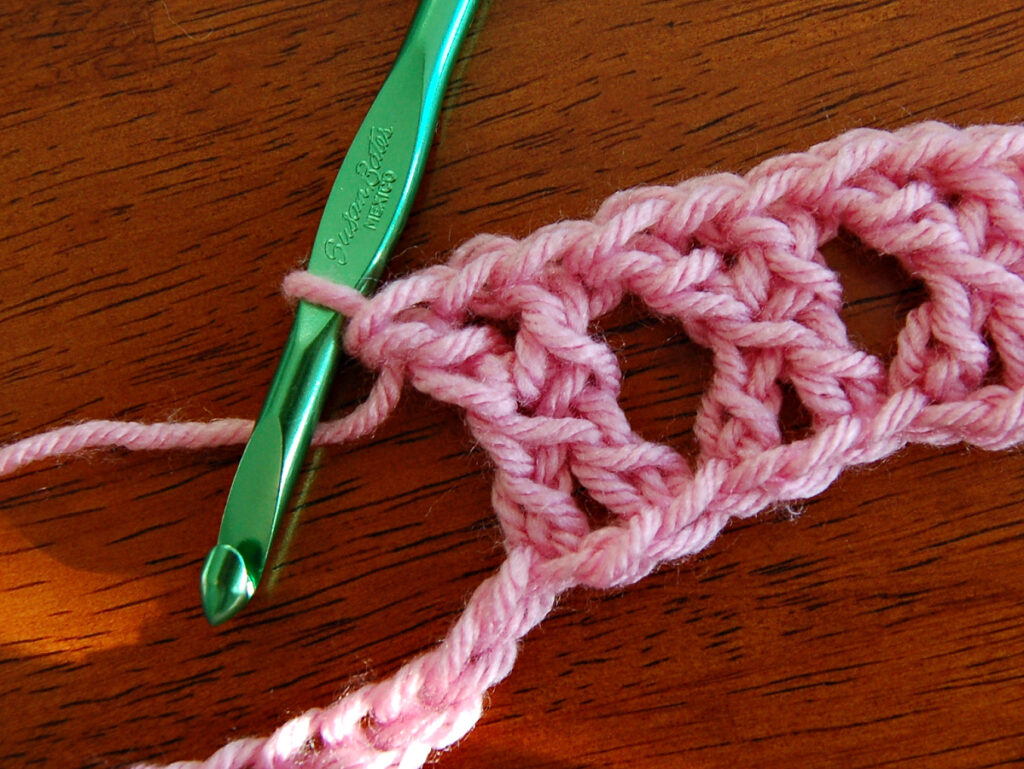
Rnd 1: With CC1 yarn & a 4.00mm crochet hook, join yarn with a standing sc in st closest to the center back of top, 2 sc in next st, sc in next 17 sts, [ Ch 26, linked dc **See Photos Below**, ch 1, skip next ch, dc in next ch, linked dc in remaining 20 chs, skip next st along edge of top, sc in next st ], sc in next 10 sts, repeat from [ to ] then sc in last 18 sts. Join with a sl st to the 1st st.
Rnd 2 (CC1): Ch 1, sc in the same st as ch 1, [ ch 2, sl st in next st, sc in next st ] work from [ to ] 9 times, ch 2, sl st in next st, ( working up the side of strap ) sc in next 2 sts, [ ch 2, sl st in next st, sc in next st ] work from [ to ] 9 times, sc in next st, 2 sc in next 3 sts (around end of strap), sc in next 21 sts, sc in next st along edge of top, [ ch 2, sl st in next st, sc in next st ] work from [ to ] 5 times, (working up the side of strap) sc in next 21 sts, 2 sc in next 3 sts (around end of strap), sc in next 2 sts, [ ch 2, sl st in next st, sc in next st ] work from [ to ] 9 times, ch 2, sl st in next st, sc in next st along edge of top, [ ch 2, sl st in next st, sc in next st ] work from [ to ] 8 times, ch 2, sl st in last st. Join with a sl st to the 1st st.
Fasten Off. Using a length of yarn and yarn needle, stitch closed the small holes on the front of the dress, just below where straps were worked. Weave in ends. Sew buttons on the back of the dress near the upper edge. Position them just slightly more towards the center than where strap placement on the front is. See photo below for button placement.
Special Linked DC Tutorial
For 1st linked dc of sundress strap (Rnd 1)
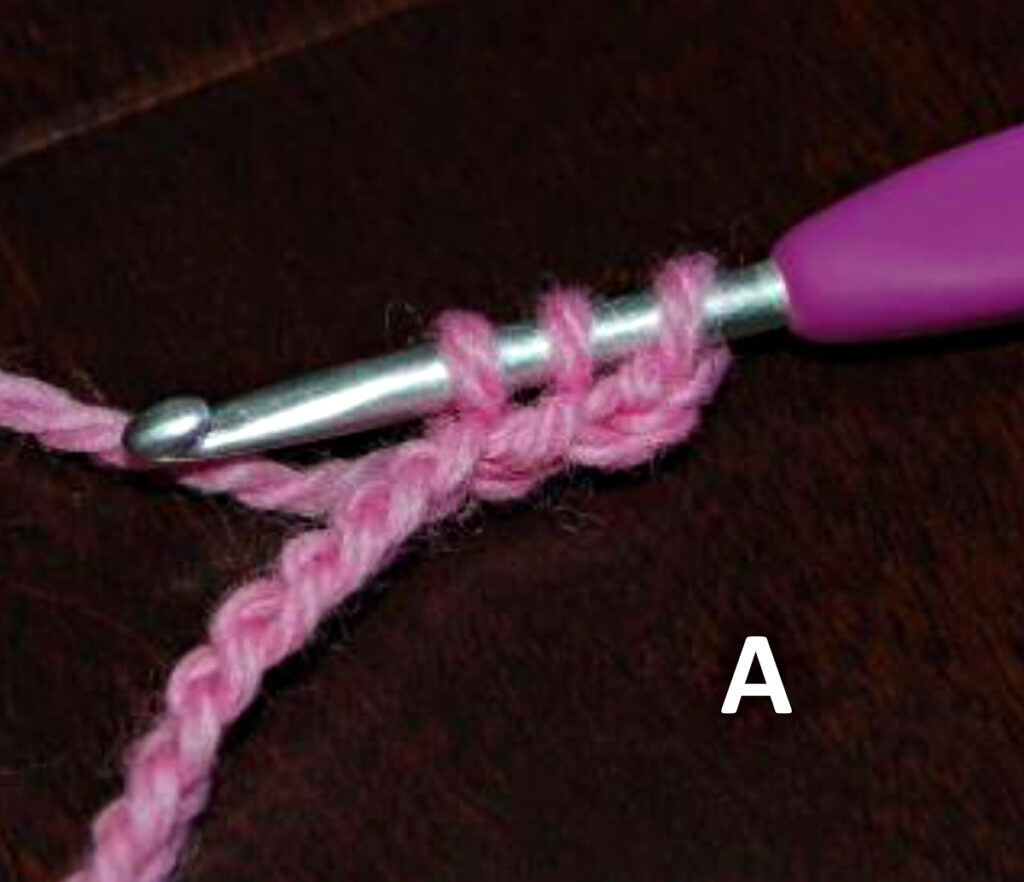
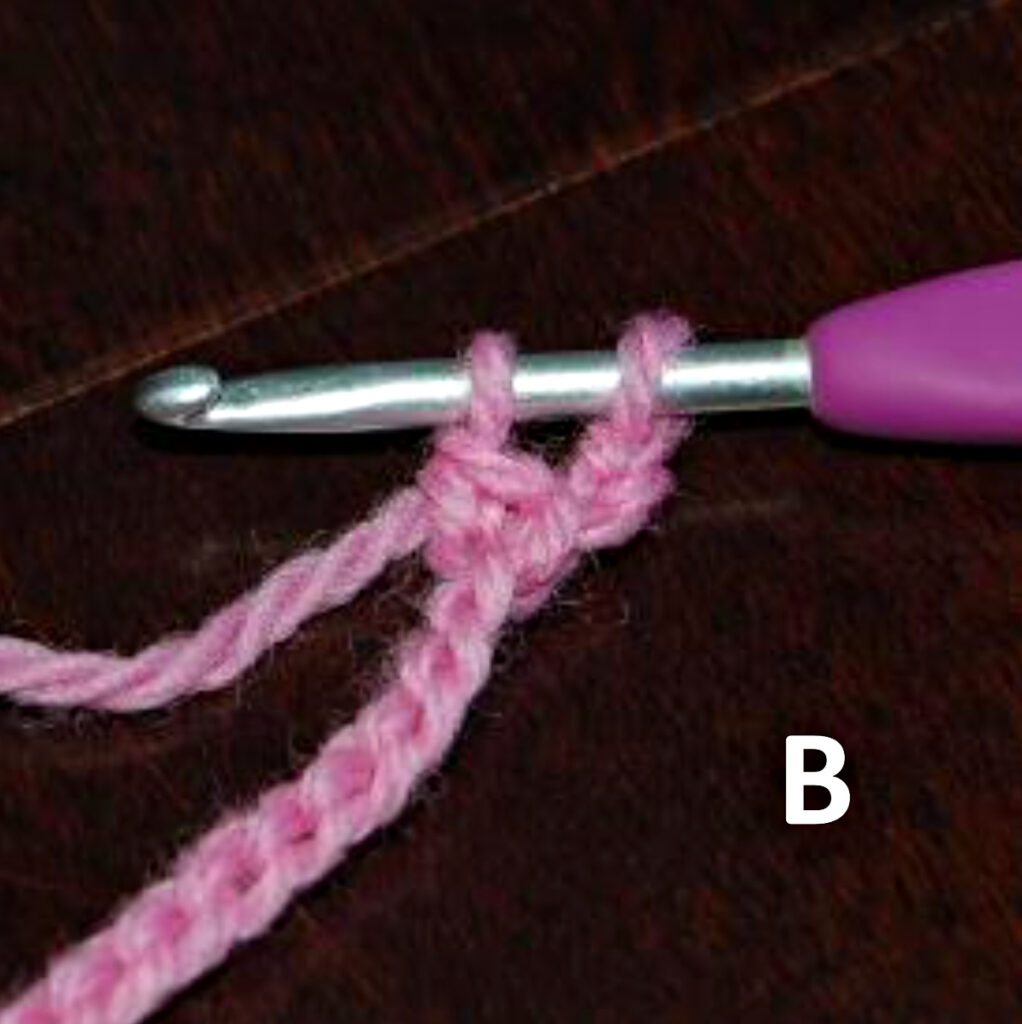
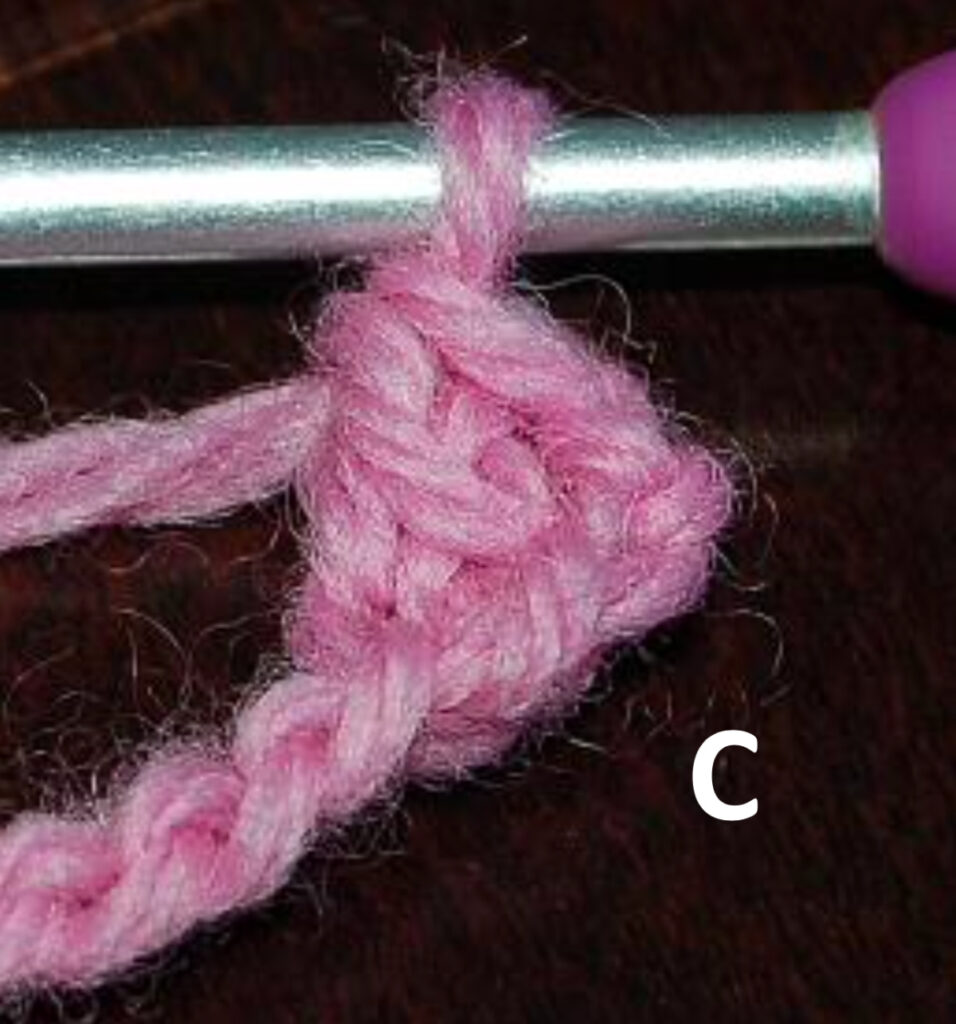
Sweet & Sassy Skirt
Hook: I/9/5.50mm
Gauge in linked dc: 14 sts = 4″; 8 rows = 4″
Stripe Pattern: I’ve noted color changes for the striped skirt as shown in the photos. If you prefer to create your own striped pattern, you might find this Random Stripe Generator useful.
Joining Rounds: All rounds of linked dc are joined using the linked dc join technique.
Rnd 1: With MC yarn & a 5.50mm crochet hook, ch 45, sc in the 2nd ch from your hook, sc in each ch across. Join with a sl st to the 1st st of the rnd. (44 sts)
Rnd 2 (MC): Ch 2, insert hook into 2nd ch from hook, pull up a loop, insert hook into same st as ch 2, pull up a loop, yo, pull thru 2 loops on hook, yo, pull thru remaining loops on hook, linked dc in next st, ch 2, skip next 2 sts, [ dc in next st, linked dc in next st, ch 2, skip next 2 sts ] work from [ to ] 10 times. Join with a sl st to 1st st of the rnd. (44 sts)
Rnd 3 (MC): Ch 1, sc in same st as ch 1, sc in next st, 2 sc in ch 2 sp from previous round, [ sc in next 2 sts, 2 sc in next ch 2 sp from previous rnd ] work from [ to ] 10 times. Join. (44 sts)
Note: The first linked dc of the round is worked as follows: Ch 2, insert hook in 2nd ch from hook, pull up a loop, insert hook in same st as ch 2, pull up a loop, yo, pull thru 2 loops, yo, pull thru remaining 2 loops. See detailed tutorial here.
Rnd 4 (MC): Ch 2, linked dc in the same st as ch 2, linked dc in next 2 sts, 2 linked dc in next st, [ linked dc in next 3 sts, 2 linked dc in next st ] rep from [ to ] around. Join. (55 sts)
Rnd 5 (MC): Ch 2, linked dc in the same st as ch 2, linked dc in next 2 sts, [ 2 linked dc in next st, linked dc in next 3 sts ] rep from [ to ] around. Join. (68 sts)
Rnd 6 (MC): Ch 2, linked dc in the same st as ch 2, linked dc in next 15 sts, 2 linked dc in next st, [ linked dc in next 16 sts, 2 linked dc in next st ] rep from [ to ] around. Join. (72 sts)
Rnd 7 (CC1): Ch 2, linked dc in the same st as ch 2, linked dc in next 7 sts, 2 linked dc in next st, [ linked dc in next 17 sts, 2 linked dc in next st ] rep from [ to ] around to last 9 sts, linked dc in last 9 sts. Join. (76 sts)
Rnd 8 (MC): Ch 2, linked dc in the same st as ch 2, linked dc in next 17 sts, 2 linked dc in next st, [ linked dc in next 18 sts, 2 linked dc in next st ] rep from [ to ] around. Join. (80 sts)
Rnd 9 (CC2): Ch 2, linked dc in the same st as ch 2, linked dc in next 9 sts, 2 linked dc in next st, [ linked dc in next 19 sts, 2 linked dc in next st ] rep from [ to ] around to last 9 sts, linked dc in last 9 sts. Join. (84 sts)
Rnd 10 (MC): Ch 2, linked dc in the same st as ch 2, linked dc in next 19 sts, 2 linked dc in next st, [ linked dc in next 20 sts, 2 linked dc in next st ] rep from [ to ] around. Join. (88 sts)
Rnd 11 (CC1): Ch 2, linked dc in the same st as ch 2, linked dc in next 10 sts, 2 linked dc in next st, [ linked dc in next 21 sts, 2 linked dc in next st ] rep from [ to ] around to last 10 sts, linked dc in last 10 sts. Join. (92 sts)
Rnd 12 (MC): Ch 2, linked dc in the same st as ch 2, linked dc in next 21 sts, 2 linked dc in next st, [ linked dc in next 22 sts, 2 linked dc in next st ] rep from [ to ] around. Join. (96 sts)
Rnd 13 (CC2): Ch 2, linked dc in the same st as ch 2, linked dc in next 11 sts, 2 linked dc in next st, [ linked dc in next 23 sts, 2 linked dc in next st ] rep from [ to ] around to last 11 sts, linked dc in last 11 sts. Join. (100 sts)
Fasten off using the invisible join technique. Weave in ends. When laid flat, the skirt measure 6″ W (at the waistband) x 6″ L. Continue on to the Belt.
Belt
Hook: H/8/5.00mm
Finished Length: Approximately 24″
Row 1: With CC1 yarn & a 5.00mm crochet hook, ch 91, sc in the 2nd ch from your hook, sc in each ch across. (90 sts)
Fasten off. Weave in ends.
Beginning in the front of the skirt, just off center to your right, weave the belt in and out through the openings in round 2. Tie in a bow after dressing the doll.
Sweet & Sassy Top
Hook: H/8/5.00mm
Gauge in BLO/FLO sc: 14 sts = 4″; 11 rows = 3″
Gauge in the shell stitch pattern as written below in rounds 12 – 17: 14 sts = 4″; 7 rows = 2-1/2″
Row 1: With CC2 yarn & a 5.00mm crochet hook, ch 41, sc in the 2nd ch from your hook, sc in each ch across. Turn. (40 sts) **Mark this side as the top’s Right Side.
Row 2: Ch 1, working in FLO, sc in the same st as ch 1, sc in each st across. Turn. (40 sts)
Row 3: Ch 1, working in BLO, sc in the same st as ch 1, sc in next 8 sts, 2 sc in next st, [ sc in next 9 sts, 2 sc in next st ] work from [ to ] 3 times. Turn. (44 sts)
Row 4: Ch 1, working in FLO, 2 sc in the same st as ch 1, sc in next 7 sts, [ 2 sc in next st, sc in next 7 sts ] work from [ to ] 4 times, 2 sc in next st, sc in last 3 sts. Turn. (50 sts)
Row 5: Ch 1, working in BLO, sc in the same st as ch 1, sc in next 6 sts, 2 sc in next st, [ 2 sc in next st, sc in next 7 sts ] work from [ to ] 6 times, sc in last 2 sts. Turn. (56 sts)
Row 6: Ch 1, working in FLO, 2 sc in the same st as ch 1, sc in next 8 sts, [ 2 sc in next st, sc in next 8 sts ] work from [ to ] 5 times, sc in last 2 sts. Turn. (62 sts)
Row 7: Ch 1, working in BLO, sc in the same st as ch 1, sc in the next 2 sts, place a SM in the 3rd st just made, sc in each remaining st across. Do not turn. (62 sts)
Row 8: Ch 1, rotate to work into the ends of the rows along the short edge, sc in each row across. Turn. (7 sts)
Row 9: Ch 1, sc in the same st as ch 1, [ ch 2, skip next 2 sts, sc in next st ] twice. (7 sts) (includes chs)
Before continuing to Rnd 10, with right side of garment facing you, join with a sl st to the stitch previously marked with a SM from Row 7. See photo below.
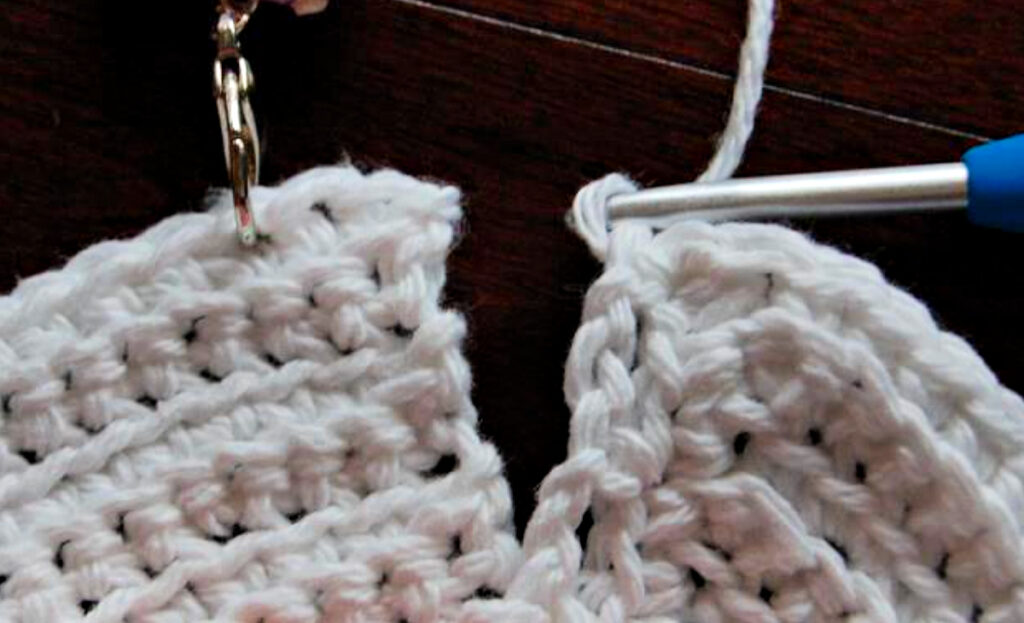
Rnd 10: Ch 1, working in BOTH Loops, sc in the same st as ch 1, ch 6, skip next 13 sts along the long edge, sc in next st, (first armhole created), sc in next 18 sts, ch 6, skip next 13 sts, sc in next st, sc in next 13 sts, sc in last 2 sts making sure to work thru both layers (you’ll be working in sts 1 & 2 that you skipped over when joining above). Join with a sl st to the 1st st. (48 sts)
Rnd 11: Ch 1, sc in the same st as ch 1, sc in next 3 chs, 2 sc in next ch, sc in next 2 chs, sc in next 9 sts, 2 sc in next st, sc in next 9 sts, sc in next 2 chs, 2 sc in next ch, sc in next 3 chs, sc in last 16 sts. Join to 1st sc with a (sc, 2dc) shell being careful not to twist work. *Place a st marker in the 1st sc of the joining shell. (51 sts)
Rnd 12: No Beginning Ch, [ skip next 2 sts, (sc, 2dc) in next st ] rep from [ to ] around to last 2 sts, skip last 2 sts. Join with a (sc, 2dc) shell in the same st as your SM. (51 sts) (joining shell is not included in st count, here and throughout)
Note: From this point on, place your SM in the 1stitch of the 1st shell of the next round. This will create a diagonal seam that will blend in to appear seamless.
Rnd 13: No Beginning Ch, [ skip 2 sts, (2dc, sc) in next st ] rep from [ to ] around to last 2 sts, skip 2 sts. Join with a (2dc, sc) shell in the same st as your st marker. (51 sts)
Rnds 14 – 17: Rep Rounds 12 – 13. (51 sts)
Skip 2 sts, sl st in next st. Fasten Off. Weave in ends. When laid flat, the top should be 7″ W x 5-1/2″ H. Sew buttons on as instructed below. Then continue on to the Sun Hat.
Position buttons on garment’s left side of yoke, under buttonholes. With a needle and thread, attach buttons to the yoke.
Sweet & Sassy Sun Hat
Doll Head Size: 12″ circumference
Hook: G/6/4.00mm
Gauge in linked dc: 16 sts = 4″; 4 rows = 1-3/4″
Note: The first linked dc of rounds 1 – 8 is worked as follows: Ch 2, insert hook in 2nd ch from hook, pull up a loop, insert hook in same st as ch 2, pull up a loop, yo, pull thru 2 loops, yo, pull thru remaining 2 loops. See detailed tutorial here.
Joining Rounds: All rounds of linked dc are joined using the linked dc join technique.
Rnd 1: With MC yarn & a 4.00mm crochet hook, begin with a Magic Ring, sl st then ch 2 in Magic Ring, work 8 linked dc in Magic Ring. Join using the linked dc join technique. (8 sts)
Sun Hat Rnd 1 Note: In Rnd 1, of the sun hat, you’ll be working your linked dc in the Magic Ring, complete the first linked dc, but instead of inserting your hook into the same st as ch 2, insert hook into Magic Ring and pull up a loop. For remaining linked dc, after beginning, instead of inserting your hook into the next ch or st, insert into the Magic Ring and pull up a loop. See detailed tutorial here.
Rnd 2 (MC): Ch 2, 2 linked dc in each st around. Join. (16 sts)
Rnd 3 (MC): Ch 2, 2 linked dc in each st around. Join. (32 sts)
Rnd 4 (MC): Ch 2, 2 linked dc in the same st as ch 2, linked dc in next st, [ 2 linked dc in next st, linked dc in next st ] rep from [ to ] around. Join. (48 sts)
Rnd 5 (MC): Ch 2, linked dc in each st around. Join. (48 sts)
Rnds 6 – 7 (MC): Rep Rnd 5. (48 sts)
In Rnd 8, you’ll make “X’s” that will become the channel that you weave the hat tie through.
Rnd 8 (MC): Ch 3, YO twice, insert hook in the same st as ch 3, YO and pull up a loop (4 loops on hook), YO and draw through 2 loops on hook, YO, skip next st, insert hook in next st, YO and pull up a loop (5 loops on hook), (YO and draw through 2 loops on hook) 4 times, ch 1, dc in center 2 loops of previous st made (see photo below for clarification), [ YO twice, insert hook in next st, YO and pull up a loop (4 loops on hook), YO and draw through 2 loops on hook, YO, skip next st, insert hook in next st, YO and pull up a loop (5 loops on hook), (YO and draw through 2 loops on hook) 4 times, ch 1, dc in center 2 loops of previous st made ] rep from [ to ] around. Join with a sl st to the top of the 1st tr of the round. (16 “X”s made)
Rnd 9 (MC): In this round, work your sts around (not in) all top loops of the sts from the previous round. Ch 1, work 1 sc between “X”s and 2 sc between the top legs of each “X”. Join with a sl st to the 1st st. (48 sts)
Rnd 10 (MC): Ch 1, working in FLO, 2 sc in the same st as ch 1, sc in next 2 sts, [ 2 sc in next st, sc in next 2 sts ] rep from [ to ] around. Join. (64 sts)
Rnd 11 (CC1): Ch 1, working in BOTH Loops, sc in the same st as ch 1, sc in next 2 sts, 2 sc in next st, [ sc in next 3 sts, 2 sc in next st ] rep from [ to ] around. Join. (80 sts)
Rnd 12 (MC): Ch 1, 2 sc in the same st as ch 1, sc in next 4 sts, [ 2 sc in next st, sc in next 4 sts ] rep from [ to ] around. Join. (96 sts)
Rnd 13 (CC2): Ch 1, sc in the same st as ch 1, sc in next 8 sts, 2 sc in next st, [ sc in next 9 sts, 2 sc in next st ] rep from [ to ] around to last 6 sts, sc in last 6 sts. Join. (105 sts)
Rnd 14 (MC): Ch 1, 2 sc in the same st as ch 1, sc in next 12 sts, [ 2 sc in next st, sc in next 12 sts ] rep from [ to ] around to last st, sc in last st. Join. (113 sts)
Rnd 15 (CC1): Ch 1, sc in the same st as ch 1, sc in next 9 sts, 2 sc in next st, [ sc in next 10 sts, 2 sc in next st ] rep from [ to ] around to last 3 sts, sc in last 3 sts. Join. (123 sts)
Fasten off using the invisible join technique. Weave in all ends. Continue on to Tie for Sun Hat.
Tie for Sun Hat
Hook: H/8/5.00mm
Row 1: With CC1 yarn & a 5.00mm crochet hook, ch 71, sc in 2nd ch from your hook, sc in each ch across. (70 sts)
Fasten off. Weave in ends.
Beginning in the front, just off center to your right, weave the tie in and out through the openings in round 8. Tie in a bow.
I MADE IT! NOW WHAT?
Pin this post!: Save this free crochet doll dress pattern to your Pinterest boards so that you can come back and make it again.
Leave a comment below: We love to hear your feedback.
Share Your Finished Projects on Facebook or Instagram: I love to see your finished projects! Share with us on social media and tag me @acrochetedsimplicity or use the hashtag #ACrochetedSimplicity so I can find your posts.
Join us in the Facebook Community Group!
Come share your finished projects with us in the A Crocheted Simplicity Crochet Community Group on Facebook. Join us for fun community events such as crochet alongs, join in on crochet conversations, ask questions, get advice, and share your love for crochet!

More Crochet Dolls Clothes Patterns
We have free crochet doll clothes patterns right here on the blog. We also have several premium crochet patterns for doll clothes on Ravelry and Etsy (aff).