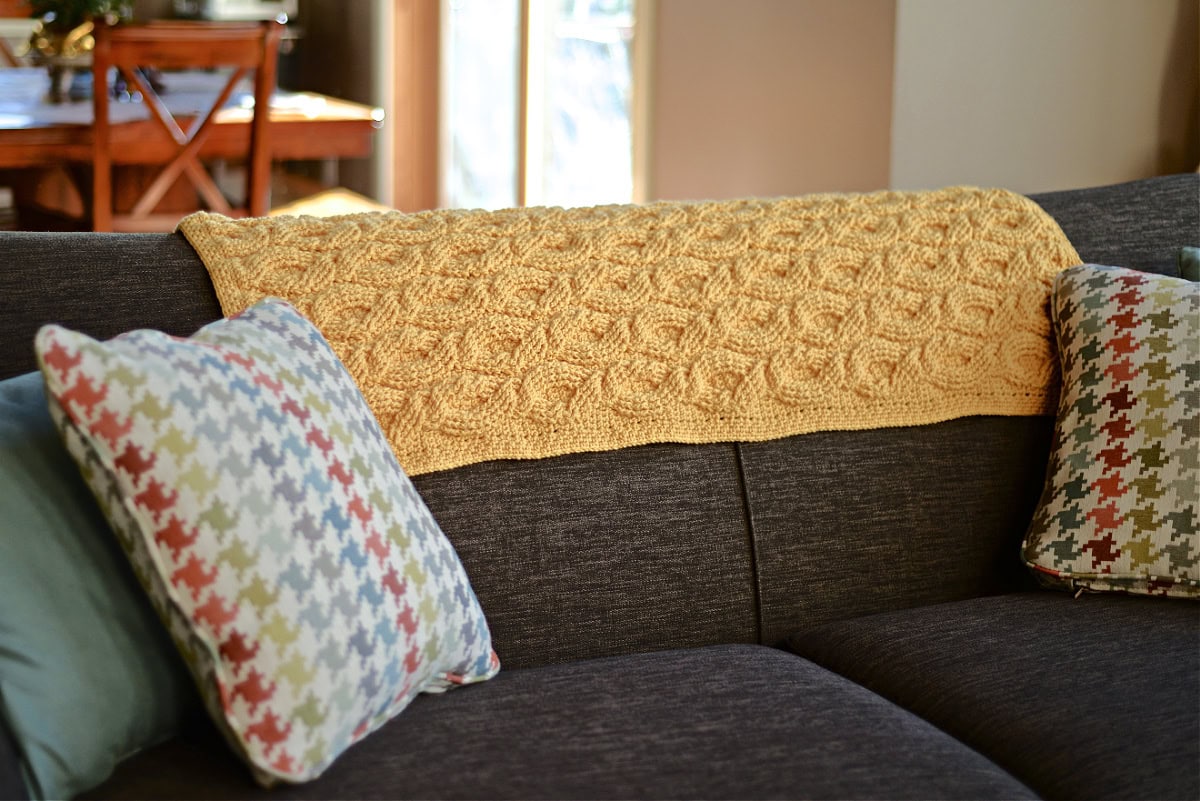
Cascading Cable Crochet Blanket Pattern
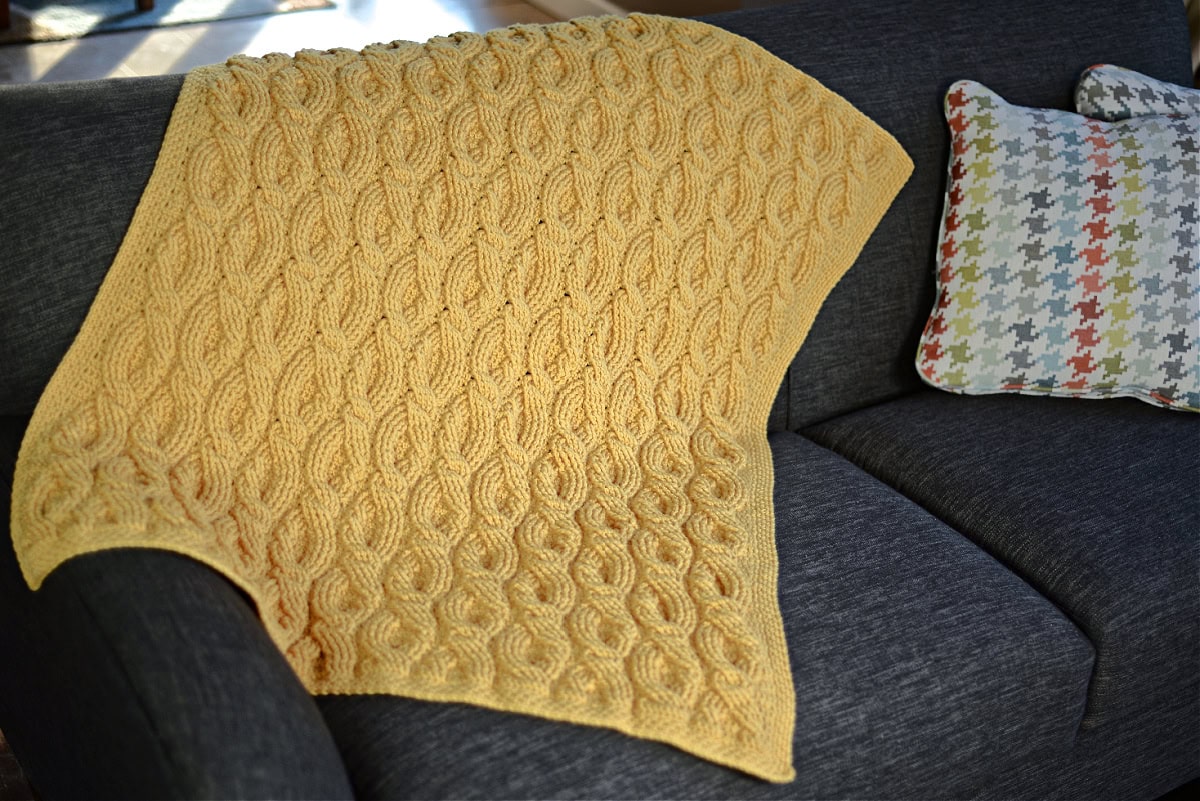
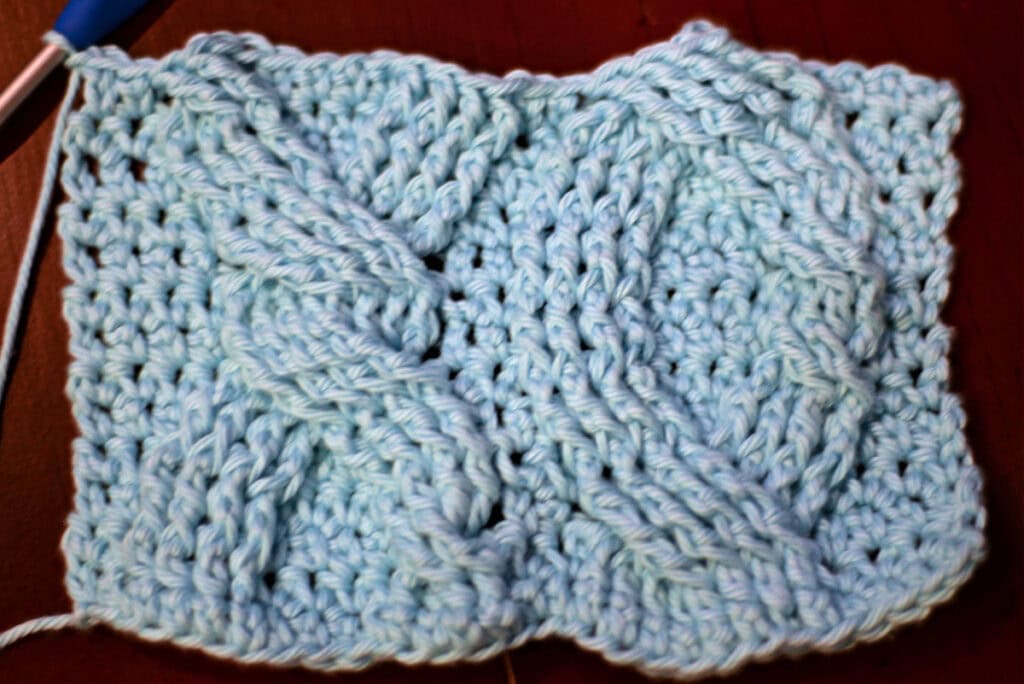
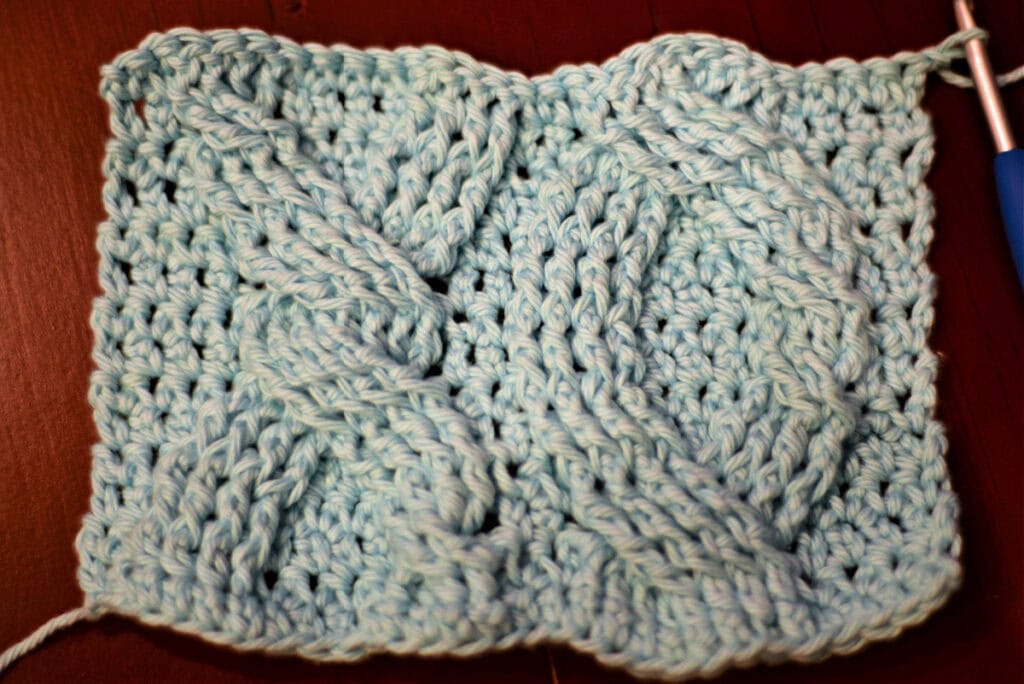
Cables come in all shapes and sizes and I love the variety we can achieve from just a few textured stitches, such as the larger loops in this cable crochet blanket pattern.
Cables give a knit-like look to the crochet project and once you get a hang of the pattern repeat, they’re not so daunting anymore. And cable crochet throws drape beautifully over the bed or sofa!
You’ll find the cable crochet blanket pattern free below, or you can find an ad-free printable PDF (including all photo tutorials) on Ravelry, or on Etsy (aff).
I’ve used smaller, more intricate cables in my patterns as well as larger ones. There’s a distinct look and feel to each and I highly encourage you to try out both to see what you prefer. In my opinion, every piece should appear unique and there are so many techniques we can add to our crochet toolbox!
Related: If you love the cable design on this crocheted blanket, make sure to check out my Cable Crochet Slipper Boots.
Skills & Techniques You’ll Use
This cable crochet blanket pattern combines crochet post stitches on a background of extended single crochet stitches (ext sc). It’s finished off with a simple single crochet and chains (Moss Stitch) blanket border to create a stunning crochet 3D blanket.
Crochet skills you’ll practice:
- Front post double crochet (fpdc)
- Front post treble crochet (fptr)
- Front post double treble (fpDtr)
- Extended single crochet (ext sc)
How to Crochet a Cable Blanket
Crochet cables are one of many fun ways to add texture and design to a crochet blanket. Cable designs range from very basic crochet cables that only move upward, to more intricate cable designs that move inward and outward as they move upward.
Many crocheters are intimidated by cable stitches at first, but after working a few rows, they soon discover that they’re easier than they thought!
I would classify this cable crochet blanket pattern as an intermediate cable design.
The blanket is worked back and forth in rows using a combination of basic crochet stitches and post stitches. Once it is the desired size, you’ll crochet a border on it using single crochet stitches and chains.

How To Get The
Cascading Cable Crochet Blanket Pattern
Option 1: Scroll down for the free cable crochet blanket pattern right here in this blog post.
Option 2: Purchase the ad-free printable PDF from one of my shops:
Adjusting the Size of Your Blanket
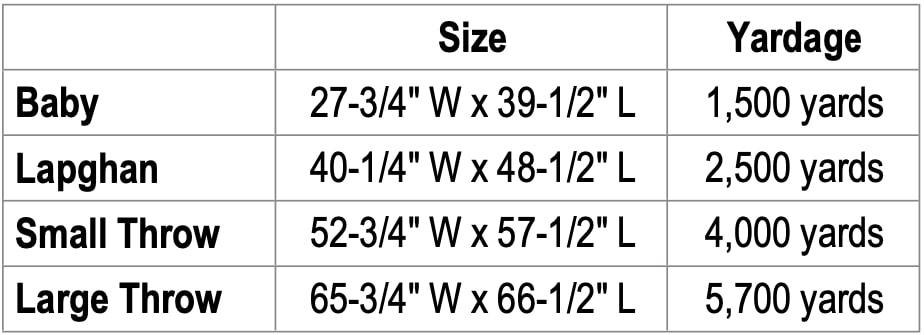
The cable crochet blanket pictured is lapghan size. The written crochet pattern includes instructions to make a crochet baby blanket, lapghan, small throw, and large throw.
You can easily increase the length of your blanket by crocheting more rows. You can increase the width of your blanket by increasing the foundation chain in multiples of 24.
For help determining what size to make your cable stitch crochet blanket, check out my Standard Blanket Size Chart.
Size and Yardage Chart
In order to achieve the right size of your blanket, be sure to check how much yarn you’ll need beforehand.
Yarn
For the Cascading Cable Crochet Blanket Pattern, I chose Cascade 220 Superwash Aran Yarn in Daffodil. I could have used a gradient yarn, but knew that the definition of the crochet cables would get lost in the color changes of the yarn. That’s why I ended up with this bright beautiful sunshine-y yellow color.
Cascade 220 Superwash is great for making so many different types of crochet projects such as sweaters, cowls, hats, mittens or anything that needs a durable 100% wool yarn. It’s a worsted weight / 4 and you can find it in many beautiful solid colors.
For help determining what size to make your crocheted blanket, check out my Standard Blanket Size Chart.
How to Style a Cable Crochet Blanket
1. Living Room: Drape it over the back of your sofa or an armchair for a chic yet inviting look.
2. Bedroom: Layer it at the foot of your bed for added warmth and a luxurious aesthetic.
3. Reading Nook: Pair it with a comfy chair, a good book, and a cup of tea for the ultimate cozy corner.
4. Seasonal Decor: Use crochet blankets in warm, earthy tones for fall and winter or light pastels for spring and summer.
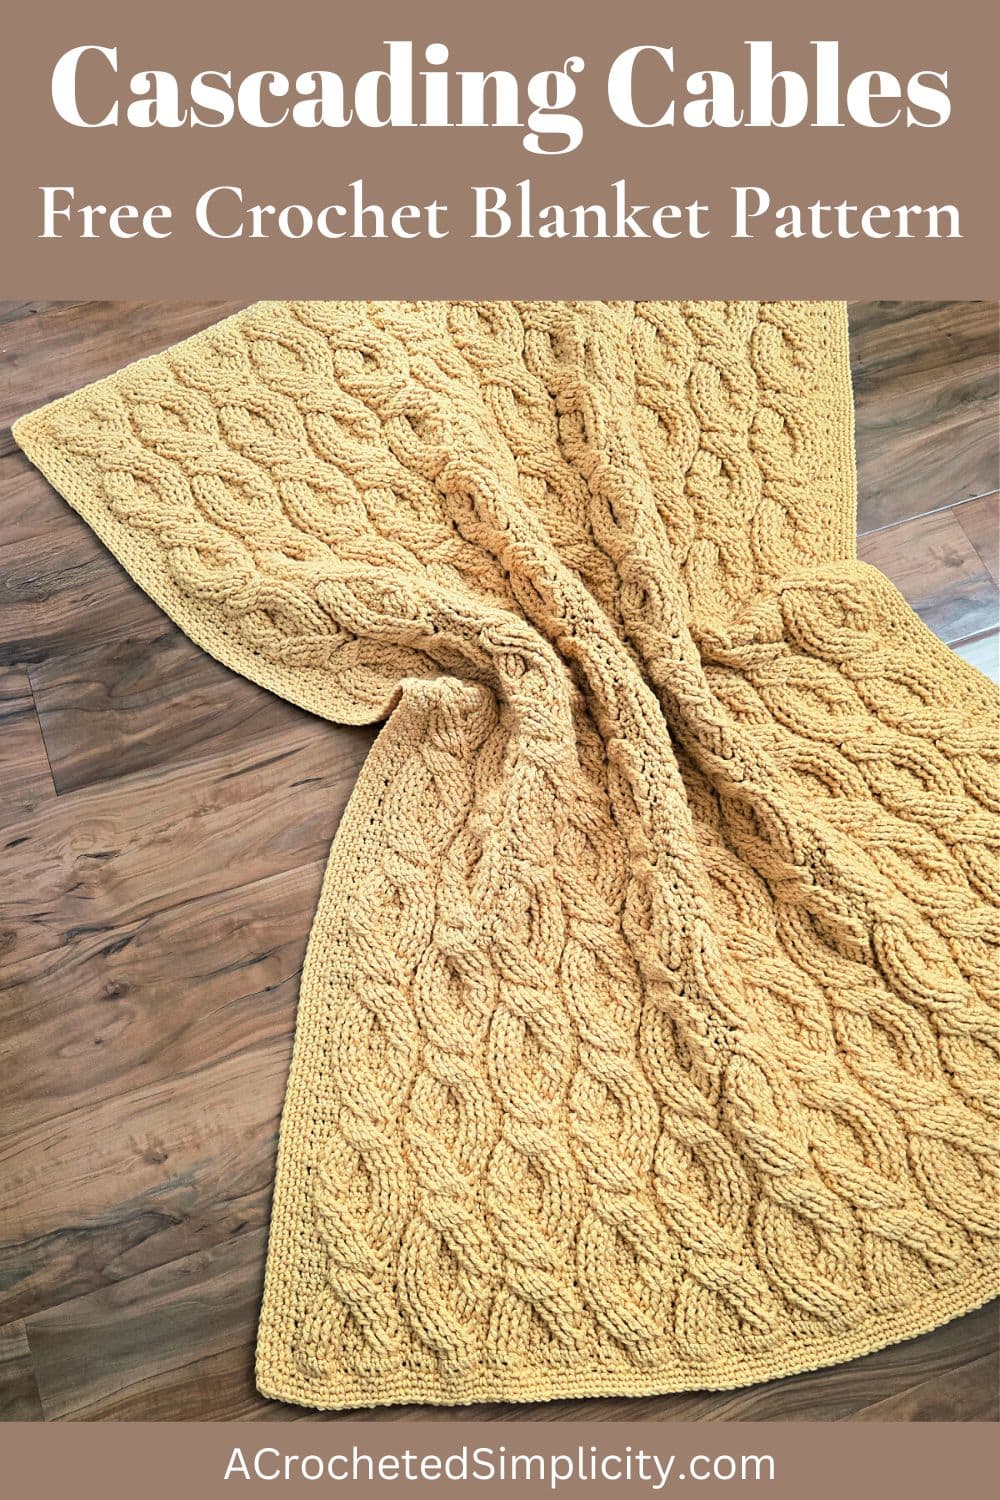
Cascading Cables Afghan – Free Crochet Blanket Pattern
The cable crochet blanket pattern is free below, but if you love to work offline, I’ve got a couple other great options for you.
Purchase the ad-free, printable PDF, (including all photo tutorials) on Ravelry, or on Etsy (aff).
This post contains affiliate links.
Materials
- Yarn: Aran / Worsted Weight / 4 / Yarn, Cascade 220 Superwash Aran Yarn in Daffodil was used for the cable crochet blanket shown in the photos.
- Yardage: See Size Chart above
- Crochet Hooks: I/9/5.50mm; H/8/5.00mm; or size needed to obtain gauge (My favorite crochet hooks are the Clover Amour Crochet Hooks, I’ve never had an ache in my hand since switching).
- Measuring Tape
- Scissors
- Yarn Needle
Abbreviations (US Terms)
- ch(s): chain(s)
- sl st: slip stitch
- st(s): stitch(es)
- sc: single crochet
- ext sc: extended single crochet
- bpdc: back post double crochet
- fpdc: front post double crochet
- fptr: front post treble crochet
- fpDtr: front post double treble
- RS / WS: Right Side / Wrong Side
- sp: space
Experience Level
- Intermediate
Gauge
- Cable pattern stitch: 28 sts = 7″; 24 rows = 9″
- Border pattern stitch: 16.5 sts = 4″
Sizes
- Baby, Lapghan, Small Throw, Large Throw
- See size chart above.
Special Stitches
- Extended Single Crochet (ext sc): Insert hook into stitch indicated, yo, pull up a loop, yo, pull thru 1 loop on hook, yo, pull thru remaining two loops on hook.
- Front Post Treble Crochet (fptr): yo 2 twice, insert hook from front to back to front around the post of the designated stitch, yo, pull up a loop, (yo, pull thru 2 loops) 3 times.
- Front Post Double Treble Crochet (fpDtr): yo 3 times, insert hook from front to back to front around the post of the designated stitch, yo, pull up a loop, (yo, pull thru 2 loops) 4 times.
- Forward Cable A (FWD Cbl A): Skip next 4 post sts, fpDtr around next 4 post sts, working in front of fpDtr just made, fpDtr around each skipped post st.
- Forward Cable B (FWD Cbl B): Skip next 2 post sts, fptr around next 2 post sts, working in front of fptr just made, fptr around each skipped post st.
Pattern Notes
- Turning chains are not included in stitch count unless noted otherwise.
- Yarn Notes: Cascade 220 Superwash Aran in Daffodil was used for the blanket shown, 100% Superwash Merino Wool (150 yards / 137.5 m / 100 g / 3.5 oz) Another comparable worsted weight yarn may be used as long as gauge is met.
- Please Read the “Important Notes” below before beginning. These notes go over how the stitches are worked in this afghan so that the cables move horizontally outward and inward.
- Construction Notes: This cabled blanket is worked back and forth in rows using a combination of basic crochet stitches and post stitches. A crochet blanket border is then added.
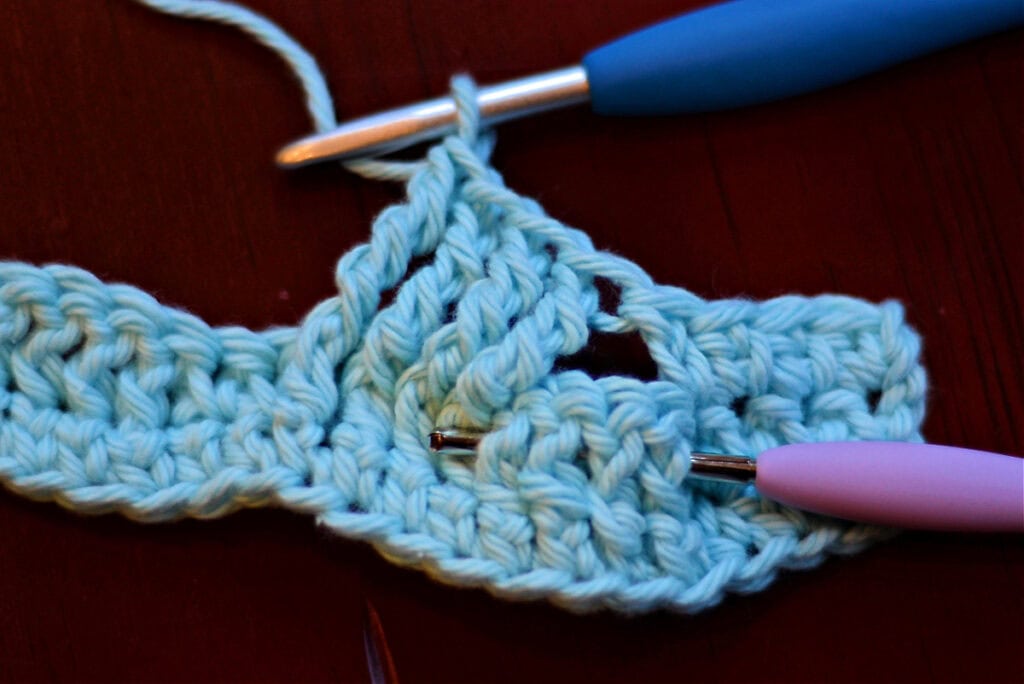
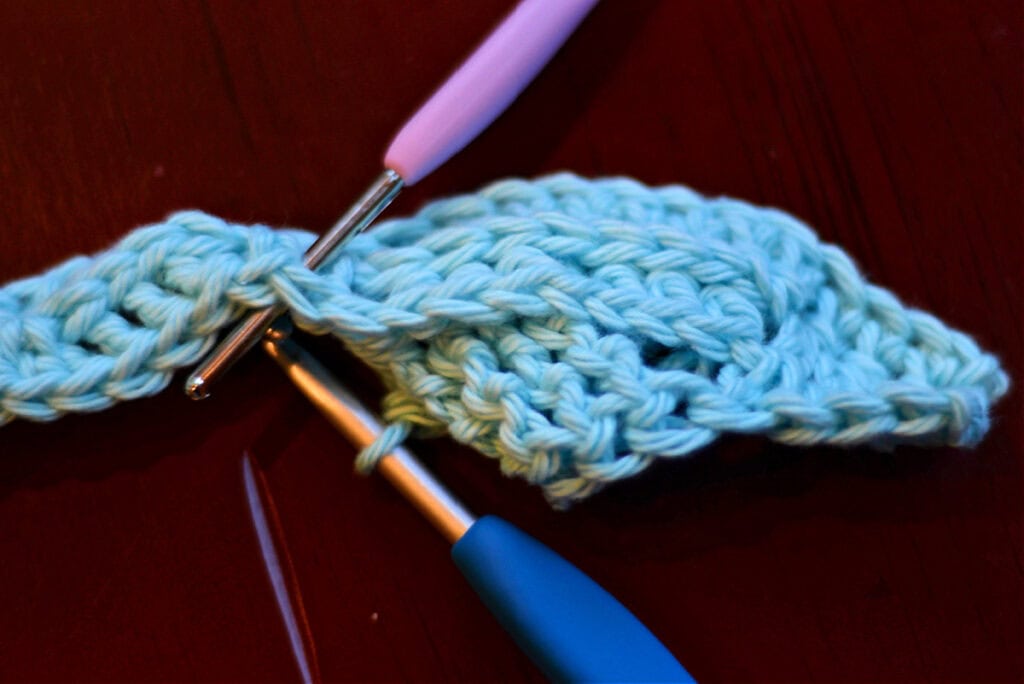
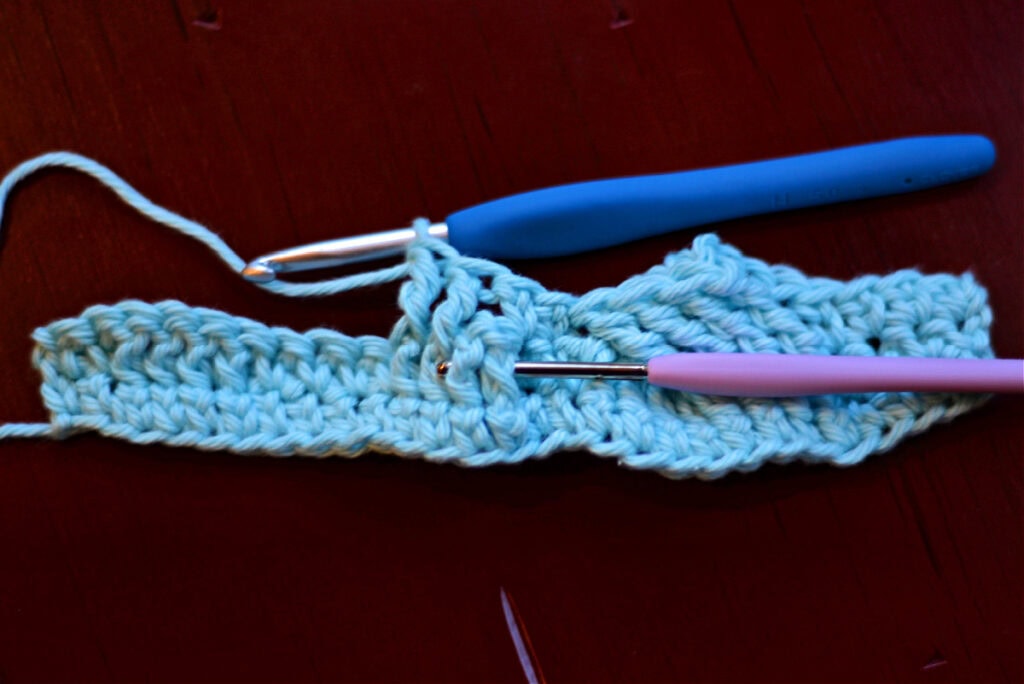
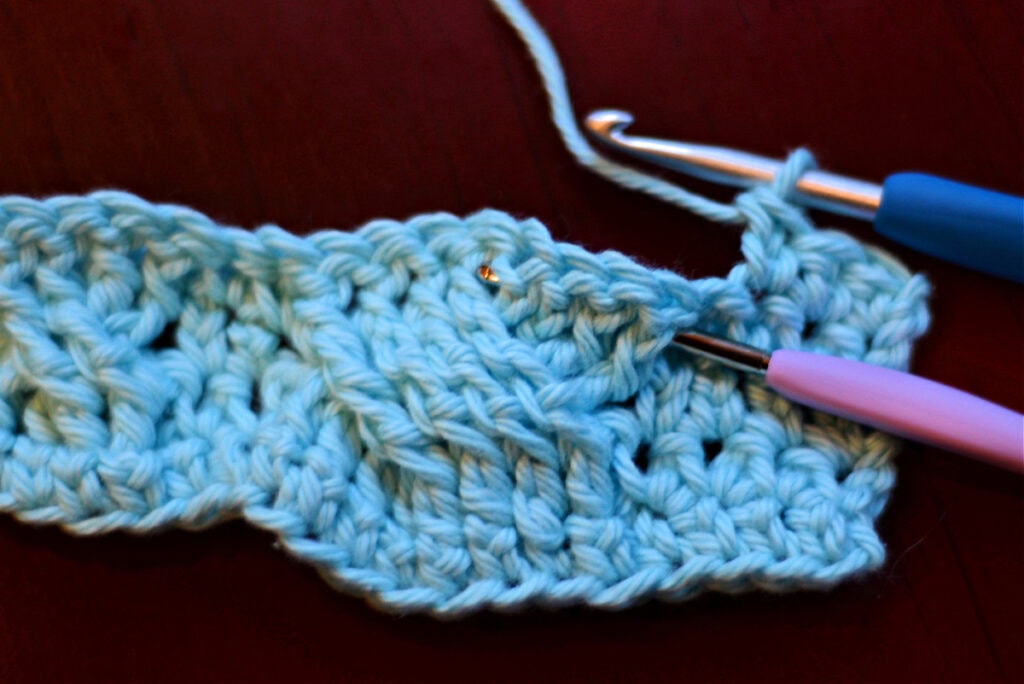
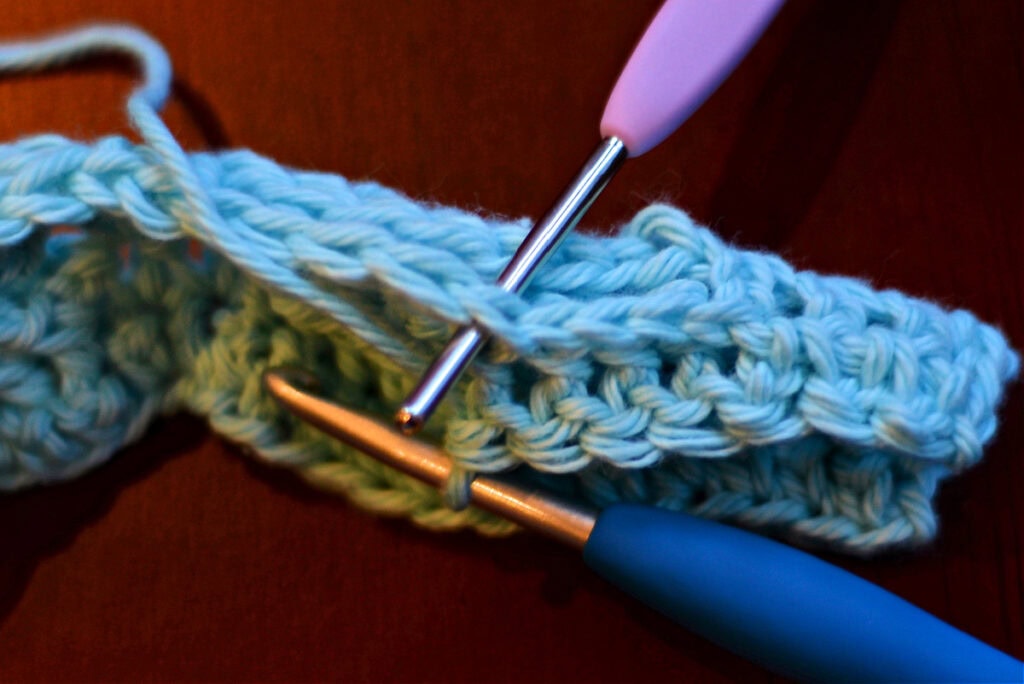
Important Notes
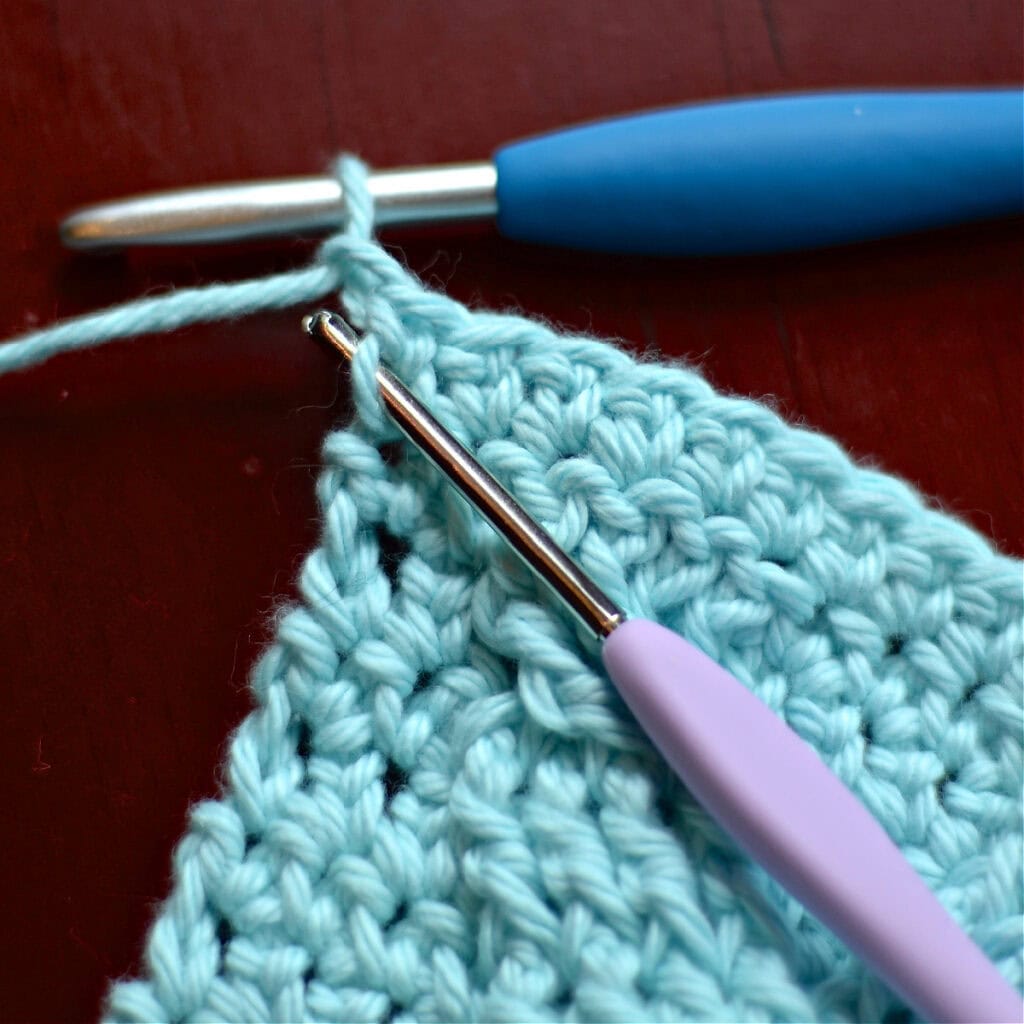
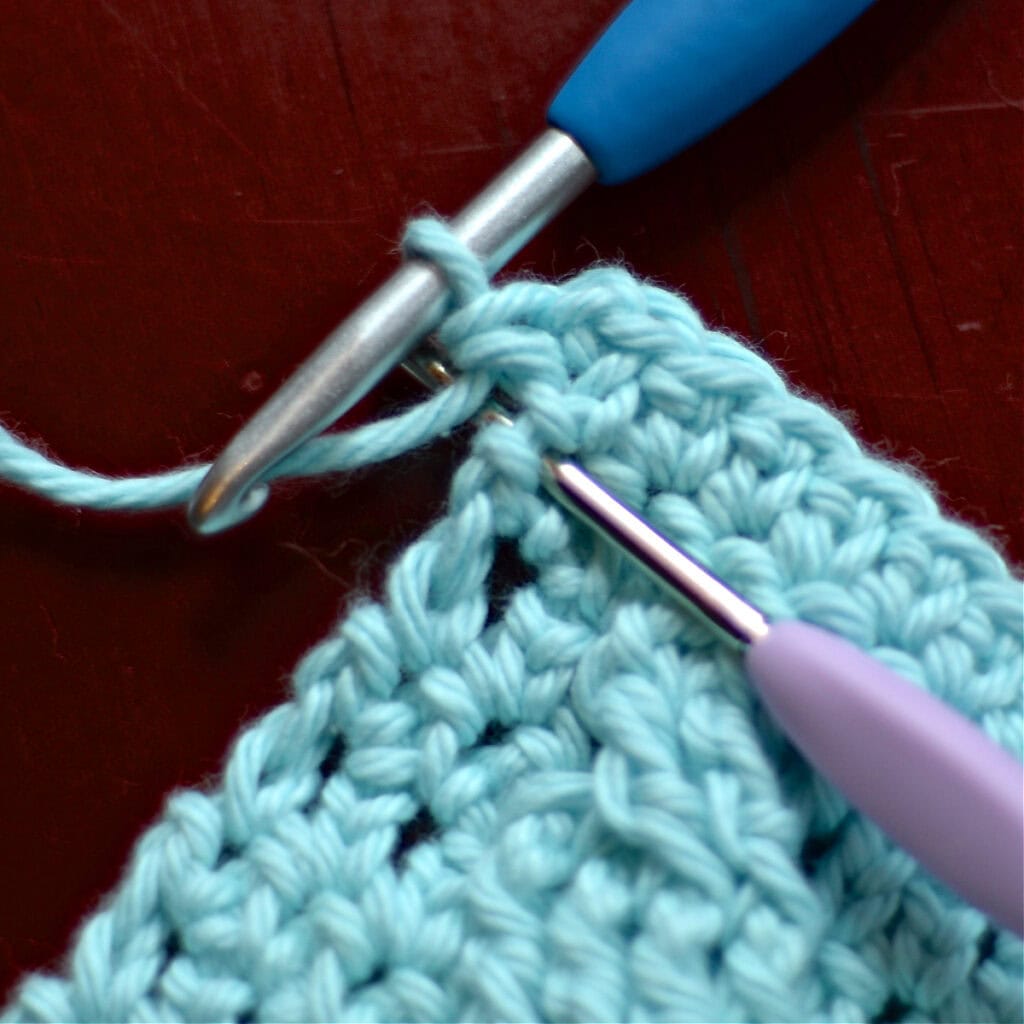
Keep these notes in mind while working your afghan. They will help you with proper stitch placement, especially when your cables are moving horizontally, outward and inward. I’ve also included step-by-step photos that show specific stitch placement for these trickier stitches.
- Unwritten Rule of Post Stitches: When working post stitches, you always skip over the top loops of 1 stitch behind each post stitch. If you do not skip over those top loops, you’ll end up increasing your overall stitch count. **I believe that most of us do this without even thinking about it, but when it comes to using the post stitches to create cables that move, we forget about that little tidbit.
- Pay REALLY close attention to wording, it is very literal. The pattern always says “fpXX around next post st“. Except for Row 2 (which is the first row of post sts) you will work EVERY post stitch around a post st from the previous row (not around an ext sc). In short, make sure to work EVERY post stitch from Row 3 or later, around the post of a post stitch from the previous row and your cables will be where they need to be.
- To achieve proper movement of cables, you may be working into BOTH the top loops of a post stitch and around it. Watch wording carefully and make sure to always skip the top loops of 1 stitch behind every post stitch.
- To maintain cable movement and stitch count, there are also times when you will not be working into an ext sc. Count stitches and pay special attention to wording. **And use the photos as needed, for clarification.
Cascading Cable Crochet Blanket – Written Pattern
Changes for Sizes Written as Follows: Baby (Lapghan, Small Throw, Large Throw)
Changes for Stitch Counts Written as Follows: (Baby, Lapghan, Small Throw, Large Throw)
Set-Up: With yarn & a 5.50 mm crochet hook, ch 101 (149, 197, 245). (101, 149, 197, 245 chs)
Row 1 (RS): Switch to a 5.00 mm crochet hook, ext sc in the 2nd ch from your hook, ext sc in each ch across. Turn. (100, 148, 196, 244 sts)
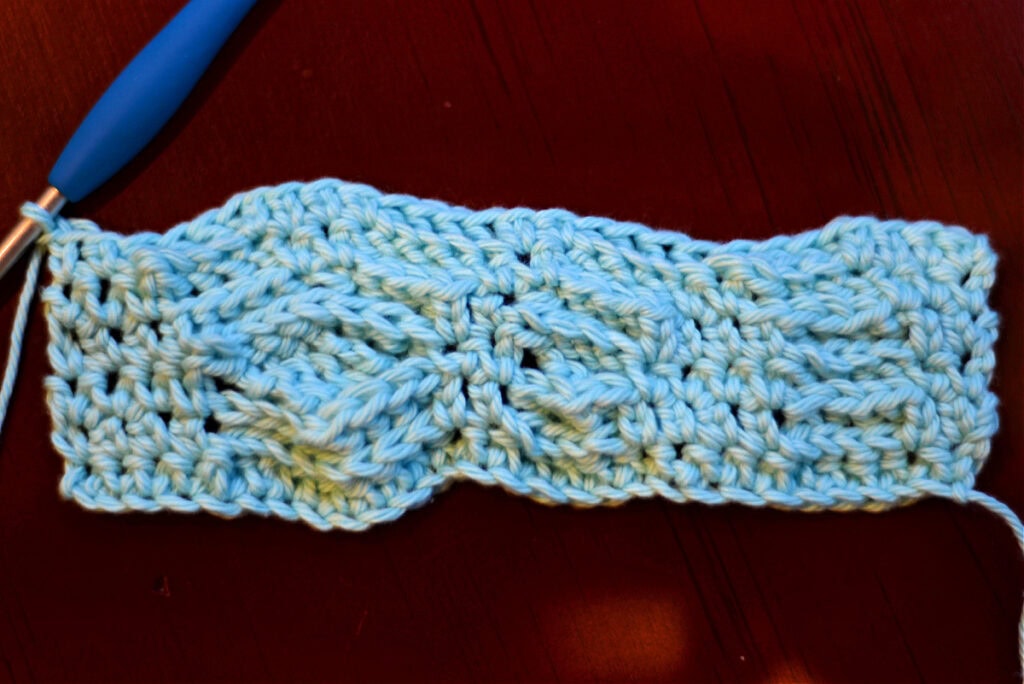
Important Row 2 Tip: Row 2 of the Cable Afghan is the cable set-up row. If you’re struggling with knowing exactly where the post of the stitch is that you need to work a post stitch around, make sure to check out my 2 Tips for Proper Post Stitch Placement. There is a quick video and a photo tutorial that will not only help you with the Cascading Cable Crochet Blanket Pattern, it will help you with all other crochet cable patterns.
Row 2: Ch 1, * ext sc in each of the next 2 sts, bpdc around each of the next 4 sts, ext sc in each of the next 4 sts, bpdc around each of the next 4 sts, ext sc in each of the next 2 sts, bpdc around each of the next 8 sts, rep from * across to the last 4 sts, ext sc in each of the last 4 sts. Turn. (100, 148, 196, 244 sts)
Row 3: Ch 1, ext sc in each of the first 4 sts, * FWD Cbl A, ext sc in each of the next 2 sts, FWD Cbl B, ext sc in each of the next 4 sts, fpdc around each of the next 4 post sts, ext sc in each of the next 2 sts, rep from * across. Turn. (100, 148, 196, 244 sts)
Row 4: Ch 1, * ext sc in each of the next 2 sts, bpdc around each of the next 4 post sts, ext sc in each of the next 4 sts, bpdc around next 4 post sts, ext sc in each of the next 2 sts, bpdc around each of the next 8 post sts, rep from * across to the last 4 sts, ext sc in each of the last 4 sts. Turn. (100, 148, 196, 244 sts)
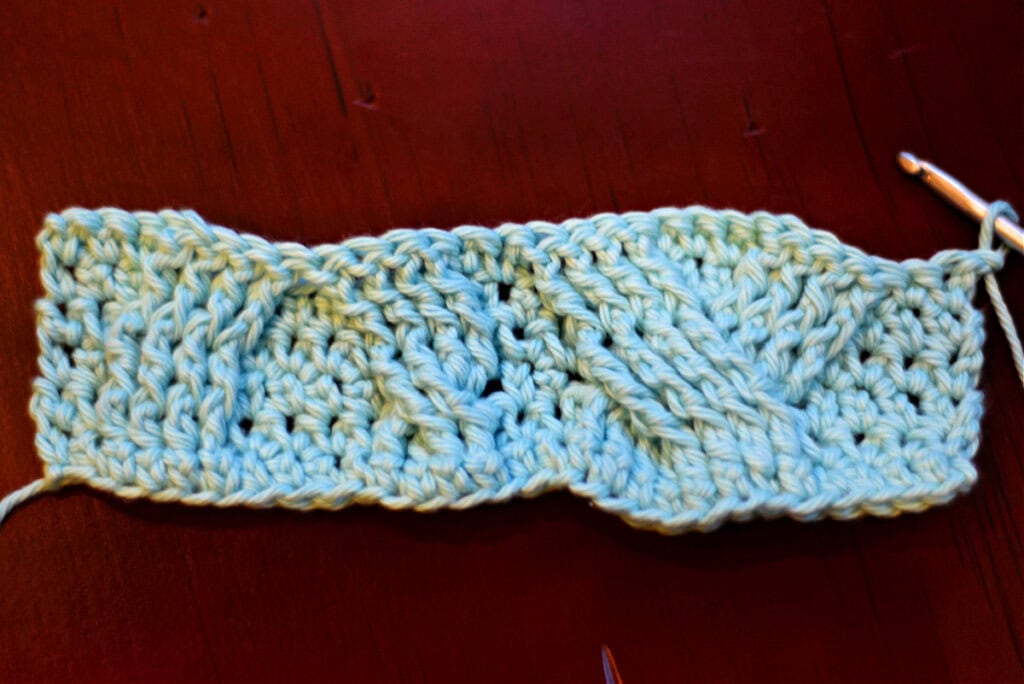
Row 5: Ch 1, ext sc in each of the first 3 sts, * skip the next st, fpdc around each of the next 4 post sts, ext sc in top of the same st as last fpdc worked, ext sc in top of next post st, fpdc around same post st as last ext sc worked and around next 3 post sts, skip the next st, ext sc in the next st, ext sc in the top of the next post st, fpdc around the same post st as last ext sc worked and the next 3 post sts, skip the next st, ext sc in each of the next 2 sts, skip the next st, fpdc around each of the next 4 post sts, ext sc in the top of the same st as the last post st worked, ext sc in the next st, rep from * across to the last st, ext sc in the last st. Turn. (100, 148, 196, 244 sts)


Row 6: Ch 1, ext sc in the first 3 sts, * ext sc in top of next post st, bpdc around same post st as last ext sc made and around next 3 post sts, skip each of the next 2 sts, bpdc around each of the next 4 post sts, ext sc in top of same st as last post st worked around, ext sc in the next st, skip the next st, bpdc around each of the next 4 post sts, ext sc in top of same st as last post st worked around, ext sc in each of the next 2 sts, ext sc in top of next post st, bpdc around same post st as last ext sc made and around next 3 post sts, skip the next st, ext sc in the next st, rep from * across to the last st, ext sc in the last st. Turn. (100, 148, 196, 244 sts)

Row 7: Ch 1, * ext sc in each of the first 2 sts, FWD Cbl B, ext sc in each of the next 4 sts, fpdc around each of the next 4 post sts, ext sc in each of the next 2 sts, FWD Cbl A, rep from * across to the last 4 sts, ext sc in each of the last 4 sts. Turn. (100, 148, 196, 244 sts)
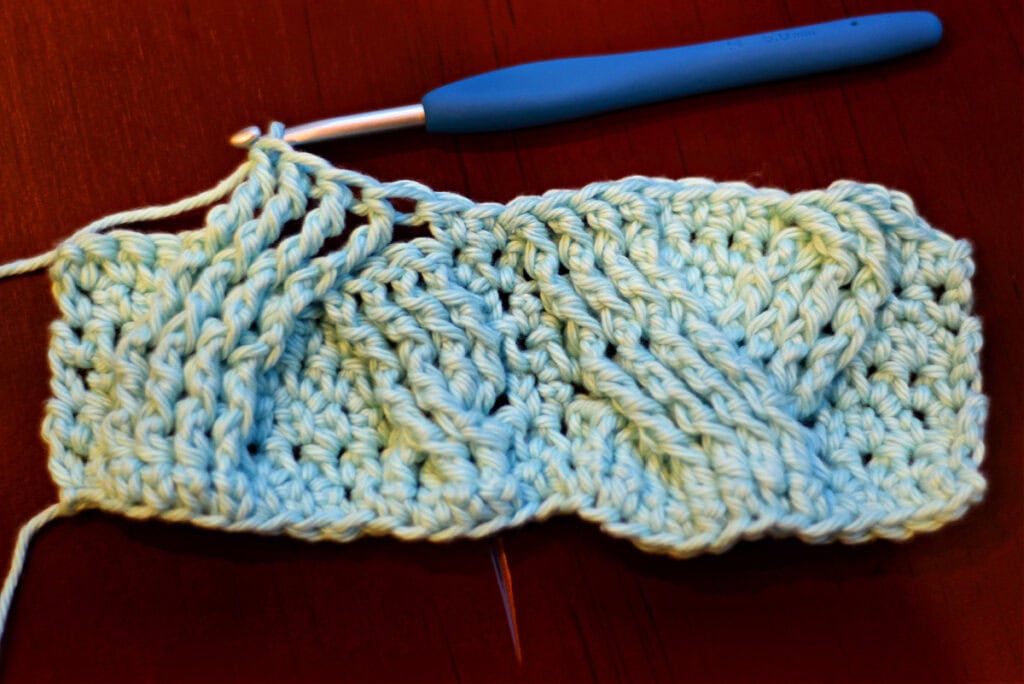
Row 8: Ch 1, ext sc in each of the first 4 sts, * bpdc around each of the next 8 post sts, ext sc in each of the next 2 sts, bpdc around each of the next 4 post sts, ext sc in each of the next 4 sts, bpdc around each of the next 4 post sts, ext sc in each of the next 2 sts, rep from* across. Turn. (100, 148, 196, 244 sts)
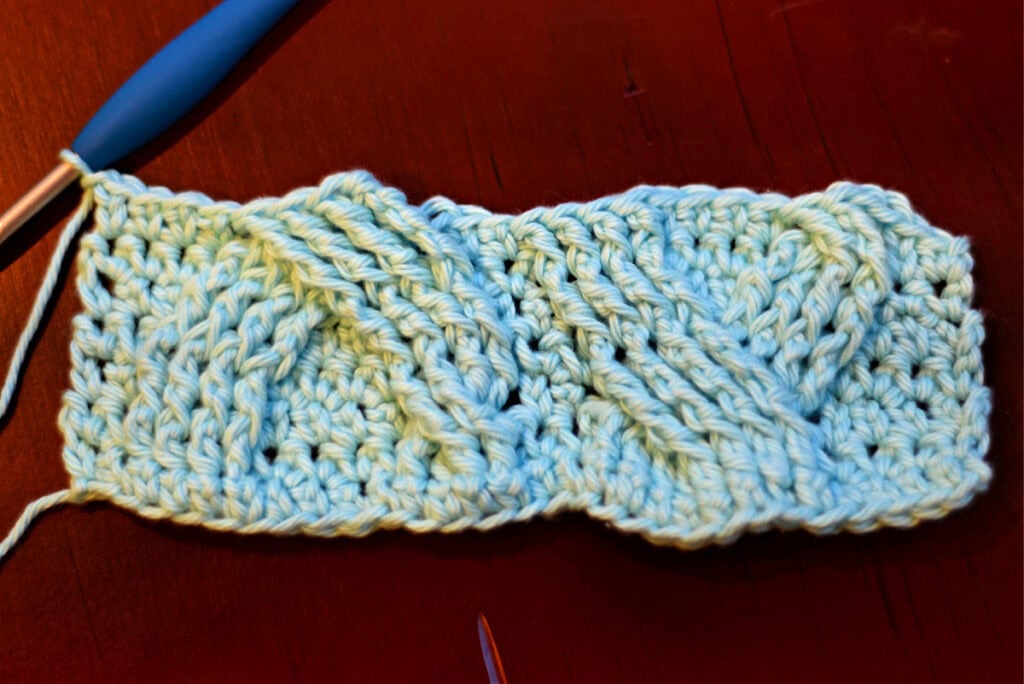
Rows 9 – 10: Repeat Rows 7 – 8. (100, 148, 196, 244 sts)
Row 11: Ch 1, ext sc in each of the first 2 sts, * ext sc in top of next post st, fpdc around same post st as last ext sc worked and around next 3 post sts, skip the next st, ext sc in each of the next 2 sts, skip the next st, fpdc around each of the next 4 post sts, ext sc in top of same st as last post st worked, ext sc in next st, skip next st, fpdc around each of the next 4 post sts, ext sc in the top of same st as last fpdc worked, ext sc in top of next post st, fpdc around the same post st as last ext sc worked and around the next 3 post sts, skip next st, ext sc in next st, rep from * across to the last 2 sts, then ext sc in each of the last 2 sts. Turn. (100, 148, 196, 244 sts)
Row 12: Ch 1, ext sc in each of the first 2 sts, * skip next st, bpdc around each of the next 4 post sts, ext sc in top of same st as last bpdc worked, ext sc in top of next 2 sts, ext sc in top of next post st, bpdc around same post st as last ext sc worked and around next 3 post sts, skip the next st, ext sc in the next st, ext sc in top of next post st, bpdc around same post st as last ext sc worked and around next 3 post sts, skip each of the next 2 sts, bpdc around each of the next 4 post sts, ext sc in top of same st as last bpdc worked, ext sc in the next st, rep from * across to the last 2 sts, then ext sc in each of the last 2 sts. Turn. (100, 148, 196, 244 sts)
Row 13: Ch 1, ext sc in each of the first 4 sts, * FWD Cbl A, ext sc in next 2 sts, fpdc around next 4 post sts, ext sc in next 4 sts, FWD Cbl B, ext sc in next 2 sts, rep from * across. Turn. (100, 148, 196, 244 sts)
Row 14: Ch 1, * ext sc in each of the first 2 sts, bpdc around each of the next 4 post sts, ext sc in each of the next 4 sts, bpdc around each of the next 4 post sts, ext sc in each of the next 2 sts, bpdc around each of the next 8 post sts, rep from * across to the last 4 sts, ext sc in each of the last 4 sts. Turn. (100, 148, 196, 244 sts)
Rows 15 – 16: Repeat Rows 13 – 14.
Now that we’ve gone over all of the techniques used in the cable design, you can follow the remaining instructions to complete your afghan.
Row 17: Ch 1, ext sc in each of the next 3 sts, * skip the next st, fpdc around each of the next 4 post sts, ext sc in top of same st as last fpdc worked, ext sc in top of next post st, fpdc around same post st as last ext sc worked and around next 3 post sts, skip the next st, ext sc in the next st, ext sc in top of next post st, fpdc around same post st as last ext sc worked and next 3 post sts, skip the next st, ext sc in each of the next 2 sts, skip the next st, fpdc around each of the next 4 post sts, ext sc in the top of the same st as the last post st worked, ext sc in the next st, rep from * across to the last st, then ext sc in last st. Turn. (100, 148, 196, 244 sts)
Row 18: Ch 1, ext sc in each of the next 3 sts, * ext sc in top of next post st, bpdc around same post st as last ext sc made and around next 3 post sts, skip each of the next 2 sts, bpdc around each of the next 4 post sts, ext sc in top of same st as last post st worked around, ext sc in the next st, skip the next st, bpdc around next 4 post sts, ext sc in top of same st as last post st worked around, ext sc in the next 2 sts, ext sc in top of next post st, bpdc around same post st as last ext sc made and around next 3 post sts, skip next st, ext sc in next st, rep from * across to the last st, then ext sc in last st. Turn (100, 148, 196, 244 sts)
Row 19: Ch 1, * ext sc in each of the next 2 sts, fpdc around each of next 4 post sts, ext sc in each of the next 4 sts, FWD Cbl B, ext sc in the next 2 sts, FWD Cbl A, rep from * across to the last 4 sts, then ext sc in last 4 sts. Turn. (100, 148, 196, 244 sts)
Row 20: Ch 1, ext sc in each of the first 4 sts, * bpdc around each of the next 8 post sts, ext sc in each of the next 2 sts, bpdc around each of the next 4 post sts, ext sc in each of the next 4 sts, bpdc around each of the next 4 post sts, ext sc in each of the next 2 sts, rep from * across. Turn. (100, 148, 196, 244 sts)
Rows 21 – 22: Repeat Rows 19 – 20.
Row 23: Ch 1, ext sc in each of the first 2 sts, * ext sc in top of next post st, fpdc around same post st as last ext sc worked and around next 3 post sts, skip the next st, ext sc in each of the next 2 sts, skip the next st, fpdc around each of the next 4 post sts, ext sc in top of same st as last post st worked, ext sc in the next st, skip the next st, fpdc around each of the next 4 post sts, ext sc in the top of same st as last fpdc worked, ext sc in the top of next post st, fpdc around same post st as last ext sc worked and around next 3 post sts, skip the next st, ext sc in the next st, rep from * across to the last 2 sts, then ext sc in each of the last 2 sts. Turn. (100, 148, 196, 244 sts)
Row 24: Ch 1, ext sc in each of the first 2 sts, * skip the next st, bpdc around each of the next 4 post sts, ext sc in the top of same st as last bpdc worked, ext sc in the top of next 2 post sts, ext sc in top of next post st, bpdc around same post st as last ext sc worked and around next 3 post sts, skip the next st, ext sc in the next st, ext sc in top of next post st, bpdc around same post st as last ext sc worked and around next 3 post sts, skip each of the next 2 sts, bpdc around each of the next 4 post sts, ext sc in top of same st as last bpdc worked, ext sc in the next st, rep from * across to the last 2 sts, then ext sc in each of the last 2 sts. Turn. (100, 148, 196, 244 sts)
Row 25: Ch 1, ext sc in each of the first 4 sts, * FWD Cbl A, ext sc in each of the next 2 sts, fpdc around each of the next 4 post sts, ext sc in each of the next 4 sts, FWD Cbl B, ext sc in each of the next 2 sts, rep from * across. Turn. (100, 148, 196, 244 sts)
Row 26: Ch 1, * ext sc in each of the next 2 sts, bpdc around each of the next 4 post sts, ext sc in each of the next 4 sts, bpdc around each of the next 4 post sts, ext sc in each of the next 2 sts, bpdc around each of the next 8 post sts, rep from * across to the last 4 sts, ext sc in each of the last 4 sts. Turn. (100, 148, 196, 244 sts)
Rows 27 – 28: Repeat Rows 25 – 26.
Rows 29 – 76 (100, 124, 148): Repeat Rows 5 – 28.
Rows 77 – 98 (101 – 122) (125 – 146) (149 – 170): Repeat Rows 5 – 26.
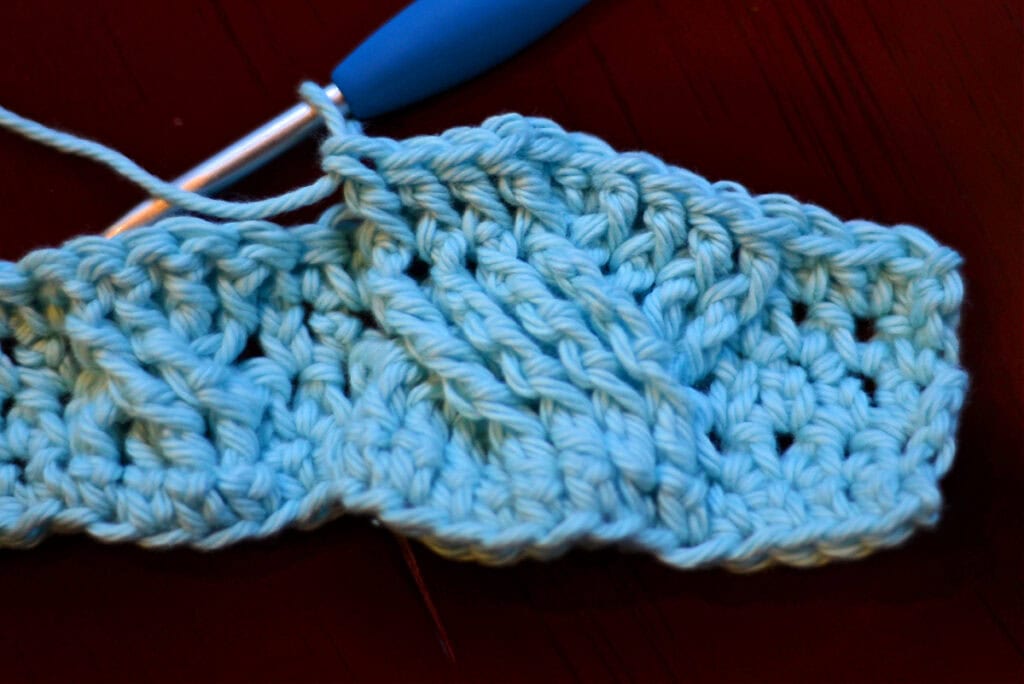
Row 99 (123, 147, 171): Ch 1, ext sc in each st across. Do not turn.
Do not fasten off. Continue on to Border.
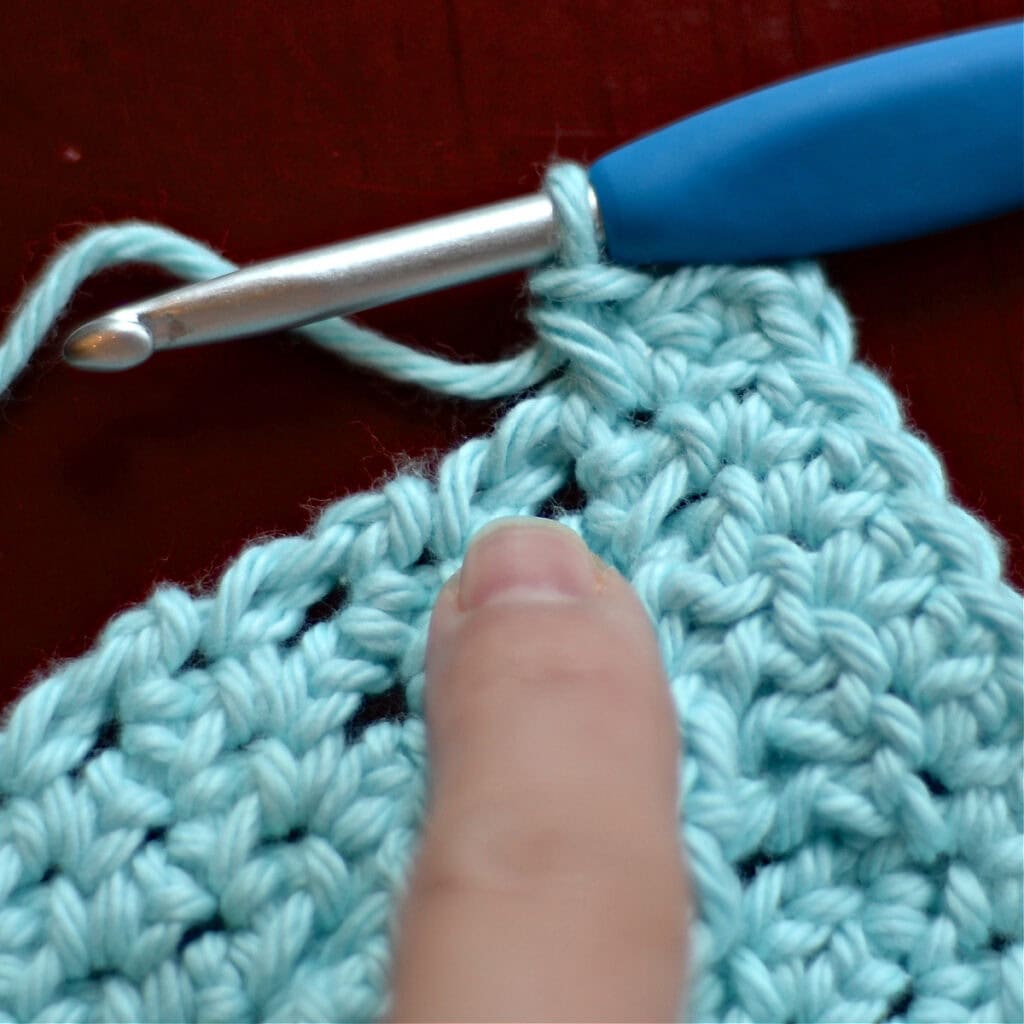
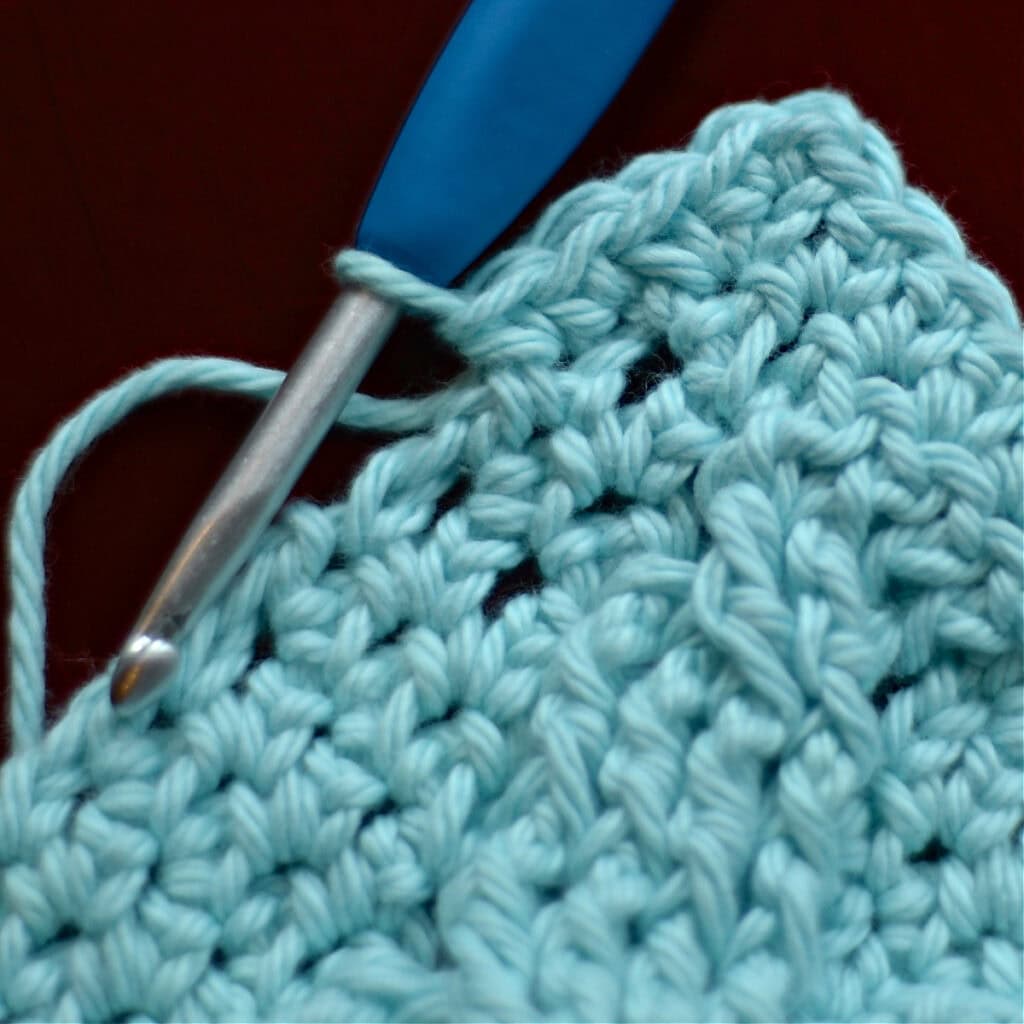
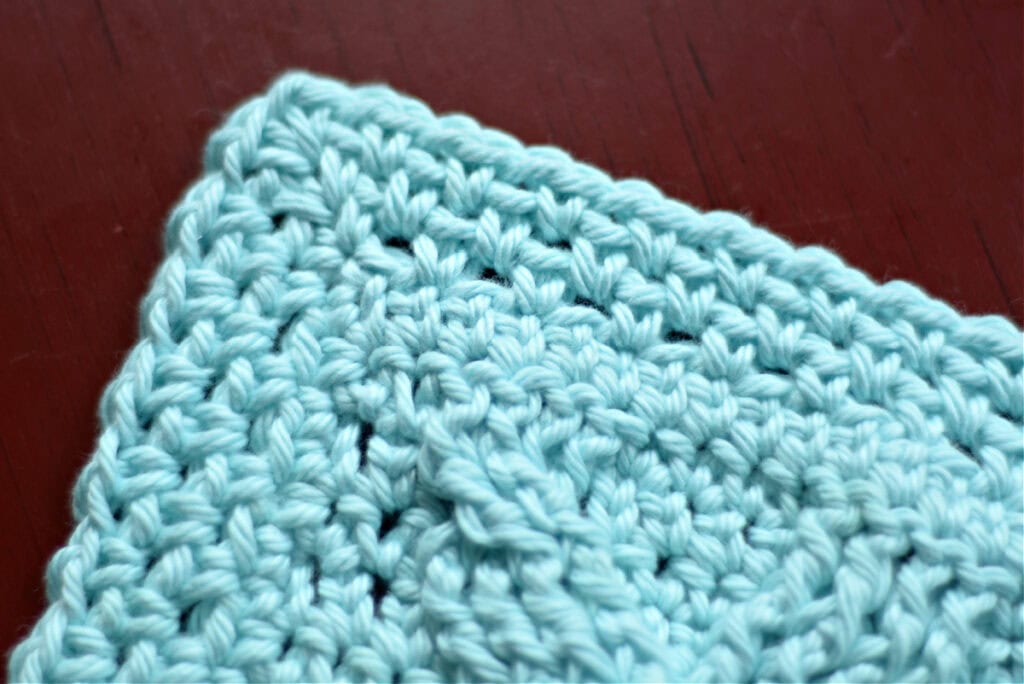
Border
Note: Border is worked in continuous rounds.
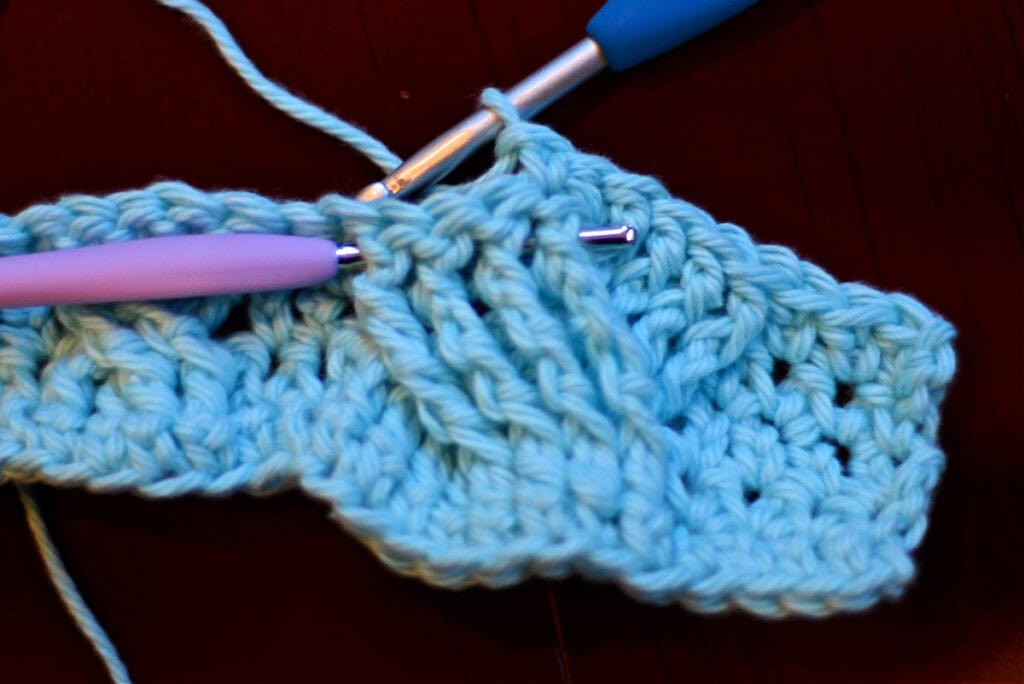
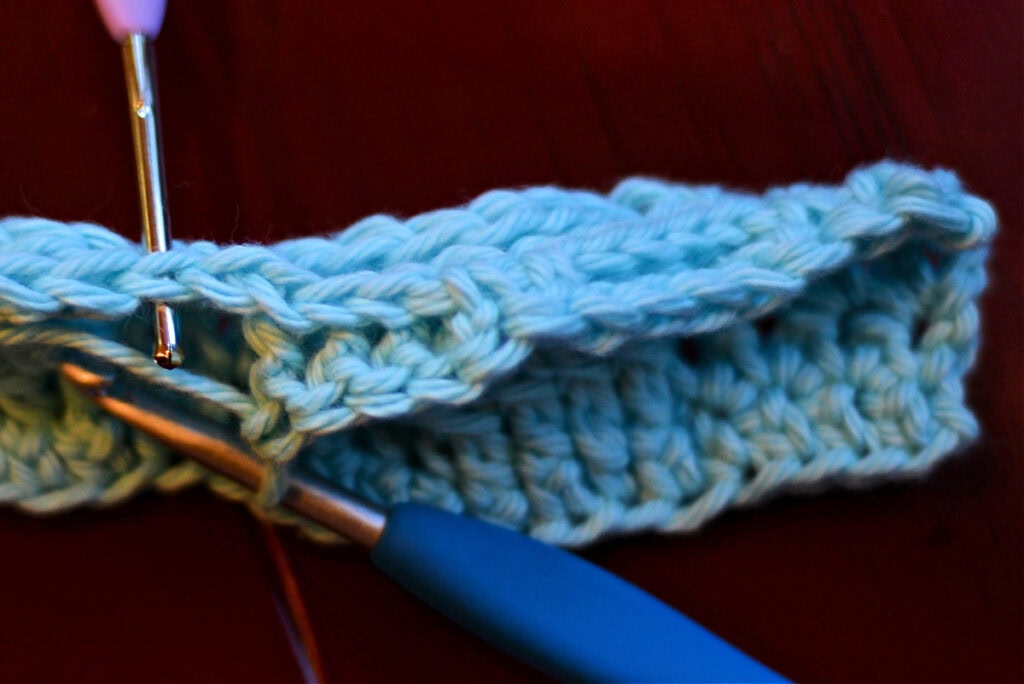
Round 1: Loosely ch 1 at the corner, rotate to work along the side of the afghan and into the sides of the rows, sc into the side of the 1st row, * sc into the side of the next row, 2 sc into the side of the next row, repeat from * until you reach the next corner, loosely ch 1 at the corner, rotate to work into the bottom of the foundation ch, sc in each st across to corner, loosely ch 1 at the corner, rotate to work along the side of the afghan and into the sides of the rows, sc into the side of the 1st row, * sc into the side of the next row, 2 sc into the side of the next row, repeat from * until you reach the next corner, loosely ch 1 at the corner. Do Not Join. Rotate to begin Round 2 on the top edge of the afghan. Stitch count isn’t crucial.
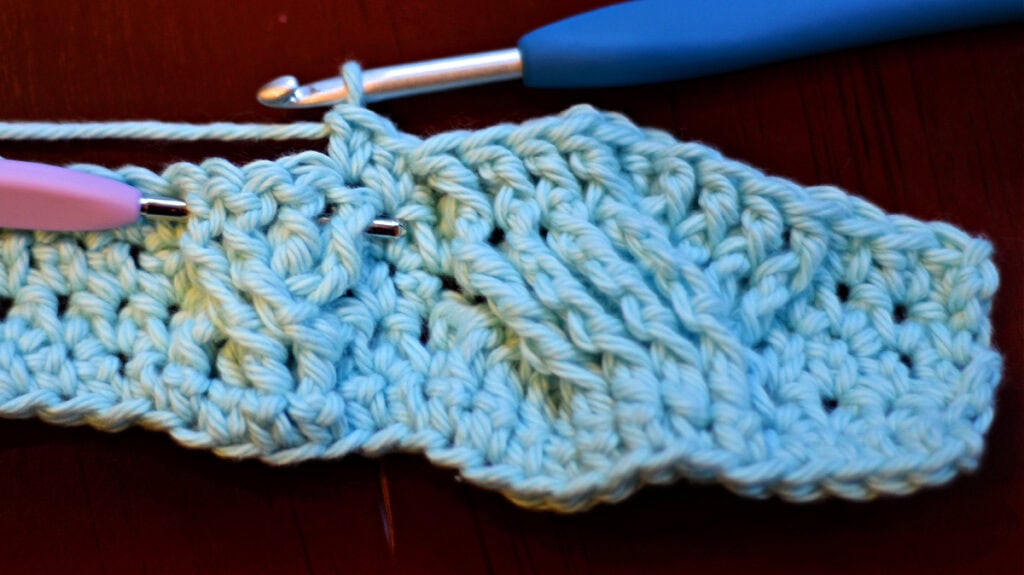
Round 2: [ *sc in the next st, skip the next st, ch 1, repeat from * across to corner, (sc, ch 1, sc) in ch-1 at corner ] repeat from [ to ] around all 4 sides of the afghan. Stitch count isn’t crucial.
Round 3: Work the following around the perimeter of the blanket: sc into each ch-1 sp, ch 1 & skip over each sc, (sc, ch 1, sc) into the ch-1 sp at each corner.
Repeat Round 3 as many times as you’d like. When you’ve added the desired width border to your afghan, join with a sl st at the end of the final round. Fasten off. Weave in ends.
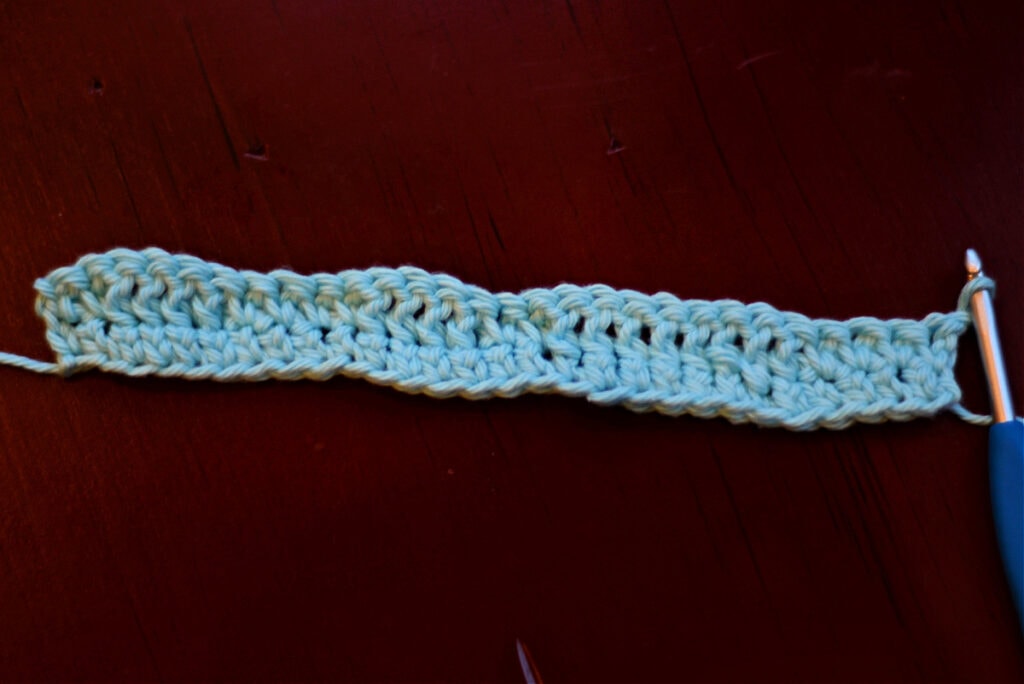
Note: The afghan shown in the photos has a border of 4 total rounds.
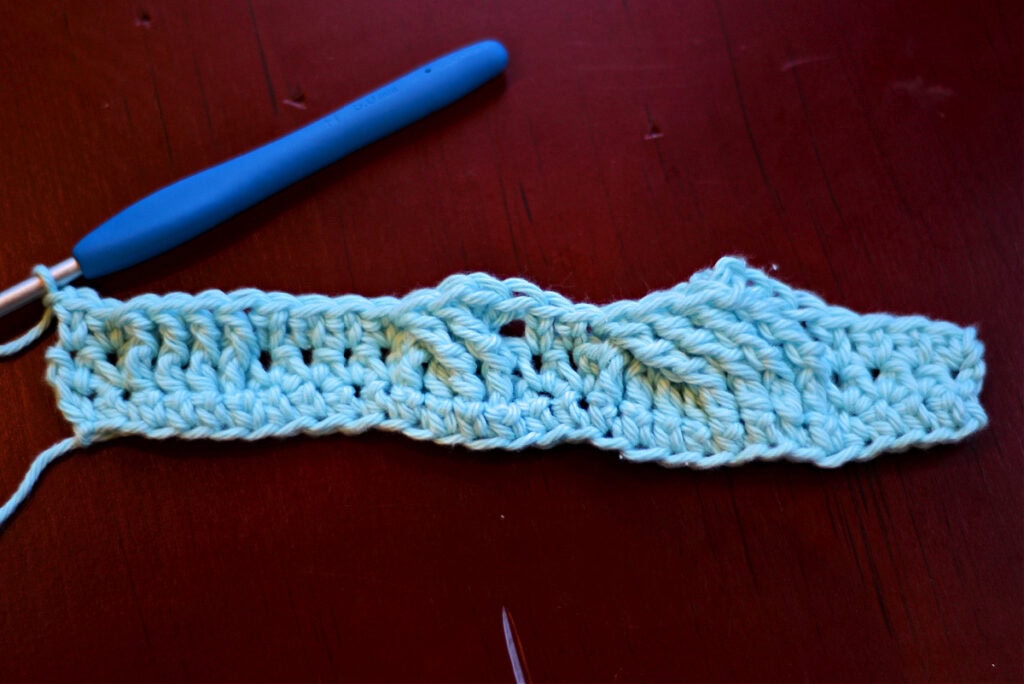
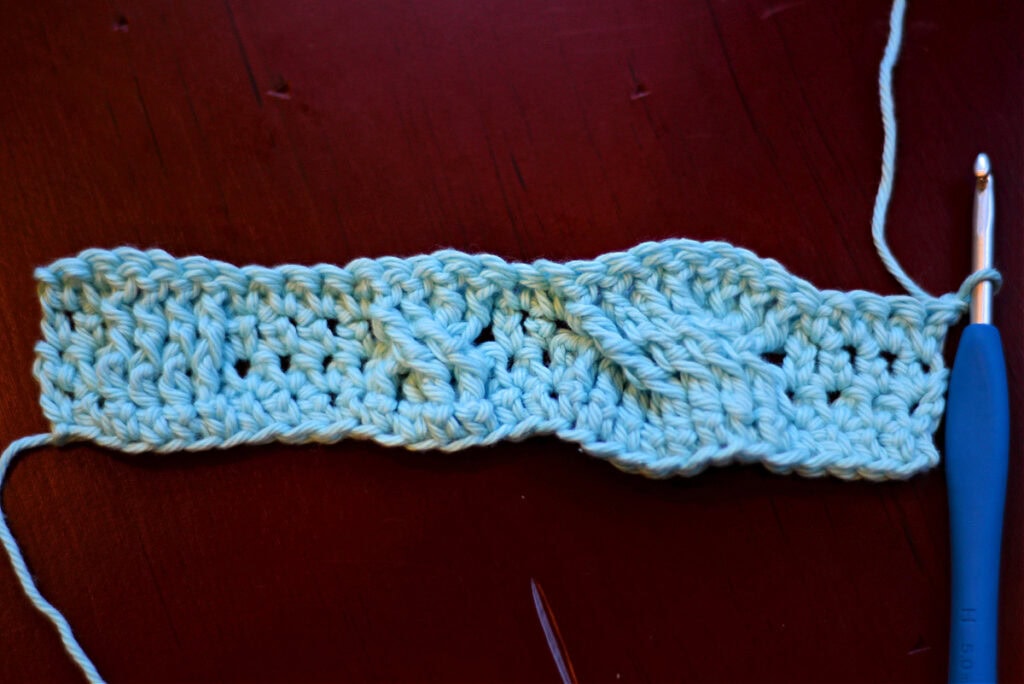
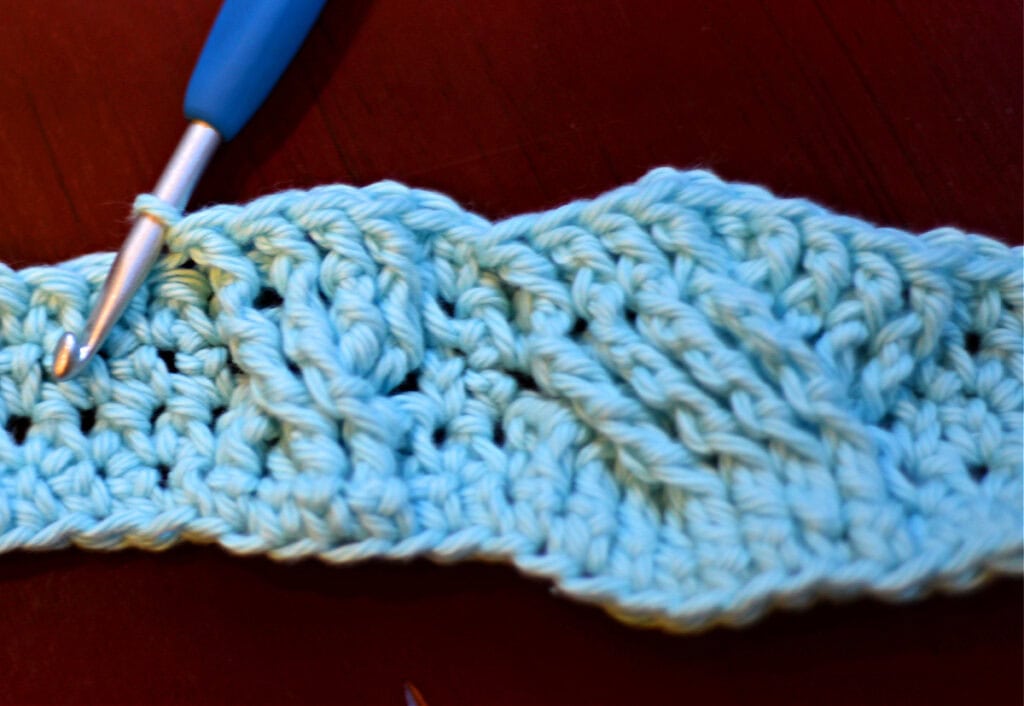
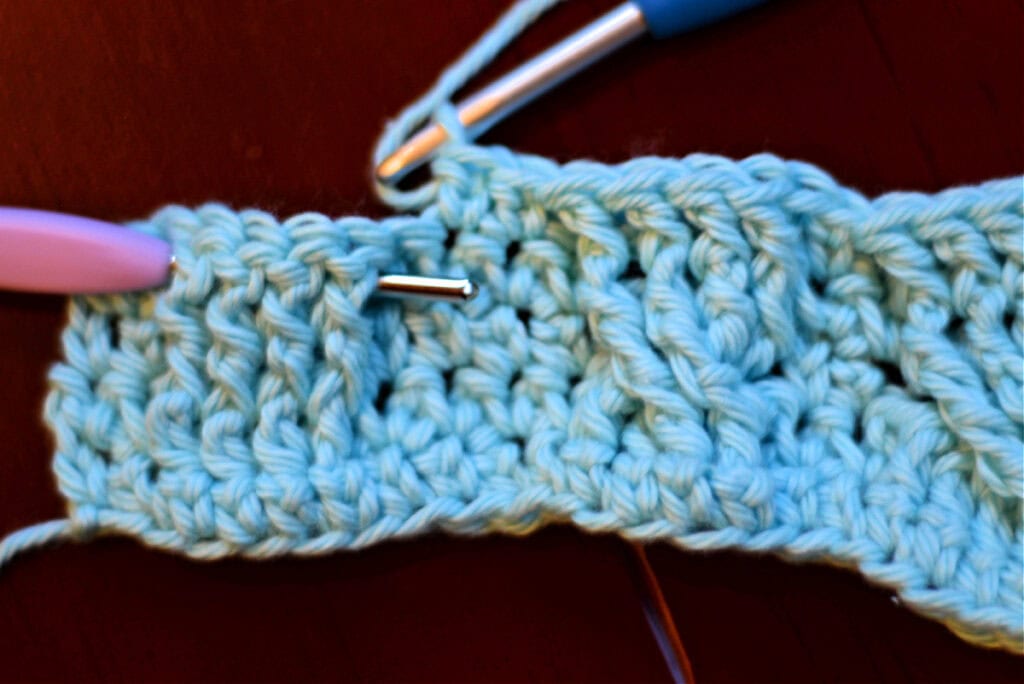
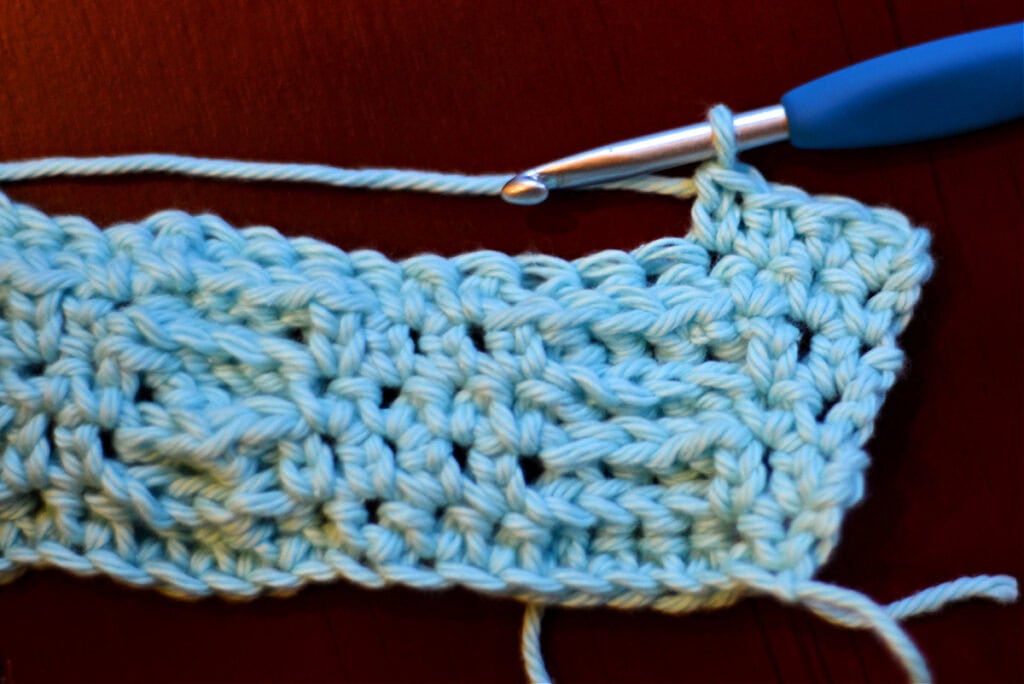
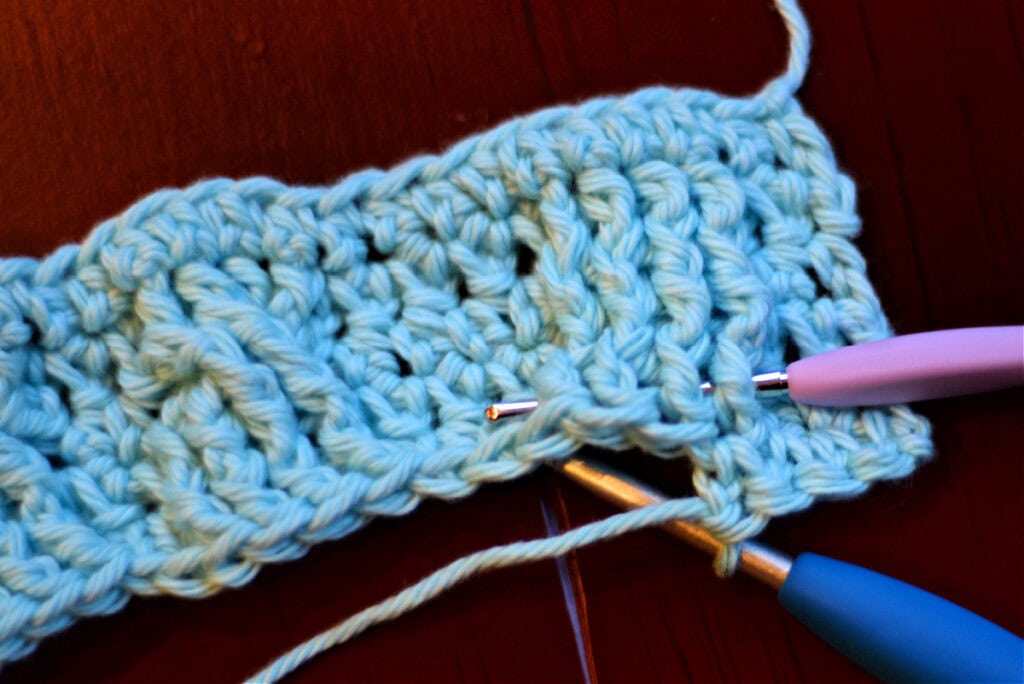
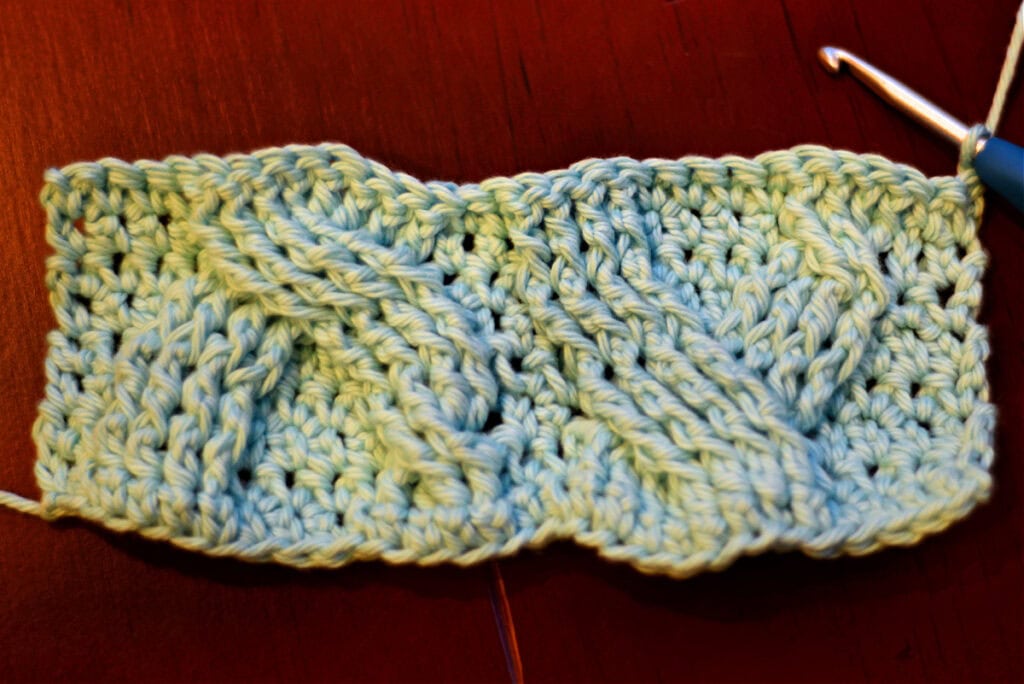
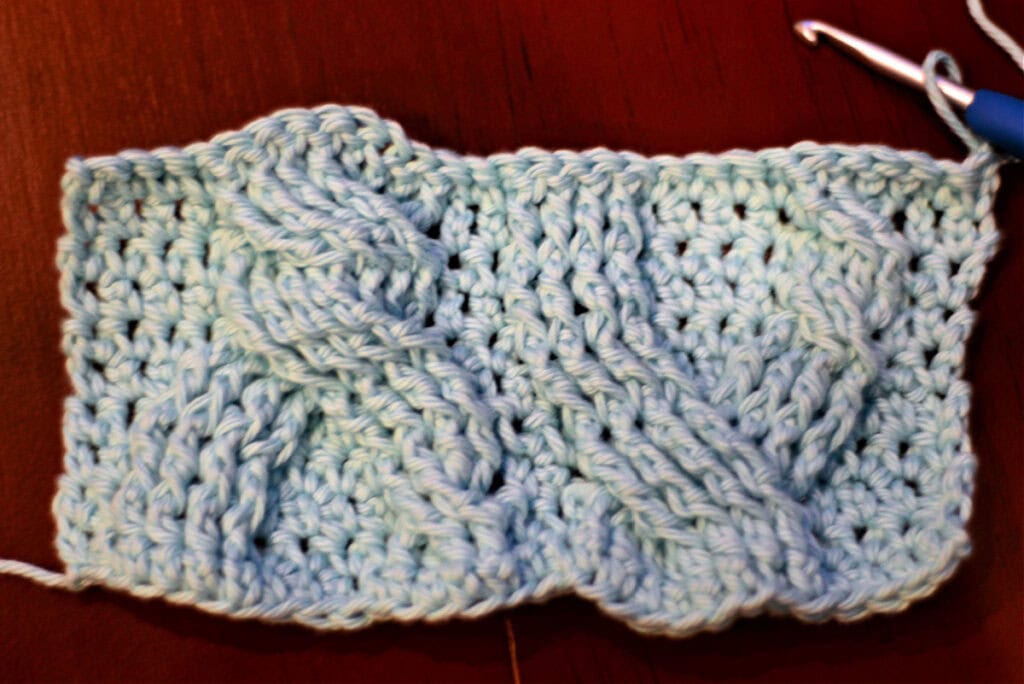
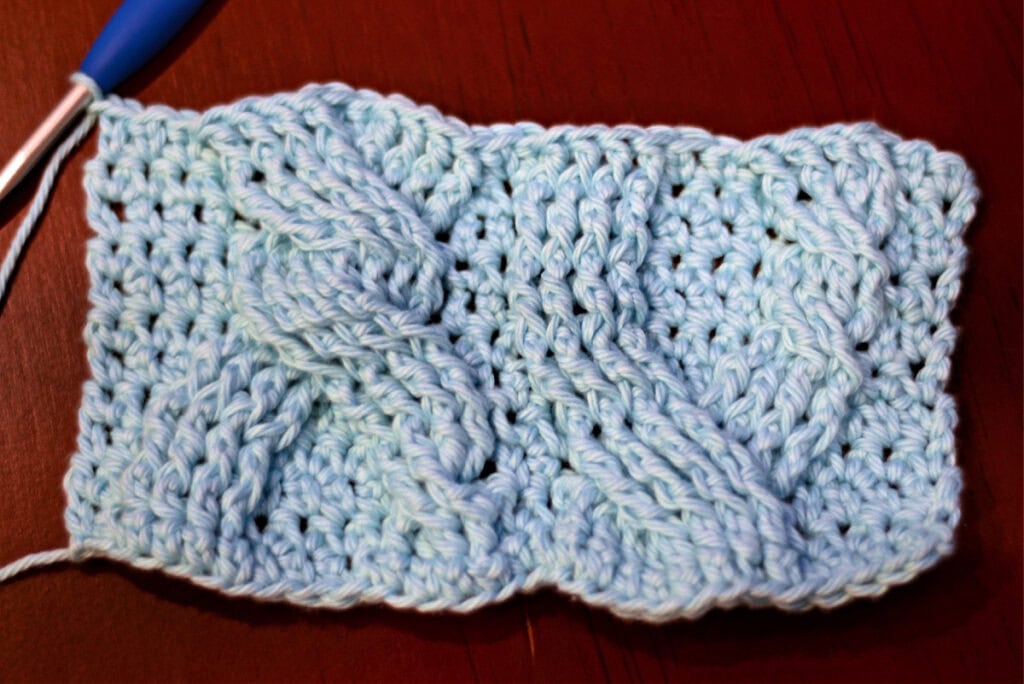
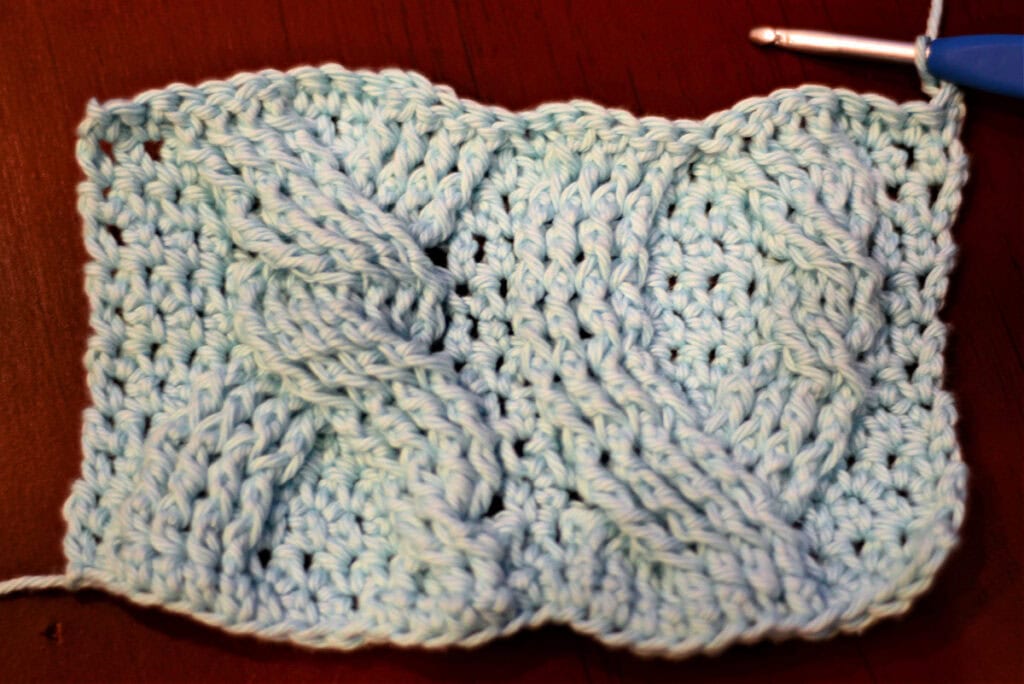
Photo Progression – Border
A cable crochet blanket is more than just a warm throw; it’s a piece of art that adds personality and warmth to your home. Whether you’re making one yourself or purchasing a handmade creation, these blankets are an investment in comfort and style!
I Made It! Now What?
Pin this post! Save this cable crochet blanket pattern to your Pinterest boards so that you can come back and make it again.
Leave a comment below: We love to hear your feedback.
Share Your Finished Projects on Facebook or Instagram: I love to see your finished projects! Share with us on social media and tag me @acrochetedsimplicity or use the hashtag #ACrochetedSimplicity so I can find your posts.
Join us in the Facebook Community Group!
Come share your finished projects with us in the A Crocheted Simplicity Crochet Community Group on Facebook. Join us for fun community events such as crochet alongs, join in on crochet conversations, ask questions, get advice, and share your love for crochet!

More Crochet Blanket Patterns I Think You’ll Love
More Crochet Blanket Patterns Free
Are you looking for more free crochet blanket patterns? We have several more free crochet patterns for a crochet throw blanket pattern, hexagon crochet blanket, crochet baby blanket patterns, and more.
If you’re looking for how to crochet a granny square, you’ll also find several crochet squares for blanket.