Beach Day Sunhat – Free Crochet Pattern – #CelebrateMomCAL
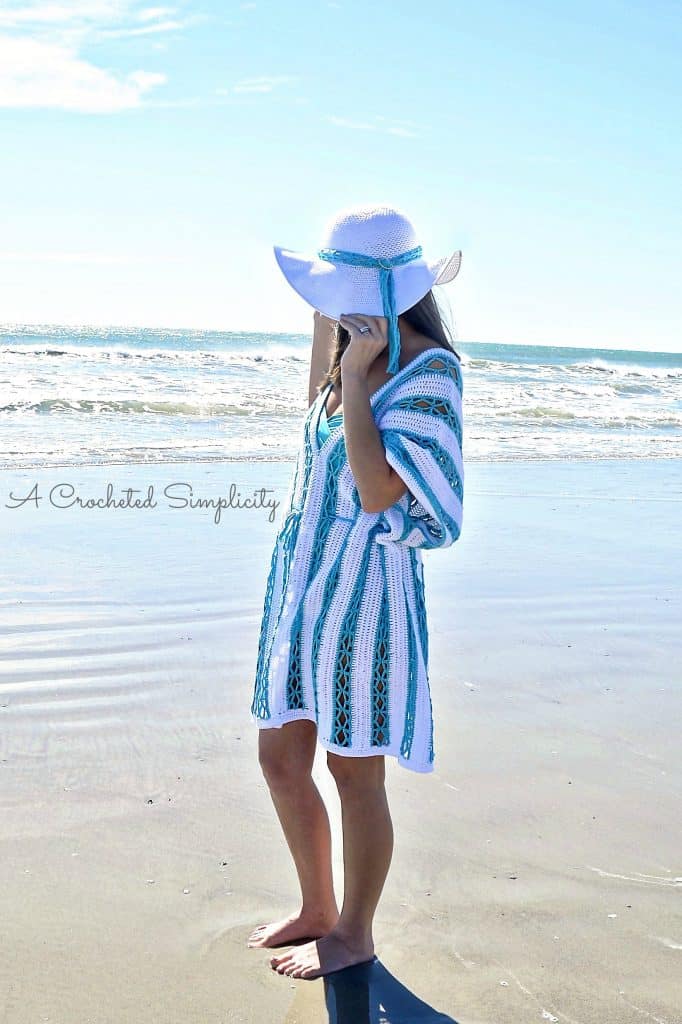
I designed the Beach Day Sunhat to coordinate with Maria’s Beach Day Cover-Up (Click Here for pattern) for the Mother’s Day CAL. This is the 4th pattern in the series. You can find all of the information about the CAL, and the patterns, HERE.
My favorite sun hats have wide, slightly wavy brims so I designed this hat to have a wider, slightly wavy brim. But, if you prefer a more narrow brim, you can easily adjust its width.
I used Premier Cotton Fair for my sunhat, in Turquoise and White. I’ve worked with this yarn before and loved working with it, especially the fact that for a cotton blend, it didn’t dry my hands out!
Cotton Fair is a blend of 52% cotton and 48% acrylic, which makes it perfect for garments and year-round wear. The blend makes it a great cotton yarn to work with as it’s easy on your hands (one of my favorite things about it!).
It’s a nice, soft, and smooth yarn with a beautiful sheen and it also creates incredible stitch definition! This yarn comes in a great range of bright solids and multi colors so you are sure to find just the right color for your sunhat.
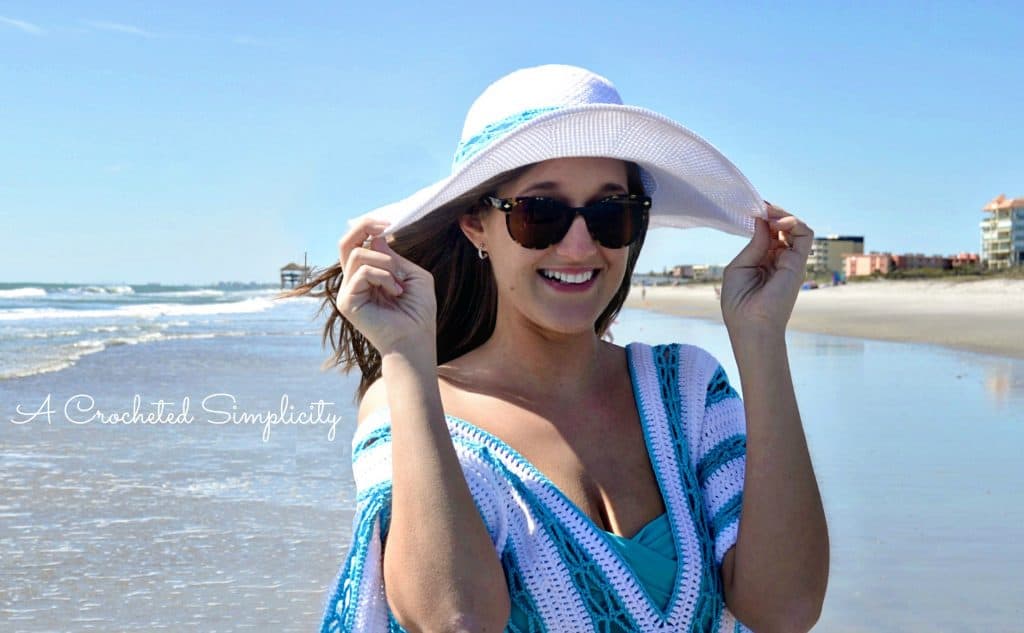
While we were on vacation in Florida, I took photos of my oldest daughter modeling my new crochet sun hat pattern and Maria’s cover-up. While the ocean made for a great background, the wind was atrocious and she had to hold the hat on or it would’ve ended up in the ocean! lol
~Don’t lose it, add It To Your Ravelry Favorites or Queue.~
~Don’t forget to Pin It too!~
*Purchase an ad-free PDF of this pattern (including all charts and photo tutorials) on Ravelry*
This post contains affiliate links.
Materials
- Yarn: Premier Yarns Cotton Fair, 2 balls of White (460 yards) & 1 ball of Turquoise (60 yards)
- Crochet Hook: D/3.25mm (My favorite crochet hooks are the Clover Amour Hooks, I’ve never had an ache in my hand since switching)
- Scissors
- Yarn Needle
- Stitch Marker (or scrap of yarn)
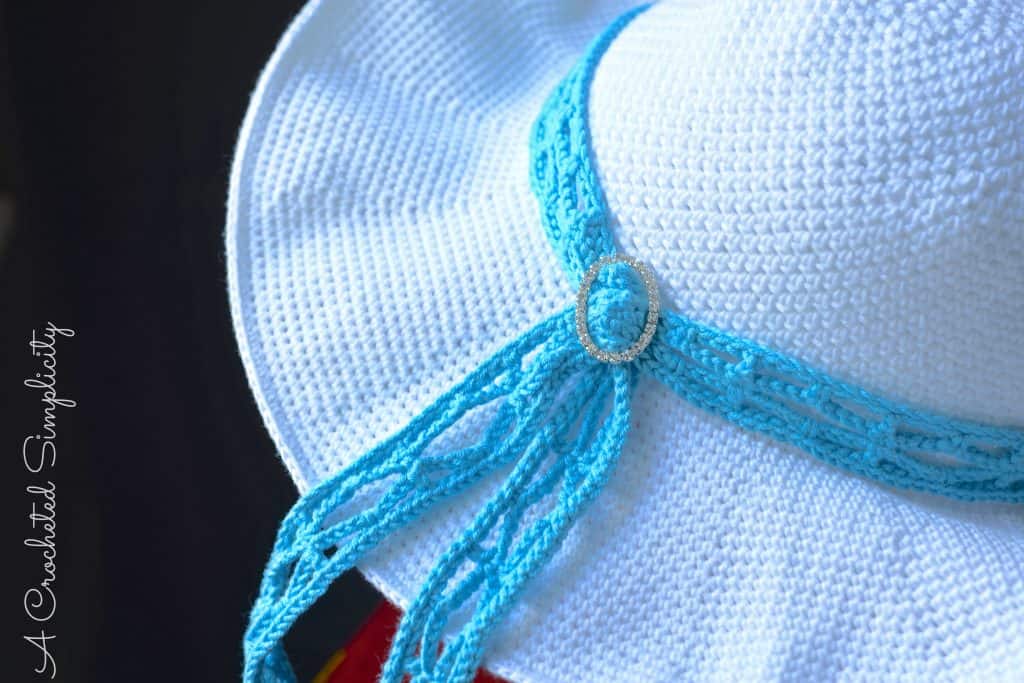
- Slide for Tie (optional): 1″ – 1-1/4″
- Millinery Wire & Joiner *See Notes below
Many of these materials are available for purchase through our affiliates below:
") Premier Yarns Cotton Fair S...Shop on Amazon
Premier Yarns Cotton Fair S...Shop on Amazon Clover 1042/D Orange Amour ...Shop on Amazon
  Fiskars 154110-1001 Non-sti...Shop on Amazon
  Lion Brand Yarn 400-5-5002 ...Shop on Amazon
Abbreviations (U.S. Terms)
- ch: chain
- sl st: slip stitch
- sc: single crochet
- dc: double crochet
- RS: right side
- st(s): stitch(es)
- sp(s): space(s)
- Rep: repeat
- Rnd(s): round(s)
- yo: yarn over
- FLO: front loop only
One Size
- Fits Head Size 21.5″ – 23″ circumference
Gauge
- In sc: 6.75 sts x 7 rows = 1″
Notes:
- I tend to crochet on the tighter side. You may need to go down a hook size (or two) to meet gauge if you crochet on the looser side.
- When working in rows, the first stitch of every row is worked into the same stitch as the turning chain.
- Yarn Notes: Premiere Yarns Cotton Fair (2 balls white / 1 ball turquoise) was used for the sample on page 1. Another comparable #2 sport weight yarn may be used as long as gauge is met.
-
This hat is worked from the crown down in continuous rounds. The only round you will join w/ a sl st will be your very last round.
-
Don’t want to add wire to your hat? You can also work the brim with a smaller hook. This will tighten up the stitches and stiffen up the brim. The brim will still be wavy, but not droopy.
Reading Pattern Repeats [ to ]
- Everything written within the brackets [ to ] is one full repeat.
- Sometimes you will also have small repeats in parenthesis ( to ) that are written within the [ to ]. Rnd 5 is the first example of this.
- Let’s dissect the beginning of Rnd 5 and the first bracket [ to ]:
- This is what’s written: Rnd 5: [ (sc, ch 1, sc) in the next st, ch 1, skip the next st, (sc in the next st, ch 1, skip the next st) 3 times ] work from [ to ] 3 times,….
- You will work everything from [ to ] as one full repeat. Each repeat is 10 sts.
- If we write out what’s within the brackets in longhand, we would have this:
- [ (sc, ch 1, sc) in the next st, ch 1, skip the next st, sc in the next st, ch 1, skip the next st, sc in the next st, ch 1, skip the next st, sc in the next st, ch 1, skip the next st ] (10 sts)
- After completing everything within brackets [ to ] 3 times, then you can continue on to complete the rest of the round.
- This is what’s written: Rnd 5: [ (sc, ch 1, sc) in the next st, ch 1, skip the next st, (sc in the next st, ch 1, skip the next st) 3 times ] work from [ to ] 3 times,….
Crochet Sun Hat Pattern Instructions
Note: This crochet sun hat is worked in continuous rounds. Do not join at the end of each round, instead place a stitch marker after the last stitch of the round to keep your place. Move the stitch marker up as you complete each round.
Rnd 1 (RS): Using a 3.25mm crochet hook, begin with a magic ring, work 8 sc into the magic ring. (8 sts)
Rnd 2: Work 2 sc into each st around. (16 sts)
Rnd 3: [ 2 sc into the next st, sc in the next st ] rep from [ to ] around. (24 sts)
Rnd 4: [ 2 sc into the next st, sc in each of the next 2 sts ] rep from [ to ] around. (32 sts)
Rnd 5: [ (sc, ch 1, sc) in the next st, ch 1, skip the next st, (sc in the next st, ch 1, skip the next st) 3 times ] work from [ to ] 3 times, (sc, ch 1, sc) in the next st, ch 1, skip the next st, (sc in the next st, ch 1, skip the next st) twice, sc in the next st, ch 1, sc in the last st . (41 sts)
Rnd 6: Ch 1, skip the next sc, sc in the next ch-1 sp, ch 1, skip the next sc, [ (sc, ch 1, sc) in the next ch-1 sp, ch 1, skip the next st, (sc in the next ch-1 sp, ch 1, skip the next st) 4 times ] work from [ to ] 3 times, (sc, ch 1, sc) in the next ch-1 sp, ch 1, skip the next st, (sc in the next ch-1 sp, ch 1, skip the next st) 3 times. (49 sts)
Rnd 7: [ (sc, ch 1, sc) in the next ch-1 sp, ch 1, skip the next st, (sc in the next ch-1 sp, ch 1, skip the next st) 5 times ]work from [ to ] around to last ch-1 sp, skip last ch-1 sp. (56 sts not including skipped ch-1) Begin next round in the ch-1 space you just skipped.
Rnd 8: [ (sc, ch 1, sc) in the next ch-1 sp, ch 1, skip the next st, (sc in the next ch-1 sp, ch 1, skip the next st) 6 times ] work from [ to ] around to last ch-1 sp, skip last ch-1 sp. (64 sts not including skipped ch-1) Begin next round in the ch-1 space you just skipped.
Rnd 9: [ (sc, ch 1, sc) in the next ch-1 sp, ch 1, skip the next st, (sc in the next ch-1 sp, ch 1, skip the next st) 7 times ] work from [ to ] around to last ch-1 sp, skip last ch-1 sp. (72 sts not including skipped ch-1) Begin next round in the ch-1 space you just skipped.
Rnd 10: [ (sc, ch 1, sc) in the next ch-1 sp, ch 1, skip the next st, (sc in the next ch-1 sp, ch 1, skip the next st) 8 times ] work from [ to ] around to last ch-1 sp, skip last ch-1 sp. (80 sts not including skipped ch-1) Begin next round in the ch-1 space you just skipped.
Rnd 11: [ (sc, ch 1, sc) in the next ch-1 sp, ch 1, skip the next st, (sc in the next ch-1 sp, ch 1, skip the next st) 9 times ] work from [ to ] around to last ch-1 sp, skip last ch-1 sp. (88 sts not including skipped ch-1) Begin next round in the ch-1 space you just skipped.
Rnds 14 – 15: [ sc in the next ch-1 sp, ch 1, skip the next st ]work from [ to ] around to last ch-1 sp, skip last ch-1 sp. (104 sts not including skipped ch-1) Begin next round in the ch-1 space you just skipped.
Rnd 16: [ (sc, ch 1, sc) in the next st, ch 1, skip the next st, (sc in the next st, ch 1, skip the next st) 12 times ]work from [ to ] around to last ch-1 sp, skip last ch-1 sp. (112 sts not including skipped ch-1) Begin next round in the ch-1 space you just skipped.
Rnd 17: [ (sc, ch 1, sc) in the next st, ch 1, skip the next st, (sc in the next st, ch 1, skip the next st) 13 times ]work from [ to ] around to last ch-1 sp, skip last ch-1 sp. (120 sts not including skipped ch-1) Begin next round in the ch-1 space you just skipped.
Rnds 18 – 19: [ sc in the next ch-1 sp, ch 1, skip the next st ] work from [ to ] around to last ch-1 sp, skip last ch-1 sp. (120 sts not including skipped ch-1) Begin next round in the ch-1 space you just skipped.
Rnd 20: [ (sc, ch 1, sc) in the next st, ch 1, skip the next st, (sc in the next st, ch 1, skip the next st) 14 times ]work from [ to ] around to last ch-1 sp, skip last ch-1 sp. (128 sts not including skipped ch-1) Begin next round in the ch-1 space you just skipped.
Rnds 21 – 42: [ sc in the next ch-1 sp, ch 1, skip the next st ]work from [ to ] around to last ch-1 sp, skip last ch-1 sp. (128 sts not including skipped ch-1) Begin next round in the ch-1 space you just skipped.
Rnd 43: sc in each sc and ch-1 sp around. (128 sts)
*The brim begins in the next round.
Rnd 44: *Working in the FLO*, [ sc in each of the next 15 sts, 2 sc in the next st ] work from [ to ] around. (136 sts)
Rnd 45: *Back to working in BOTH loops*, sc in each of the next 8 sts, 2 sc in the next st, [ sc in each of the next 16 sts, 2 sc in the next st ] work from [ to ] around to the last 8 sts, sc in each of the last 8 sts. (144 sts)
Rnd 46: [ sc in each of the next 17 sts, 2 sc in the next st ] work from [ to ] around. (152 sts)
Rnd 47: sc in each of the next 9 sts, 2 sc in the next st, [ sc in each of the next 18 sts, 2 sc in the next st ] work from [ to ] around to the last 9 sts, sc in each of the last 9 sts. (160 sts)
Rnd 48: [ sc in each of the next 19 sts, 2 sc in the next st ] work from [ to ] around. (168 sts)
Rnd 49: sc in each of the next 10 sts, 2 sc in the next st, [ sc in each of the next 20 sts, 2 sc in the next st ] work from [ to ] around to the last 10 sts, sc in each of the last 10 sts. (176 sts)
Rnd 50: [ sc in each of the next 21 sts, 2 sc in the next st ] work from [ to ] around. (184 sts)
Rnd 51: sc in each of the next 11 sts, 2 sc in the next st, [ sc in each of the next 22 sts, 2 sc in the next st ] work from [ to ] around to the last 11 sts, sc in each of the last 11 sts. (192 sts)
Rnd 52: [ sc in each of the next 23 sts, 2 sc in the next st ] work from [ to ] around. (200 sts)
Rnd 53: sc in each of the next 12 sts, 2 sc in the next st, [ sc in each of the next 24 sts, 2 sc in the next st ] work from [ to ] around to the last 12 sts, sc in each of the last 12 sts. (208 sts)
Rnd 54: [ sc in each of the next 25 sts, 2 sc in the next st ] work from [ to ] around. (216 sts)
Rnd 55: sc in each of the next 13 sts, 2 sc in the next st, [ sc in each of the next 26 sts, 2 sc in the next st ] work from [ to ] around to the last 13 sts, sc in each of the last 13 sts. (224 sts)
Rnd 56: [ sc in each of the next 27 sts, 2 sc in the next st ] work from [ to ] around. (232 sts)
Rnd 57: sc in each of the next 14 sts, 2 sc in the next st, [ sc in each of the next 28 sts, 2 sc in the next st ] work from [ to ] around to the last 14 sts, sc in each of the last 14 sts. (240 sts)
Rnd 58: [ sc in each of the next 29 sts, 2 sc in the next st ] work from [ to ] around. (248 sts)
Rnd 59: sc in each of the next 15 sts, 2 sc in the next st, [ sc in each of the next 30 sts, 2 sc in the next st ] work from [ to ] around to the last 15 sts, sc in each of the last 15 sts. (256 sts)
Rnd 60: [ sc in each of the next 31 sts, 2 sc in the next st ] work from [ to ] around. (264 sts)
Rnd 61: sc in each of the next 16 sts, 2 sc in the next st, [ sc in each of the next 32 sts, 2 sc in the next st ] work from [ to ] around to the last 16 sts, sc in each of the last 16 sts. (272 sts)
Rnd 62: [ sc in each of the next 33 sts, 2 sc in the next st ] work from [ to ] around. (280 sts)
Rnd 63: sc in each of the next 17 sts, 2 sc in the next st, [ sc in each of the next 34 sts, 2 sc in the next st ] work from [ to ] around to the last 17 sts, sc in each of the last 17 sts. (288 sts)
Rnds 64 – 66: sc in each st around. (288 sts)
Do not fasten off. Continue below to Adding Wire.
Adding Wire
Kathy Lashley from Elk Studio Crafters has a video tutorial on YouTube about adding millinery wire and a joiner to projects. You can watch her video HERE.
Adding wire to the brim is pretty simple, but you will find that there is a “sweet spot” of adding too much wire (causing your brim to be really wavy) or too little wire (causing your brim to be really droopy). I prefer a somewhat wavy brim on my sunhats.
Simply lay the wire along the top of the last round of your brim and crochet around it. Work 1 sc in each st around the brim to the last 6-8 sts (leaving space to add the joiner and adjust the length of your wire). Once you’ve adjusted the length of your wire, add the joiner and crimp each end of the joiner with plyers to keep it in place, then finish the round by crocheting around it, 1 sc in each st. Join w/ a sl st to the 1st st. (289 sts)
Fasten off. Weave in ends. Continue below to Lace Tie, if preferred.
Lace Tie
Row 1: Using CC and a 3.25mm crochet hook, ch 218, *Working in the FLO of the foundation chain*, sl st in the 2nd ch from your hook (place a SM in the 1st st to make it easier to see where to work the last st of Row 2) and in each ch across. Turn. (217 sts)
Row 2 (RS): Ch 7 (counts as 1st dc + ch-4), [ *skip the next 3 sts, sc in the next st, ch 4, skip the next 3 sts, dc in the next st*, ch 4 ] rep from [ to ] across to the last 8 sts then work from * to *, working the last dc in the last st. Turn. (28 dc + 27 sc + 54 ch-4 sps)
Row 3: Ch 1, sc in the same st as ch-1, [ ch 9, sc in the next dc ] rep from [ to ] across. Turn. (28 sc + 27 ch-9 sps)
Row 4: Ch 7 (counts as 1st dc + ch-4), sc in the middle of the ch-9 sp, ch 4, dc in the next sc, [ ch 4, sc in the middle of the ch-9 sp, ch 4, dc in the next sc ] rep from [ to ] across, working the last dc in the last sc. Turn. (28 dc + 27 sc + 54 ch-4 sps)
Row 5: Ch 1, *Working in the FLO*, sl st in every st & ch across, working your last sl st in the top of ch-3 from the beginning ch-7. (271 sl sts) *Note: work the sl sts in this row tighter. If your edge begins to get wavy, go down a hook size to complete the row.
Fasten off. Weave in ends. Block, if desired. Continue on to Finishing.
Finishing
Wrap your lace tie around your crochet sunhat, just above the brim. Use a decorative buckle or a nice knot to secure it. You may wish to tack stitch the tie in place every few inches around the circumference of your hat to keep it in place.
Find all of my FREE crochet patterns HERE
Are you intimidated by crocheted cables? Would you love to learn? Take an Annies Video Class with me and let me ease your fears of crocheted cables! Click on the photo below to watch a free preview. You can also see the other 2 classes I have available! (affiliate link)

Please share your finished ACS projects with me in the A Crocheted Simplicity Crochet Community Group on Facebook!
Happy Crocheting!

Great idea!
I made this, and it really is comfortable and effective. Thanks for the pattern!
What is meant by “sp” in round 7.
Hi Linda – sp = space
Thank you so much for this lovely pattern. You mention keeping to the correct gage but I’m having trouble figuring out what that should be. Any tips?
Hi Kate~ I can’t believe I forgot that very important info! I’ve updated the blog post to include it. I apologize. Jennifer
What a pretty sunhat pattern.
Thank you!
Such a cute hat, Jennifer! Very smart to add wiring!
Beautiful hat
Thank you very much for this nice pattern. 🙂
Premier yarn is crossed out on pattern, are they out of business?
Hi Lucy – No, they are not. Sometimes websites change the links to pages and this was the case here. I’ve updated the link to their new one. Thank you for bringing it to my attention. – Jennifer
Have u ever used the plastic cording for a weed eater instead of the wire and joiner? I’ve heard that it works just as well. All u have to is melt the ends together b4 u crochet around it in the last row. Just curious if anyone else has tried this tip and if it works.
Kristie
Hi Kristie – I have not! If you try it out please let me know how it works for you! 🙂 Jennifer
Hi, I was just wondering what I was doing wrong between rows 6 and 7…when I’m at the end of row 7 I seem to have an extra stitch left over before starting row 8…I notice that the number of stitches increases by 8 sts but between row 6 and 7 the increase is only 7 sts..from 49 to 56…what am I missing lol.
Hi Nancy,
Please check the blog post now. I’ve updated the end of Rnd 7 and following rounds in the body of the hat. Please let me know if this doesn’t make sense. 🙂
Jennifer
Hi Jennifer, that is what I did and I’m glad it was right…I am just about to start the brim. Wish me luck. I also wanted to thank you for such a beautiful pattern.I can’t wait until it is finished to see what it looks like all completed.
Thank You so much for the pattern. All you patterns are wonderful. I can’t wait to start the sunhat. Thanks again!