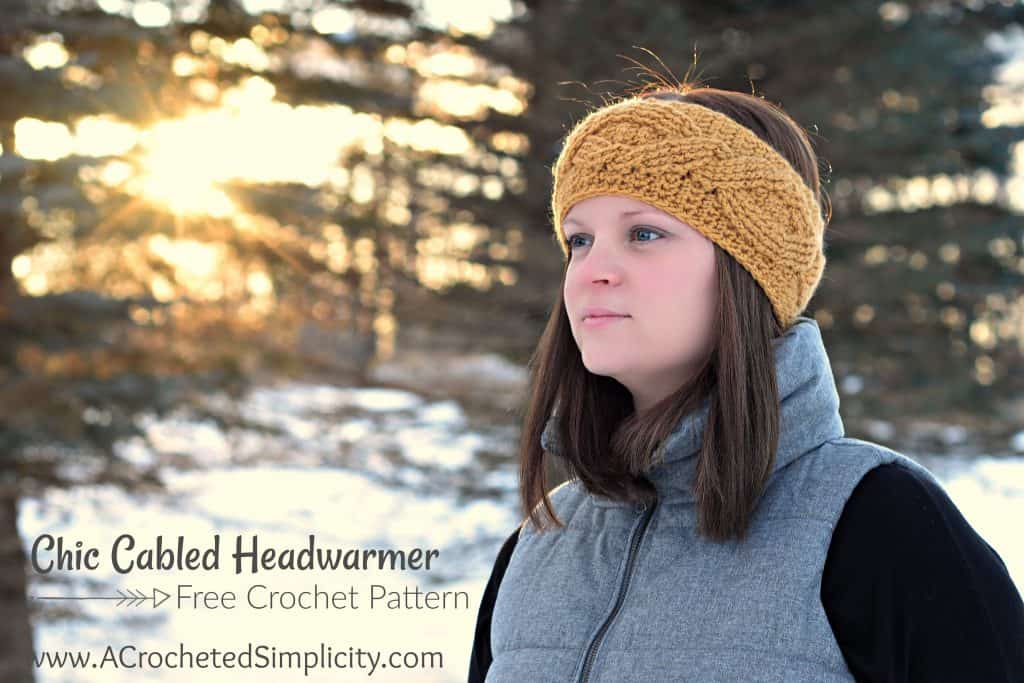
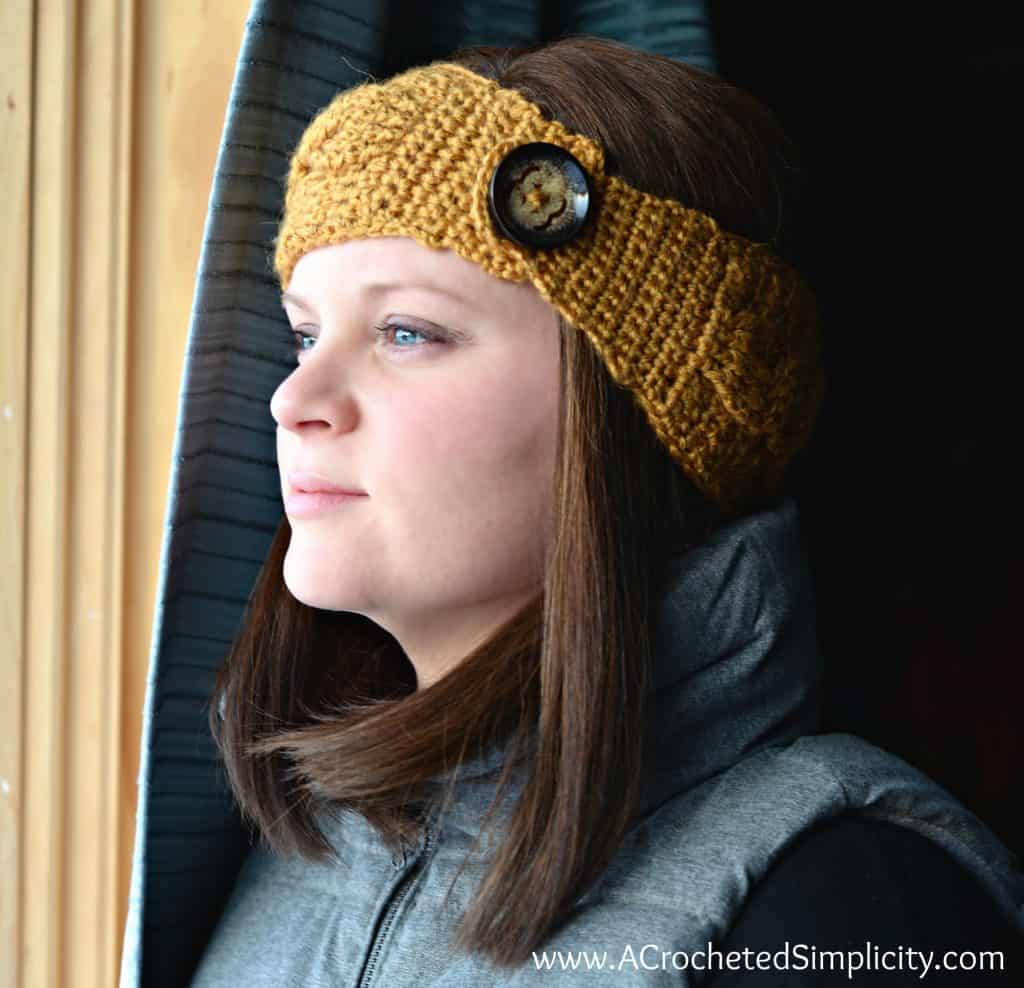
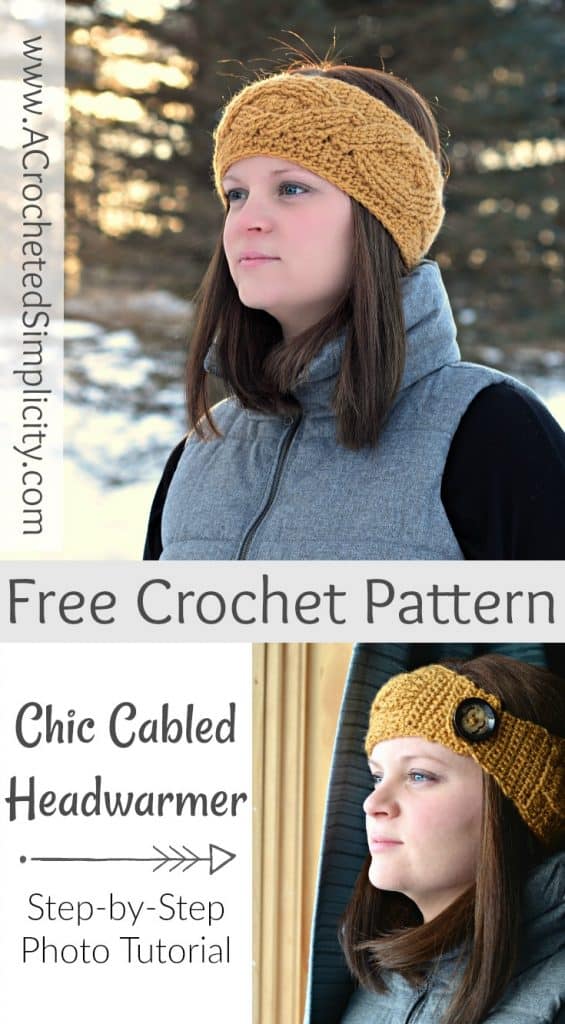
Free Crochet Pattern – Chic Cabled Headwarmer
Now that the holiday season has come to a close, it’s time for ELK Studio’s annual Make It For Me Event. During the month of January, Kathy spotlights free crochet patterns on her blog from many of your favorite designers. Each of these designs is a great project to make for yourself after spending countless days crocheting holiday gifts for others.
Last year I designed the Aveline Scarf, a stylish, reversible accessory that can be made with any weight of yarn.
~Click HERE to sign-up to receive our newsletter!~
This year I polled the A Crocheted Simplicity Crochet Community Group on Facebook and asked what you’d like to see me design for this event. Several of you requested a cabled headwarmer so I designed the Chic Cabled Headwarmer. But knowing that there are many who may not like cables, or are intimidated by them, I decided to come up with another headwarmer so no one would be left out.
The Chic Textures Headwarmer was designed to coordinate with the Scarfie Bandana Cowl. Using just one ball of Lion Brand Touch of Alpaca in Goldenrod, I was able to make both the Chic Cabled Headwarmer and Chic Textures Headwarmer!
~Don’t lose it, add It To Your Ravelry Favorites or Queue.~
~Don’t forget to Pin It too!~
*Purchase an ad-free PDF of this pattern (including all photos) on Craftsy or Ravelry*
This post contains affiliate links.
Materials
- Yarn: Worsted Weight / 4; Lion Brand Touch of Alpaca in Goldenrod was used for the sample shown on this page. 1 ball of yarn (or approximately 100 yards) is needed (3.5 oz / 100g / 207 yd / 290 m / 90% acrylic / 10% alpaca)
- Crochet Hook: H/8/5.00mm; or size needed to obtain gauge
- Scissors
- Yarn Needle
- Button: (1) 1-1/2″ diameter
 Clover 1047/H Deep Blue Amo...Shop on Amazon
  Fiskars All Purpose Scissor...Shop on Amazon
  Outus 18 Pieces Large Eye N...Shop on Amazon
  Touch of Alpaca Yarn, Goldenrod") Lion Brand Yarn (1 Skein) T...Shop on Amazon
Lion Brand Yarn (1 Skein) T...Shop on Amazon
Experience Level
- Intermediate
Gauge
- In ext sc: 16 sts + 9 rows = 4″
Size
- One Size: 4″ W x 21-1/2″ L
Stitch Abbreviations
- ch(s): chain(s)
- st(s): stitch(es)
- sl st(s): slip stitch(es)
- sc: single crochet
- ext sc: extended single crochet
- bpdc: back post double crochet
- fpdc: front post double crochet
- fptr: front post treble crochet
- fpDtr: front post double treble
- sc2tog: single crochet decrease
- yo: yarn over
- rep: repeat
- Rnd: round
- BLO: back loop only
- RS: right side
- WS: wrong side
- SM: stitch marker
- beg: beginning
- See Special Stitches below
- Join yarn w/ a single crochet: click HERE for tutorial
Special Stitches
- Front Post Double Treble Crochet (fpDtr): yo 3 times, insert hook from front to back to front around the post of the designated stitch, yo, pull up a loop, (yo, pull thru 2 loops) 4 times.
- Forward Cable A (FWD Cbl A): Skip next 4 post sts, fpDtr around next 4 post sts, working in front of fpDtr just made, fpDtr around each skipped post st.
- Forward Cable B (FWD Cbl B): Skip next 2 post sts, fptr around next 2 post sts, working in front of fptr just made, fptr around each skipped post st.
Notes
- Beginning chain(s) are not included in stitch count, unless stated otherwise.
- Another comparable worsted weight yarn may be used as long as gauge is met.
- Please Read the “Important Notes” below, before beginning. These notes go over how the stitches are worked in this design so that the cables move horizontally outward and inward.
Important Notes
Keep these notes in mind while working your headwarmer. They will help you with proper stitch placement, especially when your cables are moving horizontally, outward and inward. I’ve also included step-by-step photos that show specific stitch placement for these trickier stitches.
- Note #1: Unwritten Rule of Post Stitches: When working post stitches, you always skip over the top loops of 1 stitch behind each post stitch. If you do not skip over those top loops, you’ll end up increasing your overall stitch count. **I believe th at most of us do this without even thinking about it, but when it comes to using the post stitches to create cables that move, we forget about that little tidbit.
- Note #2: Pay REALLY close attention to wording, it is very literal. The pattern always says “fpXX around next post st”. Except for Row 3 (which is the first row of post sts) you will work EVERY post st around a post st from the previous row (not around an ext sc). In short, make sure to work EVERY post st from Row 4 or later, around the post of a post st from the previous row and your cables will be where they need to be.
- Note #3: To achieve proper movement of cables, you may be working into BOTH the top loops of a post stitch and around it. Watch wording carefully and make sure to always skip the top loops of 1 stitch behind every post st.
- Note #4: To maintain cable movement and stitch count, there are also times when you will not be working into an ext sc. Count stitches and pay special attention to wording. **And use the photos as needed, for clarification.
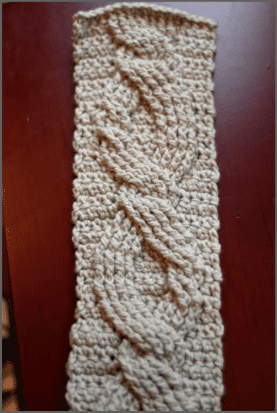
Cabled Swatch
The photo below is of a swatch of the cable design you’ll be working in this pattern. Look at the portion of the cable where it widens. Notice how only one side of the “0” has a twist. This pattern alternates from side to side as the cables climb.
Cabled Headwarmer Instructions
Row 1 (RS): Using a 5mm crochet hook (or hook size needed to obtain gauge), ch 11, working into the back hump of the foundation chain, sc in the 2nd ch from your hook, sc in each ch across. Turn. (10 sts)
Row 2: Ch 1, 2 sc in first st, sc in next 8 sts, 2 sc in the last st. Turn. (12 sts)
Row 3: Ch 1, ext sc in next 4 sts, fpdc around each of the next 4 sts, ext sc in next 4 sts. Turn. (12 sts)
Row 4: Ch 1, ext sc in next 4 sts, 2 bpdc around each of the next 4 sts, ext sc in next 4 sts. Turn. (16 sts)
Row 5: Ch 1, ext sc in next 4 sts, fpdc around each of the next 8 sts, ext sc in next 4 sts. Turn. (16 sts)
Row 6: Ch 1, ext sc in next 4 sts, bpdc around each of the next 8 sts, ext sc in next 4 sts. Turn. (16 sts)
Row 7: Ch 1, ext sc in next 4 sts, FWD Cbl A, ext sc in next 4 sts. Turn. (16 sts)
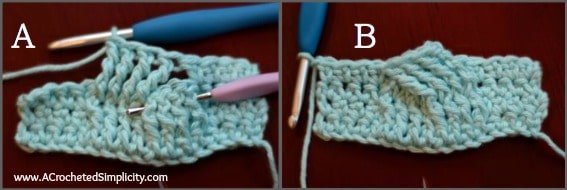
Photo A: Shows ext sc in next 4 sts, the beginning of FWD Cbl A, (skip next 4 post sts, fpDtr around next 4 post sts). The purple hook shows the 4 skipped post sts.
Photo B: Shows the rest of FWD Cbl A, (fpDtr around each of the 4 skipped post sts), ext sc in last 4 sts. Row 7 complete.
Row 8: Ch 1, ext sc in next 4 sts, bpdc around next 8 post sts, ext sc in last 4 sts. Turn. (16 sts)
Rows 9 – 10: Repeat Rows 7 – 8.
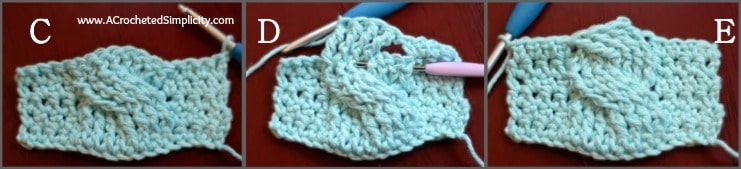
Photo C: Shows Row 8 complete.
Photo D: Shows ext sc in next 4 sts, the beginning of FWD Cbl A, (skip next 4 post sts, fpDtr around next 4 post sts). The purple hook shows the 4 skipped post sts.
Photo E: Shows the rest of FWD Cbl A, (fpDtr around each of the 4 skipped post sts), ext sc in last 4 sts. Row 9 complete.
Photo below shows Row 10 complete.

Row 11: Ch 1, ext sc in next 3 sts, skip next st, fpdc around next 4 post sts, ext sc in top of same st as last fpdc worked around, ext sc in top of next post st, fpdc around same post st as last ext sc worked and around next 3 post sts, ext sc in last 3 sts. Turn.
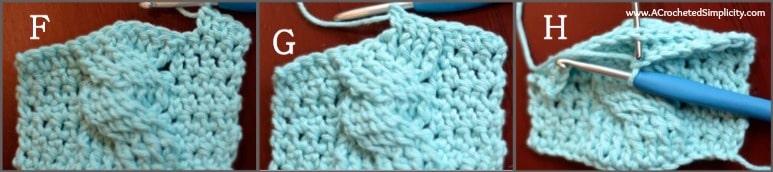
Photo F: Shows ext sc in next 3 sts.
Photo G: Shows fpdc around each of the next 4 post sts.
Photo H: To find placement of the next ext sc, bend your cables forward and make sure you skip over the top loops of 1 st for each post st just worked. In this case, skip over 4. The extra hook shows placement of your next ext sc. *Note that although you skipped over that 4th ext sc (just before the post sts), you will be counting the top loops of it when figuring placement of the next ext sc.
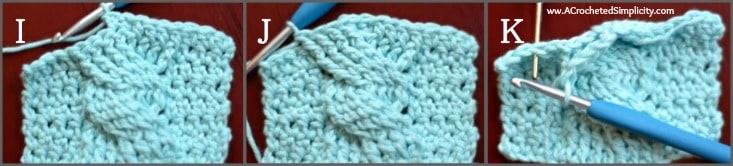
Photo I: Shows ext sc in next 2 sts. Note that they are worked into the top loops of the 4th & 5th post sts from the previous row. This is the row when you begin working into the top loops of a post st and also around the post of those same sts.
Photo J: Shows fpdc around each of the next 4 post sts.
Photo K: Bend your work forward and skip over the top loops of 4 sts. The extra hook shows placement of the next ext sc.
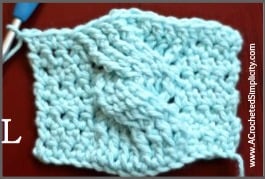
Photo L: Shows ext sc in last 3 sts.
Row 12: Ch 1, ext sc in next 2 sts, skip next st, bpdc around next 4 post sts, ext sc in top of same st as last bpdc worked around, ext sc in next 2 sts, ext sc in top of next post st, bpdc around same post st as last ext sc made and around next 3 post sts, ext sc in last 2 sts. Turn.
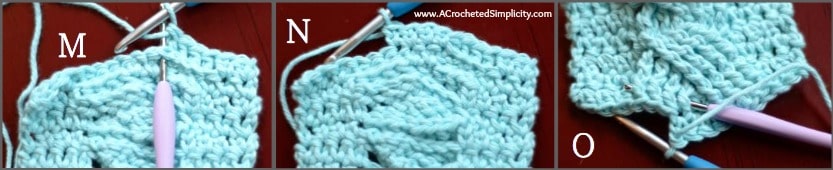
Photo M: Shows ext sc in next 2 sts, bpdc around next 4 post sts. Skip the top loops of 1 st for each bpdc. The purple hook shows where the next ext sc will be worked.
Photo N: Shows ext sc in next 4 sts. Note that you will work the 1st & 4th ext sc into the top loops of a post st and you will also work around the post of those post sts.
Photo O: Bend your work forward to see the next 4 post sts you’ll work around. The purple hook shows the 4 post sts.

Photo P: Skip the top loops of 1 st for each bpdc. The purple hook shows where the next ext sc will be worked.
Photo Q: Shows Row 12 complete.
Photo R: (Beginning of Row 13) Shows ext sc in next 2 sts, the beginning of FWD Cbl B (skip next 2 post sts, fptr around next 2 post sts). The purple hook shows the 2 skipped post sts.
Row 13: Ch 1, ext sc in next 2 sts, FWD Cbl B, ext sc in next 4 sts, fpdc around next 4 post sts, ext sc in last 2 sts. Turn.
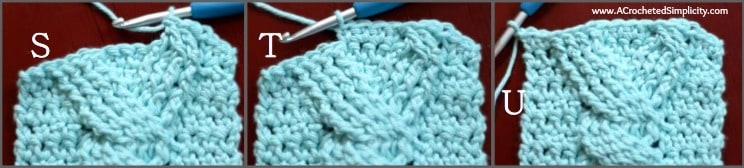
Photo S: Shows the FWD Cbl B complete.
Photo T: Shows ext sc in next 4 sts. Make sure to bend your work forward and skip the top loops of 1 st for each fptr.
Photo U: Shows fpdc around next 4 post sts, ext sc in last 2 sts.
Row 14: Ch 1, ext sc in next 2 sts, bpdc around next 4 post sts, ext sc in next 4 sts, bpdc around next 4 post sts, ext sc in last 2 sts. Turn.
Rows 15 – 16: Repeat Rows 13 – 14.
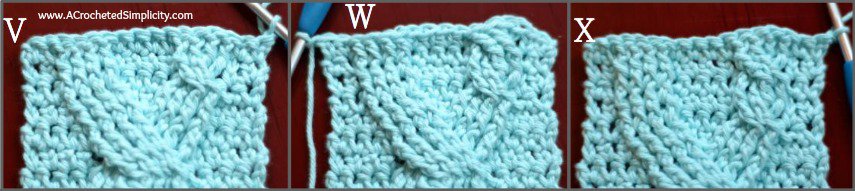
Photo V: Shows Row 14 complete.
Photo W: Shows Row 15 complete.
Photo X: Shows Row 16 complete.
Row 17: Ch 1, ext sc in next 2 sts, ext sc in top of next post st, fpdc around same post st as last ext sc worked and around next 3 post sts, skip next st, ext sc in next 2 sts, skip next st, fpdc around next 4 post sts, ext sc in top of same st as last fpdc worked around, ext sc in last 2 sts. Turn.
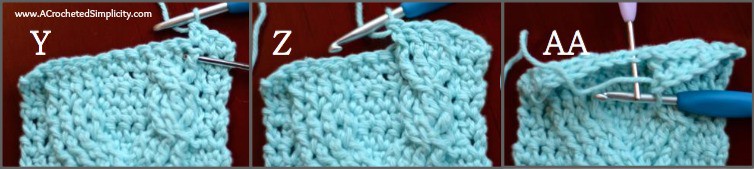
Photo Y: Shows ext sc in next 2 sts, ext sc in next post st.
Photo Z: Shows fpdc around each of the next 4 post sts.
Photo AA: Bend your work forward, skip the top loops of 1 st for each fpdc. Purple hook shows placement of the next ext sc.
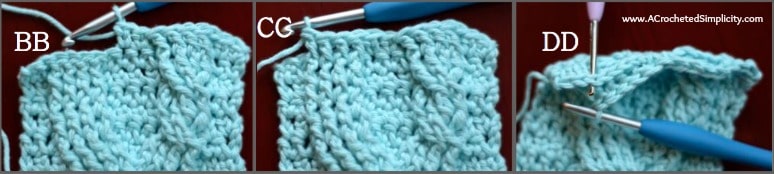
Photo BB: Shows ext sc in next 2 sts.
Photo CC: Shows fpdc around each of the next 4 post sts.
Photo DD: Bend your work forward, skip the top loops of 1 st for each fpdc. Purple hook shows placement of the next ext sc.
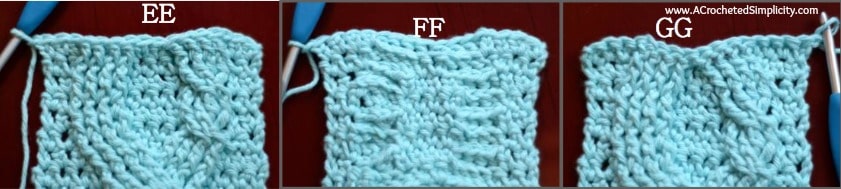
Photo EE: Shows Row 17 complete.
Photo FF: Shows Row 18 complete (WS).
Photo GG: Shows Row 18 complete (RS).
Row 18: Ch 1, ext sc in next 3 sts, ext sc in top of next post st, bpdc around same post st as last ext sc worked and around next 3 sts, skip next 2 sts, bpdc around next 4 post sts, ext sc in top of same st as last bpdc worked around, ext sc in last 3 sts. Turn.
Rows 19 – 24: Repeat Rows 7 – 12.
*See photo below for Row 25 FWD Cbl B. Notice that it is now on the left side of the cable.
Row 25: Ch 1, ext sc in next 2 sts, fpdc around next 4 sts, ext sc in next 4 sts, FWD Cbl B, ext sc in last 2 sts. Turn.
Row 26: Ch 1, ext sc in next 2 sts, bpdc around next 4 sts, ext sc in next 4 sts, bpdc around next 4 post sts, ext sc in last 2 sts. Turn.
Rows 27 – 28: Repeat Rows 25 – 26.
Row 29: Ch 1, ext sc in next 2 sts, ext sc in top of next post st, fpdc around same st as last ext sc worked and around next 3 sts, skip next st, ext sc in next 2 sts, skip next st, fpdc around next 4 sts, ext sc in top of same st as last fpdc worked around, ext sc in last 2 sts. Turn.
Row 30: Ch 1, ext sc in next 3 sts, ext sc in top of next post st, bpdc around same post st as last ext sc worked and around next 3 sts, skip next 2 sts, bpdc around next 4 post sts, ext sc in top of same st as last bpdc worked around, ext sc in last 3 sts. Turn.
Rows 31 – 46: Repeat Rows 7 – 22.
Row 47: Ch 1, ext sc in next 4 sts, fpdc around next 8 post sts, ext sc in next 4 sts. Turn. (16 sts)
Row 48: Ch 1, ext sc in next 4 sts, (bpdc2tog around next 2 post sts) 4 times, ext sc in next 4 sts. Turn. (12 sts)
Row 49: Ch 1, ext sc in next 4 sts, fpdc around next 4 post sts, ext sc in next 4 sts. Turn. (12 sts)
Row 50: Ch 1, sc2tog, sc in next 8 sts, sc2tog. Turn. (10 sts)
Row 51: Ch 1, sc in each st across.
Do not fasten off. Continue on to Edging.
Edging
Do not turn after row 51, simply rotate your work to begin working Edging along the long side of your headwarmer. You will work along the first long side, then across the bottom of Row 1, then along the next long side, ending with a sc in the side of Row 51. Edging is only worked on 3 sides.
Tip: When working your stitches along the long edges, do not work them too tight or they will restrict the stretch of your headwarmer and affect fit. Go up a hook size when working along the long edges, if needed.
Edging (RS): Ch 1, working along the long edge, sc in the side of Row 51, sc in the side of each row along the long side (51 sts), ch 1 (place a SM in ch-1 sp to mark beg of buttonhole flap), rotate to work along the bottom of Row 1, sc in each st across (10 sts), ch 1, rotate to work along the long side, sc in the side of Row 1, sc in the side of each row along the long side (51 sts). (112 sts)
Do not fasten off. Continue on to Button Flap.
Button Flap
Row 1 (RS): Ch 1 (counts as a st as you will work into it in Row 2), sc in each st across the short edge of the headwarmer working the last sc into the ch-1 from the beginning of the edging. Turn. (1 ch-1 + 11 sc)
Row 2: Ch 1, sc in each st across to ch-1 sp, sc in ch-1 sp. Turn. (12 sts)
Row 3: Ch 1, sc2tog, sc in next 8 sts, sc2tog. Turn. (10 sts)
Rows 4 – 9: Ch 1, sc in each st across. Turn. (10 sts)
Fasten off. Weave in ends. Continue on to Buttonhole Flap.
Buttonhole Flap
Row 1 (RS): Join yarn w/ a sc (click HERE for tutorial) in ch-1 sp marked with SM, sc in each st across to next ch-1 sp, sc in ch-1 sp. Turn. (12 sts)
Row 2: Ch 1, sc in each st across. Turn. (12 sts)
Row 3: Ch 1, sc2tog, sc in next 8 sts, sc2tog. Turn. (10 sts)
Rows 4 – 8: Ch 1, sc in each st across. Turn. (10 sts)
Row 9: Ch 1, sc2tog, sc in next st, ch 4, skip next 4 sts, sc in next st, sc2tog. Turn. (4 sts + ch-4 sp)
Row 10: Ch 1, sc in next 2 sts, 4 sc in ch-4 sp, sc in next 2 sts. Turn. (8 sts)
Row 11: Ch 1, sc in each st across. Turn. (8 sts)
Row 12: Ch 1, sc2tog, sc in next 4 sts, sc2tog. Turn. (6 sts)
Row 13: Ch 1, sc in each st across. Turn. (6 sts)
Fasten off. Weave in ends. Continue on to Finishing.
Finishing
Center the button on the button flap and secure it temporarily with a scrap piece of yarn. Try the headwarmer on. Adjust placement of the button, if needed. Once the button is in the perfect spot, sew it on using a needle and thread, or a yarn needle and piece of yarn. Weave in ends.
Find all of my FREE crochet patterns HERE
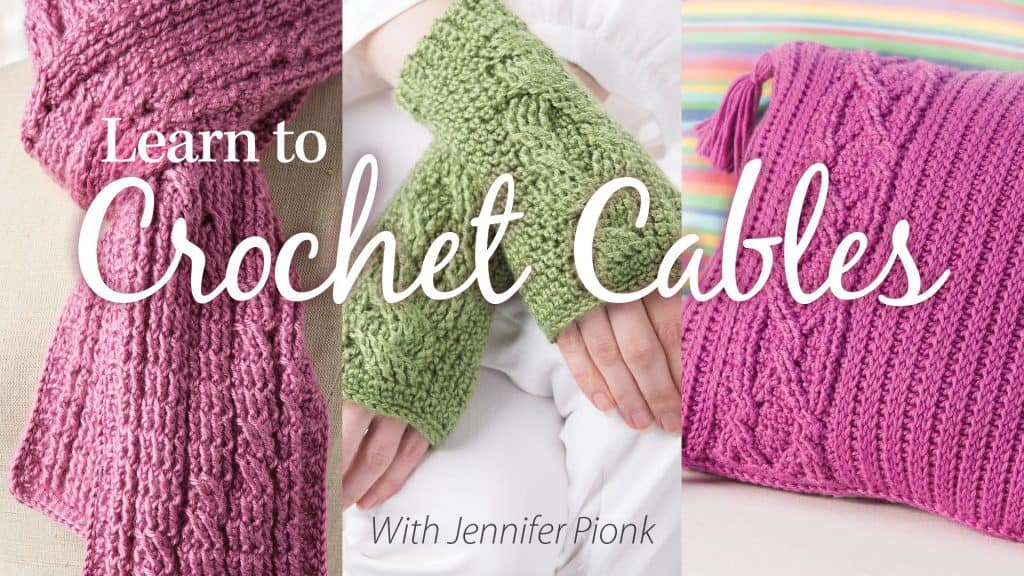
Are you intimidated by crocheted cables? Would you love to learn? Take an Annies Video Class with me and let me ease your fears of crocheted cables! Click on the photo below to watch a free preview. You can also see the other 2 classes I have available! (affiliate link)
I LOVE seeing your finished projects! Please share them with us in the A Crocheted Simplicity Crochet Community group on Facebook!
Happy Crocheting!

Not my first try at cables. I’m a LEFTY but, even with lefty instructions, cables have always resulted in frogging and using the yarn for another project. Jennifer Pionk broke the cycle. I could not believe how easy it was to follow her directions and “see” the stitch even though I was crocheting from the opposite end. I am ecstatic! No holes around the cables. Practically looks knitted.
I haven’t chosen a button for the closure yet but I had to post the outcome.
Thank you SO much for sharing!!! I’d love to see a photo once you’ve finished. 🙂
It looks so elegant! Haven’t tried crochet cables before but it is definitely on my to-do list! Thanks for sharing such a detailed tutorial.
I just finished this last night (well, I still have to add the button) and I can’t believe I’ve actually done it. I’ve tried cables before and there are always problems but this came out so nice! I’m definitely going to be making one for my sister as well and maybe another for myself in another color. Thank you so much for making this pattern available and for explaining every stitch in such a clear and easy to follow way.
Hi Marta,
I’m SO glad that you were able to follow along with no troubles and master the cables!!! They’re so much fun when you get the hang of them.
Happy Crocheting,
Jennifer