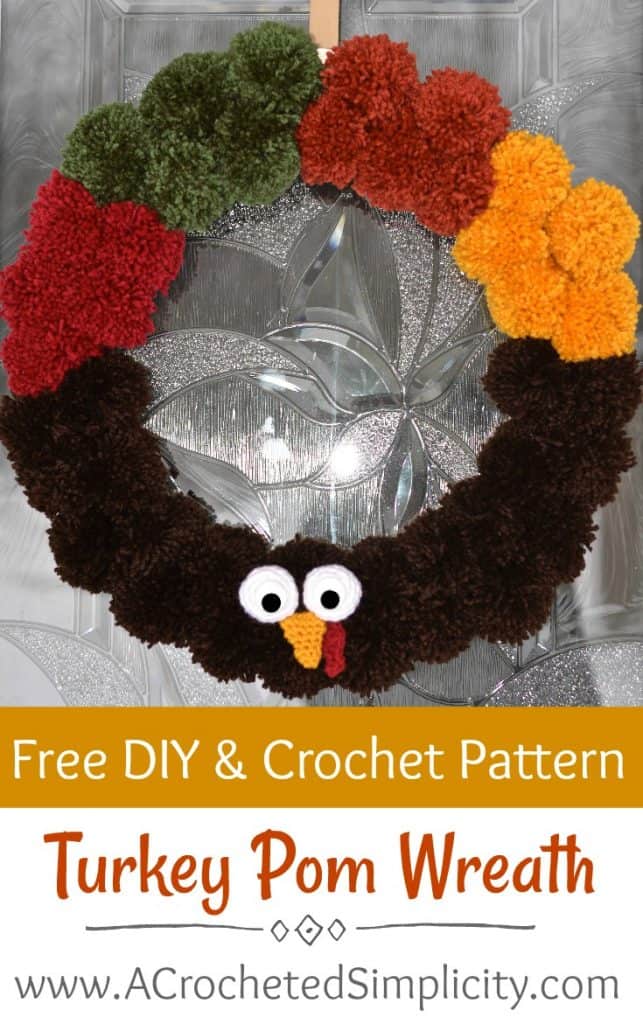
Great Kids Project: Turkey Pom Wreath
Claire has been asking for me to show her how to use my large Clover Pom Makers. So I figured it would be much more fun to come up with a project we could work on together. Instead of just making a bunch of yarn poms and wasting yarn.
Claire is 10 years old and in the beginning of this project she had lots of enthusiasm. But as the project went on, she took longer and longer to make one pom. It took a little longer to complete than anticipated, but we’re both happy with how it turned out.
At some point during the project she asked, “Mom, are you going to put this on your website so other people can make one with their daughter?” Great idea, Claire! 🙂
~Click HERE to sign-up to receive our weekly newsletter!~
This post contains affiliate links.
Materials
- Yarn: Worsted Weight / 4 yarn *See notes for colors and amounts
- Large Clover Pom Maker (Size Used: 2-1/2″)
- Clover Amour 5.5mm crochet hook
- Scissors
- Yarn Needle
- Googly Eyes (optional- you can crochet black eyes too)
- 18″ Wire Wreath Form
 Clover Pom-Pom Maker LargeShop on Amazon
  Clover Amour Crochet Hook: ...Shop on Amazon
  FISKARS All Purpose Scissor...Shop on Amazon
  Darice Paste-On Wiggle Eyes...Shop on Amazon
  Wire Wreath Frame-18Shop on Amazon
Stitch Abbreviations
- ch: chain
- sc: single crochet
- sc2tog: single crochet decrease
- sl st: slip stitch
- st(s): stitch(es)
- Rnd: round
- MR: magic ring
Yarn Colors & Amounts
- Brown: 420 yards (22 poms)
- Red: 95 yards (5 poms)
- Burnt Orange: 95 yards (5 poms)
- Gold: 95 yards (5 poms)
- Green: 95 yards (5 poms)
Turkey Wreath Instructions
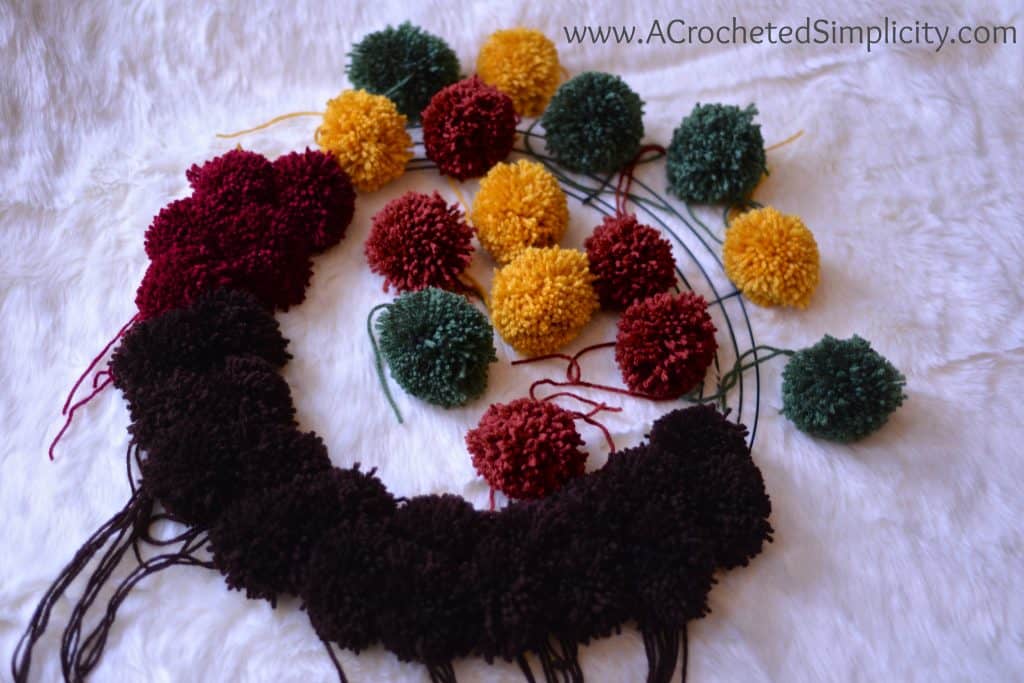
Step 1: Using the list above, make all of your poms. Make sure to leave the tails long enough. Claire made sure to leave plenty of yarn! 😉 I didn’t trim them to make sure they were perfectly round. I waited to do any trimming until we were finished with the wreath.
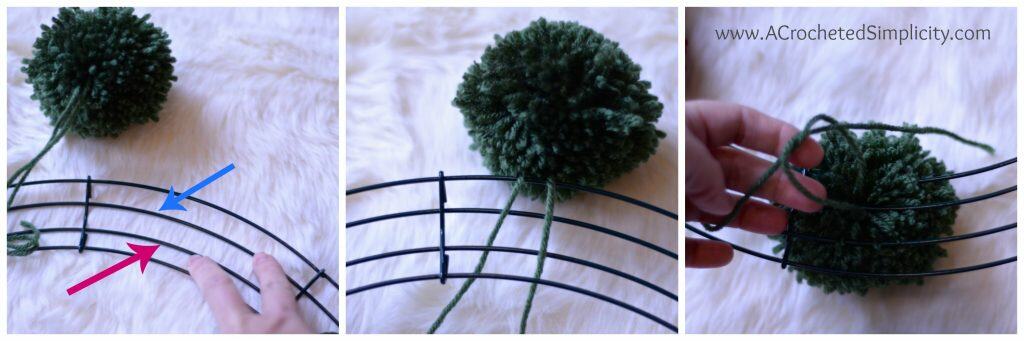
Step 2: Attach the poms to the wire wreath form. Attach 5 poms in each section. See the pink and blue arrows in the photo above, left? We alternated attaching a pom to the wire the pink arrow is pointing to and then to the wire the blue arrow is pointing to. None of the poms were attached to the inside or outside wires. We simply wrapped the yarn tails around the wire and tied a tight knot to secure them. They may be a little floppy at first, but as you add more poms, the others help to keep them in place.
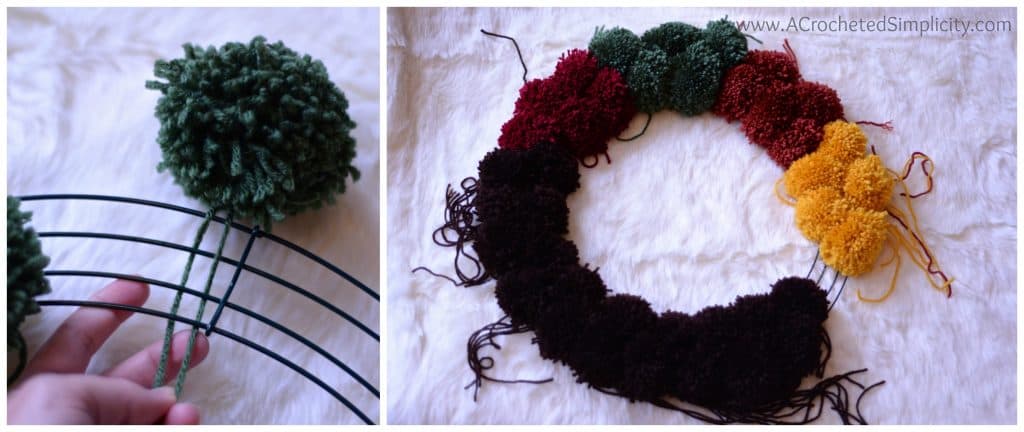
Step 3: Continue attaching poms around the wreath as shown above. We ended up making a couple extra brown poms to make our turkey a little fuller (22 in all). Depending on the fullness of your poms, you may end up having to do the same.
Now Let’s Give Our Turkey a Face!
Eyes (Make 2)
Rnd 1: Using a 5.5mm crochet hook and white yarn, begin with a magic ring, sl st into MR, ch 1, work 6 sc into MR. Do not join. (6 sts) Work in continuous rounds and use a scrap piece of yarn as a stitch marker to mark the beginning of each round & keep your place.
Rnd 2: 2 sc in each st around. (12 sts)
Tip: This is a good spot to stop and weave in the tail from your MR.
Rnd 3: *2 sc in the next st, sc in the next st, rep from * around. (18 sts)
Rnds 4 – 6: sc in each st around. (18 sts)
Rnd 7: *sc2tog, sc in the next st, rep from * around. (12 sts)
Rnd 8: *sc2tog, rep from * around. (6 sts)
Fasten off leaving a 12″ tail. Stuff the eye with scraps of yarn. Using a yarn needle and tail of yarn, weave in and out of every stitch from round 8, pull tail tight to close the opening, weave in ends to secure. Make the second eye then move on to the Beak.
Beak
Rnd 1: Using a 5.5mm crochet hook and gold yarn, begin with a magic ring, sl st into MR, ch 1, work 3 sc into MR. Do not join. (3 sts) Work in continuous rounds and use a scrap piece of yarn as a stitch marker to mark the beginning of each round & keep your place.
Rnd 2: 2 sc in each st around. (6 sts)
Rnds 3 – 4: sc in each st around. (6 sts)
Rnd 5: *2 sc in the next st, sc in the next st, rep from * around. (9 sts)
Rnd 6: *2 sc in the next st, sc in each of the next 2 sts, rep from * around. (12 sts)
Rnd 7: sc in each st around. (12 sts)
Fasten off leaving an 8″ tail. Using a yarn needle and tail of yarn, flatten Rnd 7 as shown in the photos below and sew across the top of Rnd 7 to sew it closed. Continue on to Snood.
Snood
Row 1: Using a 5.5mm crochet hook and red yarn, ch 7, working into the back hump of the chain, sc in the 2nd ch from your hook, sl st in next ch, hdc in next ch, dc in each of the next 2 chs, hdc in last ch. (6 sts)
Fasten off leaving a 6″ tail. Continue on to Face Assembly.
Face Assembly
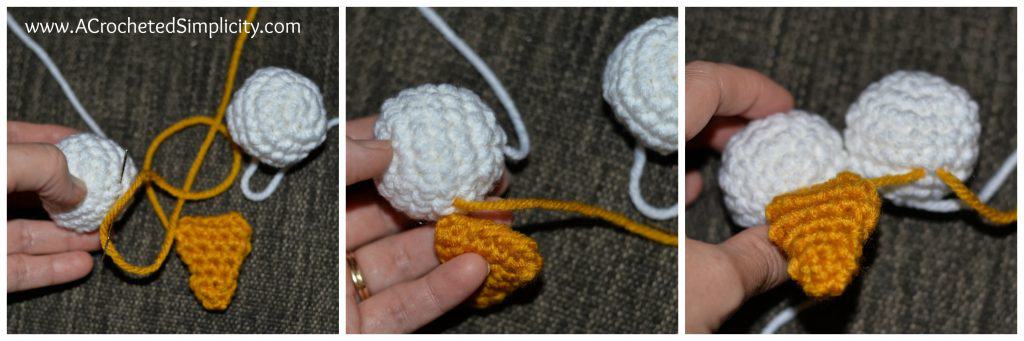
Step 1: Attach 1 corner of the beak to each eye. Using a yarn needle and tail of yarn left from the beak, attach the beak to Rnd 4 of one eye. Weave the yarn back across the top of the beak to the opposite corner. Attach the other corner to Rnd 4 of the other eye. See photos above and below.
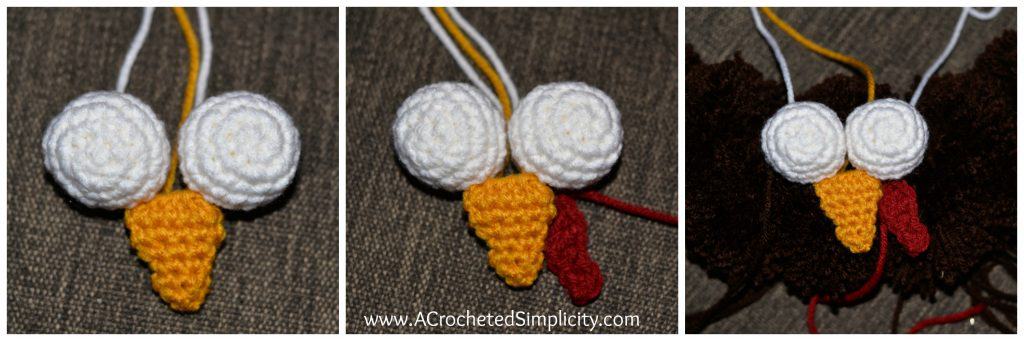
Step 2: Using a yarn needle and tail of red yarn, attach the snood to the side of the beak as shown in the photos above.
Step 3: Position your eyes/beak/snood onto your pom wreath, as close to the center of the brown as you can. See photos above and below.
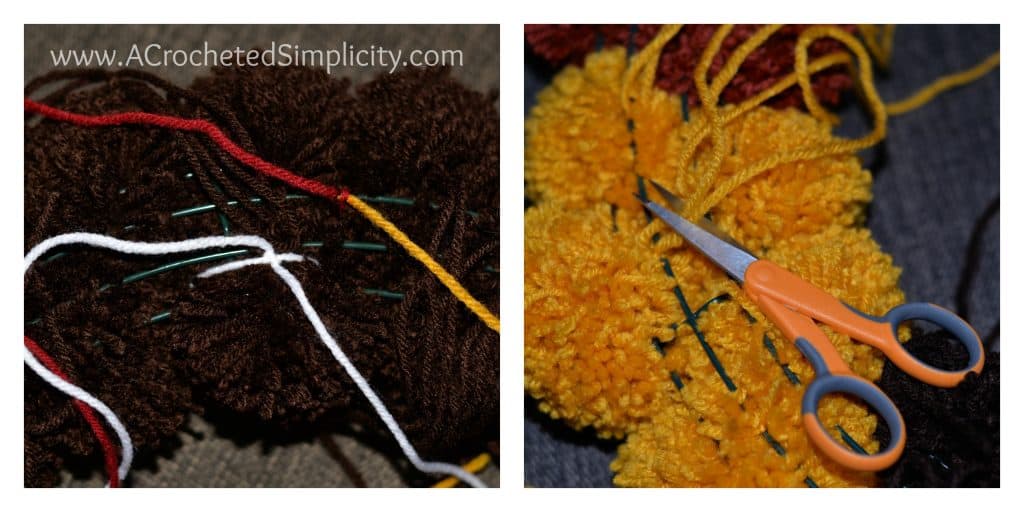
Step 4: I tied the white tails from the eyes around one of the brown poms. The tails from the beak and snood were tied around a wire from the wreath. Knot to secure.
Step 5: Trim all yarn tails from the poms and give your turkey a haircut to even out a few poms, if needed.
Step 6: Use hot glue to attach the googly eyes to the white eyes you crocheted.
Step 7: Hang up and enjoy!
Find all of my FREE crochet patterns HERE
If you love crochet cables and want to learn more or if you’re intimidated by cables, but would love to be able to crochet them with confidence, then stop by and check out the free preview and introduction of my new Annies Video Class, Learn to Crochet Cables:
Happy Crafting!


Love this! How many times did you wrap the Pom poms?
Hi Joy,
My daughter made them so I’m not really sure. I asked her to wrap them until she could barely close the pom pom makers.
Jennifer