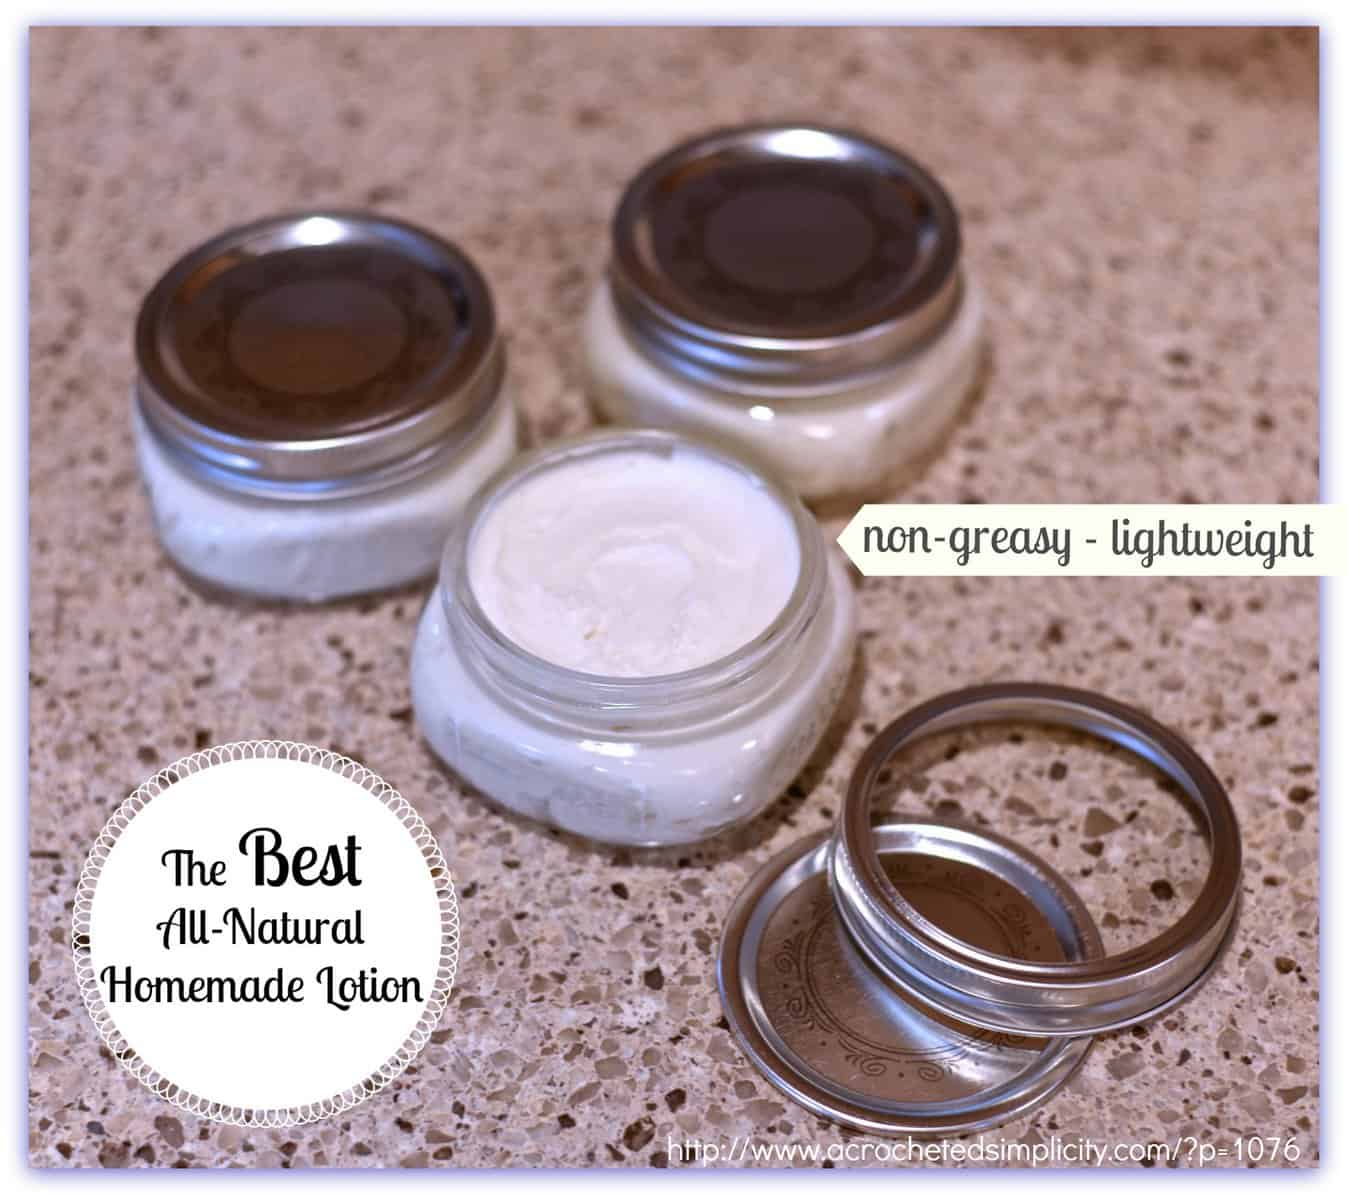
The BEST All-Natural Homemade Lotion

As young as a pre-teen, I can remember choosing my lotions based on scent alone. This carried into my teens and twenties and as the popularity of big chains grew so did my collection of scented lotions… lotions that I slathered all over my body, from head to toe, because “they smelled soooo good”.
Did I ever think to read the back of the bottles to see exactly what I was forcing into the largest organ of my body….my skin? Oh heck no! I chose based on scent. I wanted to smell good. I wanted to feel good. After all, if we smell good, we feel better about ourselves, right? We may, but does our body feel better?
Approximately 4 years ago, I began to develop psoriasis. Just little spots on my elbows and knees. Not too bothersome, but there. I would use a dab of a steroid cream prescribed by my doctor (again not thinking about what exactly I was putting on my body) and the little spots would go away for a while. Then 2 years ago, my psoriasis came back and this time it was more persistent and spreading. A couple more trips to the doctor, a couple blood tests to check for underlying causes, more prescriptions and still not much relief ultimately led me to the creation of this lotion.
I began by changing my diet and that seemed to help a little, but it wasn’t until after I read an online article that said, “your skin is the largest organ on your body”, that the lightbulb in my head went off! My skin is what?! I obviously didn’t remember that from science class in elementary school. I’m sure I was more interested in talking to friends than learning about my body, or maybe I was sick that day…yeah, let’s just go with that! 😉
This is when my journey to make all-natural body products began. I started on Pinterest by searching for homemade lotion. The results were overwhelming, but I chose a couple, ordered all of the ingredients suggested and off I went! While the lotions I made were okay, there was something about each of them that I didn’t like… many were greasy (I had to wash my hands after applying), some were super thick and had to be spooned out of the jar and held in my hands for a minute before they were soft enough to spread over my body, and others weren’t all-natural… they called for the use of that smelly pink baby lotion that my mom slathered all over me as an infant!
Eventually, I learned enough about the different ingredients I had been using and began to experiment on my own. Then one day this past summer, it happened! I had finally made The BEST All-Natural Homemade Lotion!!! I was SO excited that I made some for friends and family (to make sure I could duplicate it) and they all loved it! It’s non-greasy (you don’t have to wash your hands after applying), lightweight (great for all year round…even summer), leaves your skin softer than a baby’s bottom, has a nice soft texture, spreads evenly, soaks in almost immediately (there’s no need to wait to get dressed), and the best part? It’s great for your health!!! 😀 It even helps to keep my psoriasis under control…it’s no longer noticeable to others!
So without further ado, let’s make The BEST All-Natural Homemade Lotion and nourish the largest organ on your body!
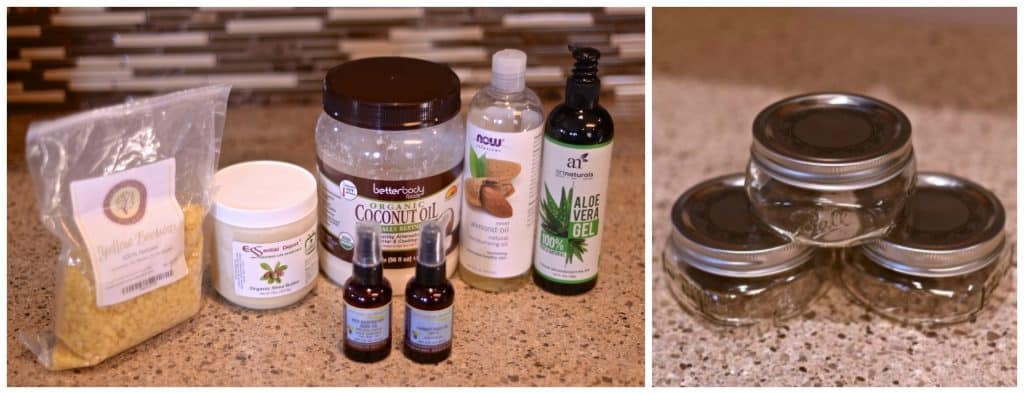
Items you will need
*These items can be purchased through our affiliates by clicking the links below.


- 1/2 cup Coconut Oil – 100% Pure, Unrefined, Cold Pressed: BetterBody Foods Organic Extra Virgin Coconut Oil
- 2 teaspoons Beeswax Pellets – 100% Pure: Your Natural Planet BEESWAX PELLETS
- 1 cup Shea Butter – 100% Pure, Organic, Unrefined, All Natural: Shea Butter – Organic – Unrefined
- 1/2 cup Sweet Almond Oil – 100% Pure: Sweet Almond Oil 100% Pure
- 1/4 cup Aloe Gel – 100% Pure Gel (substituting with aloe juice will greatly affect the consistency of your lotion): Art Naturals Aloe Vera Gel – Certified Organic, 100% Pure Natural **Note: if you choose to purchase a different aloe vera gel, make sure it DOES NOT have the ingredient Triethanolamine in it. It has been proven to cause many health issues.
- 15 drops Red Raspberry Seed Oil (not to be confused with an essential oil): RASPBERRY SEED OIL 100% Pure / Natural / Virgin. Cold Pressed
- 15 drops Carrot Seed Oil (not to be confused with an essential oil): CARROT SEED OIL 100 % Natural Cold Pressed
- 48 drops total of the Essential Oils of your choice for scent *See list below for scent combinations and more info regarding EO’s (yes, I still love a good scented lotion, but now have the best of both worlds…a lotion that smells great and nourishes my body)
- Pipettes (not a necessity, but I prefer to use them): Plastic Transfer Pipettes
- (3) 8oz Glass Storage Jars (I prefer the square ones because it’s easier to get all of the lotion out of them.): Ball Wide Mouth Jars 8 Oz with Lid and Bands, 4-Count
- Double Boiler (I prefer to use a regular pan & stainless steel bowl. I’ve found it easier than a double boiler when mixing.)
- Hand Mixer
- Wooden Tags (optional, but fun): 10 Count Wooden Tags
Directions
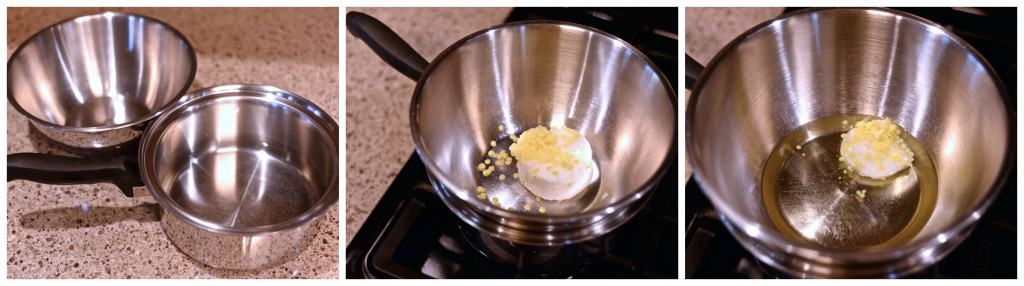
- Add approximately 1 inch of water to your pan and put your bowl on top of your pan. *Make sure your bowl is a tad bigger than your pan so that the bottom of the bowl doesn’t touch the bottom of the pan.
- Add the Coconut Oil & Beeswax Pellets to your bowl and melt over medium heat. *Coconut oil has a much lower melting point than beeswax, so expect the beeswax to take a little longer to fully melt.
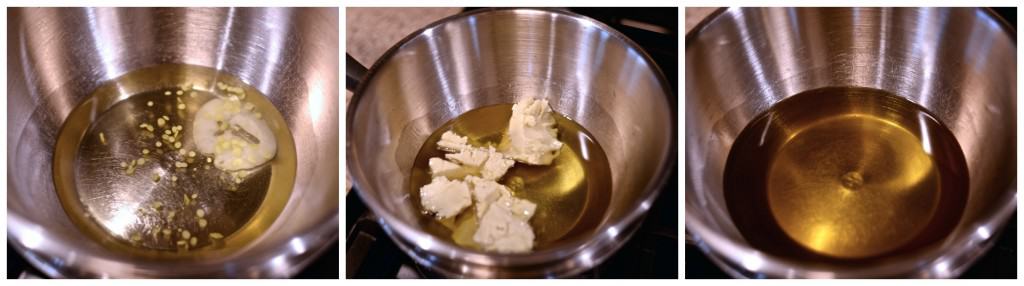
- Add the Shea Butter once the beeswax has fully melted. *The shea butter is added after the coconut oil & beeswax because it doesn’t like to be heated for too long.
- Once the shea butter has melted, stir to make sure it’s all mixed well. Remove from heat and put it in the fridge for 20 minutes. *Doing so brings the temp down closer to the room temp oils you’ll be adding next and allows them to blend easier.

5. In a separate glass bowl, mix together the Almond Oil, Aloe Gel, Red Raspberry Seed Oil, Carrot Seed Oil & approximately 48 drops of Essential Oils of choice. *See Below for scent blends to try.
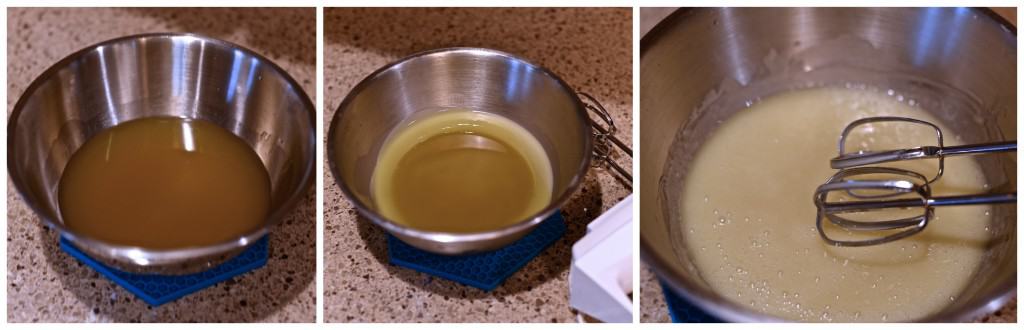
6. Combine the aloe/oils mixture with the cooled coconut oil/shea butter/beeswax mixture. Stir until mixed well. Put mixture in the freezer for 15 – 20 minutes, or until the mixture starts to look like the center photo above. ^^^
7. Using a hand mixer, mix on low for 30-45 seconds to even out the consistency again. Pop the mixture back into the freezer for another 5 minutes.
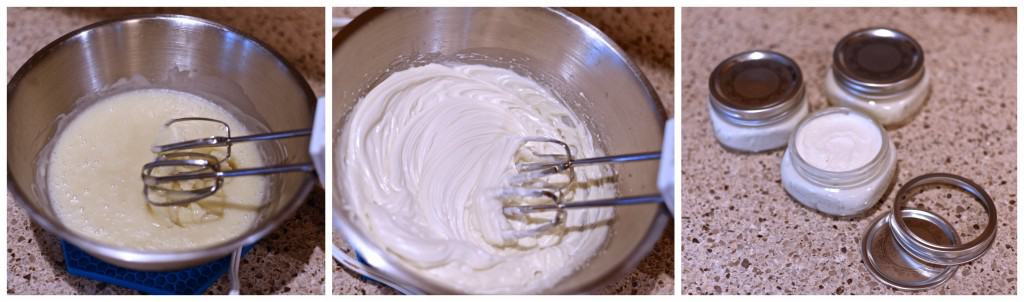
8. When you pull your mixture out of the freezer for the last time it should still be very liquidy, just a little lighter in color than when you put it in this last time. *See photo above, left. ^^^
9. Using a hand mixer, mix on speed 1 – 2 for approximately 1 – 1.5 minutes. *The longer you mix, the thicker your lotion is going to be. It’s easier to fill your jars if it’s a little softer (like the consistency of honey). If it’s a little thicker and you need to spoon it into your jars, that’s okay too. You just don’t want to beat it to death and turn it into a big chunky mess. 😉
10. Fill your jars! Let the lotion sit on the counter for a while to finish setting up. Of course you can use it right away, but I prefer to wait.
*A little goes a long way! An amount the size of an almond is enough for both of my arms. If you find yourself feeling a little greasy the first time you use your lotion, you’ve probably used a little too much.

*Optional: I like to use these neat wooden tags to label my jars. They add a nice touch when giving as gifts. I use a scrap piece of yarn to attach them.
Let’s Talk Scents & Essential Oils!
- I prefer to add 48 drops total of my essential oil blends for a lighter overall scent (I use clinical grade oils). You can add more or less to suit your personal taste, but I believe this is a good starting point. *If you’re sensitive to fragrance, I recommend starting with even less.
- Clinical Grade versus Therapeutic Grade EO’s: Not all essential oils are created equally, but I’m not here to suggest which oils you should use. Definitely use the oils you trust and prefer. I just want to point out that the grade of the oil can affect the number of drops you need to add to achieve your desired scent strength. I’ve found that most therapeutic grade oils only contain 40% pure essential oil, where most clinical grade oils are 100% pure. So depending on which you choose to use, you may need to use more or less to obtain your desired scent strength.
These are a few of my Favorite Essential Oil Scent Combinations
**NEW: Hormone Balancing Combination for Women: 30 drops Clary Sage, 30 drops Thyme & 30 drops Ylang Ylang. This is a blend that I use and I love it! Check out Dr. Axe for great information on balancing hormones naturally!

Enjoy your favorite scent combination throughout your home with an essential oil diffuser from our affiliates.
Frequently Asked Questions
- How much do I need to use? A little goes a long way with this one! I use approximately the size of an almond for both arms. If you find yourself feeling a touch greasy, try using less next time as you shouldn’t feel greasy at all…just super soft!
- What is the shelf life of this lotion? I am not 100% sure, but it’s at least 3+ months as this is how long I’ve had a partial jar sitting on my bathroom counter. I’m sure it’s much longer.
- Do I have to use glass jars? I strongly suggest you do because the oils in the lotion would cause plastic containers to start breaking down and leaching chemicals in to your all-natural lotion.
- How do I store it? I store mine on the counter in my bathroom, out of direct sunlight. If your home gets extremely warm in the summer, you will find your lotion will become very thin. You can store it in the fridge, if desired.
- What is the SPF of this lotion? I have not tested this lotion for SPF, but plan to next summer.
I hope you love The Best All-Natural Homemade Lotion as much as we do! I’d love to hear your feedback, including your favorite scents! 🙂

I just wanted to thank you for sharing your experiences and recipe. I am looking forward to trying it!
I’ve just started experimenting with home-made lotions and have struggled to find one that works well for me. This one looks really promising and I’m looking forward to trying it once I receive my order of carrot seed and raspberry seed oils!
I’m just wondering about preservation – I’ve been reading a lot on the internet that anything that has a water-like base (from my understanding aloe gel counts as this) needs a preservative to keep it safe beyond a few days? Are one of the ingredients in this list a natural preservative? Or is this preservative-free? In that case, how long does the product last?
Thanks!
Hi Sara, Here’s an article regarding natural preservatives. There are several things you can use (including some of the essential oils you choose) to help preserve the shelf life of your lotions. http://www.fromnaturewithlove.com/library/preservatives.asp Lots of great info there that you can incorporate into your lotion. I typically use mine up rather quickly, make sure to store it in a dark cupboard, use small bamboo spatulas (found on Amazon) to scoop lotion out and I use different essential oils that help preserve and I’ll also add T-50 Vitamin E Oil.
I hope this info helps you on your way to finding something that works great for you!
Jennifer
Great – thanks for the link and advice Jennifer! 🙂
Thank you so much for the recipe! I can’t wait to try it out. All the other recipes were always too greasy, that’s why I’m so excited for this one! I have a question though, can I substitute shea butter with cocoa butter, or mix like half half? Or will that change the consistency? Thank you!
Hi Dana,
You could definitely play around with it and tweak it to make it your own. As for the consistency, if it seems thicker near the end, just mix it for less time and vice versa, if it’s a little thin, you can mix it a tad longer until it’s the honey like consistency. 🙂
Hi, I absolutely love your recipe, however, I must did something wrong or use the wrong oil, I am allergic to coconut oil, so I used a mixture of evening primrose oil, jojoba oil and borage oil to substitute the coconut oil. And I used homemade aloe vera gel from my own plant. The “cream” was okay up to method 8, magic didn’t happened and the ‘mixture’ didn’t turn into a cream, it ended up as a greenish colour lotion…..><….
Can you tell me what did I do wrong?
Still, the lotion does give me a super soft skin…. I am suffering from severe eczema, have been searching for a non greasy recipe, yours one seems perfect, well, if I can get it to become a cream….
If it is too liquidy, you could always add a little more beeswax to help it set up more.
Hi Jennifer,
Do you use this on your face?
Thanks for the great post!
Cheryl
Hi Cheryl,
I do! But it takes very little.
Jenn
Is it just me or does unrefined shea butter have an extremely strong, not necessarily pleasant, smell to it? I just bought it a few months ago from mountain rose herbs and its been stored in the fridge so I know it’s not rancid. But wow! It is so strong!
It does have a strong scent to it! It took me a while to get used to it. lol
Question, Do you use this on your face? I’m looking for a diy cream or lotion that I can use on my face. All the ones i’ve made thus far have been too greasy.
I do use it on my face, but sparingly except on the spots that are super dry. 🙂
What brand of essential oils do you use?
I use Ameo Oils. They’re 100% pure clinical grade oils.
Hello!
I’m really excited to try this!! Like everyone else has said, all other homemade lotions are overly greasy.
I was wondering that if i can’t get carrot seed oil and the red raspberry seed oil, is there something else I can replace it with or maybe even just take it out of the recipe? Would it change the greasiness of the lotion when finished?
Thank you
Hi Iris~ The only reasons I added those two oils were for a SPF factor. You could easily remove them for the recipe as the amounts are minimal. 🙂
Just some FYI that may help readers and makers.
Carrier Oil SPF
Red Raspberry Seed 28 – 50
Carrot Seed Oil 38 – 40
Wheatgerm 20
Soybean 10
Macadamia Nut 6
Jojoba 4
Sesame Seed Oil 2 – 4
Shea Butter 3 – 6
Coconut 2 – 8
Olive 2 – 8
Avocado (unrefined) 4 – 15
Castor Oil 6
Almond Oil 5
Thank you very much indeed for sharing this recipe -seems promising for a good consistency cream. I wonder if I could possibly use grape seed oil instead of the raspberry and carrot seed oil? I live in country where it is very difficult to get hold of the above -however I do have a bottle of good quality organic grape seed oil.
Hi Betti~ You could definitely give it a try. I only added the raspberry and carrot seed oils to help with a SPF factor in the lotion and the amounts are minimal so I doubt you’d notice a big difference in texture.
Would using an oil other than coconut oil greatly affect the consistency or outcome? I find coconut oil to be a bit heavier Ave greasier. Do you have any experience making this with a lighter oil? If so, did it change the shelf life in any way?
Hi Alison,
I’ve only ever tried this recipe with coconut oil. Before I researched and came up with this recipe, I tried countless others and I found them to be too greasy and way too heavy. Between the ingredients and the way this one is made, I do not find that it is greasy or heavy at all. My friends and family agree.
The consistency in the jar is like a softer cream, not a hard body butter. And when applied, it soaks in and leaves the skin really soft.
Jennifer
Hello, is adding “niacinamide 10% + Zinc 1%” from The ordinary products will be helpful for very dry skin? And how many drops you will suggest? Thank you for The recipe!!
Hi, I’ve been experimenting with making lotion for a while and have found the same problems you have expressed: way too Greasy. I was wondering if you’ve tried making this lotion adding Magnesium Oil? And if so how much do you think you can add?
Hi Sarah,
In the past I have made my own magnesium solution using magnesium chloride flakes and boiling water and I have added that to this lotion recipe, but I was just experimenting and I do not remember how much I added to a batch.
Jennifer
when you make hormonal creme do you add the clary sage, ylang and thyme to original recipe or just sub them.
Hi Carola,
I just sub them. 🙂
For anyone wondering what the lotion is like I made it and I actually didn’t have aloe Vera on hand and it still came out beautifully. The method 8 magic happened and everything. I stuck it in the fridge and forgot about it but it stays soft to where you can just whip it up no problem. Anyway I have a huge sensory issue with lotions and I have to say this one is very do able. I don’t feel like I need to shower everything off and I was able to lay in bed with my blankets and not feel oily like an oily awful mess. Compliments to our girl Jennifer. Thank you for having bad skin or this recipe wouldn’t have been born. Lol.
Hi Alexis,
I’m so glad to you love this lotion as much as I do! <3
Jennifer