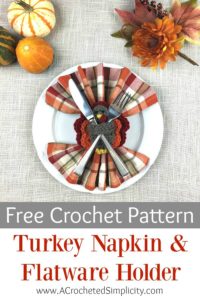
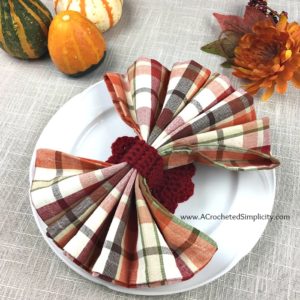
Turkey Napkin Ring & Flatware Holder – Free Crochet Pattern
This fun little turkey napkin ring & flatware holder was designed for our 7th Mini-Mystery Crochet Along. Now that the MMCAL is over, the full pattern is available below.
> CLICK HERE TO SIGN-UP TO RECEIVE OUR NEWSLETTER <
If you’d like to learn more our Mini-Mystery Crochet Alongs, please read our Information Guide in this blog post HERE so you know how to join along!

For this fun, festive design, I chose to use some of the Lion Brand Vanna’s Choice Yarn I had in my stash. Vanna’s Choice is a medium worsted weight/4 acrylic yarn that is available in 57 colors!!!
> DON’T LOSE IT! ADD IT TO YOUR RAVELRY FAVORITES OR QUEUE. <
> Pin-It to Save It for Later <
>PURCHASE AN AD-FREE PDF OF THIS PATTERN (INCLUDING ALL SIZES, CHARTS, AND PHOTO TUTORIALS) ON CRAFTSY OR RAVELRY<
This post contains affiliate links.
MATERIALS
- Yarn: Worsted Weight / 4 Yarn; Lion Brand Vanna’s Choice or another similar worsted weight yarn. You’ll need 5 colors or yarn in the yardage listed below.
- Colors & Yardage: Orange: 10 yards ; Red: 15 yards; Brown: 7 yards; Yellow: 1 yard; Black: 12″
- Crochet Hooks: I/9/5.50mm; G/6/4.00mm (or sizes needed to match gauge) (My favorite crochet hooks are the Clover Amour Hooks, I’ve never had an ache in my hand since switching)
- Scissors
- Yarn Needle
- Scrap Piece of Yarn to use as a stitch marker
- Napkins
Many of these materials are available for purchase through our affiliates below:
 Clover 1048/I Green Amour C...Shop on Amazon
  Fiskars 154110-1001 Non-sti...Shop on Amazon
  Lion Brand Yarn 400-5-5002 ...Shop on Amazon
  DII Thanksgiving & Fall Tab...Shop on Amazon
ABBREVIATIONS
- ch(s): chain(s)
- sl st(s): slip stitch(es)
- sc: single crochet
- hdc: half double crochet
- dc: double crochet
- st(s): stitch(es)
- RS: right side
- Rep: repeat
- Rnd: round
EXPERIENCE LEVEL
- Easy
GAUGE
- See individual sections for sizes.
Size
One Size: 4.5″ W x 4.5″ H
Notes
- Beginning chain(s) are not included in stitch count unless noted otherwise.
- First stitch of each row is worked into the same stitch as beginning chain, unless stated otherwise.
- Worsted Yarn Notes: Lion Brand Vanna’s Choice was used for the sample in the photos. (100 g / 3.5oz / 170 yards/ 156 m / 100% acrylic)
- Colors & Yardage
- Orange: 10 yards
- Red: 15 yards
- Brown: 7 yards
- Yellow: 1 yard
- Black: 12″
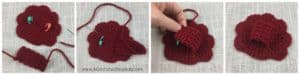
Large Motif
Note: The motif is worked in continuous rounds to keep from having an unsightly seam. Do not join at the end of each round, instead use a scrap piece of yarn to keep track of the beginning of each round. Move the scrap of yarn up as you complete each round.
Rnd 1 (RS): Using a 5.5mm crochet hook & red yarn, ch 2, work 6 sc into the 2nd ch from your hook. (6 sts)
Rnd 2: Work 2 sc in each st around. (12 sts)
Rnd 3: * 2 sc in the next st, sc in the next st, rep from * around. (18 sts)
Rnd 4: * 2 sc in the next st, sc in each of the next 2 sts, rep from * around. (24 sts)
Rnd 5: * 2 sc in the next st, sc in each of the next 3 sts, rep from * around. (30 sts)
Rnd 6: * 2 sc in the next st, sc in each of the next 4 sts, rep from * around. (36 sts)
Rnd 7: Skip the 1st st, sl st in the next st, * skip the next st, 5 dc in the next st, skip the next st, sl st in the next st, work from * 7 times. (7 scallops) *The scallops do not go all the way around. You will have 6 stitches left.
Fasten off. Weave in ends. Continue on to Small Motif.
Small Motif
Note: The motif is worked in continuous rounds to keep from having an unsightly seam. Do not join at the end of each round, instead use a scrap piece of yarn to keep track of the beginning of each round. Move the scrap of yarn up as you complete each round.
Rnd 1 (RS): Using a 5.5mm crochet hook & orange yarn, ch 2, work 6 sc into the 2nd ch from your hook. (6 sts)
Rnd 2: Work 2 sc in each st around. (12 sts)
Rnd 3: * 2 sc in the next st, sc in the next st, rep from * around. (18 sts)
Rnd 4: * 2 sc in the next st, sc in each of the next 2 sts, rep from * around. (24 sts)
Rnd 5: Skip the 1st st, sl st in the next st, * skip the next st, 5 dc in the next st, skip the next st, sl st in the next st, work from * 5 times. (5 scallops) *The scallops do not go all the way around. You will have 2 stitches left.
Fasten off. Weave in ends. Continue on to Napkin Ring.
Napkin Ring
Row 1: Using a 5.5mm crochet hook and red yarn, begin by leaving an 8″ tail of yarn, ch 5, sc in the 2nd ch from your hook and in each ch across. Turn. (4 sts)
Row 2: Ch 1, sc in each st across. Turn. (4 sts)
Rep Row 2 until your Part B measures 2.5″ long.
Fasten off leaving a 8″ tail of yarn. Continue on to Turkey Body.
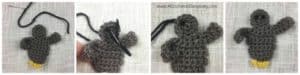
Turkey Body
Rnd 1 (RS): Using a 5.5mm crochet hook brown yarn, ch 2, work 6 sc into the 2nd ch from your hook. (6 sts)
Rnd 2: Work 2 sc in each st around. (12 sts)
Begin working in rows. Refer to photos for help.
Row 1: Sl st in the next st, 2 hdc in each of the next 2 sts. Turn. (4 sts)
Row 2: Ch 7, sc in the 2nd ch from your hook, dc in each of the next 5 chs, twist to work across Row 1, 2 sc in the next st, sc in each of the next 2 sts, 2 sc in the next st. (1 wing + 4 sts)
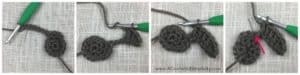
Row 3: Ch 7, sc in the 2nd ch from your hook, dc in each of the next 5 chs, twist to work across Row 2, sc in each of the next 6 sts. (1 wing + 4 sts)
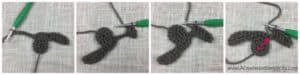
Row 4 – 7: Ch 1, sc in each st across. Turn. (6 sts)
Row 8: Ch 1, skip the first st, sc in each of the next 4 sts, sl st in the last st. Turn. (4 sts)
Row 9: Ch 1, skip the first st, sc in the next st, hdc in each of the next 2 sts, sc in the next st. (4 sts) Place a SM in the 1st hdc you worked.
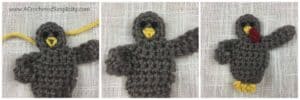
Turkey Feet
Row 1 (RS): Using a 4mm crochet hook and yellow yarn, join yarn w/ a sl st in the st marked w/ a SM, ch 1, sl st in the same st, ch 2, sl st in the same st, sl st in the next st, (ch 2, sl st in the same st ) twice.
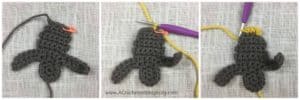
Turkey’s Face
Eyes: Using black yarn, make a small knot for an eye and sew it onto the turkey’s face. Repeat for second eye.
Beak: Using yellow yarn, embroider a small triangle beak onto the turkey’s face.
Snood: Using a 4mm crochet hook and red yarn, ch 4, sl st into the 3rd ch from your hook, sl st into the next ch. Fasten off. Sew onto the turkey’s face, to the right of his beak.
Continue on to Assembly.
Assembly
Step 1: Sew the Napkin Ring onto the back of the Large Motif. I sewed each short end between rounds 3 & 4 (see stitch markers). Make sure that the openings of the ring are pointing to the bottom flat edge of the motif, and the top edge. Weave in ends.
Step 2: Lay the turkey on top of the small motif with the turkey’s feet near the flat edge of the motif. Sew the turkey onto the small motif. Weave in ends.
Step 3: Lining up the flat edges of the motifs, sew the small motif on top of the large motif. Weave in ends.
Step 4: Overlap the wings approximately 3/4″ and sew them together. Weave in ends.
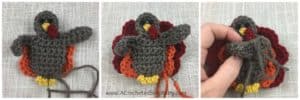
Your turkey is now ready to be stuffed! (pun intended)
FIND ALL OF MY FREE CROCHET PATTERNS HERE
Are you intimidated by knit-look crochet? Would you love to learn my tips & tricks? Take an Annies Video Class with me and let me ease your fears and help you increase your skills! Click on the photo below to watch a free preview. You can also see the other 4 video classes I have available!

WE HOPE TO SEE YOU SOON! IN THE MEANTIME, CHECK OUT OUR FREE CROCHET PATTERNS AND JOIN US IN THE FACEBOOK COMMUNITY GROUP!

That is adorable!
do u have a video? bummed to say i made multiples of the earlier pieces then got stuck at the body and napkin ring. written instrux too confusing to me
Hi,
Are you confused with how to attach the ring to the body? And the photos don’t help show you where to place the ends to sew them on?
Please let me know a little more detail about what is confusing.
Jennifer
figured out the napkin ring attachment, but going from the wing back to the body to make the 2nd wing was confusing. couldnt figure out how you were twisting it. i finally just did it my own way (added a second sc so the two wings matched better. otherwise the 2nd shoulder looked weaker (showed holes))