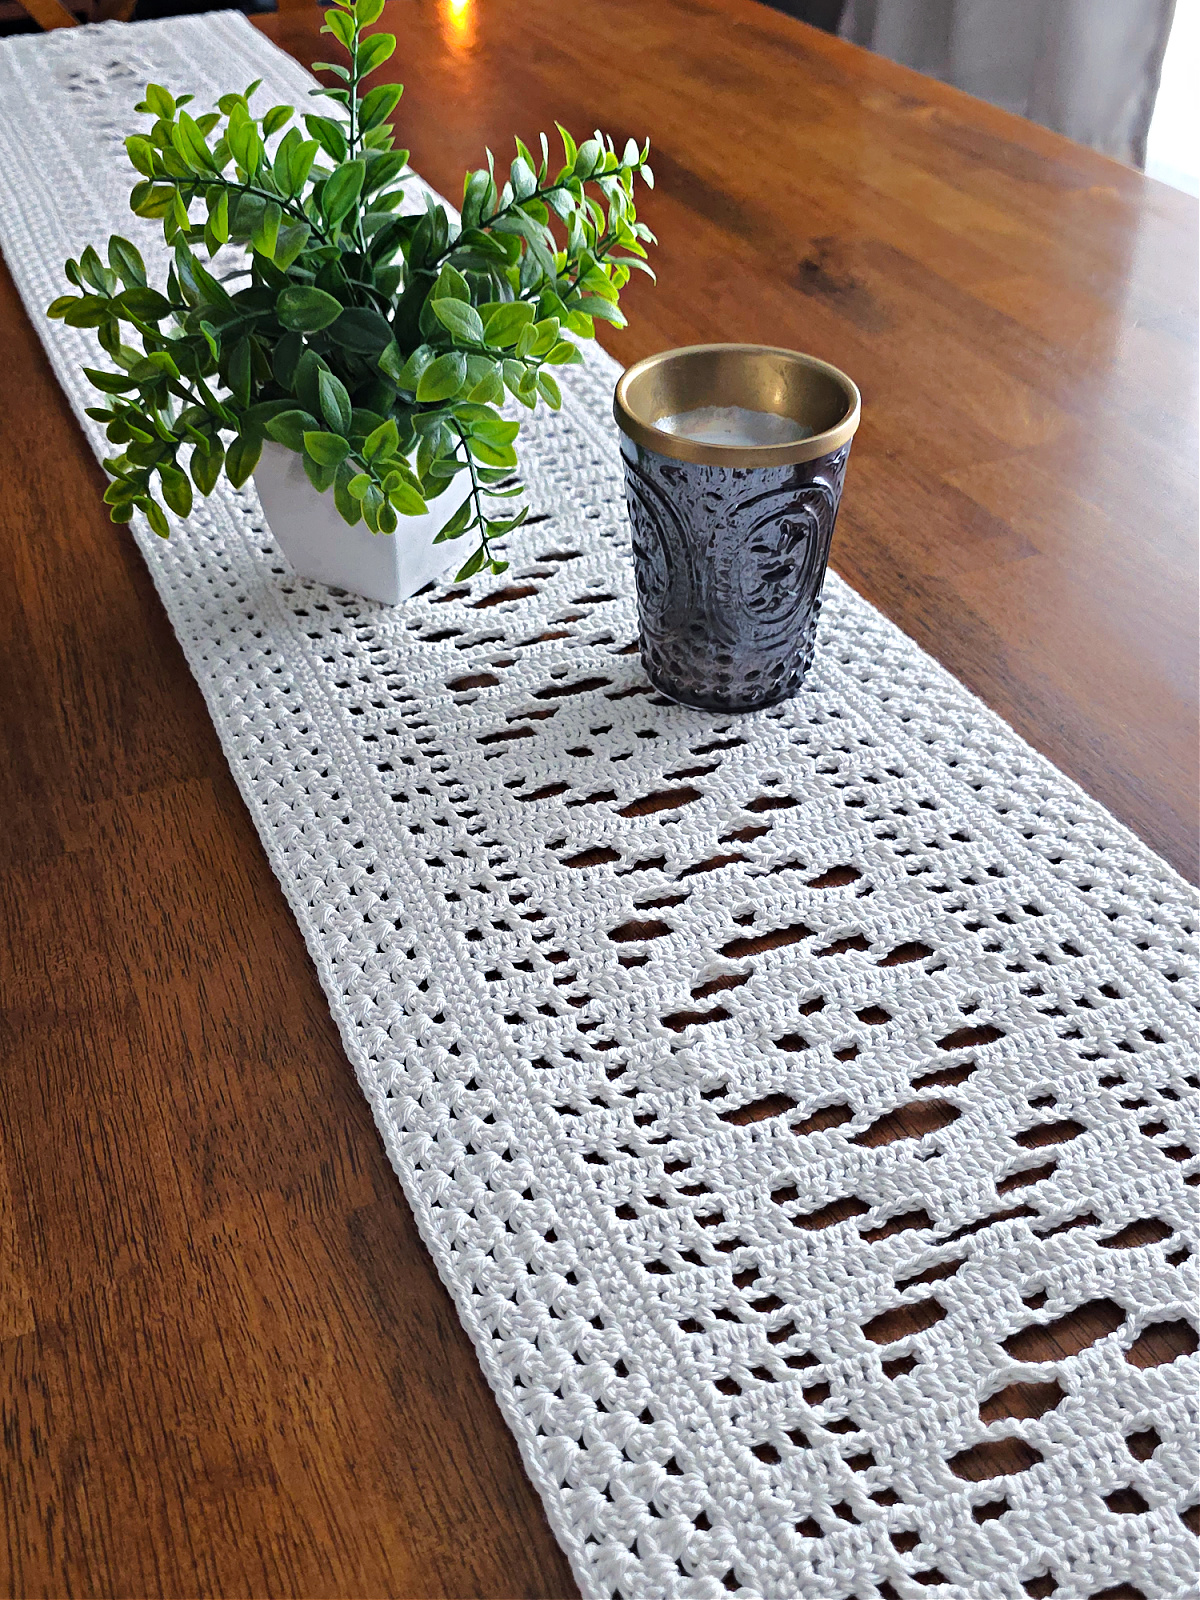
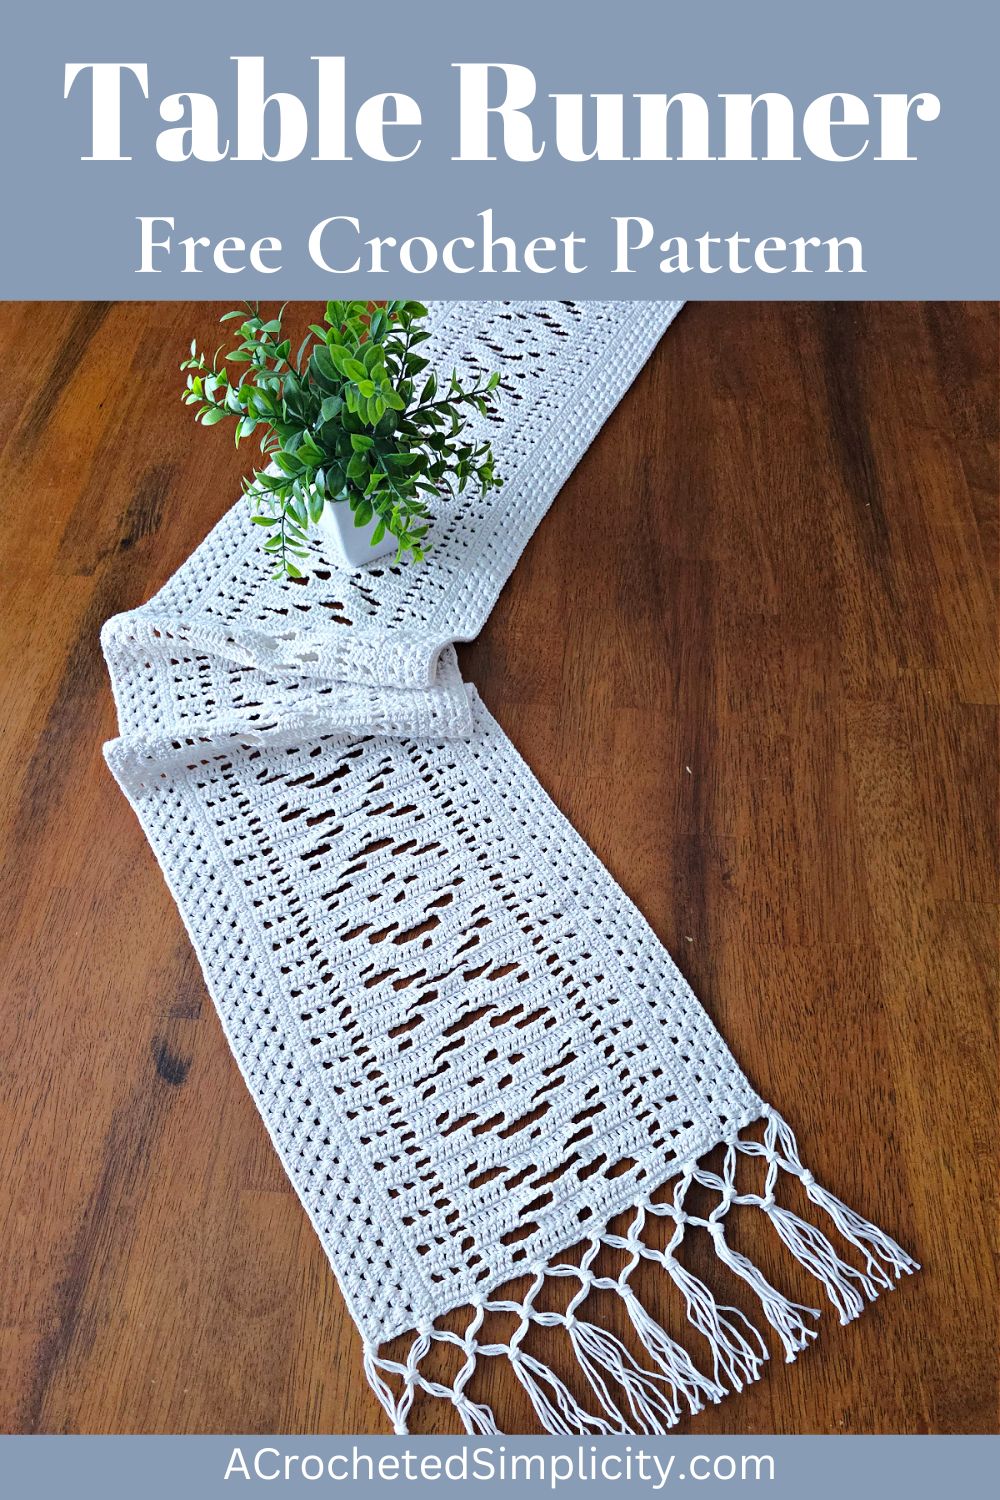
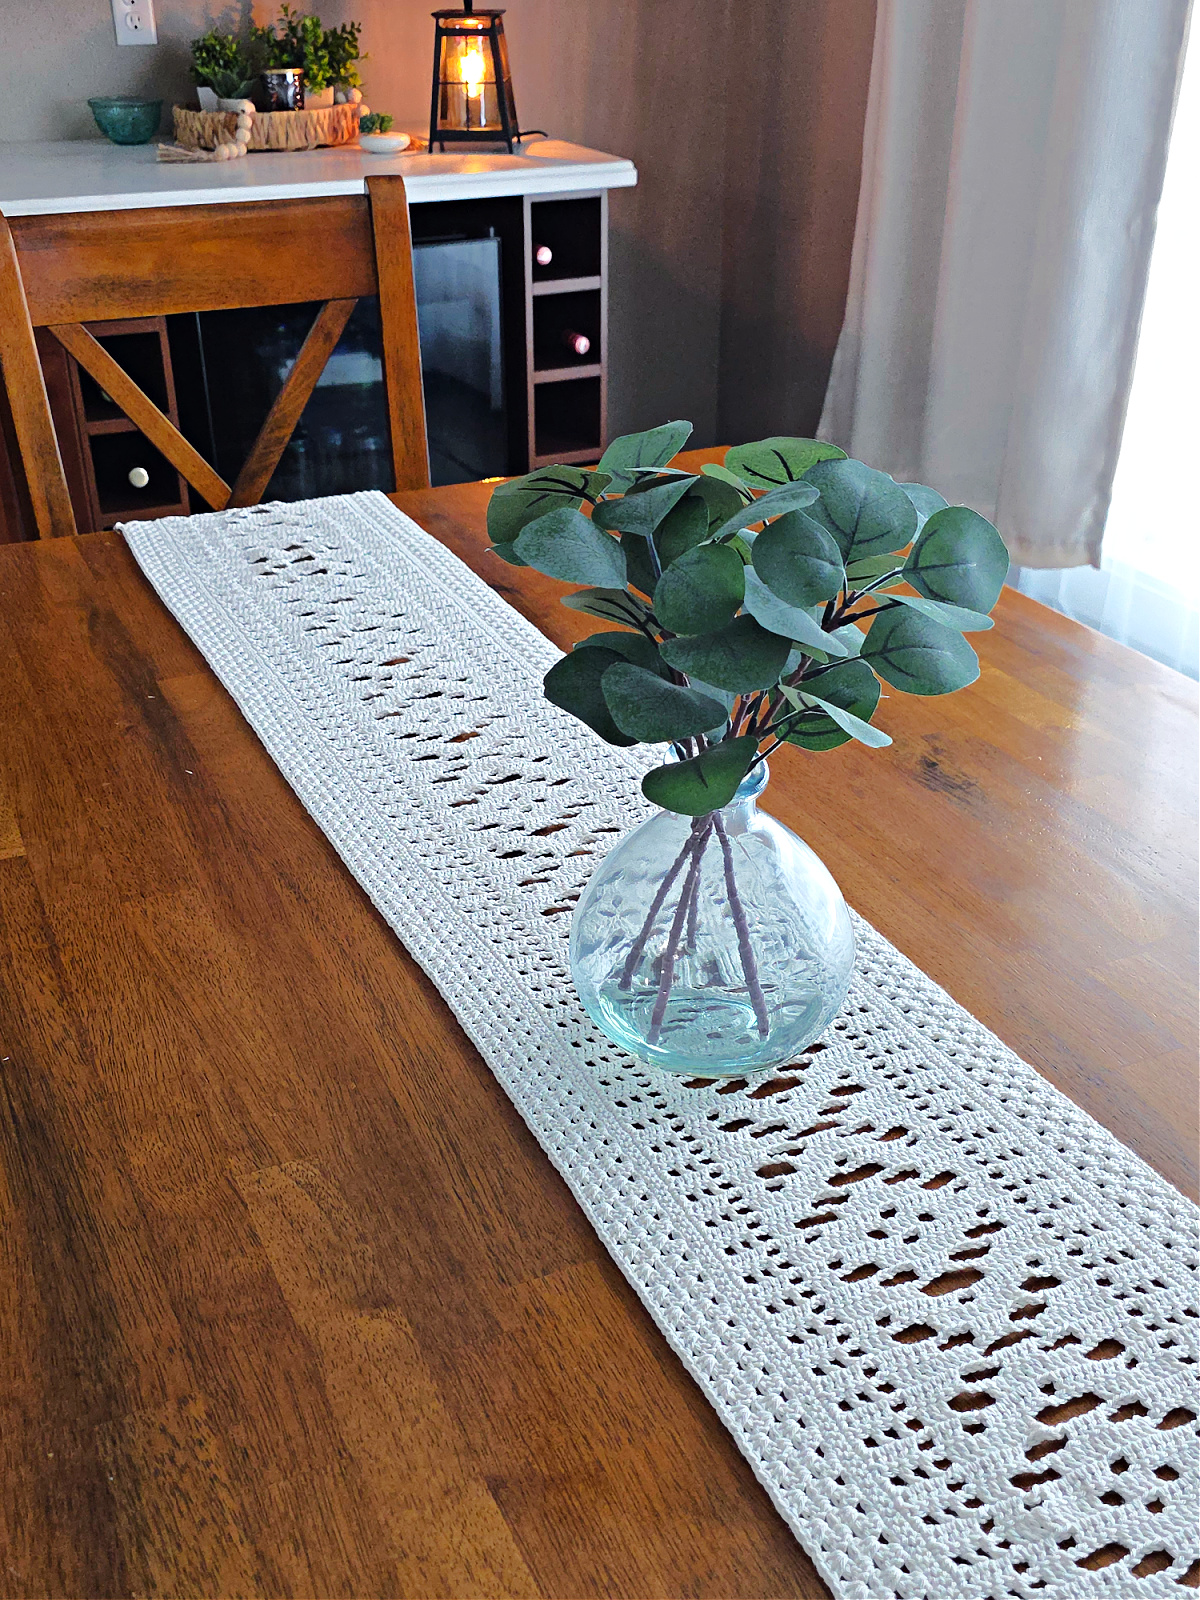
Boho Chic Crochet Table Runner
Do you want to add a crochet table runner to your dining table that looks chic, modern, and luxurious? When made with a nice neutral color, you can easily add whatever placemats, coasters, vases, and trinkets you want to set the theme for the event.
If you love hosting dinners and luncheons for your family and friends but can’t invest in new tablescapes every time, having a solid piece like this one hand is cost-friendly. You make it once and can reuse it as much as need! And whenever you have a few extra balls of yarn on hand, you can make one in another color for a different look.
You’ll find the free crochet table runner in the post below, or you can find an ad-free printable PDF (that includes all photo tutorials + a BONUS stitch chart) on Ravelry, or Etsy (aff).

I’ve used a beautiful solid color for this table runner because I think that opens up a lot of avenues for me to play around with the rest of the dining table decor. However, it can easily be worked up in a variegated yarn or different colors for the main body and border.
The best part about making your own crochet table runner is that you know what will look best in your dining room. Oftentimes, we can’t find the exact shade or color we want at the store to bring our decor together and that’s when we have to bust out the yarn and crochet hook!
Related: Looking for more table decor options? You can make this Fall Leaves Crochet Cutlery Holder for your utensils!
Why Crochet a Table Runner?
A handmade table runner is not only a great way to elevate your dining room decor but also incredibly practical. Here are a few reasons why you should consider making one:
- Easy to Make: This pattern is great for beginners and experienced crocheters alike, requiring only basic stitches and a few special stitches that are explained below.
- Customizable: A handmade table runner instantly makes your space feel warm, cozy, and uniquely yours. Choose your favorite yarn and color to match your personal style.
- Relaxing and Rewarding: Crocheting a table runner such as this one is soothing, and every time you’ll see it spread across your table, you’ll feel a sense of accomplishment.
How to Crochet a Table Runner
You’ll be working everything on to the main body of your runner, meaning there isn’t any extra seaming involved or a lot of ends to weave in.
The center of the table runner is worked first, using the boho motif instructions. If you’re working a motif for the first time, go through the instructions carefully before you start ensuring you have a grasp of the idea.
After the center is ready, each long side is edged with a simple granny stitch pattern.
The fringe is added at each short end and this is optional. You can choose to make your table runner without a fringe, however, in my opinion, it adds to the charm of the piece and helps in holding it down over the edges of the table.
How To Get The
Boho Chic Table Runner Pattern
Option 1: Scroll down for the free crochet table runner pattern right here in this blog post.
Option 2: Purchase the ad-free printable PDF from one of my shops:
Yarn
I used Lion Brand 24/7 DK for my version of the Boho Chic Table Runner. This is a wonderfully soft 100% cotton yarn that’s perfect for year-round use. It’s currently available in 24 colorways which includes beautiful solid colors as well as variegated ones so you can easily achieve the look you’re going for.
Because it’s cotton, it’s easily washable and very durable, making it great for table runners that would be out for long periods of time.
Boho Chic Crochet Table Runner Pattern
The Boho Chic Crochet Table Runner is a free pattern below, but if you love to work offline, I’ve got a couple other great options for you.
Purchase the ad-free, printable PDF (that includes all photo tutorials + a BONUS stitch chart), on Ravelry, or on Etsy (aff).
Purchase the Crochet Table Runner Kit: Lion Brand has a full kit of the Boho Chic Crochet Table Runner, available on their website. The includes your choice of colors and a digital copy of the crochet pattern.
This post contains affiliate links.
Materials
- Yarn: DK Weight / 3 / Yarn, Lion Brand 24/7 DK was used for the sample shown in the photos.
- Yardage and Color: 4 Balls / 1,100 yards of Cream #769-098W (yardage will vary depending on your table runner length).
- Crochet Hooks: G/6/4.00mm; or size needed to obtain gauge (My favorite crochet hooks are the Clover Amour Crochet Hooks, I’ve never had an ache in my hand since switching).
- Measuring Tape
- Scissors
- Yarn Needle
- Locking Stitch Markers
Abbreviations (U.S. Terms)
- ch(s): chain(s)
- sl st: slip stitch
- st(s): stitch(es)
- sc: single crochet
- dc: double crochet
- RS / WS: Right Side / Wrong Side
- Alt-dc: alternate double crochet
- yo: yarn over
- sp: space
- Rep: repeat
- SM: stitch marker
Gauge
- In dc: 17 sts = 3″; 7 rows = 3″
Experience Level
- Easy
Size
- Table Runner shown is 10″ W x 78″ L (not including fringe)
- Customize Width & Length instructions below.
Special Stitches
- Alternate Double Crochet (alt-dc): After turning your work, do not ch, instead, insert your hook into the first st, yo, pull up a loop, yo, pull thru both loops, insert your hook between the legs of the st just made, yo, pull up a loop, yo, pull through one loop, yo, pull thru remaining loops.
- Join yarn with a standing single crochet: Begin with a slip knot on your hook, insert your hook into the stitch or space indicated, yo, pull up a loop, yo and draw thru both loops on hook.
Pattern Notes
- I tend to crochet on the tighter side. You may need to go down a hook size (or two) to meet gauge if you crochet on the looser side.
- Turning chains are not included in stitch count.
- Chains (for chain spaces) are included in the stitch count. When reading the instructions, skipped stitches can be chains or stitches. The first stitch of every row is worked into the same stitch as the turning chain, unless stated otherwise.
- Yarn Notes: Lion Brand 24/7 DK in Cream (100 g / 3.5oz / 273 yards / 250 m / 100% cotton). was used for the sample shown in the photos. Another comparable DK weight yarn may be substituted.
- Yardage & Color
- Cream: #769-098W (4 Balls / 1,100 yards)
- Construction Notes: The center of the table runner is worked first, using the boho motif instructions. Then each long side is edged with a simple granny stitch pattern. Fringe is then added at each short end.
Boho Chic Table Runner – Free Crochet Pattern
Customizing Width & Length
Custom Length: Follow the instructions at the end of Boho Motif Panel section.
Custom Width: To increase or decrease the width of your table runner, simply work more or fewer rows when adding the Sides of Runner.
Boho Motif Panel
Note: Chains are included in stitch count. When reading the instructions, skipped stitches can be chains or stitches.
Set-Up (RS): With yarn & a 4.00mm crochet hook, ch 41, working into the back hump of the foundation ch, sc into the 2nd ch from your hook and in each ch across. Turn. (40 sts)
Row 1 (WS): Alt-dc in the first st, dc in each of the next 4 sts, ch 2, skip the next 2 sts, dc in each of the next 3sts, (ch 2, skip the next 2 sts, dc in each of the next 7 sts) twice, ch 2 skip the next 2 sts, dc in each of the next 3 sts, ch 2, skip the next 2 sts, dc in each of the next 5 sts. Place a SM in the bottom of the 1st st of Row 1 to mark where you’ll later join yarn. Turn. (40 sts) includes chains
Row 2: Alt-dc in the first st, (ch 1, skip the next st, dc in the next st) twice, ch 2, skip the next 2 sts, dc in each of the next 3 sts, ch 5, skip the next 5 sts, dc in each of the next 10 sts, ch 5, skip the next 5 sts, dc in each of the next 3 sts, ch 2, skip the next 2 sts, (dc in the next st, ch 1, skip the next st) twice, dc in the next st. Turn. (40 sts)
Row 3: Alt-dc in the first st, dc in each of the next 4 sts, ch 2, skip the next 2 sts, dc in each of the next 6 sts, ch 5, skip the next 5 sts, dc in each of the next 4 sts, ch 5, skip the next 5 sts, dc in each of the next 6 sts, ch 2, skip the next 2 sts, dc in each of the next 5 sts. Turn. (40 sts)
Row 4: Alt-dc in the first st, (ch 1, skip the next st, dc in the next st) twice, ch 2, skip the next 2 sts, dc in each of the next 9 sts, ch 8, skip the next 8 sts, dc in each of the next 9 sts, ch 2, skip the next 2 sts, (dc in the next st, ch 1, skip the next st) twice, dc in the next st. Turn. (40 sts)
Row 5: Rep Row 3.
Row 6: Rep Row 2.
Row 7: Alt-dc in the first st, dc in each of the next 4 sts, ch 2, skip the next 2 sts, dc in each of the next 3 sts, (ch 2, skip the next 2 sts, dc in each of the next 7 sts) twice, ch 2, skip the next 2 sts, dc in each of the next 3 sts, ch 2, skip the next 2 sts, dc in each of the next 5 sts. Turn. (40 sts)
Row 8: Rep Row 4.
Row 9: Rep Row 3.
Row 10: Rep Row 2.
Row 11: Rep Row 7.
Row 12: Alt-dc in the first st, (ch 1, skip the next st, dc in the next st) twice, ch 2, skip the next 2 sts, dc in each of the next 9 sts, ch-2, skip the next 2 sts, dc in the next 4 sts, ch 2, skip 2, dc in each of the next 9 sts, ch 2, skip the next 2 sts, (dc in the next st, ch 1, skip the next st) twice, dc in the last st. Turn. (40 sts)
Row 13: Rep Row 7.
Row 14: Rep Row 2.
Row 15: Rep Row 3.
Row 16: Rep Row 4.
Row 17: Rep Row 7.
Row 18: Rep Row 2.
Row 19: Rep Row 3.
Row 20: Rep Row 4.
Row 21: Rep Row 3.
Row 22: Rep Row 2.
Row 23: Rep Row 7.
Tip: Beginning with Row 24, place a SM in the first stitch of every 16 rows. Doing so will make it easier to keep track of which repeat row you’re on.
Rep Rows 8 – 23, until your table runner measures the length of your table + 6″. This allows the edge to hang over by 3″ per side. If you are not adding fringe to your table runner, you may want to make yours a little longer. I only accounted for 3″ to hang over the edge on each end.
The table runner shown in the photos is 78″ long. My table is 72″ and I want my runner to hang over each end of the table by 3″ plus the fringe.
Do not fasten off. Continue on to the Last Row of the Runner.
Last Row of the Runner
Row 1: Ch 1, sc in each st and ch across. Do not turn. (40 sts)
Do not fasten off. Continue on to Side of Runner #1.
Side of Runner #1
This section is crocheted along one of the long edges of the boho motif panel.
Row 1: Rotate to work along the long side of the boho motif. Ch 1, working across the long edge of the motif, work 1 sc into the side of each sc row and 2 sc into the side of each dc row. Turn. Stitch count needs to be a multiple of 3 + 1. You can either add or subtract stitches, if needed.
Rows 2 – 3: Ch 1, sc in each st across. Turn.
Row 4: Ch 3 (counts as 1st dc here & throughout), dc in the same st, skip each of the next 2 sts, * 3 dc in the next st, skip each of the next 2 sts, rep from* across to the last st, 2 dc in the last st. Turn. Stitch count stays the same as the previous row.
Row 5: Ch 3, 3 dc in each of the next 12 sps, dc in the top of ch 3. Stitch count increases by 1 stitch.
Row 6: Alt-ch3, dc in the same sp, 3 dc in each of the next 11 sps, 2 dc in the last sp. Turn. Stitch count decreases by 1 stitch.
Row 7: Rep Row 5.
Fasten off. Weave in ends. Continue on to Side of Runner #2.
Side of Runner #2
This section is crocheted along the opposite long edge of the boho motif panel.
Row 1: With yarn & a 4.00mm crochet hook, join yarn with a standing sc in the st you previously marked with a SM, working across the long edge of the motif, work 1 sc into the side of each sc row and 2 sc into the side of each dc row. Turn. Stitch count needs to be a multiple of 3 + 1. You can either add or subtract stitches, if needed.
Rows 2 – 3: Ch 1, sc in each st across. Turn.
Row 4: Ch 3 (counts as 1st dc here & throughout), dc in the same st, skip each of the next 2 sts, * 3 dc in the next st, skip each of the next 2 sts, rep from* across to the last st, 2 dc in the last st. Turn. Stitch count stays the same as the previous row.
Row 5: Ch 3, 3 dc in each of the next 12 sps, dc in the top of ch 3. Stitch count increases by 1 stitch.
Row 6: Alt-ch3, dc in the same sp, 3 dc in each of the next 11 sps, 2 dc in the last sp. Turn. Stitch count decreases by 1 stitch.
Row 7: Rep Row 5.
Fasten off. Weave in ends. Block your crochet table runner to add a nice professional finish. Continue on to Fringe, if desired.
Fringe
Tassels: You will make 18 tassels (9 per each short edge). Each tassel is made using (4) 14″ strands of yarn. Begin by cutting all strands of yarn and separating them into tassels.
Tassel Placement Across One Short Edge:
- Attach one tassel in each of the two corners.
- Attach one tassel in the middle of the short edge.
- Then, evenly space three more tassels between the middle tassel and each of the corner tassels.
- You should have 9 tassels along one short edge.
Photo A: Shows a tassel attached to a stitch.
Photo B: Divide each tassel in half and join to the adjacent tassel as shown.
Photo C: Divide each tassel in half and join to the adjacent tassel as shown.
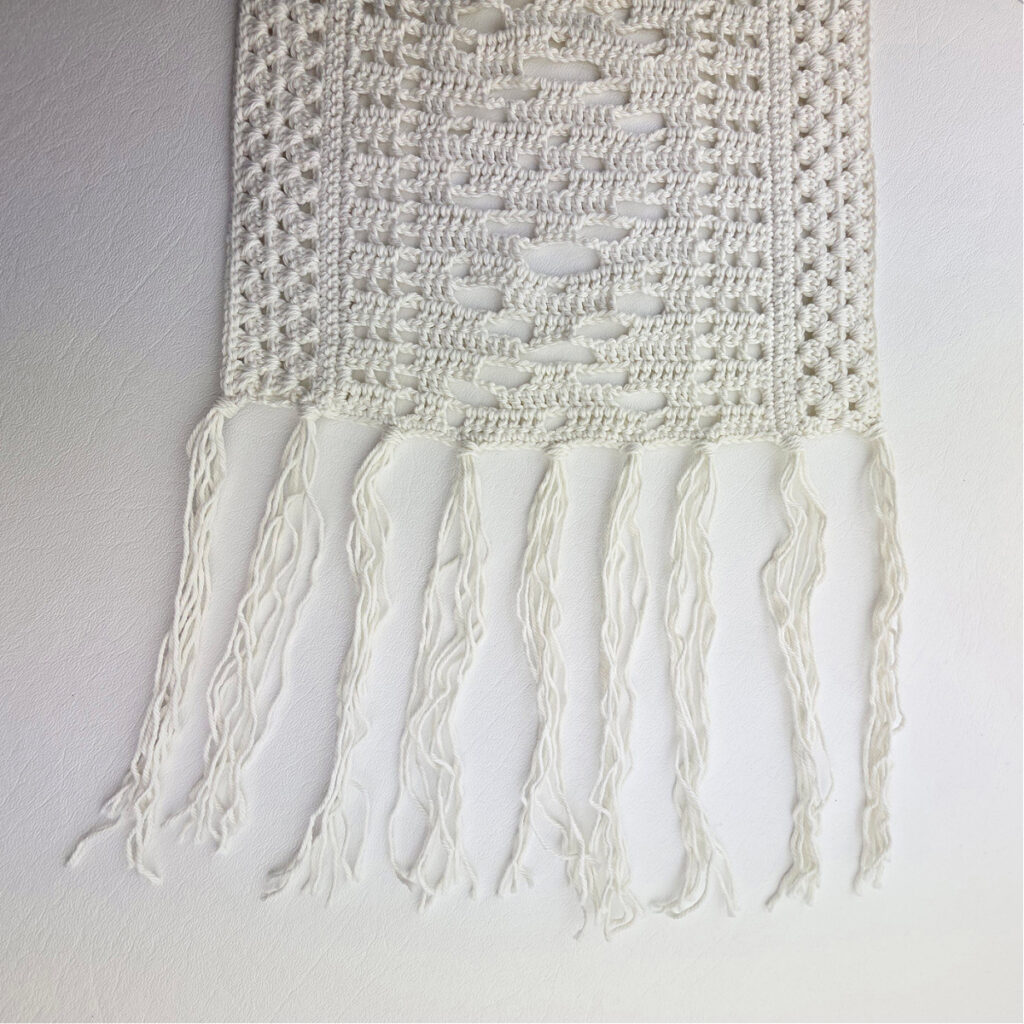
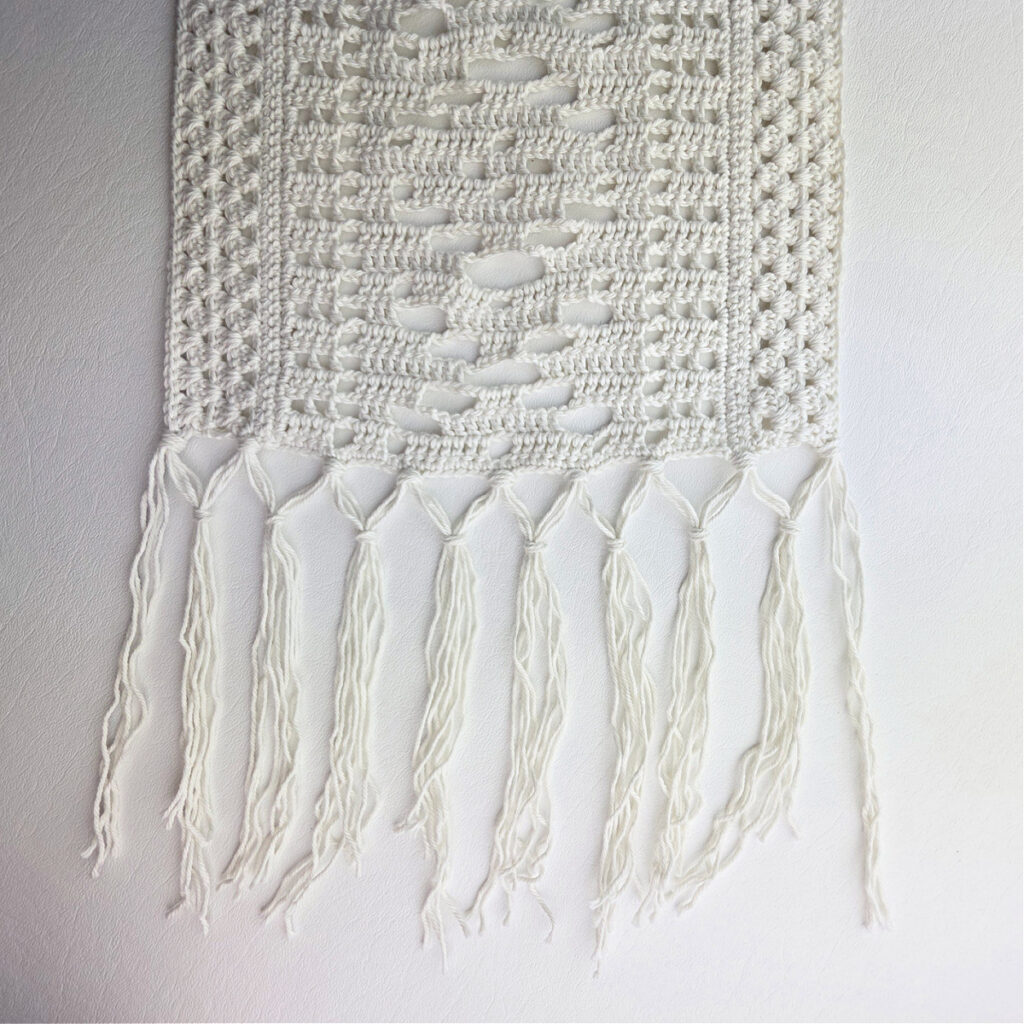
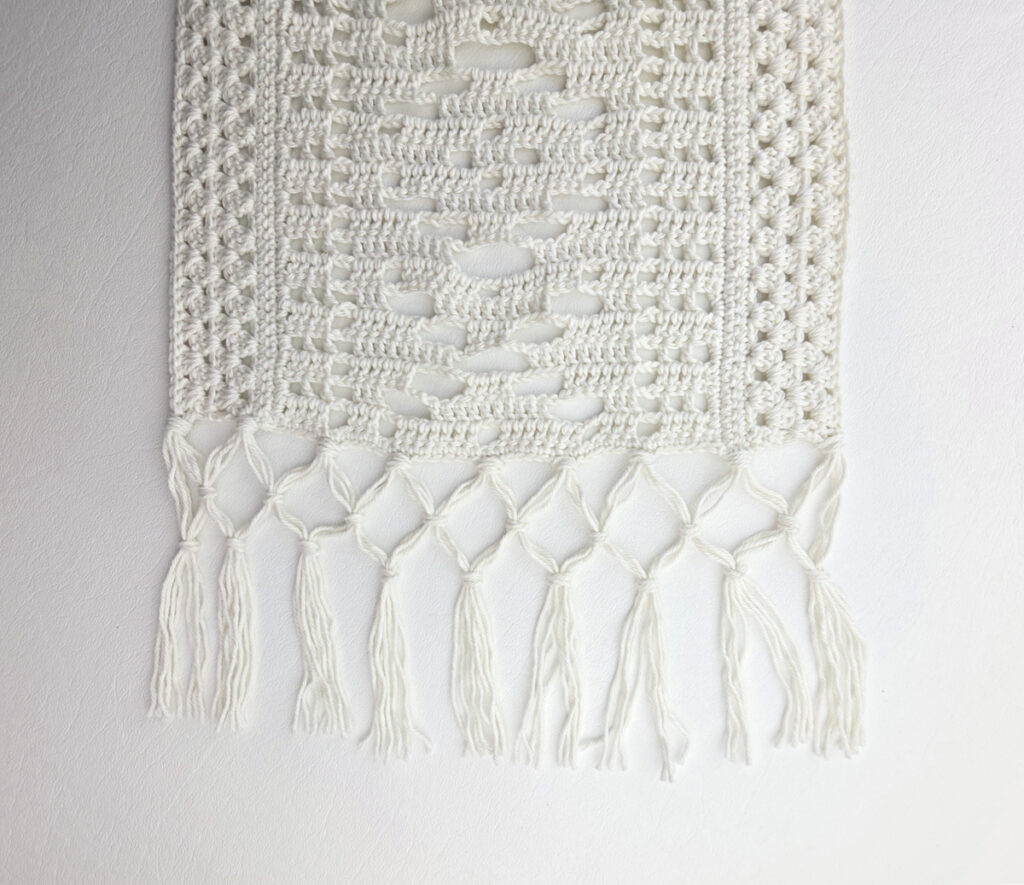
Adjust any knots to make them even and evenly spaced. Trim ends to the length you prefer. The tassels pictured are trimmed to 3-1/2″ from the last knot.
Repeat for the second short edge.
I MADE IT! NOW WHAT?
Pin this post!: Save this crochet table runner to your Pinterest boards so that you can come back and make it again.
Leave a comment below: We love to hear your feedback.
Share Your Finished Projects on Facebook or Instagram: I love to see your finished projects! Share with us on social media and tag me @acrochetedsimplicity or use the hashtag #ACrochetedSimplicity so I can find your posts.
Join us in the Facebook Community Group!
Come share your finished projects with us in the A Crocheted Simplicity Crochet Community Group on Facebook. Join us for fun community events such as crochet alongs, join in on crochet conversations, ask questions, get advice, and share your love for crochet!

Looking for More Crochet Home Patterns?
Check out our other free crochet patterns that will enhance your home decor and give a unique handmade look to all of your spaces.