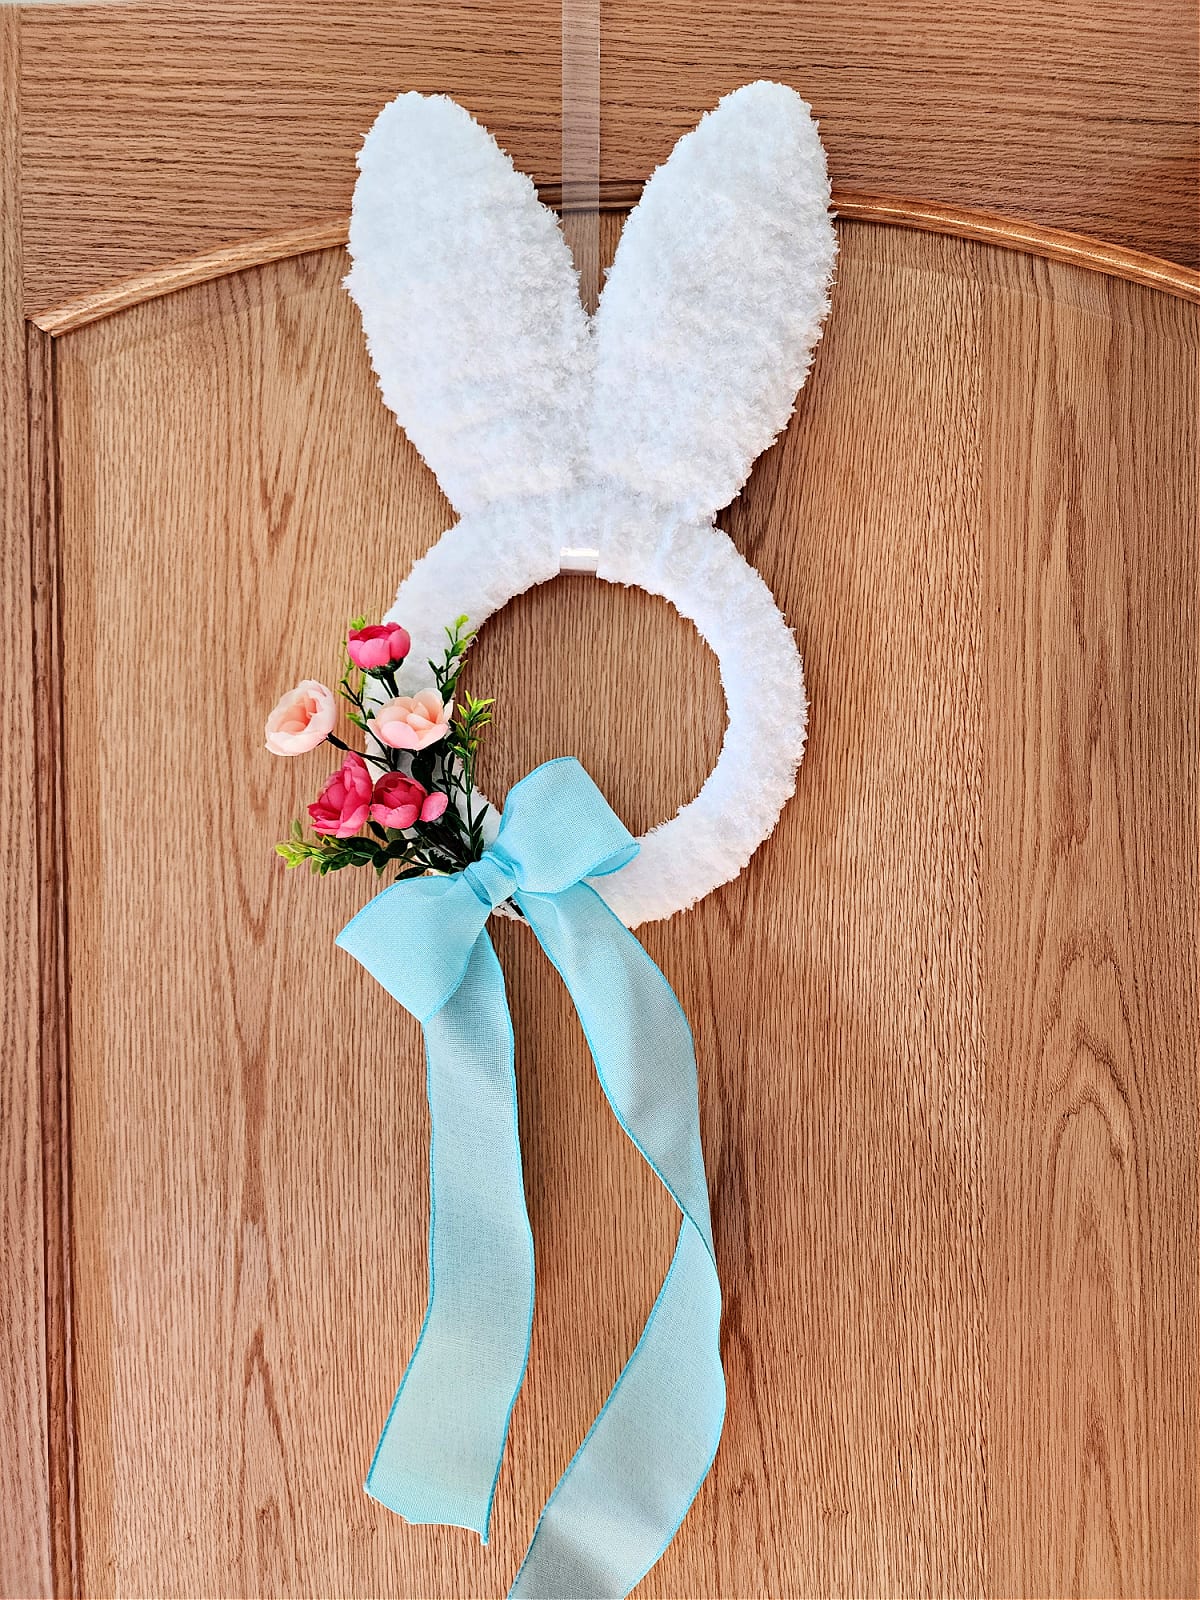
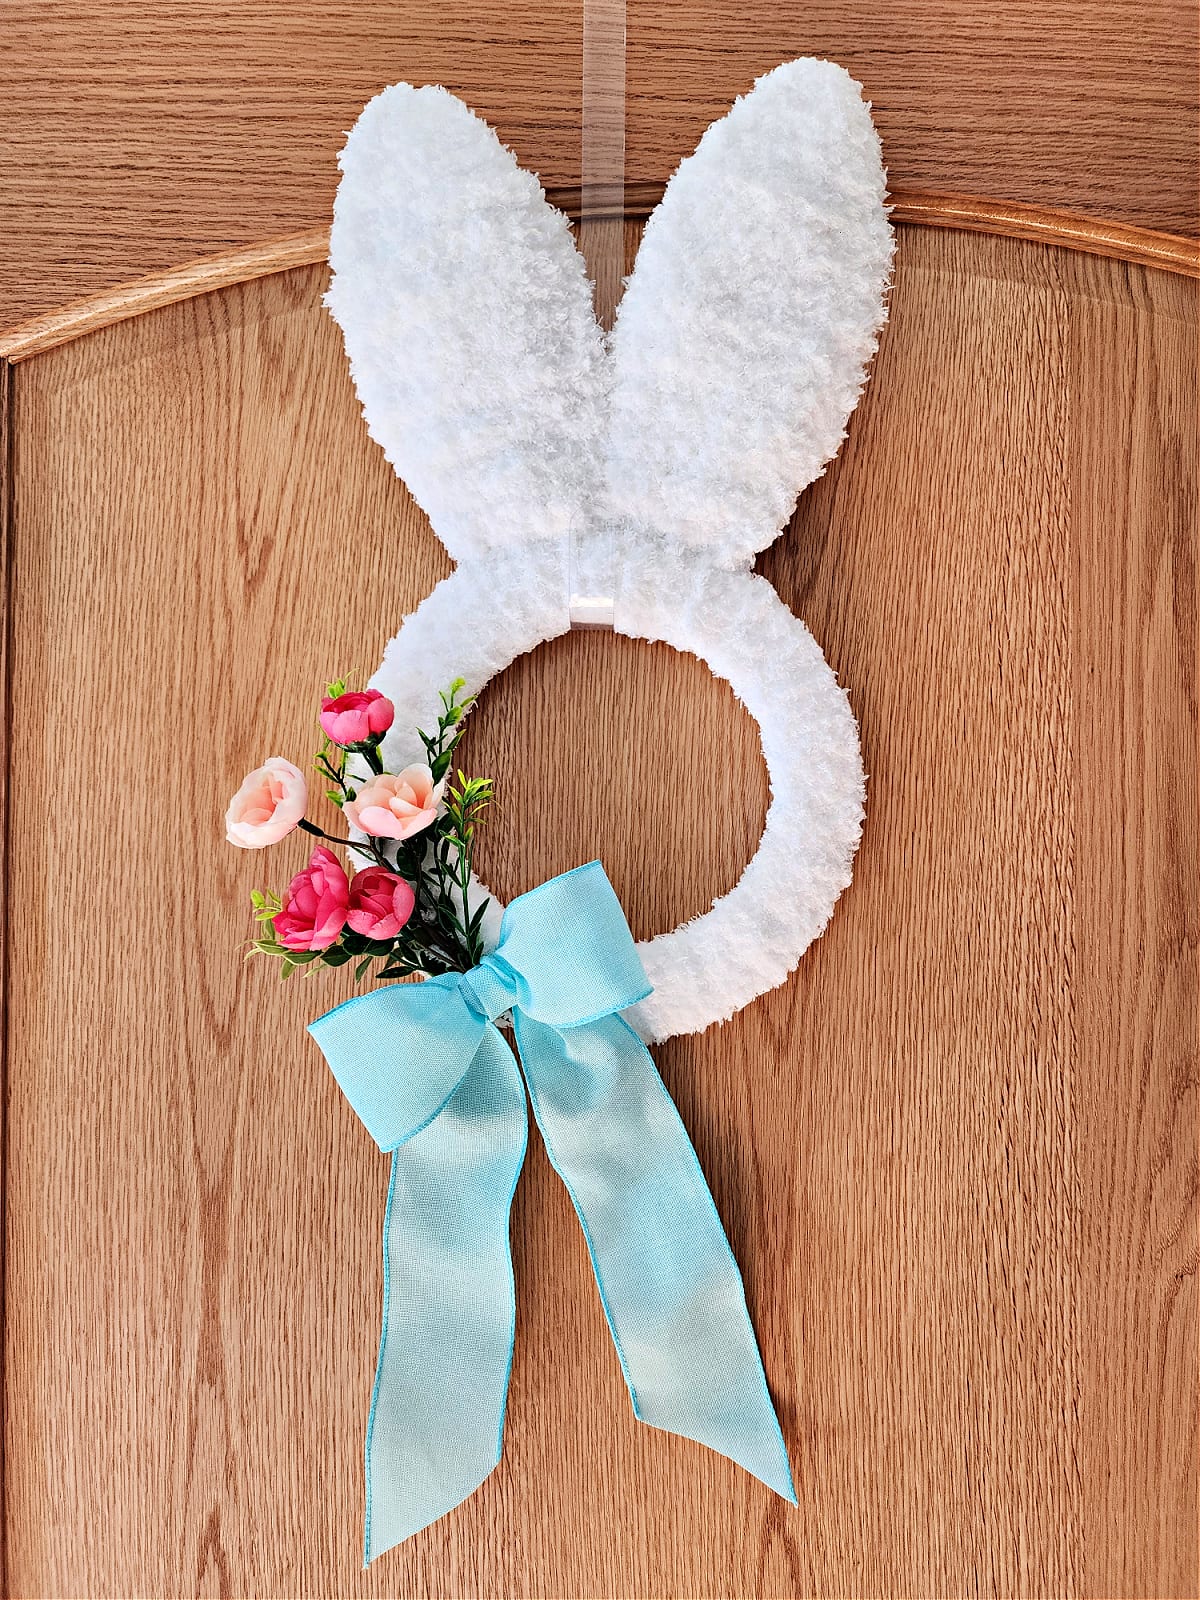
Crochet Bunny Wreath
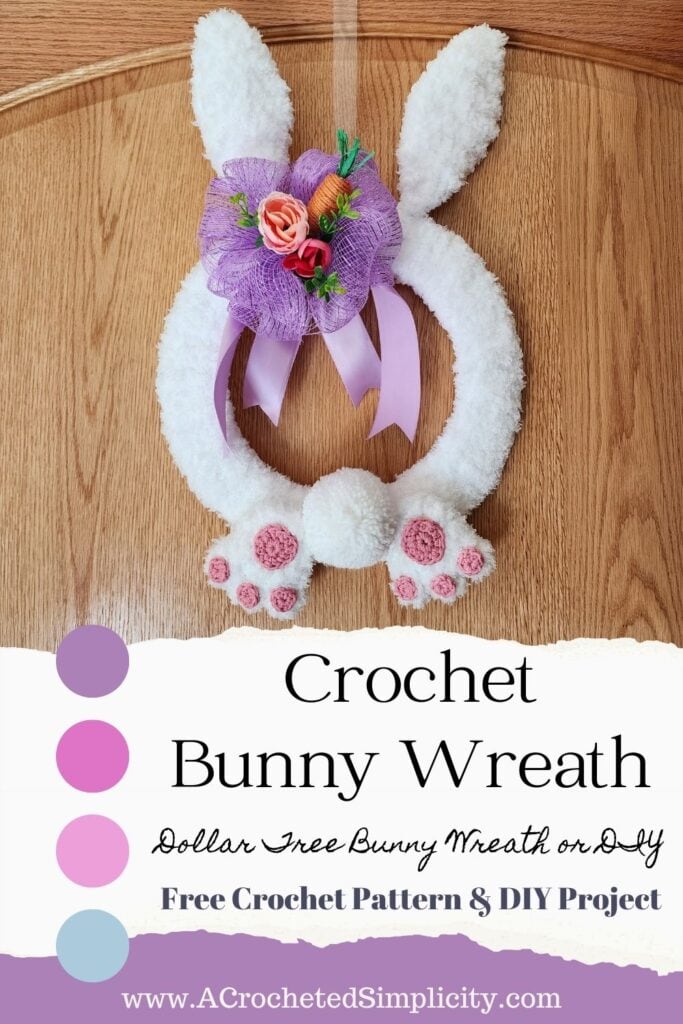
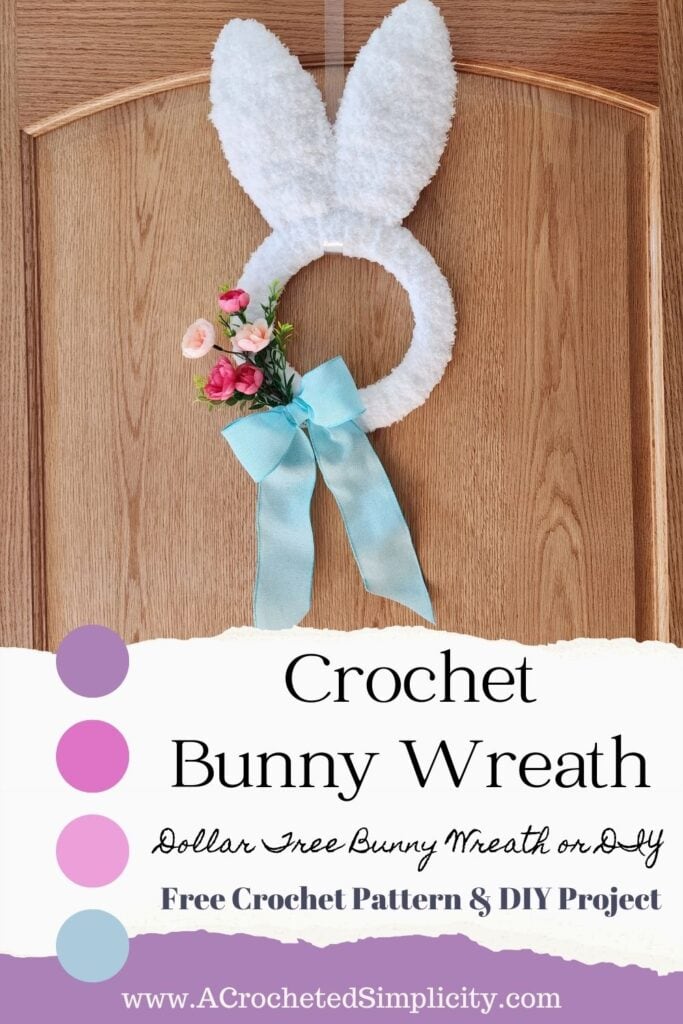

It’s time to add to your Easter decorations with a Crochet Bunny Wreath!
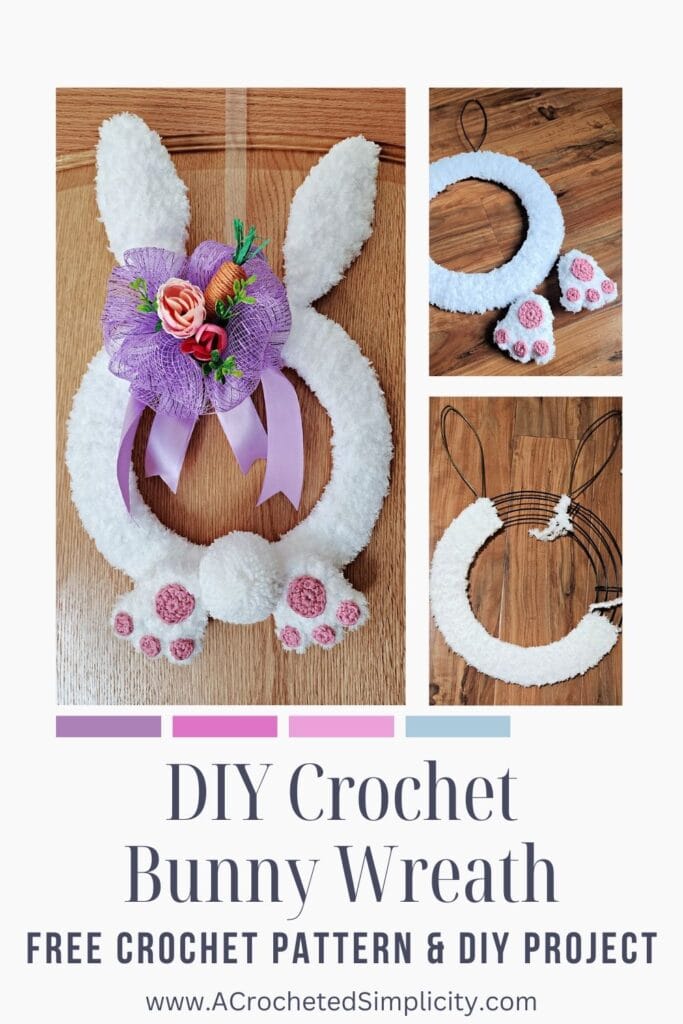
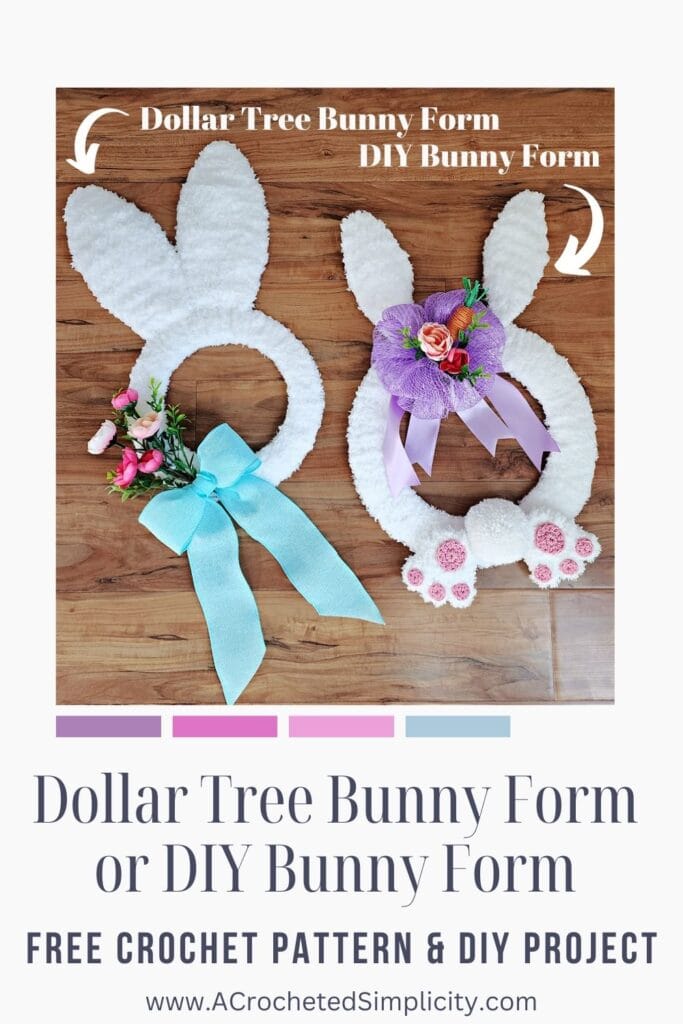
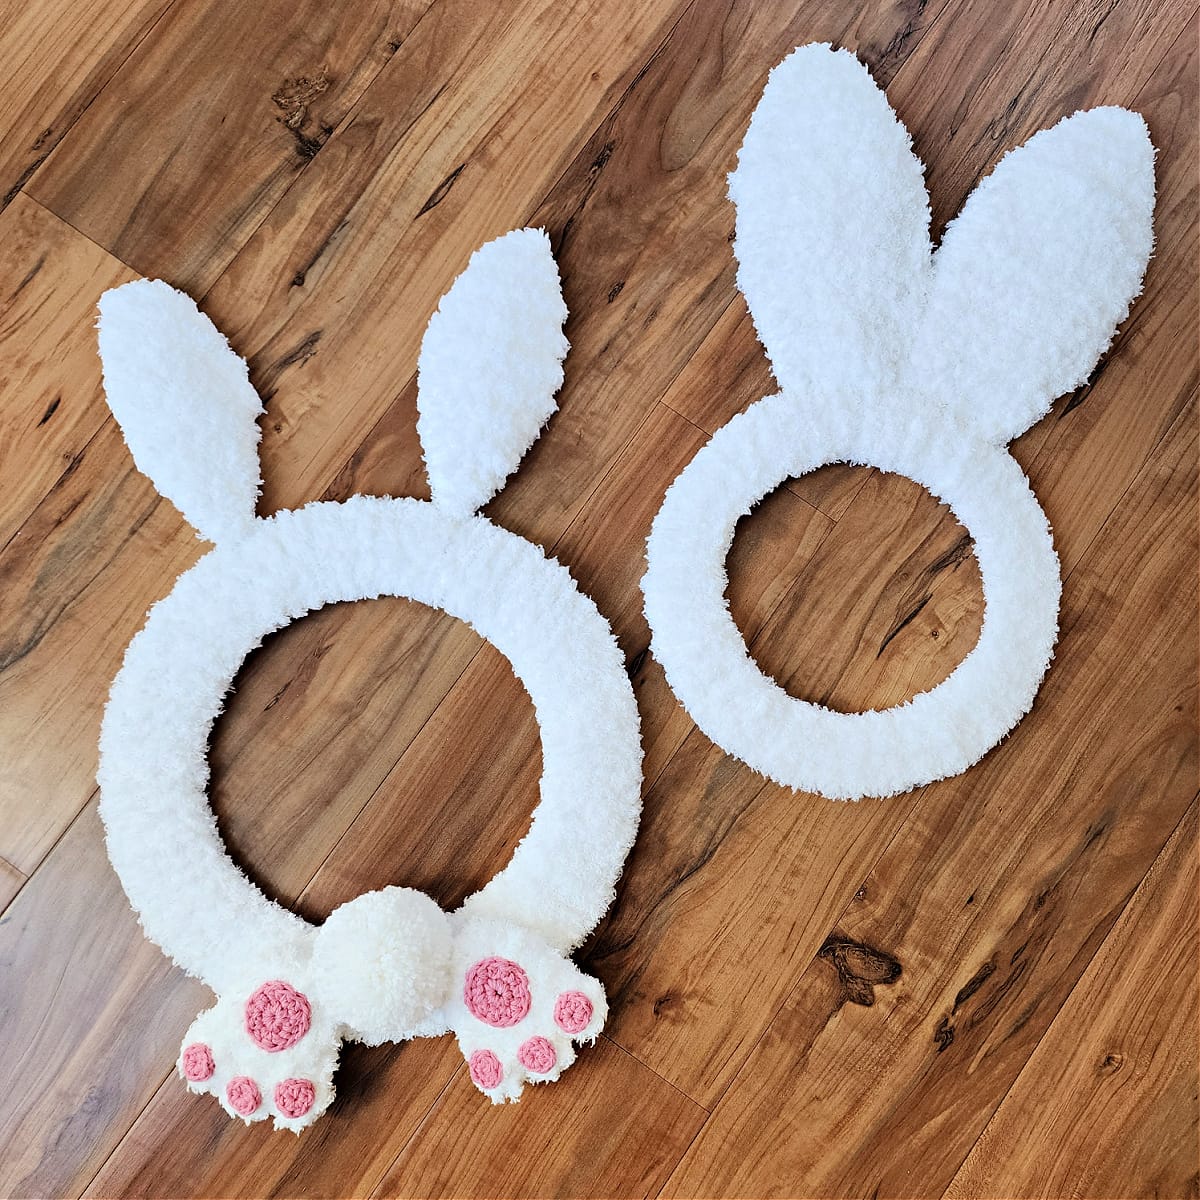
This crochet bunny wreath pattern includes instructions for two bunny wreath form options: Dollar Tree Bunny Wreath Form and a DIY Bunny Wreath Form with Coat Hanger Bunny Ears.
You’ll find the crochet Easter bunny pattern free in the post below, or an ad-free print friendly PDF (including all photo tutorials) on Ravelry, or on Etsy (aff).
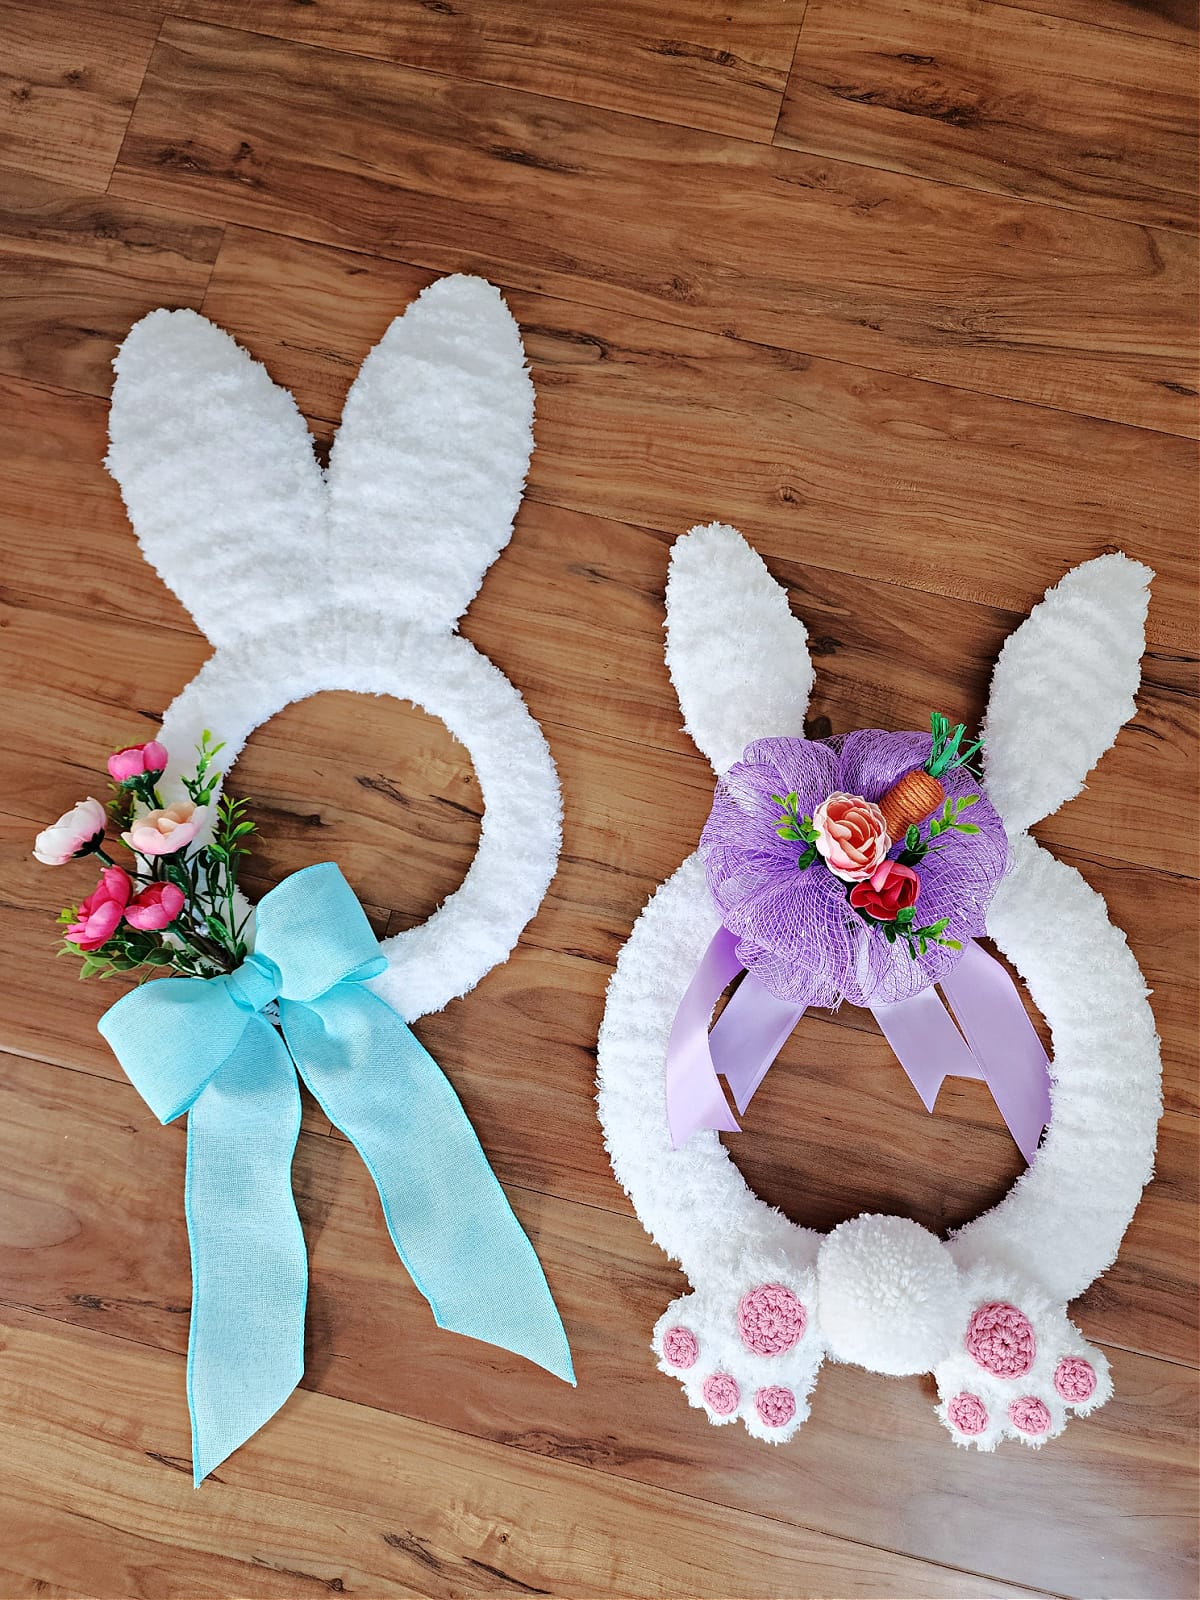
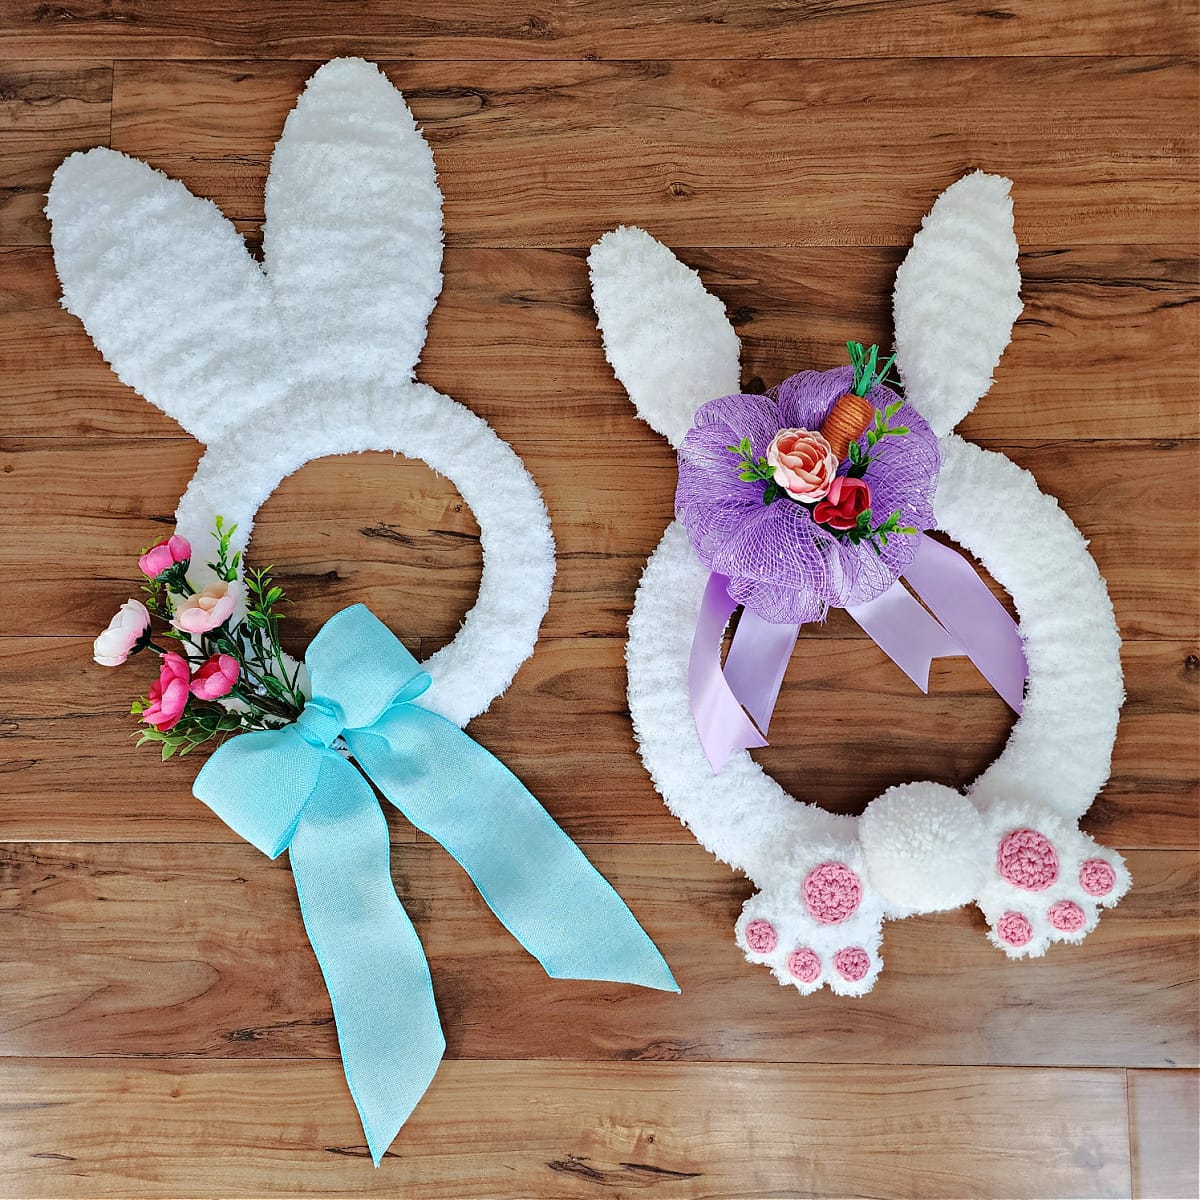
There are so many fun DIY Easter decorations you can crochet for your home. Projects range from kitchen decor to outside Easter decorations, such as this super cute crochet bunny wreath for your entryway door!
A little over a month ago, I saw an ad for a cute bunny head wreath that was wrapped with a rope type material. It was super cute and I knew I had to crochet one, or several!
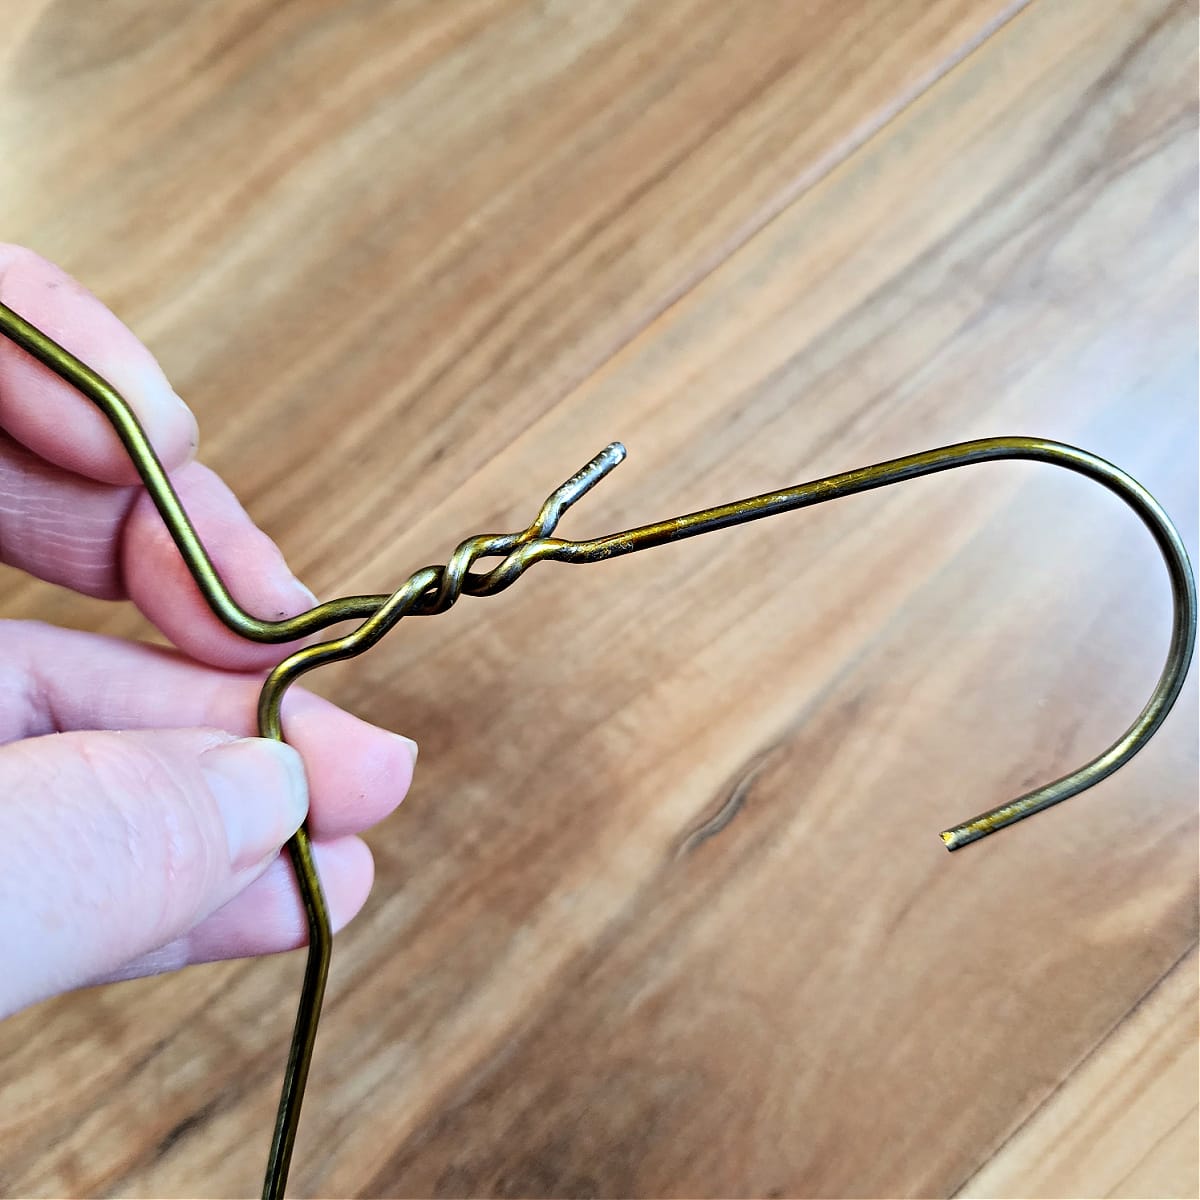
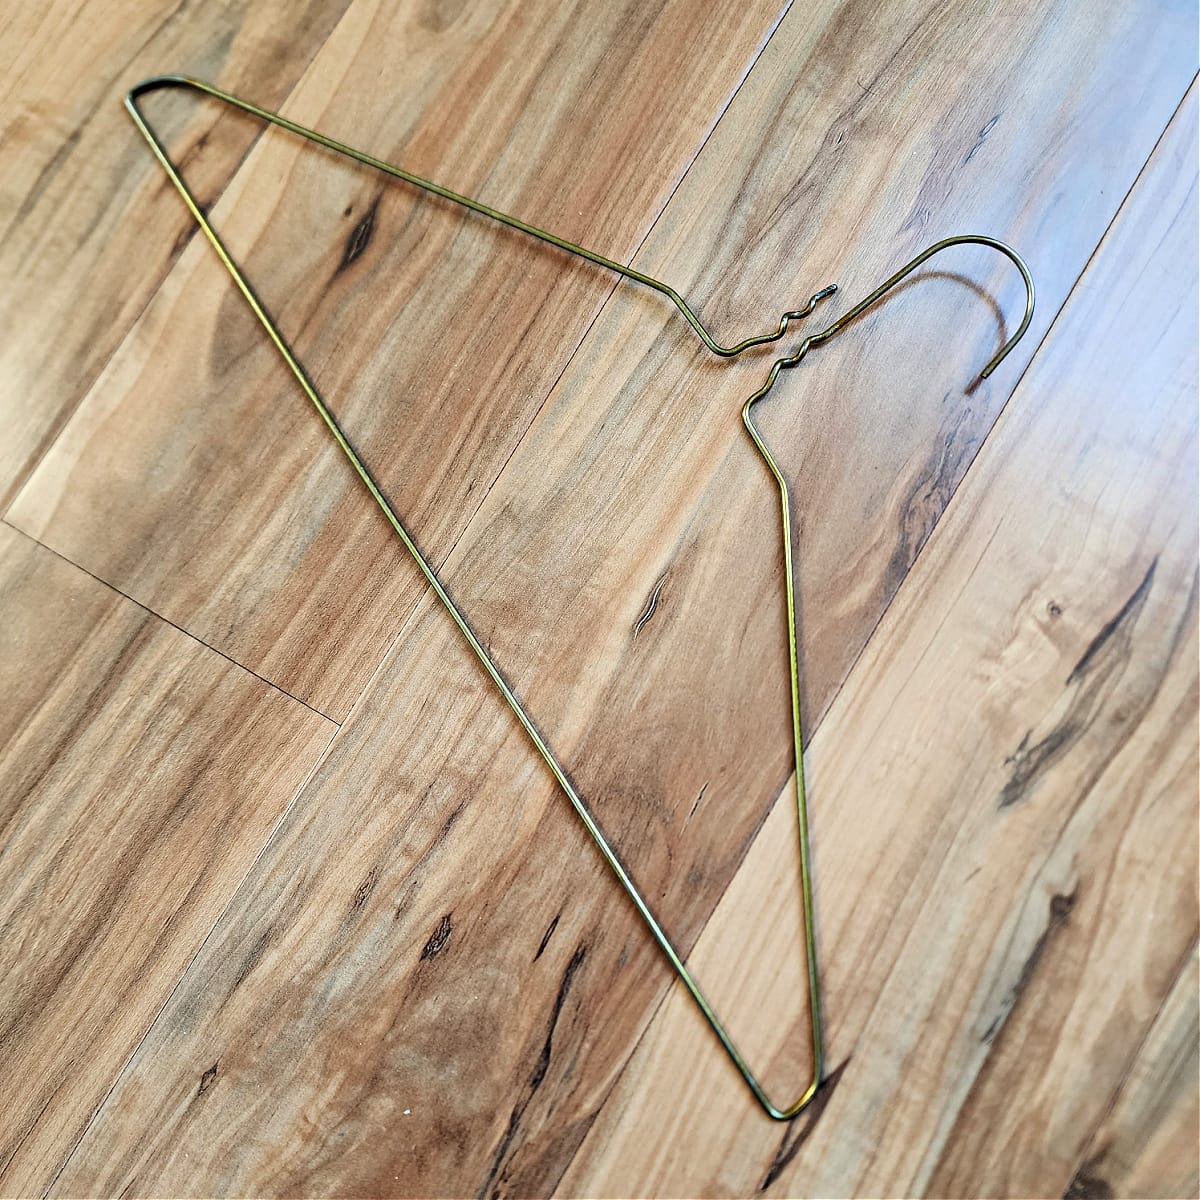
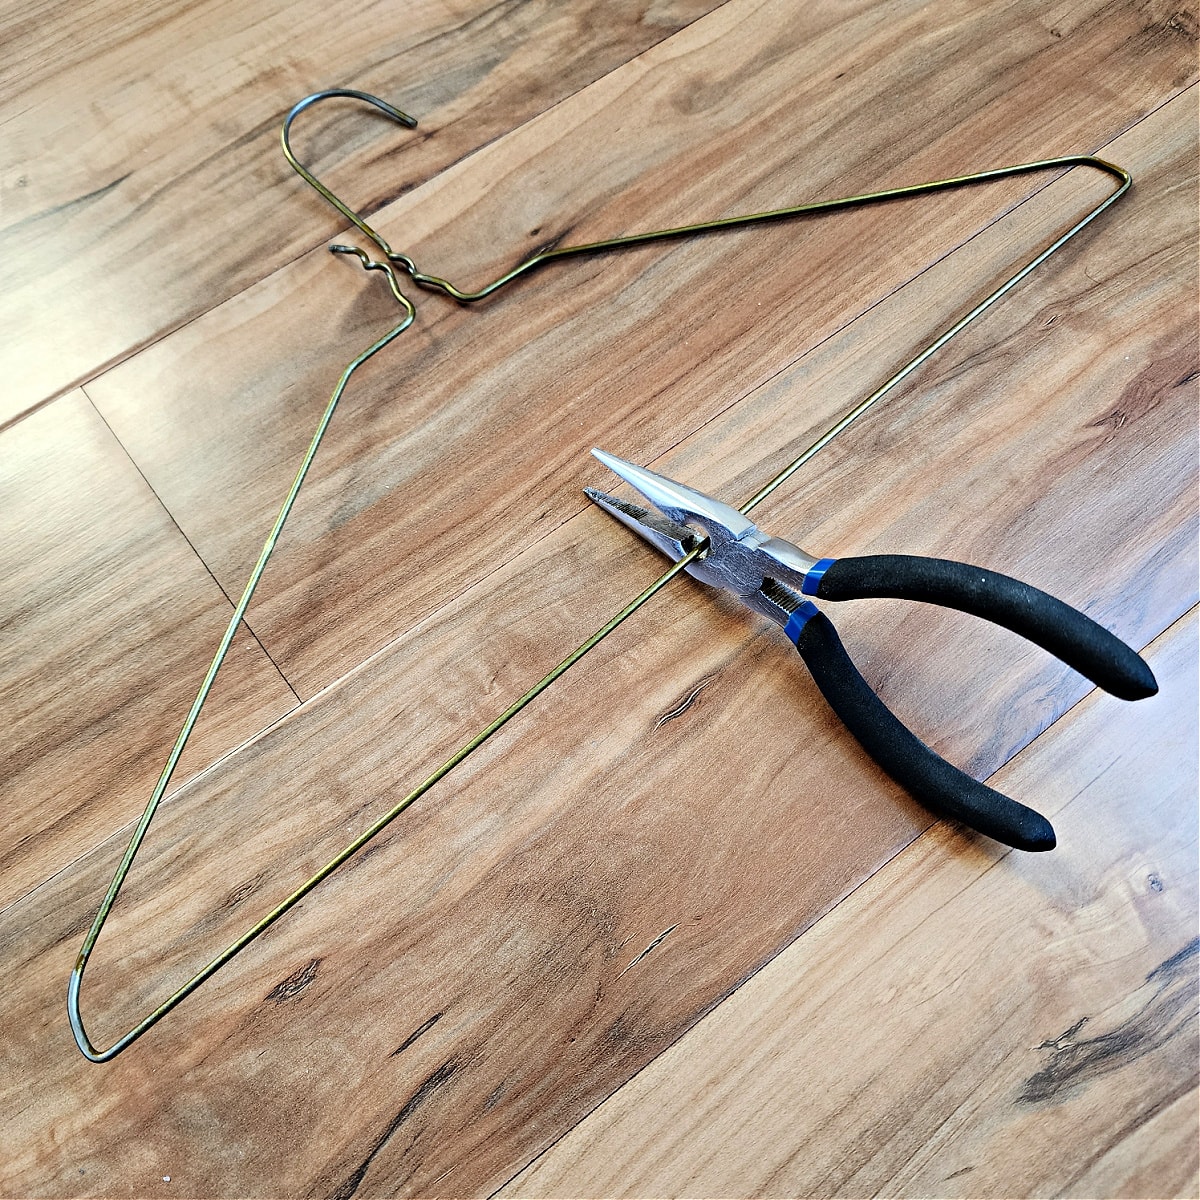
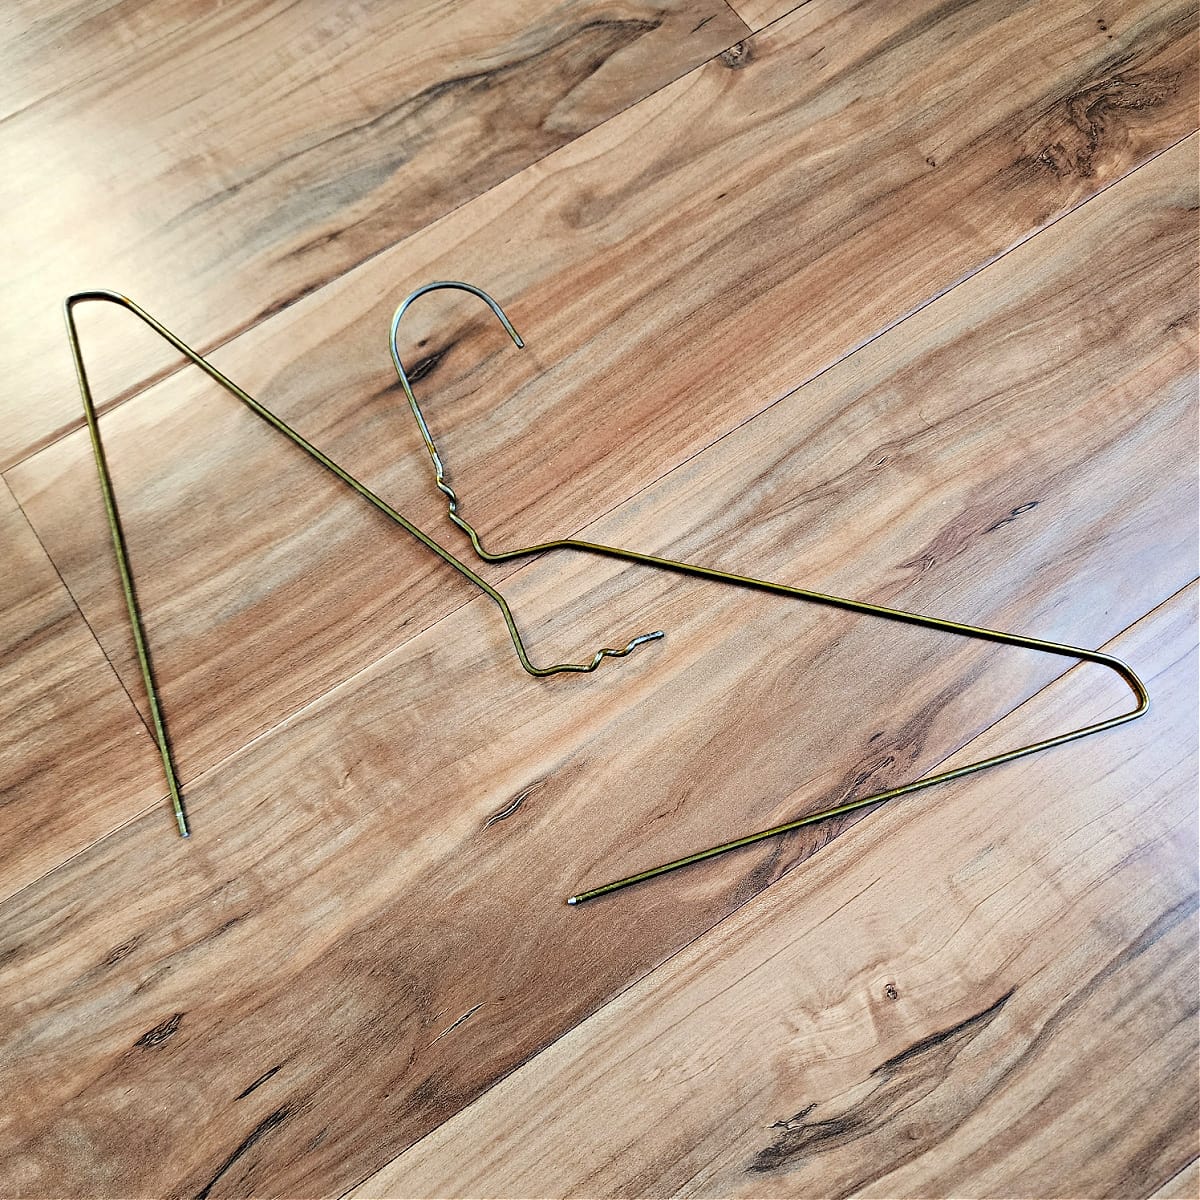
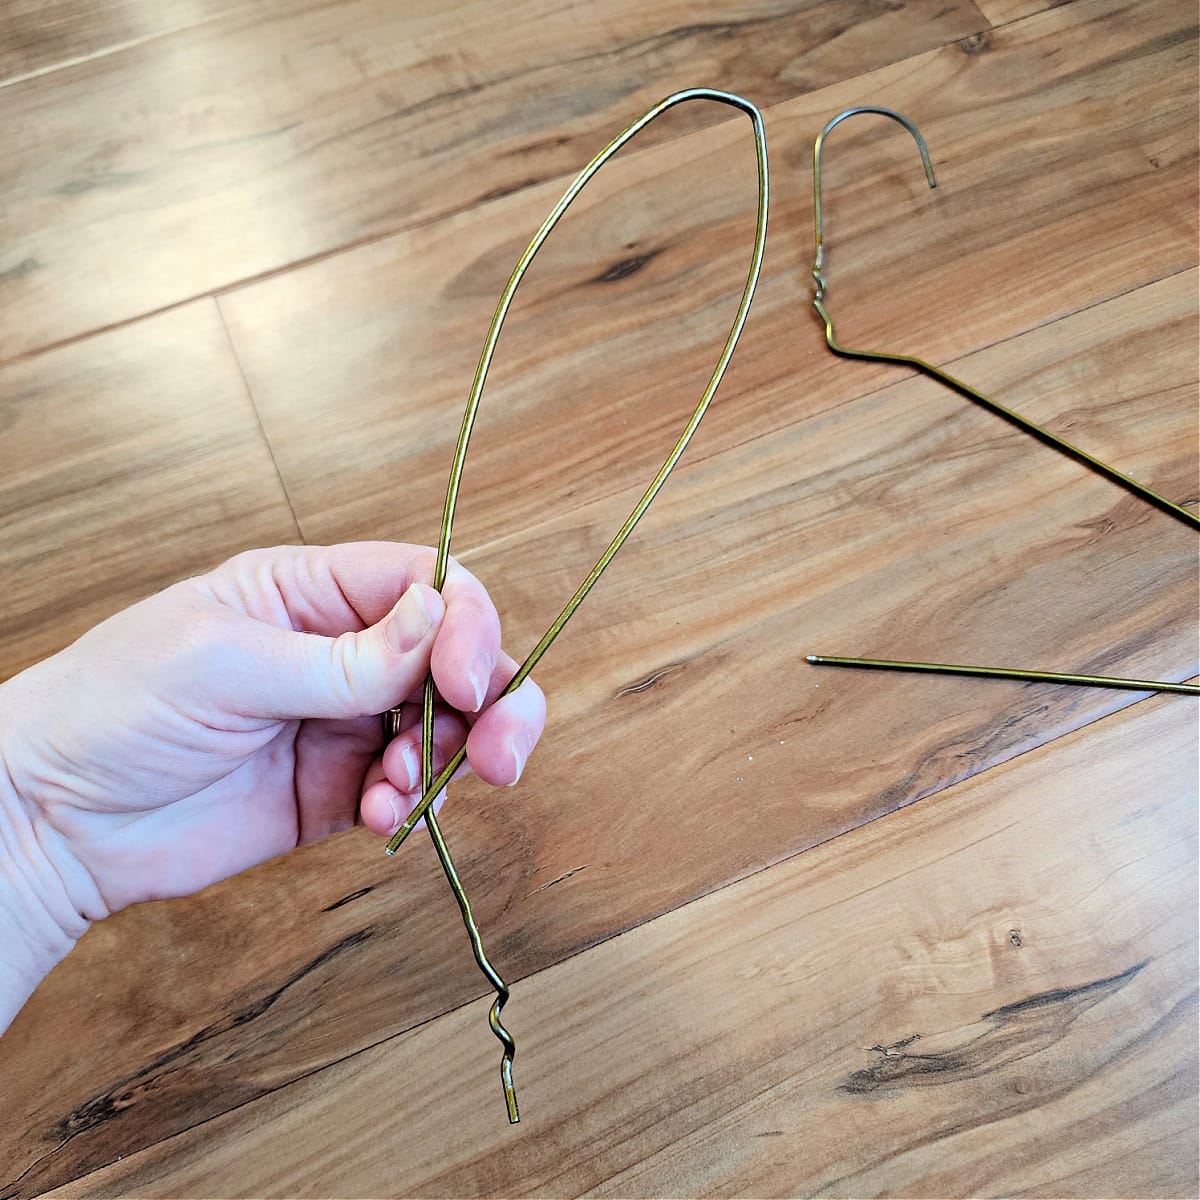
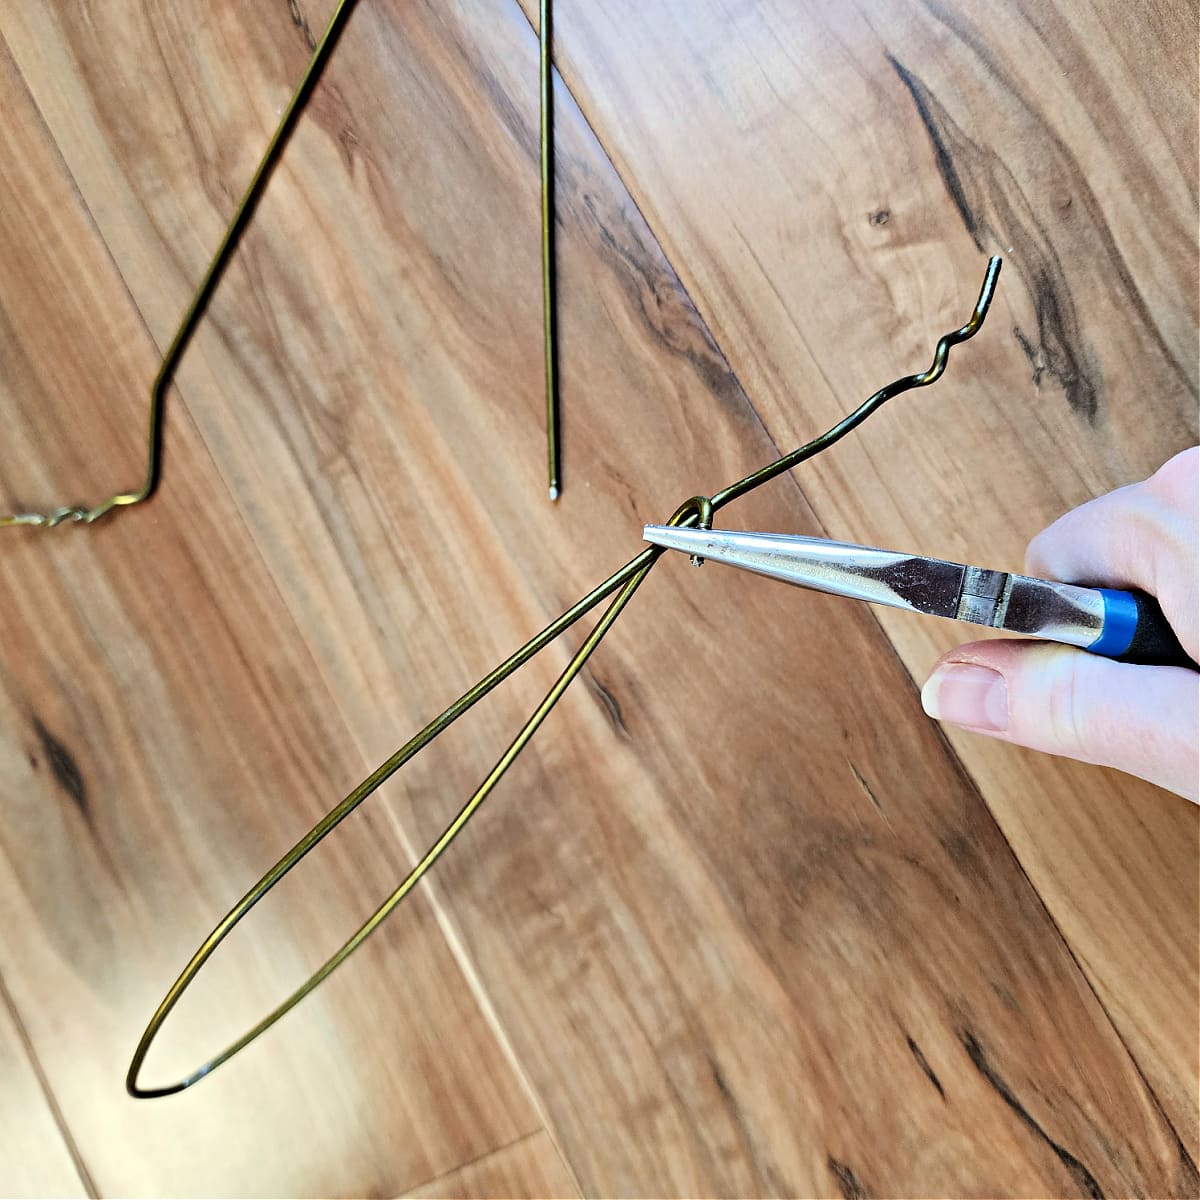
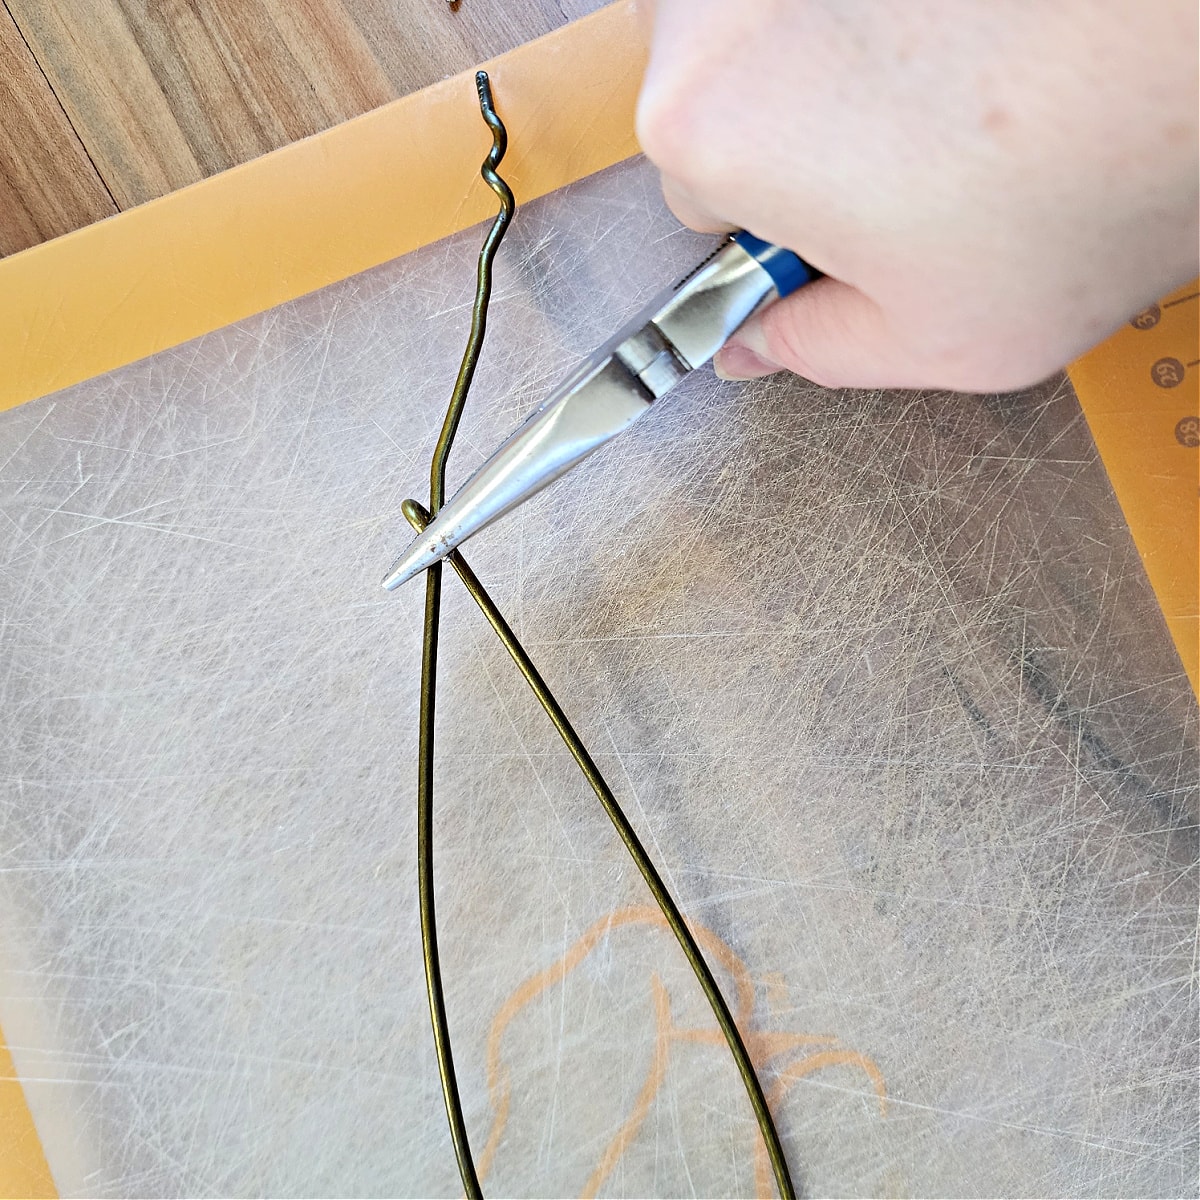
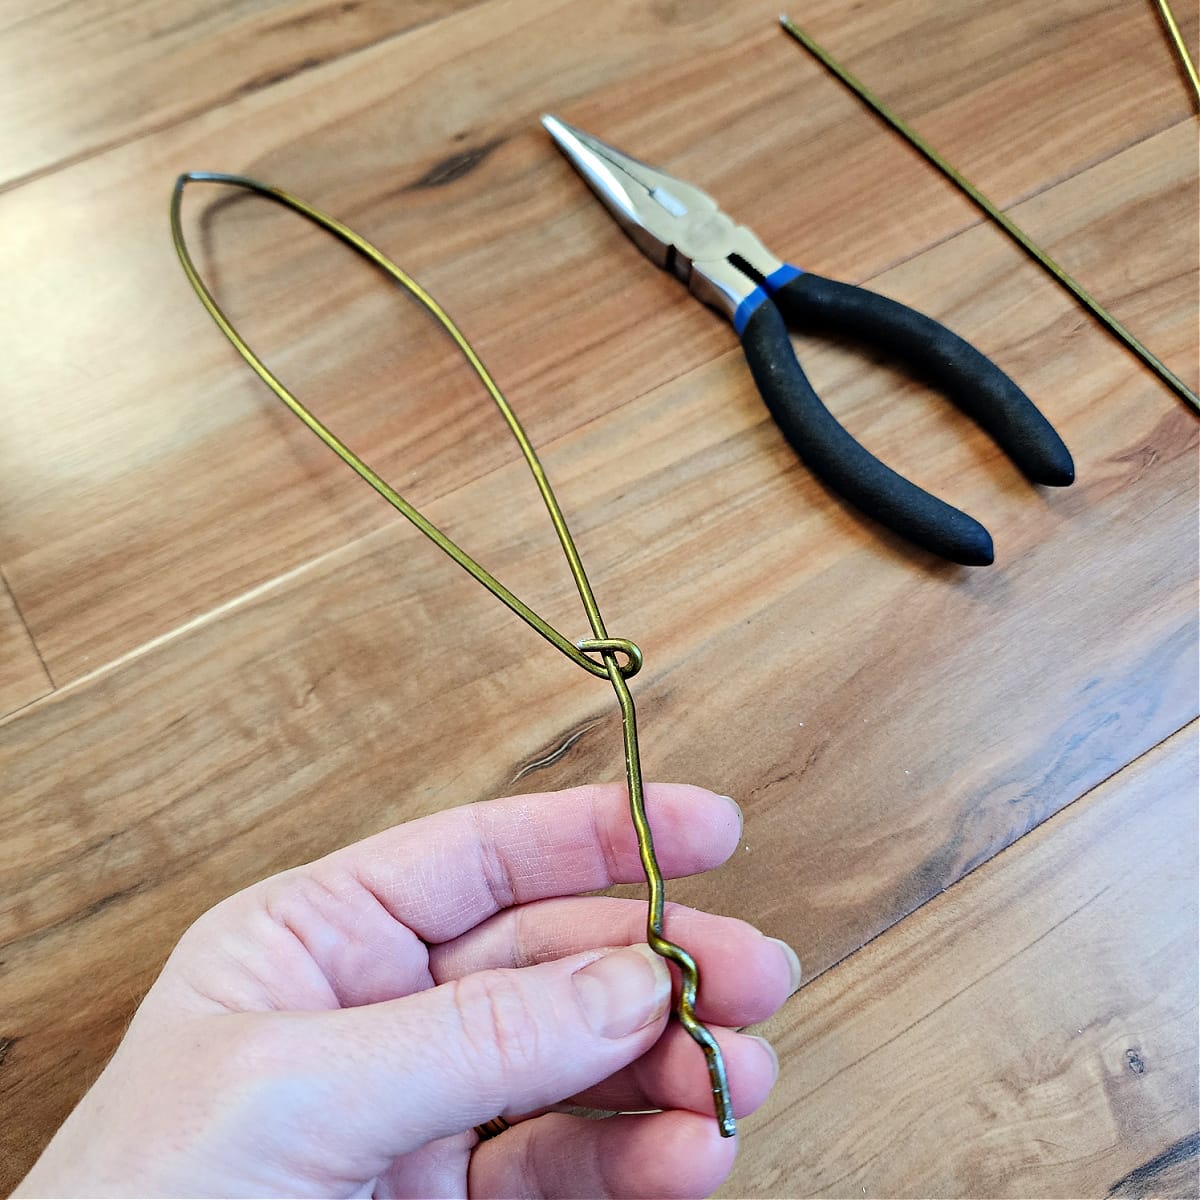
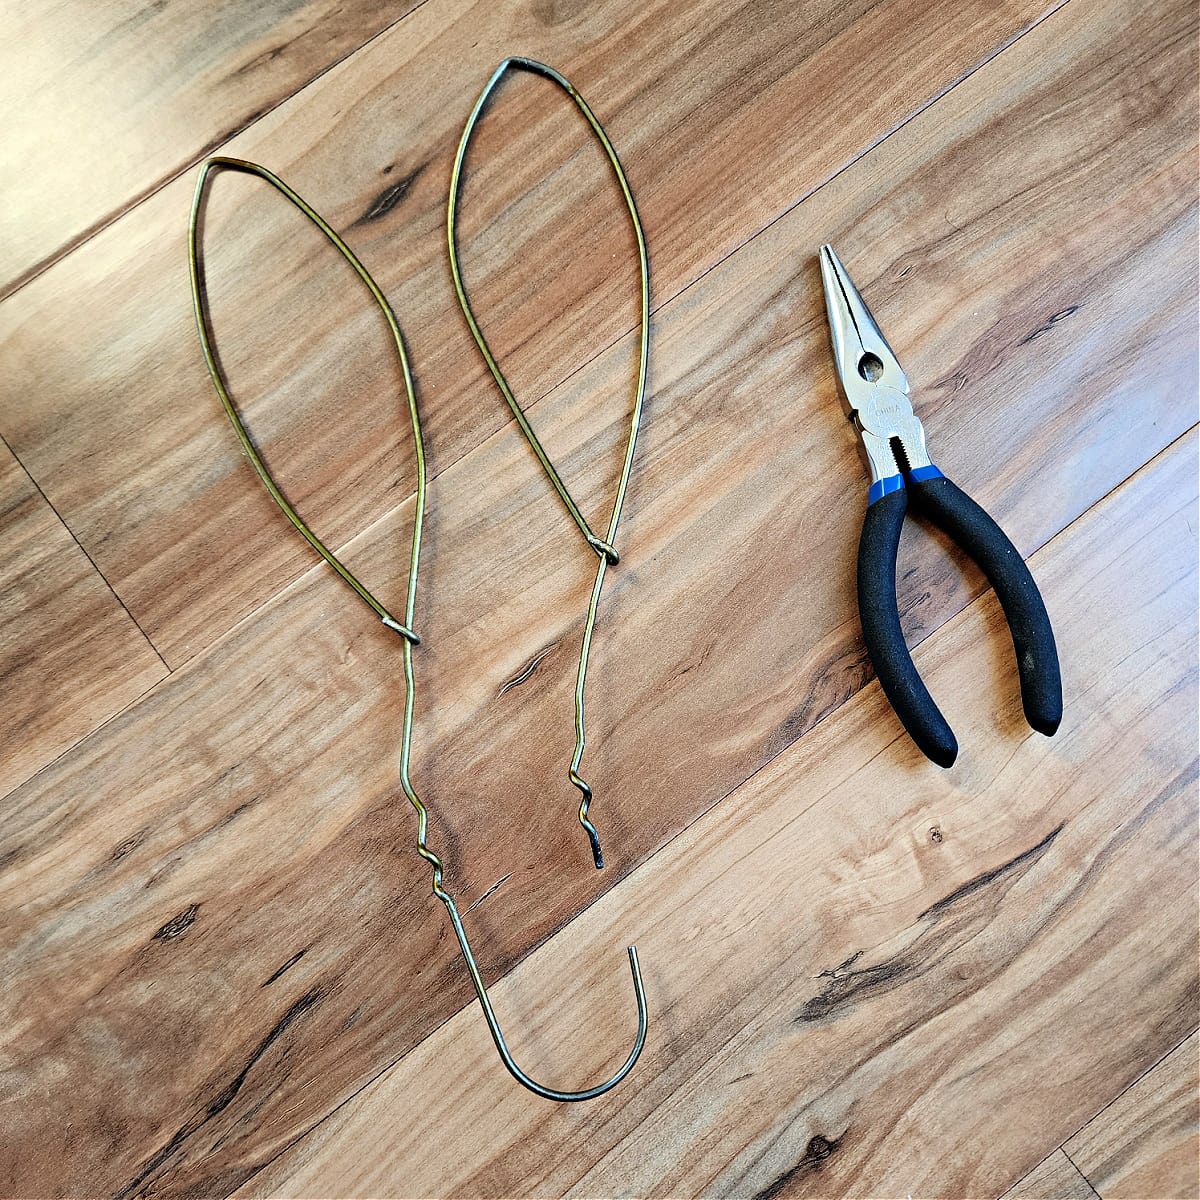
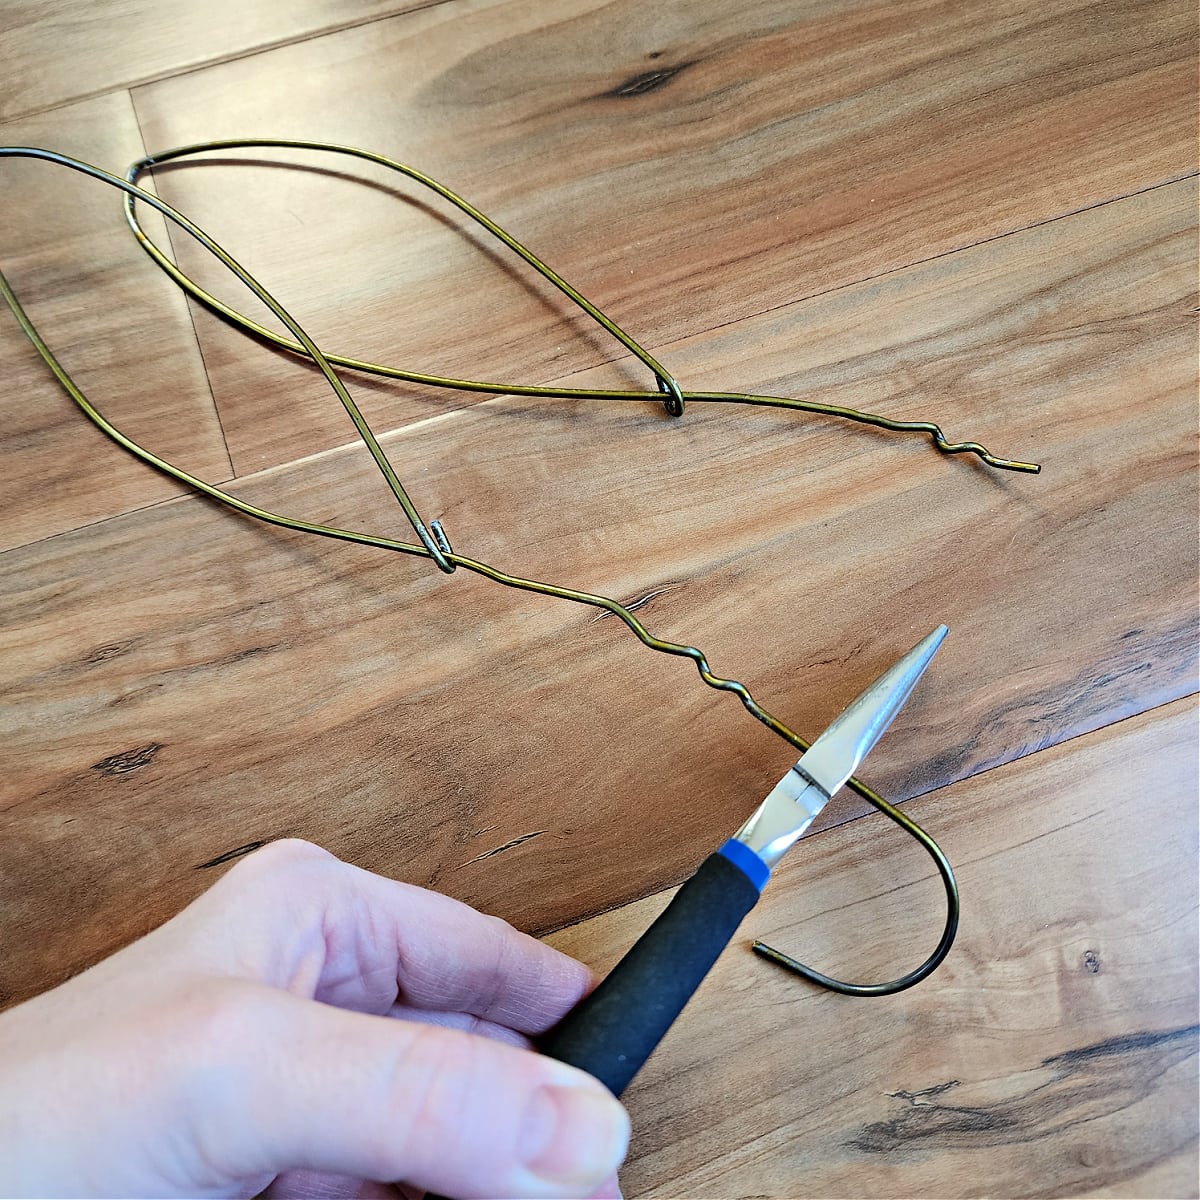
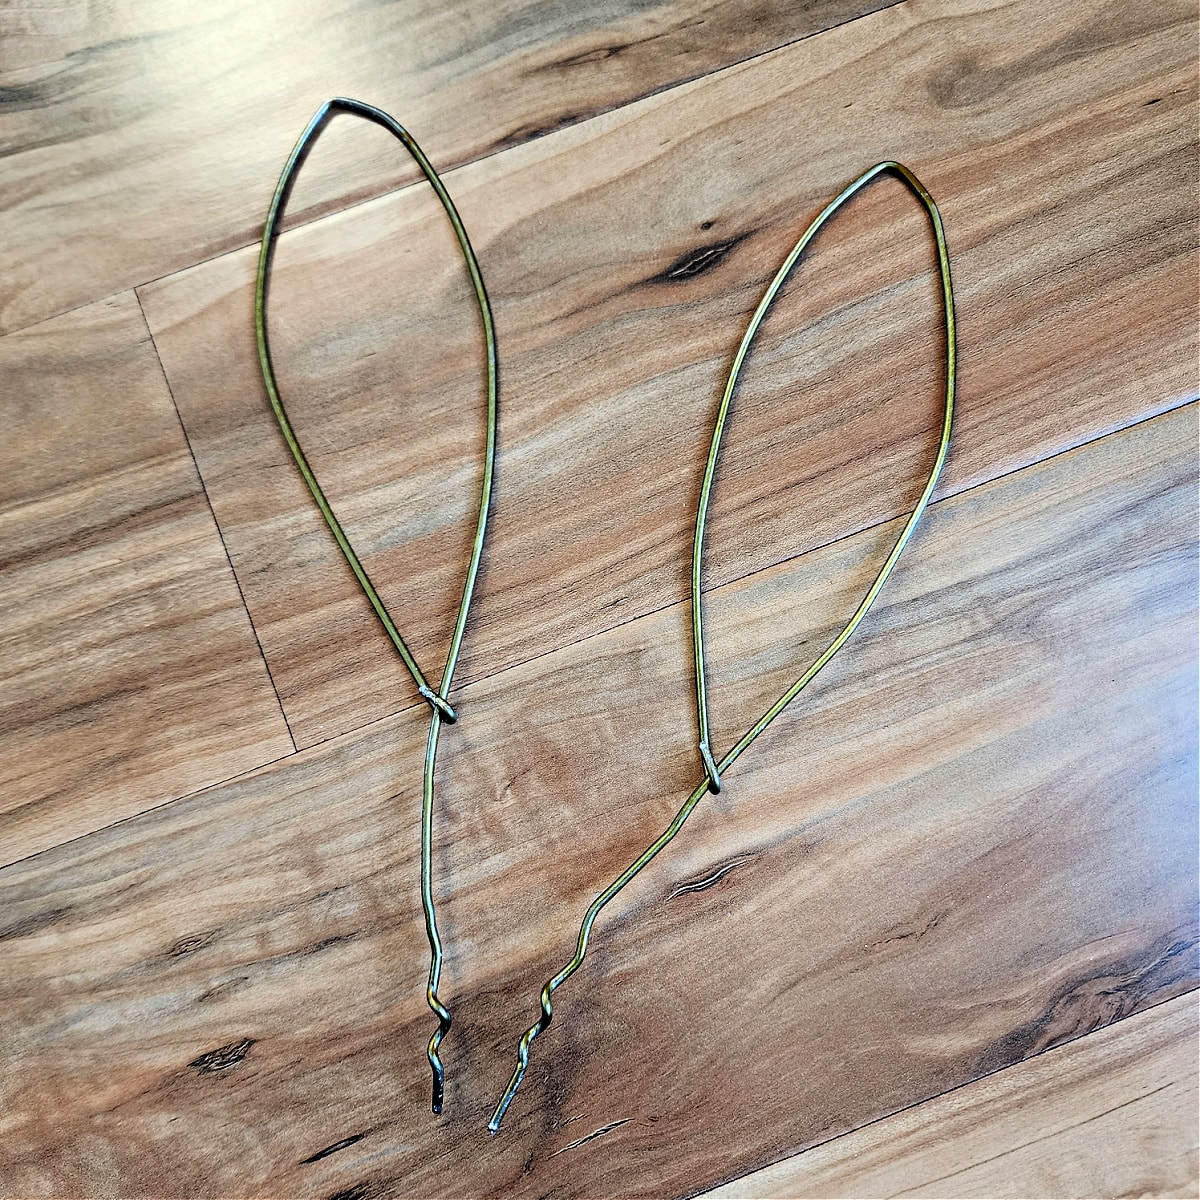
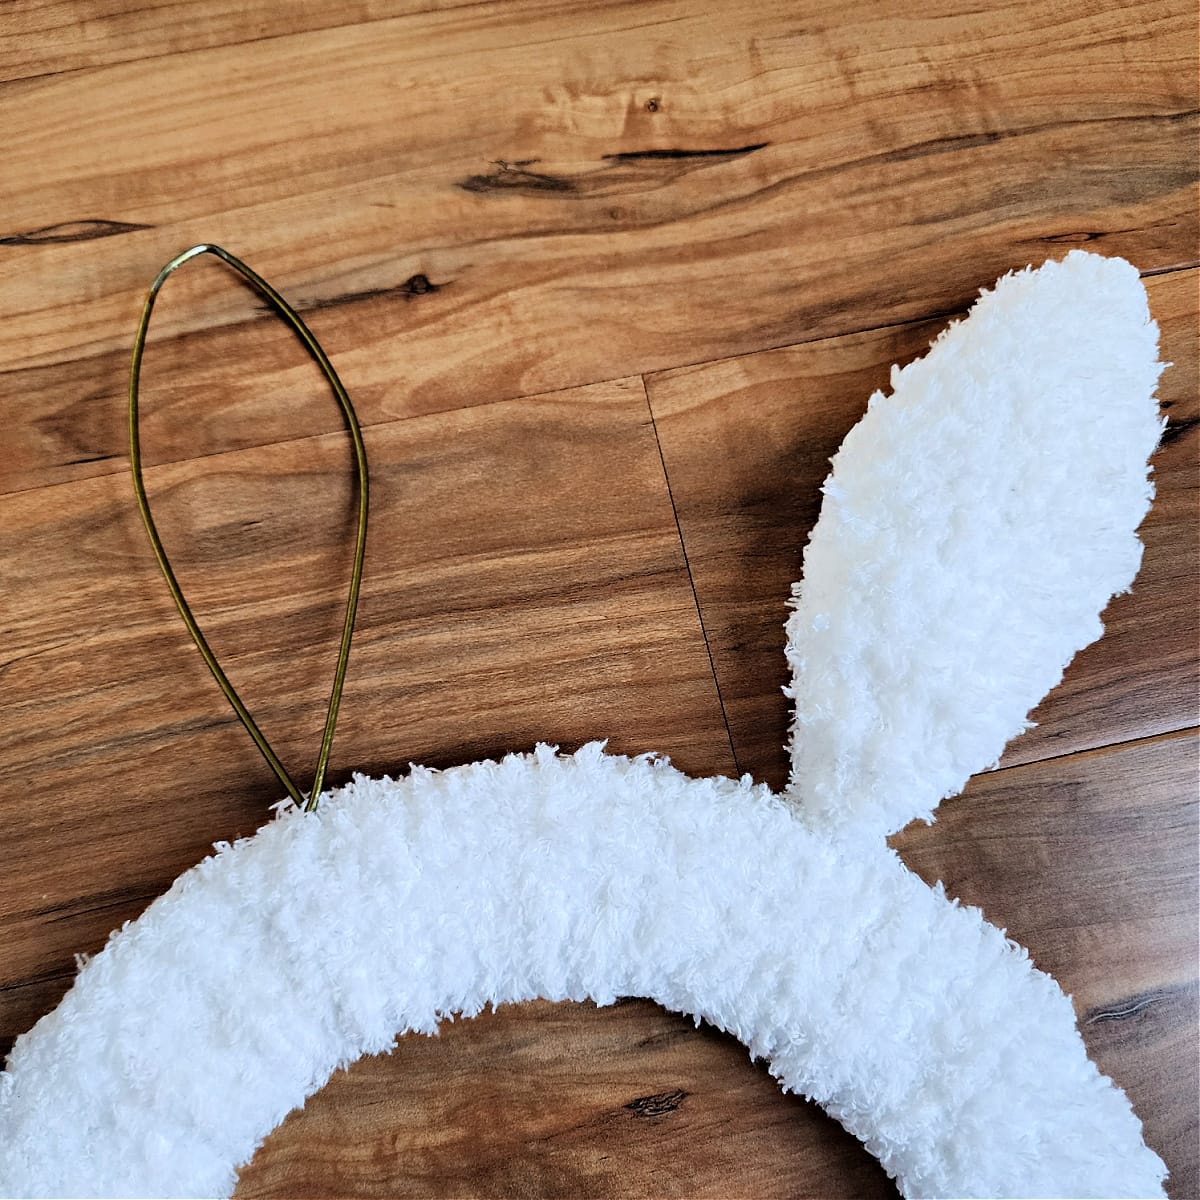
I headed to my local Dollar Tree to find a bunny wreath form, but they hadn’t set them out yet. In the meantime, I decided to DIY my own bunny wreath frame using a wire coat hanger for the bunny ears.
Then, a couple weeks ago, Claire went to the Dollar Tree with her boyfriend so I asked her to pick-up a few small Easter decorations for me to embellish my crochet bunny wreath. Much to my surprise, she text me a picture of a wire bunny wreath frame! I had her pick up a couple and that’s when I decided that I would include instructions in my crochet bunny wreath pattern for both wreath form options.
Related: Do you have a little one who loves to collect Easter eggs? If so, they’ll love our Pipsqueak Bunny Bag!
How to Make a Bunny Wreath
This Easter crochet wreath includes instructions for two bunny wreath form options so you’ll first need to choose which option you’ll be making.
If you are able to find the cute Dollar Tree Bunny Wreath Form, it’s the most cost and time effective option. If not, no worries, you can DIY your own wire bunny wreath form using a small round wire wreath form and an old wire coat hanger!
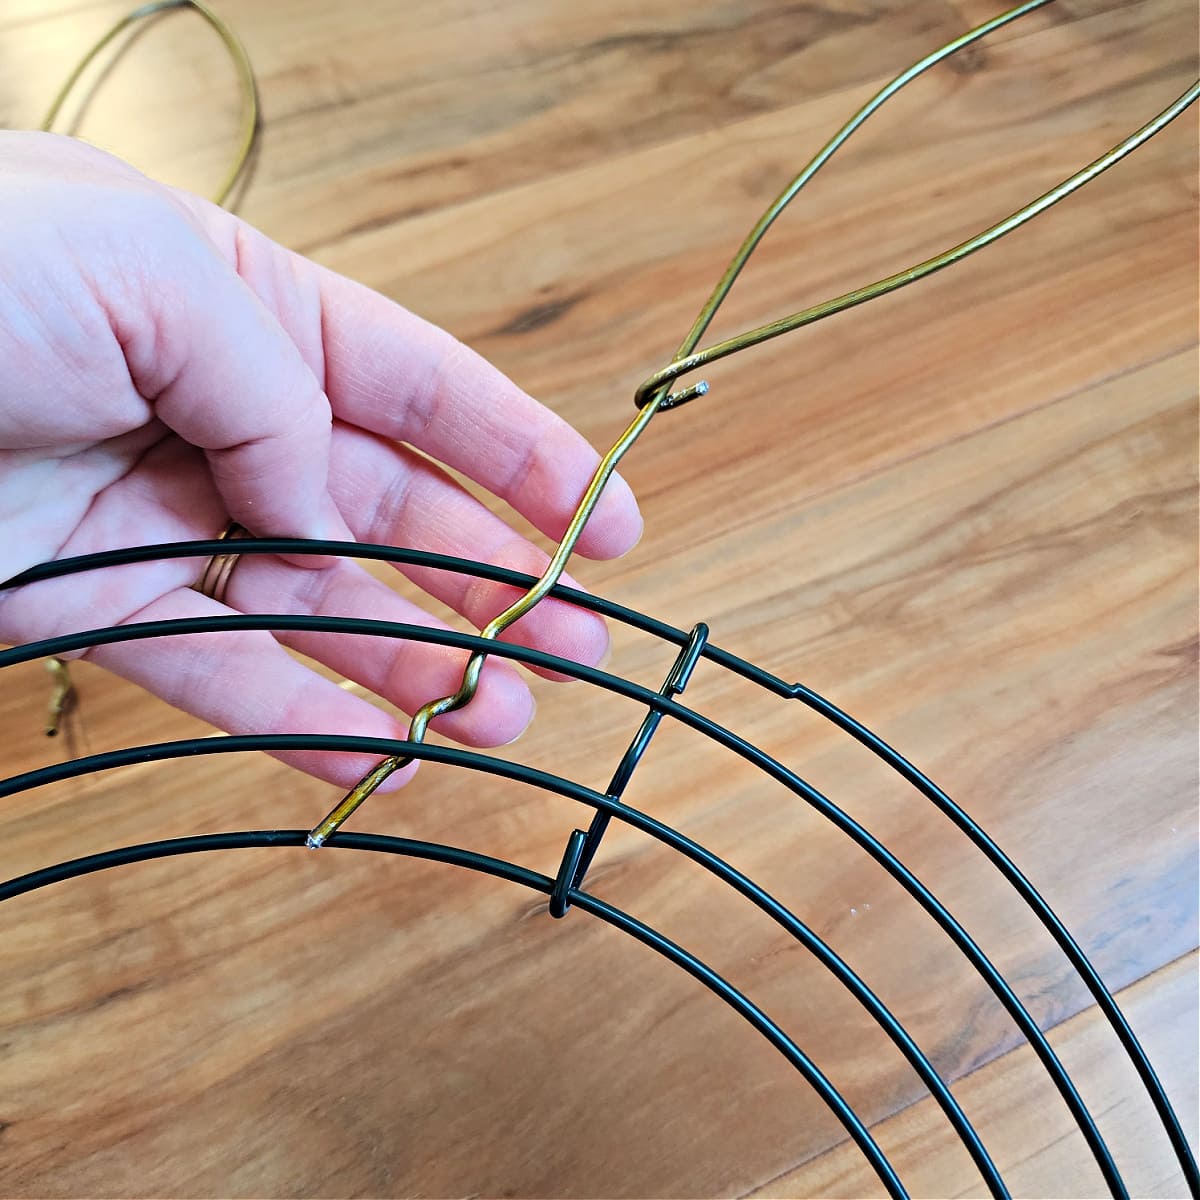
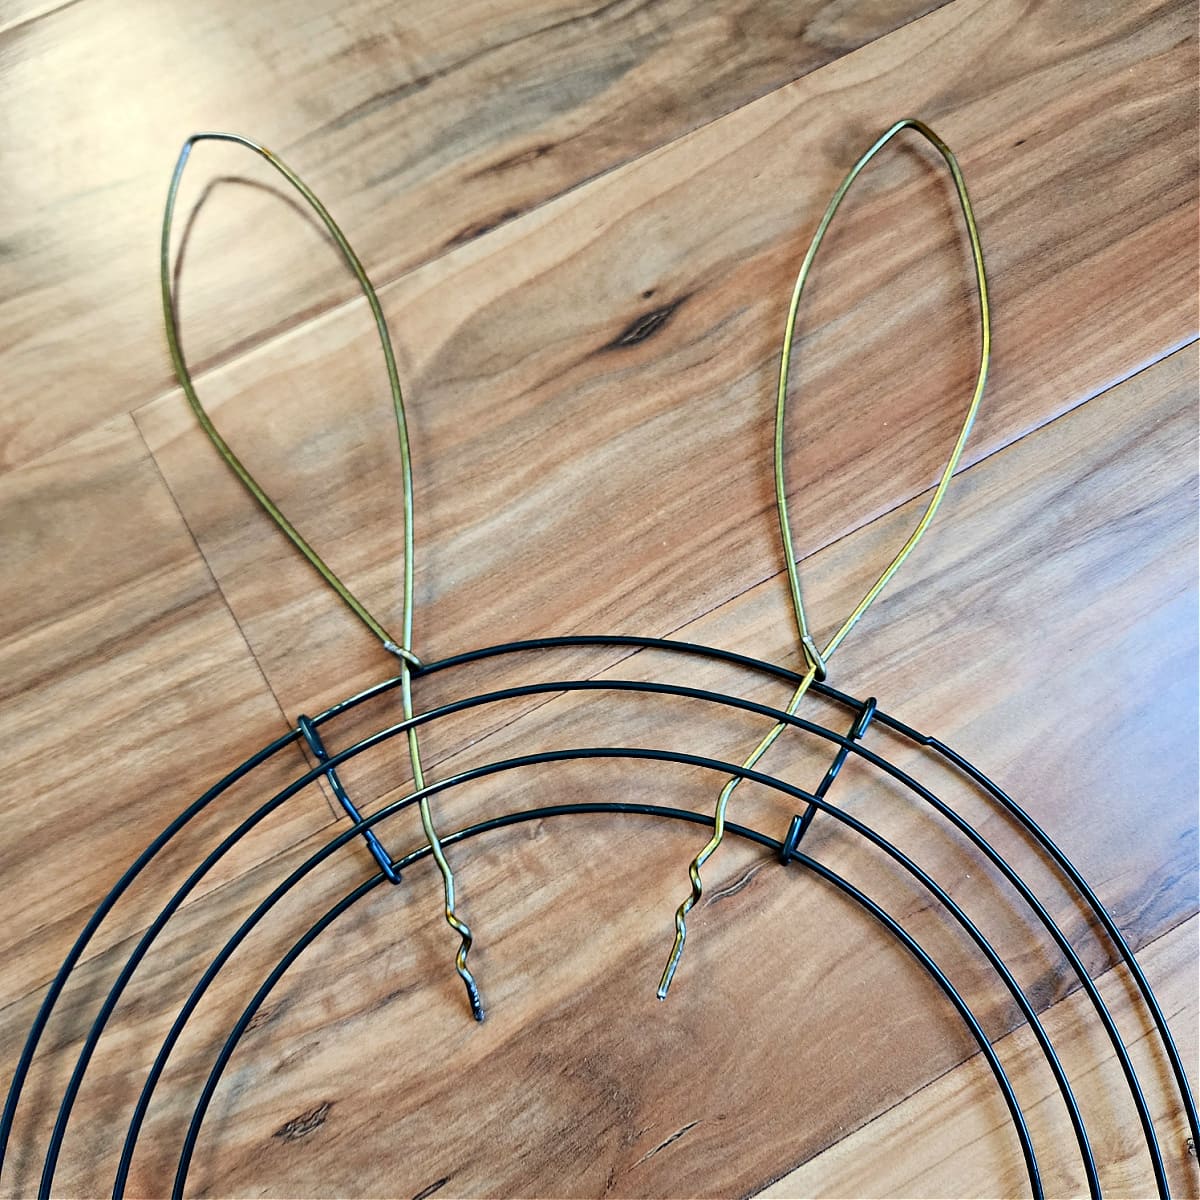
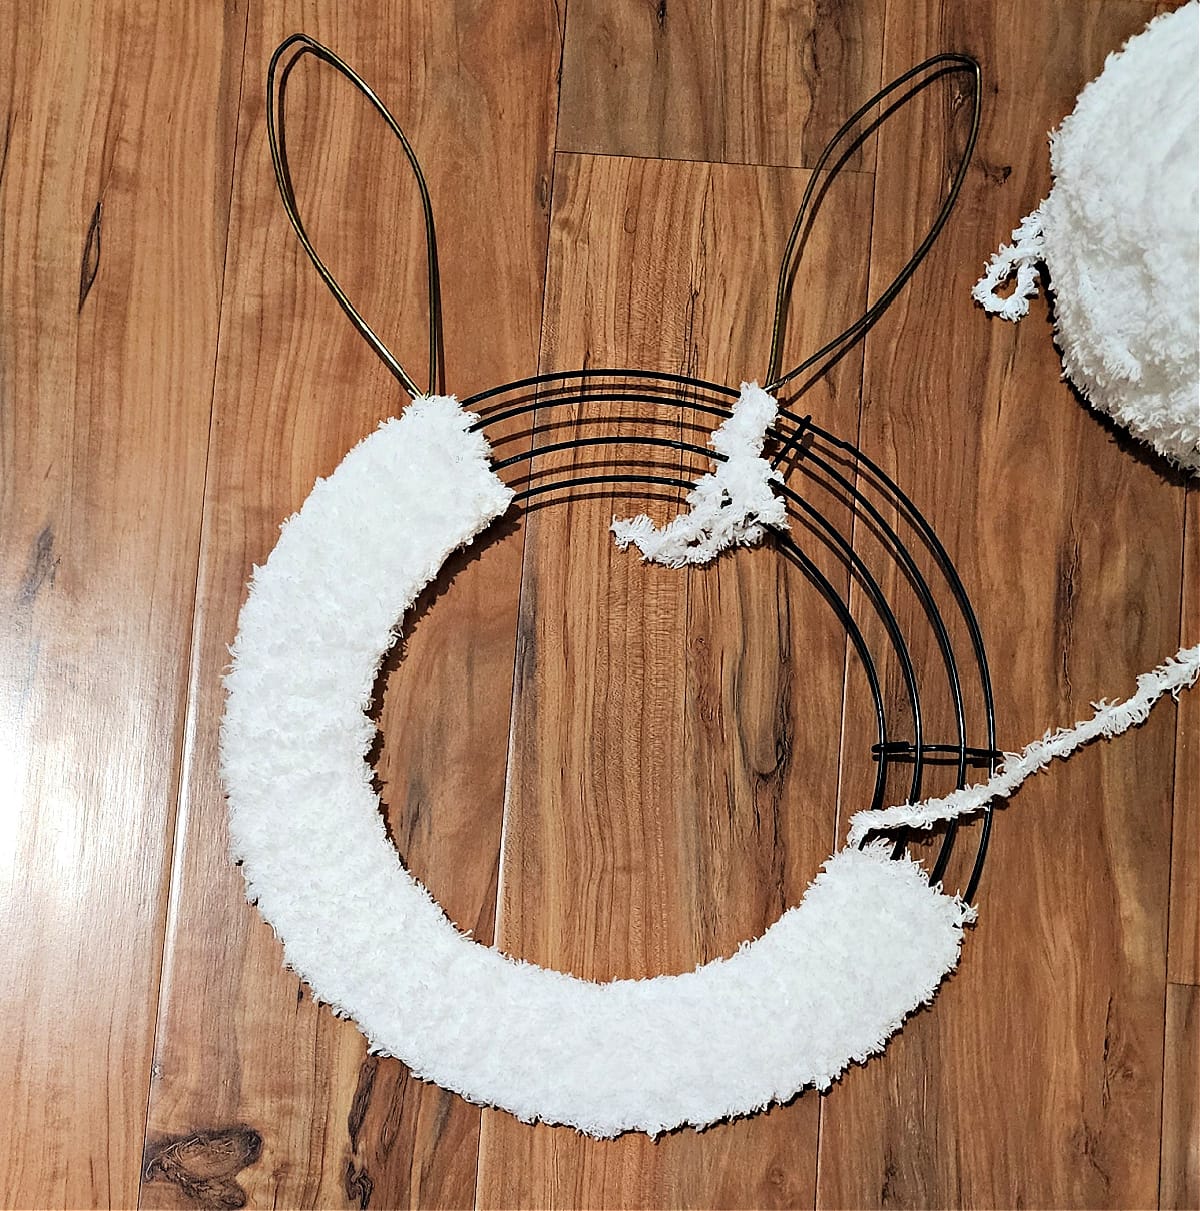
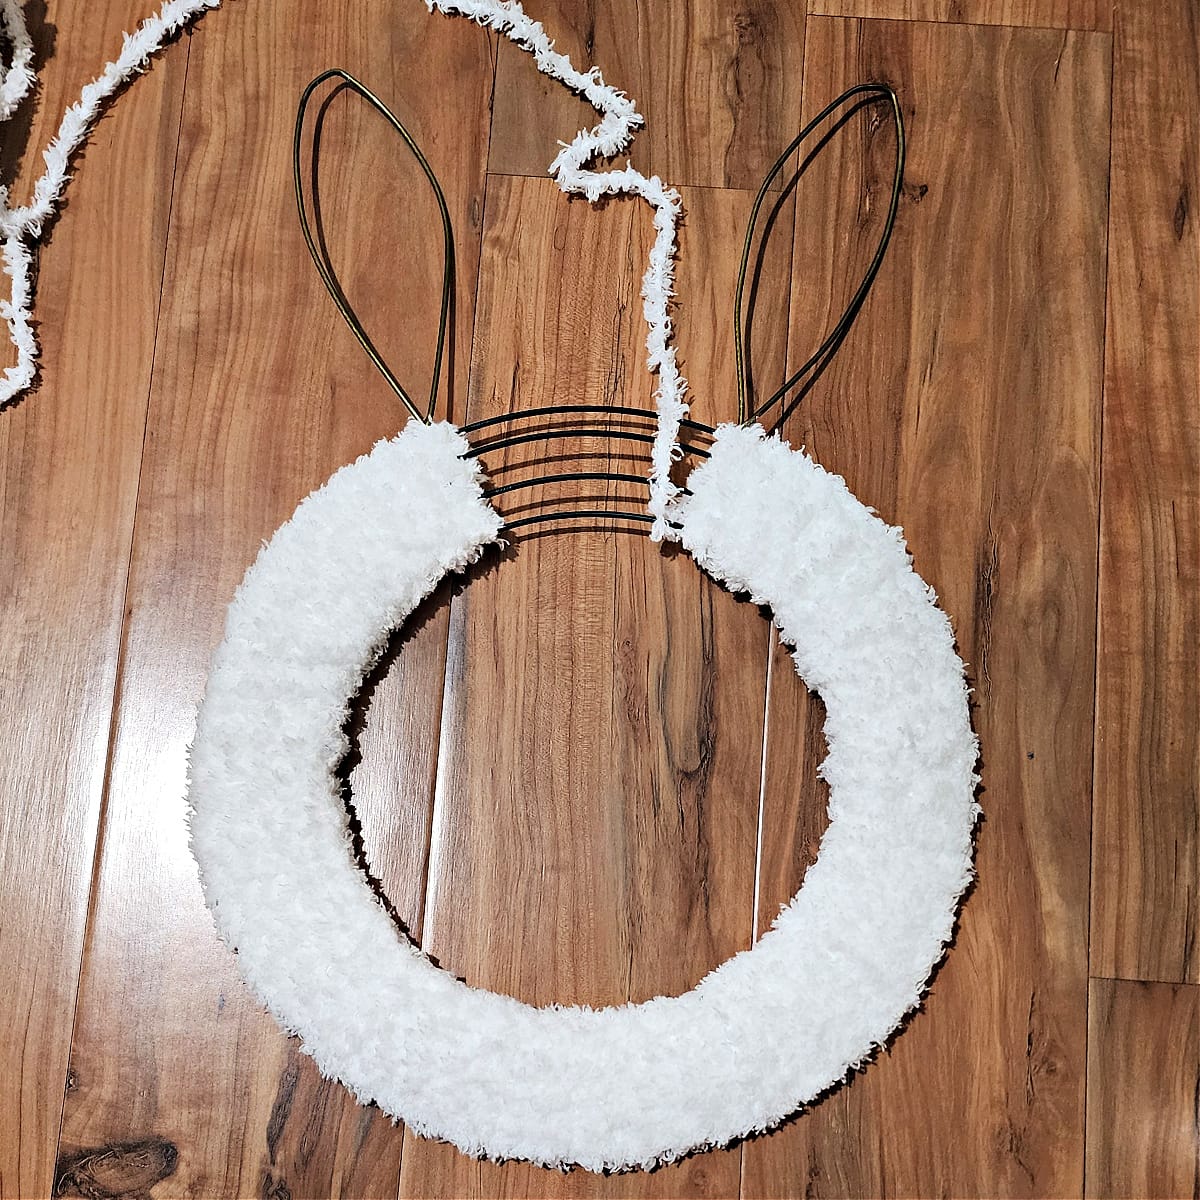
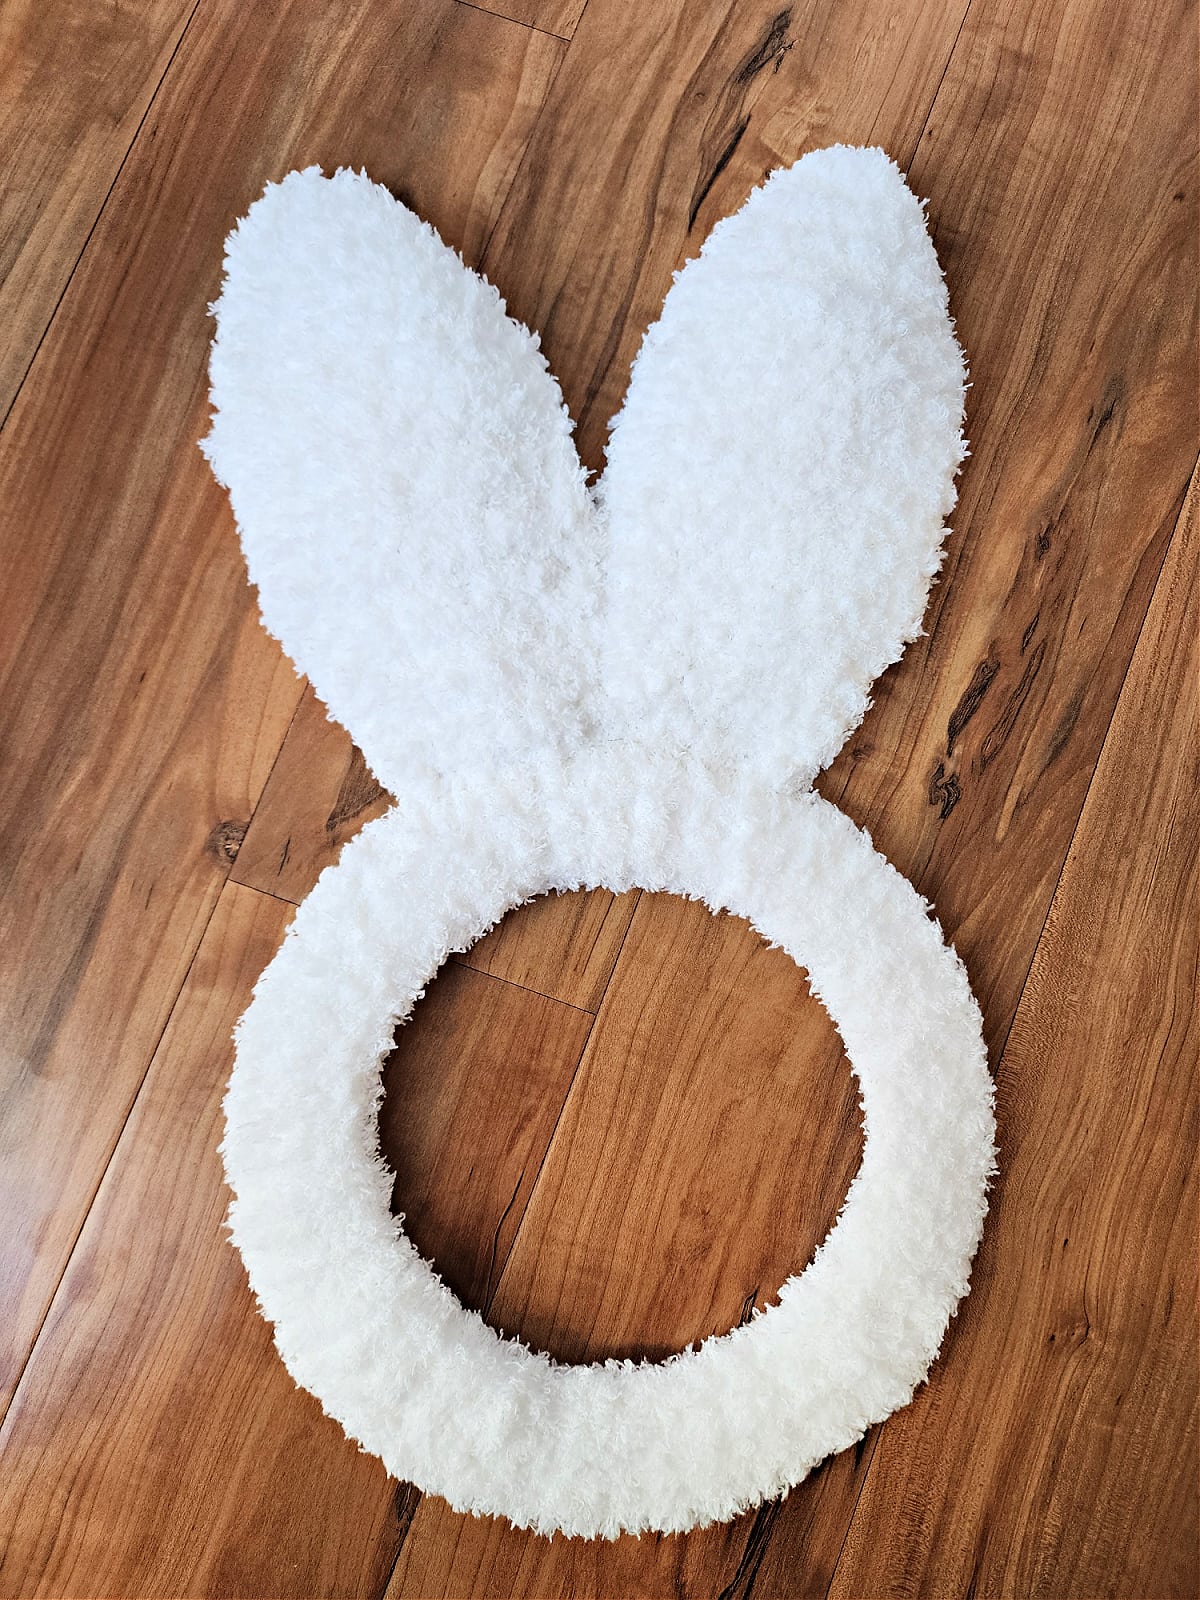
If you’re making your own bunny wire wreath form with coat hanger bunny ears, first, you’ll need to make the bunny ears from the coat hanger and attach them to the round wire wreath form.
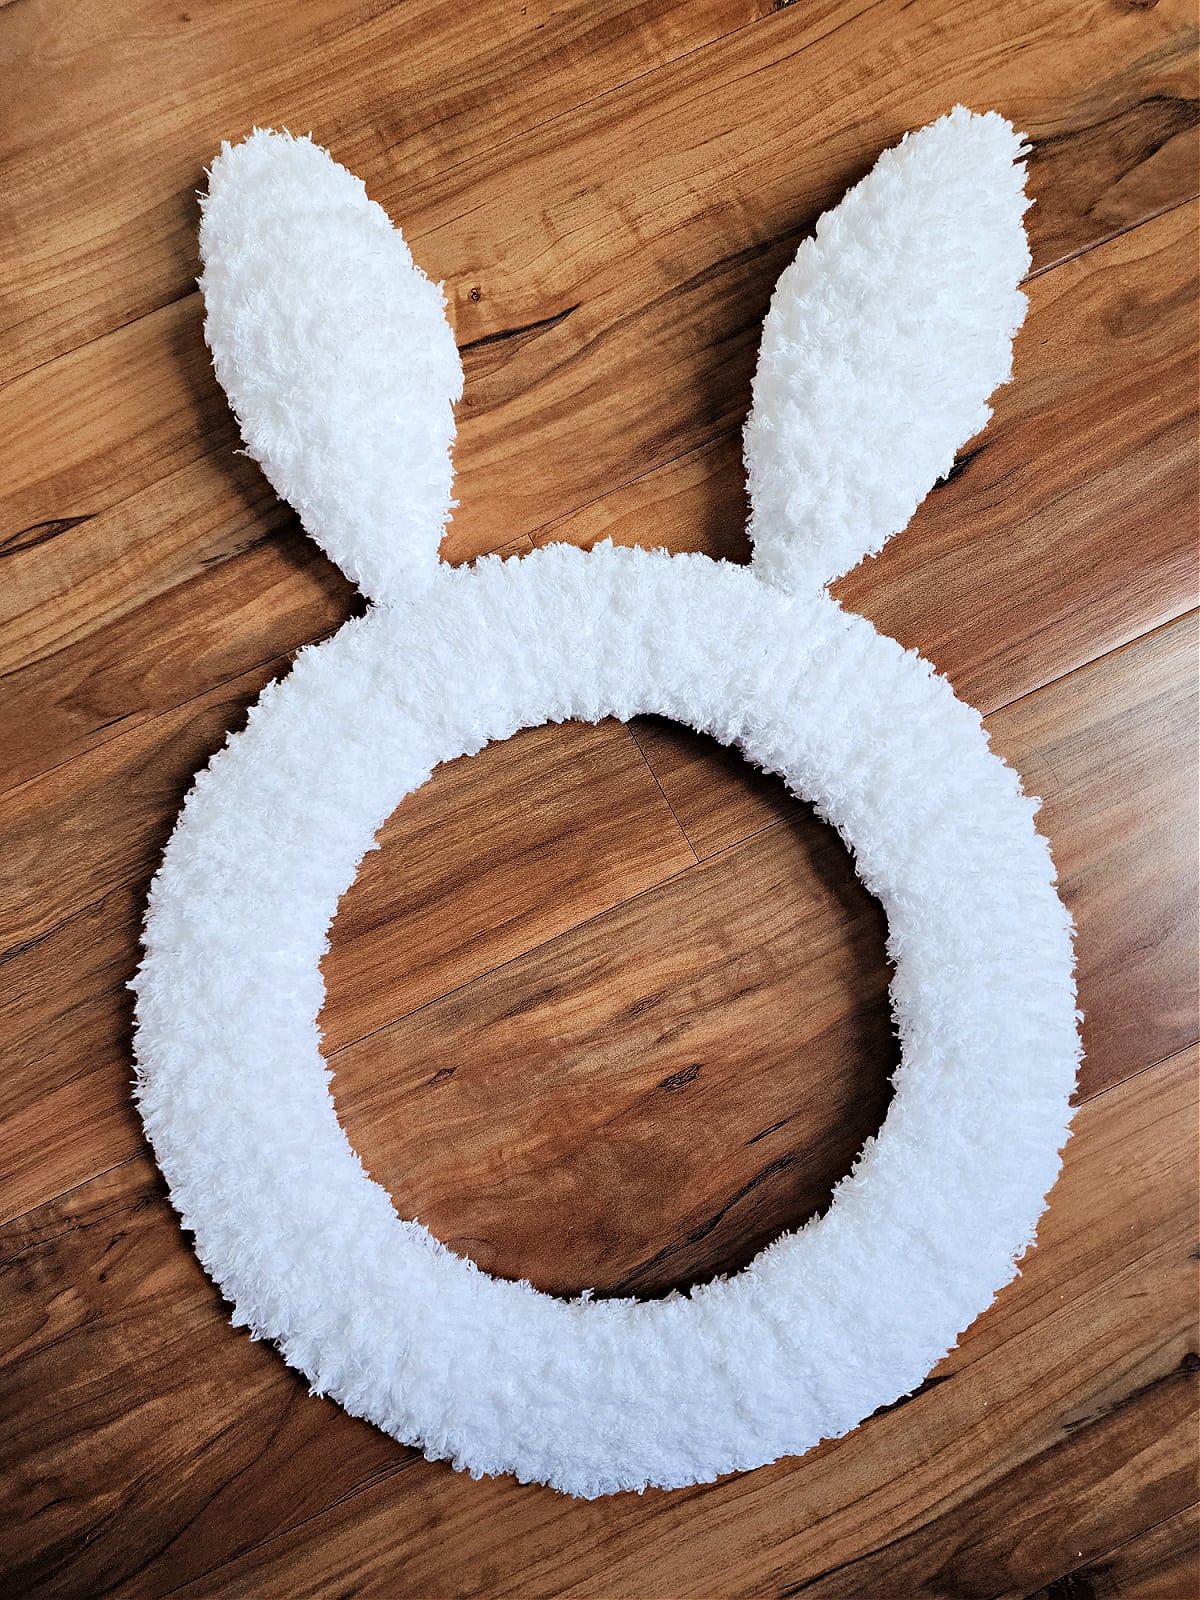
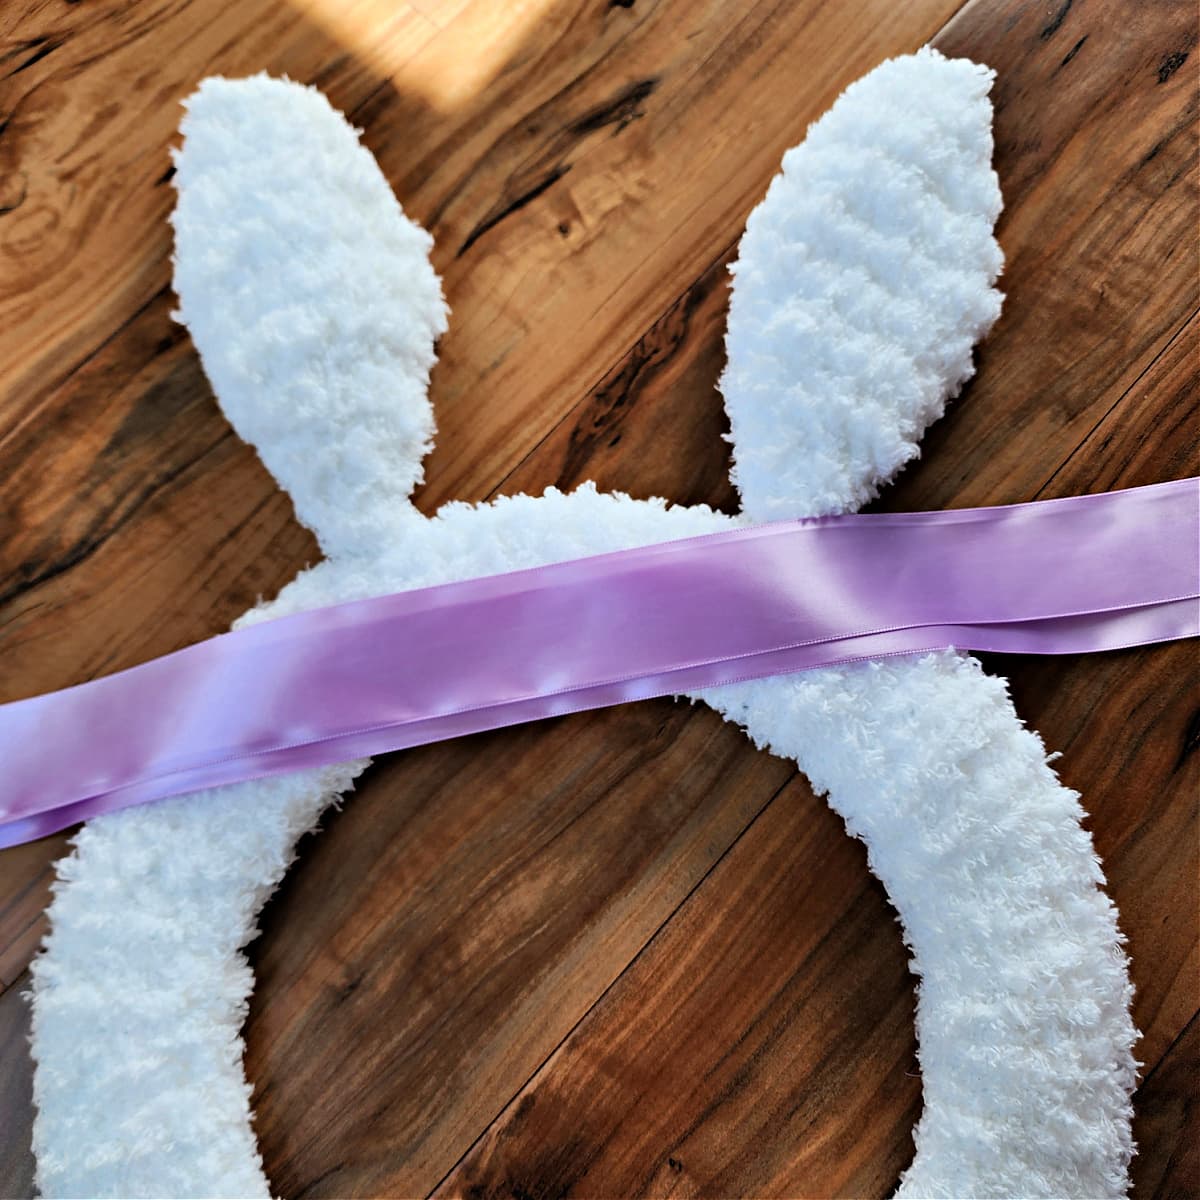
Once you have your bunny wreath form ready, you’ll begin by wrapping the round portion of the wreath with yarn.
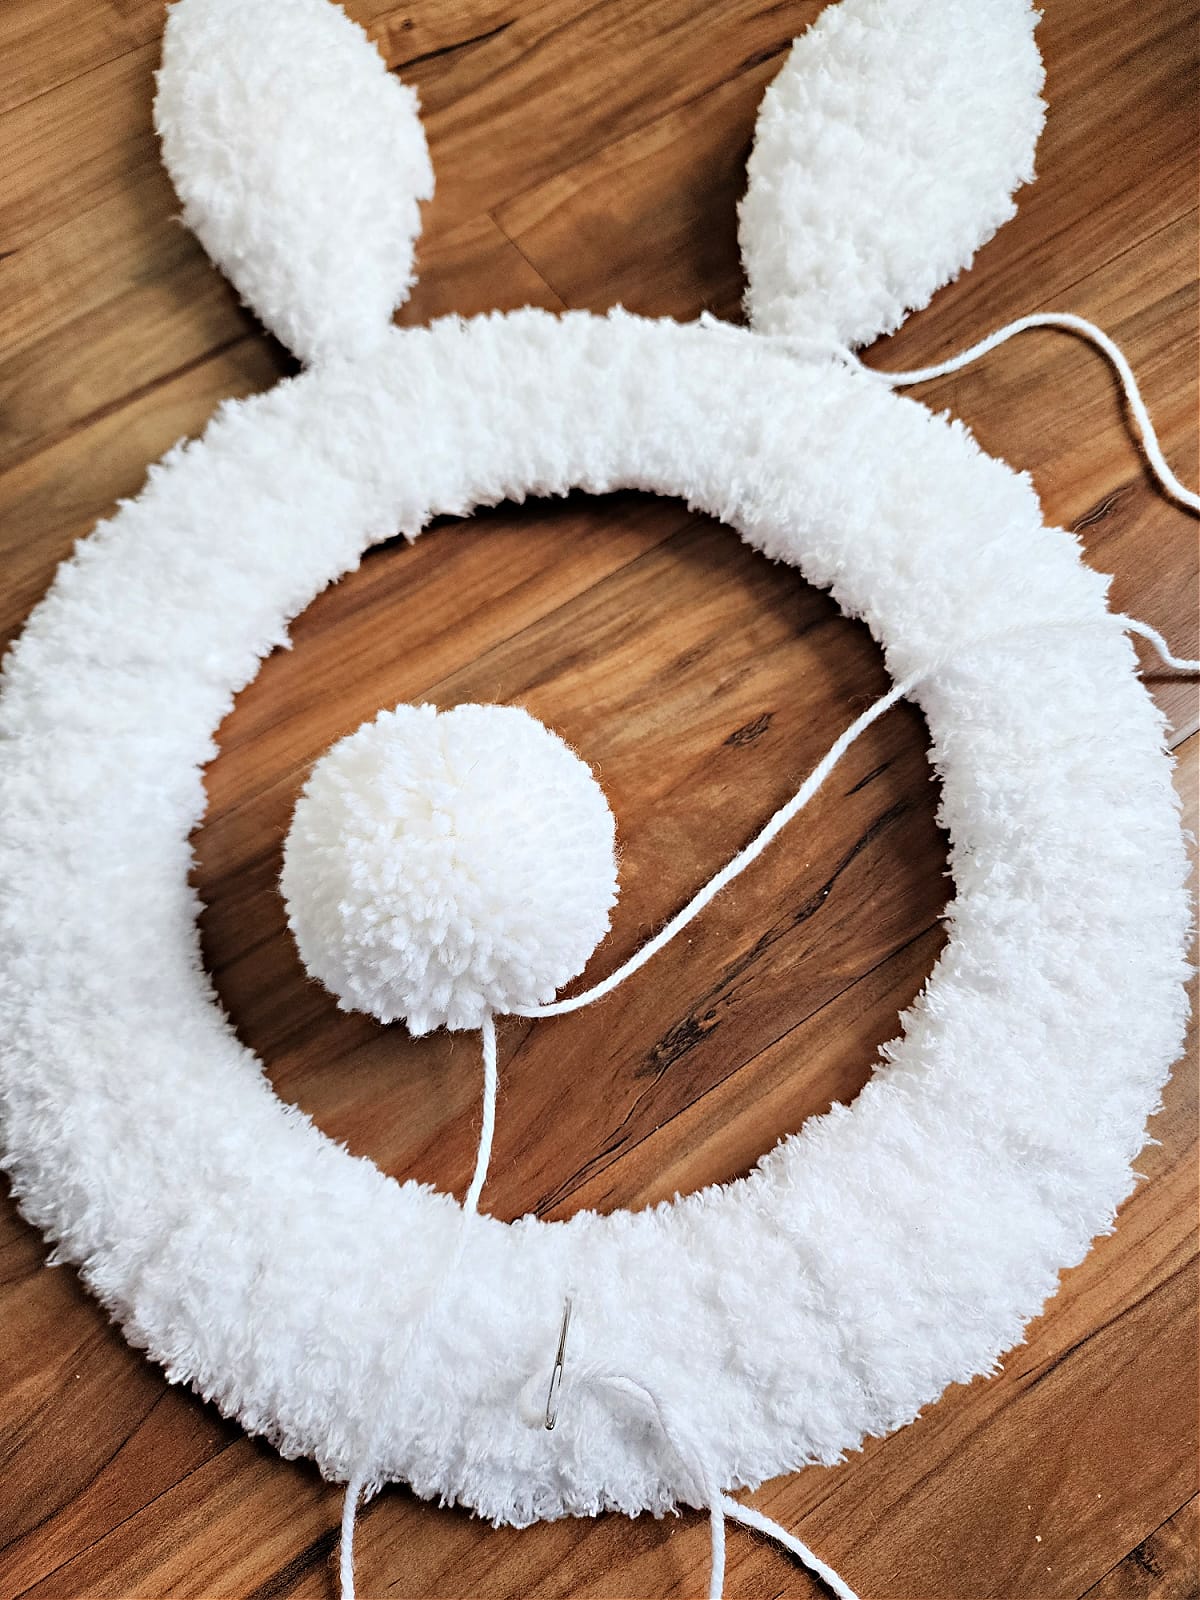
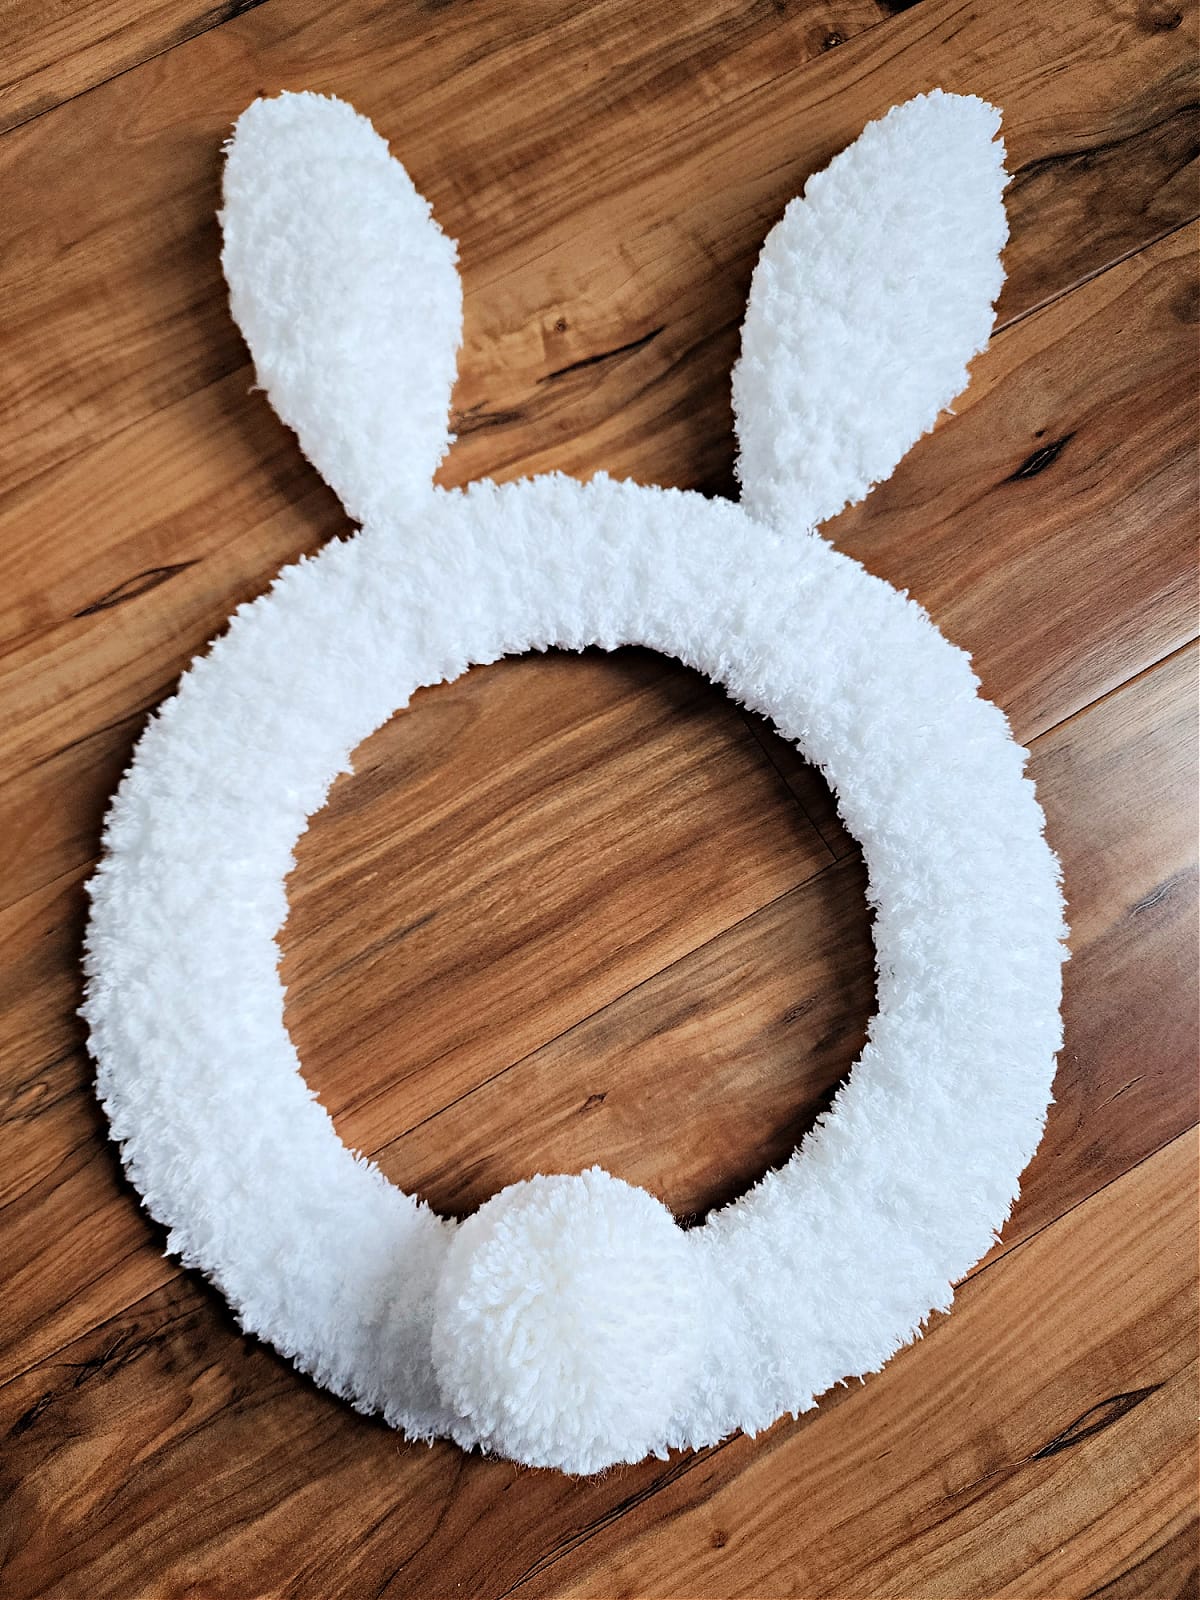
Next, you’ll crochet bunny ears that fit the wreath option you chose. After you crochet the ears, you’ll whipstitch them to the frame.
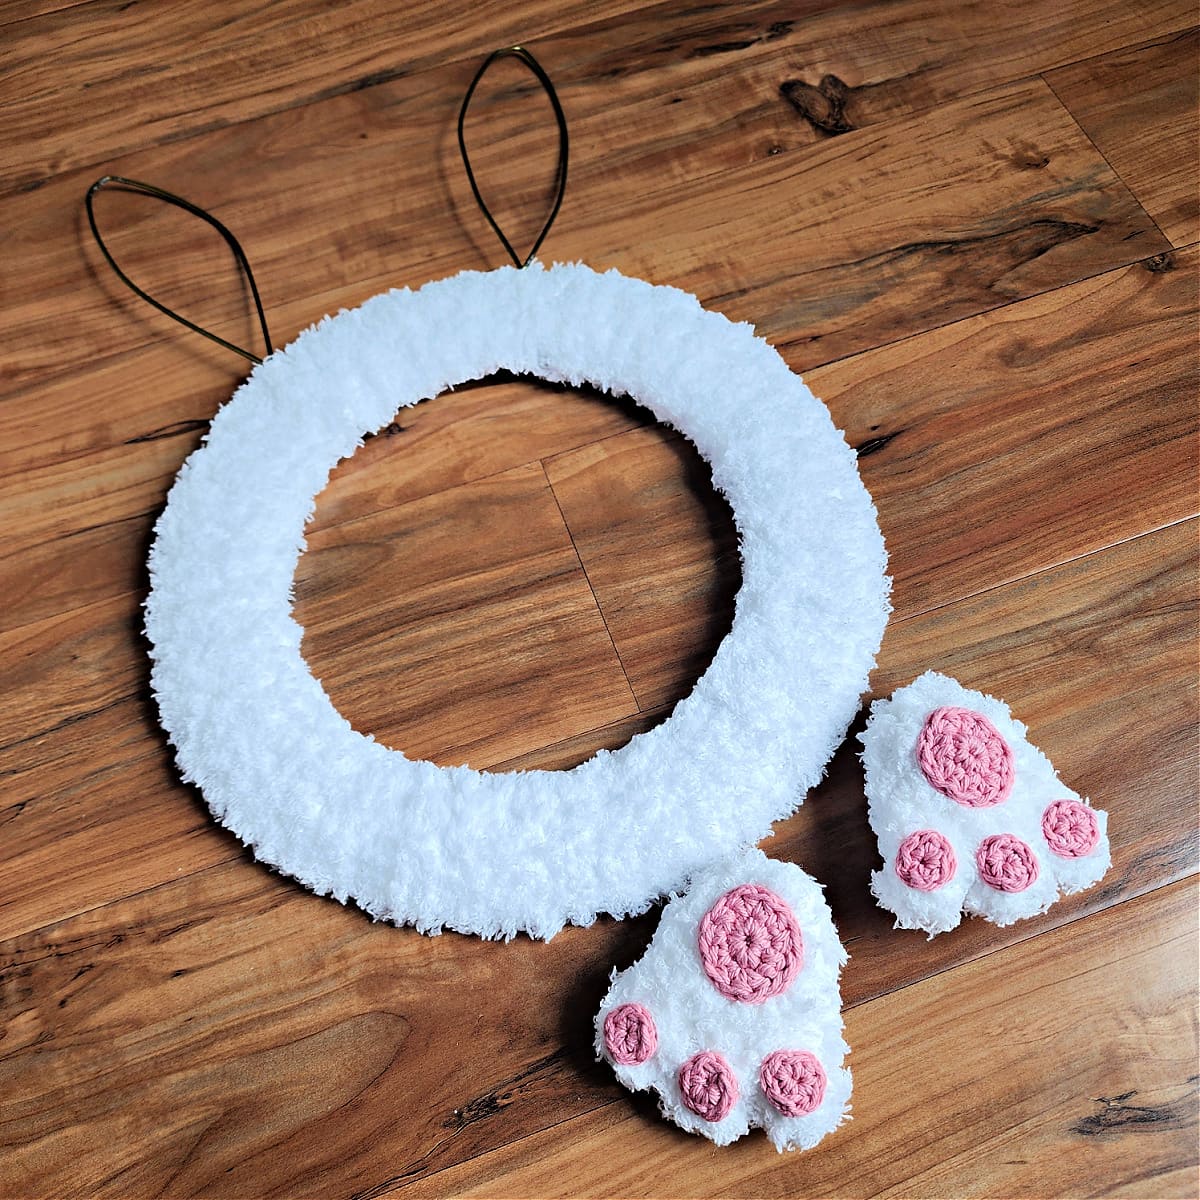
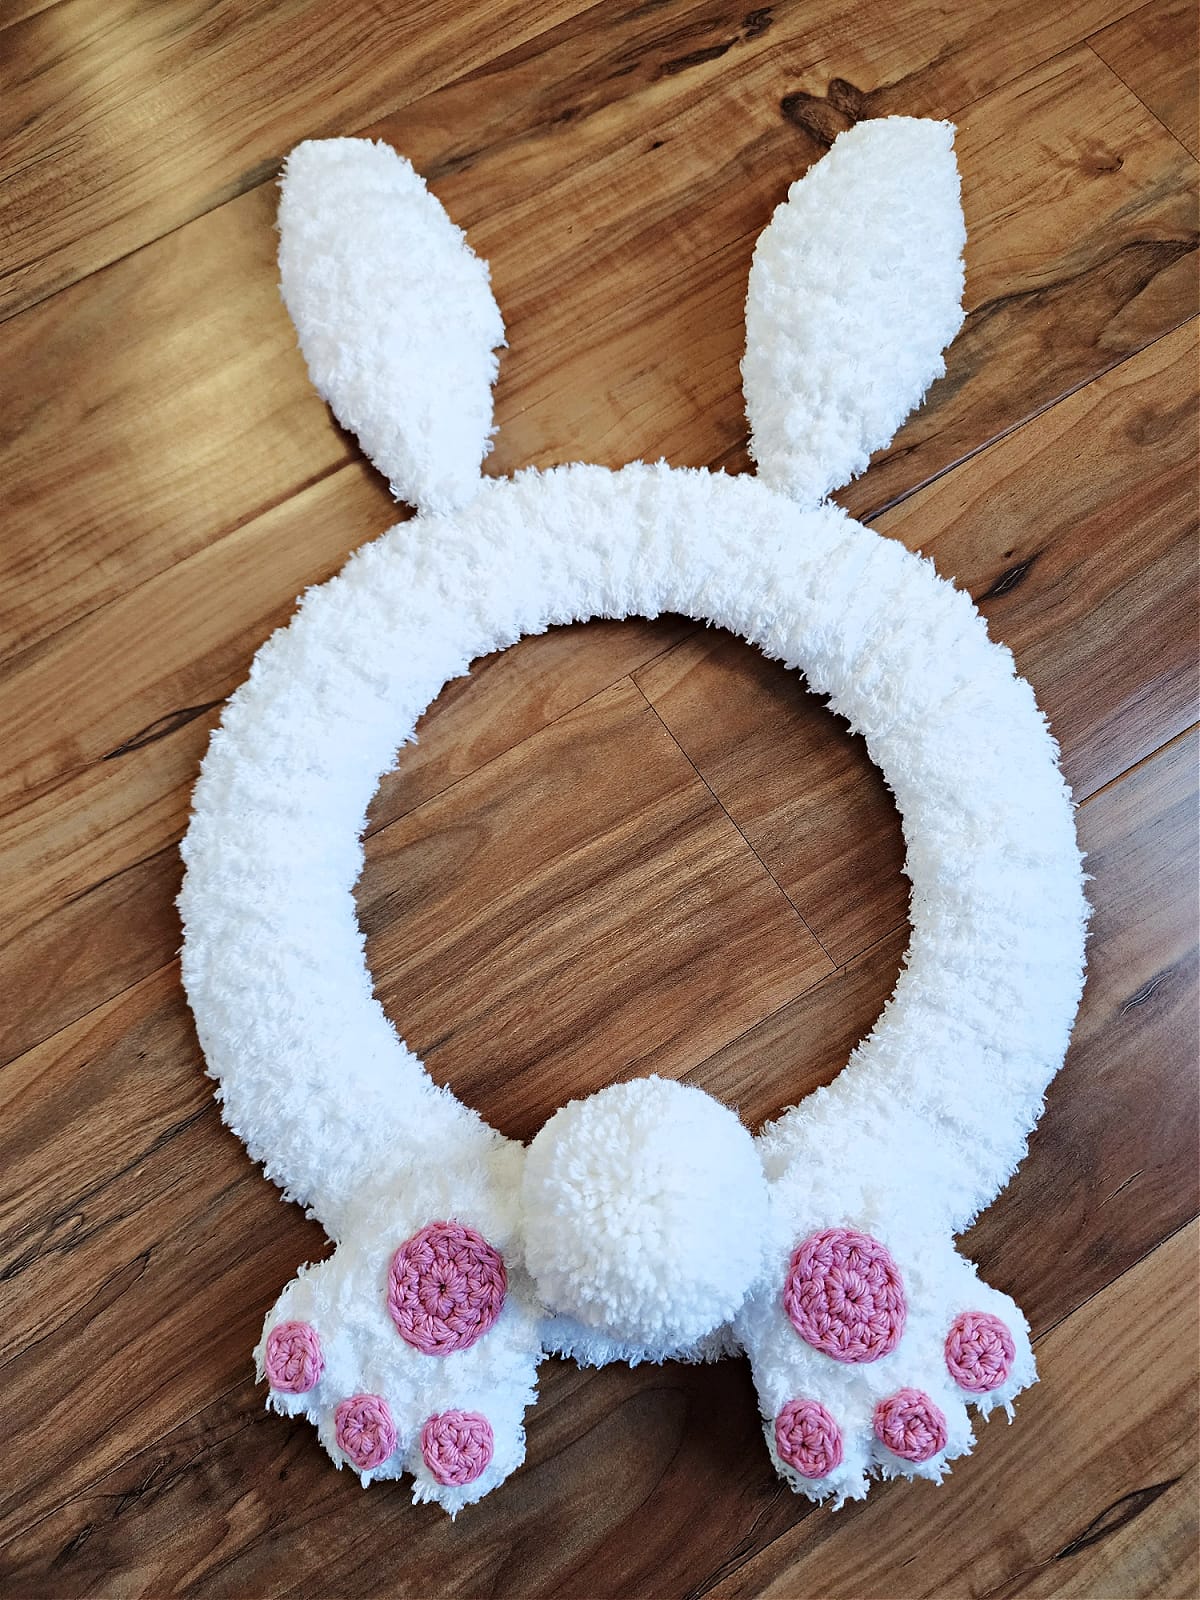
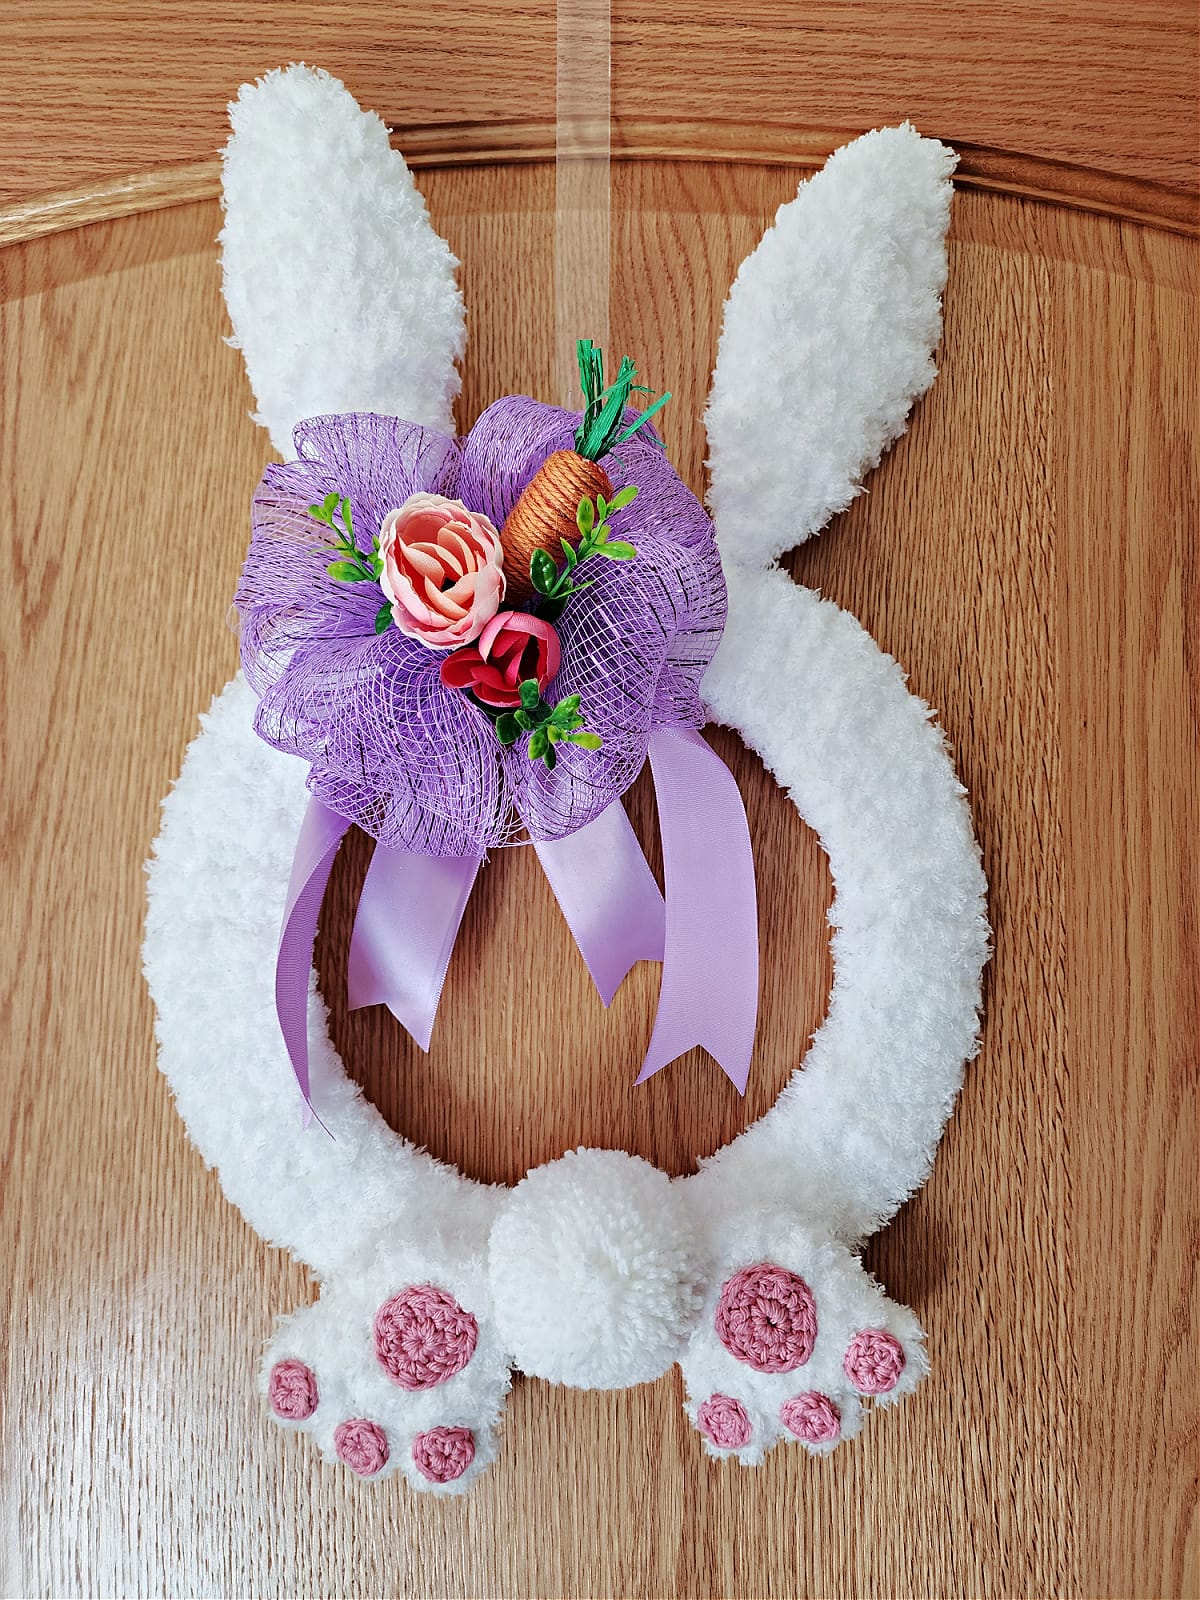
If you’re making a bunny butt wreath, you’ll make a yarn pom for a bushy bunny tail and then two crochet feet and attach them.
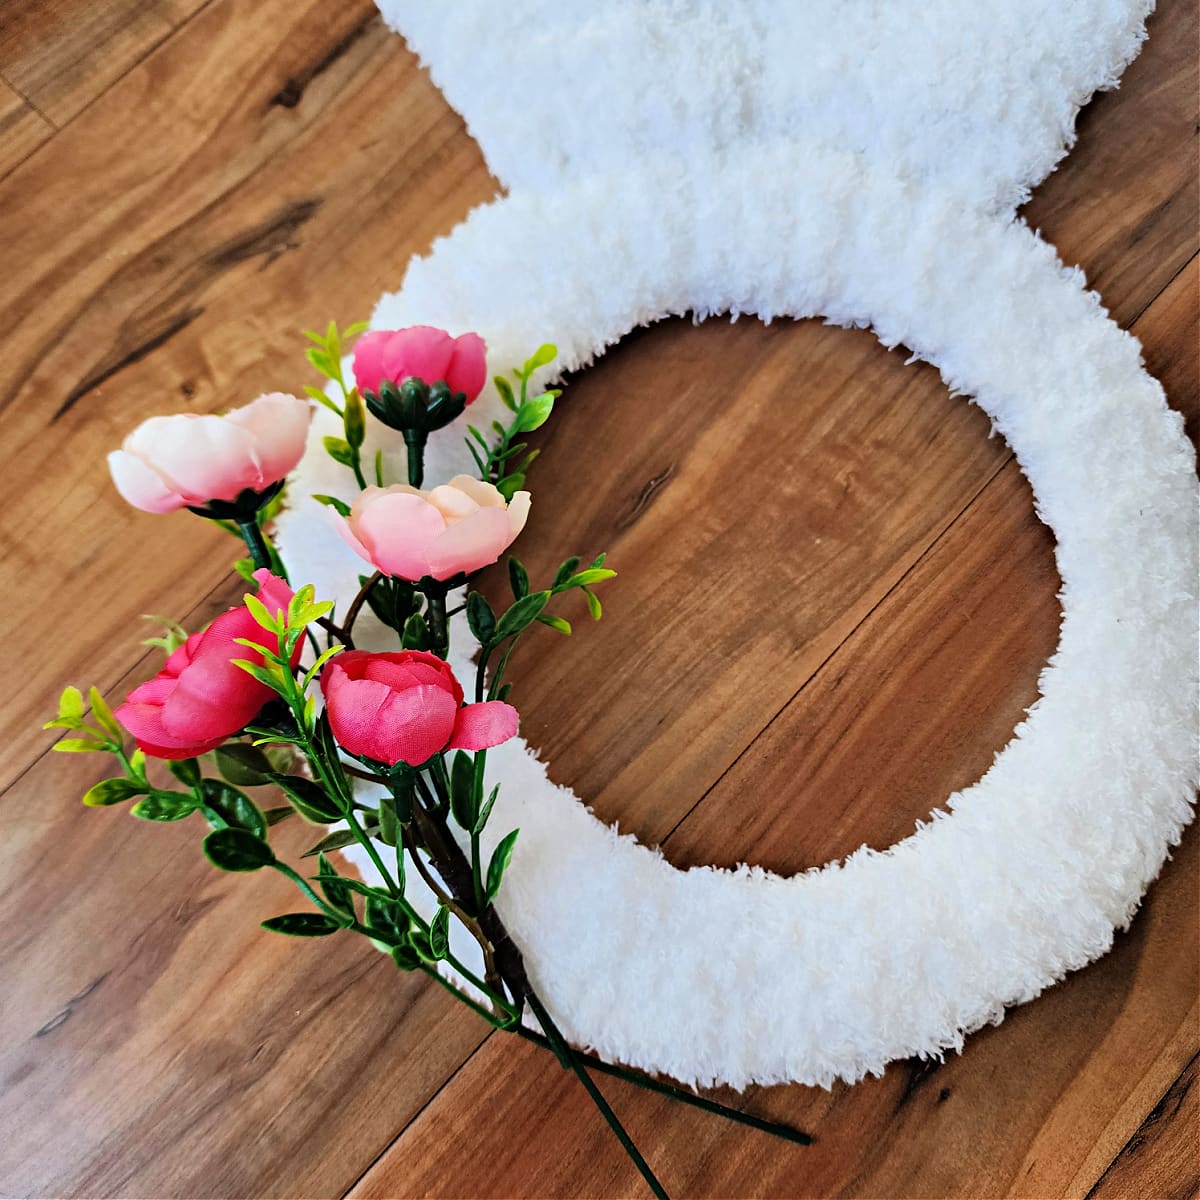
Lastly, you’ll Embellish your Easter bunny wreath with small Easter decorations from the Dollar Store or other craft stores. I shared a photo below of the cute embellishments Claire picked-up from the Dollar Tree for me.
Yarn
Bernat Pipsqueak yarn is the perfect yarn for making a soft and fluffy crochet bunny. I used Bernat Pipsqueak yarn in whitey white to cover the round section of the wreath and make the bunny ears. To crochet the bunny feet, I used one strand of Pipsqueak yarn and one strand of a white worsted weight acrylic yarn, held together as one.
Yarn Substitutions
If you’re not a big fan of Pipsqueak yarn, you can substitute with either two strands of a worsted weight yarn or Bernat Blanket Yarn.
If you choose to use either a worsted weight yarn or blanket yarn, you may have to adjust the size of the bunny ears as you crochet them. The finished sizes of the bunny ears are listed in each section to help you easily adjust for the yarn you choose.
Pink Yarn: I used Caron Simply Soft in Soft Pink for the features of my Easter Bunny Crochet Basket, but I didn’t have any on hand when making my bunny wreath. So instead, I chose to use Lily Sugar n’ Cream in Rose Pink for the bunny toes and pads on the feet.
Crochet Bunny Wreath – Free Crochet Wreath Pattern
The free crochet Easter bunny wreath pattern is below, but if you love to work offline, I’ve got a couple other great options for you.
Purchase the ad-free, printable PDF, including all photo tutorials, on Ravelry, or on Etsy (aff).
This post contains affiliate links.
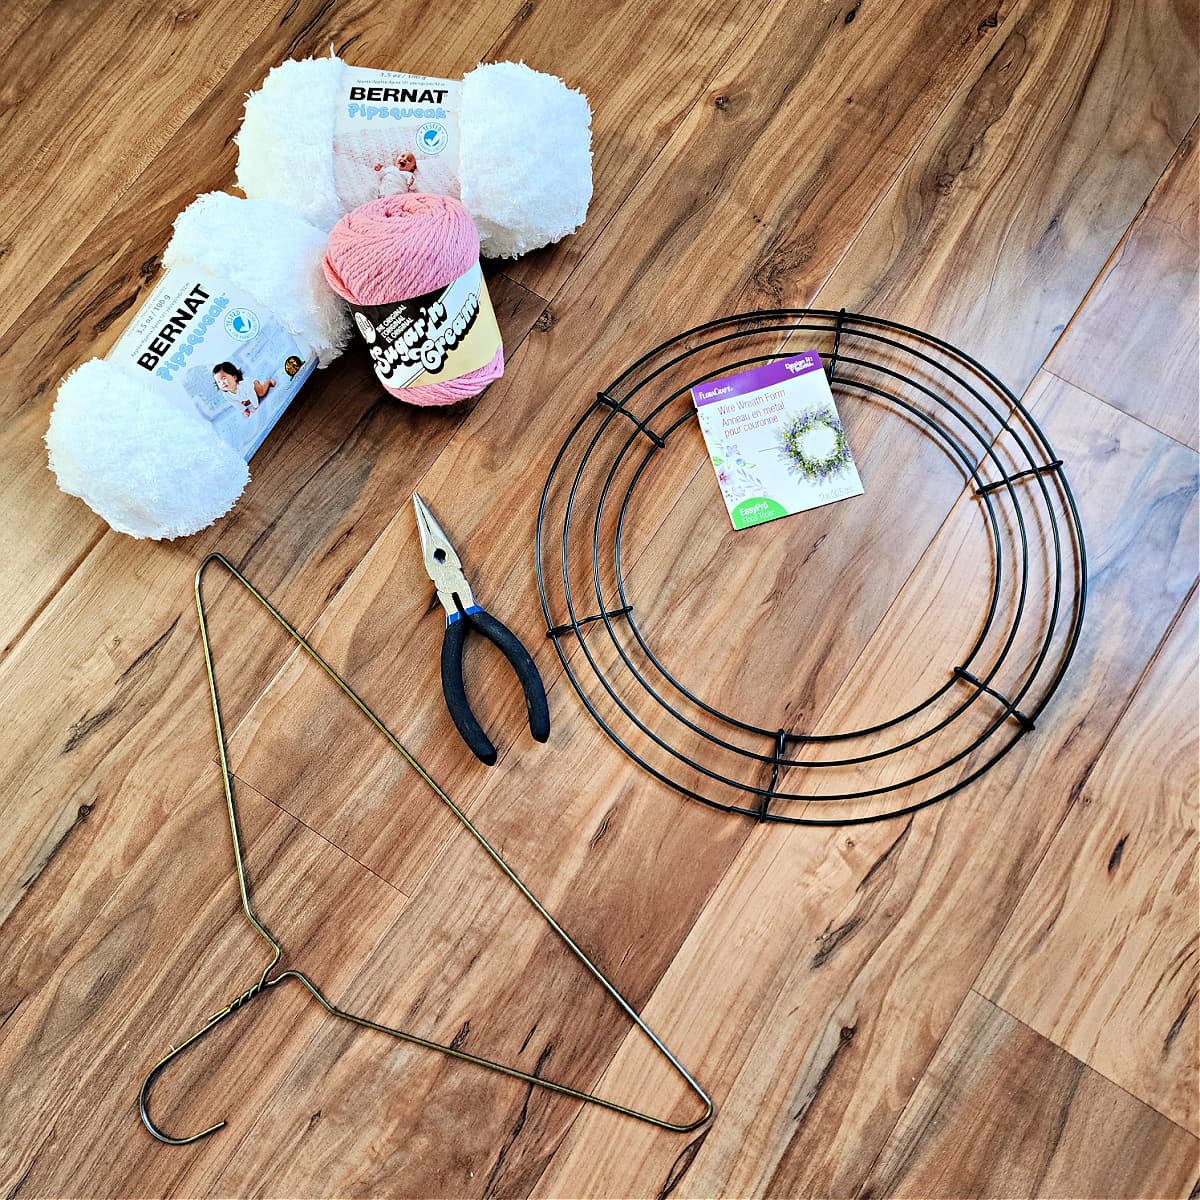
Materials
- Yarn: Bulky Bernat Pipsqueak in Whitey White and a white worsted weight acrylic yarn were used for the bunny wreaths shown in the photos.
- Pipsqueak Yarn: 2 balls (140 yards) per wreath
- White Worsted Weight / 4 Yarn: 25 yards (for bunny feet only)
- Pink Worsted Weight / 4 Yarn: 6 yards (for bunny feet only)
- Crochet Hooks: J/10/6.00mm; I/9/5.50mm (My favorite crochet hooks are the Clover Amour Hooks, I’ve never had an ache in my hand since switching)
- Scissors
- Yarn Needle
- Needle Nose Pliers with Wire Cutter
- (1) Bunny Wreath Form, or
- (1) 8 inch or 10 inch Wire Wreath & a wire coat hanger
- (18″ L) 2.5″ W Wired Ribbon, or
- (1 roll) 6″ Dollar Tree Decorative Mesh (for bows – also available at the Dollar Tree)
- Faux Flowers & other small Easter embellishments
- Clover 2.5″ Pom Maker (optional)
Abbreviations (U.S. Terms)
- ch(s): chain(s)
- sl st: slip stitch
- st(s): stitch(es)
- sp: space
- sc: single crochet
- hdc: half double crochet
- 2dc-cl: 2 double crochet cluster stitch
- yo: yarn over
- Rep: repeat
- RS: right side
Gauge
- See measurements listed throughout pattern.
Sizes
- Dollar Tree Bunny Wreath Form: 10.5″ W x 18.5″ H
- DIY Bunny Ear Wreath Form: 12″ W x 19.5″ H
Pattern Notes
- Turning chain(s) are not included in stitch count, unless noted otherwise.
- The first stitch of each row is worked into the same stitch as the turning chain, unless noted otherwise.
- Yarn Notes: Bernat Pipsqueak in whitey white and a worsted weight acrylic were used for the bunny wreaths shown in the photos.
- Bernat Pipsqueak / Bulky Weight / 5 100% Polyester (101 yds / 92 m / 100 g / 3.5 oz)
- Yardage
- Pipsqueak Yarn – 2 balls per wreath (140 yards total)
- White Worsted Weight Yarn – 25 yards (for bunny feet only)
- Pink Worsted Weight Yarn – 6 yards (for bunny feet only)
- DIY Bunny Wreath with Coat Hanger Ears: I used a 12″ circular wire wreath for the sample shown. When I make another, I will use an 8″ or 10″ wire wreath to make it closer in size to the Dollar Tree wreath form.
Special Stitches
- 2 DC Cluster Stitch (2dc-cl): Yo, insert hook into designated st, yo, pull up a loop, yo, pull through 2 loops, yo, insert hook into same st, yo, pull up a loop, yo, pull through 2 loops, yo, pull through all remaining loops.
Crochet Bunny Wreath Pattern
Bunny Wreath Form Options
Don’t have a Dollar Tree near you to purchase their Bunny Wreath Form? No worries! This crochet pattern includes 2 bunny wreath form options. You can either purchase a Dollar Tree Bunny Wreath Form, OR purchase a 10-12″ wreath form and find an old wire coat hanger.
Scroll down and begin with the instructions for the form option you’ve chosen: Dollar Tree Bunny Wreath Form or DIY Bunny Wreath Form with Coat Hanger Ears.
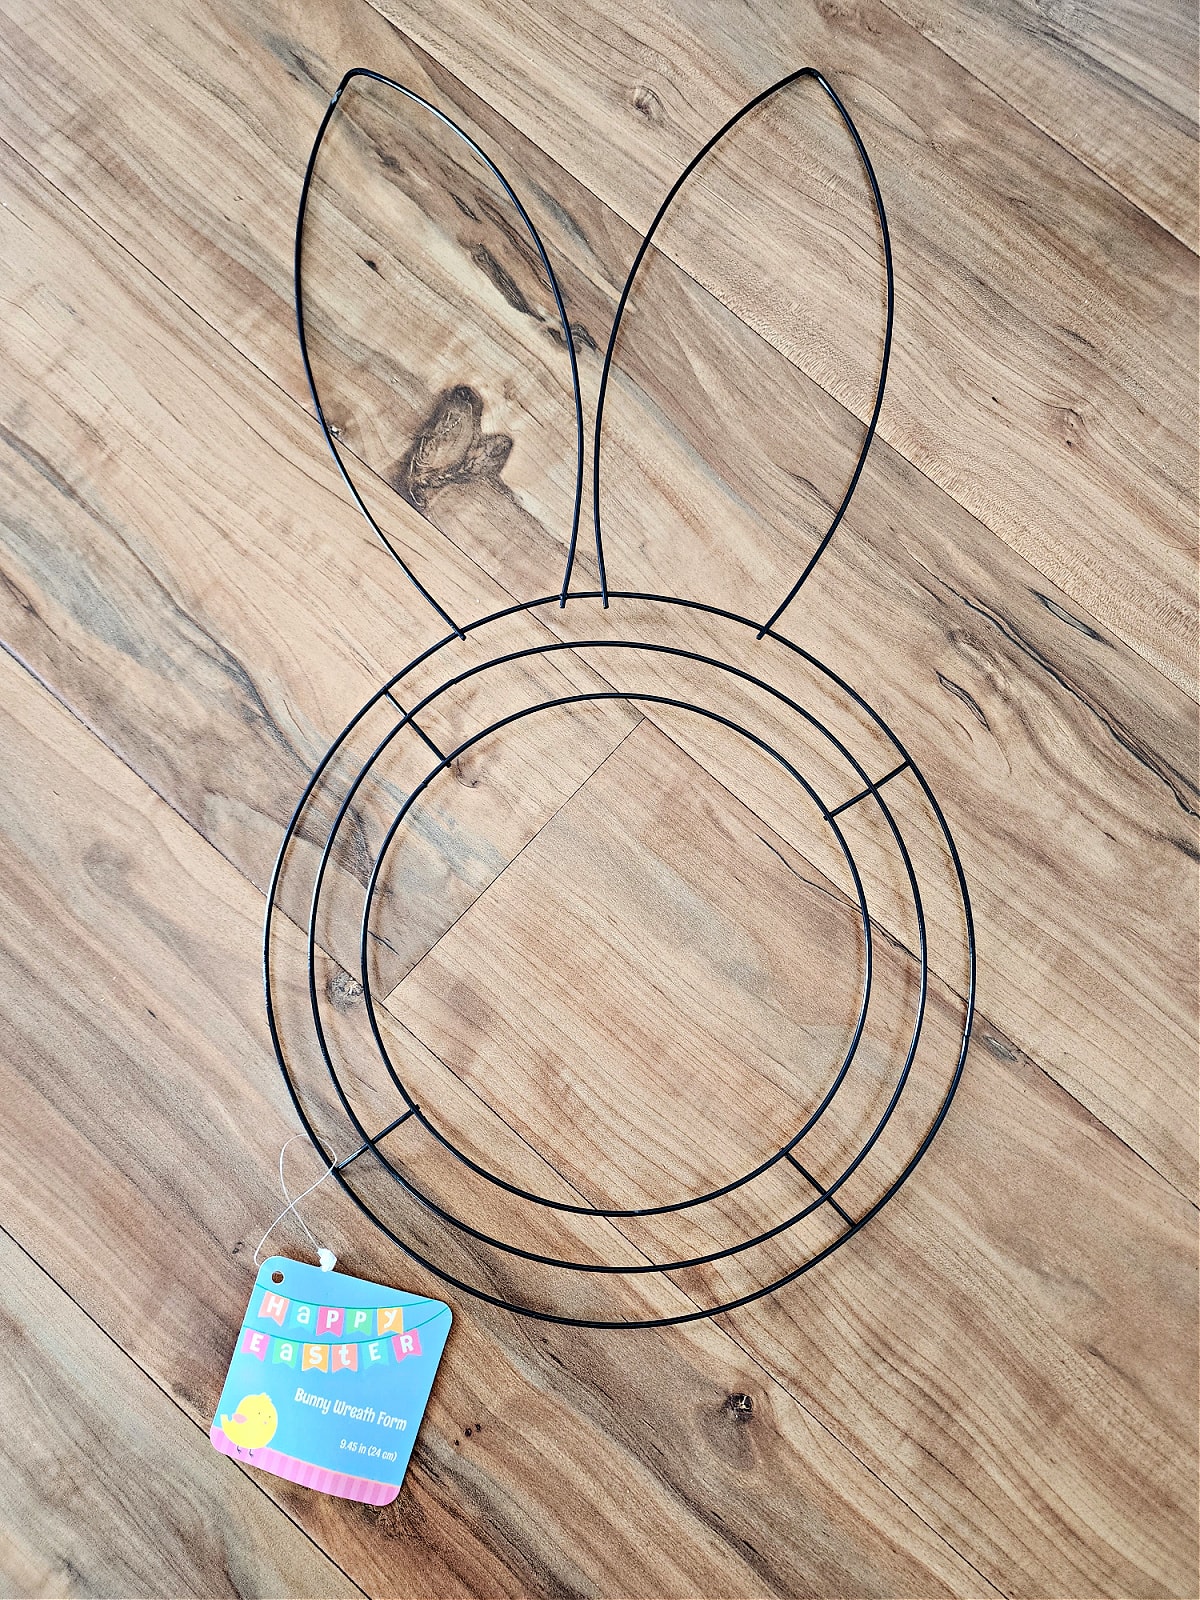
Dollar Tree Bunny Wreath Form
If you’re using a Dollar Tree Bunny Wreath Form, follow the instructions below.
Cover the Round Wire Wreath
Tie one end of Pipsqueak yarn near one of the bunny ears. Wrap the yarn around the entire circular portion of the wreath making sure to wrap it thick enough so that the wire wreath form cannot be seen through the yarn.
Once you’ve completely covered the round portion of the wreath, fasten off and weave in the tail of yarn along the back side of the wreath.
Continue onto Dollar Tree Bunny Wreath Bunny Ears.
Dollar Tree Bunny Wreath Bunny Ears (Make 2)
Yarn Notes: 1 strand of Bernat Pipsqueak in white.
Row 1: With yarn & a 5.50 mm crochet hook, ch 9, hdc in the 2nd ch from your hook and in each ch across. Turn. (8 sts)
Row 2: Ch 1, 2 hdc in the first st, hdc in each of the next 6 sts, 2 hdc in the last st. Turn. (10 sts)
Rows 3 – 5: Ch 1, hdc in each st across. Turn. (10 sts)
Row 6: Ch 1, 2 hdc in the first st, hdc in each of the next 8 sts, 2 hdc in the last st. Turn. (12 sts)
Row 7: Ch 1, 2 hdc in the first st, hdc in each of the next 10 sts, 2 hdc in the last st. Turn. (14 sts)
Rows 8 – 14: Ch 1, hdc in each st across. Turn. (14 sts)
Row 15: Ch 1, skip the first st, hdc in each of the next 11 sts, skip the next st, hdc in the last st. Turn. (12 sts)
Row 16: Ch 1, hdc in each st across. Turn. (12 sts)
Row 17: Ch 1, skip the first st, hdc in each of the next 9 sts, skip the next st, hdc in the last st. Turn. (10 sts)
Row 18: Ch 1, hdc in each st across. Turn. (10 sts)
Row 19: Ch 1, skip the first st, hdc in each of the next 7 sts, skip the next st, hdc in the last st. Turn. (8 sts)
Row 20: Ch 1, hdc in each st across. Turn. (8 sts)
Row 21: Ch 1, skip the first st, hdc in each of the next 5 sts, skip the next st, hdc in the last st. Turn. (6 sts)
Row 22: Ch 1, skip the first st, hdc in each of the next 3 sts, skip the next st, hdc in the last st. Turn. (4 sts)
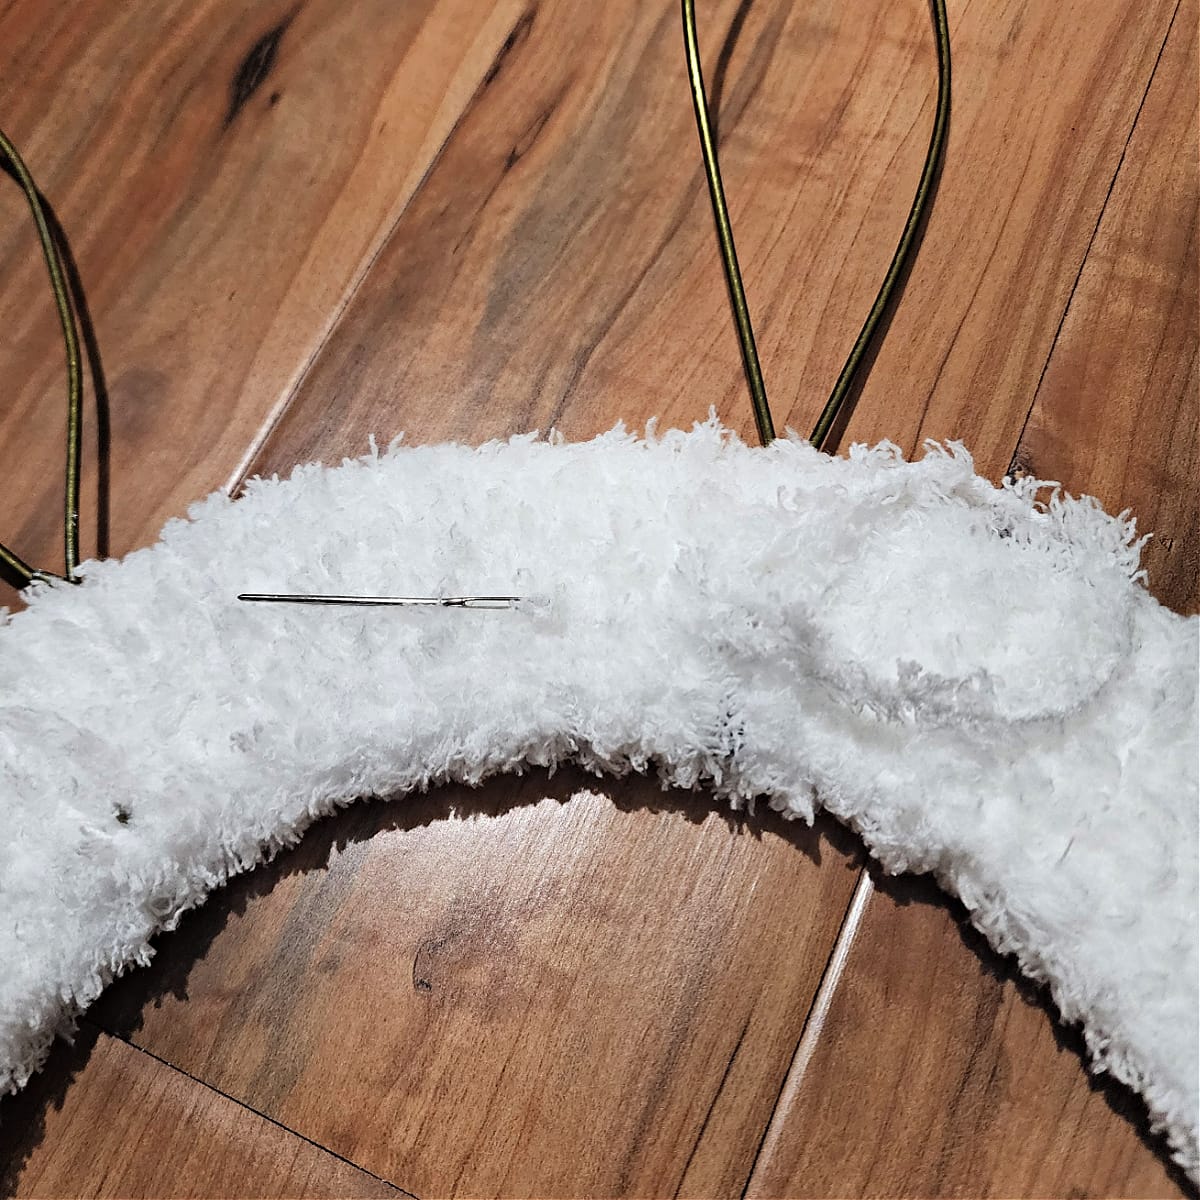
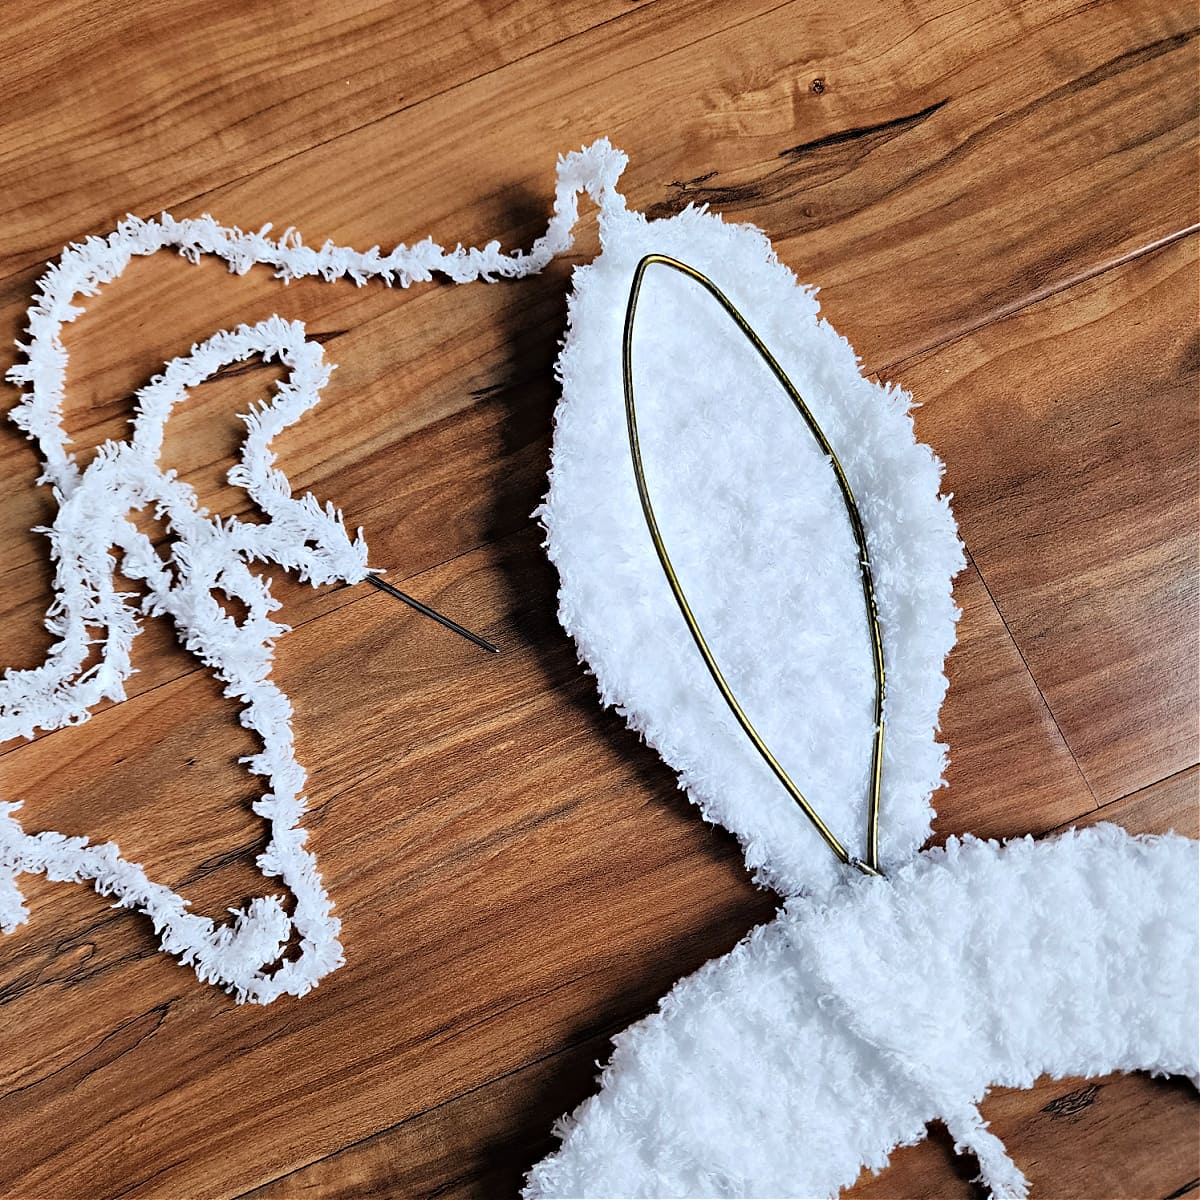
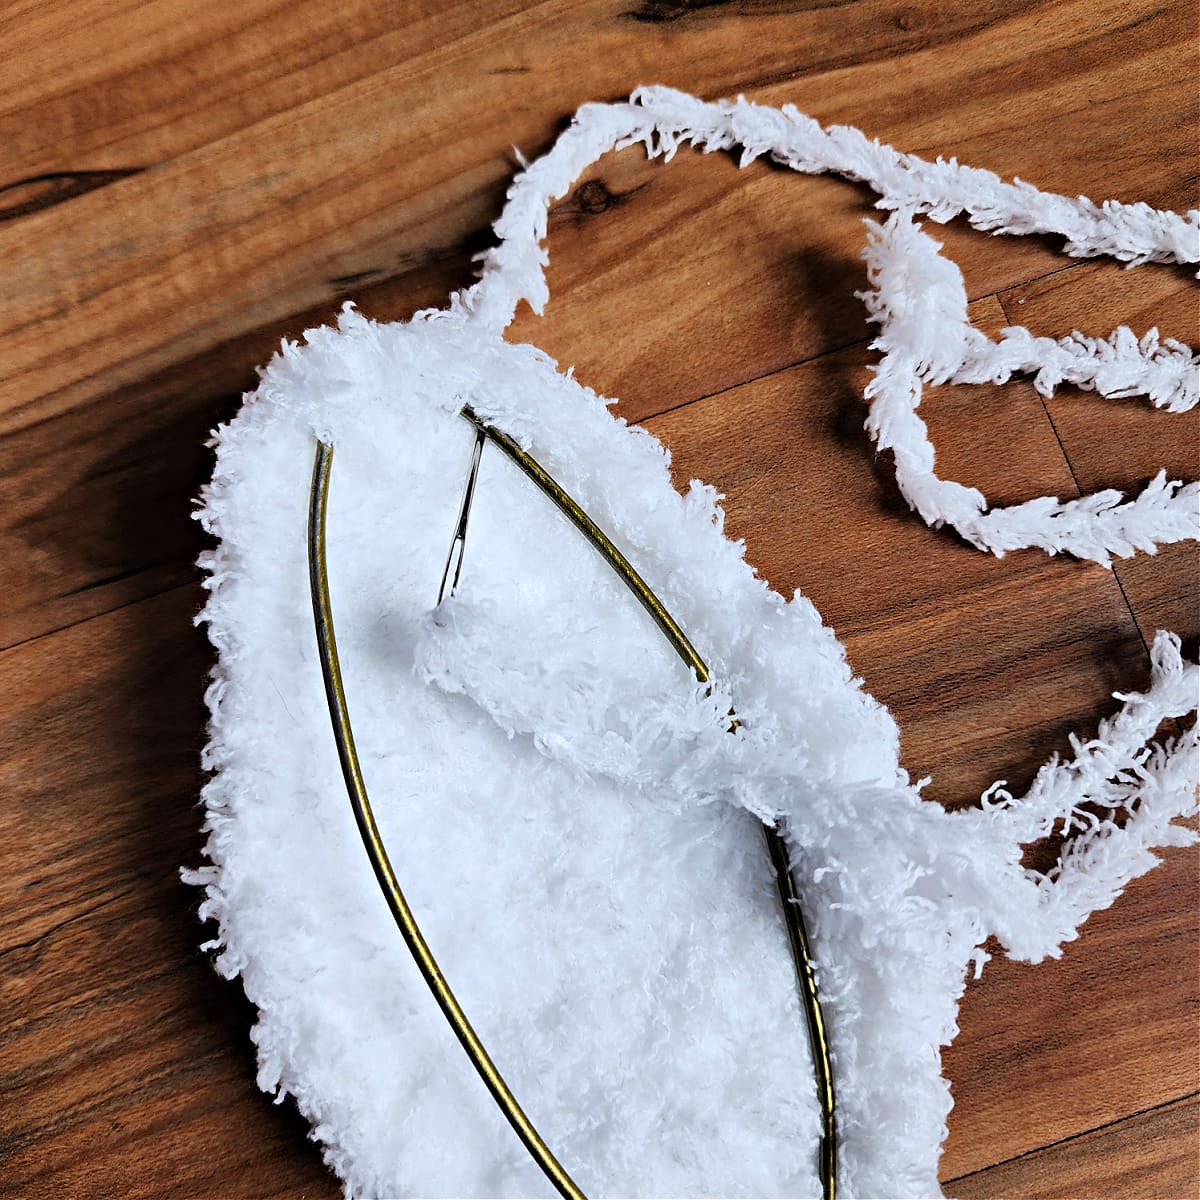
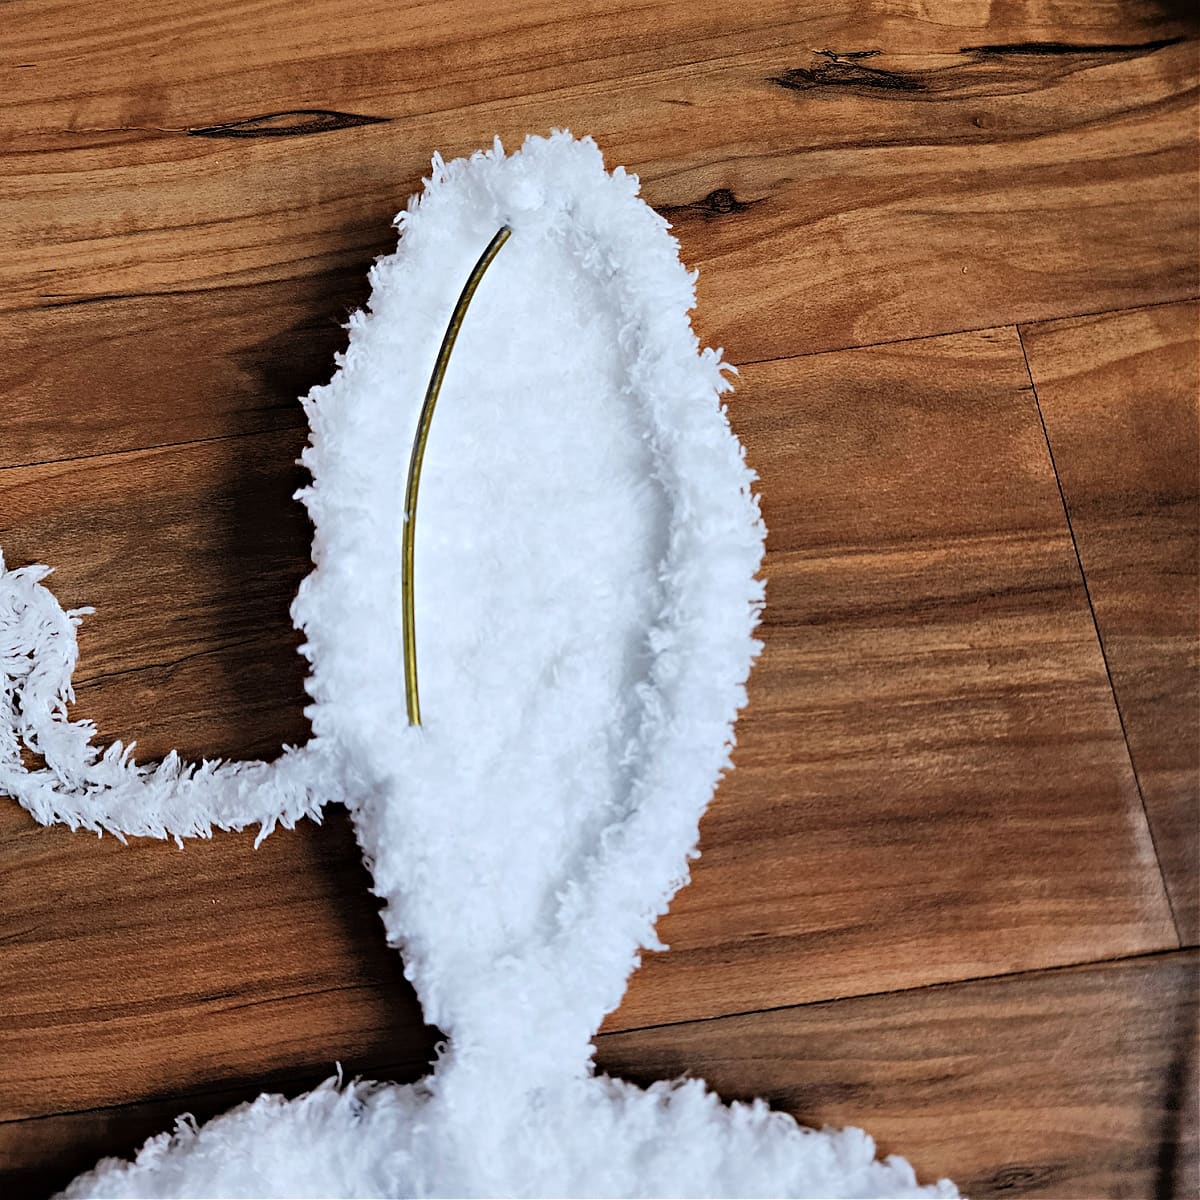
Fasten off leaving a tail of yarn 2 – 3 times the perimeter around the ear. Make second crochet bunny ear, then scroll down to the Bunny Ear Assembly.
Bunny Ears for Dollar Tree Bunny Wreath measure approximately 5″ W x 9.25″ L.
DIY Bunny Wreath Form with Coat Hanger Bunny Ears
If you’re making your own DIY bunny wreath form using coat hangers to make bunny ears, follow the instructions below.
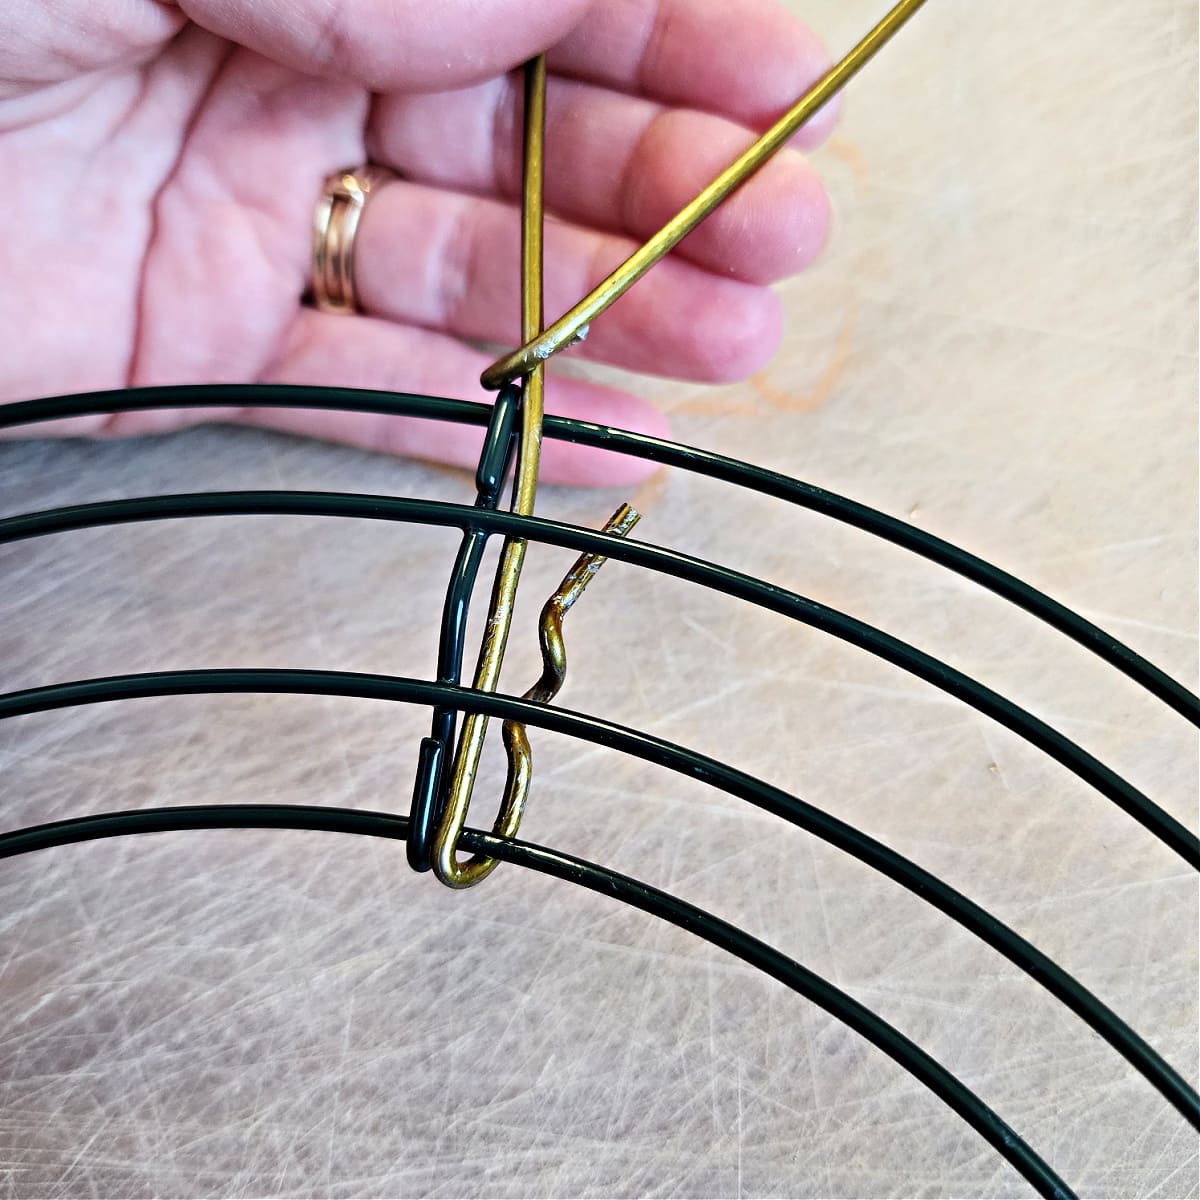
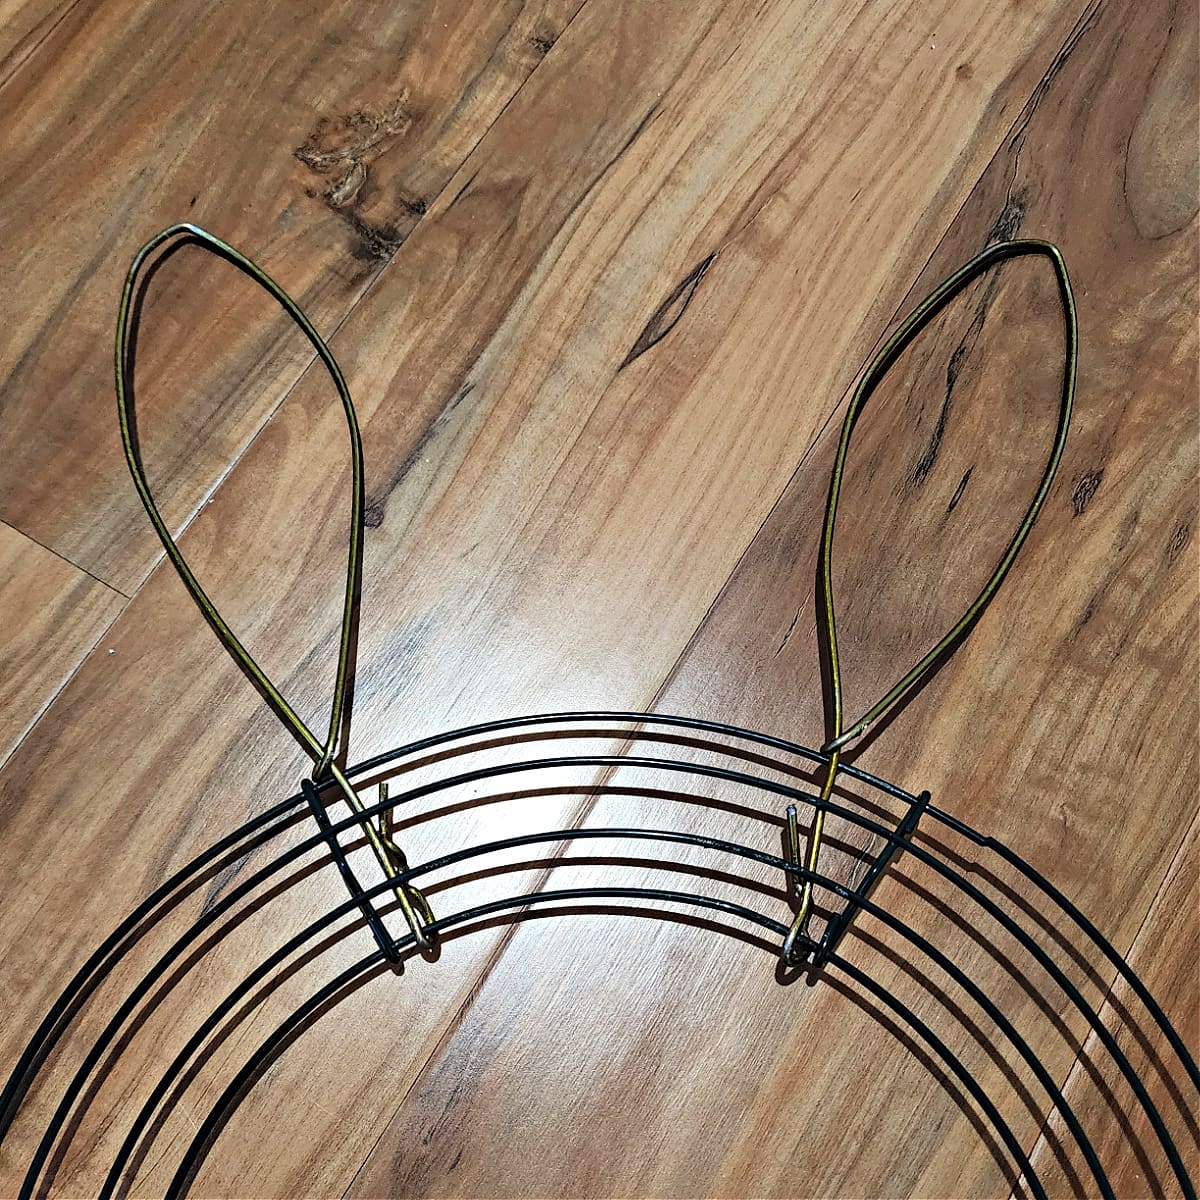
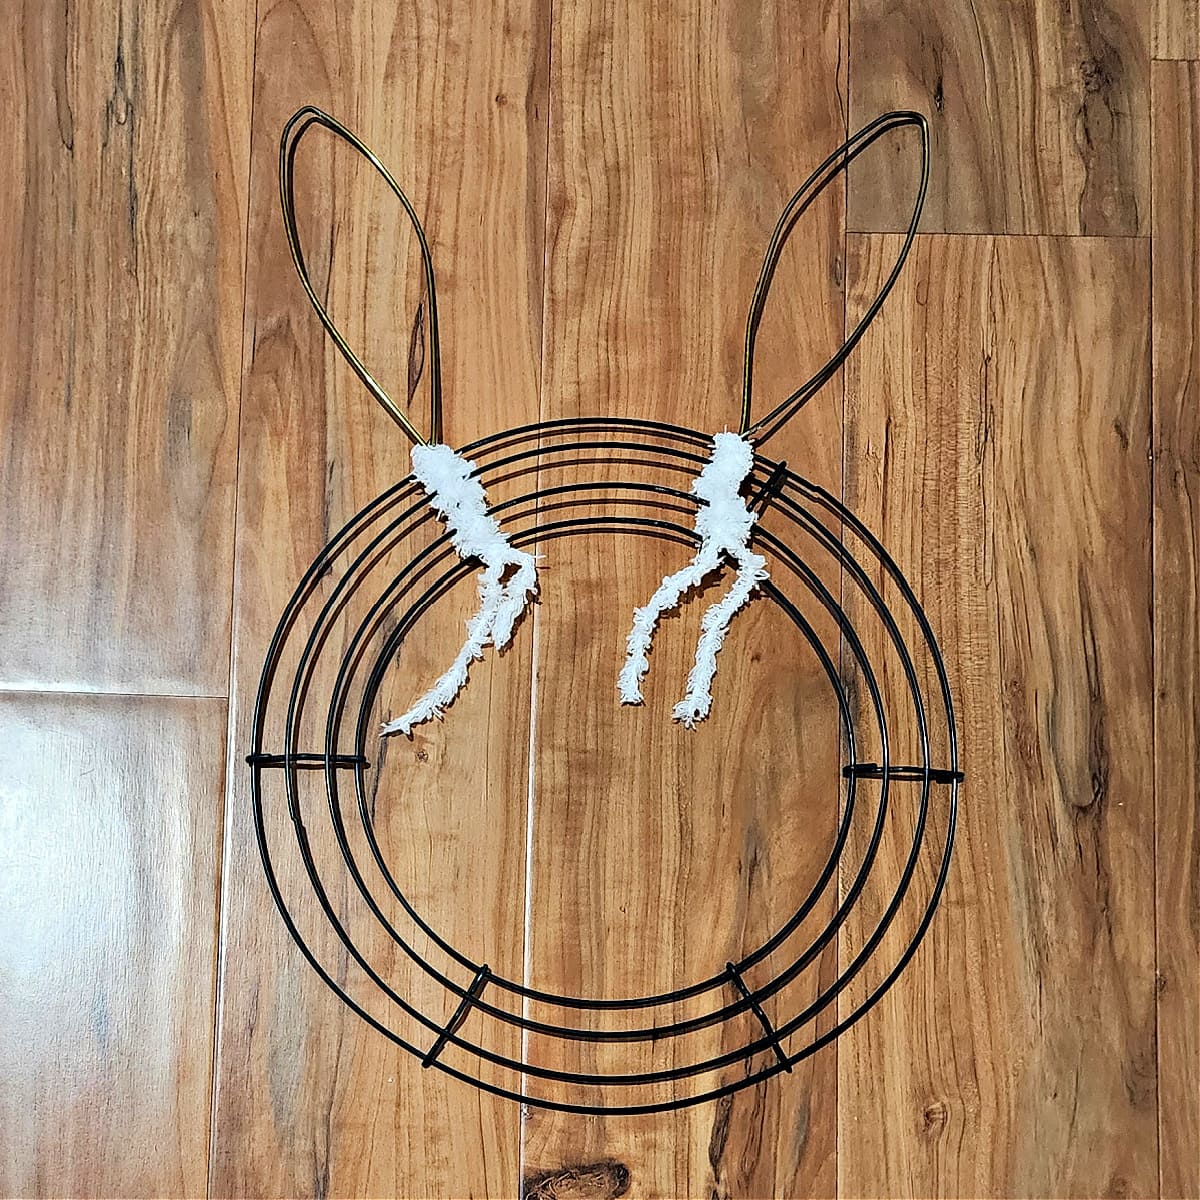
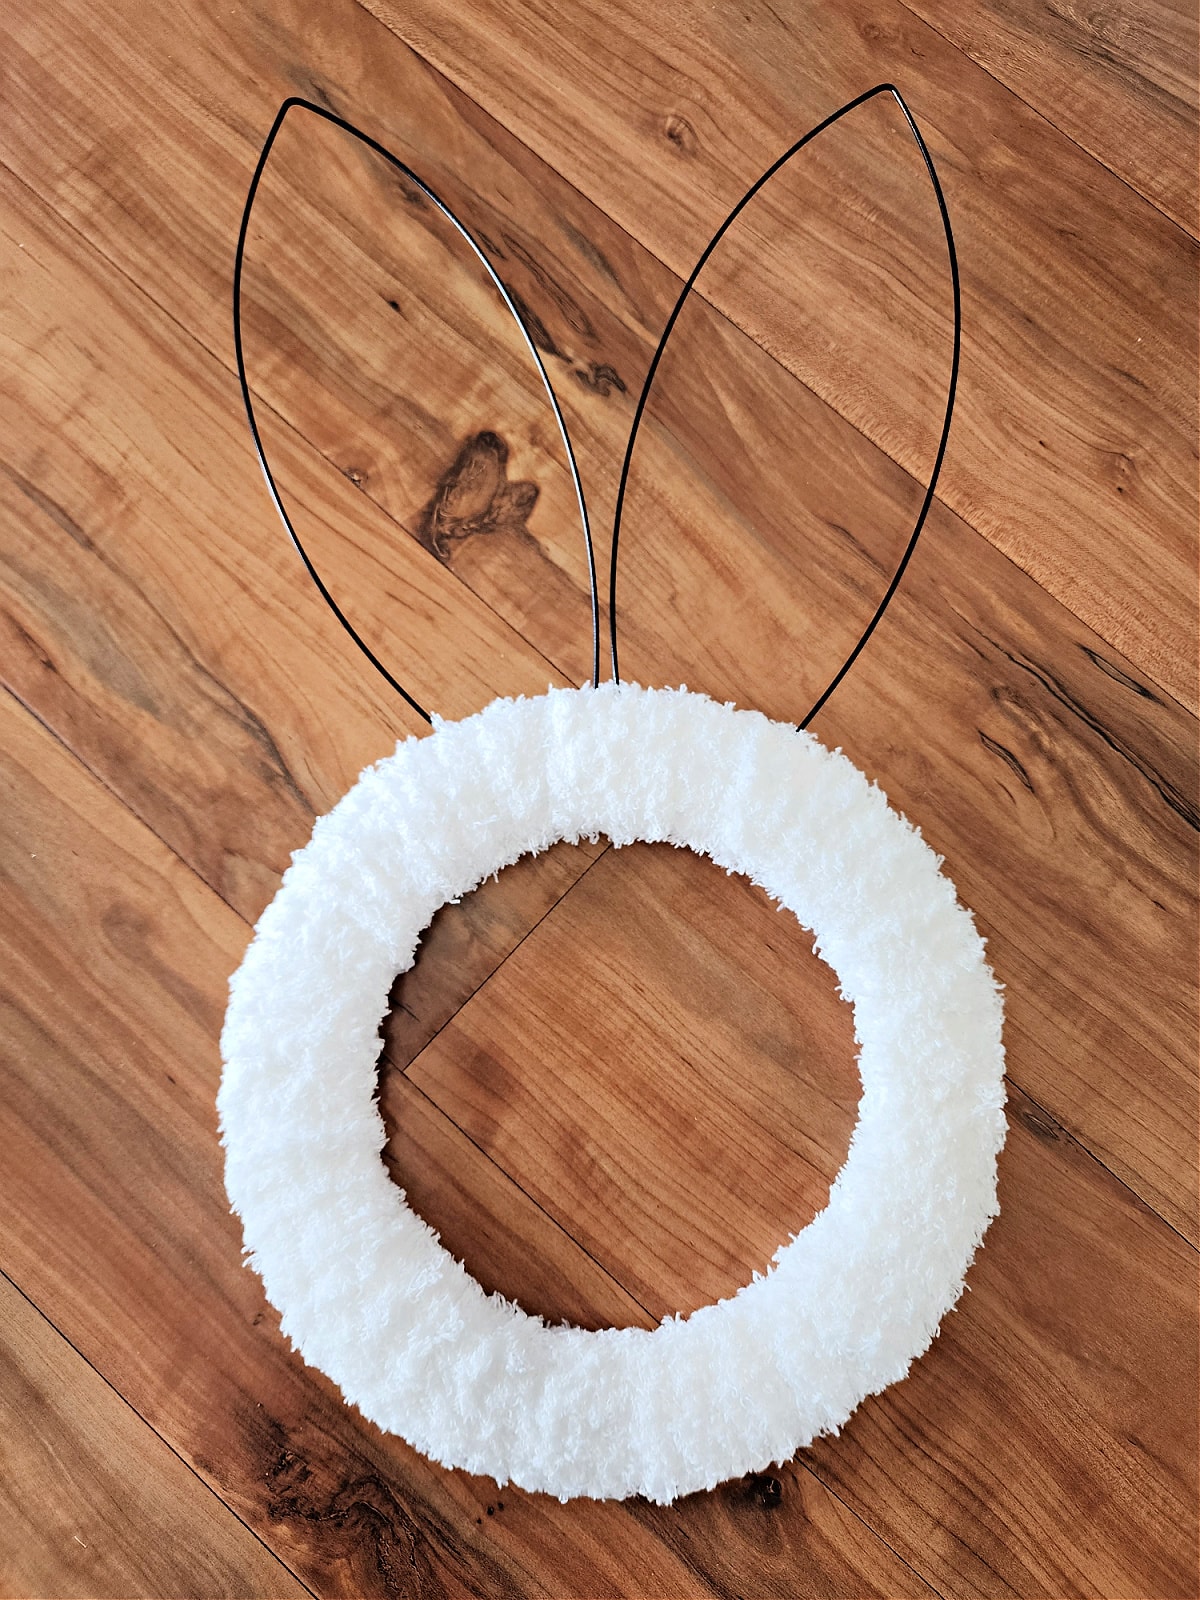
Cover the Round Wire Wreath
Tie one end of Pipsqueak yarn near one of the bunny ears. Wrap the yarn around the entire circular portion of the wreath making sure to wrap it thick enough so that the wire wreath form cannot be seen through the yarn.
Once you’ve completely covered the round portion of the wreath, fasten off and weave in the tail of yarn along the back side of the wreath.
Continue on to Coat Hanger Bunny Ears.

Coat Hanger Bunny Ears (Make 2)
Yarn Notes: 1 strand of Bernat Pipsqueak in white.
Row 1: With yarn & a 5.50 mm crochet hook, ch 4, hdc in the 2nd ch from your hook and in each ch across. Turn. (3 sts)
Row 2: Ch 1, 2 hdc in the first st, hdc in the next st, 2 hdc in the last st. Turn. (5 sts)
Row 3: Ch 1, 2 hdc in the first st, hdc in each of the next 3 sts, 2 hdc in the last st. Turn. (7 sts)
Row 4: Ch 1, 2 hdc in the first st, hdc in each of the next 5 sts, 2 hdc in the last st. Turn. (9 sts)
Row 5: Ch 1, hdc in each st across. Turn. (9 sts)
Row 6: Ch 1, 2 hdc in the first st, hdc in each of the next 7 sts, 2 hdc in the last st. Turn. (11 sts)
Rows 7 – 10: Ch 1, hdc in each st across. Turn. (11 sts)
Row 11: Ch 1, skip the first st, hdc in each of the next 8 sts, skip the next st, hdc in the last st. Turn. (9 sts)
Row 12: Ch 1, hdc in each st across. Turn. (9 sts)
Row 13: Ch 1, skip the first st, hdc in each of the next 6 sts, skip the next st, hdc in the last st. Turn. (7 sts)
Rows 14 – 15: Ch 1, hdc in each st across. Turn. (7 sts)
Row 16: Ch 1, skip the first st, hdc in each of the next 4 sts, skip the next st, hdc in the last st. Turn. (5 sts)
Row 17: Ch 1, skip the first st, hdc in each of the next 2 sts, skip the next st, hdc in the last st. Turn. (3 sts)
Fasten off leaving a tail of yarn 2 – 3 times the perimeter around the ear. Make second crochet bunny ear, then continue on to Bunny Ear Assembly.
Bunny Ears measure approximately 3.75″ W x 7.5″ L.
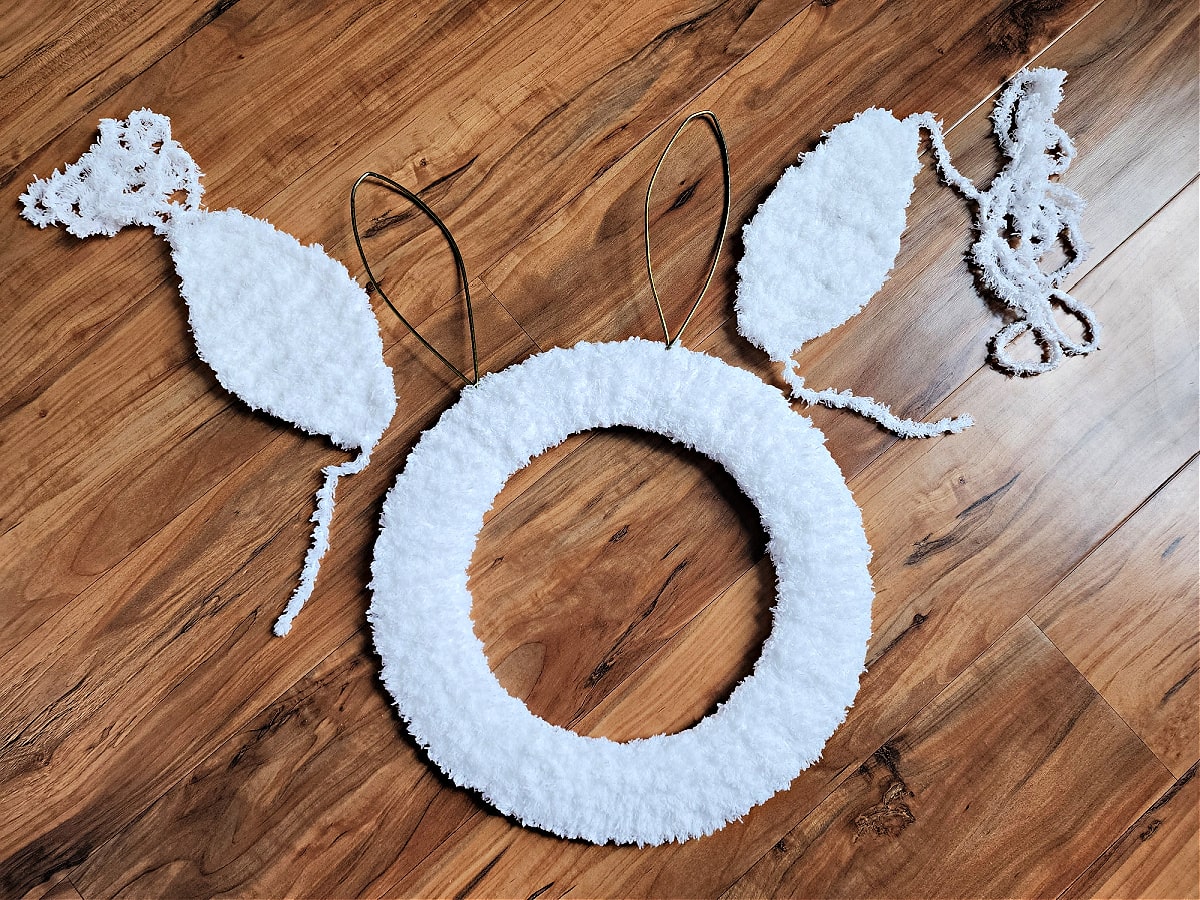
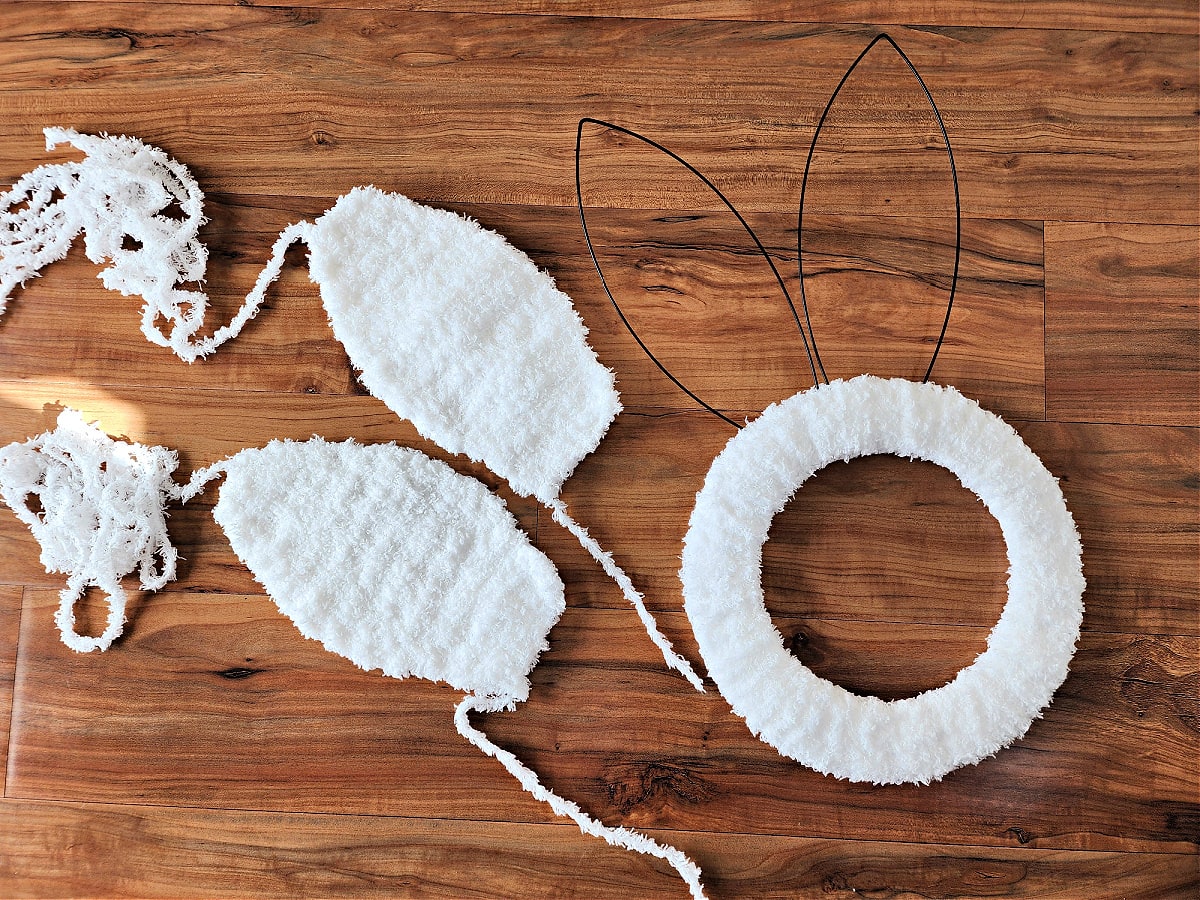
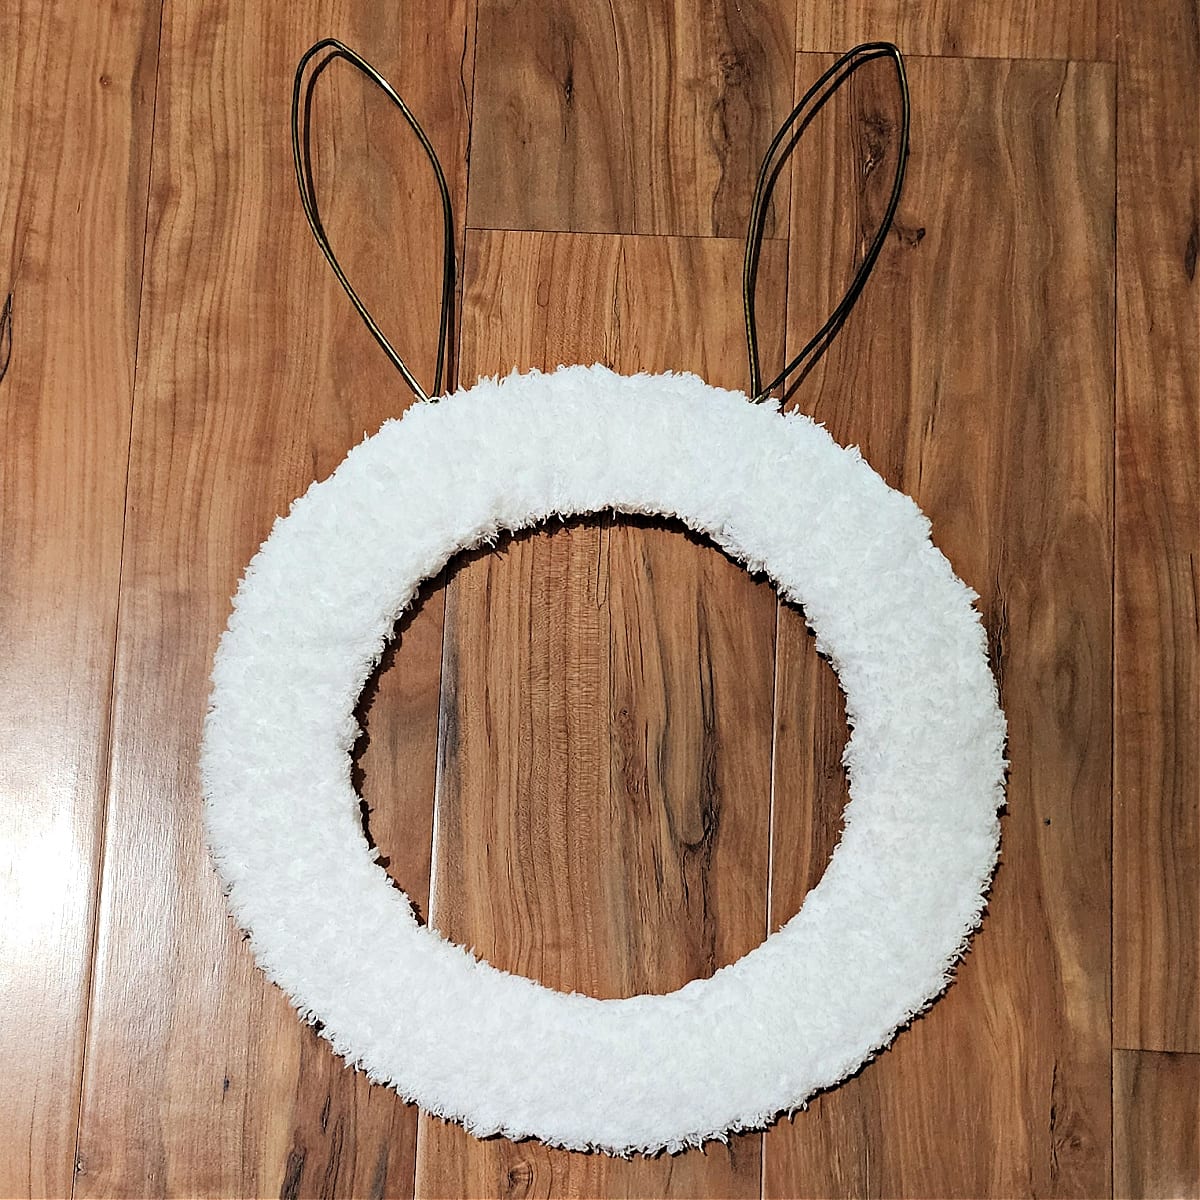
Bunny Ears Assembly
The tutorial photos below show crocheted bunny ears being attached to the coat hanger bunny ears. Follow the same steps for the Dollar Tree Wreath Bunny Ears.
If you’re making a bunny butt wreath, continue below to Crochet Bunny Feet. If you’re not adding bunny feet, scroll down to Wreath Embellishments.
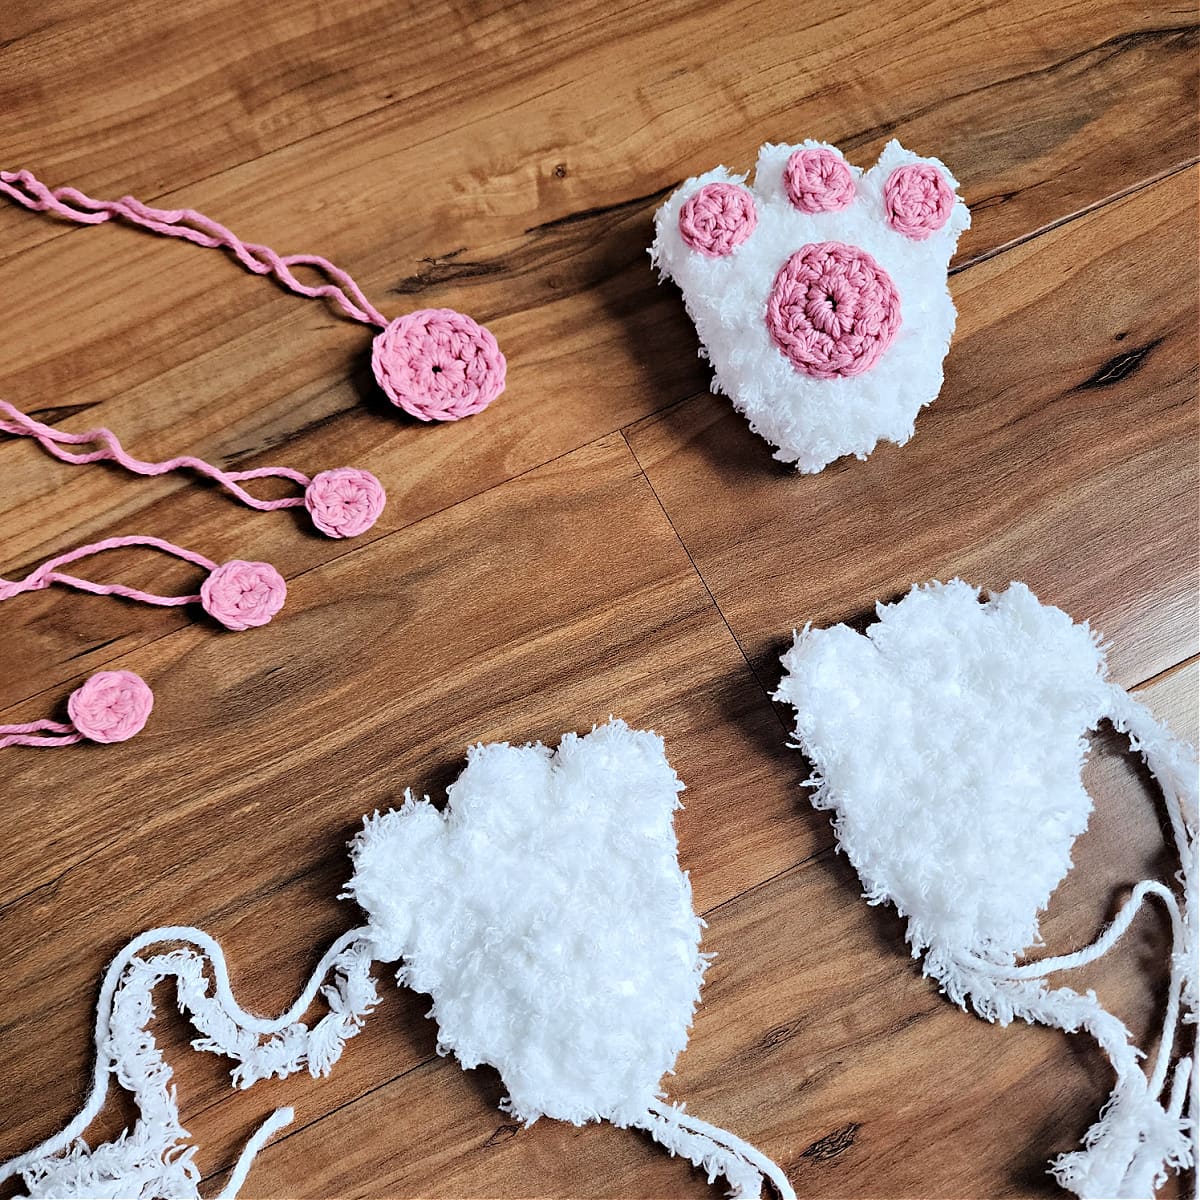
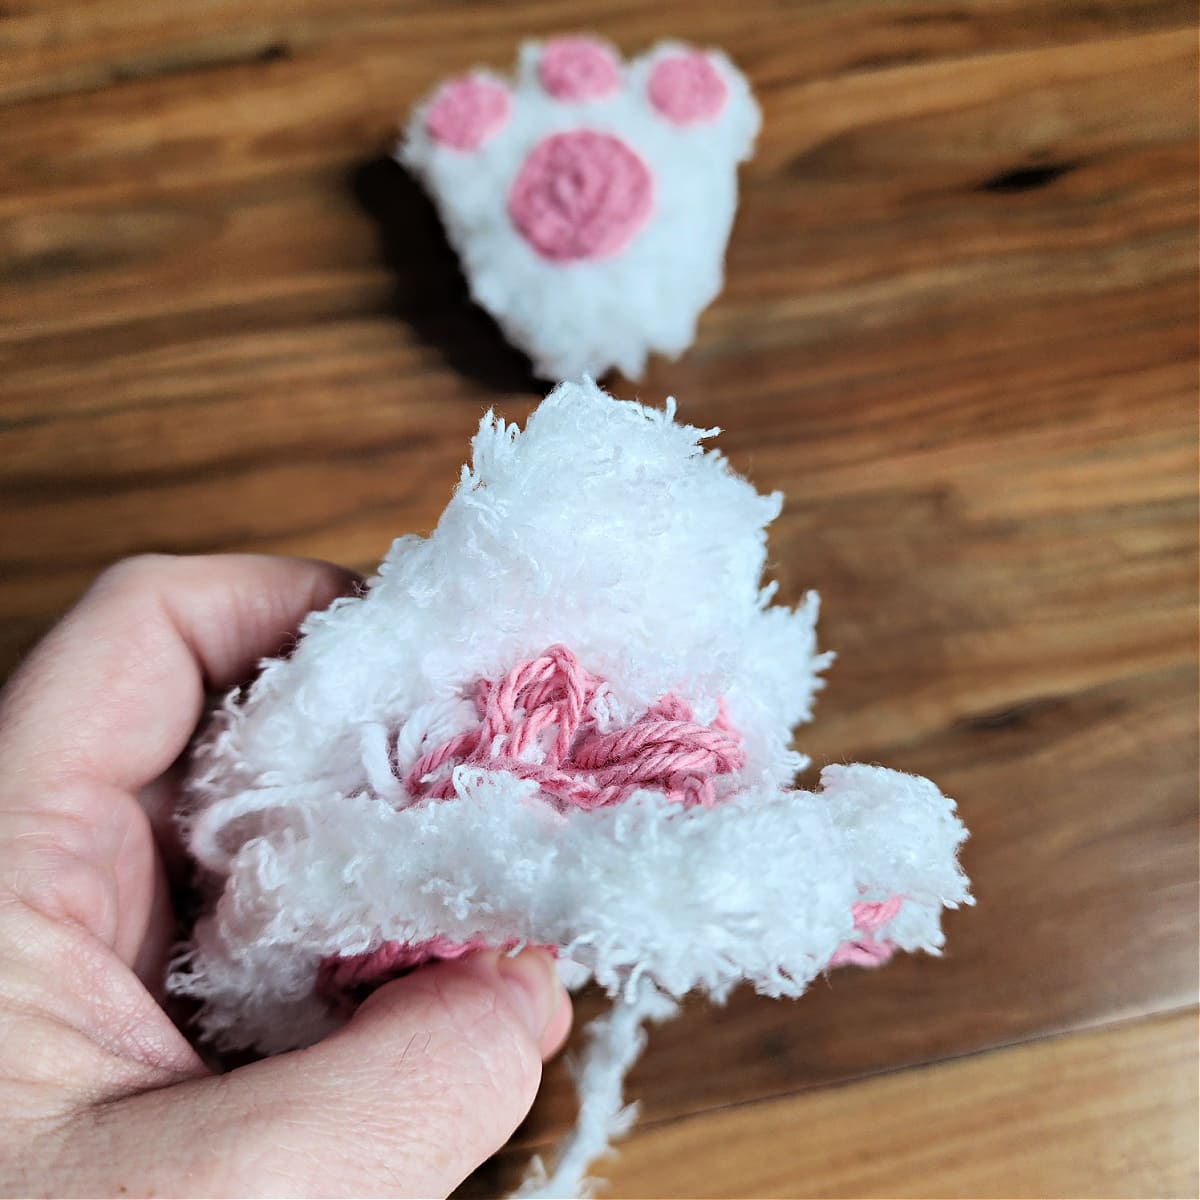
Crochet Bunny Feet (Make 4)
Yarn Note: 1 strand of worsted weight yarn in White & 1 strand of Bernat Pipsqueak, held together and worked as one.
Row 1: With both strands of yarn held together as one & a 6.00mm crochet hook, begin with a magic ring, sl st into magic ring, ch 1, work 4 hdc into magic ring. Do not join. Pull yarn to tighten ring. Turn. (4 sts)
Row 2: Ch 1, hdc in each st across. Turn. (4 sts)
Row 3: Ch 1, 2 hdc in first st, hdc in each of the next 2 sts, 2 hdc in the last st. Turn. (6 sts)
Rows 4 – 6: Ch 1, hdc in each st across. Turn. (6 sts)
Row 7: Ch 2, 2dc-cl in the first st, ch 2, *sl st in each of the next 2 sts, ch 2, 2dc-cl in the same st as ch-2, ch 2, rep from *, then sl st in the last st. (3 bunny toes made)
Fasten off. Leave a tail of the Pipsqueak yarn on 2 of the bunny feet to whipstitch them together later. Approximate size: 3.75″ H x 3.25″ W. Continue on to Toes.
Bunny Toes (Make 6)
Yarn Notes: 1 strand of pink worsted weight yarn.
Rnd 1: With yarn & a 5.00mm crochet hook, ch 2, work 8 sc in 2nd ch from hook. Join with a sl st to 1st st. (8 sts)
Fasten off leaving a tail of yarn to sew onto foot. Using a yarn needle, sew 1 toe onto each toe of 2 of the feet. Continue on to Pads.
Pads (Make 2)
Yarn Notes: 1 strand of pink worsted weight yarn.
Rnd 1: With yarn & a 5.00mm crochet hook, ch 2, work 8 sc in 2nd ch from hook. Join with a sl st to 1st st. (8 sts)
Rnd 2: Ch 1, *hdc in each of the next 3 sts, 3 hdc in the next st, rep from *. Join. (12 sts)
Fasten off leaving a tail of yarn to sew onto foot. Using a yarn needle, sew 1 pad onto 2 of the feet. Continue on to Feet Assembly.
Feet Assembly
Using a yarn needle and tail of Pipsqueak yarn, whipstitch together 1 plain foot and 1 foot with the toes and pads. Lightly stuff with scraps of yarn before completing the seam.
Weave in ends. Continue on to Finishing the Bunny Wreath below.
Finishing the Bunny Wreath
If you’re adding bunny feet and a fluffy pom pom tail like my DIY Bunny Wreath, follow the instructions below. If you’re adding flowers and a bow as in the Dollar Tree Bunny Wreath sample, continue below to Wreath Embellishments.
Continue to Wreath Embellishments.
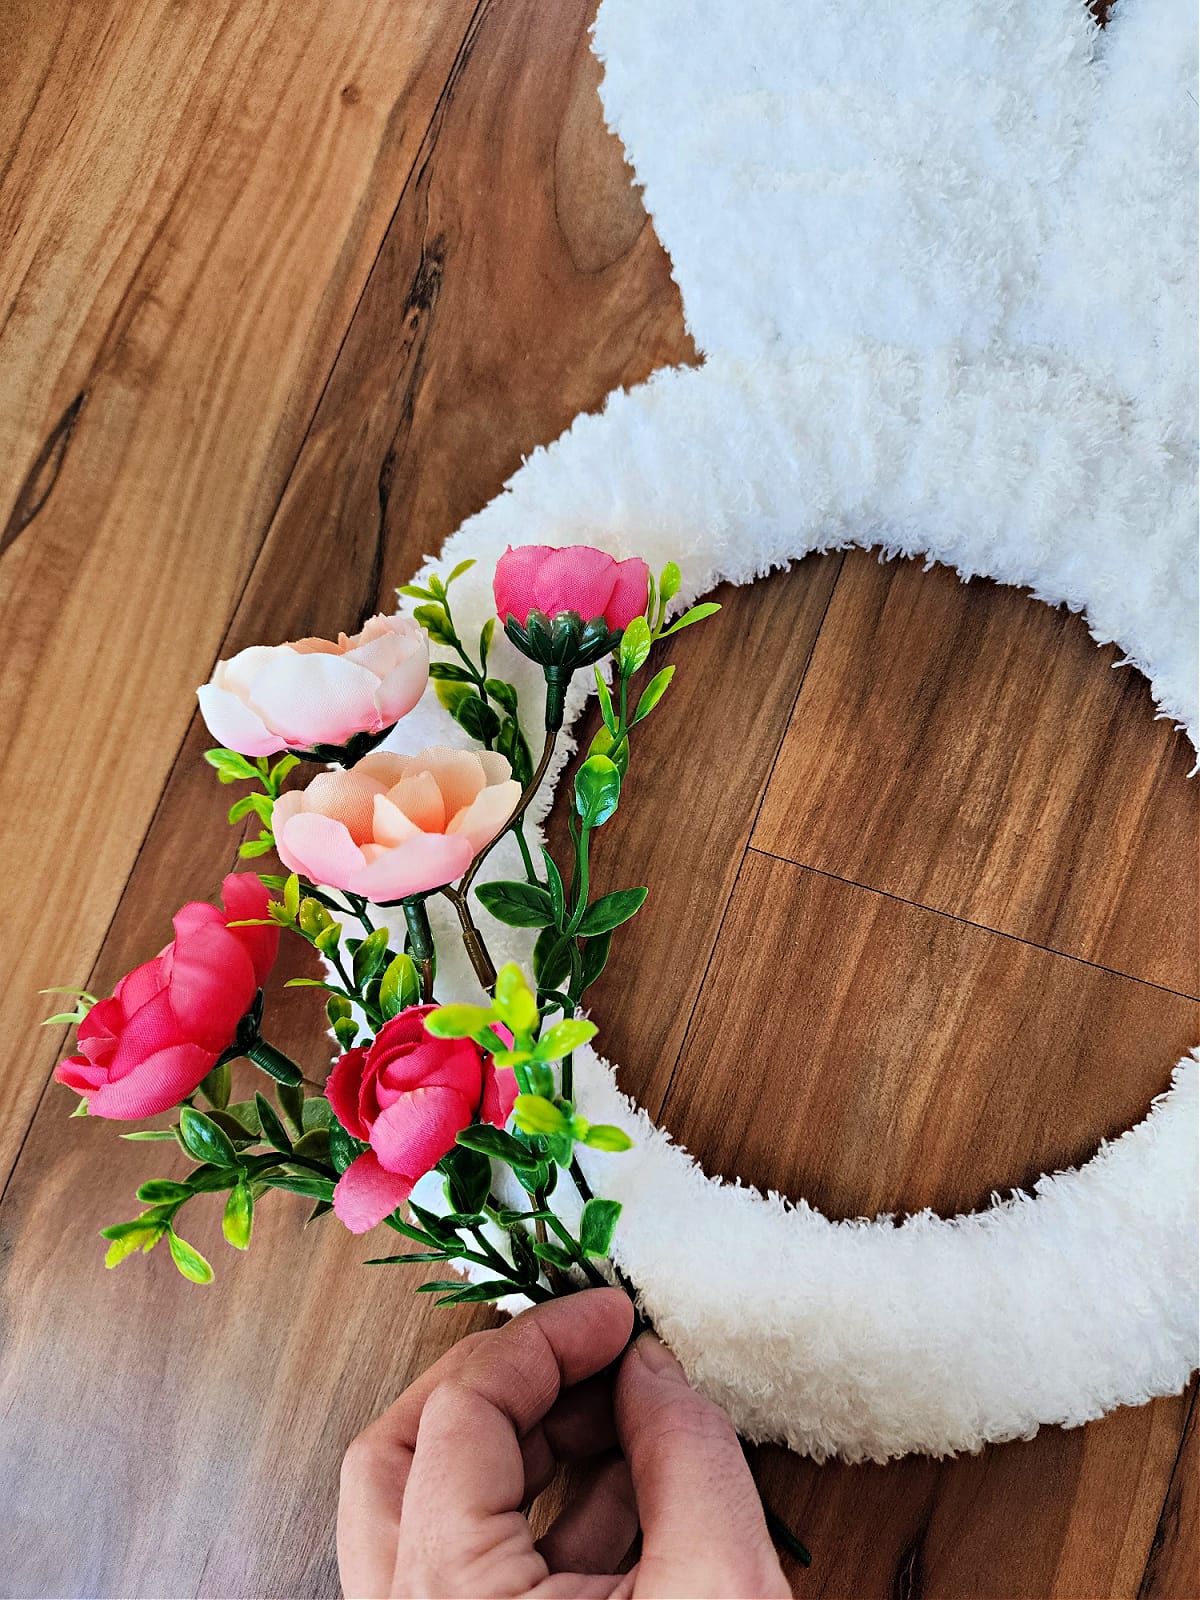
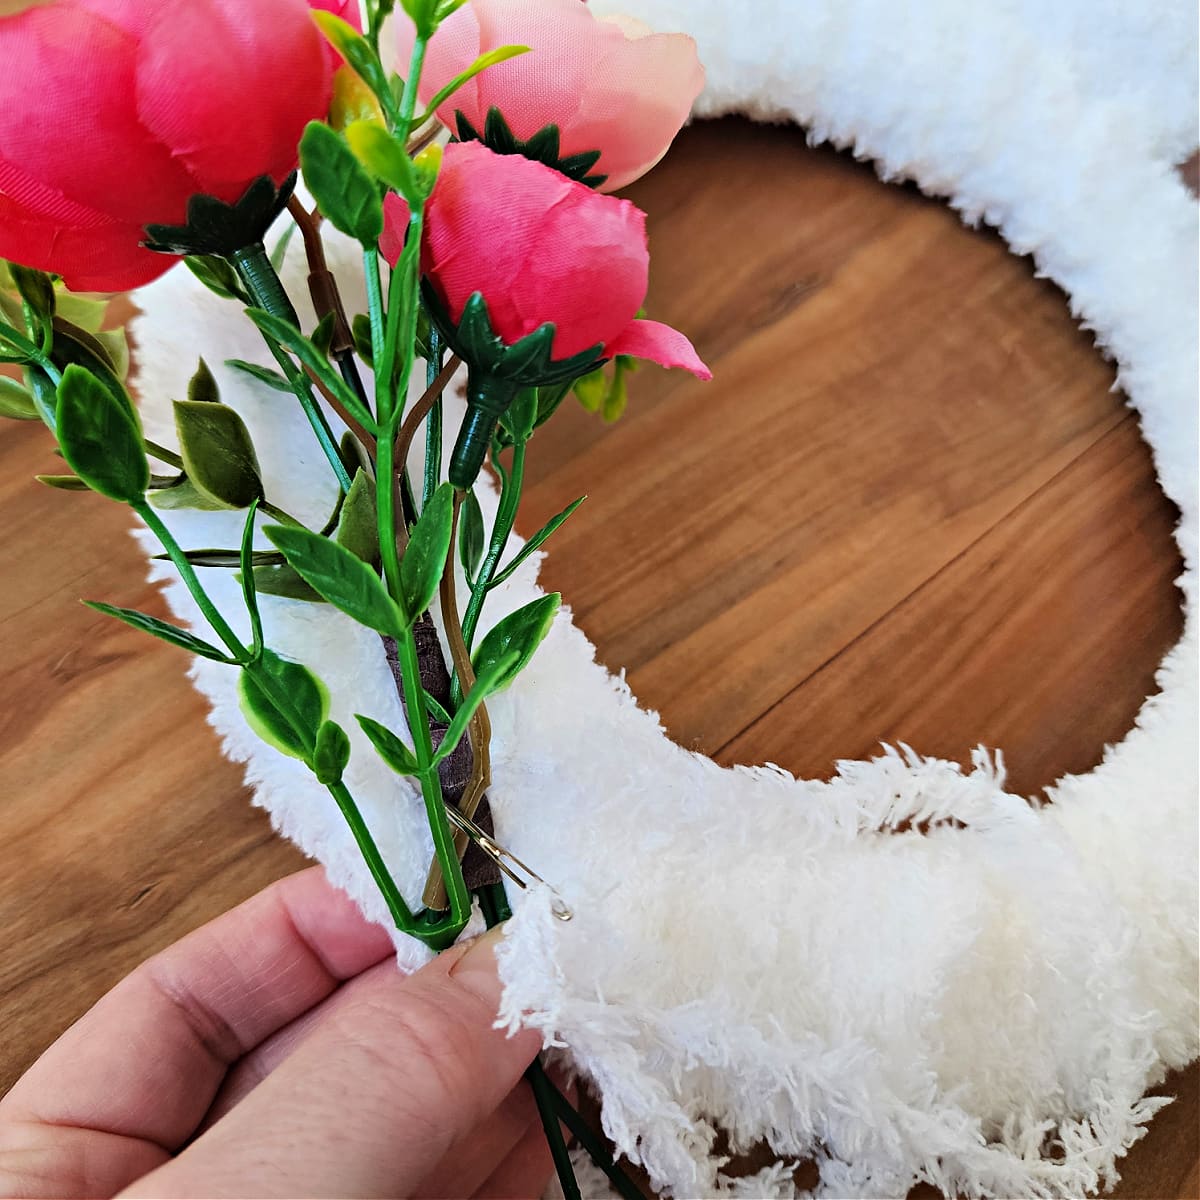
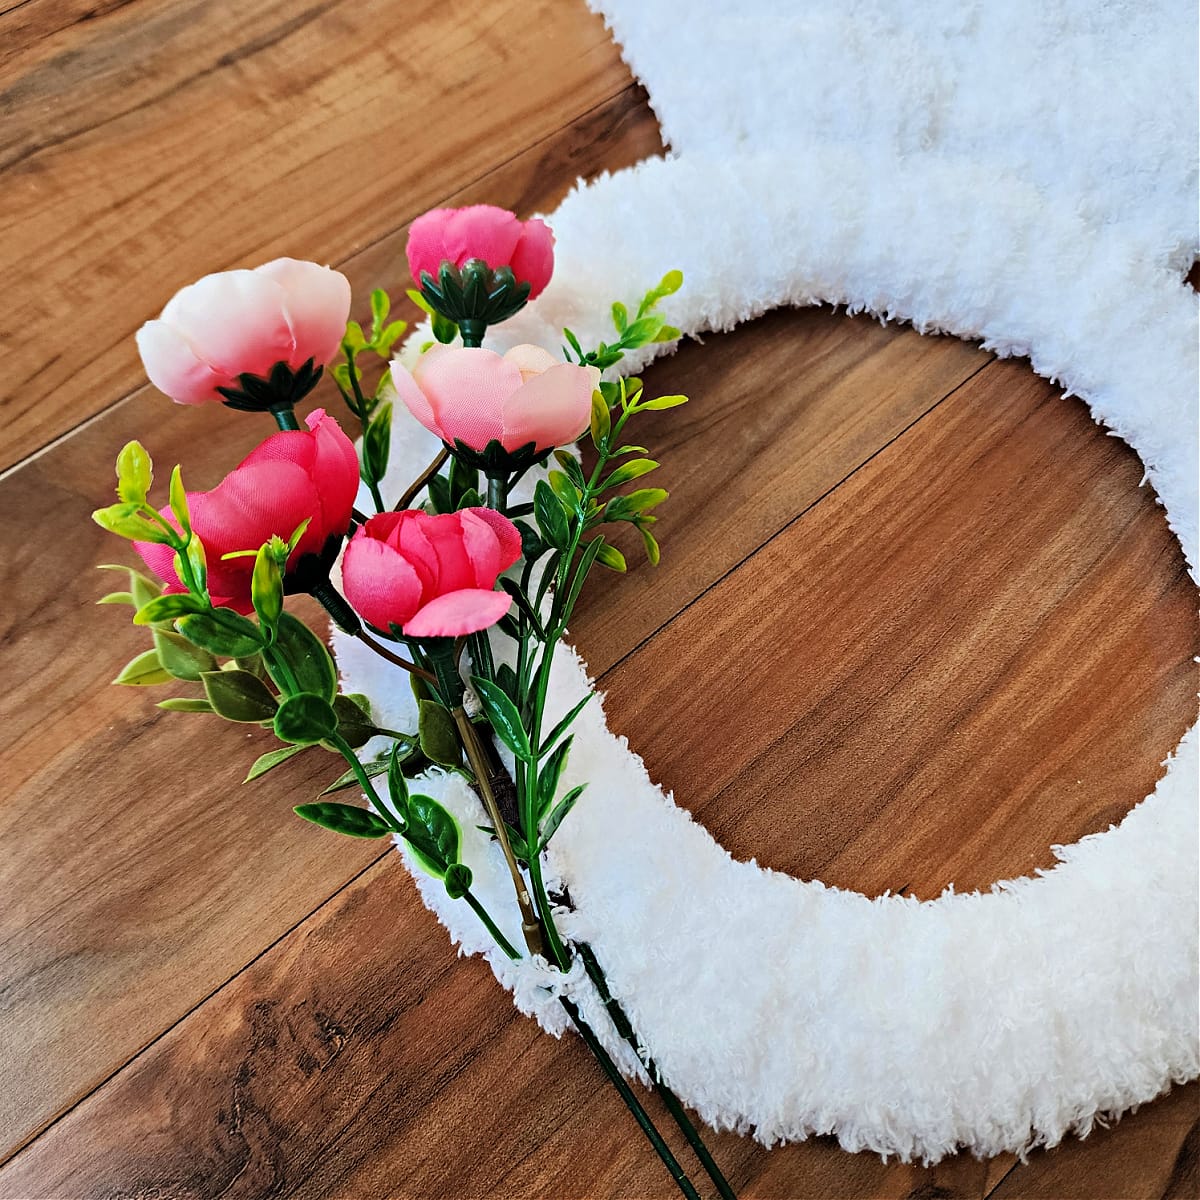
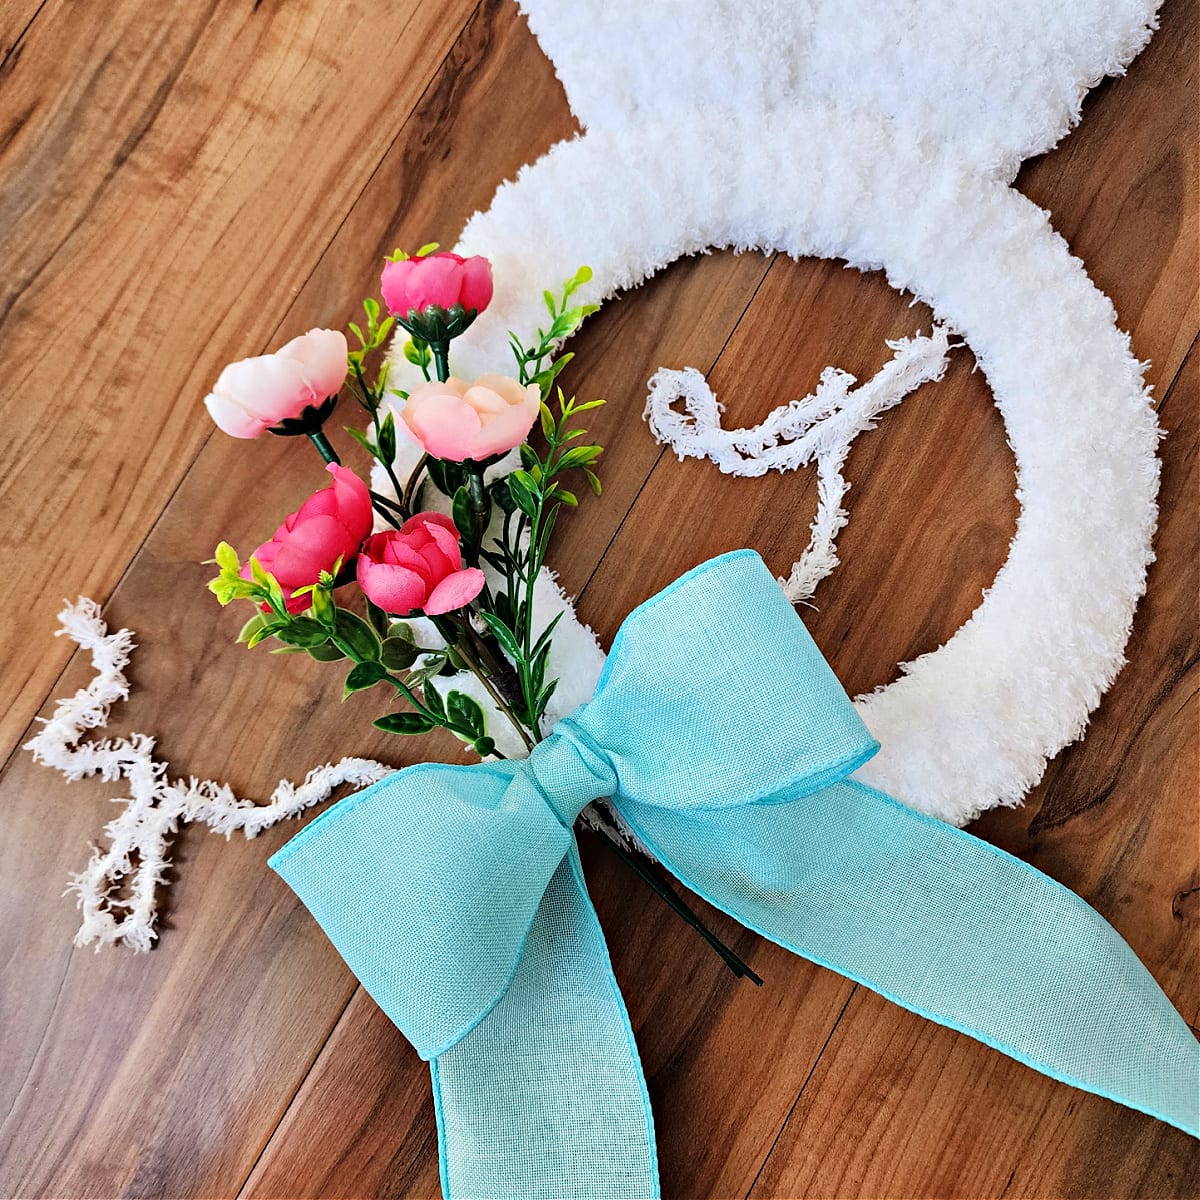
Wreath Embellishments

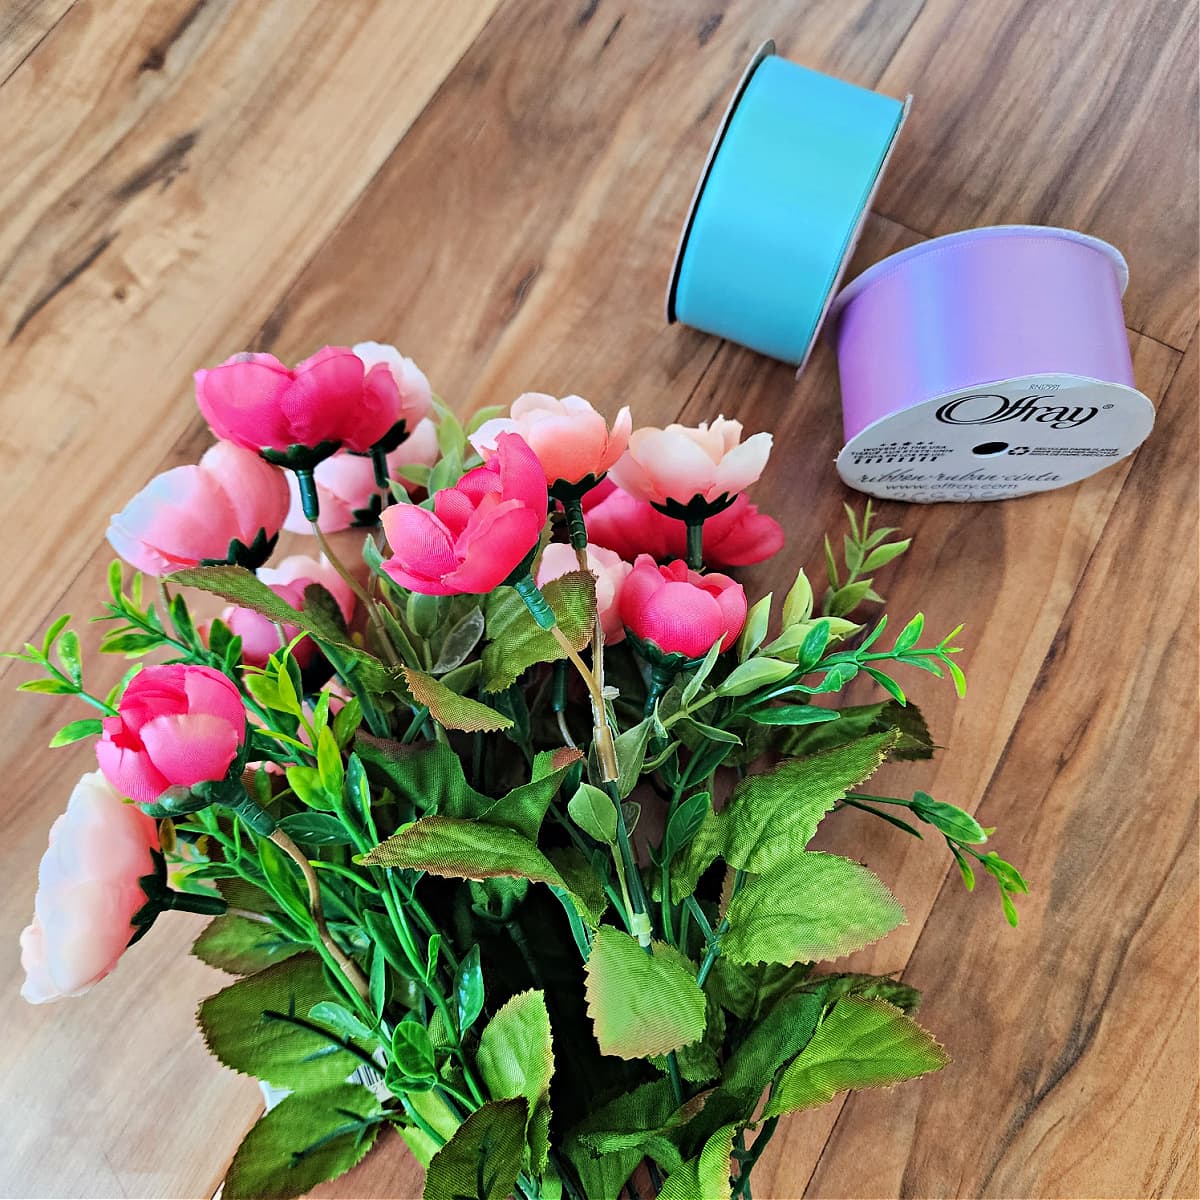
Adding a Floral Sprig
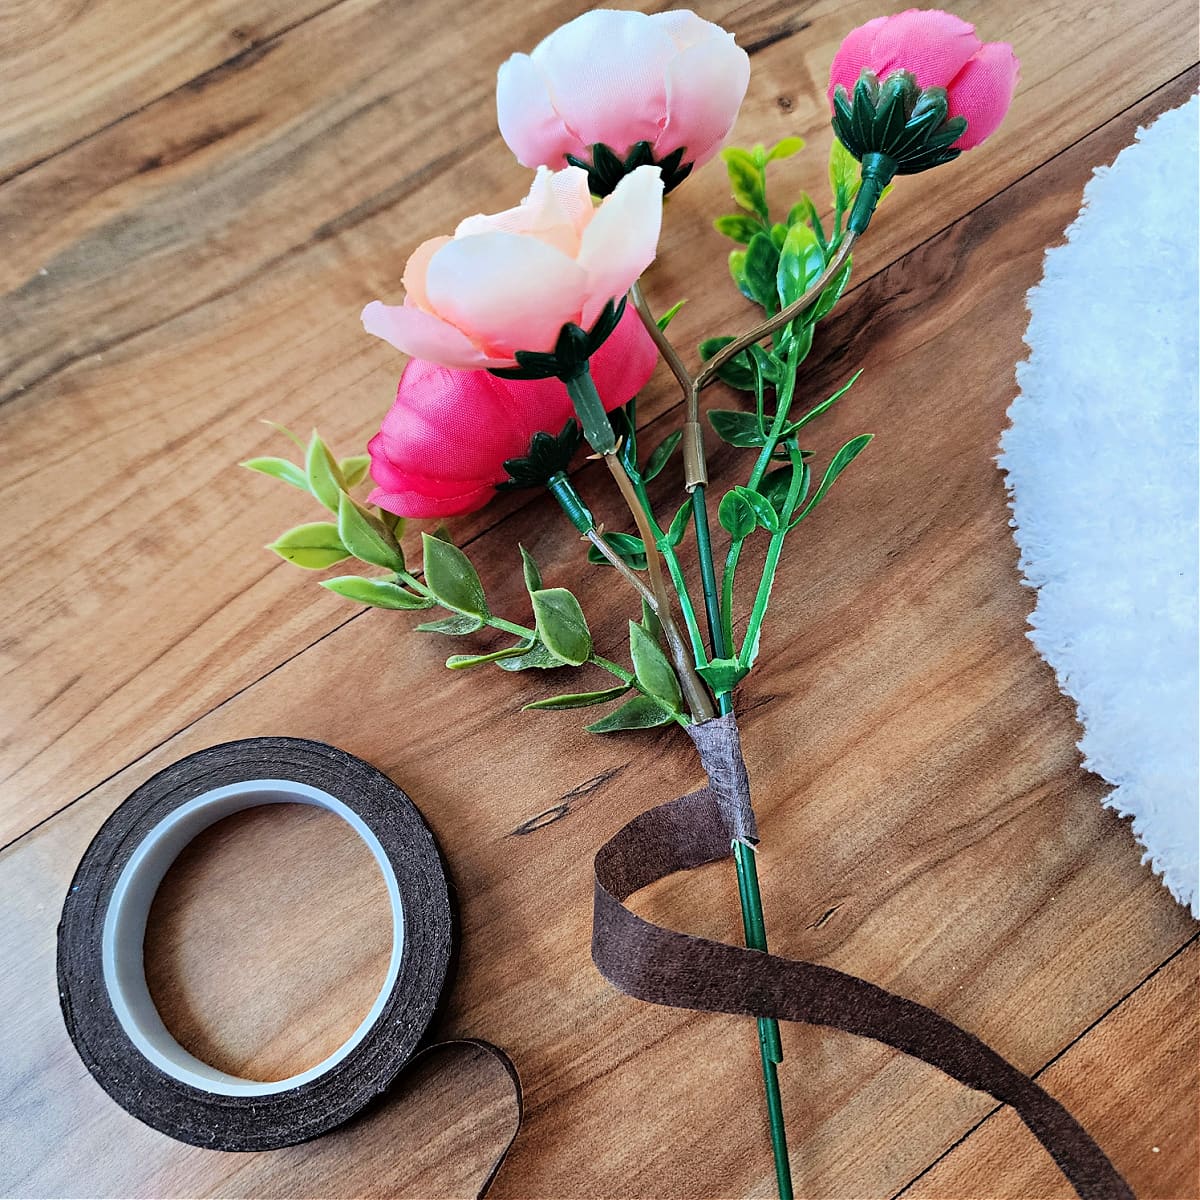
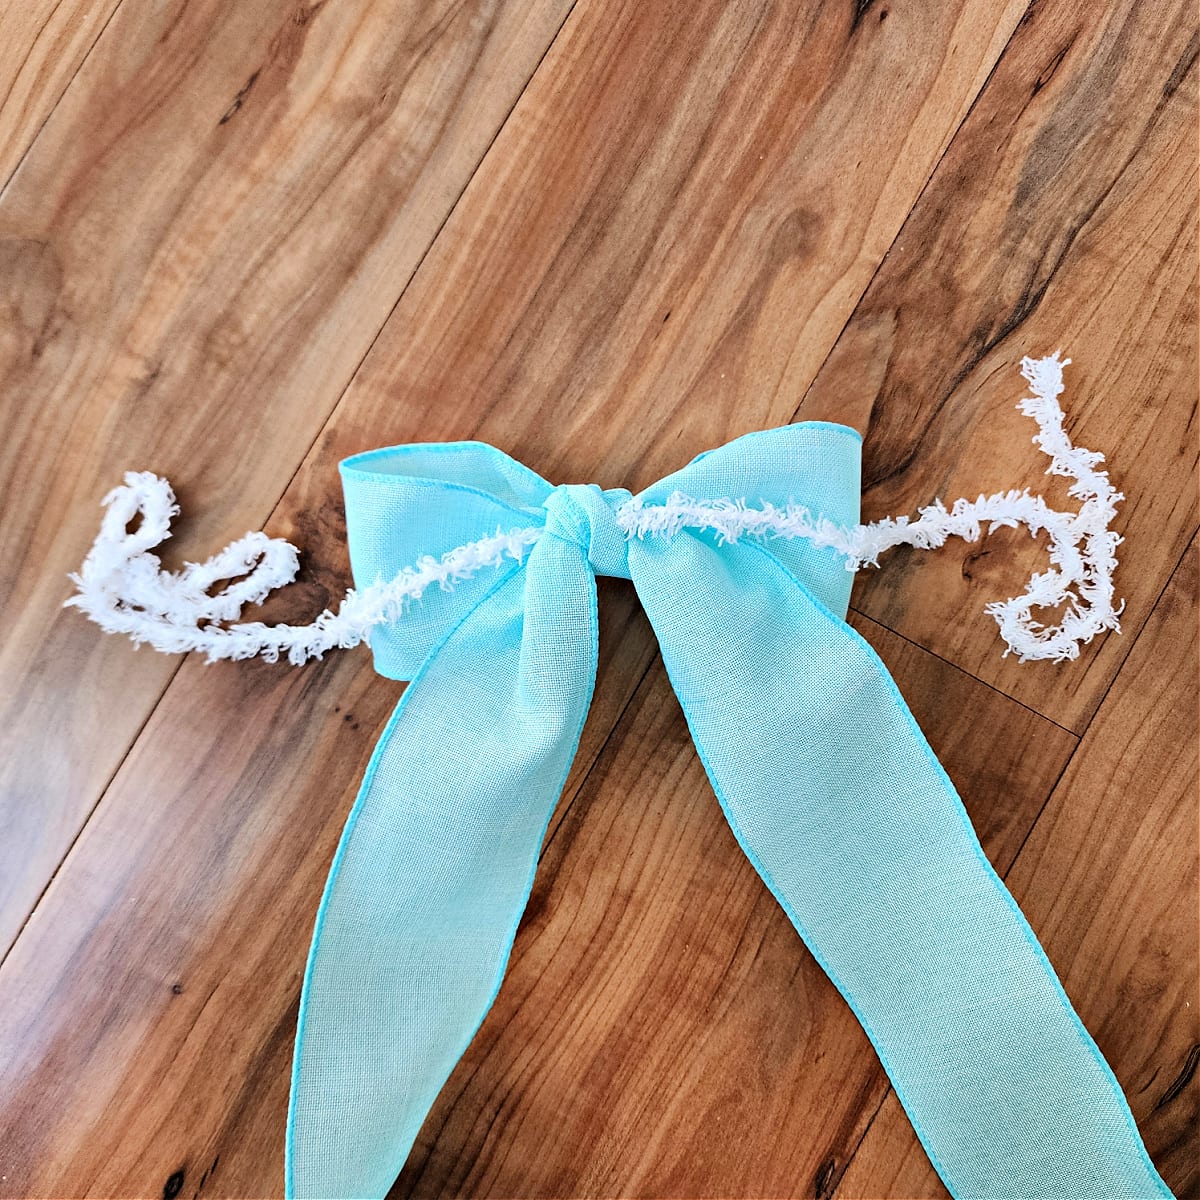
2.5″ Wide Bow from Wired Dollar Tree Ribbon
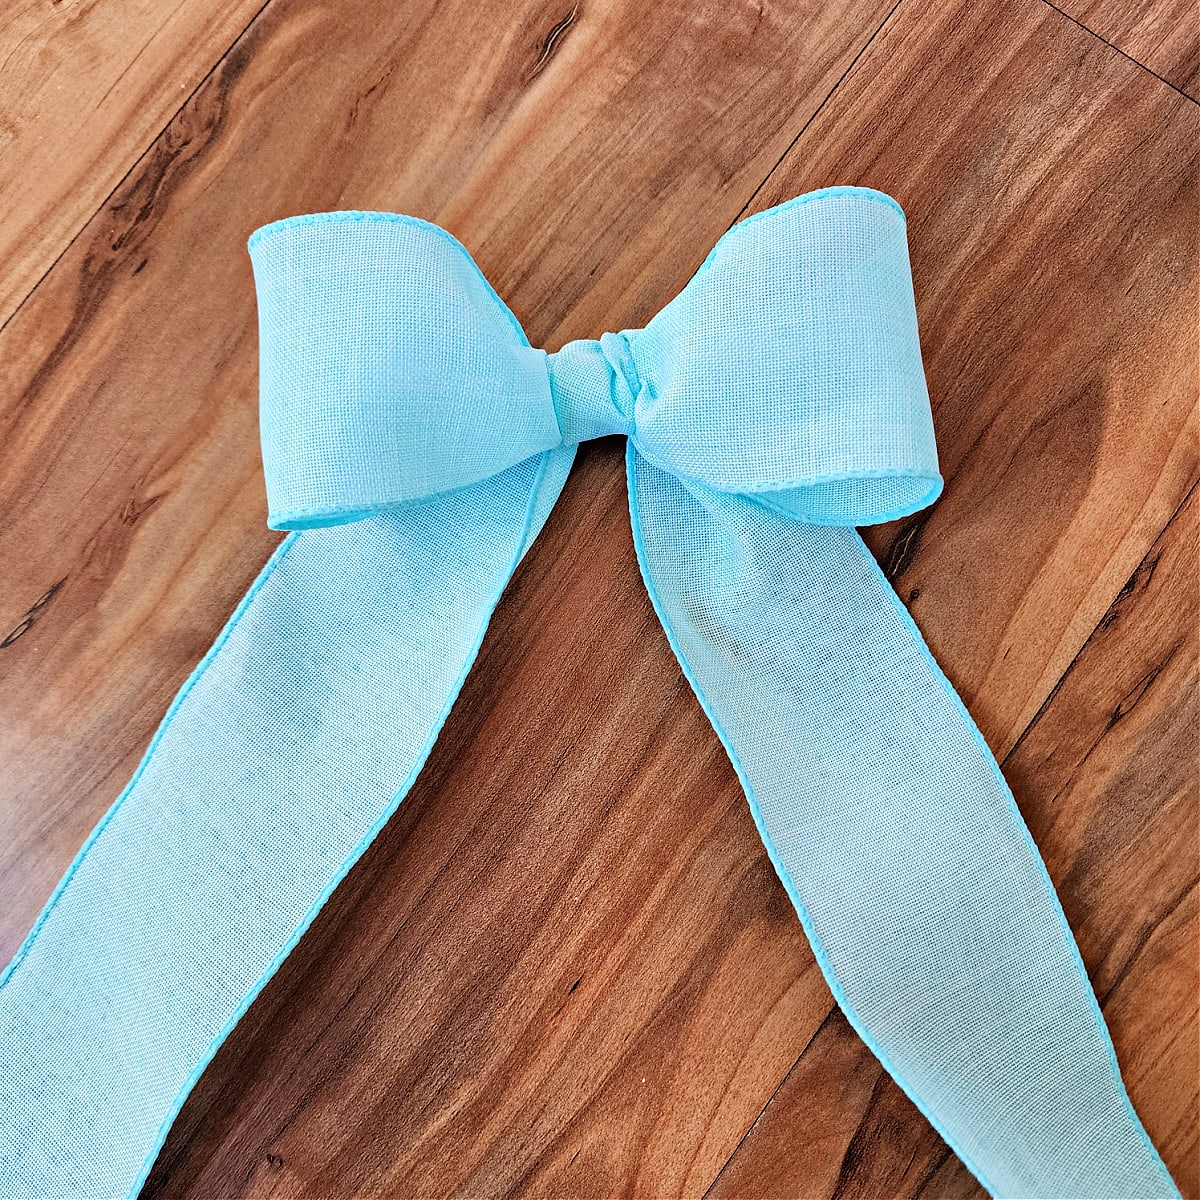
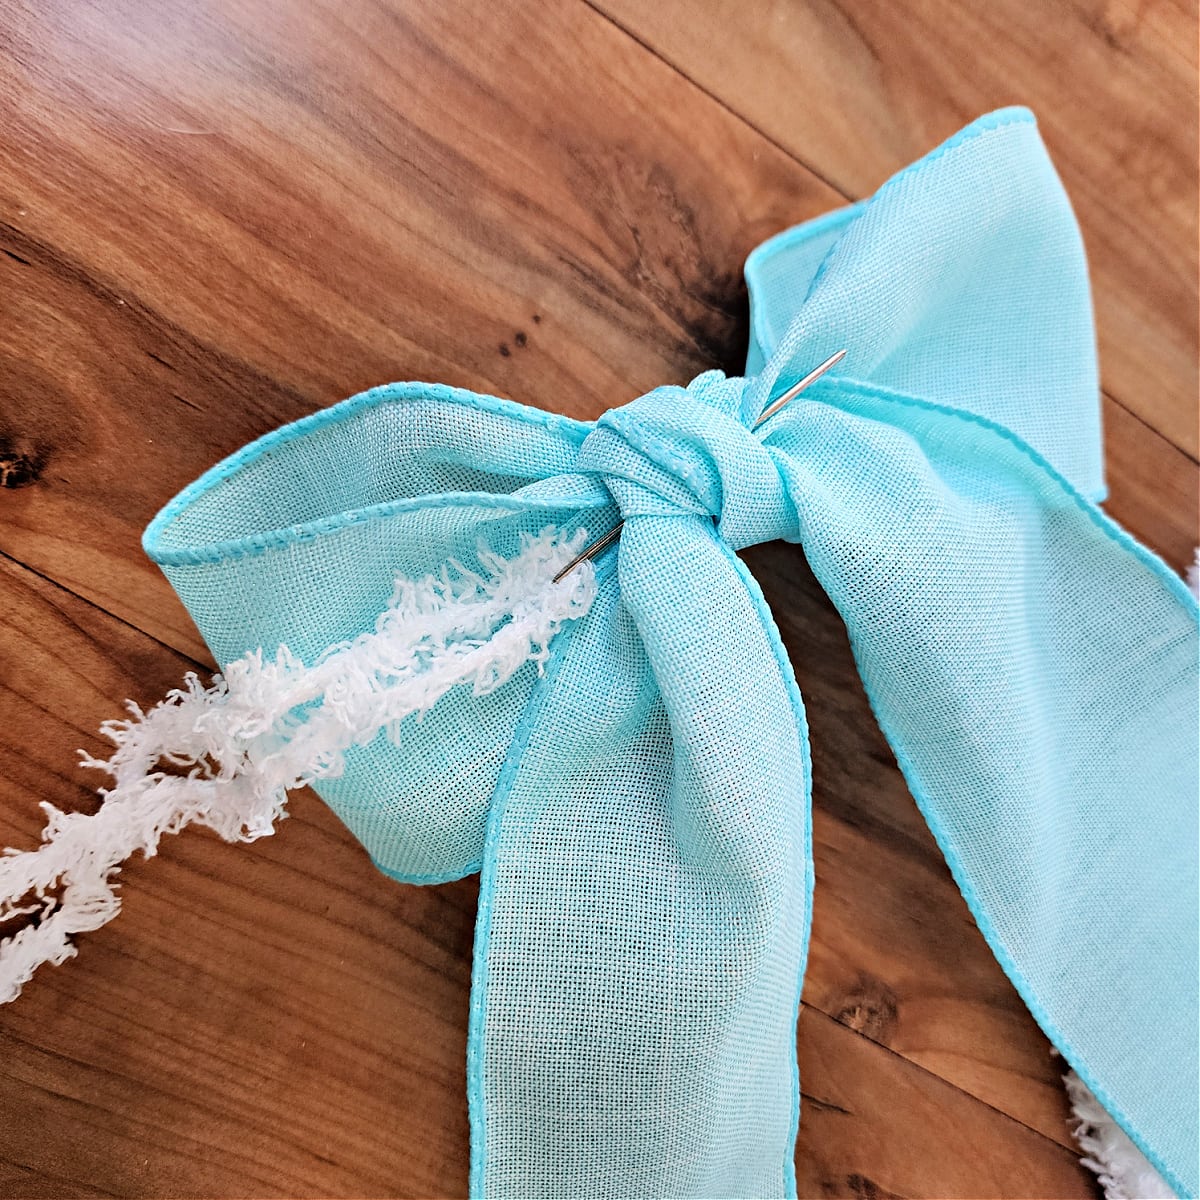
I added a tie to the back of the bow so that I could attach it to the bunny wreath.
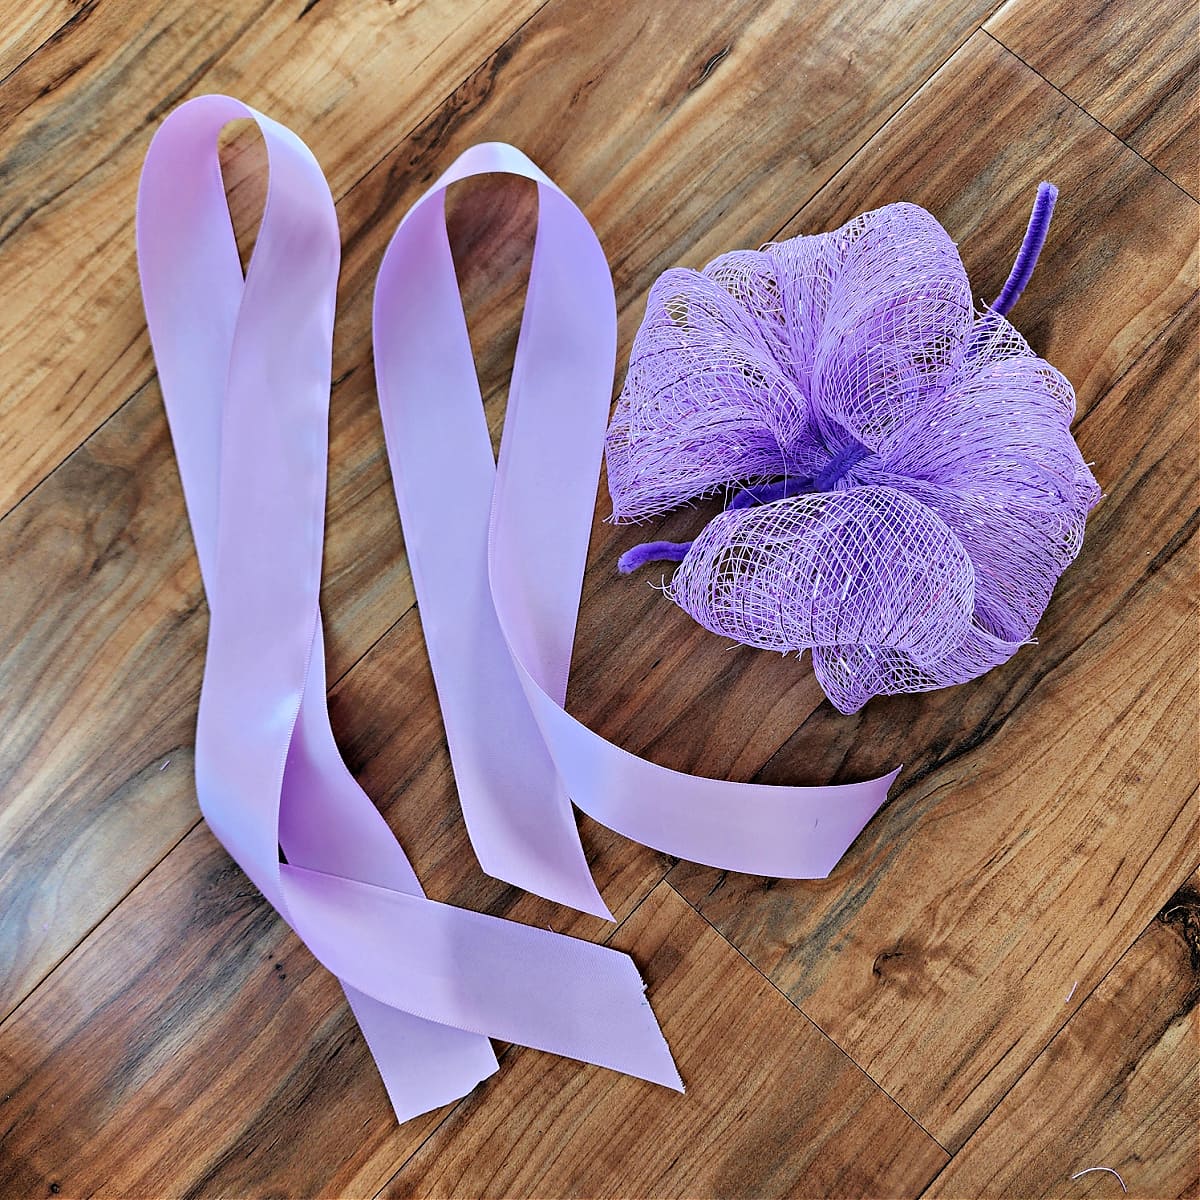
6″ Wide Dollar Tree Deco Mesh Bow
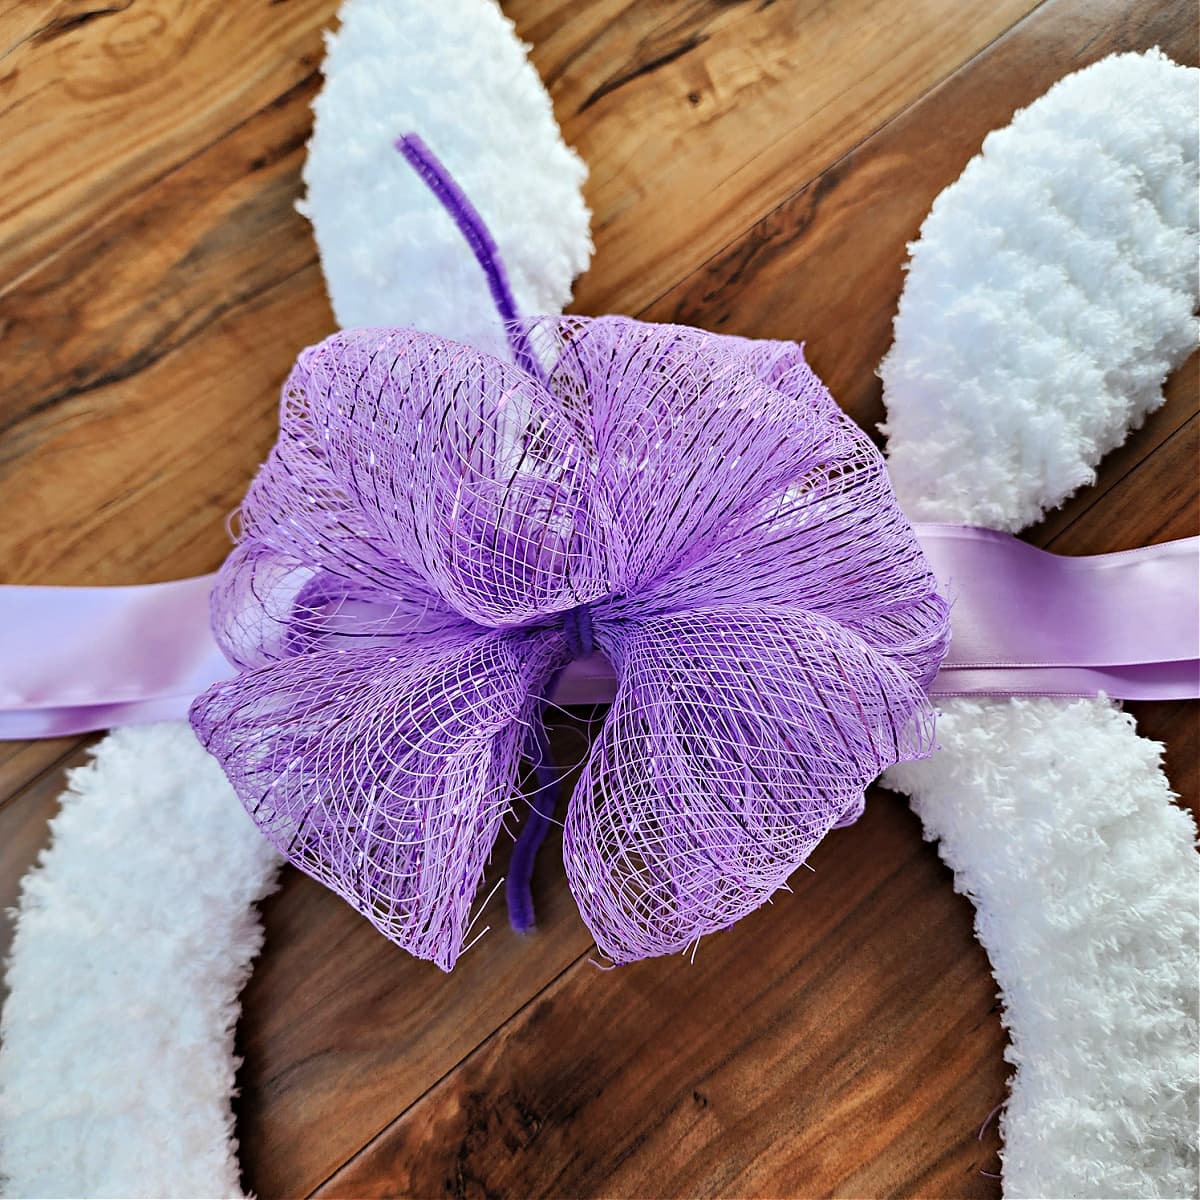
For the purple bow on my DIY Bunny Wreath Form with Coat Hanger Bunny Ears, I used 6″ W decorative mesh from the Dollar Tree. I used approximately half of one roll for my bow.
If you’re unsure how to make a simple deco mesh bow, on YouTube search “Dollar Tree 6″ Wide Deco Mesh Bow”. You’ll find lots of great video tutorials.
As you can see in the photos below, I used a purple pipe cleaner to secure my deco mesh bow. If you don’t have pipe cleaners, you can use a piece of yarn.
I also used two pieces of 2″ W satin ribbon approximately 18″ L each.
Which Crochet Bunny Wreath is Your Favorite?
I’d love to hear from you! Let me know in the comments below which bunny wreath is your favorite.
I MADE IT! NOW WHAT?
Pin this post!: Save this crochet bunny wreath pattern to your Pinterest boards so that you can come back and make it again.
Leave a comment below: We love to hear your feedback.
Share Your Finished Projects on Facebook or Instagram: I love to see your finished projects! Share with us on social media and tag me @acrochetedsimplicity or use the hashtag #ACrochetedSimplicity so I can find your posts.
JOIN US IN THE FACEBOOK COMMUNITY GROUP!
Come share your finished projects with us in the A Crocheted Simplicity Crochet Community Group on Facebook. Join us for fun community events such as crochet alongs, join in on crochet conversations, ask questions, get advice, and share your love for crochet!

Bunny Crochet Patterns I Think You’ll Love
More Easter Crochet Patterns
Did you enjoy this Easter bunny door wreath pattern? We have several DIY Easter patterns for the home that I think you’ll enjoy.
These are adorable! My favorite is a combination of them both. I like the Dollar Tree wreath with the bunny butt embellishments.
Hi Anna,
Mine too! I have one more Dollar Tree wreath form that I’m going to use the bunny bottom instructions on. 🙂
Happy Crocheting,
Jennifer
How cute are these? Thanks for the instructions!
I’m glad you love them, Kelly!
Happy Crocheting,
Jennifer
This season is actually not about the bunny, but about the Lamb, of God!
I would like to see a lamb pattern, or maybe a cross one!
God bless you!
Hi Treena,
I agree and I’m currently working on a small cross project. It’ll be on the blog soon! 🙂
Happy Crocheting,
Jennifer
love both! ❤️
Thanks, Dawn! <3