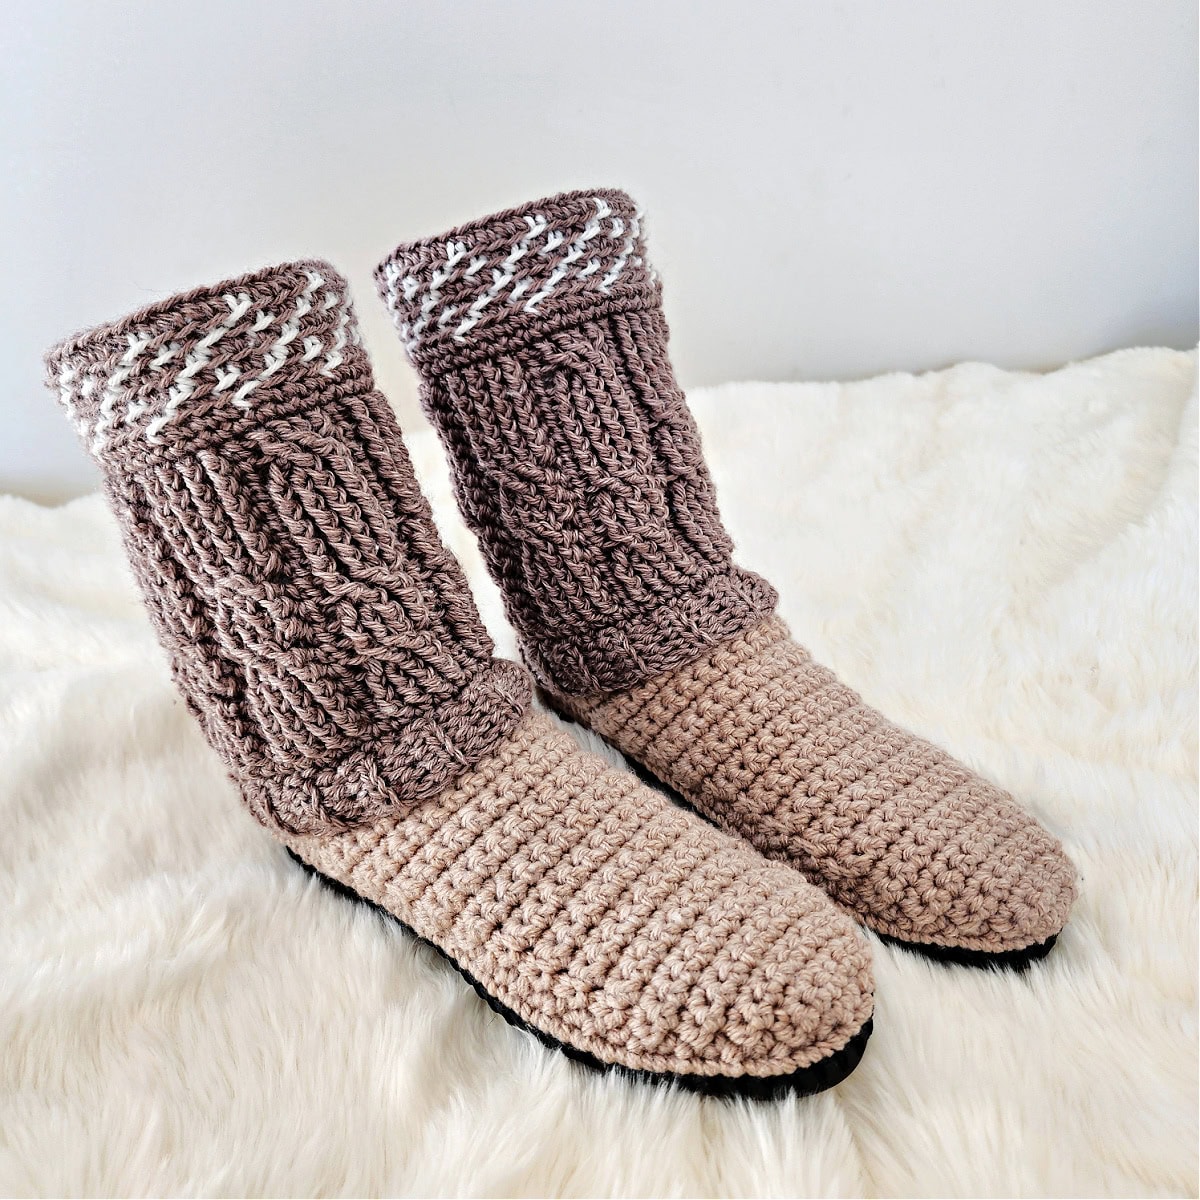
Cable Crochet Slipper Boots
Combine tapestry crochet, cables, and cozy vibes to create these cable crochet slipper boots that not only refine your crocheting skills but give you a final make that you’ll be very proud of.
With a sole at the bottom that allows you to use these boots both inside and outside of your house, and a durable design to ensure they last the season, you’ll love having this pair of handmade shoes on hand in the winters.
You’ll find the free cable crochet slipper boots in the post below, or you can find an ad-free printable PDF (that includes all photo tutorials + color chart), on Ravelry, or Etsy (aff).
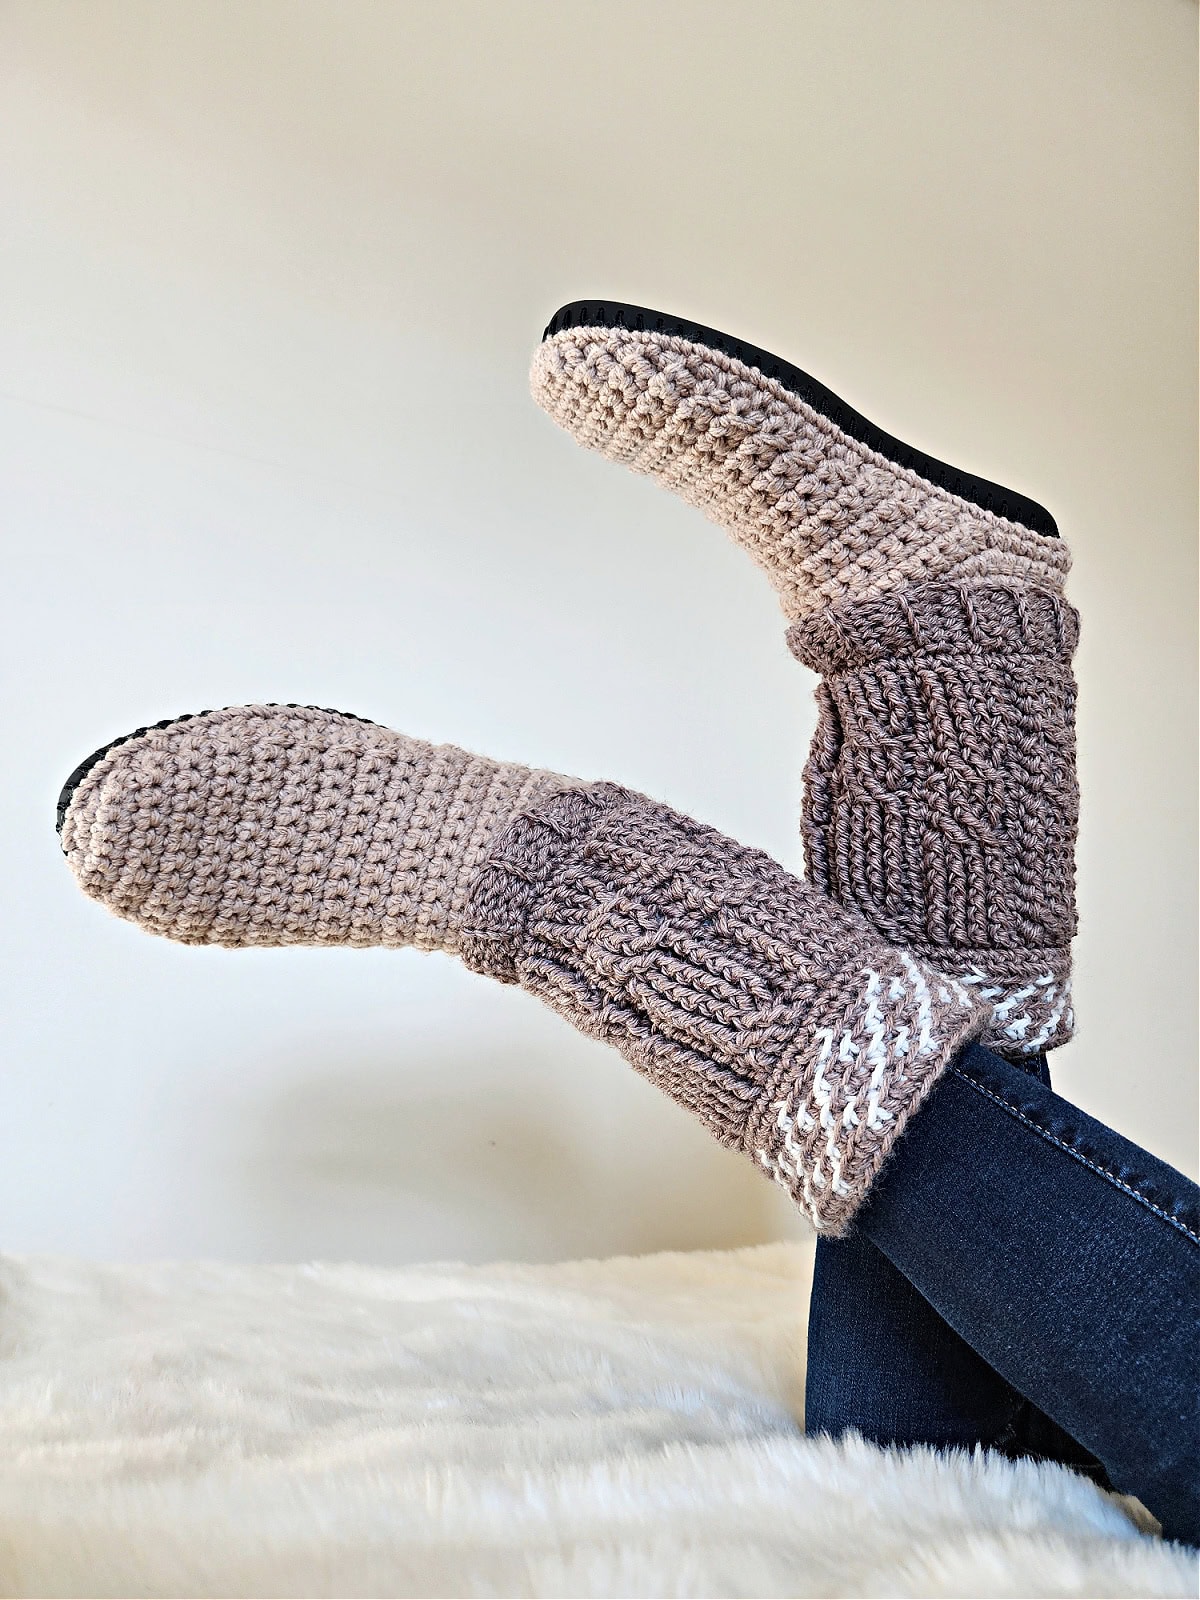
These cable crochet slipper boots both stylish and practical, making them a rewarding project for any crocheter who wants to keep their toes warm in the winters. The use of different crochet techniques creates beautiful texture and depth to the pattern and by combining a classic cable design with a fitted boot shape, you can create a piece that looks elegant and feels cozy.
Also, since you’ll be adding a sturdy sole to make these winter boots, this takes them to the next level in terms of durability and functionality. The shape of the boots remains intact and you won’t mind rocking them outside of the house too.
How to Crochet a Pair of Boots
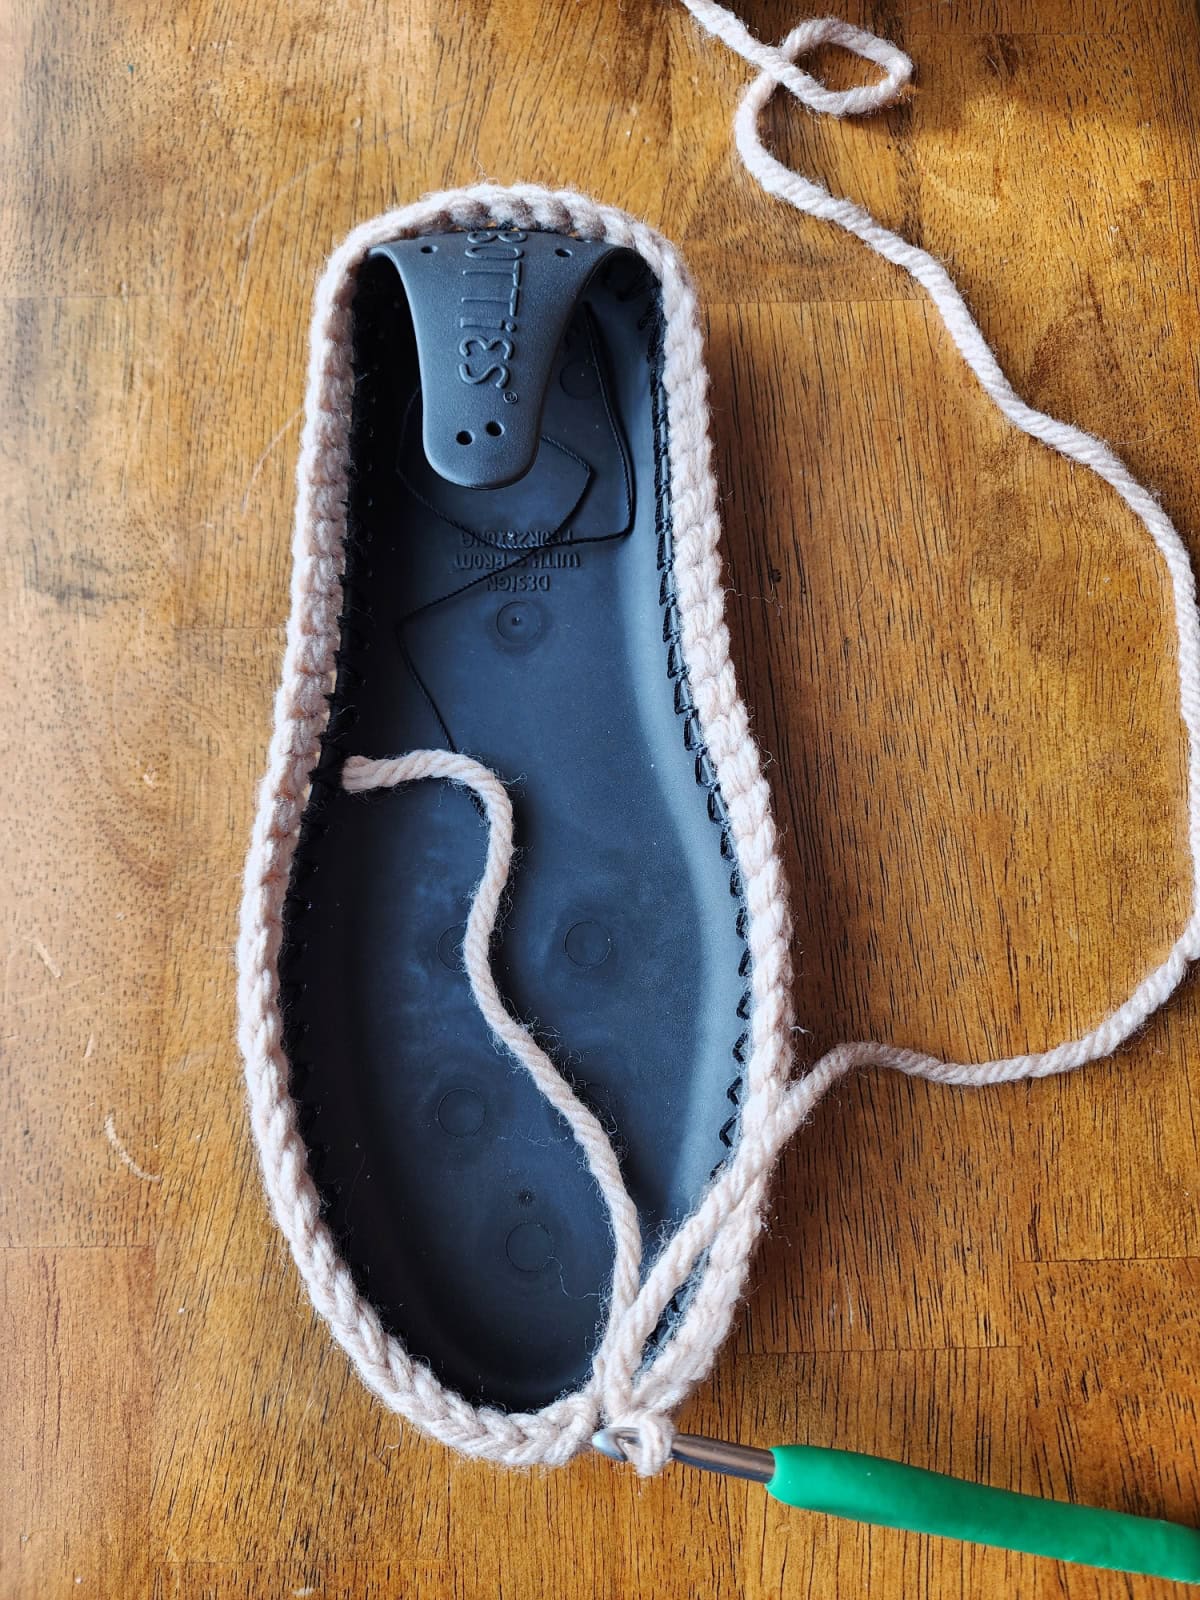
These crochet slipper boots are made in one piece starting from the sole and working your way up. First, you’ll prepare the Botties soles by crocheting into the pre-punched holes around the sole. This allows your stitches to be evenly spaced out and your work to have a neat look to it.
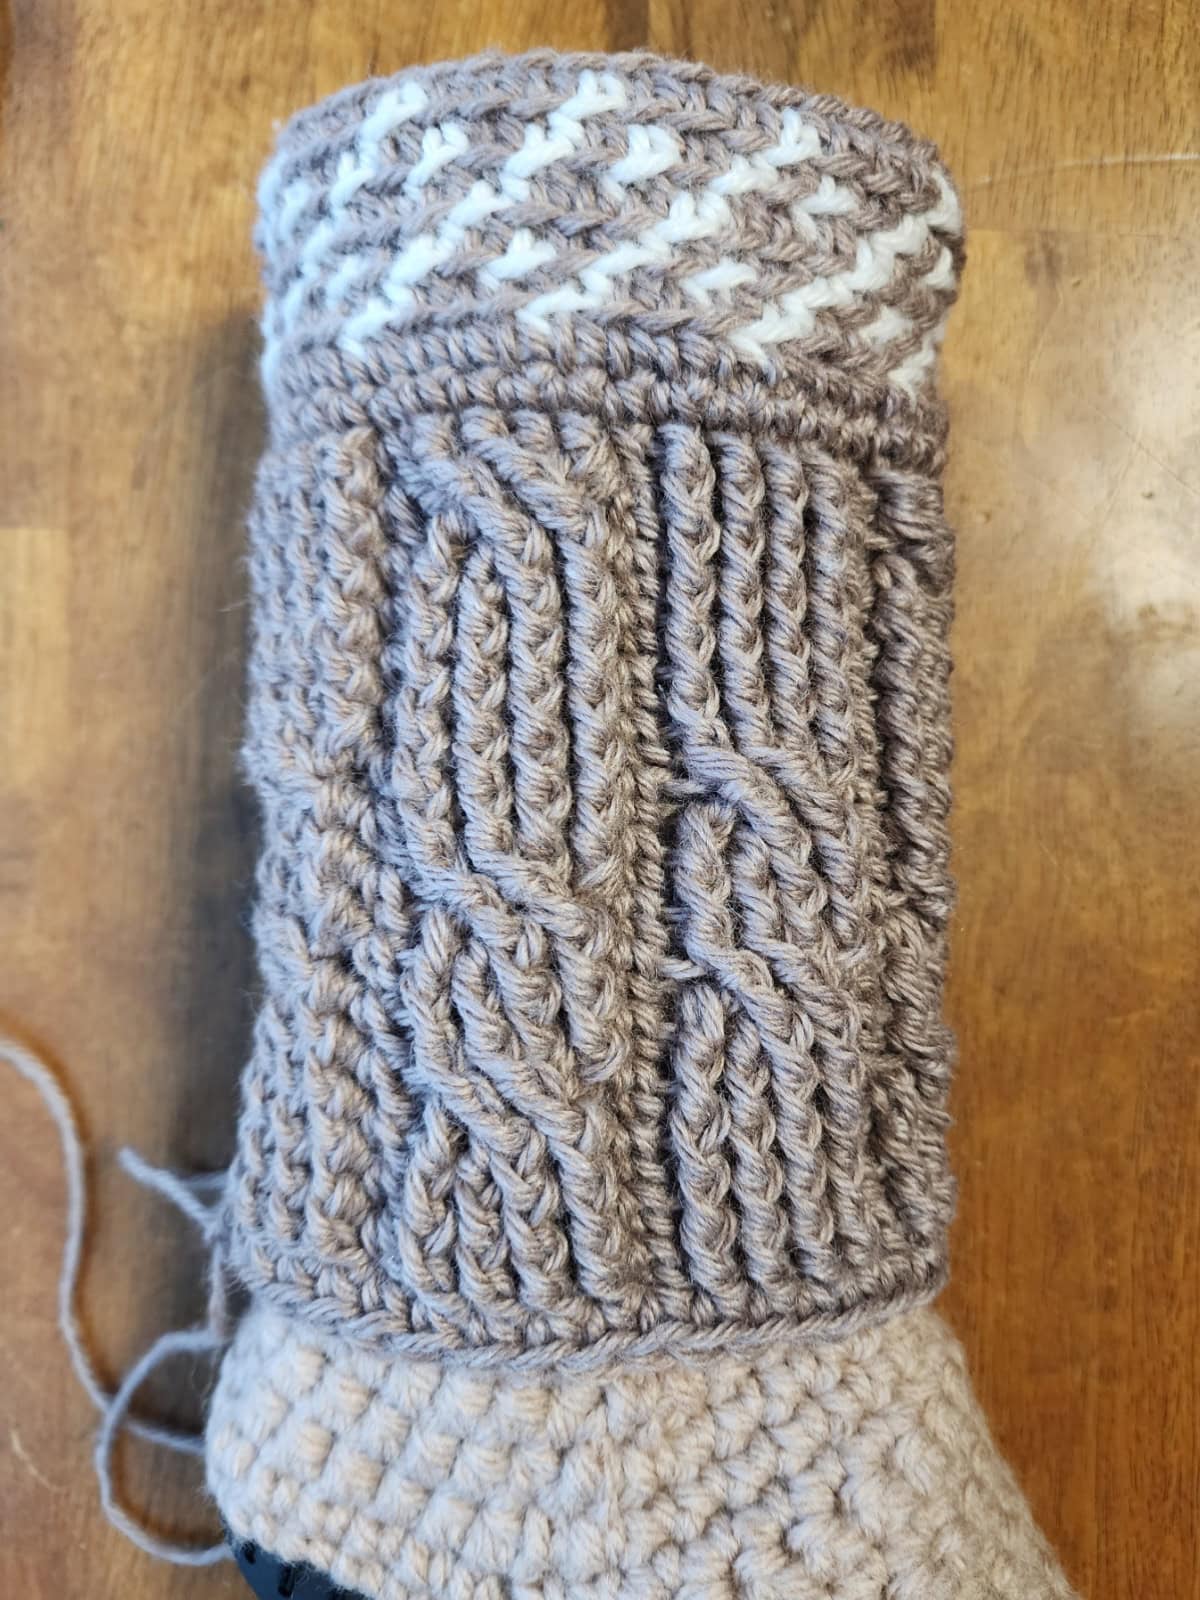
Next, with bulky weight yarn, you’ll crochet the toe, foot and ankle. Then, you’ll switch to worsted weight yarn to complete the ankle. Once this is done, you’ll crochet the decorative cuff, which includes a tapestry crochet section, crochet cable section, and cuff ribbing.
All of these elements together make your stylish cable crochet slipper boots.

How To Get The
Cable Slipper Boots
Option 1: Scroll down for the free cable boots crochet pattern right here in this blog post.
Option 2: Purchase the ad-free printable PDF from one of my shops:
Choosing Which Size to Crochet
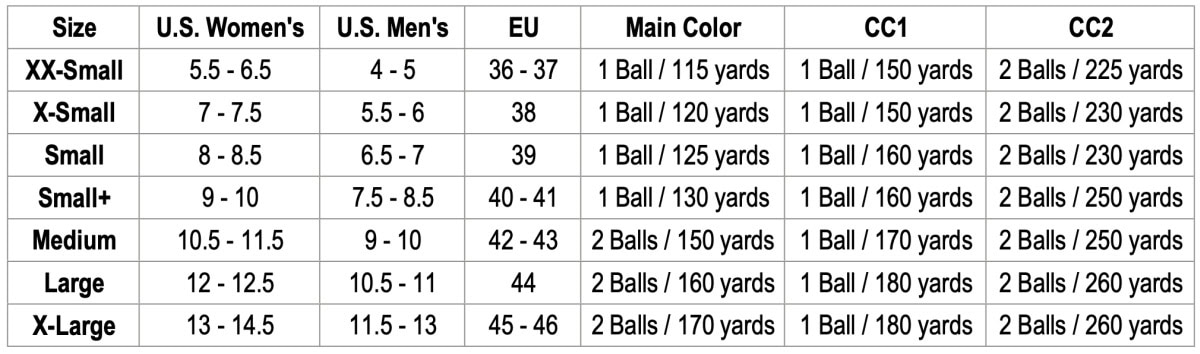
To choose your size, look over the size chart below.
- Main Color: Lion Brand Hue & Me in Desert #617-099U
- CC1: Lion Brand Basic Stitch Antimicrobial in Vintage #204-099R
- CC2: Lion Brand Basic Stitch Antimicrobial in Hazelwood #204-124AE
Size & Yardage Chart
The notes above refer to this size chart.
Yarn
For the Cable Crochet Slipper Boots, I chose Lion Brand Yarns Hue & Me and Basic Stitch Antimicrobial. Both of them have a percentage of acrylic or polyester in them while the former has wool content as well.
Acrylic yarn is a great choice for making crochet boots because it is durable, low-maintenance, and available in a variety of colors. It holds its shape well, which is important for boots that need structure and support, especially around the ankles and foot. The wool blend adds extra warmth to your slipper boots.
Yarn Substitutions
Other worsted and bulky weight yarns can be substituted as long as you meet gauge and love the overall look of your boots. Since the antimicrobial variant of Basic Stitch has been discontinued, you can buy the regular one. Here are some other great yarns that can be used as alternatives:
- Lion Brand Yarns Wool Ease (197 yds / 180 m / 85 g / 3 oz) comes in amazing colors, especially with a wide range of neutrals, and is an 80% acrylic, 20% wool blend that has added warmth with the same ease of use as pure acrylic yarn.
- Lion Brand Pound of Love (1,020 yds / 932 m / 454 g / 16 oz) is a 100% premium acrylic yarn that comes in a bigger package with greater yardage, making it great for those who don’t like joining new ends of yarn.
- Lion Brand Color Theory (1,020 yds / 932 m / 454 g / 16 oz) is a gorgeous 100% acrylic yarn with a contemporary color palette for those who prefer a modern neutral look to their wearables.
Crochet Slipper Boots – Free Pattern
The cable crochet slipper boots pattern is free below, but if you love to work offline, I’ve got a couple other great options for you.
Purchase the ad-free, printable PDF, (that includes all photo tutorials, + color chart), on Ravelry, or on Etsy (aff).
Purchase the kit here! (aff) Lion Brand also has a full kit of the Cable Crochet Slipper Boots, available on their website. The kit includes your choice of colors and a digital copy of the pattern. You can also get it with the Botties Latex Foam Insoles (aff).
This post contains affiliate links.
Materials
- Yarn: Bulky Weight / 5 and Worsted Weight / 4 Yarn, Lion Brand Yarns Hue & Me and Basic Stitch Antimicrobial were used for the sample.
- Yardage: See Size Chart Above
- Crochet Hook: I/9/5.50mm; B/2.25mm or size needed to obtain gauge (My favorite crochet hooks are the Clover Amour Crochet Hooks, I’ve never had an ache in my hand since switching).
- Measuring Tape
- Locking Stitch Markers
- Scissors
- Yarn Needle
- Botties Soles and Botties Insoles – 1 pair in preferred size (or Botties Latex Foam Insoles)
- Botties Round 0 Yarn – 1 pack (14 m)
Abbreviations (US Terms)
- ch: chain
- sl st: slip stitch
- st(s): stitch(es)
- sc: single crochet
- hdc: half double crochet
- ext sc: extended single crochet
- FPdc: front post double crochet
- FPtr: front post treble crochet
- Invsc2tog: invisible single crochet decrease
- yo: yarn over
- BLO / FLO: back loop only / front loop only
- SM: stitch marker
- Rep: repeat
- RS / WS: right side / wrong side
- Inc: increase
- MC: Main Color
- CC1: Contrasting Color 1
- CC2: Contrasting Color 2
Experience Level
- Intermediate
Gauge
- See individual sections for gauge.
Sizes
- See Size Chart above.
Special Stitches
- Invisible Single Crochet Decrease (invsc2tog): Insert hook into the FLO of stitch indicated, insert hook into FLO of next stitch, yo, pull up a loop, yo, pull thru all loops on hook.
- Extended Single Crochet (ext sc): Insert hook into stitch indicated, yo, pull up a loop, yo, pull thru 1 loop on hook, yo, pull thru remaining two loops on hook.
- Front Post Double Crochet (fpdc): Yo, insert hook from front to back to front around the post of the designated stitch, yo, pull up a loop, yo, pull thru 2 loops, yo, pull thru remaining 2 loops.
- Front Post Treble Crochet (fptr): Yo 2 twice, insert hook from front to back to front around the post of the designated stitch, yo, pull up a loop, (yo, pull thru 2 loops) 3 times.
- Join yarn with a standing single crochet: Begin with a slip knot on your hook, insert your hook into the stitch or space indicated, yo, pull up a loop, yo and draw thru both loops on hook.
Pattern Notes
- Turning chains are not counted as stitches, unless specified otherwise.
- The first stitch of each row is worked into the same stitch as the turning chain, unless noted otherwise.
- Yarn Notes: Lion Brand Yarns Hue & Me and Basic Stitch Antimicrobial were used for the sample. Other comparable yarns may be used as long as gauge is met.
- Lion Brand Yarns Hue & Me, bulky weight / 5 yarn, 80% Acrylic / 20% Wool (137 yards / 125 m / 125 g / 4.4 oz)
- Lion Brand Yarns Basic Stitch Antimicrobial, worsted weight / 4 yarn, 65% Recycled Polyester / 35% Amicor Acrylic (186 yards / 170 m / 100 g / 3.5 oz)
- Slipper Boot Construction: This crochet slipper boot is crocheted from the sole up. First, you’ll prepare the Botties soles by crocheting into the pre-punched holes around the sole. Next, with bulky weight yarn, you’ll crochet the toe, foot and ankle. Then, you’ll switch to worsted weight yarn to complete the ankle. Lastly, you’ll crochet the decorative cuff, which includes a tapestry crochet section, crochet cable section, and cuff ribbing.
Tip: Try your slipper boot on as you work, to check fit. Make sure to add the sole insert first. Adjust your hook size accordingly, if it’s too snug or too loose.
- Changes for Sizes: When the instructions for all sizes are written together, the following is how the changes for sizes are written. If all sizes are not included in a section, changes for sizes for that specific section will be given.
- Changes for Sizes as follows: XXS (XS, S, S+, M, L, XL)
- Changes for Stitch Counts as follows: (XXS, XS, S, S+, M, L, XL)
- Tapestry Crochet Color Changes on Cuff: All color changes are worked in the last pull through of the last stitch of the previous color. Make sure to keep your color changes all on the wrong side of your work.
- Finished Slipper Boot Height: Your slipper boot will be approximately 9″ H when complete.
Cable Crochet Slipper Boots Written Pattern
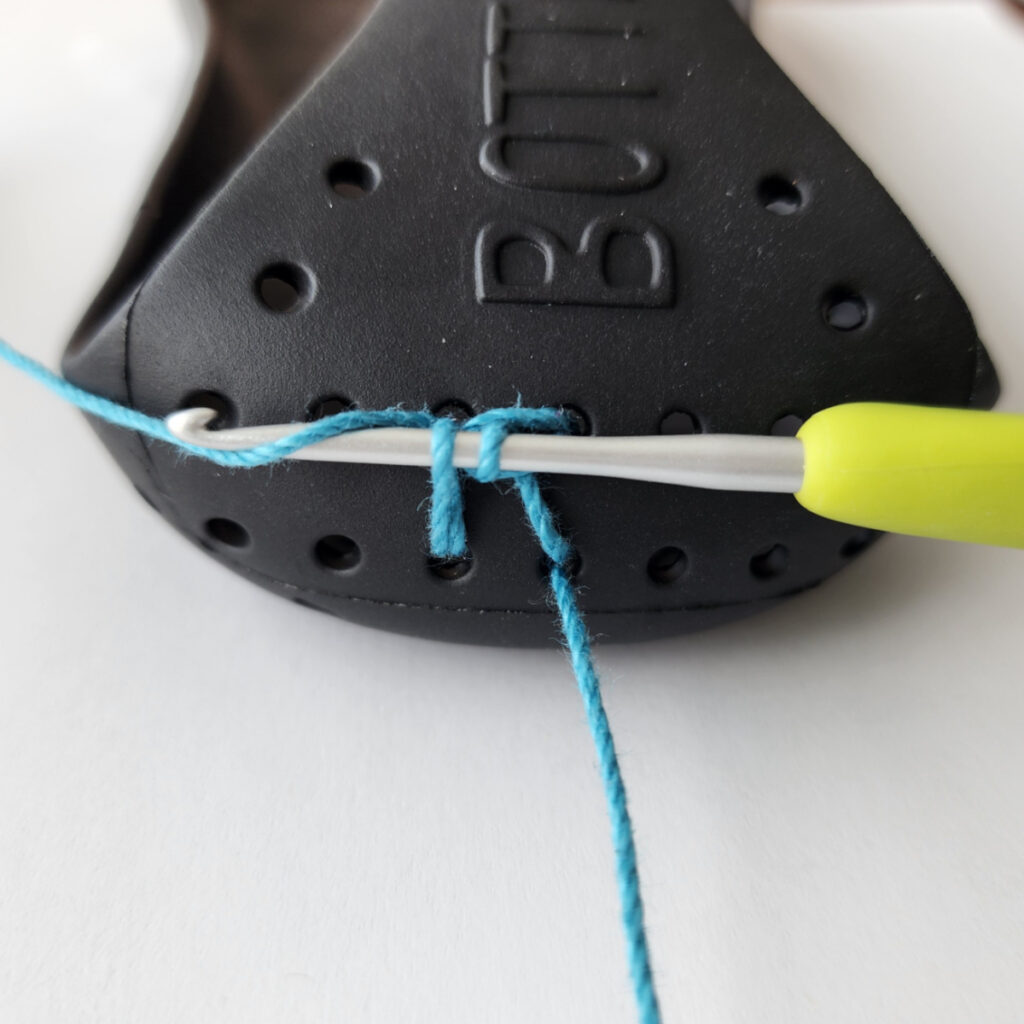
Round 0
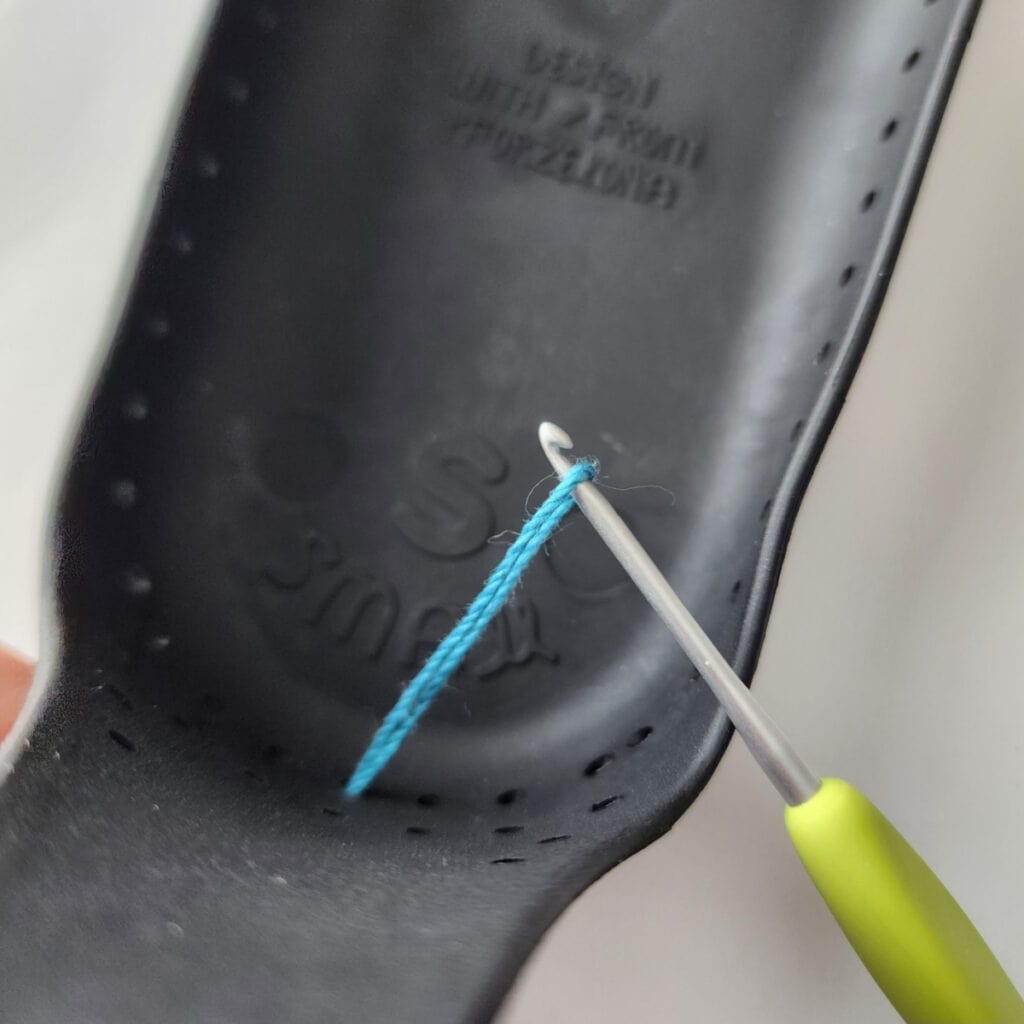
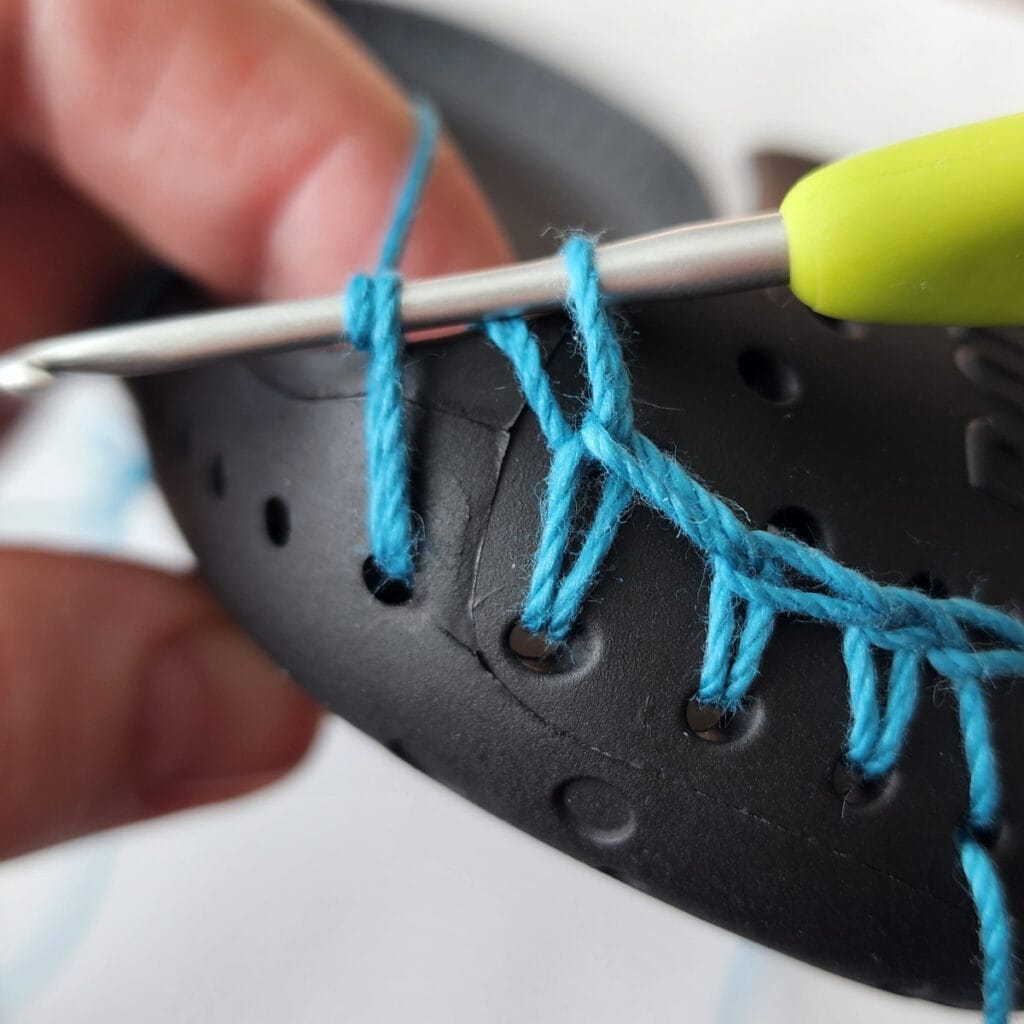
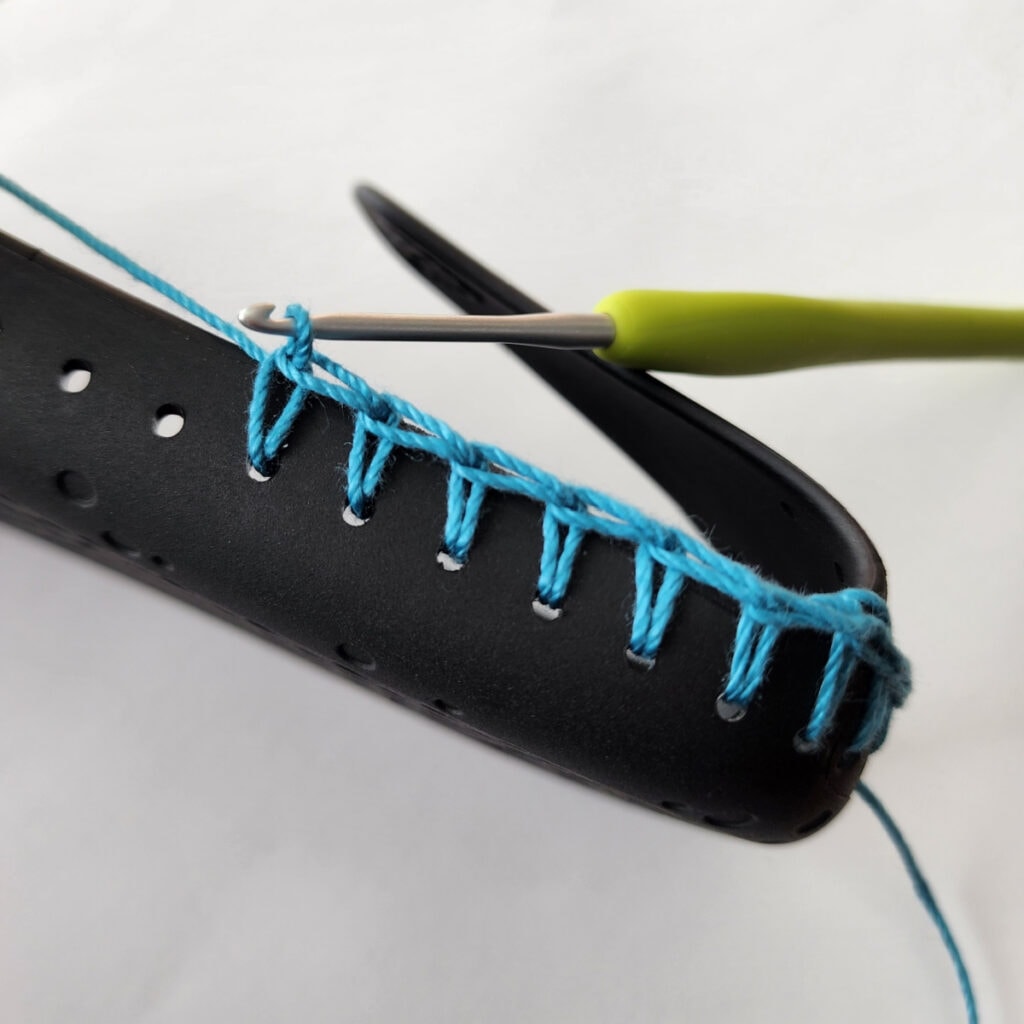
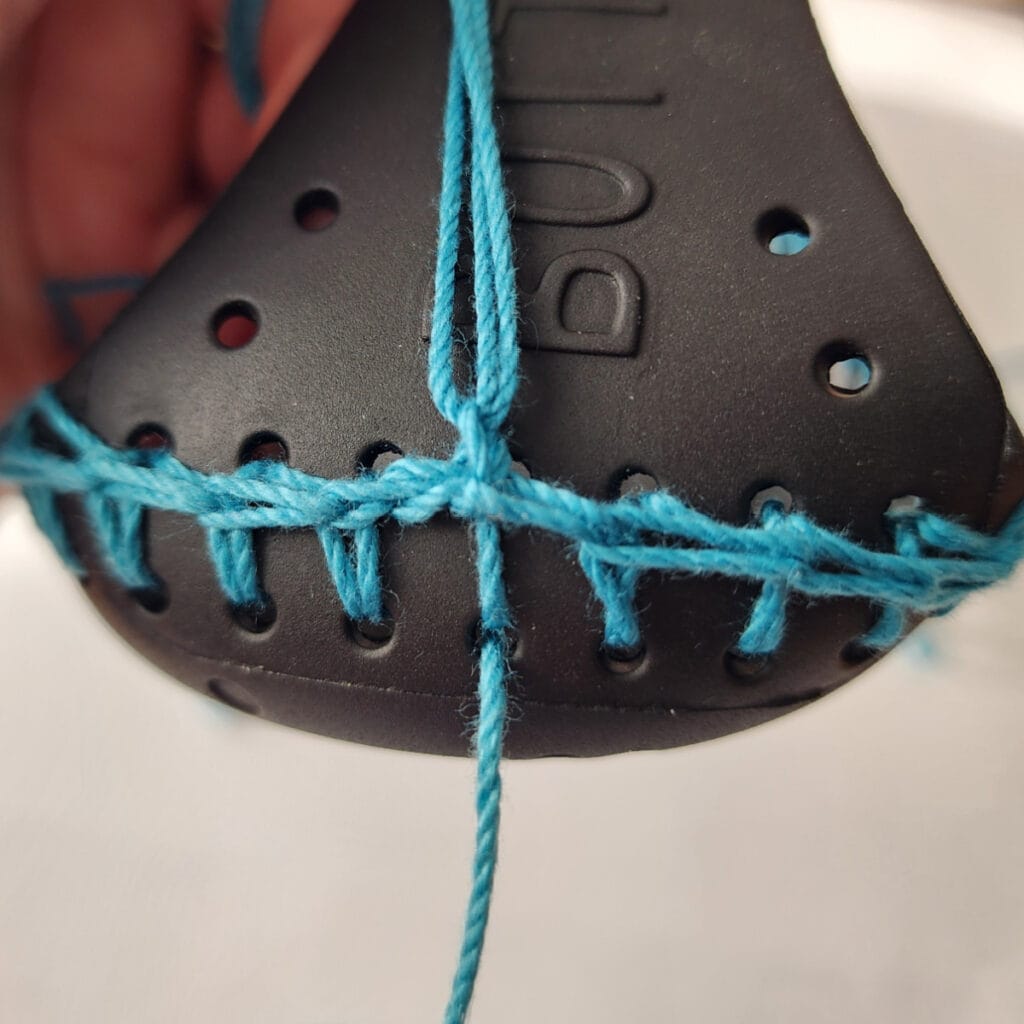
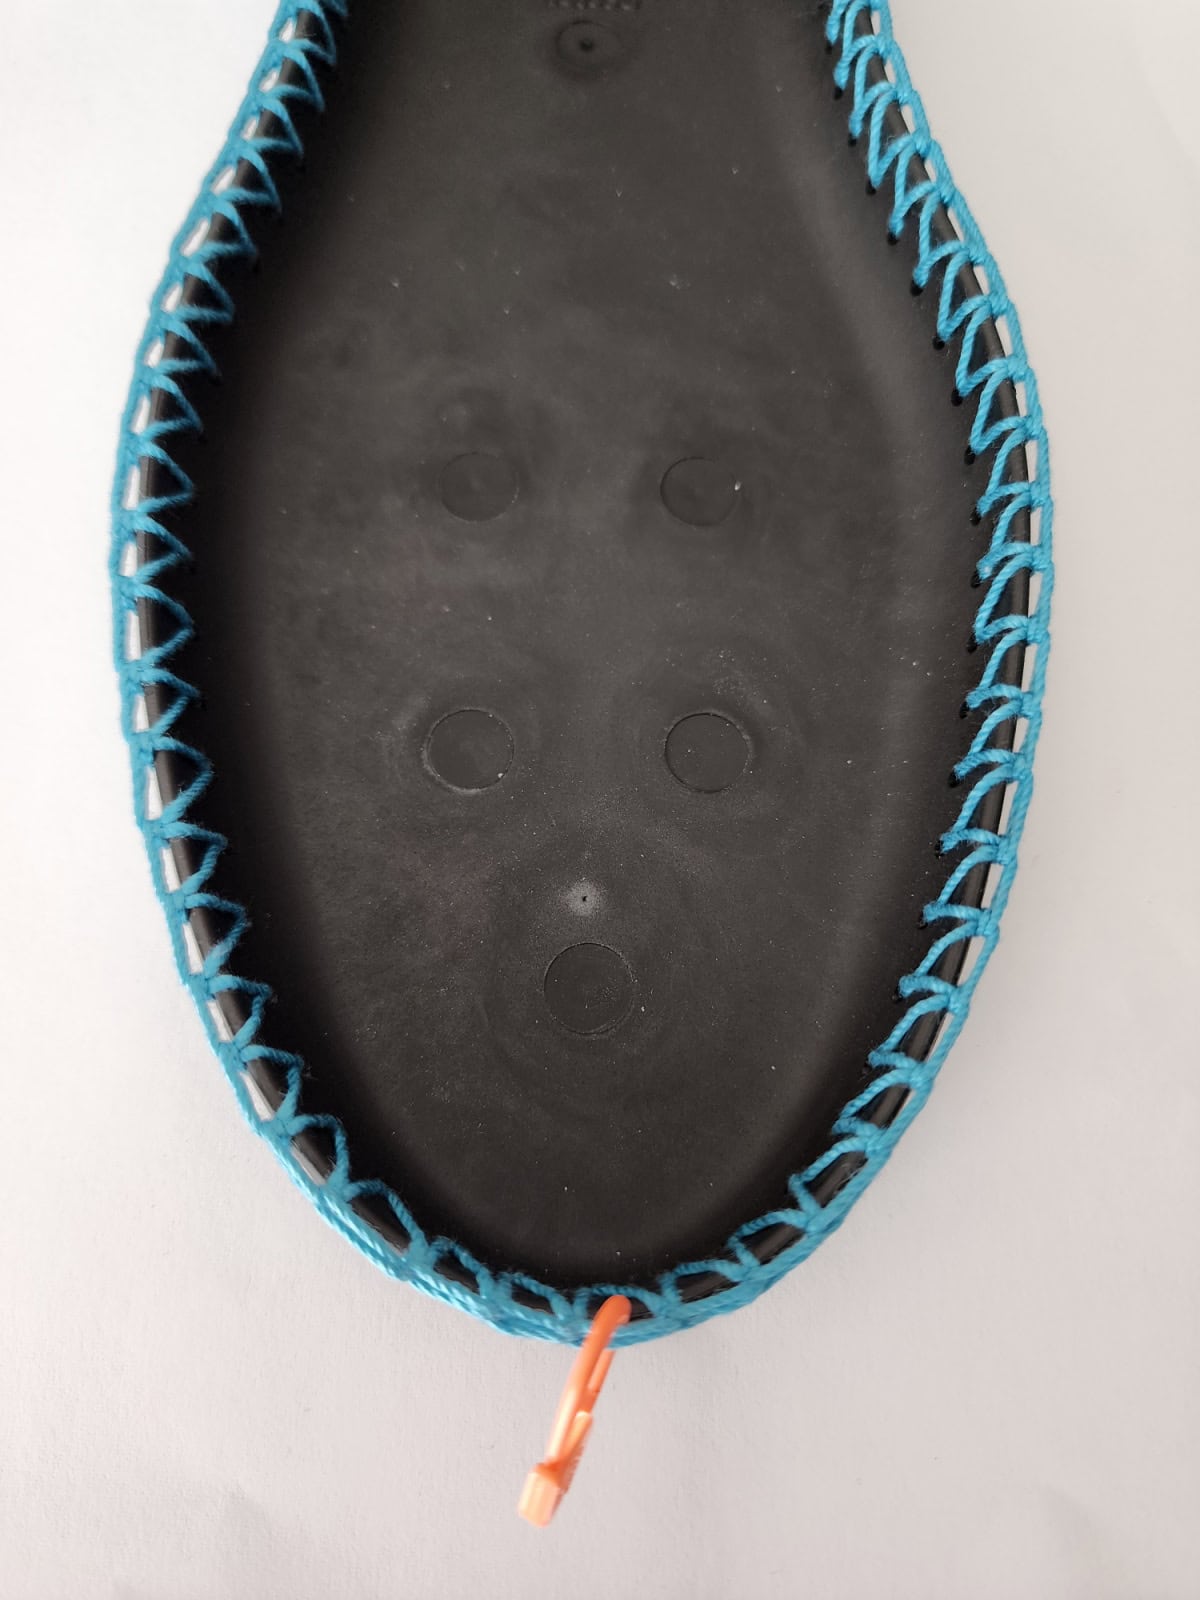
In order to crochet onto our Botties Soles, we have to first crochet what Botties calls “Round 0”. Round 0 is a round of crochet stitches that we will work directly onto our soles using Botties Round 0 yarn. Do not work these stitches too tight or it will be hard to work the first round of the slipper.
Note about Round 0 Yarn: I will be using Botties own Round 0 Yarn which is a 0.8mm, waxed polyester yarn. You can substitute other yarns, just be sure that it’s highly tear-resistant and durable enough to hold the slipper uppers onto the soles.
Yardage of Round 0 Yarn: You will need 6 – 7 yards of Round 0 yarn per sole. Total of 12 – 14 yards for a pair.
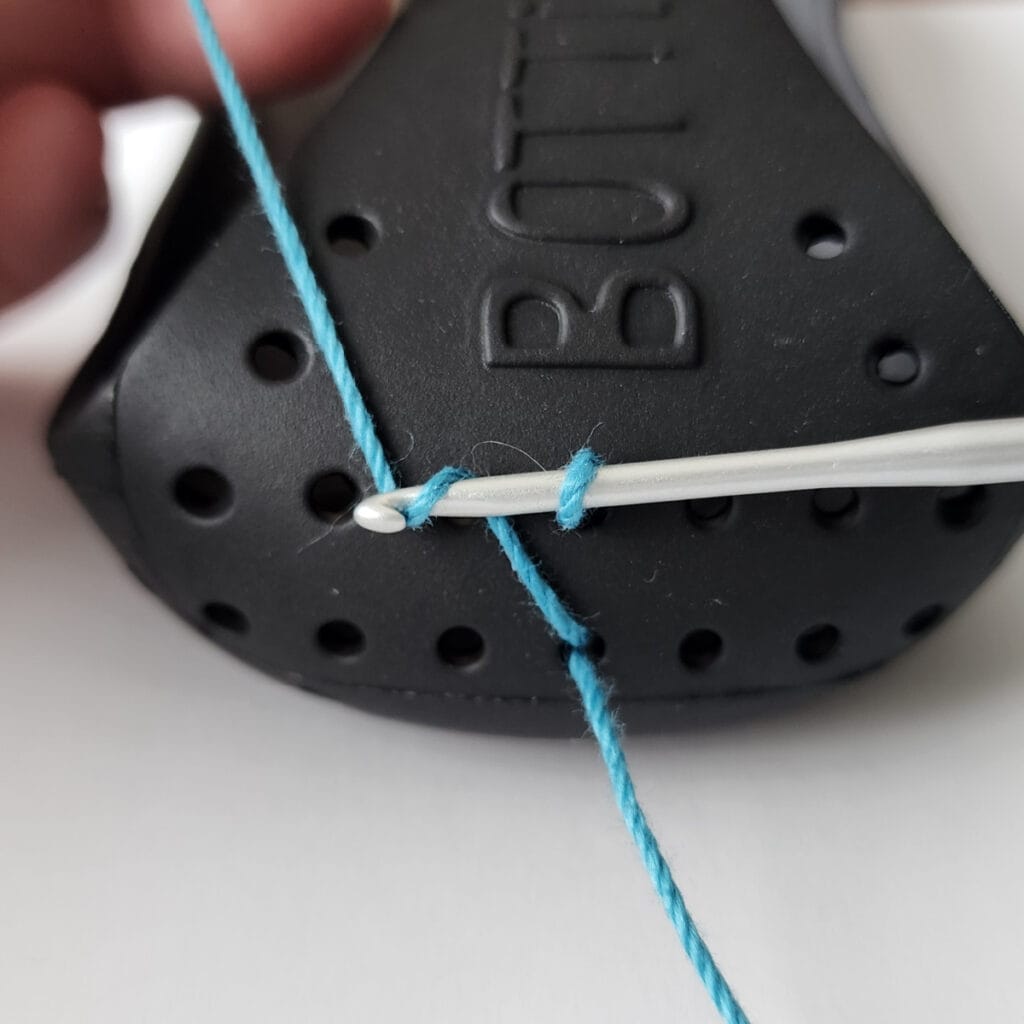
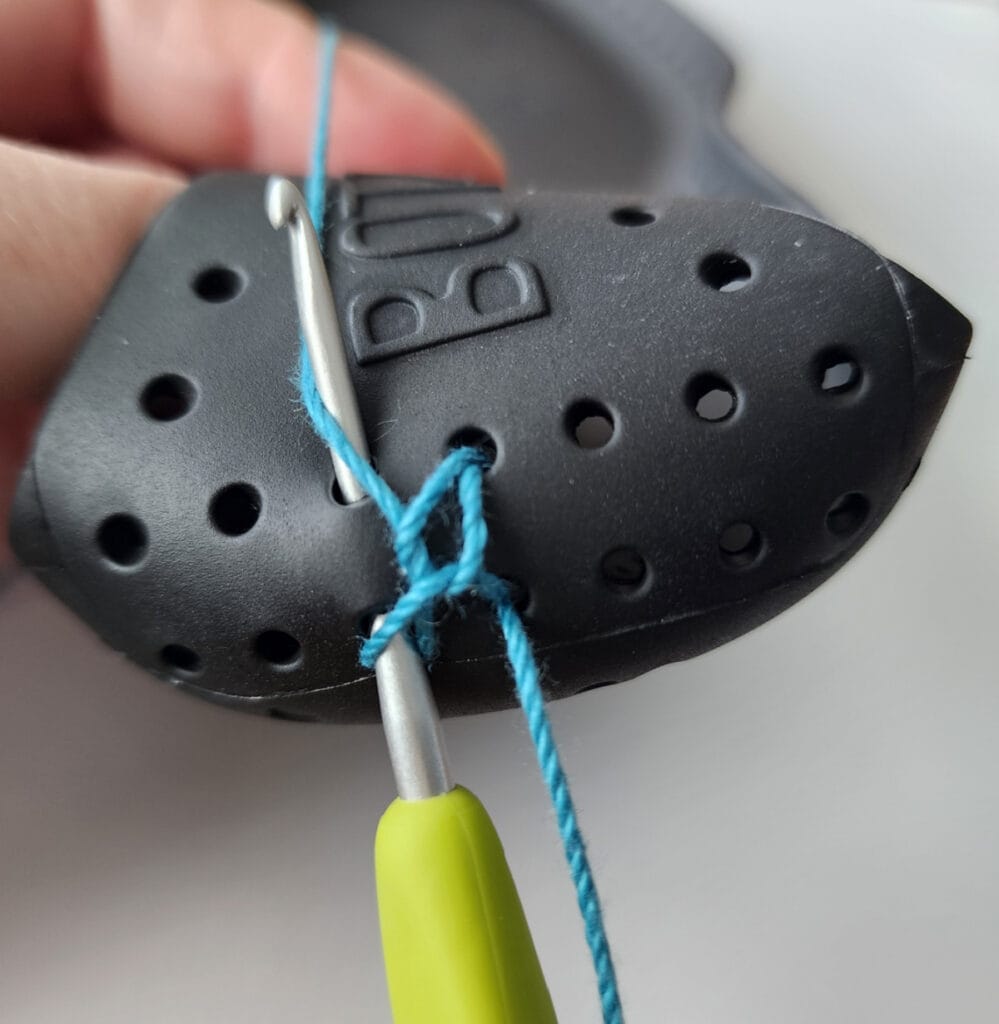
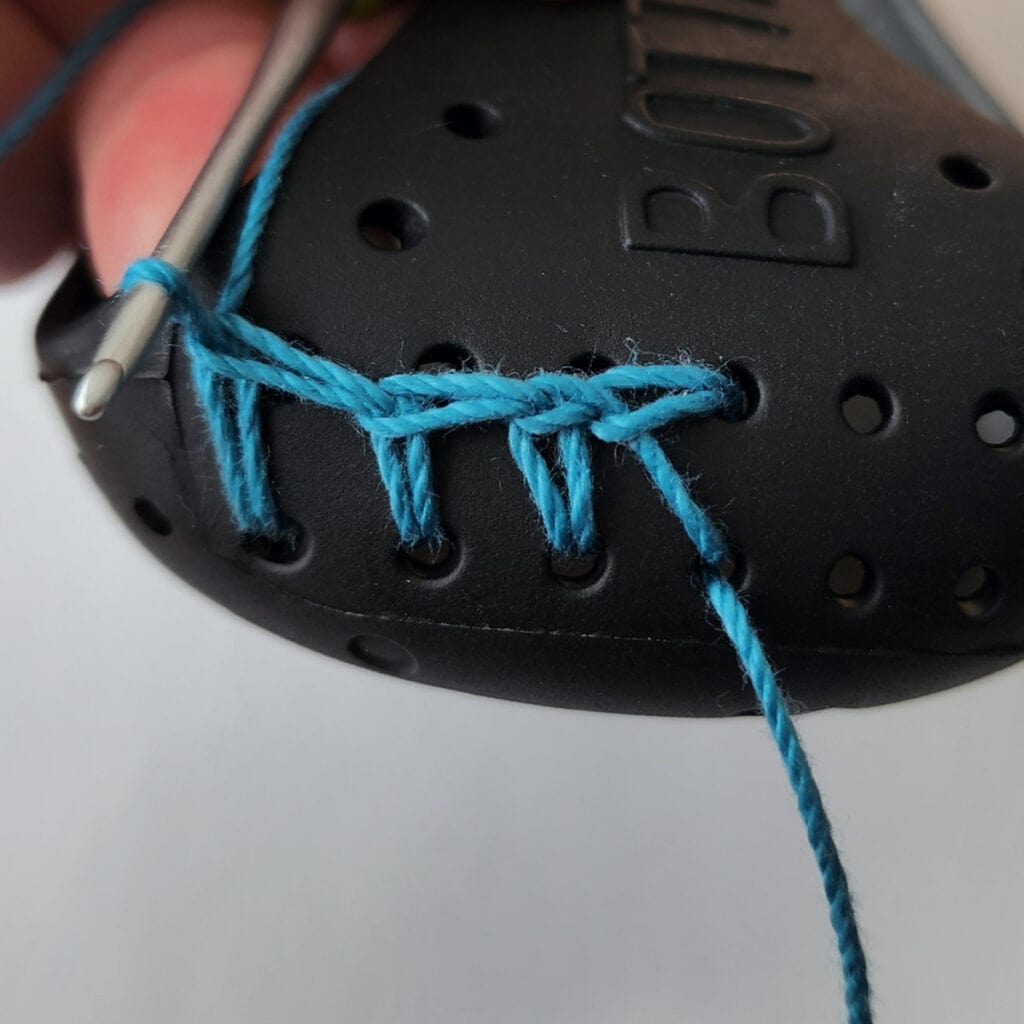
How to Crochet Round 0
The yarn shown in the photos is not the Bottie Round 0 yarn. I chose a contrasting color yarn for the photo tutorial only. I used black Bottie Round 0 yarn for my slipper boots.
Step One: Using yarn and a 2.25mm crochet hook (or size small enough to work through the holes in the sole) and with the heel facing you, insert your hook, from the inside out, through the bottom middle hole and draw a loop of your yarn through to the inside of the sole. Remove your hook.
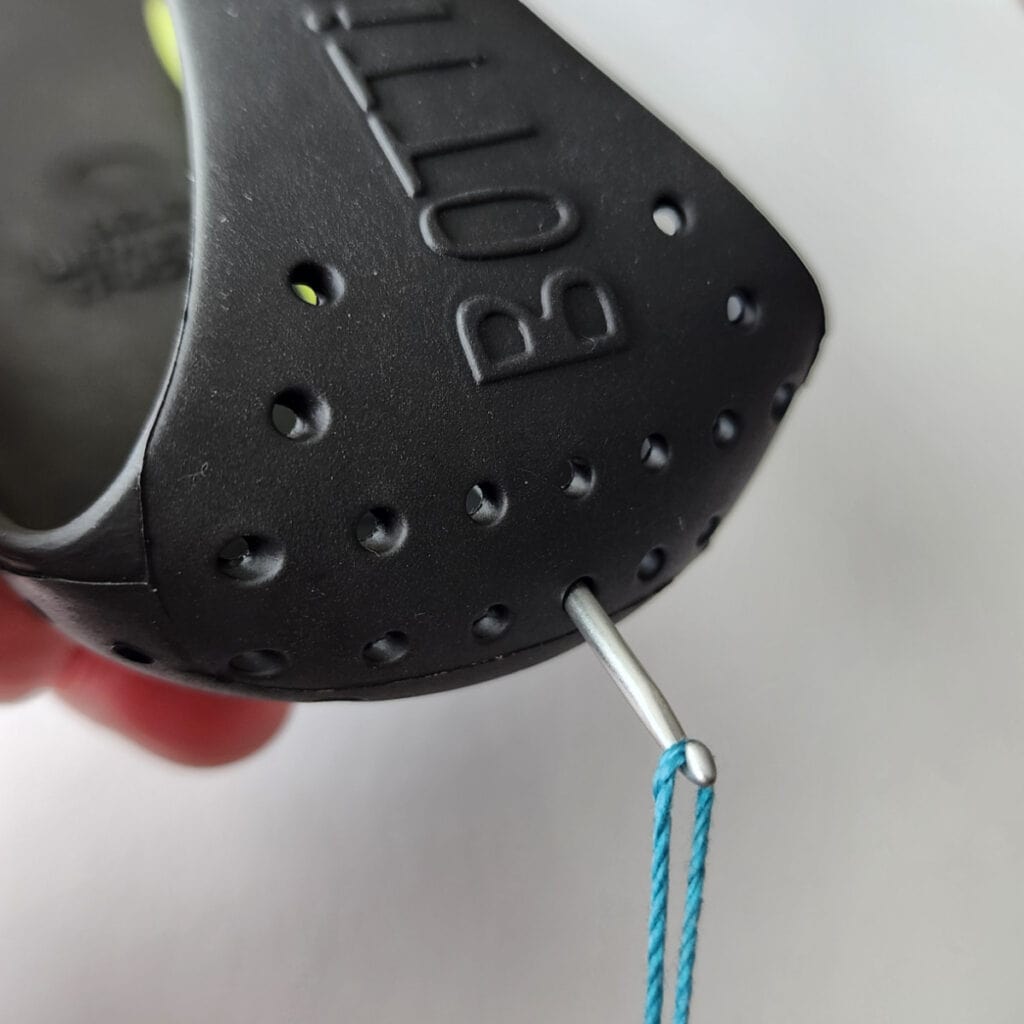
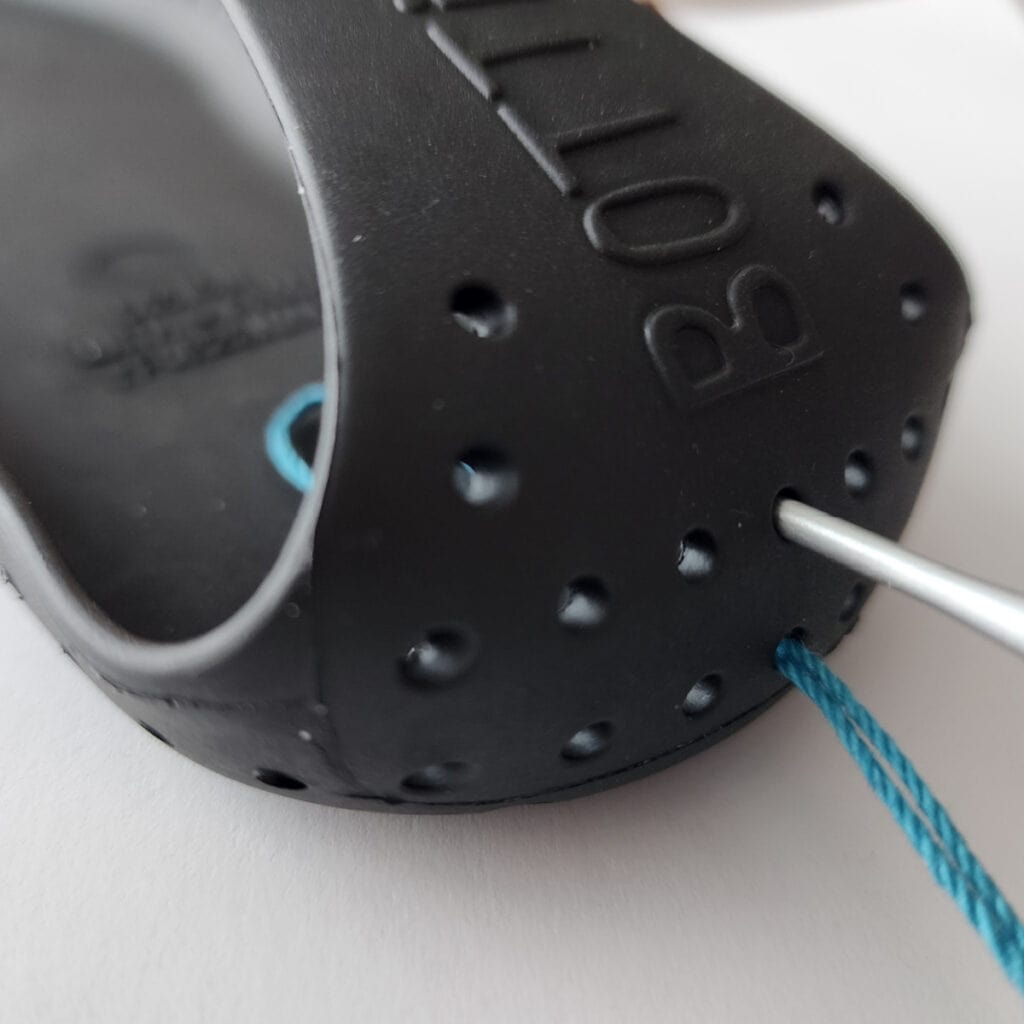
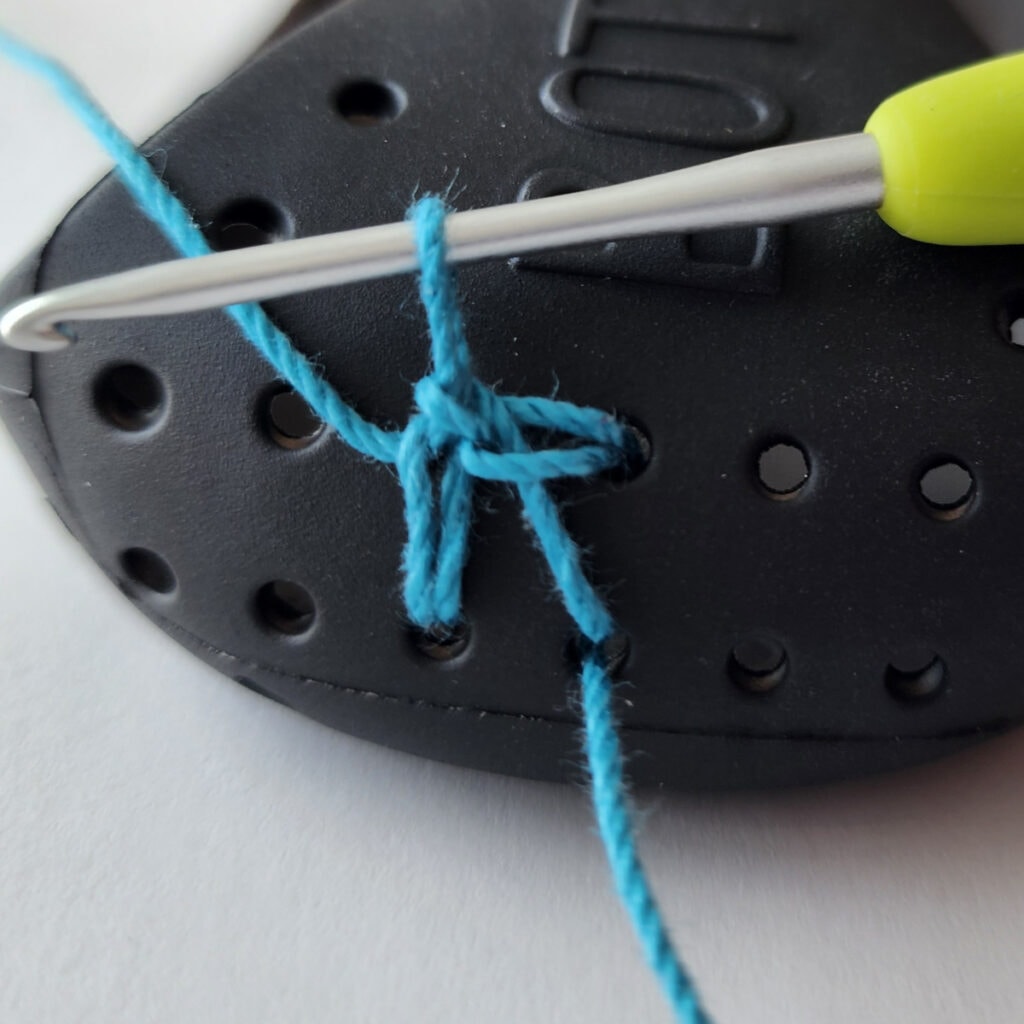
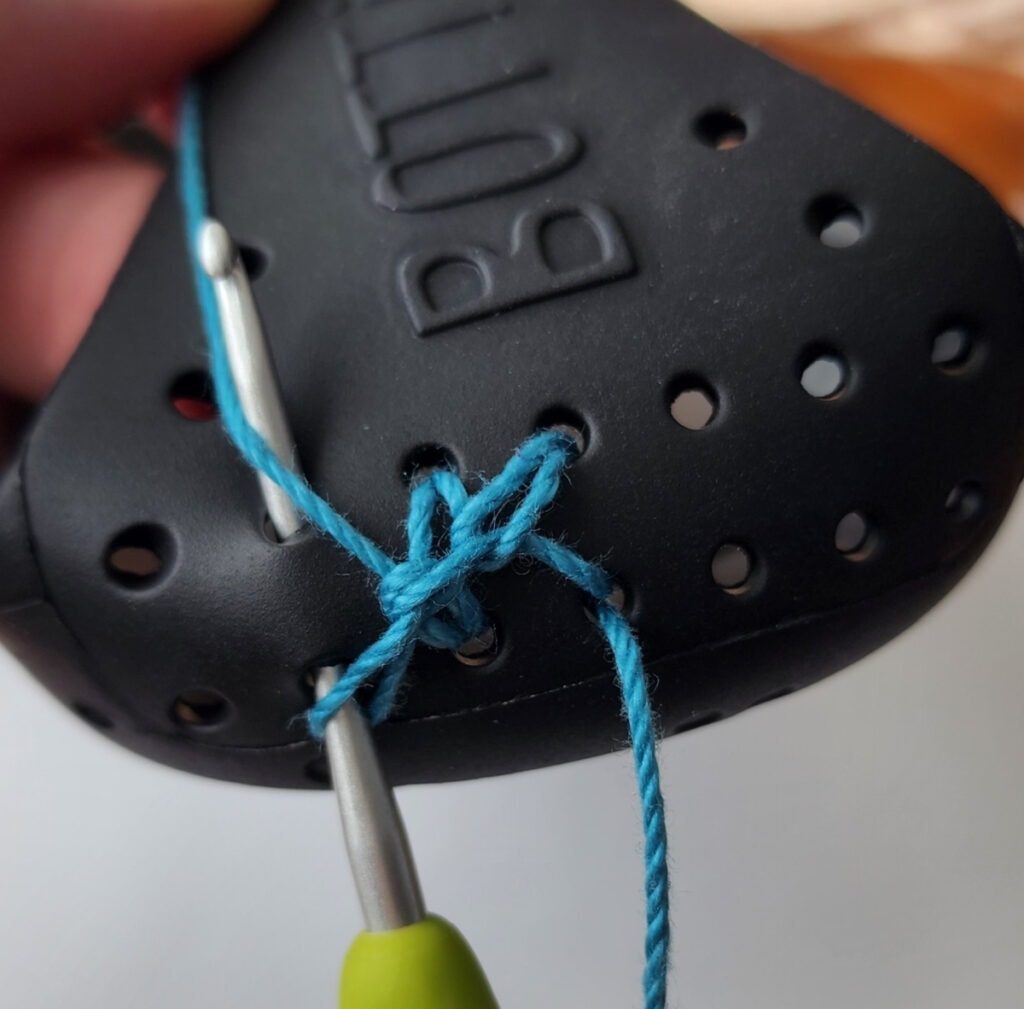
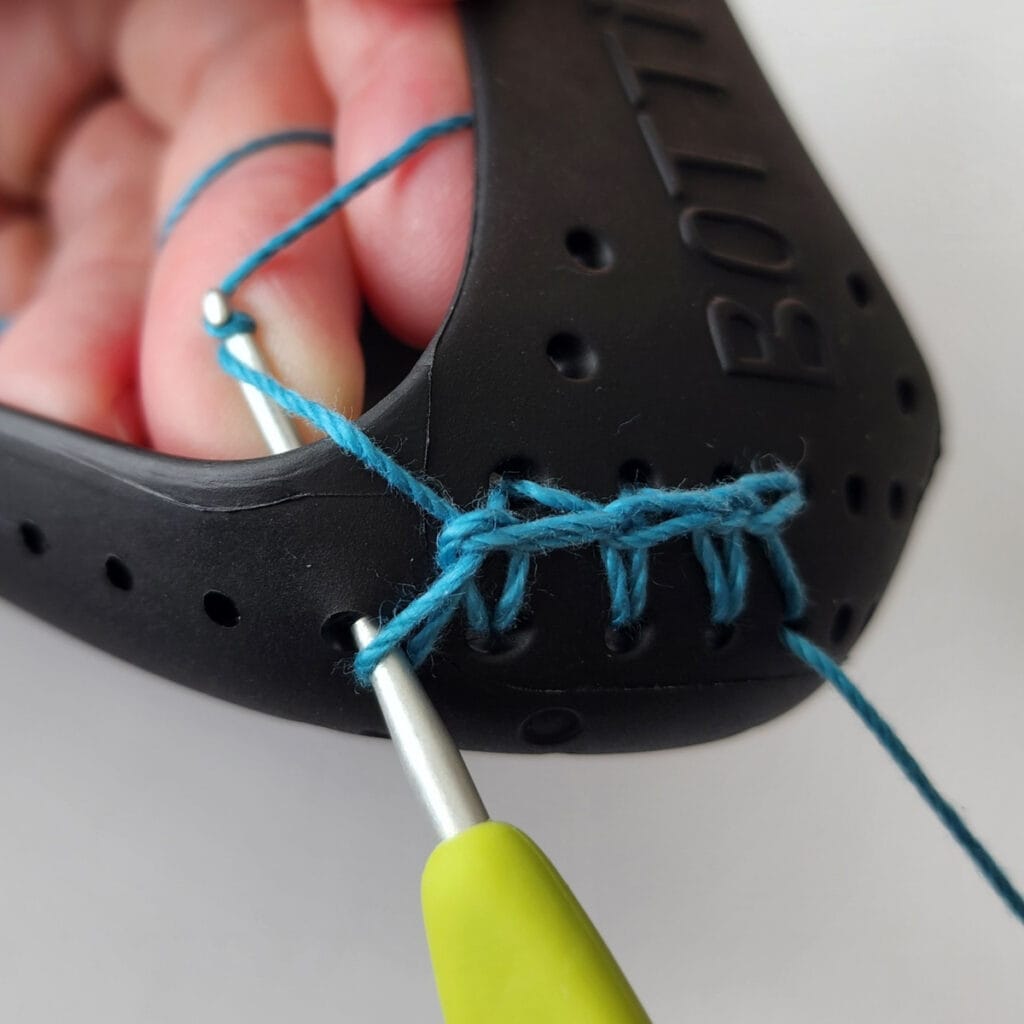

Fasten off. With a yarn needle and tails of yarn, pull your tails of yarn to the inside of your sole and weave them in to secure them. It’s easier to weave them in now.
Stitch Count Around the Sole: (68, 70, 72, 74, 76, 78, 80) single crochet stitches
Place Stitch Marker: With the toe facing you, mark the centermost stitch with a locking stitch marker.
Continue on to Toe & Top of Foot.
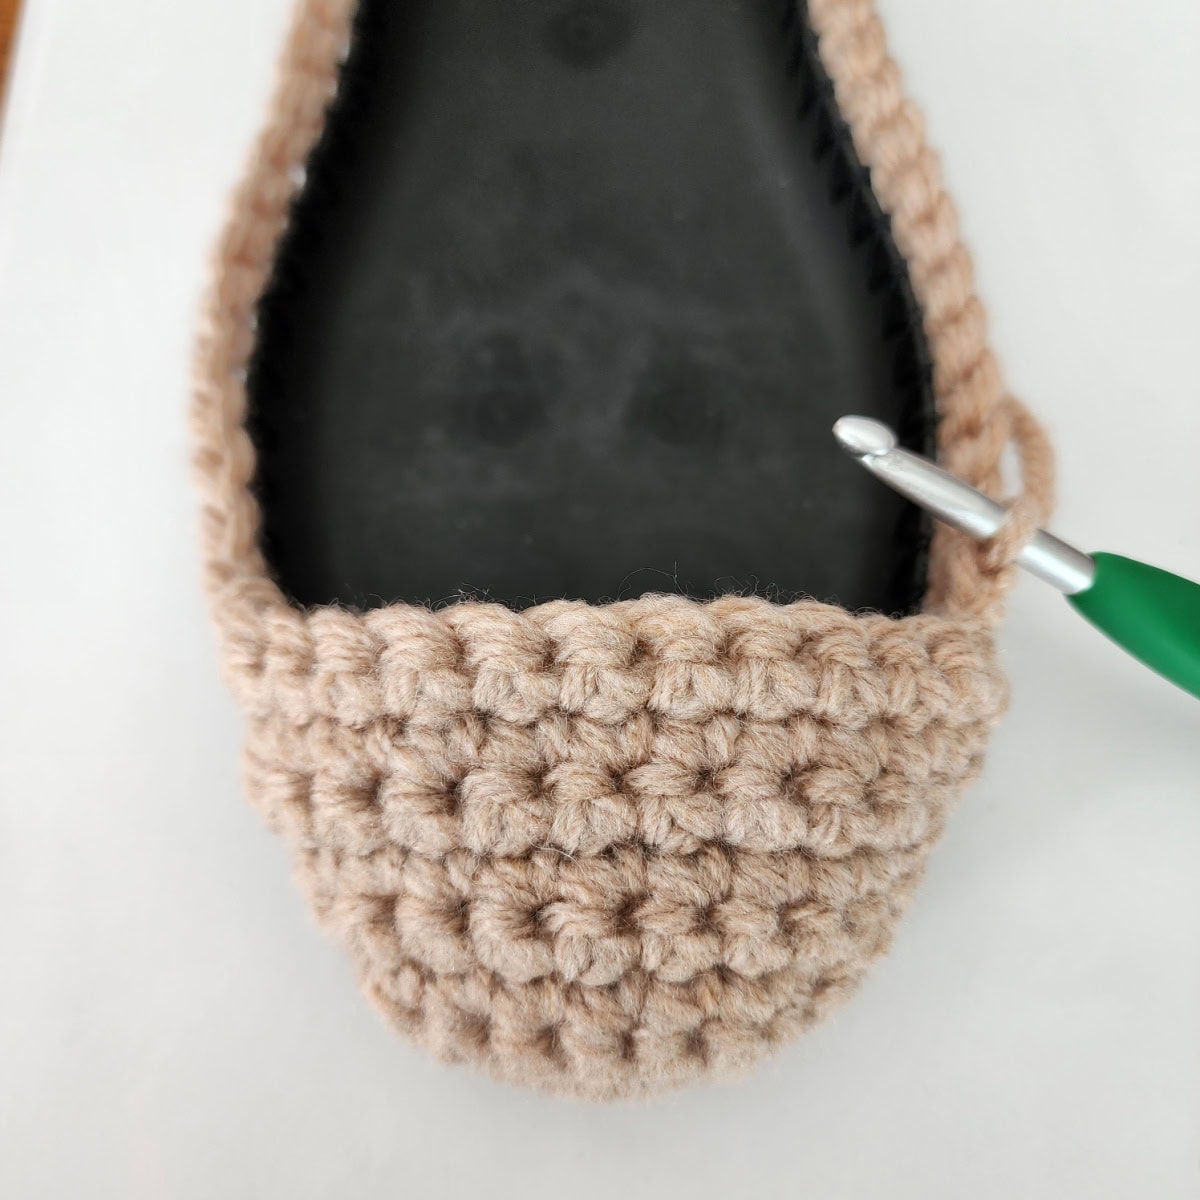
Toe & Top of Foot
Gauge: Chunky weight yarn, in sc with a 5.50mm crochet hook: 8 sts = 3″; 8 rows = 2.5″.
Set-Up Rnd (RS): With the toe facing you, MC yarn, and a 5.50mm crochet hook, join yarn with a standing sc in the stitch to the right of the marked stitch, sc in each st around the sole. Do not join. (68, 70, 72, 74, 76, 78, 80 sts)
Next, you’ll begin working back and forth in rows to create the top of the toe. After working into the stitches from the previous row, you end each new row by working into the next 2 stitches, along the sole, from the set-up round.
Increase Rows – All Sizes
Inc Row 1 (RS): 2 sc in the next st, sc in the next st, 2 sc in the next st, sc in each of the next 2 sts. Turn. (7 sts)
Inc Row 2: Do not ch 1, skip the first st, sc in each remaining st across the previous row, sc in each of the next 2 sts from the set-up rnd. Turn. (8 sts)
Inc Rows 3 – 8: Rep Inc Row 2. (14 sts) at the end of Row 8.
Do not fasten off. Weave in tail of yarn from set-up round. Continue on to Non-Increase Rows.
Tip: Try your slipper boot on as you work, to check fit. Make sure to add the sole insert first. Adjust your hook size accordingly, if it’s too snug or too loose.
Non-Increase Row – All Sizes
Non-Inc Row 1: Do not ch 1, skip the first 2 sts, sc in each remaining st across the previous row, sc in each of the next 2 sts from the set-up rnd. Turn. (14 sts)
Do not fasten off. Continue below with the instructions for the size slipper boots you’re making.
XX-Small
Rows 2 – 8: Rep Non-Inc Row 1. (14 sts)
Rows 9 – 12: Rep Inc Row 2. (18 sts) at the end of Row 12.
Rows 13 – 14: Rep Non-Inc Row 1. (18 sts)
Rows 15 – 16: Rep Inc Row 2. (20 sts) at the end of Row 16.
You should have 17 unworked stitches around the heel, from the set-up round.
Do not fasten off. Continue on to the Ankle.
X-Small
Rows 2 – 6: Rep Non-Inc Row 1. (14 sts)
Rows 7 – 11: Rep Inc Row 2. (19 sts) at the end of Row 11.
Rows 12 – 14: Rep Non-Inc Row 1. (19 sts)
Rows 15 – 17: Rep Inc Row 2. (22 sts) at the end of Row 17.
You should have 17 unworked stitches around the heel, from the set-up round.
Do not fasten off. Continue on to the Ankle.
Small
Rows 2 – 8: Rep Non-Inc Row 1. (14 sts)
Rows 9 – 12: Rep Inc Row 2. (18 sts) at the end of Row 12.
Rows 13 – 14: Rep Non-Inc Row 1. (18 sts)
Rows 15 – 18: Rep Inc Row 2. (22 sts) at the end of Row 18.
You should have 17 unworked stitches around the heel, from the set-up round.
Do not fasten off. Continue on to the Ankle.
Small +
Rows 2 – 6: Rep Non-Inc Row 1. (14 sts)
Rows 7 – 12: Rep Inc Row 2. (20 sts) at the end of Row 12.
Rows 13 – 14: Rep Non-Inc Row 1. (20 sts)
Rows 15 – 18: Rep Inc Row 2. (24 sts) at the end of Row 18.
You should have 19 unworked stitches around the heel, from the set-up round.
Do not fasten off. Continue on to the Ankle.
Medium
Rows 2 – 6: Rep Non-Inc Row 1. (14 sts)
Rows 7 – 11: Rep Inc Row 2. (19 sts) at the end of Row 11.
Rows 12 – 14: Rep Non-Inc Row 1. (19 sts)
Rows 15 – 19: Rep Inc Row 2. (24 sts) at the end of Row 19.
You should have 19 unworked stitches around the heel, from the set-up round.
Do not fasten off. Continue on to the Ankle.
Large
Rows 2 – 4: Rep Non-Inc Row 1. (14 sts)
Rows 5 – 10: Rep Inc Row 2. (20 sts) at the end of Row 10.
Rows 11 – 14: Rep Non-Inc Row 1. (20 sts)
Rows 15 – 20: Rep Inc Row 2. (26 sts) at the end of Row 20.
You should have 19 unworked stitches around the heel, from the set-up round.
Do not fasten off. Continue on to the Ankle.
X-Large
Rows 2 – 4: Rep Non-Inc Row 1. (14 sts)
Rows 5 – 10: Rep Inc Row 2. (20 sts) at the end of Row 10.
Rows 11 – 14: Rep Non-Inc Row 1. (20 sts)
Rows 15 – 20: Rep Inc Row 2. (26 sts) at the end of Row 20.
You should have 21 unworked stitches around the heel, from the set-up round.
Do not fasten off. Continue on to the Ankle.
Progression Photos: Toe & Top of Foot


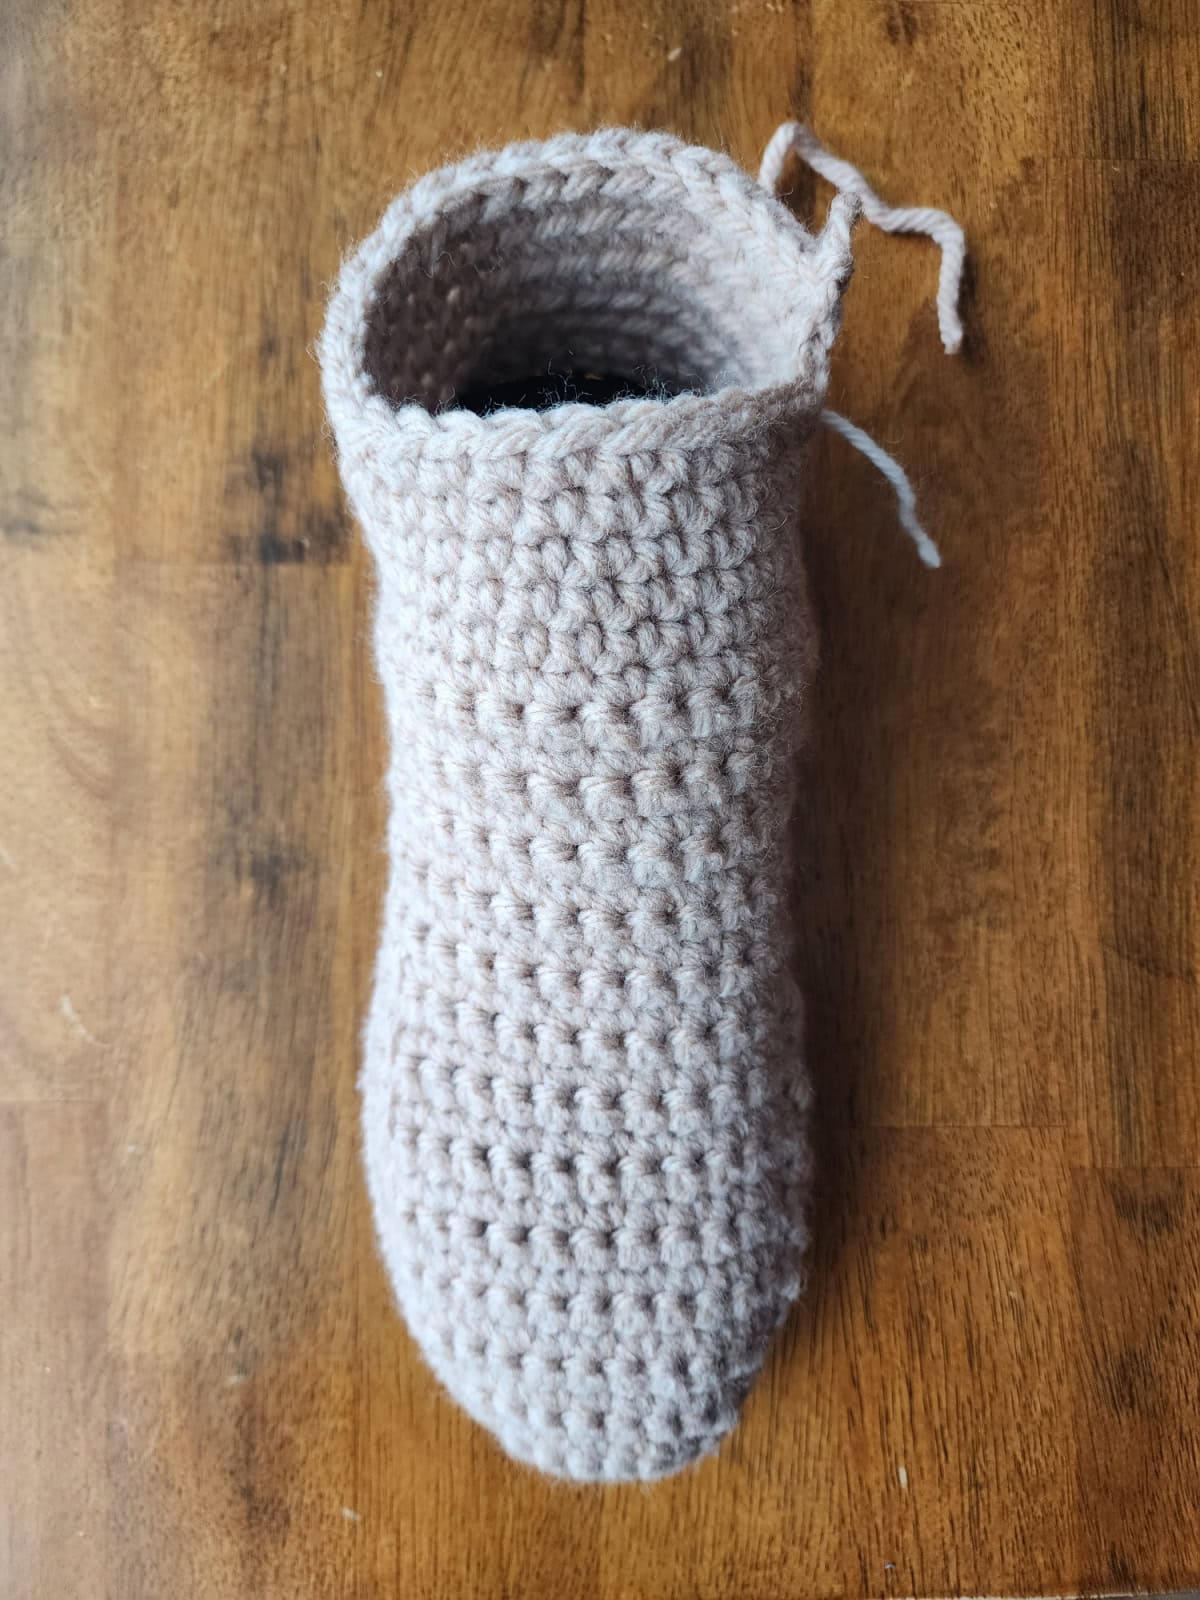
Ankle for Size: XX-Small
You’ll begin round 1 of the ankle by working across the last row you worked, then continue working around the heel. After working in all stitches, you will add an extra stitch in the space before the first stitch of the round.
Continuous Rounds: The ankle is worked in continuous rounds without joining (also known as working in a spiral). I recommend using a stitch marker or scrap piece of yarn to help you keep track of each round.
Gauge: Worsted weight yarn, sc with a 5.50mm crochet hook: 5 sts = 1.5″; row height isn’t crucial.
Make sure you’ve turned after completing the last row of the Toe & Top of Foot.
Scroll down to see progression photos.
Rnd 1 (RS): Do not ch 1, skip the first 2 sts, sc in each remaining st across the previous row, sc in each of the 17 unworked sts from the set-up rnd, sc in the small space before the first sc of the round. Do not join. (36 sts)
Rnd 2: Sc in each of the next 18 sts, hdc in each of the remaining 18 sts. Do not join. (36 sts)
Rnd 3: Invsc2tog, sc in each of the next 14 sts, invsc2tog, hdc in each of the remaining 18 sts. Do not join. (34 sts)
Rnd 4: Invsc2tog, sc in each of the next 12 sts, invsc2tog, hdc in each of the remaining 18 sts. Do not join. (32 sts)
Rnd 5: Invsc2tog, sc in each of the next 10 sts, invsc2tog, hdc in each of the remaining 18 sts. Do not join. (30 sts)
Rnd 6: Sc in each of the next 12 sts, hdc in each of the remaining 18 sts. Do not join. (30 sts)
Switch to CC1 yarn. Fasten off MC yarn and weave in ends.
Continue below with the ankle instructions for the size slipper boots you’re making.
XX-Small Ankle
Rnd 7: With CC1 and a 5.50mm crochet hook, (2 sc in the next st, sc in each of the next 2 sts) work from ( to ) 10 times.
Do not join. (40 sts)
Rnd 8: Sc in each st around. Do not join. (40 sts)
Attach Ankle of Sole to Slipper: Once the ankle of your slipper boot is as tall as the rubber heel on the sole, use yarn and a yarn needle and secure it to the ankle of your slipper.
Tip! Weave in any ends you may have before continuing.
Rep Rnd 8 until ankle is 8.75″ H, measured from the bottom of the sole.
Join last round with a slip stitch and fasten off CC1. Continue on to the Decorative Cuff Set-Up.
Ankle for Sizes: X-Small (Medium)
Changes for Sizes as follows: X-Small (Medium)
Changes for Stitch Counts as follows: (X-Small, Medium)
You’ll begin round 1 of the ankle by working across the last row you worked, then continue working around the heel. After working in all stitches, you will add an extra stitch in the space before the first stitch of the round.
Continuous Rounds: After completing Round 1, the ankle is worked in continuous rounds without joining (also known as working in a spiral). I recommend using a stitch marker or scrap piece of yarn to help you keep track of each round.
Gauge: Worsted weight yarn, sc with a 5.50mm crochet hook: 5 sts = 1.5″; row height isn’t crucial.
Make sure you’ve turned after completing the last row of the Toe & Top of Foot.
Scroll down to see progression photos.
Rnd 1 (WS): Do not ch 1, skip the first 2 sts, sc in each remaining st across the previous row, sc in each of the 17 (19) unworked sts from the set-up rnd, sc in the small space before the first sc of the round. Join with a sl st to the 1st st. Turn. (38, 42 sts)
Rnd 2 (RS): Ch 1, hdc in each of the next 18 (20) sts, sc in each of the next 20 (22) sts. Do not join. (38, 42 sts)
Rnd 3: Hdc in each of the next 18 (20) sts, invsc2tog, sc in each of the next 16 (18) sts, invsc2tog. Do not join. (36, 40 sts)
Rnd 4: Hdc in each of the next 18 (20) sts, invsc2tog, sc in each of the next 14 (16) sts, invsc2tog. Do not join. (34, 38 sts)
Rnd 5: Hdc in each of the next 18 (20) sts, invsc2tog, sc in each of the next 12 (14) sts, invsc2tog. Do not join. (32, 36 sts)
Rnd 6: Hdc in each of the next 18 (20) sts, invsc2tog, sc in each of the next 10 (12) sts, invsc2tog. Do not join. (30, 34 sts)
Switch to CC1 yarn. Fasten off MC yarn and weave in ends.
Continue below with the ankle instructions for the size slipper boots you’re making.
X-Small Ankle
Rnd 7: With CC1 and a 5.50mm crochet hook, (2 sc in the next st, sc in each of the next 2 sts) work from ( to ) 10 times. Do not join. (40 sts)
Rnd 8: Sc in each st around. Do not join. (40 sts)
Attach Ankle of Sole to Slipper: Once the ankle of your slipper boot is as tall as the rubber heel on the sole, use yarn and a yarn needle and secure it to the ankle of your slipper.
Tip! Weave in any ends you may have before continuing.
Rep Rnd 8 until ankle is 8.75″ H, measured from the bottom of the sole.
Join last round with a slip stitch and fasten off CC1. Continue on to the Decorative Cuff Set-Up.
Medium Ankle
Rnd 7: With CC1 and a 5.50mm crochet hook, sc in each of the next 4 sts, (2 sc in the next st, sc in each of the next 2 sts) work from ( to ) 10 times. Do not join. (44 sts)
Rnd 8: Sc in each st around. Do not join. (44 sts)
Attach Ankle of Sole to Slipper: Once the ankle of your slipper boot is as tall as the rubber heel on the sole, use yarn and a yarn needle and secure it to the ankle of your slipper.
Tip! Weave in any ends you may have before continuing.
Rep Rnd 8 until ankle is 8.75″ H, measured from the bottom of the sole.
Join last round with a slip stitch and fasten off CC1. Continue on to the Decorative Cuff Set-Up.
Ankle for Sizes: Small (Small+, Large, X-Large)
Changes for Sizes as follows: Small (Small+, Large, X-Large)
Changes for Stitch Counts as follows: (Small, Small+, Large, X-Large)
You’ll begin round 1 of the ankle by working across the last row you worked, then continue working around the heel. After working in all stitches, you will add an extra stitch in the space before the first stitch of the round.
Continuous Rounds: The ankle is worked in continuous rounds without joining (also known as working in a spiral). I recommend using a stitch marker or scrap piece of yarn to help you keep track of each round.
Gauge: Worsted weight yarn, sc with a 5.50mm crochet hook: 5 sts = 1.5″; row height isn’t crucial.
Make sure you’ve turned after completing the last row of the Toe & Top of Foot.
Scroll down to see progression photos.
Rnd 1 (RS): Do not ch 1, skip the first 2 sts, sc in each remaining st across the previous row, sc in each of the 17 (19, 19, 21) unworked sts from the set-up rnd, sc in the small space before the first sc of the round. Do not join. (38, 42, 44, 46 sts)
Rnd 2: Sc in each of the next 20 (22, 24, 24) sts, hdc in each of the remaining 18 (20, 20, 22) sts. Do not join. (38, 42, 44, 46 sts)
Rnd 3: Invsc2tog, sc in each of the next 16 (18, 20, 20) sts, invsc2tog, hdc in each of the remaining 18 (20, 20, 22) sts. Do not join. (36, 40, 42, 44 sts)
Rnd 4: Invsc2tog, sc in each of the next 14 (16, 18, 18) sts, invsc2tog, hdc in each of the remaining 18 (20, 20, 22) sts. Do not join. (34, 38, 40, 42 sts)
Rnd 5: Invsc2tog, sc in each of the next 12 (14, 16, 16) sts, invsc2tog, hdc in each of the remaining 18 (20, 20, 22) sts. Do not join. (32, 36, 38, 40 sts)
Rnd 6: Invsc2tog, sc in each of the next 10 (12, 14, 14) sts, invsc2tog, hdc in each of the remaining 18 (20, 20, 22) sts. Do not join. (30, 34, 36, 38 sts)
Switch to CC1 yarn. Fasten off MC yarn and weave in ends.
Continue below with the ankle instructions for the size slipper boots you’re making.
Small Ankle
Rnd 7: With CC1 and a 5.50mm crochet hook, (2 sc in the next st, sc in each of the next 2 sts) work from ( to ) 10 times. Do not join. (40 sts)
Rnd 8: Sc in each st around. Do not join. (40 sts)
Attach Ankle of Sole to Slipper: Once the ankle of your slipper boot is as tall as the rubber heel on the sole, use yarn and a yarn needle and secure it to the ankle of your slipper.
Tip! Weave in any ends you may have before continuing.
Rep Rnd 8 until ankle is 8.75″ H, measured from the bottom of the sole.
Join last round with a slip stitch and fasten off CC1. Continue on to the Decorative Cuff Set-Up.
Small+ Ankle
Rnd 7: With CC1 and a 5.50mm crochet hook, sc in each of the next 4 sts, (2 sc in the next st, sc in each of the next 2 sts) work from ( to ) 10 times. Do not join. (44 sts)
Rnd 8: Sc in each st around. Do not join. (44 sts)
Attach Ankle of Sole to Slipper: Once the ankle of your slipper boot is as tall as the rubber heel on the sole, use yarn and a yarn needle and secure it to the ankle of your slipper.
Tip! Weave in any ends you may have before continuing.
Rep Rnd 8 until ankle is 8.75″ H, measured from the bottom of the sole.
Join last round with a slip stitch and fasten off CC1. Continue on to the Decorative Cuff Set-Up.
Large Ankle
Rnd 7: With CC1 and a 5.50mm crochet hook, (2 sc in the next st, sc in each of the next 2 sts) work from ( to ) 12 times. Do not join. (48 sts)
Rnd 8: Sc in each st around. Do not join. (48 sts)
Attach Ankle of Sole to Slipper: Once the ankle of your slipper boot is as tall as the rubber heel on the sole, use yarn and a yarn needle and secure it to the ankle of your slipper.
Tip! Weave in any ends you may have before continuing.
Rep Rnd 8 until ankle is 8.75″ H, measured from the bottom of the sole.
Join last round with a slip stitch and fasten off CC1. Continue on to the Decorative Cuff Set-Up.
X-Large Ankle
Rnd 7: With CC1 and a 5.50mm crochet hook, sc in each of the next 8 sts, (2 sc in the next st, sc in each of the next 2 sts) work from ( to ) 10 times. Do not join. (48 sts)
Rnd 8: Sc in each st around. Do not join. (48 sts)
Attach Ankle of Sole to Slipper: Once the ankle of your slipper boot is as tall as the rubber heel on the sole, use yarn and a yarn needle and secure it to the ankle of your slipper.
Tip! Weave in any ends you may have before continuing.
Rep Rnd 8 until ankle is 8.75″ H, measured from the bottom of the sole.
Join last round with a slip stitch and fasten off CC1. Continue on to the Decorative Cuff Set-Up.
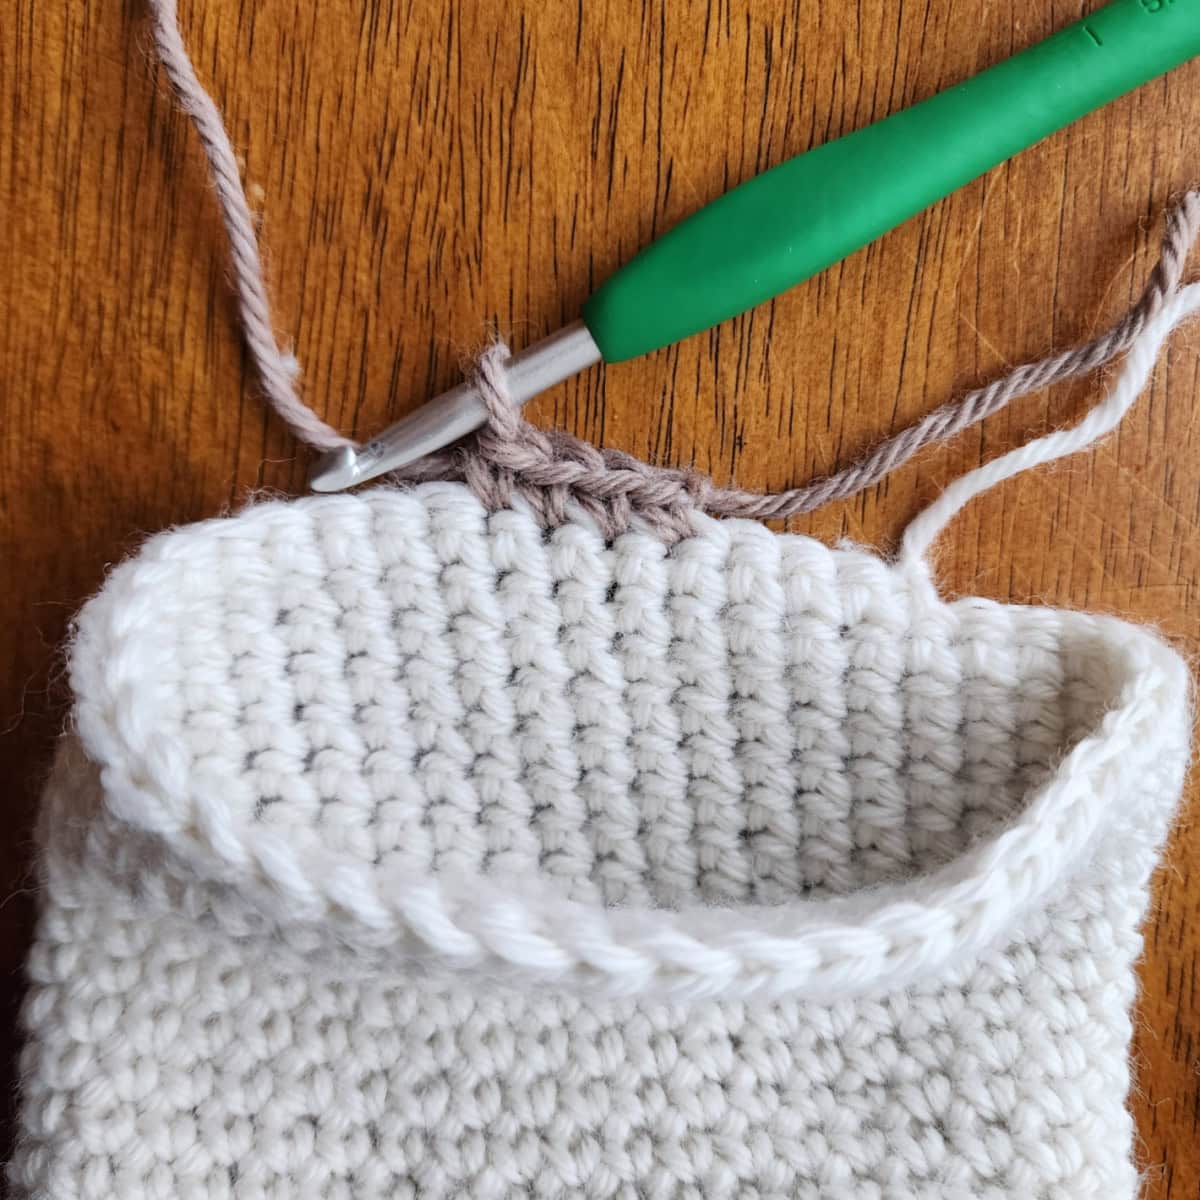
Progression Photos: Ankle
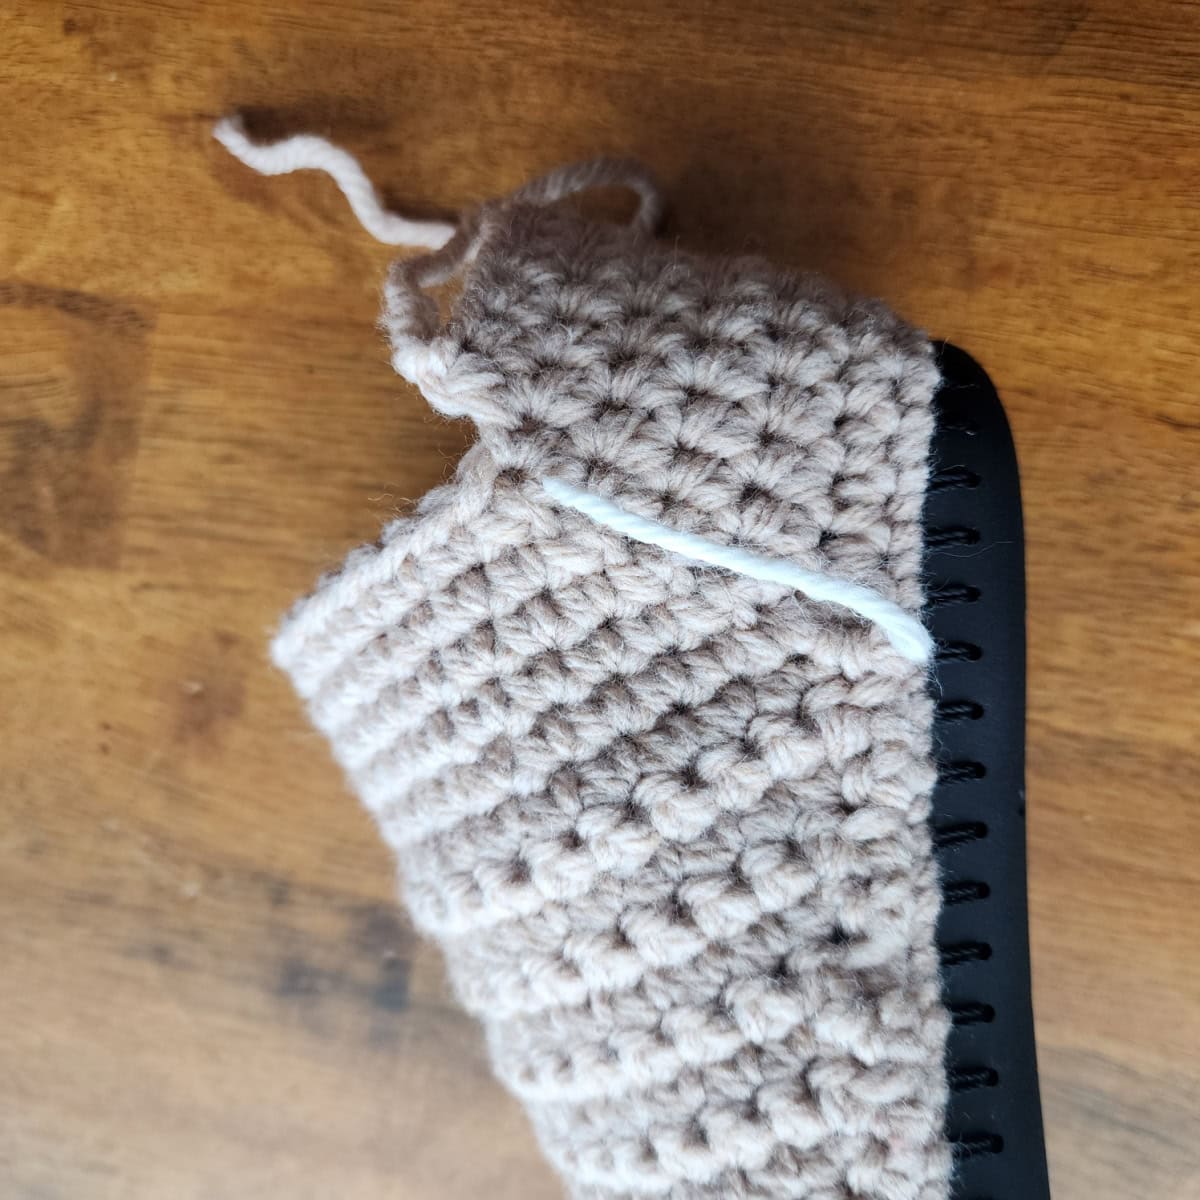

*If you’re making a size X-Small or Medium, you will be continuing with CC1 on the opposite side of the ankle.

Decorative Cuff Set-Up
The decorative cuff is worked from the inside of the ankle (the wrong side). When folded down, the right side of the decorative cuff will be on the outside.
Rnd 1: With CC2 and a 5.50mm crochet hook, join yarn with a standing sc, on the INSIDE of the ankle, in a stitch nearest the back of the leg, sc in each st around. Join. (40, 40, 40, 44, 44, 48, 48 sts)
Rnd 2: Ch 1, sc in each st around. Join. (40, 40, 40, 44, 44, 48, 48 sts)
Do not fasten off. Continue on to the Decorative Cuff.
Decorative Cuff
The decorative cuff is worked from the inside of the ankle. When folded down, the right side of the decorative cuff will be on the outside.
Gauge: Worsted weight yarn, sc in BLO with a 5.50mm crochet hook: 5 sts = 1.5″; 6 rows = 1.875″.
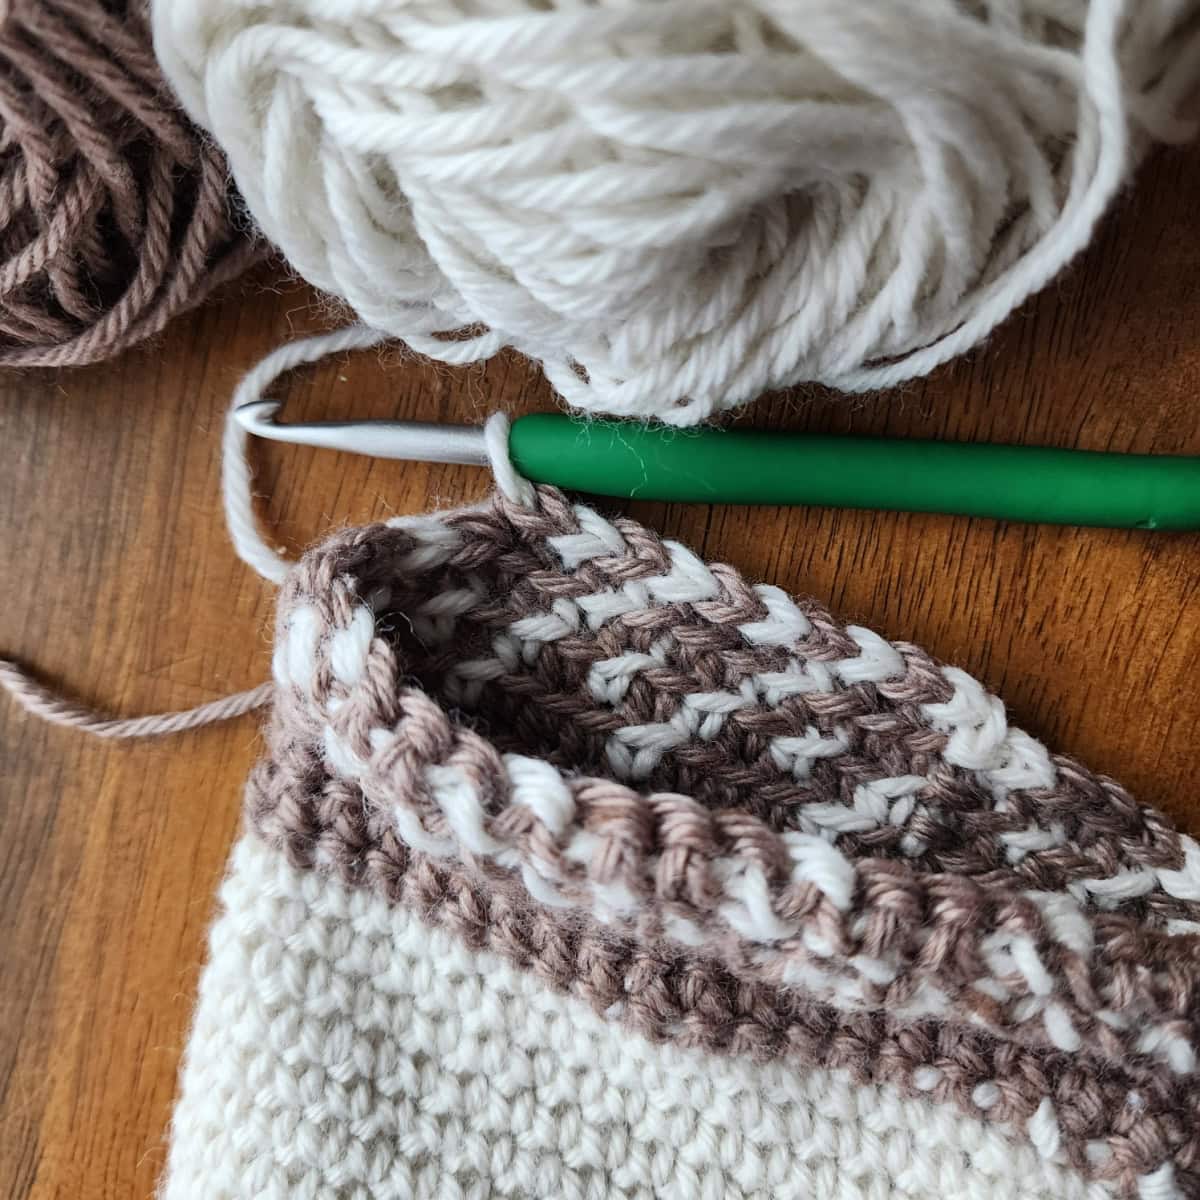
Tapestry Crochet
The colorwork in rounds 1 – 7 is done with tapestry crochet. You can choose to follow the written instructions for color changes, or the colorwork chart below.
Rnd 1: Work in BLO, CC2 sc in each st around. Join (40, 40, 40, 44, 44, 48, 48 sts)
Rnd 2: Work in BLO, 1 sc in CC2, 1 sc in CC1, (3 sc in CC2, 1 sc in CC1) rep from ( to ) around to the last 2 sts, 2 sc in CC2. Join. (40, 40, 40, 44, 44, 48, 48 sts)
Rnd 3: Work in BLO, (1 sc in CC1, 1 sc in CC2) rep from ( to ) around. Join. (40, 40, 40, 44, 44, 48, 48 sts)
Rnd 4: Work in BLO, (3 sc in CC2, 1 sc in CC1) rep from ( to ) around. Join. (40, 40, 40, 44, 44, 48, 48 sts)
Rnd 5: Work in BLO, (1 sc in CC1, 1 sc in CC2) rep from ( to ) around. Join. (40, 40, 40, 44, 44, 48, 48 sts)
Rnd 6: Work in BLO, 1 sc in CC2, 1 sc in CC1, (3 sc in CC2, 1 sc in CC1) rep from ( to ) around to the last 2 sts, 2 sc in CC2. Join. (40, 40, 40, 44, 44, 48, 48 sts)
Rnd 7: Work in BLO, CC2, sc in each st around. Join. (40, 40, 40, 44, 44, 48, 48 sts)
Fasten off CC1 and weave in ends. Continue on to the Crochet Cables Section for the size slipper boot you’re making.
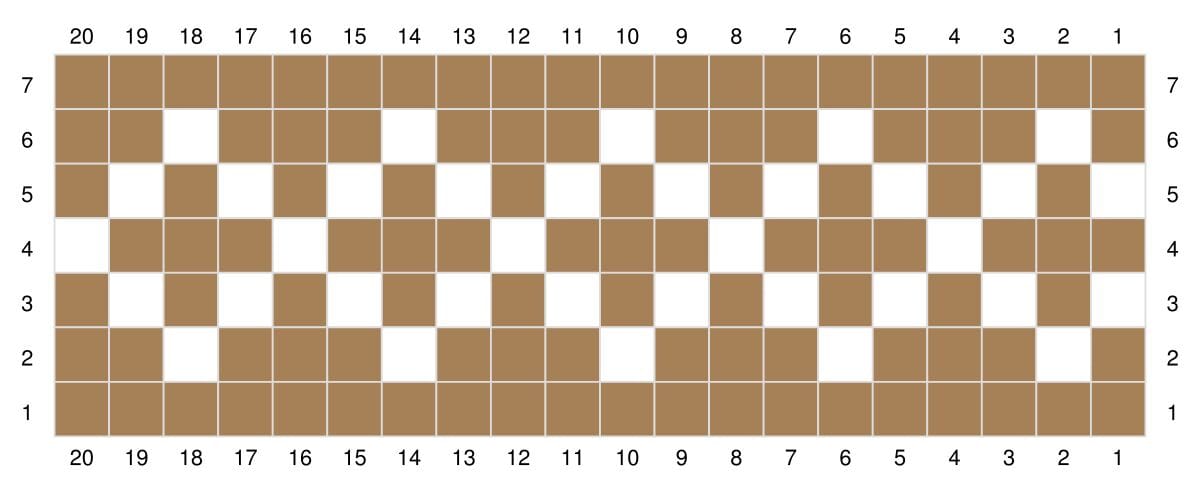
Reading the Color Chart
- Each square represents one single crochet worked in the back loop only.
- Read the chart from right to left, bottom to top.
- The colorwork is a repeat of only 4 stitches. The chart only shows 20 stitches, but your cuff will have 40, 44, or 48 stitches. Simply continue to repeat the 4 stitch repeat.
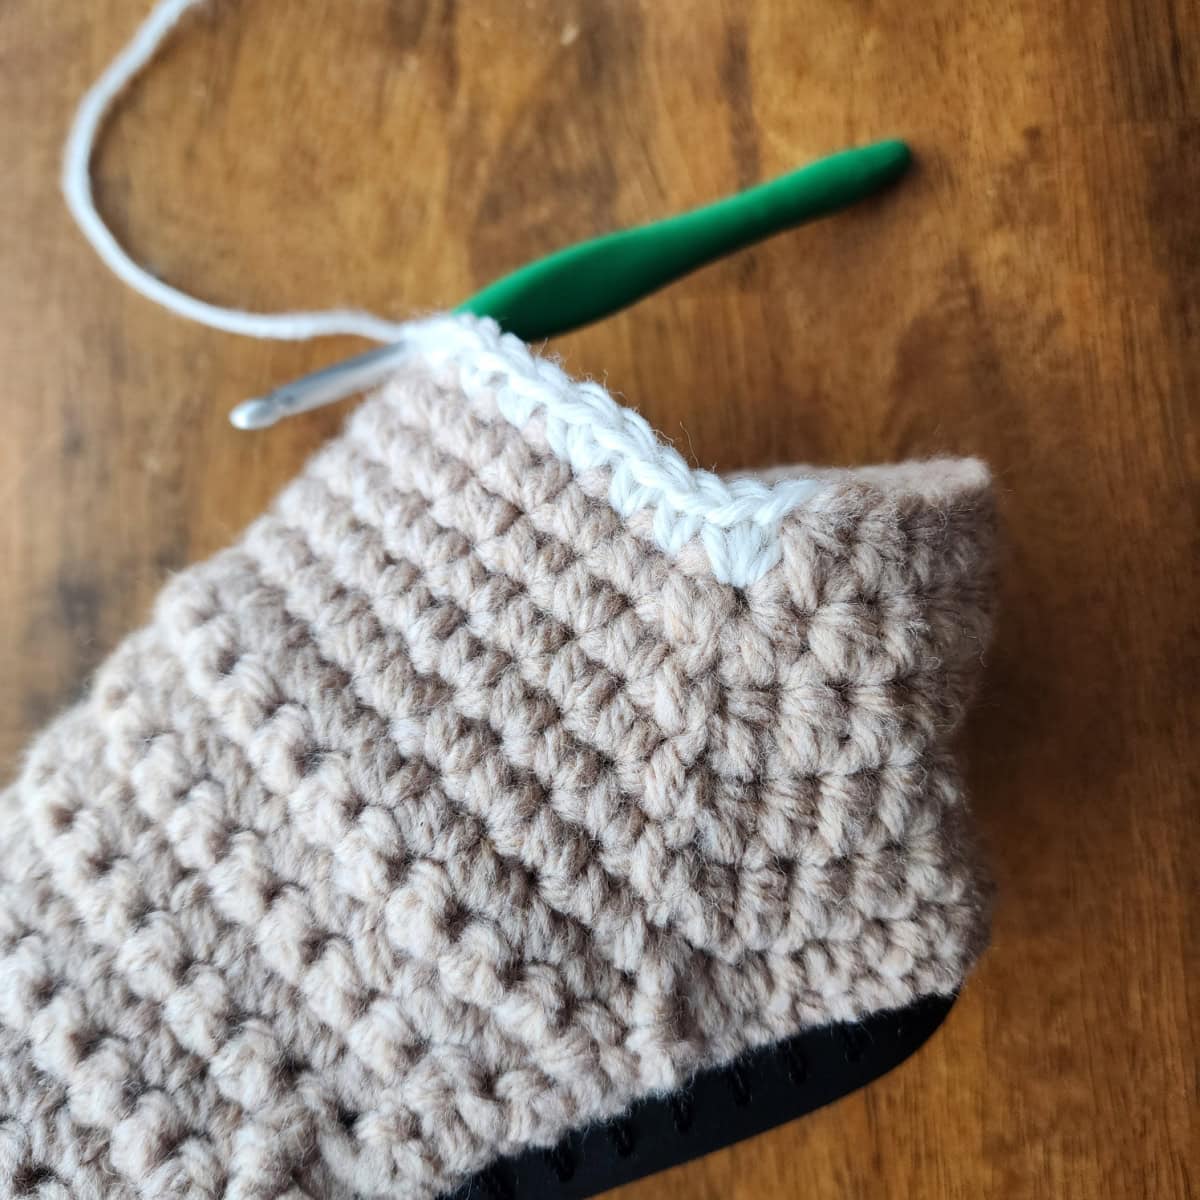
Progression Photos: Decorative Cuff – Tapestry Crochet
Crochet Cables Section for Sizes: XX-Small (X-Small, Small, Large, X-Large)
Gauge: Worsted weight yarn, ext sc with a 5.50mm crochet hook: 5 sts = 1.5″; 6 rows = 1.875″.
Scroll down for tutorial photos of the crochet cables.
Sizes XX-Small, X-Small & Small
Rnd 1: Ch 1, BOTH LOOPS, sc in each st around. Join. (40, 40, 40 sts) Continue on to Round 2.
Sizes Large & X-Large
Rnd 1: Ch 1, BOTH LOOPS, 2 sc in each of the first 2 sts, sc in each remaining st around. Join. (50, 50 sts) Continue on to Round 2.
Changes for Sizes as follows: XX-Small (X-Small, Small, Large, X-Large)
Changes for Stitch Counts as follows: (XX-Small, X-Small, Small, Large, X-Large)
Sizes XX-Small (X-Small, Small, Large, X-Large)
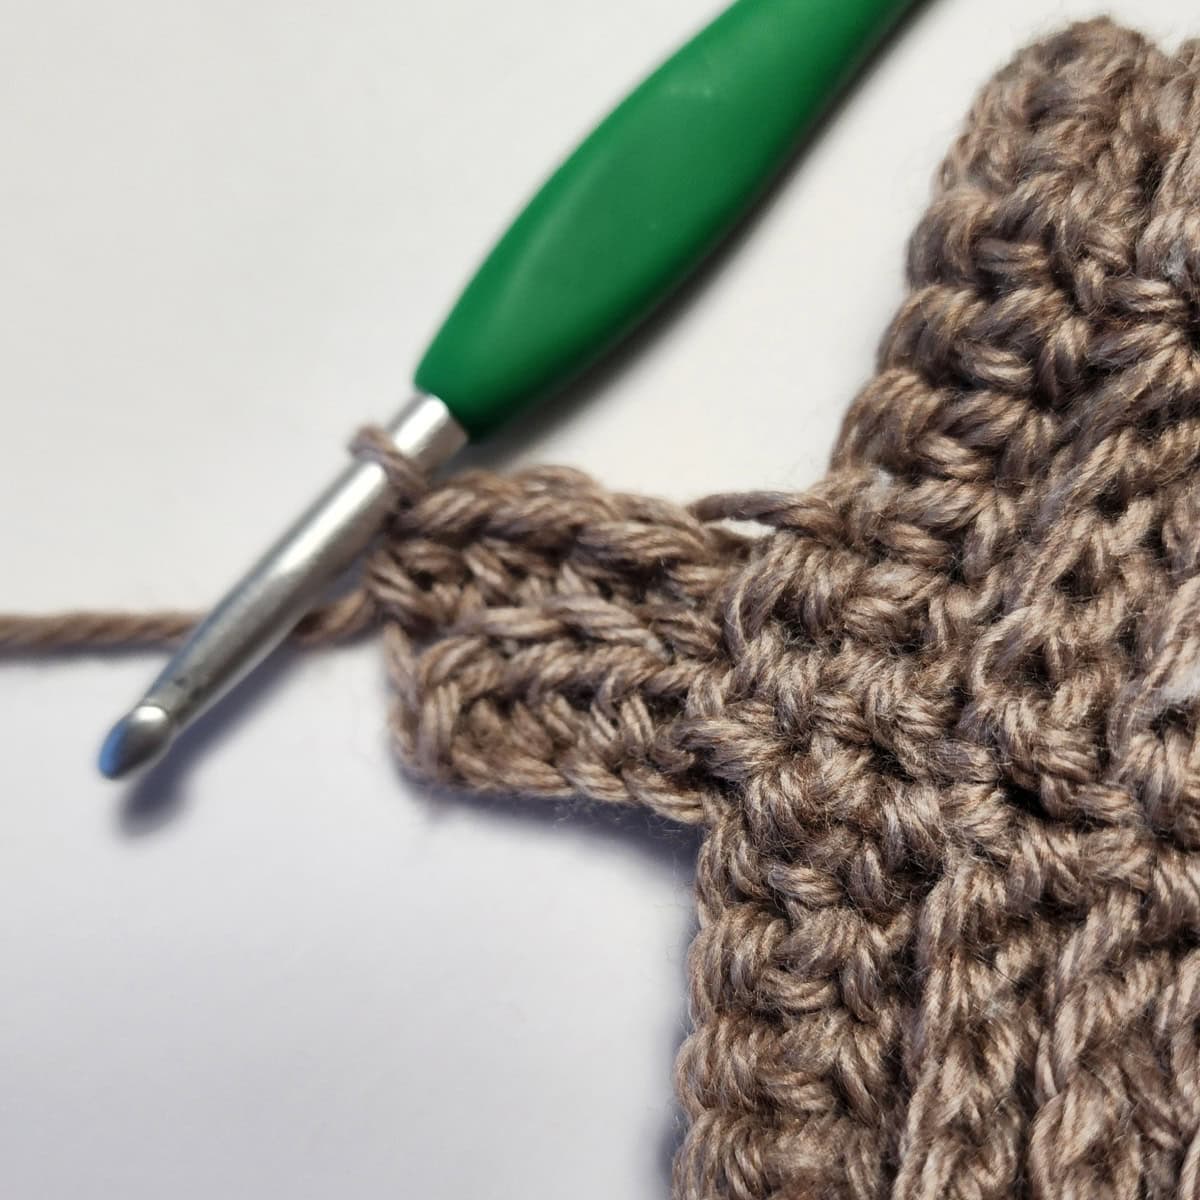
Rnd 2: Ch 1, (ext sc in the next st, FPdc around each of the next 4 sc) rep from ( to ) around. Join. (40, 40, 40, 50, 50 sts)
Rnd 3: Ch 1, (ext sc in the next st, FPdc around each of the next 4 post sts, ext sc in the next st, skip each of the next 2 post sts, FPtr around each of the next 2 post sts, FPtr around each of the 2 skipped post sts) rep from ( to ) around. Join. (40, 40, 40, 50, 50 sts)
Rnds 4 – 7: Ch 1, (ext sc in the next st, FPdc around each of the next 4 post sts) rep from ( to ) around. Join. (40, 40, 40, 50, 50 sts)
Rnd 8: Ch 1, (ext sc in the next st, skip each of the next 2 post sts, FPtr around each of the next 2 post sts, FPtr around each of the 2 skipped post sts, ext sc in the next st, FPdc around each of the next 4 post sts) rep from ( to ) around. Join. (40, 40, 40, 50, 50 sts)
Rnd 9: Ch 1, (ext sc in the next st, FPdc around each of the next 4 post sts) rep from ( to ) around. Join. (40, 40, 40, 50, 50 sts)
Rnd 10: Ch 1, (ext sc in the next st, FPdc around each of the next 4 post sts, ext sc in the next st, skip each of the next 2 post sts, FPtr around each of the next 2 post sts, FPtr around each of the 2 skipped post sts) rep from ( to ) around. Join. (40, 40, 40, 50, 50 sts)
Rnd 11: Ch 1, (ext sc in the next st, skip each of the next 2 post sts, FPtr around each of the next 2 post sts, FPtr around each of the 2 skipped post sts, ext sc in the next st, FPdc around each of the next 4 post sts) rep from ( to ) around. Join. (40, 40, 40, 50, 50 sts)
Rnd 12: Ch 1, (ext sc in the next st, FPdc around each of the next 4 post sts) rep from ( to ) around. Join. (40, 40, 40, 50, 50 sts)
Rnd 13: Ch 1, (ext sc in the next st, FPdc around each of the next 4 post sts, ext sc in the next st, skip each of the next 2 post sts, FPtr around each of the next 2 post sts, FPtr around each of the 2 skipped post sts) rep from ( to ) around. Join. (40, 40, 40, 50, 50 sts)
Rnds 14 – 16: Ch 1, (ext sc in the next st, FPdc around each of the next 4 post sts) rep from ( to ) around. Join. (40, 40, 40, 50, 50 sts)
Rnd 17: Ch 1, sc in each st around. Join. (40, 40, 40, 50, 50 sts)
Do not fasten off. Continue on to the Cuff Ribbing.
Crochet Cables Section for Sizes: Small+ (Medium)
Changes for Sizes as follows: Small+ (Medium)
Changes for Stitch Counts as follows: (Small+, Medium)
Gauge: Worsted weight yarn, ext sc with a 5.50mm crochet hook: 5 sts = 1.5″; 6 rows = 1.875″.
See tutorial photos below.
Rnd 1: Ch 1, BOTH LOOPS, 2 sc in the first st, sc in each remaining st around. Join. (45, 45 sts)
Rnd 2: Ch 1, (ext sc in the next st, FPdc around each of the next 4 sc) rep from ( to ) around. Join. (45, 45 sts)
Rnd 3: Ch 1, ext sc in the next st, skip each of the next 2 post sts, FPtr around each of the next 2 post sts, FPtr around each of the 2 skipped post sts, (ext sc in the next st, FPdc around each of the next 4 post sts, ext sc in the next st, skip each of the next 2 post sts, FPtr around each of the next 2 post sts, FPtr around each of the 2 skipped post sts) rep from ( to ) around. Join (45, 45 sts)
Rnds 4 – 7: Ch 1, (ext sc in the next st, FPdc around each of the next 4 post sts) rep from ( to ) around. Join. (45, 45 sts)
Rnd 8: Ch 1, ext sc in the next st, FPdc around each of the next 4 post sts, (ext sc in the next st, skip each of the next 2 post sts, FPtr around each of the next 2 post sts, FPtr around each of the 2 skipped post sts, ext sc in the next st, FPdc around each of the next 4 post sts) rep from ( to ) around. Join. (45, 45 sts)
Rnd 9: Ch 1, (ext sc in the next st, FPdc around each of the next 4 post sts) rep from ( to ) around. Join. (45, 45 sts)
Rnd 10: Ch 1, ext sc in the next st, skip each of the next 2 post sts, FPtr around each of the next 2 post sts, FPtr around each of the 2 skipped post sts, (ext sc in the next st, FPdc around each of the next 4 post sts, ext sc in the next st, skip each of the next 2 post sts, FPtr around each of the next 2 post sts, FPtr around each of the 2 skipped post sts) rep from ( to ) around. Join. (45, 45 sts)
Rnd 11: Ch 1, ext sc in the next st, FPdc around each of the next 4 post sts, (ext sc in the next st, skip each of the next 2 post sts, FPtr around each of the next 2 post sts, FPtr around each of the 2 skipped post sts, ext sc in the next st, FPdc around each of the next 4 post sts) rep from ( to ) around. Join. (45, 45 sts)
Rnd 12: Ch 1, (ext sc in the next st, FPdc around each of the next 4 post sts) rep from ( to ) around. Join. (45, 45 sts)
Rnd 13: Ch 1, ext sc in the next st, skip each of the next 2 post sts, FPtr around each of the next 2 post sts, FPtr around each of the 2 skipped post sts, (ext sc in the next st, FPdc around each of the next 4 post sts, ext sc in the next st, skip each of the next 2 post sts, FPtr around each of the next 2 post sts, FPtr around each of the 2 skipped post sts) rep from ( to ) around. Join. (45, 45 sts)
Rnds 14 – 16: Ch 1, (ext sc in the next st, FPdc around each of the next 4 post sts) rep from ( to ) around. Join. (45, 45 sts)
Rnd 17: Ch 1, sc in each st around. Join. (45, 45 sts)
Do not fasten off. Continue on to the Cuff Ribbing.
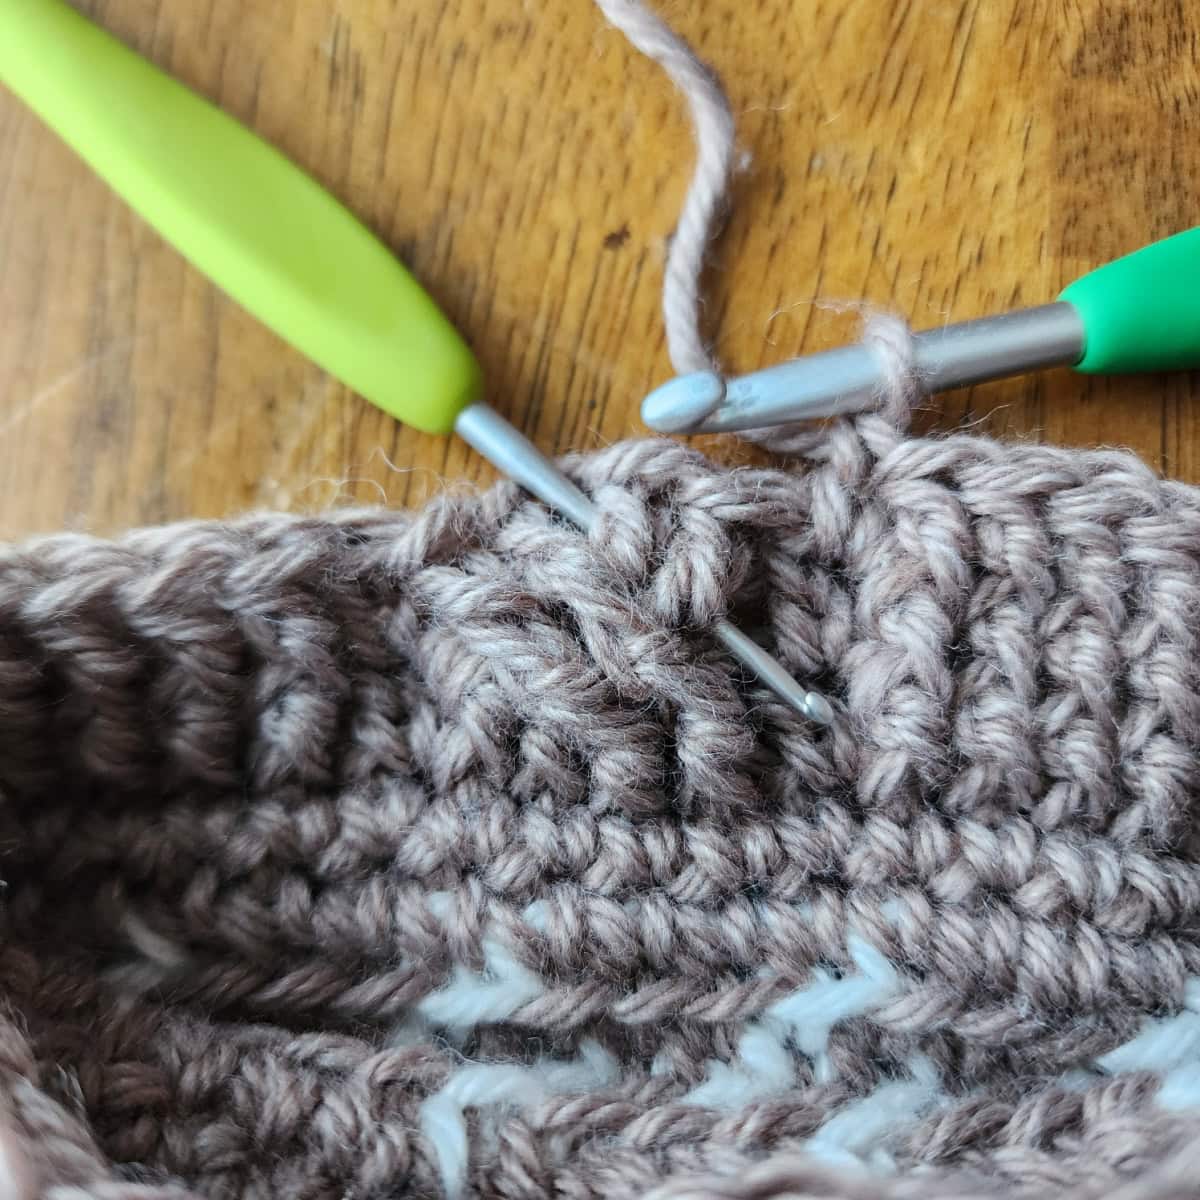
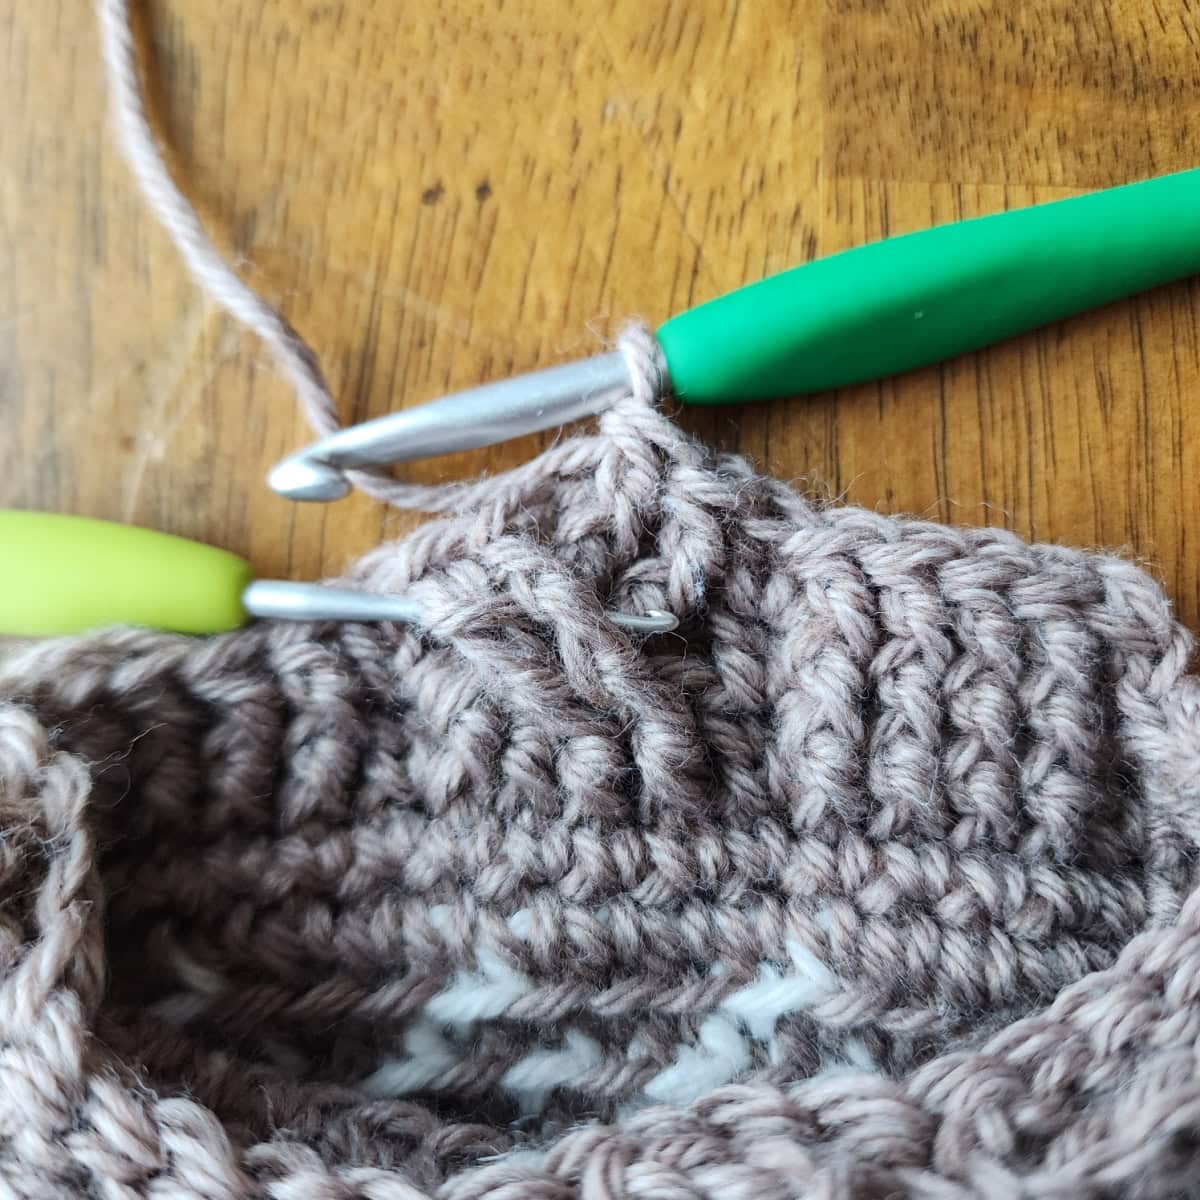
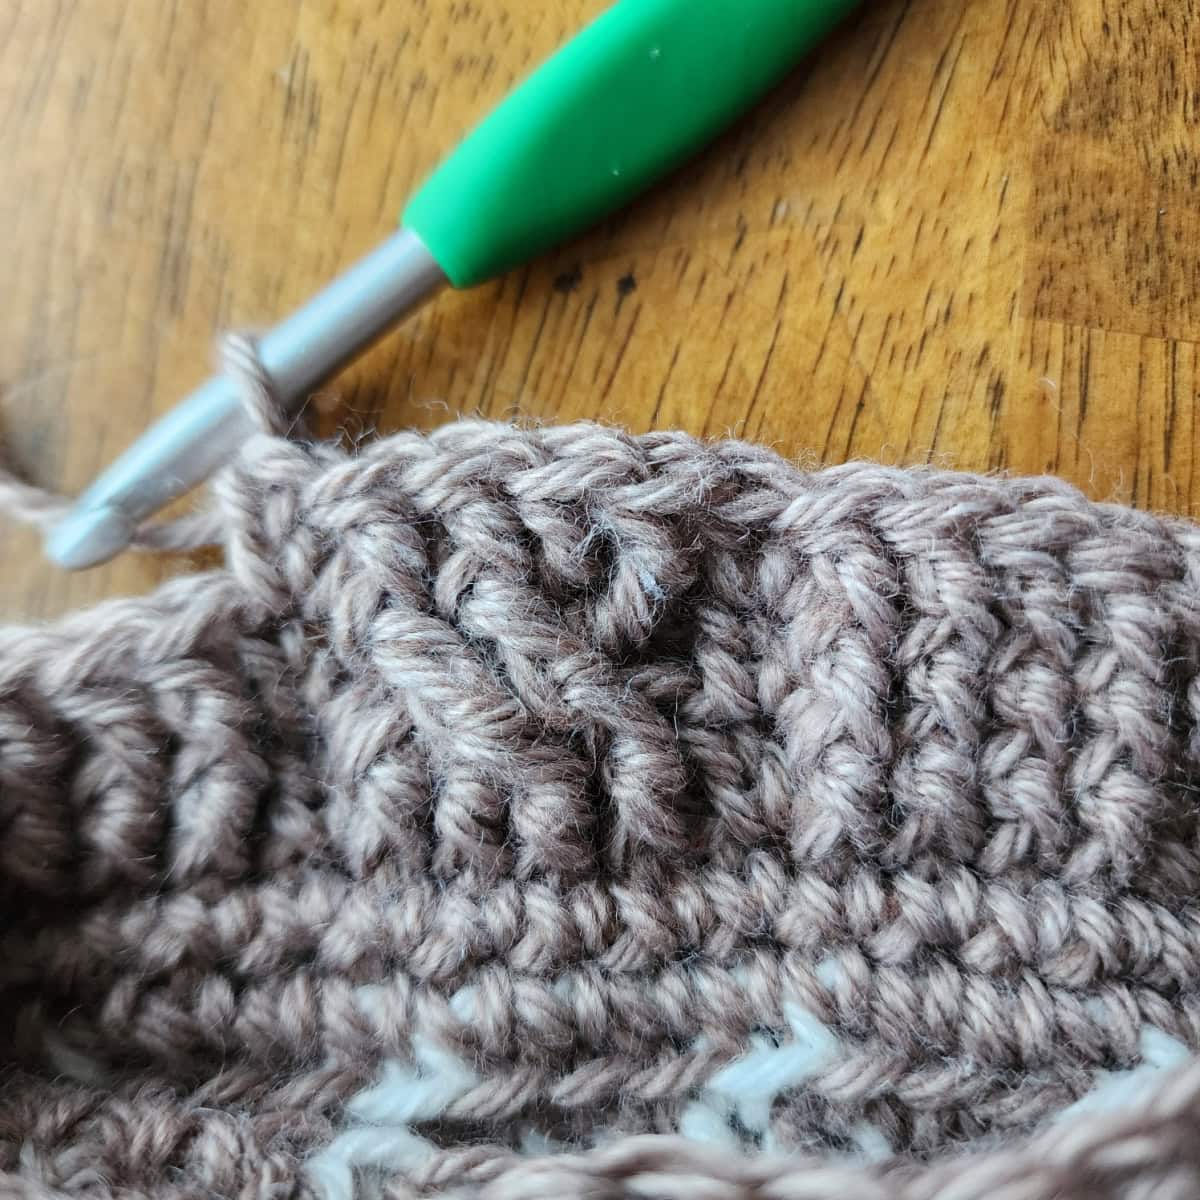
Progression Photos: Decorative Cuff – Cabled Section
These photos will show you step-by-step, how to work the 4-strand cable twists.

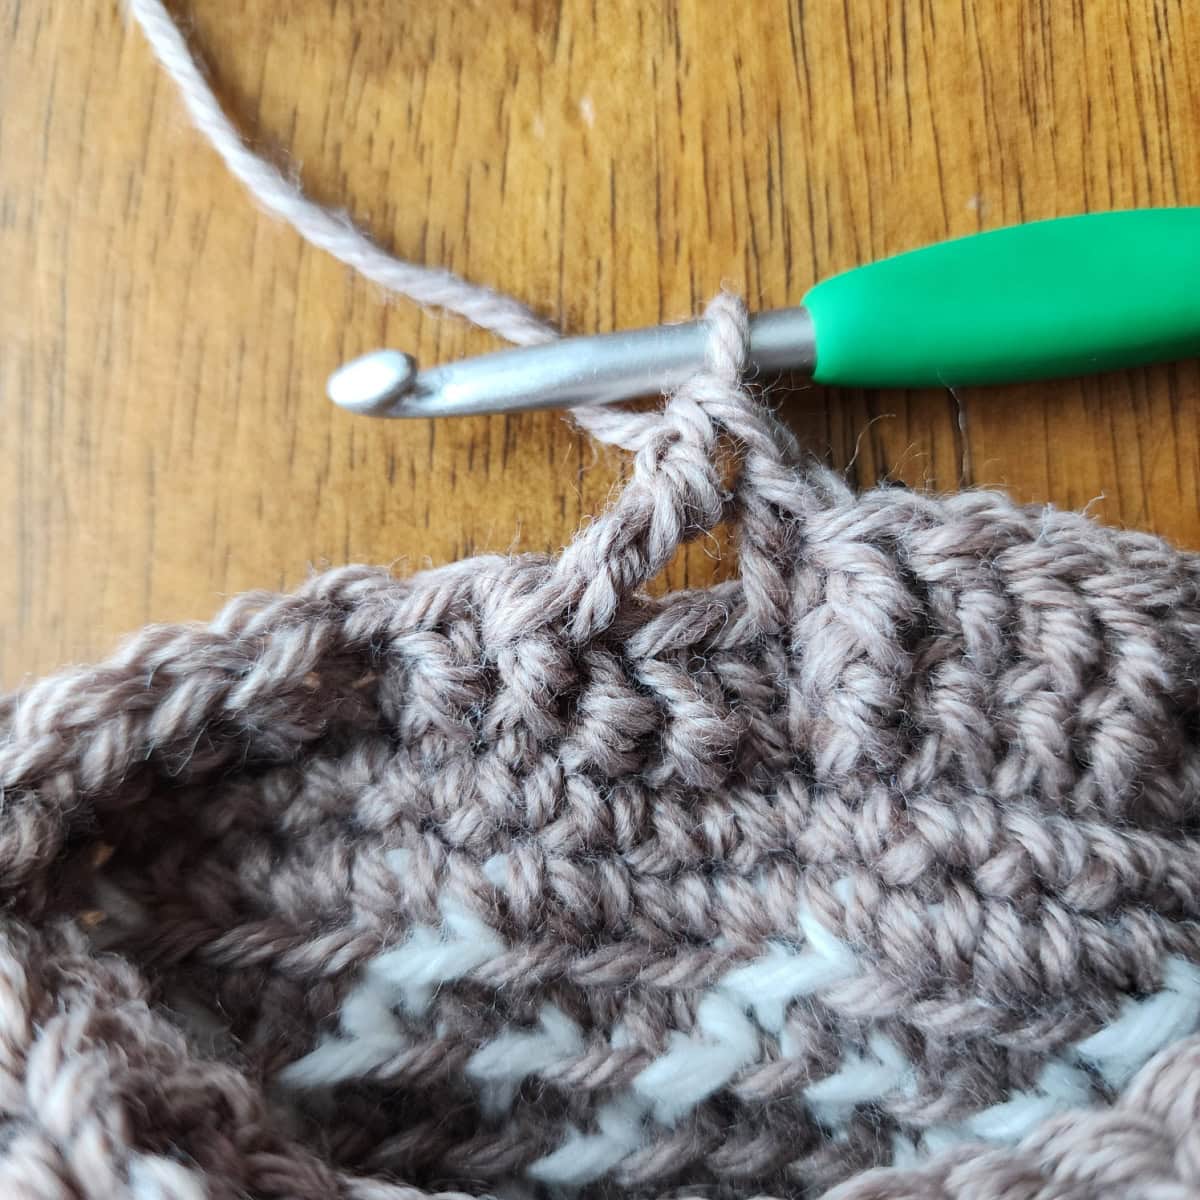
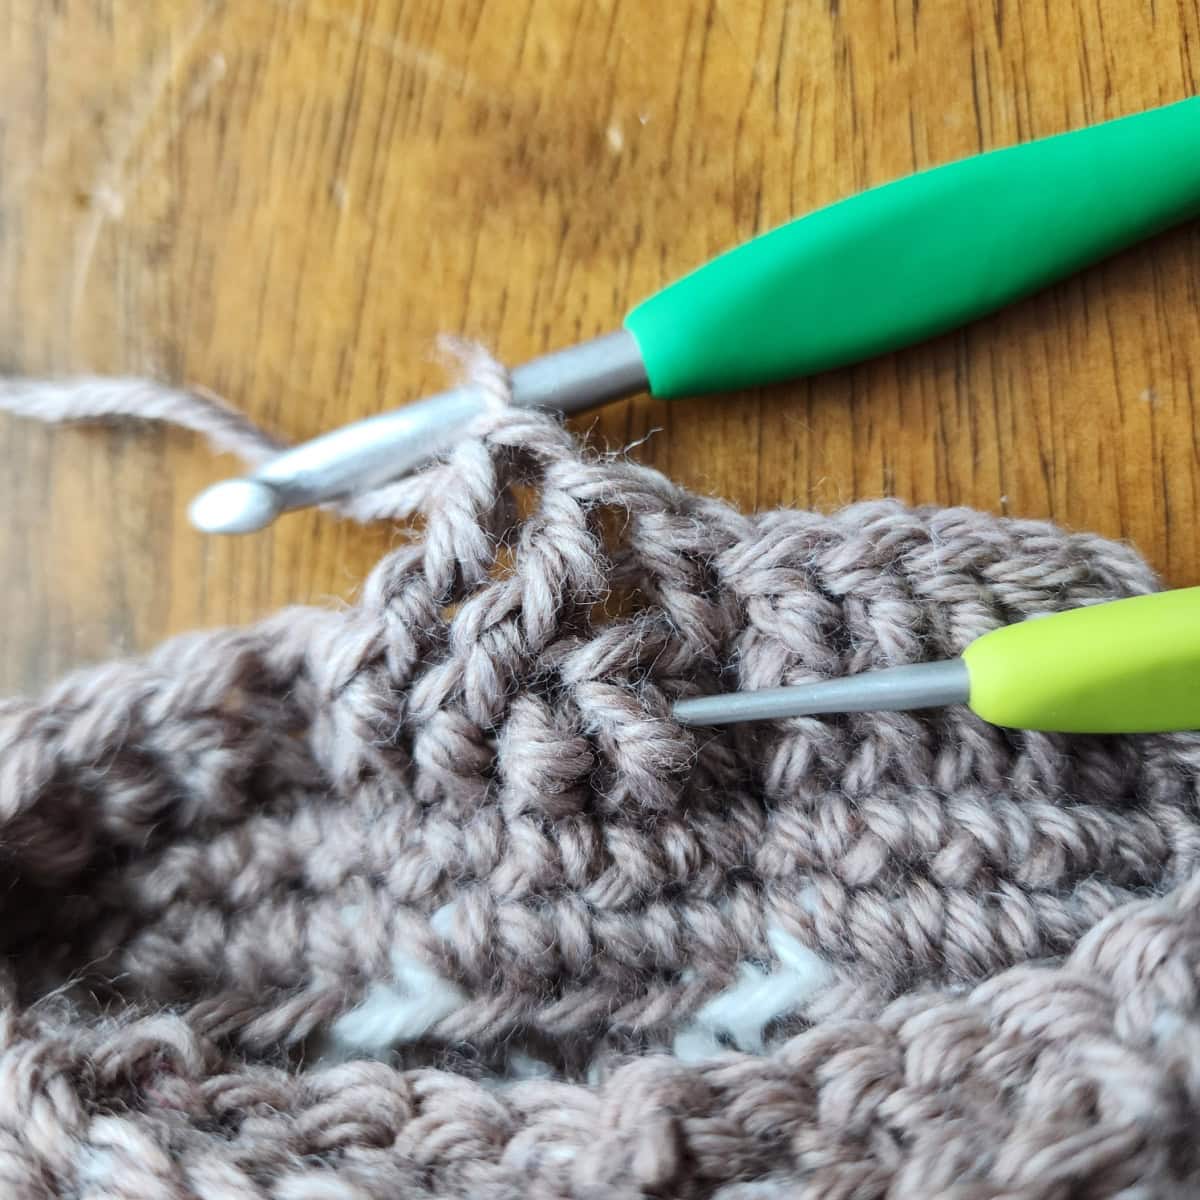
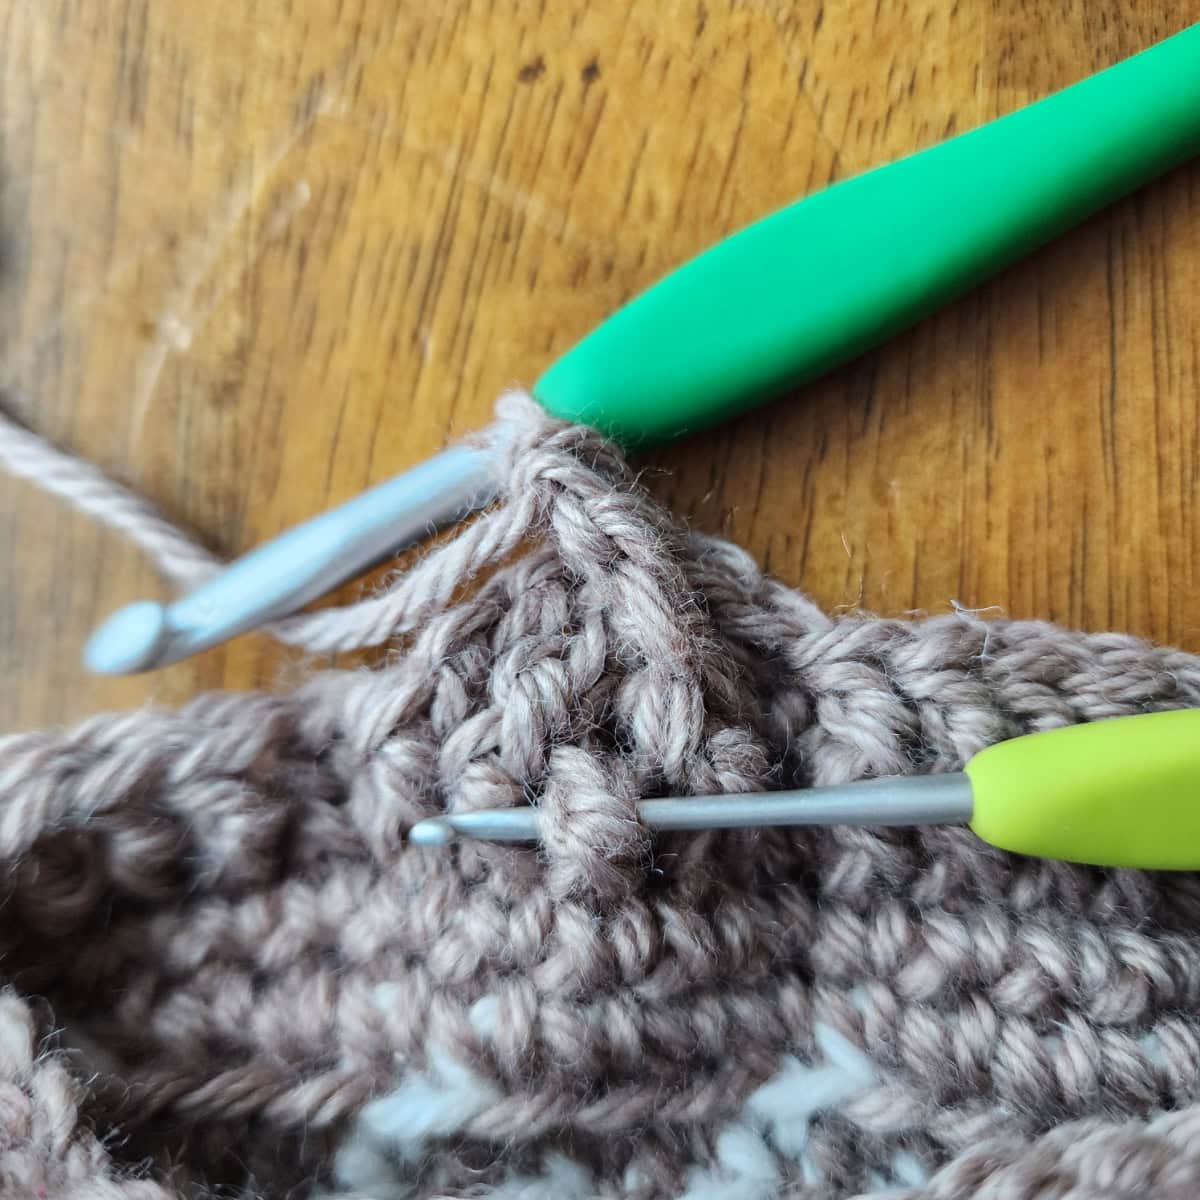
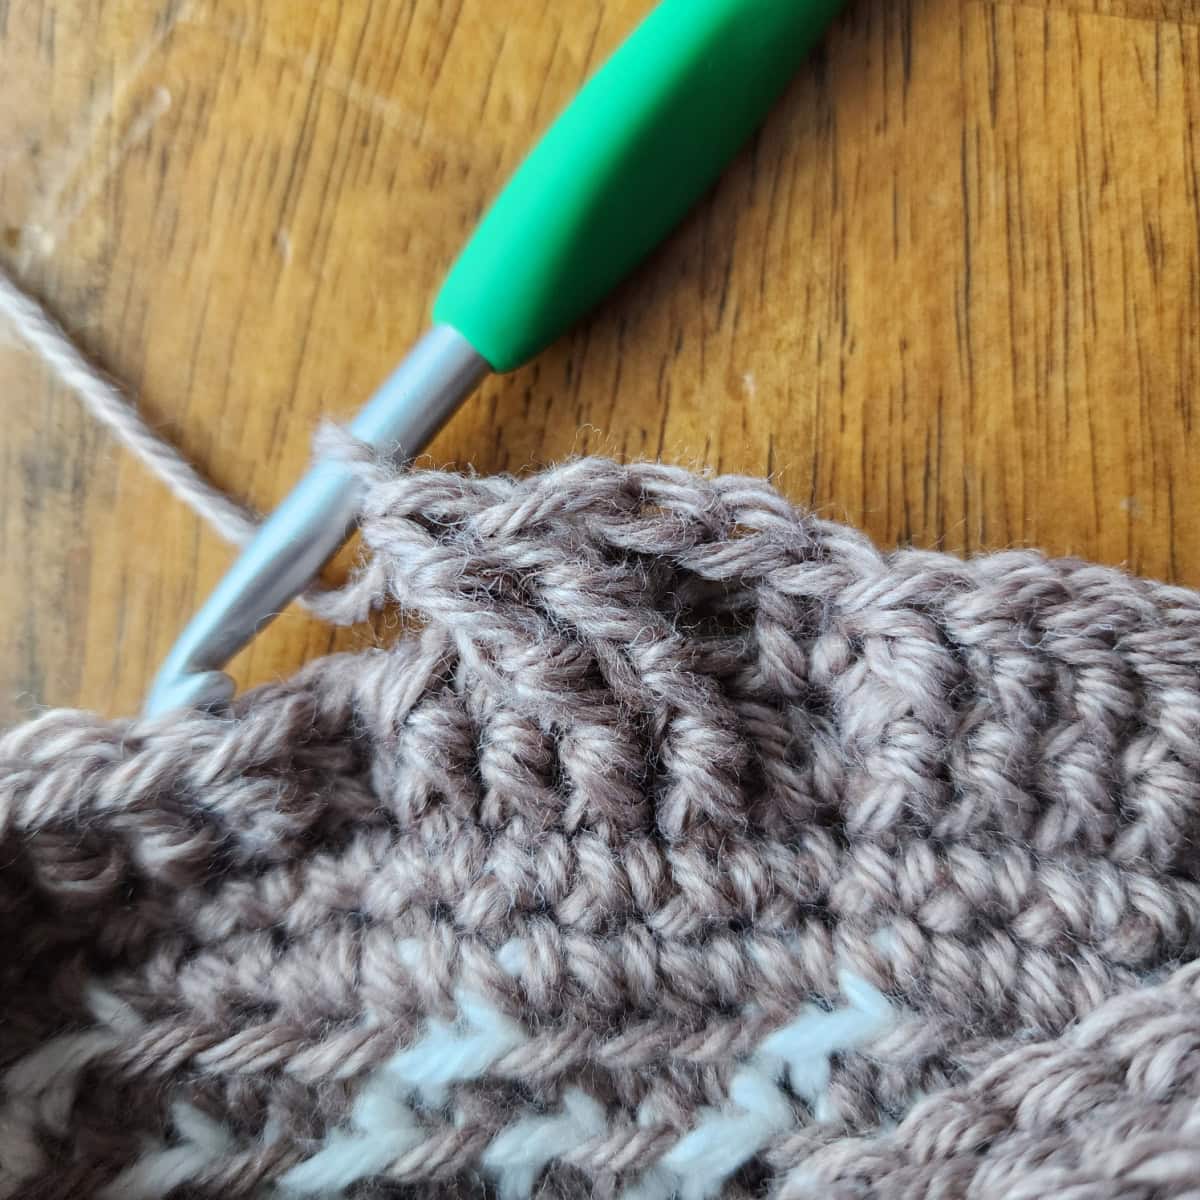
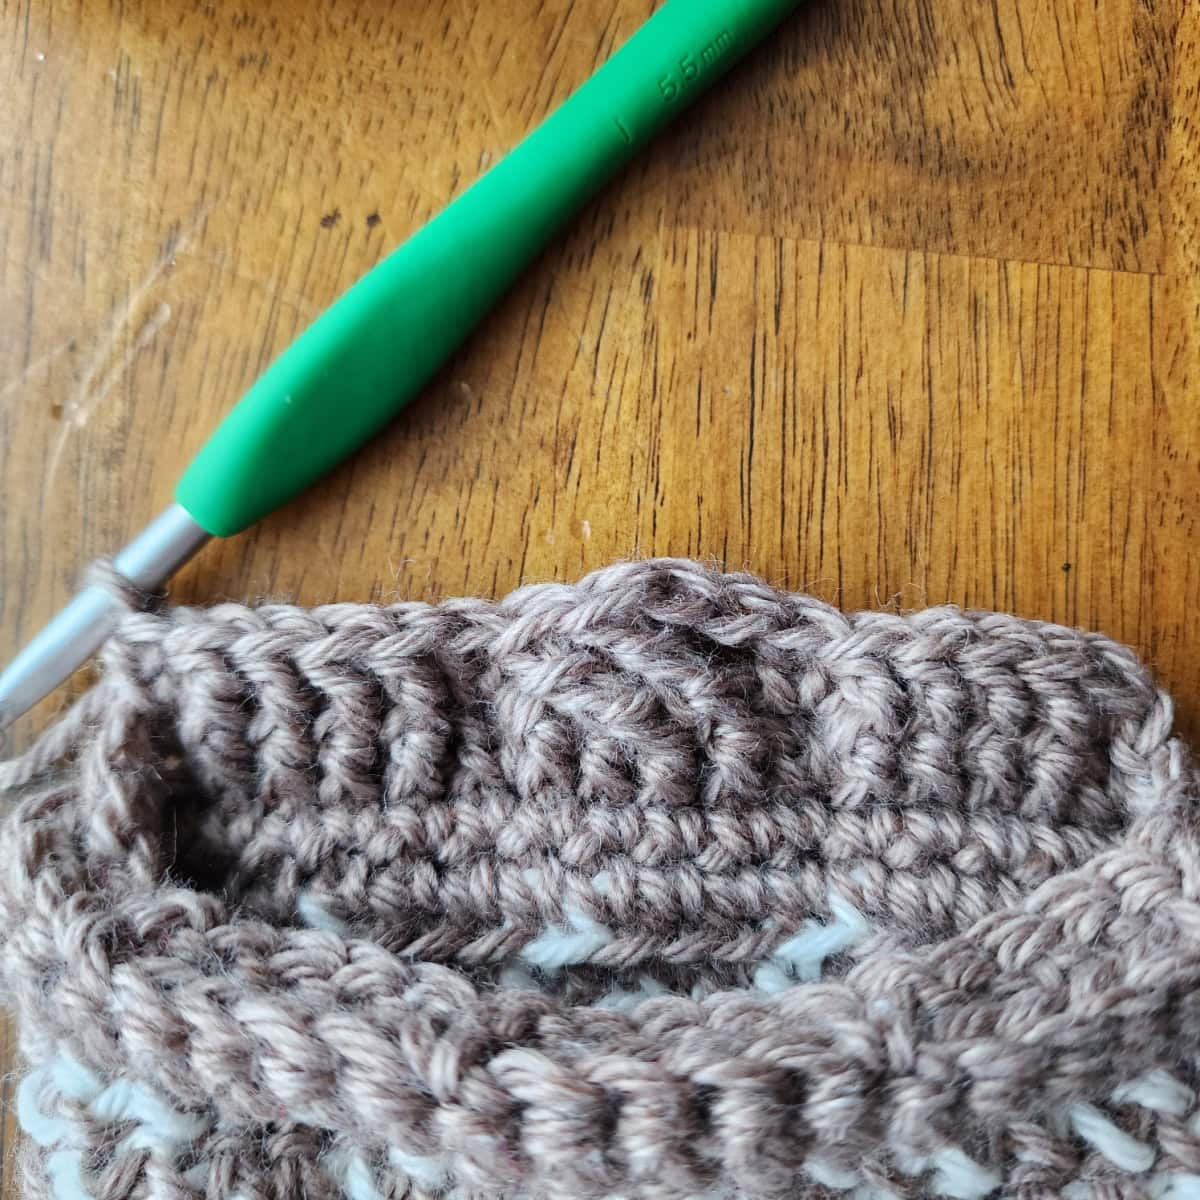
These photos show how to work the post stitches in the round following a cable twist.
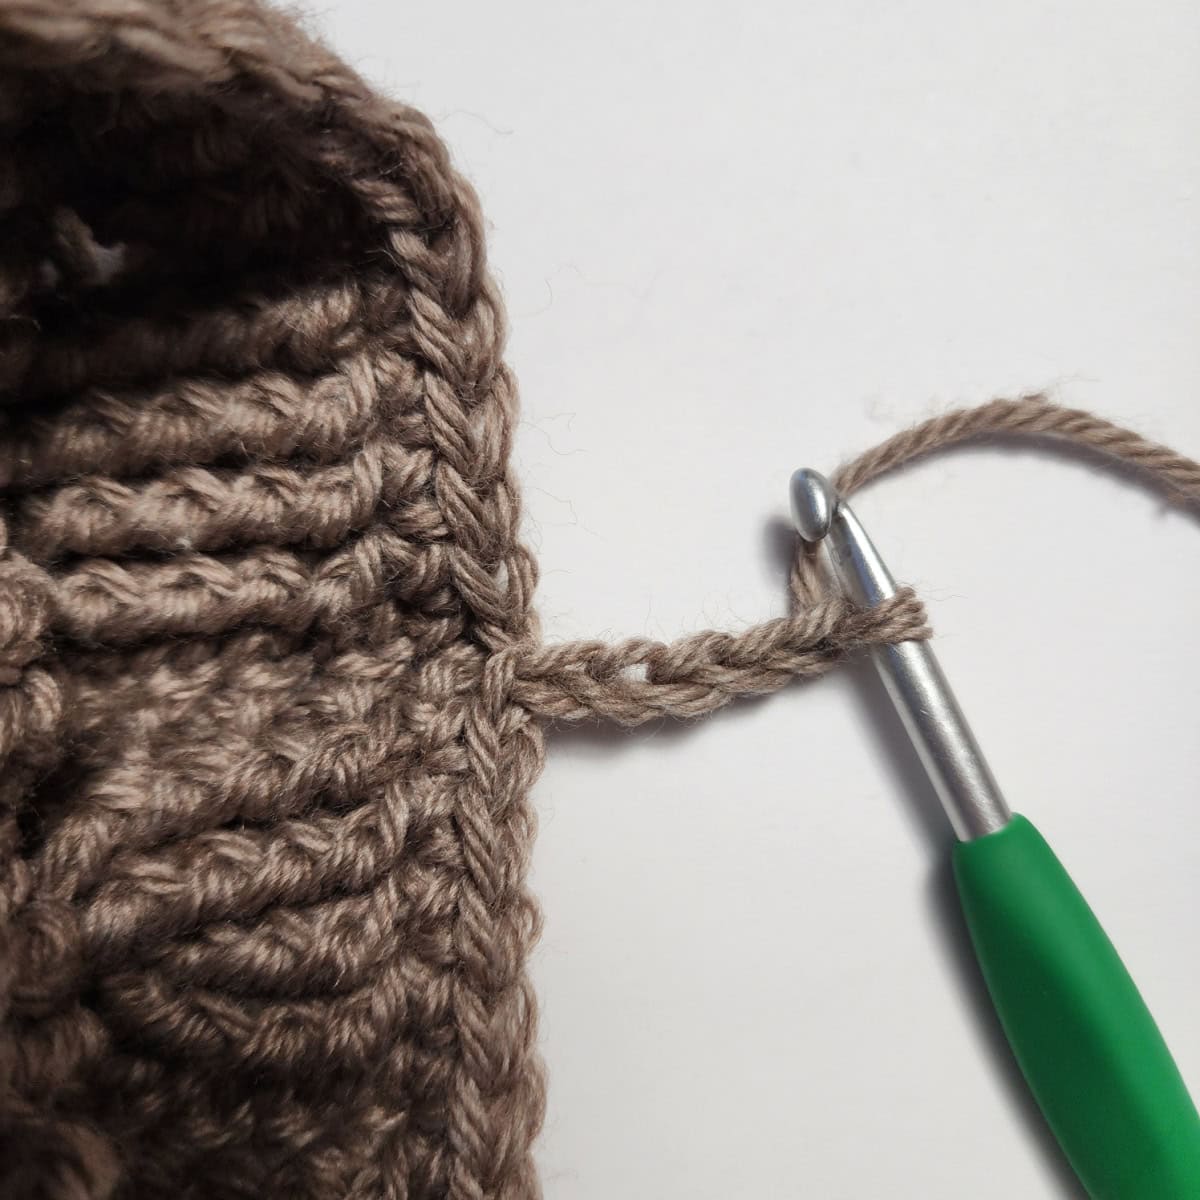
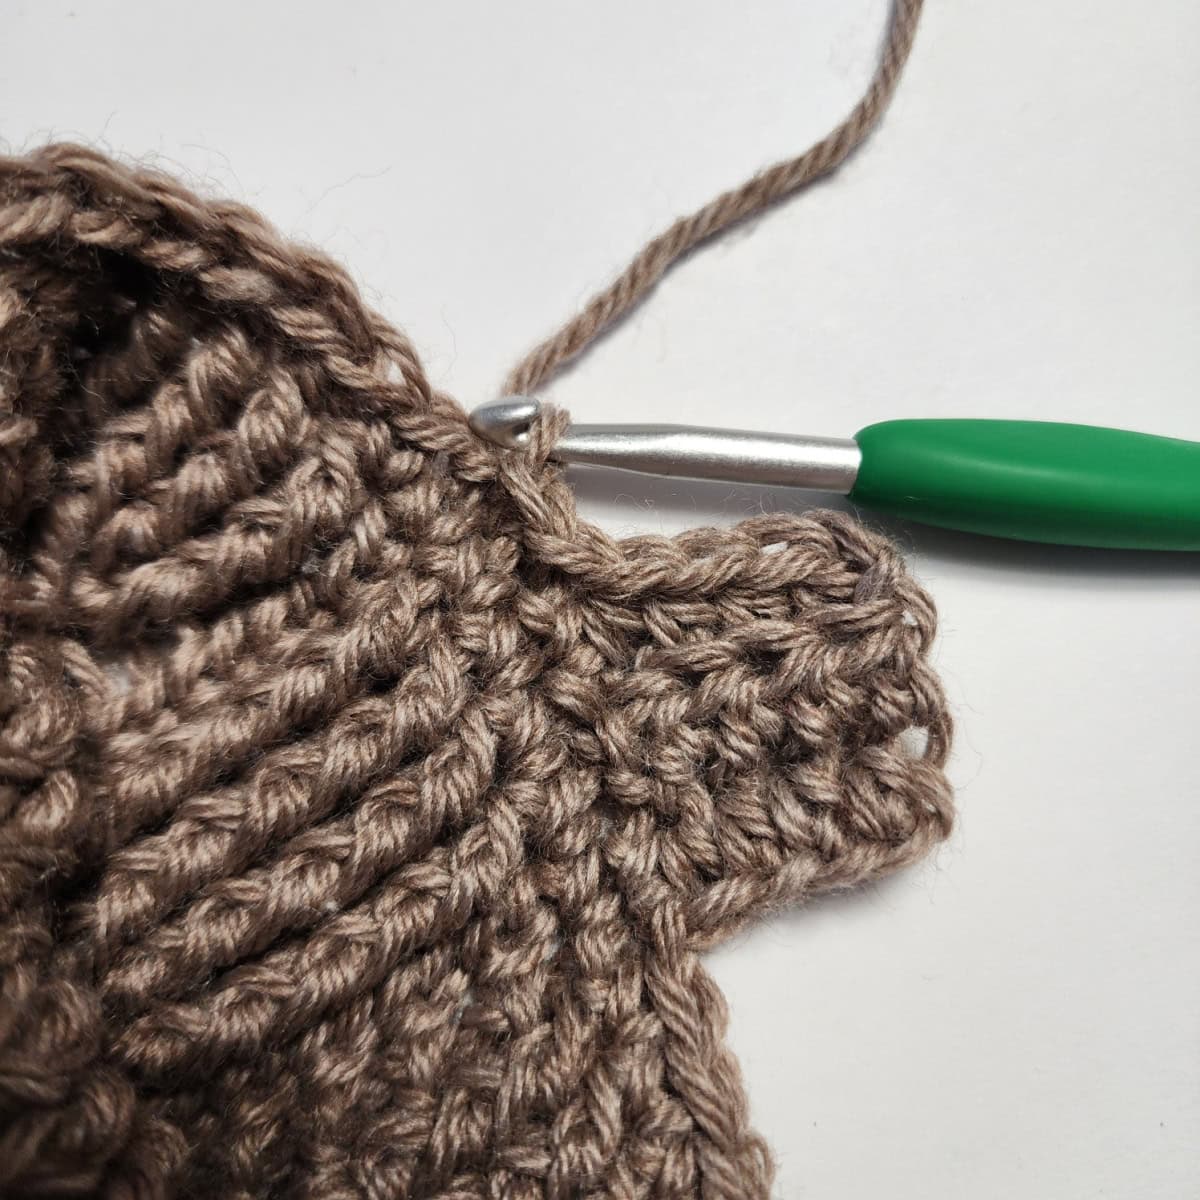
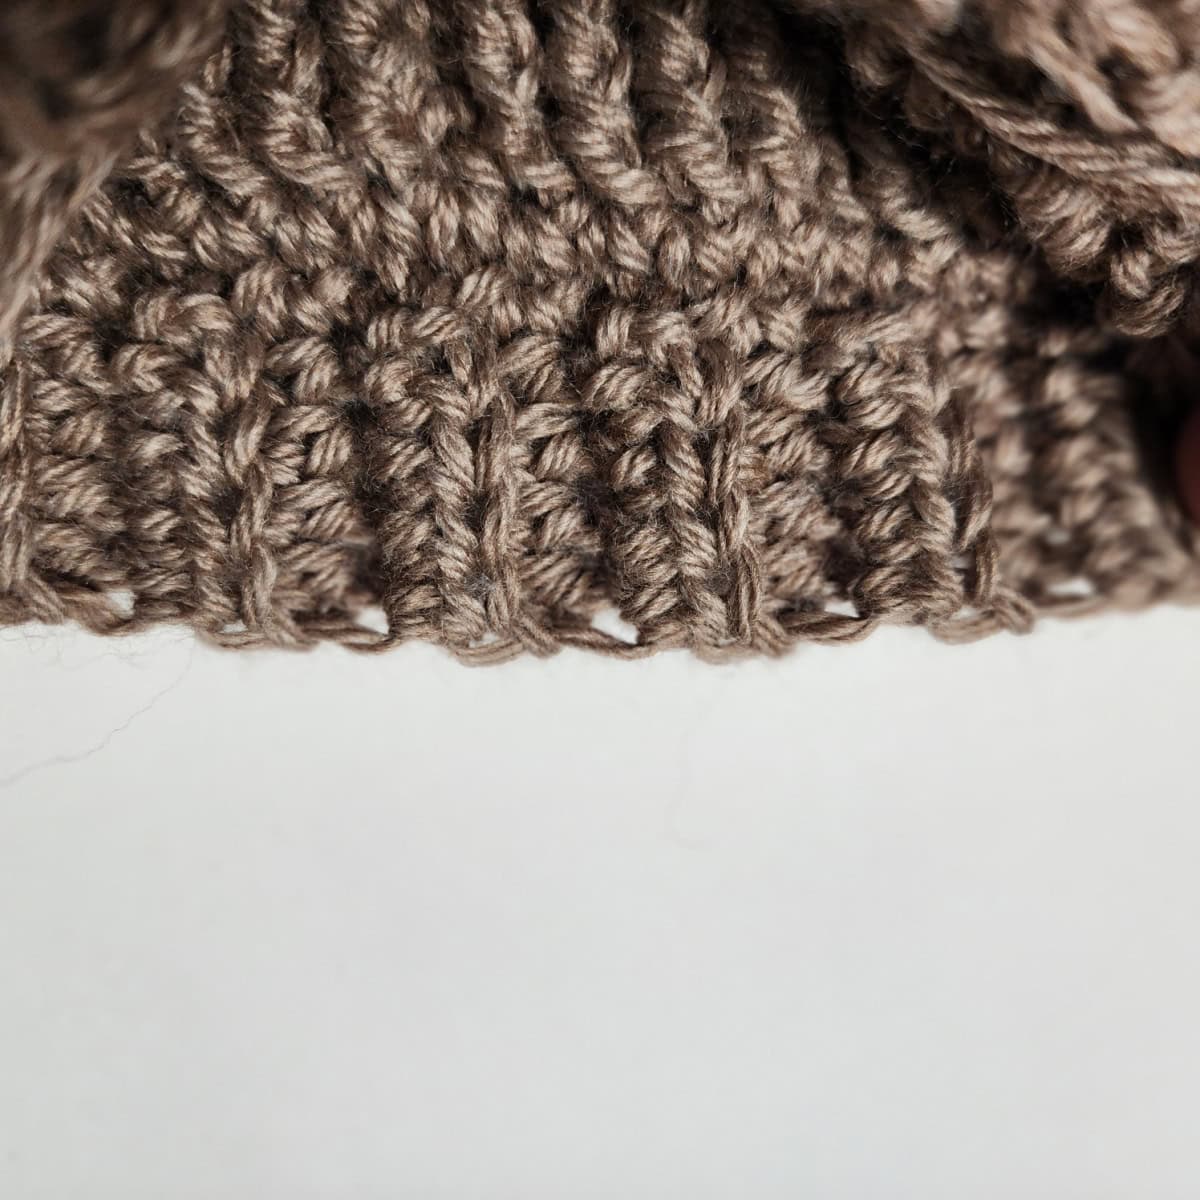
Cuff Ribbing – All Sizes
Gauge Note & Tip: Exact gauge is not crucial. Simply adjust your hook size so that your Cuff Ribbing lays nicely. As you’re working the Cuff Ribbing, if it becomes wavy, this means that your row height is too tall. Try going down a hook size or two. If the ribbing seems to be too tight, go up a hook size or two.
Ribbing is approximately 1.125″ wide.
See tutorial photos below.
Row 1 (RS): Continuing with a 5.50mm crochet hook, ch 5, working into the back hump of the ch, hdc in the 2nd ch from your hook, hdc in each of the next 2 chs, hdc2tog in the next ch & same st as ch 5. Do not turn. (4 sts)
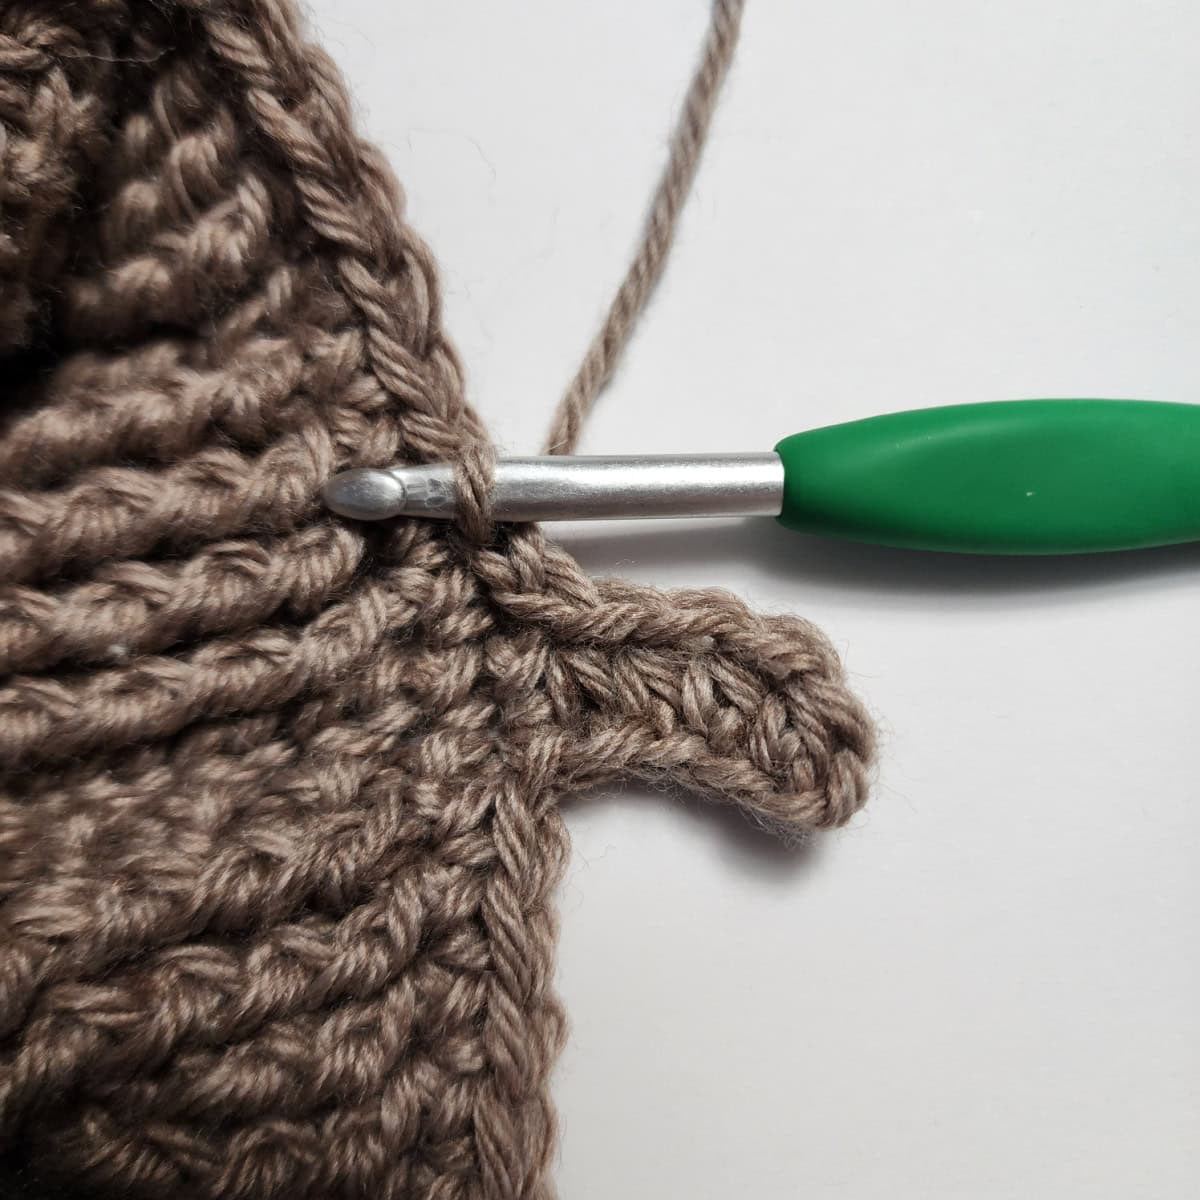
Row 2: ( sl st into the next st along the edge of the cuff ) 2 times (these 2 sl sts do not count as sts), TURN, BLO hdc in each st across the previous row. Turn. (4 sts)
Row 3: Ch 1, BLO hdc in the first st, BLO hdc in each of the next 2 sts, hdc2tog in the BLO of the next st and both loops of the next st along the edge of the cuff. Do not turn. (4 sts)
Rep Rows 2 – 3 around the edge of the cuff, ending with a Row 3 repeat, then continue on to the Seam Row.
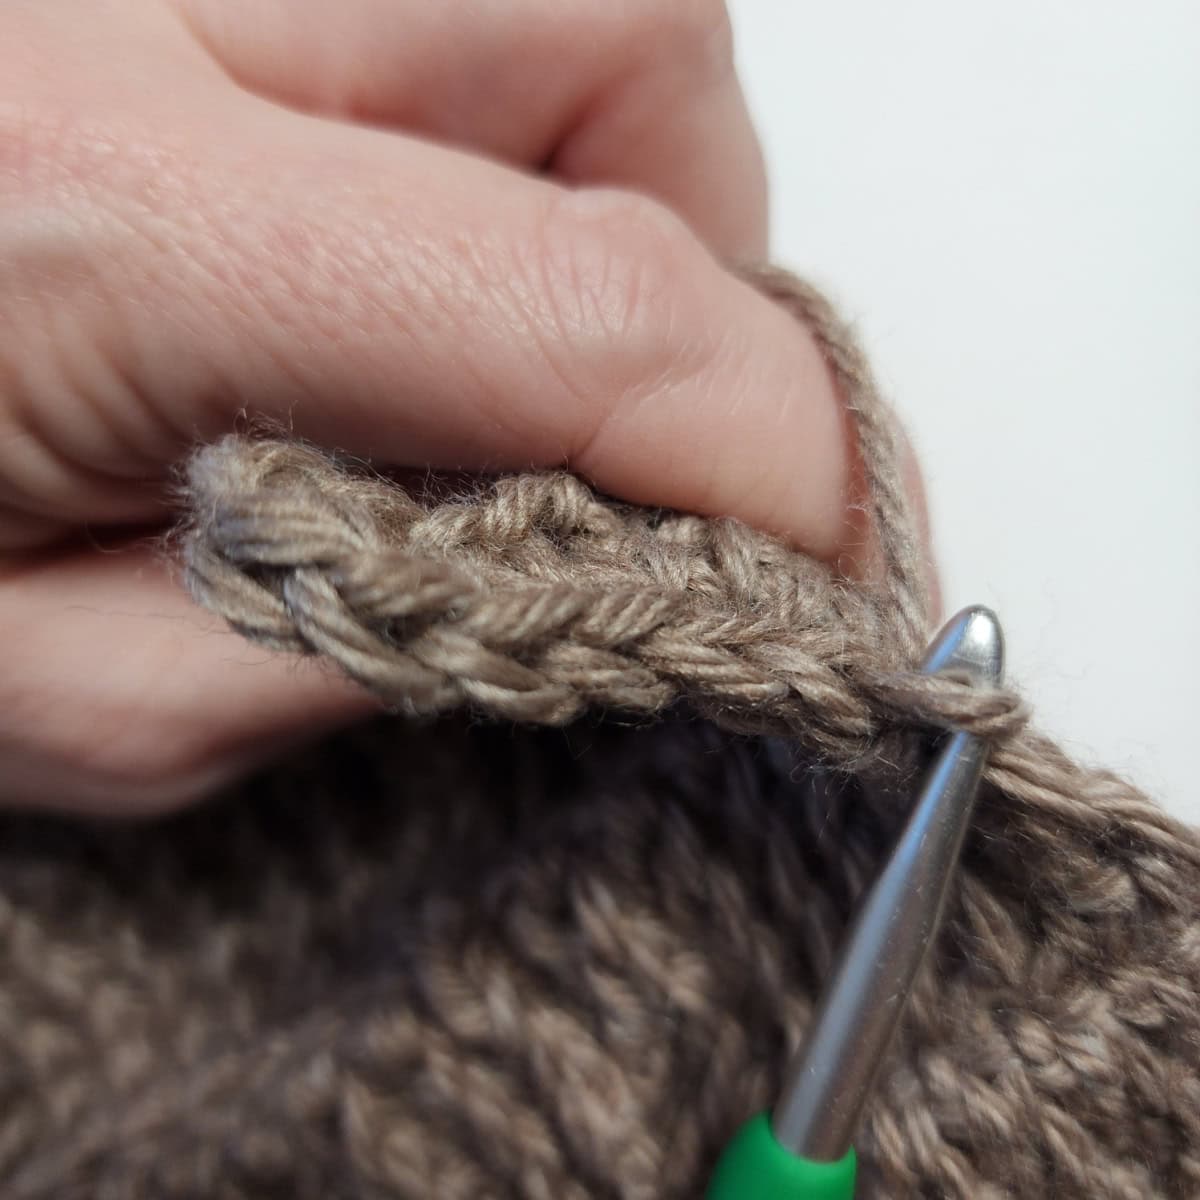
Seam Row: Turn, line up the last row with Row 1, holding working yarn on the inside of the cuff, sl st FLO of 1st row to BLO of last row across. (4 sts)
Fasten off. Weave in ends. Make a second slipper boot.
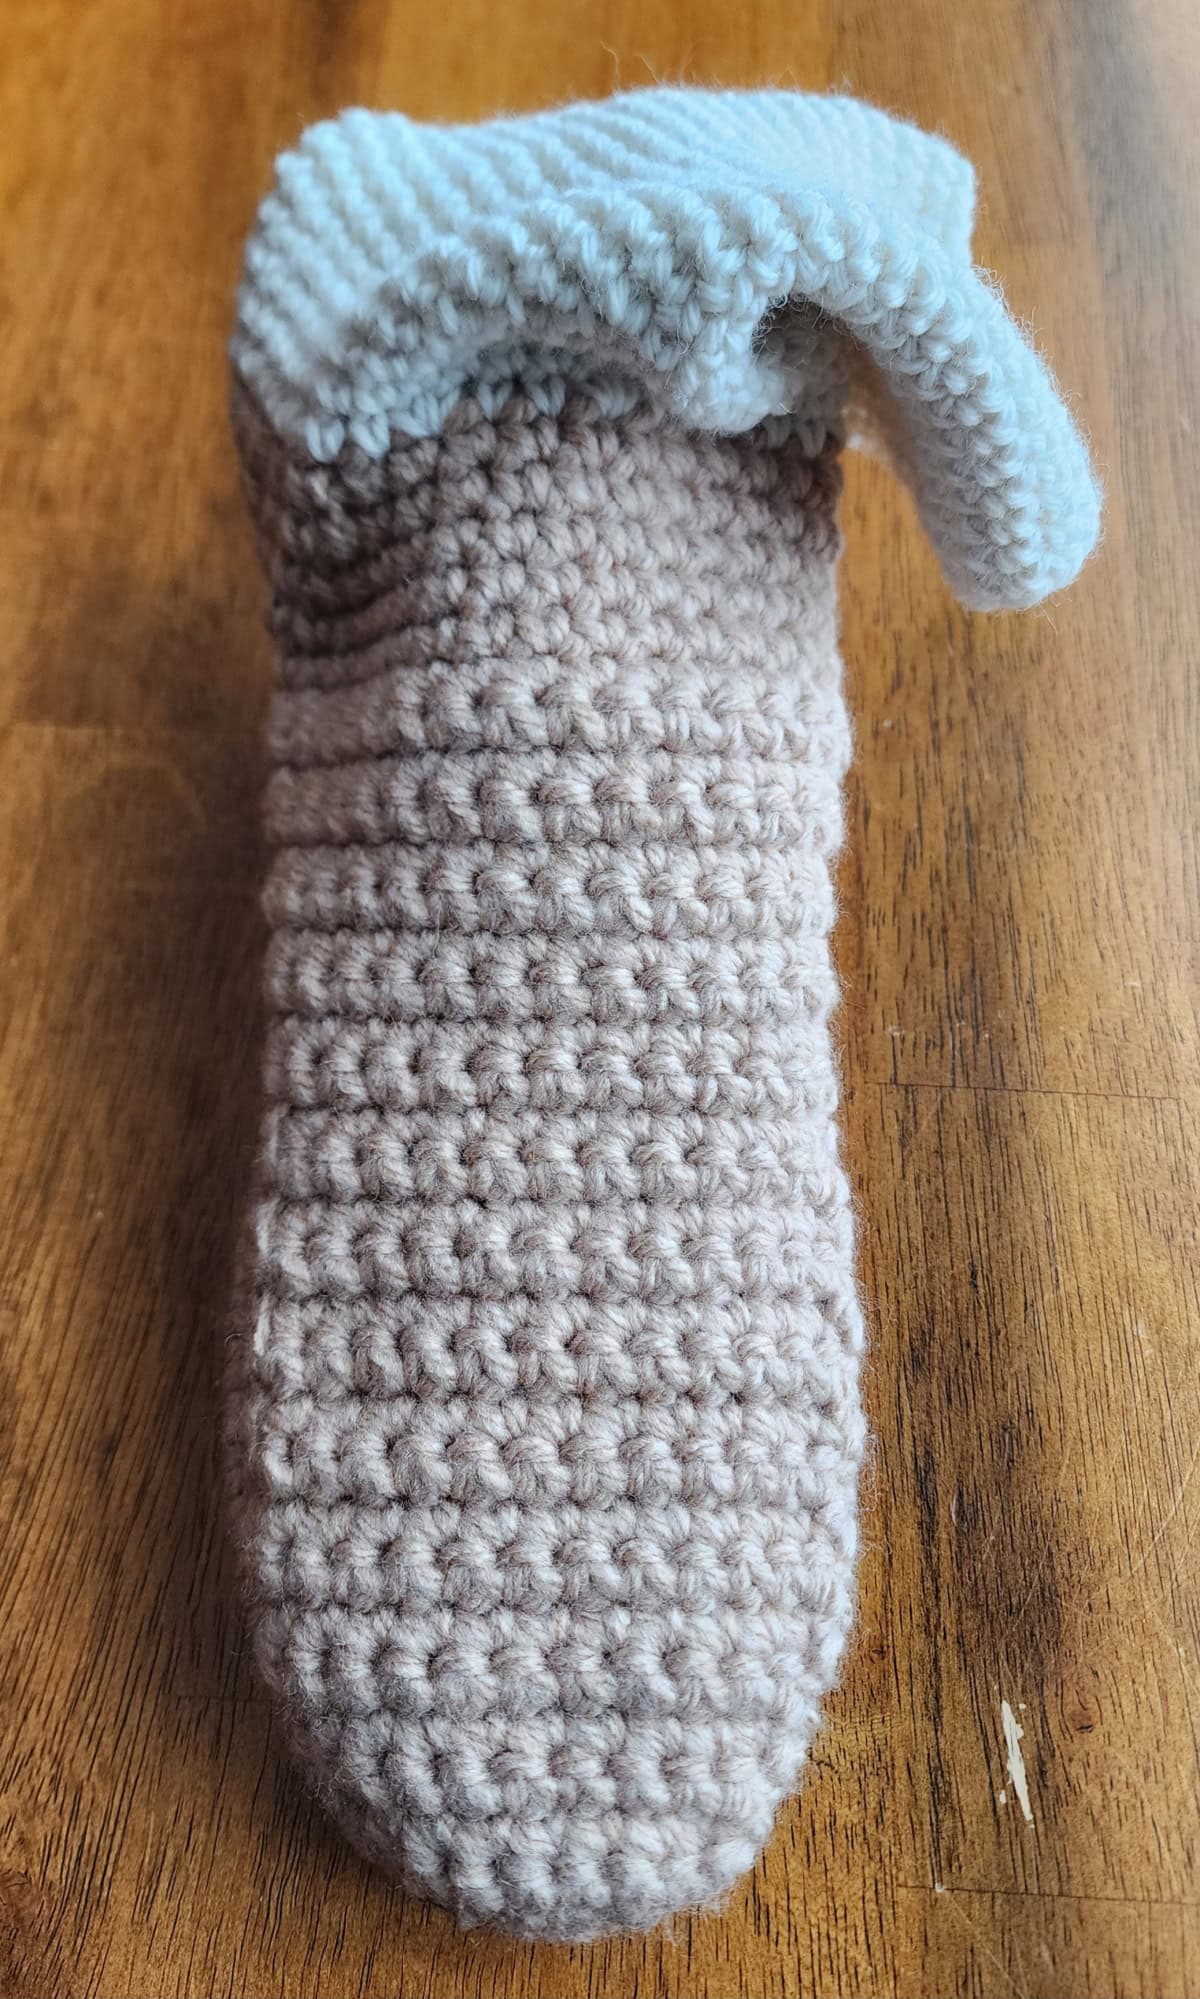
Fold the Decorative Cuff down. Finished Cuff is approximately 8″ H. Finished Slipper Boot is approximately 9″ H.
Progression Photos: Cuff Ribbing

I MADE IT! NOW WHAT?
Pin this post!: Save this crochet cable boots pattern to your Pinterest boards so that you can come back and make it again.
Leave a comment below: We love to hear your feedback.
Share Your Finished Projects on Facebook or Instagram: I love to see your finished projects! Share with us on social media and tag me @acrochetedsimplicity or use the hashtag #ACrochetedSimplicity so I can find your posts.
Join us in the Facebook Community Group!
Come share your finished projects with us in the A Crocheted Simplicity Crochet Community Group on Facebook. Join us for fun community events such as crochet alongs, join in on crochet conversations, ask questions, get advice, and share your love for crochet!

Free Crochet Slipper Patterns I Think You’ll Love
More Cozy Crochet Patterns
Are you looking for more cozy crochet patterns for fall and winter? We have several more patterns for crochet sweaters, mittens, beanies, and blankets.
We also have a few premium crochet slipper patterns as well.