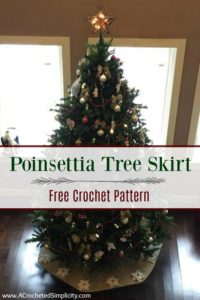
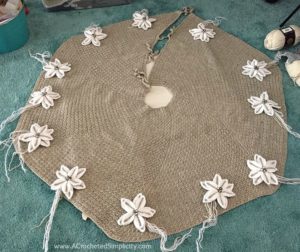
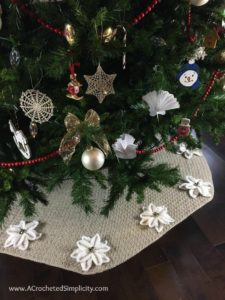
Poinsettia Christmas Tree Skirt – Free Crochet Pattern
Each year our Christmas tree is decorated with a wide variety of ornaments. Many of these ornaments are handmade by my kiddos (these are my favorite) and gifts from friends. Others are store bought and remind us of places we’ve visited. My favorites of the collection have always been the handmade ones. Because we have such a variety of ornaments, I’ve always chosen a neutral accent color for ribbons and a Christmas tree skirt.
>CLICK HERE TO SIGN-UP TO RECEIVE OUR NEWSLETTER!<
My first poinsettia design was a pillow (click HERE to see the pillow), followed by a Christmas stocking (click HERE to see the stocking). For each of these designs I used Lion Brand Fishermans Wool in the color Oatmeal. I found this to be the perfect color to add to our Christmas decor so it was only natural to use it for the Christmas tree skirt as well.
> DON’T LOSE IT, ADD IT TO YOUR RAVELRY FAVORITES OR QUEUE. <
> DON’T FORGET TO PIN IT TOO! <
>> PURCHASE AN AD-FREE PDF OF THIS PATTERN ON CRAFTSY OR RAVELRY <<
This post contains affiliate links.
Materials
- Yarn: Lion Brand Fishermans Wool Yarn in Oatmeal & Lion Brand Wool Ease in White Frost
- Crochet Hook: H/8/5.00mm; J/10/6.00mm or size needed to obtain gauge (My favorite crochet hooks are the Clover Amour Crochet Hooks, I’ve never had an ache in my hand since switching).
- Scissors
- Yarn Needle
- Locking Stitch Markers
- Jingle Bells (36) 1/2″ diameter
 Lion Brand Yarn Fishermen's...Shop on Amazon
  Lion Brand Yarn 620-501 Woo...Shop on Amazon
  Clover 1049/J Amour Crochet...Shop on Amazon
  Clover 1047/H Deep Blue Amo...Shop on Amazon
  with Free 6\" Candy Cane Ornament (Comes with Free How to Live Stress Free Ebook)") Potomac Banks Pack of 2 Cra...Shop on Amazon
Potomac Banks Pack of 2 Cra...Shop on Amazon
Stitch Abbreviations
- ch: chain
- sl st: slip stitch
- st(s): stitch(es)
- sp(s): space(s)
- sc: single crochet
- hdc: half double crochet
- dc: double crochet
- sc2tog: single crochet decrease
- dc-cl: 2 double crochet cluster
- tr-cl: 2 treble crochet cluster
- BLO: back loop only
- Magic Ring: magic ring
- RS/WS: right side / wrong side
- Rep: repeat
- Rnd: round
- yo: yarn over
- Join yarn w/ a sc: click HERE for tutorial
- MC: Main Color (oatmeal)
- CC: Contrasting Color (white)
Size
- One Size: 56″ diameter
- Easy to adjust the size.
Gauge
- See individual sections for gauge.
Notes
- Beginning chain(s) are not included in stitch count, unless noted otherwise.
- First stitch of each row is worked in the same stitch as the turning chain, unless otherwise specified.
- I tend to crochet on the tighter side. You may find yourself needing to go down a hook size (or two) to properly meet gauge, but gauge isn’t as critical with this design.
- Lion Brand Fisherman’s Wool Oatmeal was used for the tree skirt. (465 yards / 425 m / 8 oz / 277 g / 100% pure virgin wool)
- Lion Brand Wool Ease in White Frost was used for the flowers. (162 yards / 146 m / 2.5 oz / 70 g / 20% wool / 70% acrylic / 10% nylon)
- Yardage: MC: 5 skeins (2,100 yards); CC: 3 balls (400 yards)
- The center opening of the tree skirt is approximately 6″ in diameter.
- Instructions are written so that you can easily customize the size of your tree skirt.
Special Stitches
- 2 Double Crochet Cluster (dc-cl): yo, insert hook into the specified stitch, yo, pull up a loop, yo, pull thru 2 loops on hook, yo, insert hook into the same stitch, yo, pull up a loop, yo, pull thru 2 loops on hook, yo, pull thru remaining 3 loops.
-
2 Treble Crochet Cluster (tr-cl): yo twice, insert hook into the specified stitch, yo, pull up a loop, yo, pull thru 2 loops on hook, yo, insert hook into the same stitch, yo, pull up a loop, yo, pull thru 2 loops on hook, yo, pull thru remaining 4 loops.
Christmas Tree Skirt Instructions
Gauge in pattern stitch as written: 9 sts + 8 rows = 3″
Row 1 (RS): With MC & 6mm crochet hook, ch 73, working in the back hump of the ch, sc in the 2nd ch from your hook, dc in the next ch, *sc in the next ch, dc in the next ch, rep from * across. Turn. (72 sts)
Row 2: Ch 1, * (sc, dc) in each of the next 2 sts, then (sc in the next st, dc in the next st) 5 times, rep from * across. Turn. (84 sts)
Row 3: Ch 1, *sc in the next st, dc in the next st, rep from * across. Turn. (84 sts)
Row 4: Ch 1, * (sc, dc) in each of the next 2 sts, then (sc in the next st, dc in the next st) 6 times, rep from * across. Turn. (96 sts)
Row 5: Ch 1, *sc in the next st, dc in the next st, rep from * across. Turn. (96 sts)
Row 6: Ch 1, * (sc, dc) in each of the next 2 sts, then (sc in the next st, dc in the next st) 7 times, rep from * across. Turn. (108 sts)
Row 7: Ch 1, *sc in the next st, dc in the next st, rep from * across. Turn. (108 sts)
Row 8: Ch 1, * (sc, dc) in each of the next 2 sts, then (sc in the next st, dc in the next st) 8 times, rep from * across. Turn. (120 sts)
Row 9: Ch 1, *sc in the next st, dc in the next st, rep from * across. Turn. (120 sts)
Note: To keep the length of the pattern to a minimum I’m not writing out every row. Instead, I’ll write out the 2 pattern repeat you’ve been working and give you notes on where to adjust the number. Each even numbered row increases by 12 stitches. To work these increases evenly across the row, work the repeat as written in Even Rows below, and replace XX with a number that is 1 number more than the previous even row. Example: Row 6 says to rep ( to ) 7 times, Row 8 says to rep ( to ) 8 times. In every even numbered row, increase that number by 1.
Work the following Even & Odd Rows (ending w/ an even row repeat) until your work measures 25″ from Row 1.
Even Rows: Ch 1, * (sc, dc) in each of the next 2 sts, then (sc in the next st, dc in the next st) XX times, rep from * across. Turn. (+12 more than the previous row st count)
Odd Rows: Ch 1, *sc in the next st, dc in the next st, rep from * across. Turn. (same as previous row st count)
Final Round: Ch 1, sc in each st across the previous even row rep, rotate to work into the sides of the rows, work 1 sc into the side of each row to your Row 1 foundation ch, rotate, sc into the bottom of each foundation ch from Row 1, rotate to work into the sides of the rows on the opposite side, work 1 sc into the side of each row to 1st st. Join w/ a sl st to 1st st.
Fasten off. Weave in ends. Block, if desired. Continue on to Ties.
Ties (Make 8)
Note: You can make as many ties as you prefer to secure the opening of your tree skirt. I suggest a minimum of 4 sets (8 ties total): 1 set at the inside corners, 1 set at the outside corners, and 2 sets evenly spaced along the sides of the opening (approximately 8″ apart).
Tie Instructions: Join yarn w/ a sc in one of the locations noted in the note above, ch 31, sc in the 2nd ch from your hook and in each ch across. Fasten off. Weave in ends. Repeat on the opposite side of the tree skirt opening, directly across from this tie. After you’ve completed 2 ties for the set, repeat for remaining sets then continue on to Poinsettias.
Poinsettia Instructions
I made 12 poinsettias for my tree skirt. You can add as many as you’d like.
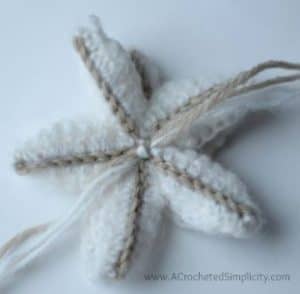
Large Petals (Make 12) – See progression photos below
Rnd 1 (RS): Using MC & a 5mm crochet hook, begin with a Magic Ring, sl st into the MR, [ch 12, working into the back humps of the ch, sl st in the 2nd ch from your hook, sl st in each of the next 10 chs, sl st into the MR] 5 times. Fasten off. Pull to tighten MR then knot MR tail to fastening off tail. (5 petal veins)
Rnd 2: Using CC, join with a sl st in BLO of 1st st in first vein, [ch 1, BLO sc in same st as ch 1, BLO hdc in next st, BLO dc-cl in next st, BLO tr-cl in each of the next 4 sts, BLO dc-cl in next st, BLO dc in next st, BLO hdc in each of the next 2 sts, ch 3, sc in 3rd ch from your hook (tip of petal), rotate to work down the other side of the vein, FLO hdc in each of the next 2 sts, FLO dc in next st, FLO dc-cl in the next st, FLO tr-cl in each of the next 4 sts, FLO dc-cl in next st, FLO hdc in next st, FLO sc in next st, sl st to sl st in MR before next vein, BLO sl st in 1st st of next vein] work from [ to ] 5 times. Fasten off. (5 petals)
Small Petals (Make 12)
Rnd 1 (RS): Using MC & a 5mm crochet hook, begin with a Magic Ring, sl st into the MR, [ch 10, working into the back humps of the ch, sl st in the 2nd ch from your hook, sl st in each of the next 8 chs, sl st into the MR] 5 times. Fasten off. Pull to tighten MR then knot MR tail to fastening off tail. (5 petal veins)
Rnd 2: Using CC, join with a sl st in BLO of 1st st in first vein, [ch 1, BLO sc in same st as ch 1, BLO hdc in next st, BLO dc-cl in each of the next 4 sts, BLO dc in next st, BLO hdc in each of the next 2 sts, ch 3, sc in 3rd ch from your hook (tip of petal), rotate to work down the other side of the vein, FLO hdc in each of the next 2 sts, FLO dc in next st, FLO dc-cl in each of the next 4 sts, FLO hdc in next st, FLO sc in next st, sl st to sl st in MR before next vein, BLO sl st in 1st st of next vein] work from [ to ] 5 times. Fasten off. (5 petals)
Note: The photos shown below are of a smaller flower, but the technique is the same. Make sure you follow the pattern as written.
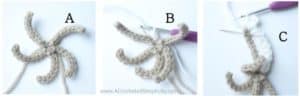
Photo A: Shows Rnd 1 complete and the yarn needle shows where you will join CC in the beginning of Rnd 2.
Photo B: Shows where you work the next st in Rnd 2.
Photo C: Shows the ch 3, sc in 3rd ch from your hook and the yarn needle is in the FLO of the next st.
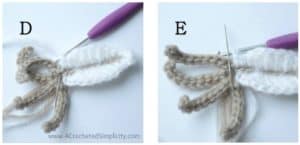
Photo D: Shows sl st to sl st in MR before next vein.
Photo E: Shows to sl st in the BLO of the 1st st of the next vein.
Flower Assembly & Finishing
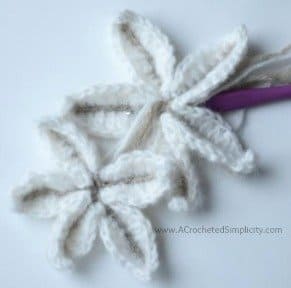
Step 1: Lay the small petals on top of the large petals, RS facing up. Pull the tails of yarn from the small petals through the center of the large petals. Tie the tails together from the small and large petals to join the pieces together.
Step 2: Turn the flower back over to the RS. Rotate the small petals so that they are between the large petals.
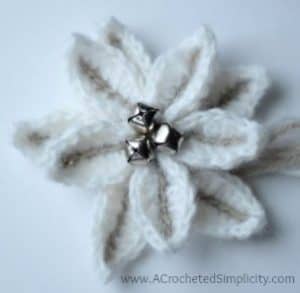
Step 3: Using CC, tightly attach 3 jingle bells to the center of the flower.
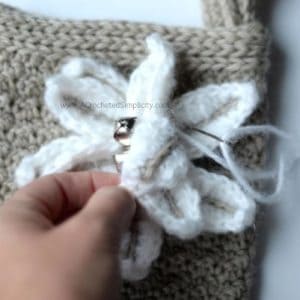
Step 4: Using a yarn needle and yarn, sew the flowers onto the tree skirt. After attaching the flower, I use CC to tack stitch the petals down to keep them in place and prevent them from curling. Tack the large petals (bottom), down first. When tacking down the large petals, I like to arch the petal just a little before tacking the tips down. This helps to give the flower a more 3D look. When tacking down the small petals (top), I tack them to the large petals, not the tree skirt.
Weave in all ends.
Are you intimidated by knit-look crochet? Would you love to learn my tips & tricks? Take an Annies Video Class with me and let me ease your fears and help you increase your skills! Click on the photo below to watch a free preview. You can also see the other 4 video classes I have available!

WE HOPE TO SEE YOU SOON! IN THE MEANTIME, CHECK OUT OUR FREE CROCHET PATTERNS AND JOIN US IN THE FACEBOOK COMMUNITY GROUP!
