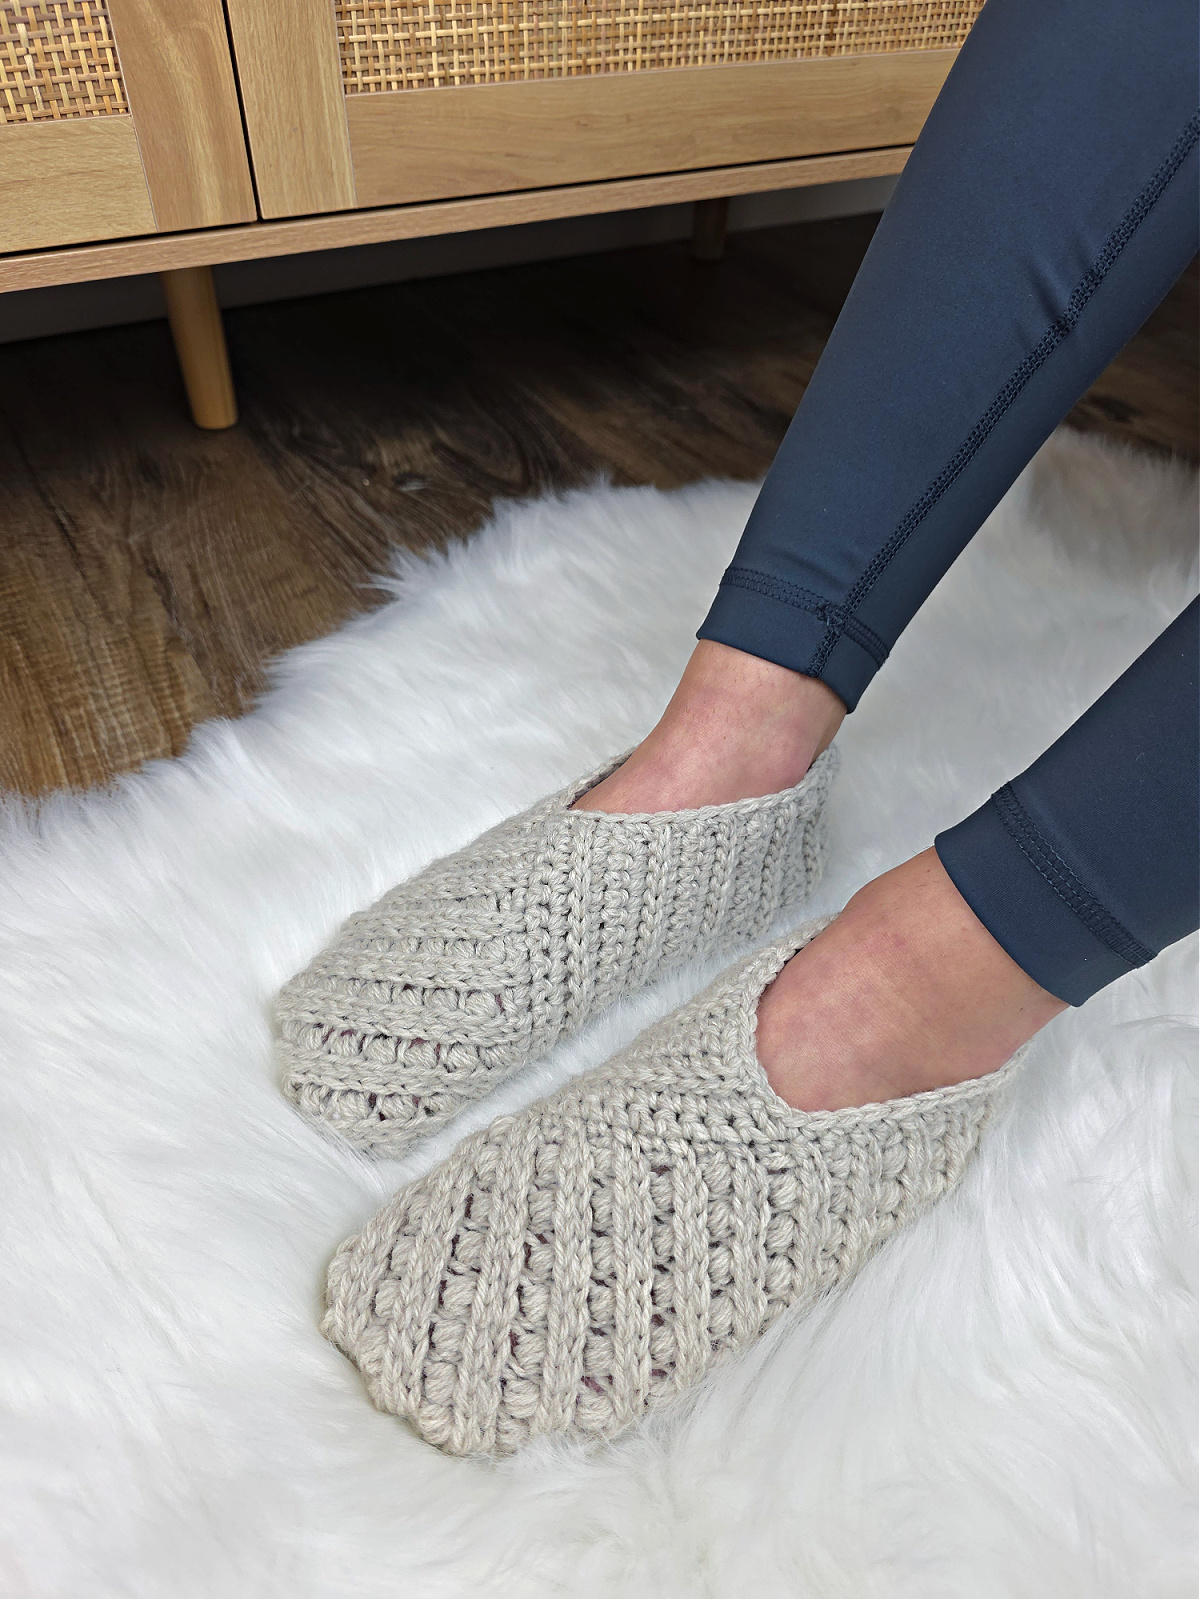
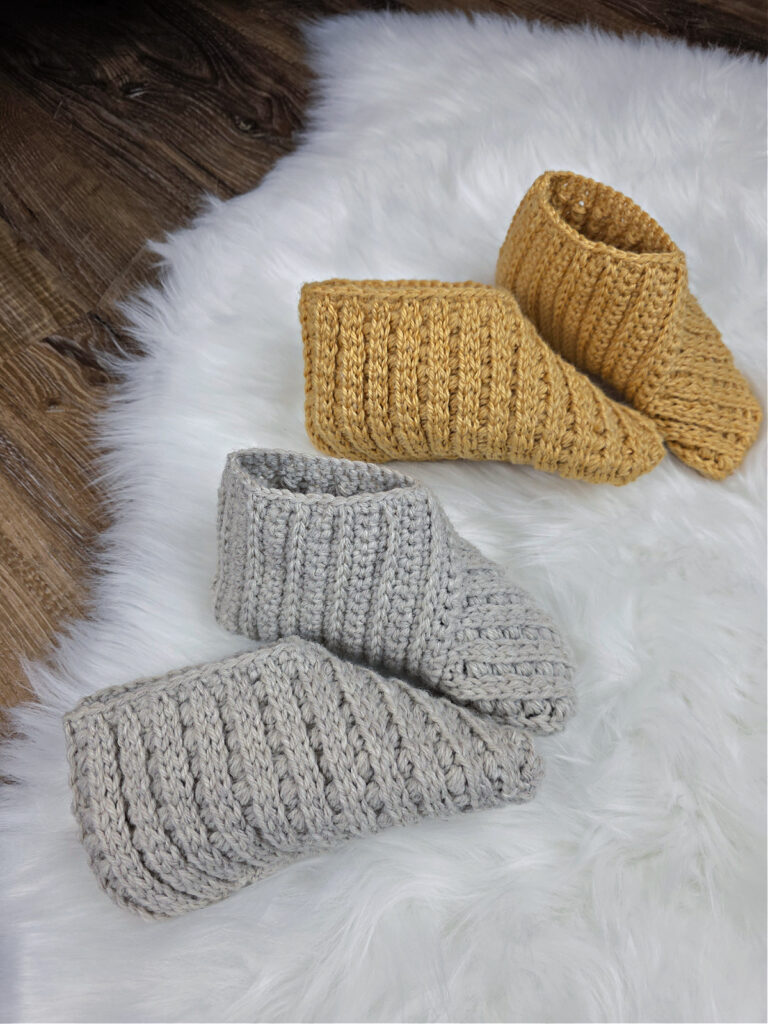
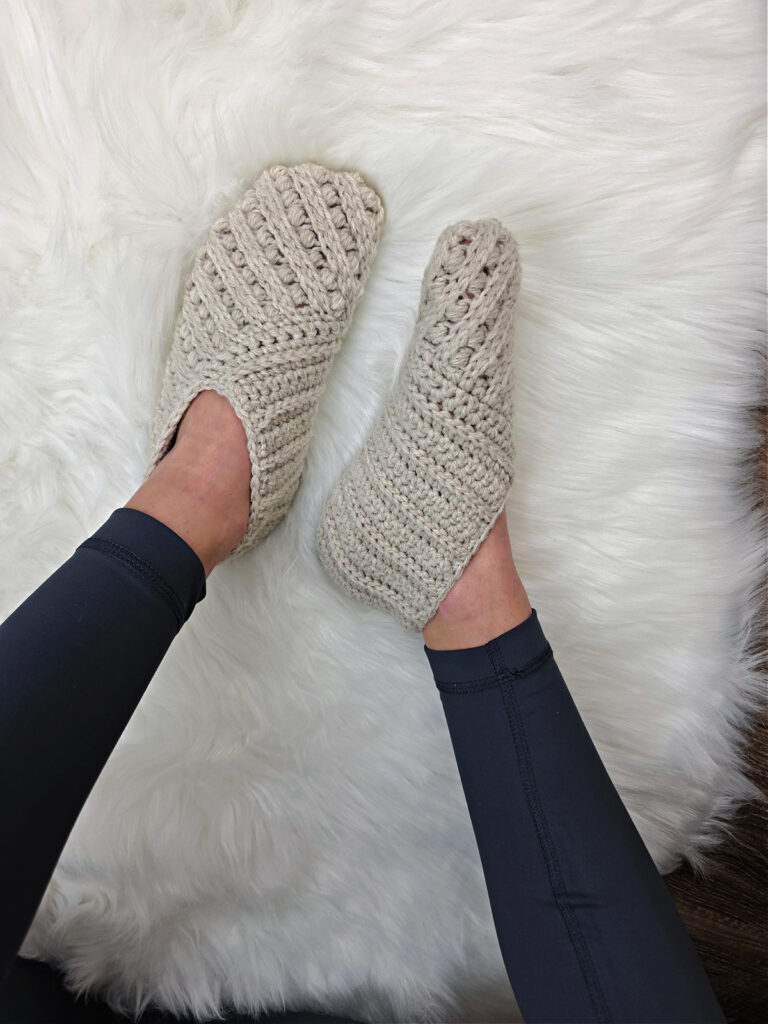
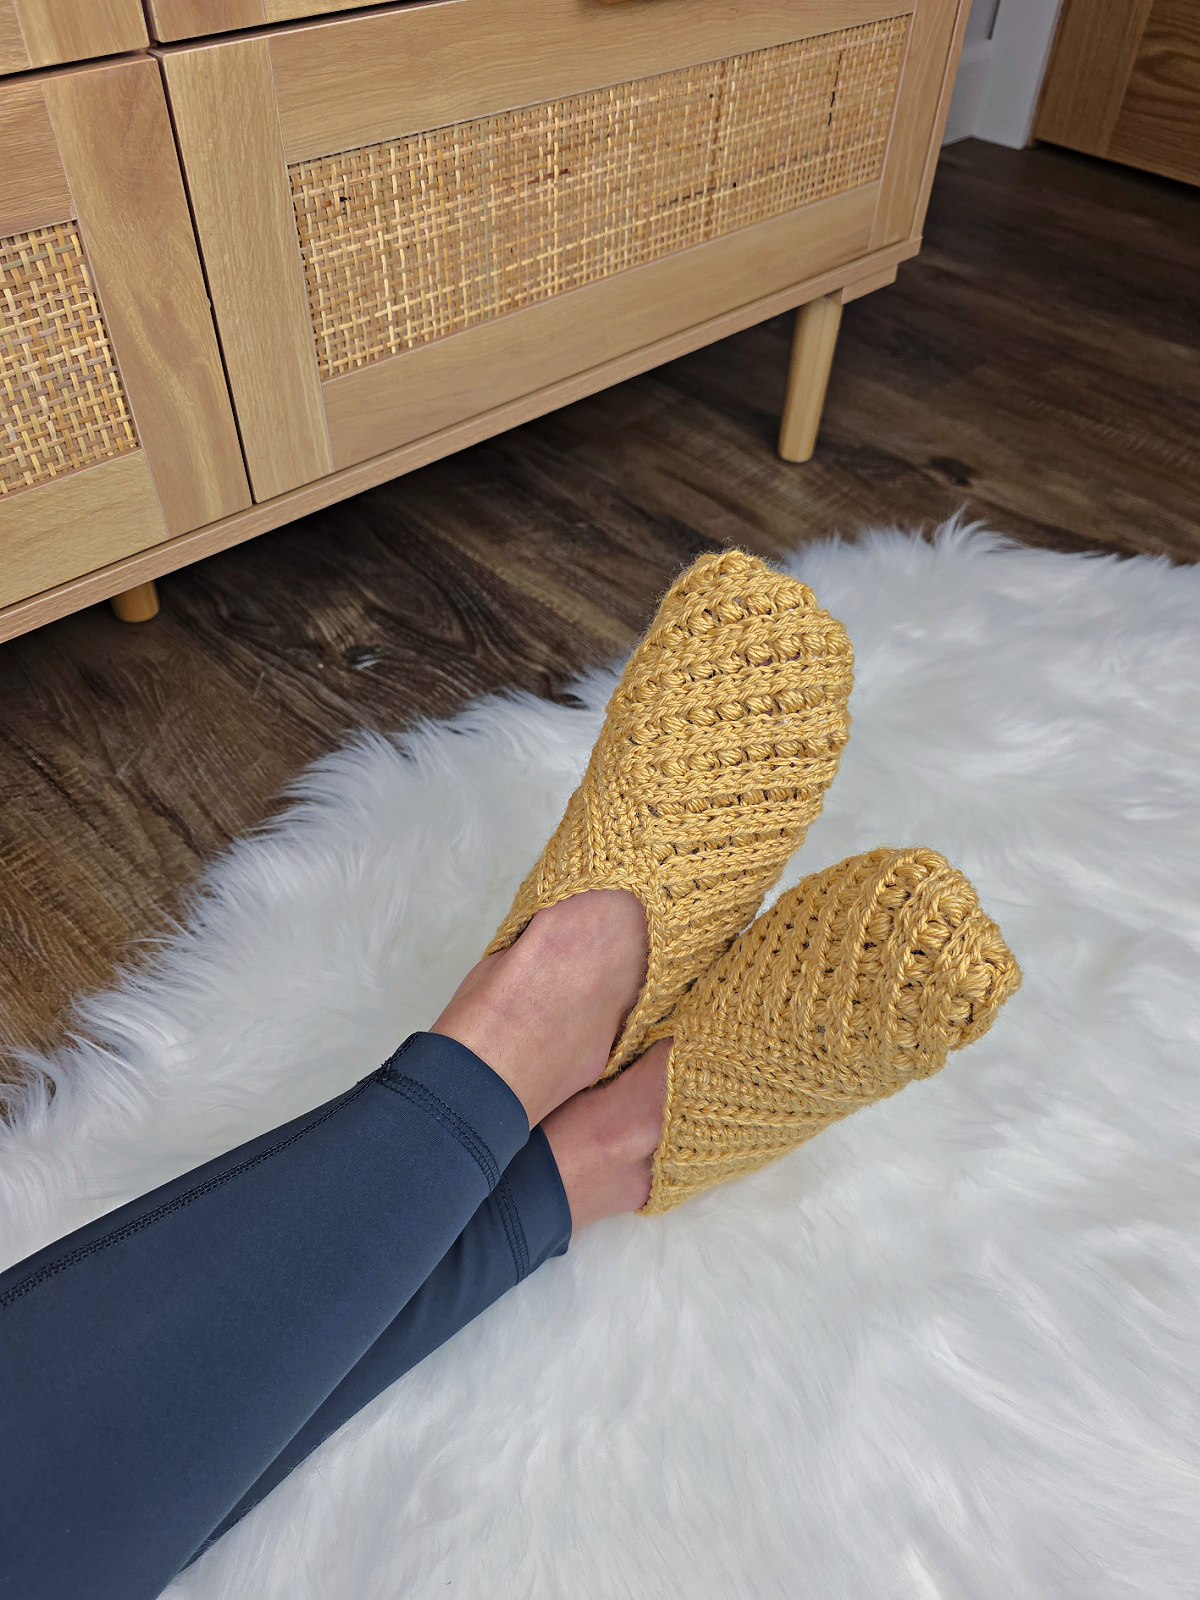
Willow Crochet Slippers
Who doesn’t love a good challenging pattern that combines basic stitches with a few special ones to create a unique piece such as these crochet slippers? They’re worked in one piece without a lot of seaming (except to give them shape) and if your friends and family see you strutting around with them, they’ll surely want pairs for themselves too!
Since the pattern is so uncomplicated to make, you’ll get the hang of it no time and love using up those single skeins you have laying around to crochet them. The pattern includes detailed step-by-step instructions and all you need to know to ensure your handmade slippers look and fit perfectly.
You’ll find the crochet slippers pattern free below, or you can find an ad-free printable PDF (that includes all photo tutorials) on Ravelry, or on Etsy (aff).
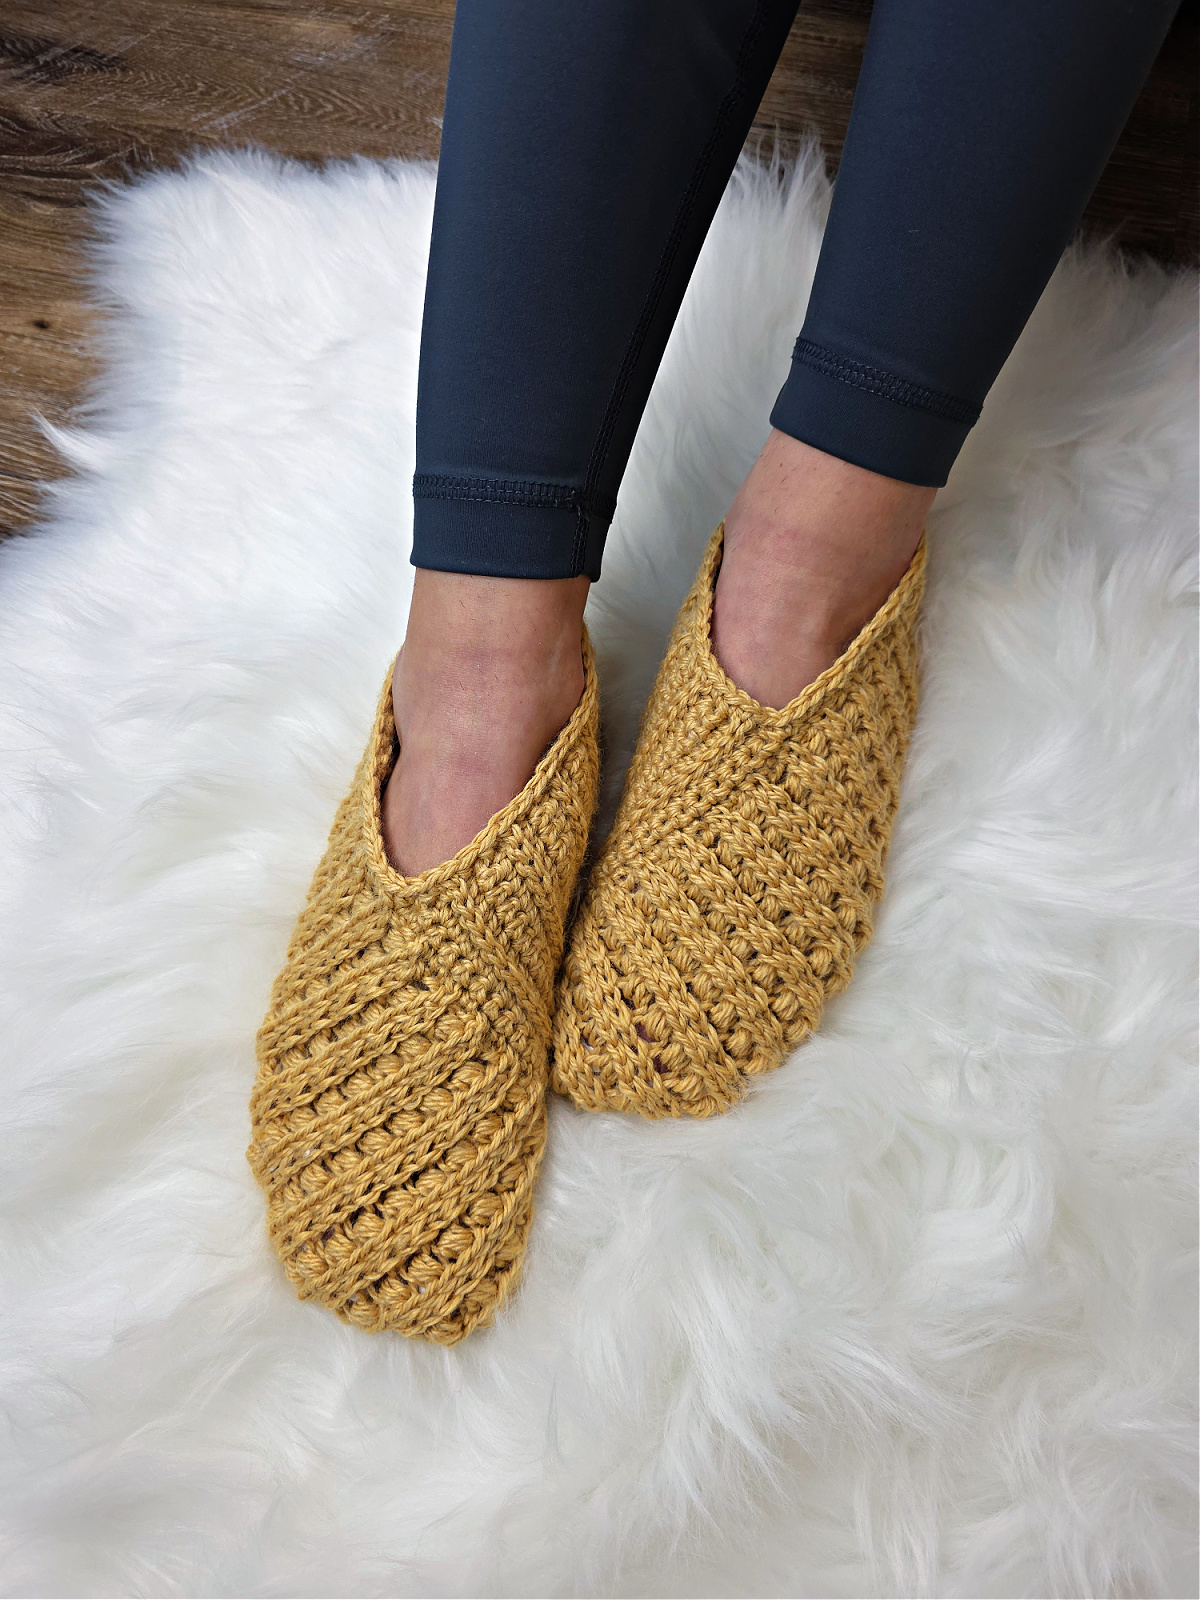
Make these cozy slippers in a nice neutral shade so that you can wear them with any outfit and it’ll seem like you’re put together in the house too. Or if you’ve been wanting to use up some skeins in your stash, this is a great one-skein crochet project to do just that. The pattern repeat has a few special stitches tossed in to add pizzazz to an otherwise quite simple and sweet pattern.
Related: If you want to make slipper boots as well, you can check out the Cable Slipper Boots pattern.
How to Crochet a Pair of Slippers
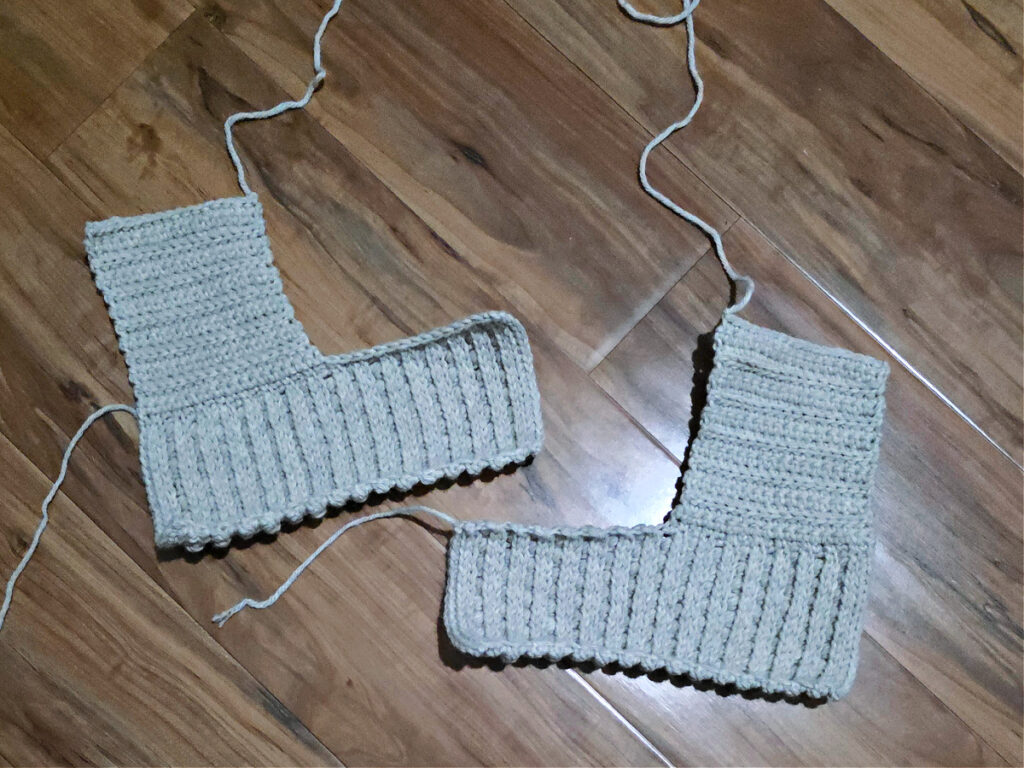
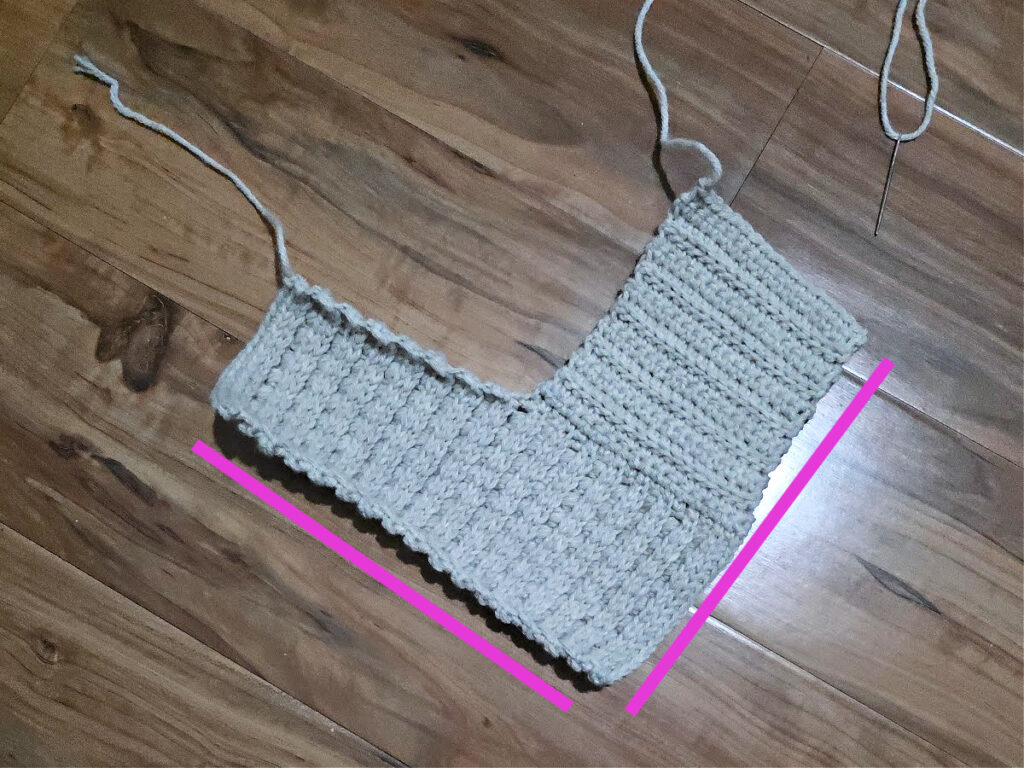
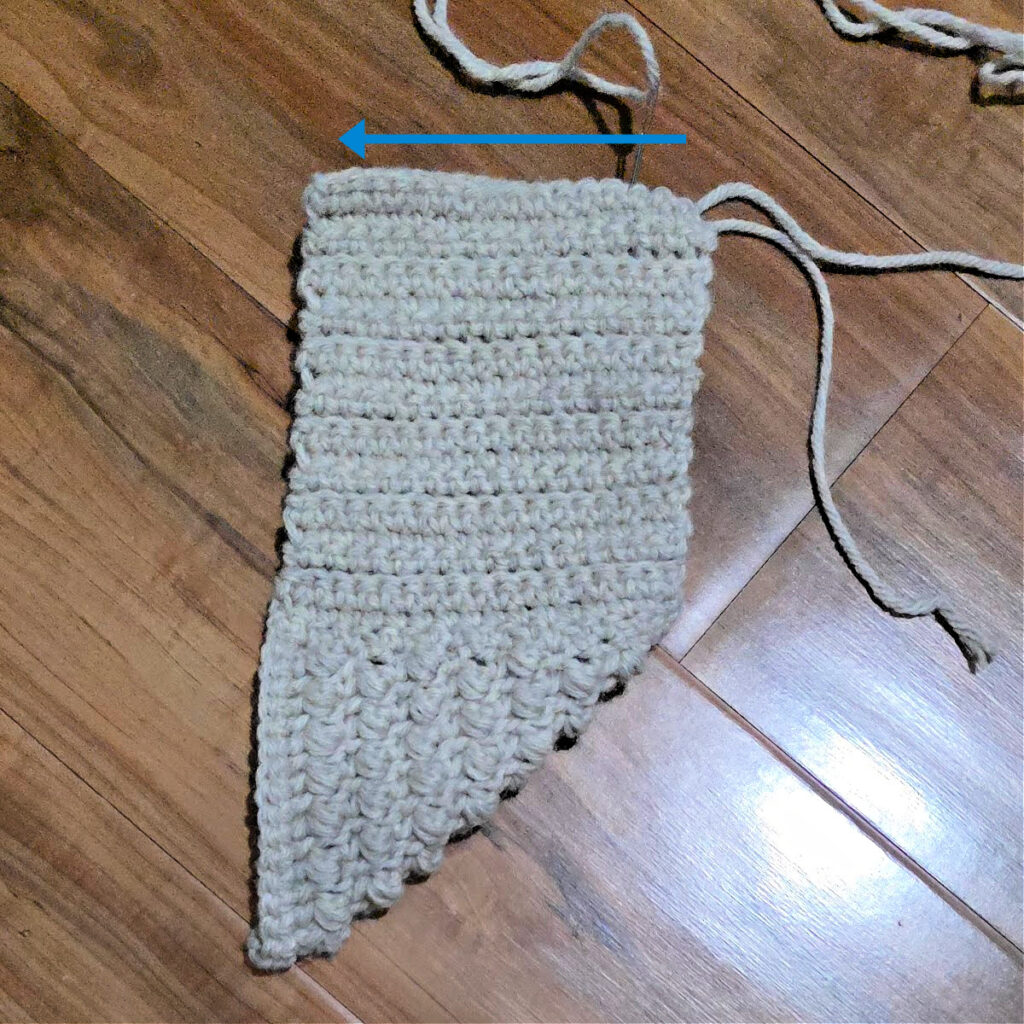
For those who don’t like stitching and seaming too much, you’ll love this pattern. These crochet slippers are made in one piece. First, you’ll crochet a larger rectangle, then rotate the larger rectangle and work a smaller rectangle right onto a long edge (imagine an L-shape).
Then, fold the crochet fabric and seam the heel and bottom of the foot. Make sure your stitches are nice and secure so that the slipper doesn’t come undone with use.
Lastly, add a round of single crochet around the foot opening to give it that neat finish. Repeat the exact same for the other slipper and they’re ready to go!
How To Get The
Willow Slippers Pattern
Option 1: Scroll down for the free crochet slippers pattern right here in this blog post.
Option 2: Purchase the ad-free printable PDF from one of my shops:
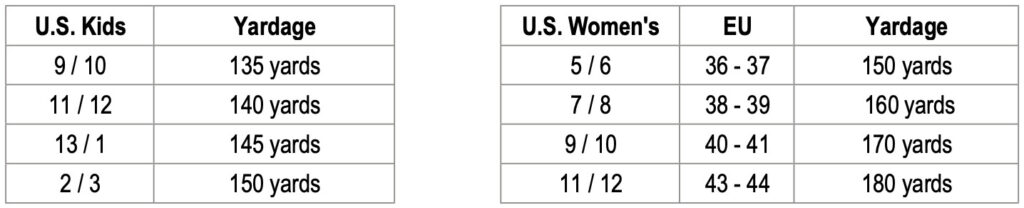
Size & Yardage Chart
Use this chart to make the slippers in the size you’d like.
Yarn
For the Willow Crochet Slippers, I chose Lion Brand Yarns Wool Ease Worsted and Re-Spun. These yarns are machine-washable and highly-durable, ideal for slippers that have a lot of wear in them. Both of these yarns are readily available in a large variety of colors and if you have some shades in your stash already, this is a great project to use them up.
The fiber content of these yarns make them both a great choice for making crochet slippers because they are durable and low-maintenance. They holds their shape well, which is important for slippers that need structure like these ones.
How to Wash Crochet Slippers
My youngest bought herself a pair of UGG slipper boots and loves them, but they aren’t as easy to care for as crocheted slippers are. I love the convenience of being able to toss my slippers in the washer!
Many crocheters will ask ‘Can you wash crochet in a washing machine?’
Depending on the yarn you used to crochet the slippers, yes, in most cases, you can simply toss your handmade slippers in the washing machine. Make sure to check the yarn label for care instructions first.
If the yarn you used is machine washable, I recommend washing them on a gentle cycle in cold or warm water. Then, lay them flat to dry.
Tip: If you have them handy, I like to wash my crochet slippers in mesh laundry bags.
How to Make Crochet Slippers Non-Slip
Handmade slippers are great, but they can be super slippery on hard surfaces!
When my kids were little and we had hardwood floors and stairs, I was always worried about them slipping and falling. So, when I started crocheting slippers for them, I wanted a fun, quick, and easy way to make the soles non-slip.
That’s when I remembered making non-slip socks with my friends for a high school sock hop. We used Tulip Puff Paint for our socks so I figured why not try it on the kids slippers… it worked great!
My kids loved being able to choose their own colors and help paint shapes on the soles of their slippers. They made little stars, hearts, and squiggly lines and their favorite was the glow-in-the-dark puff paint.
Although there are many great options to keep crochet slippers from slipping, such as Plasti Dip or sewing non-slip fabric onto the soles, I’ve found that the easiest, most fun, and most cost effective is Tulip Puff Paint!
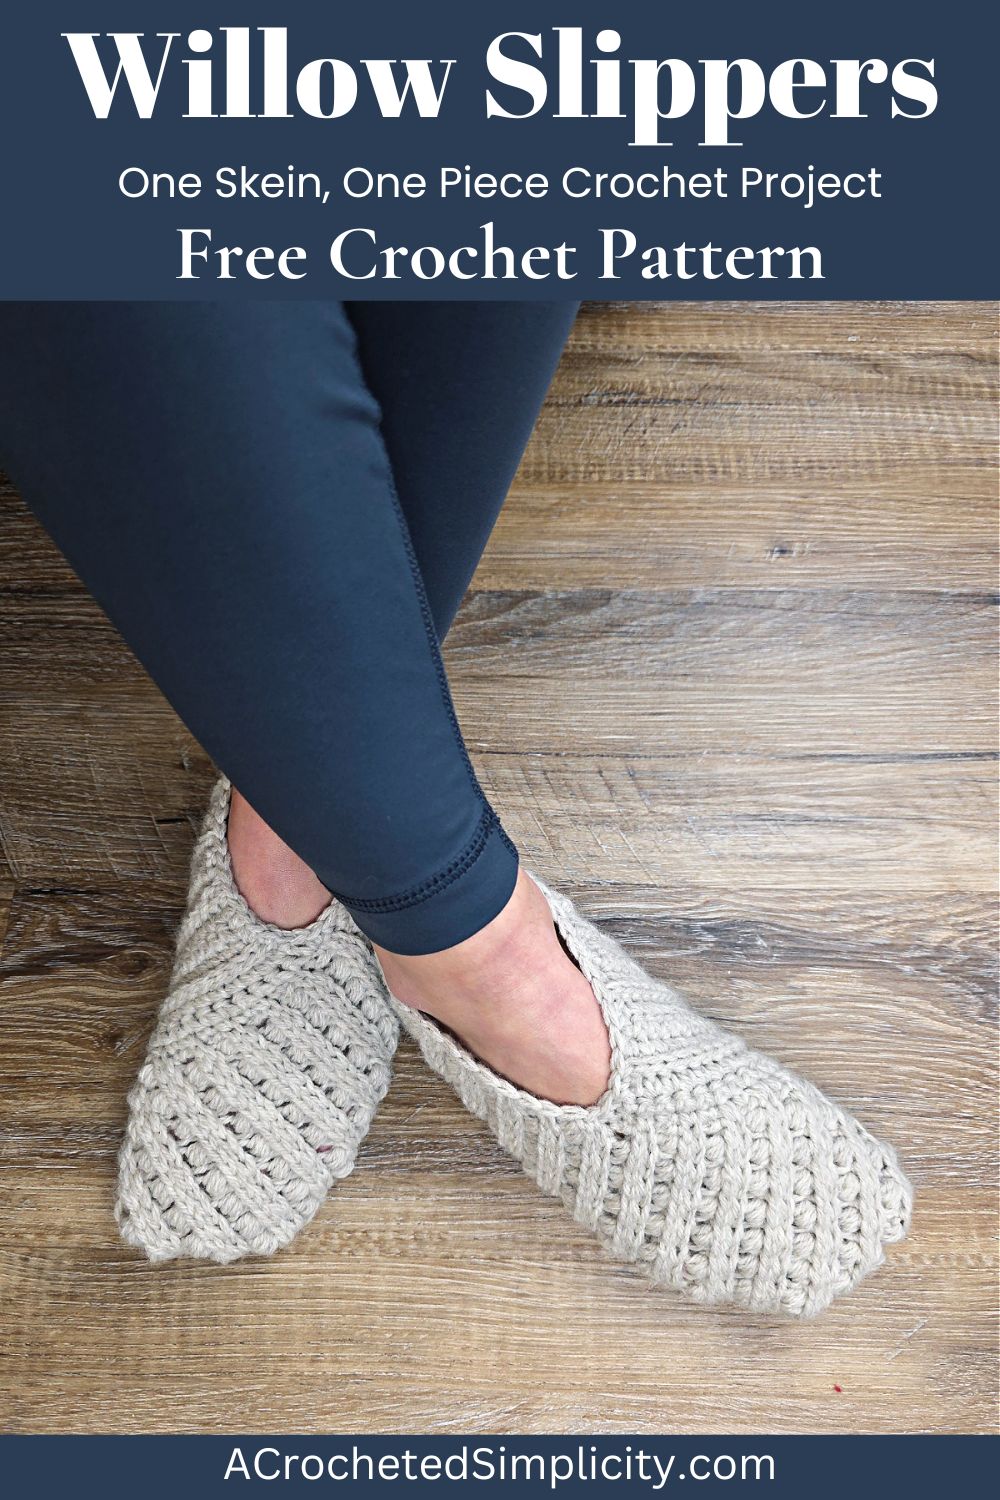
Willow Slippers – Free Crochet Pattern
The crochet slippers pattern is free below, but if you love to work offline, I’ve got a couple other great options for you.
Purchase the ad-free, printable PDF, (including all photo tutorials) on Ravelry, or on Etsy (aff).
This post contains affiliate links.
Materials
- Yarn: Worsted Weight / 4 / Yarn, Lion Brand Yarns Wool Ease Worsted and Lion Brand Yarns Re-Spun was used for the slippers shown in the photos.
- Yardage: See Size Chart Above
- Crochet Hooks: H/8/5.00mm; G/6/4.00mm; or size needed to obtain gauge (My favorite crochet hooks are the Clover Amour Crochet Hooks, I’ve never had an ache in my hand since switching).
- Scissors
- Yarn Needle
- Measuring Tape
- Locking Stitch Markers
- Scrap piece of yarn
Abbreviations (US Terms)
- ch(s): chain(s)
- sl st(s): slip stitch(es)
- st(s): stitch(es)
- sp: space
- yo: yarn over
- sc: single crochet
- hdc: half double crochet
- ps: puff stitch
- Mslst2tog: modified slip stitch 2 together
- BLO: back loop only
- Rep: repeat
- Rnd: Round
- SM: stitch marker
- Join yarn with a standing single crochet
Special Stitches
- Modified Slip Stitch 2 Together (Mslst2tog): Insert hook into same st as last st worked, yo, pull up a loop, insert hook into next st, yo, pull up loop and pull thru both loops on hook. **This st is modified because you begin each one in the last stitch worked, therefore, your stitch count will not decrease. **Note: It will seem as though you’re working these stitches along the backside of the previous row. Video Tutorial can be viewed here.
- Puff Stitch (ps): Insert hook into stitch indicated, yo, pull up a loop, (yo, insert hook in same st, yo, pull up a loop) twice, yo, pull thru all 6 loops on hook.
- Join yarn with a standing single crochet: Begin with a slip knot on your hook, insert your hook into the stitch or space indicated, yo, pull up a loop, yo and draw thru both loops on hook.
Experience Level
- Easy / Intermediate
Gauge
- Gauge checks are given throughout the pattern.
Sizes
- Kid’s Sizes (US): 9/10, 11/12, 13/1, 2/3
- Women’s Sizes (US): 5/6, 7/8, 9/10, 11/12
- See Size & Yardage Chart above.
Pattern Notes
- Turning chains are not included in stitch count.
- Yarn Notes: Lion Brand Yarns Wool Ease Worsted and Lion Brand Yarns Re-Spun were used for the sample shown in the photos. Other comparable yarns may be used as long as gauge is met.
- Lion Brand Yarns Wool Ease: 80% Acrylic / 20% Wool (197 yds / 180 m / 85 g / 3 oz)
- Lion Brand Re-Spun: 100% Recycled Polyester (658 yds / 02 m / 284 g / 10 oz)
- Yardage & Color: See chart above
- Reinforcing the Slipper Sole: See tips above.
- Construction Notes: These crochet slippers are made in one piece. First, you’ll crochet a larger rectangle, then rotate the larger rectangle and work a smaller rectangle right onto a long edge. Then, fold the crochet fabric and seam the heel and bottom of the foot. Lastly, add a round of single crochet around the foot opening.
Willow Crochet Slippers – Written Pattern
Kids Slipper Instructions – Section 1
Note: The biggest piece of advice I can give you, that will make this pattern much more enjoyable, is to make sure you work your slip stitches loosely. If you do not, working the next row will be much harder than it needs to be.
Changes for Kids Sizes as follows: 9/10 (11/12, 13/1, 2/3)
Changes for Stitch Counts as follows: (9/10, 11/12, 13/1, 2/3)
Row 1 (RS): With yarn & a 5.00mm crochet hook, ch 15 (15, 17, 19), switch to a 4.00mm crochet hook, working into the back humps of the foundation ch, sc into the 2nd ch from your hook and in each ch across. Turn. (14, 14, 16, 18 sts)
Gauge Width Check: Row 1 should be approximately 3″ (3″, 3-1/2″, 4″) W at this point.
Row 2: Ch 1, sl st in the first st, then work 13 (13, 15, 17) Mslst2tog. Turn. (14, 14, 16, 18 sts)
Row 3: Ch 1, BLO hdc in the first st, (ch 1, skip the next st, BLO ps in the next st) rep from ( to ) across to the last st, BLO hdc in last st. Turn. (14, 14, 16, 18 sts)
Row 4: Rep Row 2.
Gauge Height Check: Your work should be approximately 1-1/4″ H at this point.
Row 5: Ch 1, BLO hdc in the first st, (BLO ps in the next st, ch 1, skip the next st) rep from ( to ) across to the last st, BLO hdc in last st. Turn. (14, 14, 16, 18 sts)
Row 6: Rep Row 2.
Do not fasten off. Continue on to the instructions for the size slippers you’re making.
Size Kids 9/10
Rows 7 – 26: Rep Rows 3 – 6. (14 sts)
Row 27: Ch 1, BLO sc in each st across. (14 sts)
Do not fasten off. Continue on to Section 2. Section 1 should measure approximately 3″ W x 7″ L.
Size Kids 11/12
Rows 7 – 26: Rep Rows 3 – 6. (14 sts)
Rows 27 – 28: Rep Rows 3 – 4. (14 sts)
Row 29: Ch 1, BLO sc in each st across. (14 sts)
Do not fasten off. Continue on to Section 2. Section 1 should measure approximately 3″ W x 7-1/2″ L.
Size Kids 13/1
Rows 7 – 30: Rep Rows 3 – 6. (16 sts)
Row 31: Ch 1, BLO sc in each st across. (16 sts)
Do not fasten off. Continue on to Section 2. Section 1 should measure approximately 3-1/2″ W x 8″ L.
Size Kids 2/3
Rows 7 – 30: Rep Rows 3 – 6. (18 sts)
Rows 31 – 32: Rep Rows 3 – 4. (18 sts)
Row 33: Ch 1, BLO sc in each st across. (18 sts)
Do not fasten off. Continue on to Section 2. Section 1 should measure approximately 4″ W x 8-1/2″ L.
Slipper Instructions – Section 2
Note: You’ll begin this section by working Row 1 along the long edge of Section 1. For the Right foot, you’ll only work halfway across the long edge. For the Left Foot, you’ll work across the entire long edge. You’ll then work all remaining rows the same for both feet.
Right Foot
Row 1 (RS): Rotate to work along the long edge, ch 1, sc in the first 14 (15, 16, 17) sts. Turn. (14, 15, 16, 17 sts)
Row 2: Ch 1, sc in each st across. Turn. (14, 15, 16, 17 sts)
Do not fasten off. Continue on to Row 3.
Left Foot
Row 1 (RS): Rotate to work along the long edge, ch 1, sc in each st across. Turn. (27, 29, 31, 33 sts)
Row 2: Ch 1, sc in each of the first 14 (15, 16, 17) sts. Turn. (14, 15, 16, 17 sts)
Do not fasten off. Continue on to Row 3.
Row 3 (RS): Ch 1, sc in each st across. Turn. (14, 15, 16, 17 sts)
Row 4: Ch 1, BLO sl st in each st across. Turn. (14, 15, 16, 17 sts)
Row 5: Ch 1, BLO sc in each st across. Turn. (14, 15, 16, 17 sts)
Rows 6 – 7: Ch 1, sc in each st across. Turn. (14, 15, 16, 17 sts)
Do not fasten off. Continue on to Row 8 for the size and foot you’re making.
Size Kids 9/10
Right Foot
Rows 8 – 11: Rep Rows 4 – 7. (14 sts)
Fasten off, leaving a tail of yarn that is approximately 24″ L. Continue on to Seaming. Section 2 should measure approximately 3-3/4″ W x 2-1/4″ L.
Left Foot
Rows 8 – 11: Rep Rows 4 – 7. (14 sts)
Row 12: Rep Row 4. (14 sts)
Fasten off, leaving a tail of yarn that is approximately 24″ L. Continue on to Seaming. Section 2 should measure approximately 3-3/4″ W x 2-1/4″ L.
Size Kids 11/12
Right Foot
Rows 8 – 15: Rep Rows 4 – 7. (15 sts)
Fasten off, leaving a tail of yarn that is approximately 24″ L. Continue on to Seaming. Section 2 should measure approximately 4″ W x 3″ L.
Left Foot
Rows 8 – 15: Rep Rows 4 – 7. (15 sts)
Row 16: Rep Row 4. (15 sts)
Fasten off, leaving a tail of yarn that is approximately 24″ L. Continue on to Seaming. Section 2 should measure approximately 4″ W x 3″ L.
Size Kids 13/1
Right Foot
Rows 8 – 19: Rep Rows 4 – 7. (16 sts)
Fasten off, leaving a tail of yarn that is approximately 24″ L. Continue on to Seaming. Section 2 should measure approximately 4-1/4″ W x 3-3/4″ L.
Left Foot
Rows 8 – 19: Rep Rows 4 – 7. (16 sts)
Row 20: Rep Row 4. (16 sts)
Fasten off, leaving a tail of yarn that is approximately 24″ L. Continue on to Seaming. Section 2 should measure approximately 4-1/4″ W x 3-3/4″ L.
Size Kids 2/3
Right Foot
Rows 8 – 23: Rep Rows 4 – 7. (17 sts)
Fasten off, leaving a tail of yarn that is approximately 24″ L. Continue on to Seaming. Section 2 should measure approximately 4-1/4″ W x 4-1/2″ L.
Left Foot
Rows 8 – 23: Rep Rows 4 – 7. (17 sts)
Row 24: Rep Row 4. (17 sts)
Fasten off, leaving a tail of yarn that is approximately 24″ L. Continue on to Seaming. Section 2 should measure approximately 4-1/2″ W x 4-1/2″ L.
Women’s Slipper Instructions – Section 1
Note: The biggest piece of advice I can give you, that will make this pattern much more enjoyable, is to make sure you work your slip stitches loosely. If you do not, working the next row will be much harder than it needs to be.
Changes for Adult Sizes as follows: S (M, L, XL)
Changes for Stitch Counts as follows: (S, M, L, XL)
Row 1 (RS): With yarn & a 5.00mm crochet hook, ch 19 (21, 23, 25), switch to a 4.00mm crochet hook, working into the back humps of the foundation ch, sc into the 2nd ch from your hook and in each ch across. Turn. (18, 20, 22, 24 sts)
Gauge Width Check: Row 1 should be approximately 4″ (4-1/2″, 5″, 5-1/2″) W at this point.
Row 2: Ch 1, sl st in the first st, then work 17 (19, 21, 23) Mslst2tog. Turn. (18, 20, 22, 24 sts)
Row 3: Ch 1, BLO hdc in the first st, (ch 1, skip the next st, BLO ps in the next st) rep from ( to ) across to the last st, BLO hdc in last st. Turn. (18, 20, 22, 24 sts)
Row 4: Rep Row 2.
Gauge Height Check: Your work should be approximately 1-1/4″ H at this point.
Row 5: Ch 1, BLO hdc in the first st, (BLO ps in the next st, ch 1, skip the next st) rep from ( to ) across to the last st, BLO hdc in last st. Turn. (18, 20, 22, 24 sts)
Row 6: Rep Row 2.
Do not fasten off. Continue on to the instructions for the size slippers you’re making.
Size Small
Rows 7 – 30: Rep Rows 3 – 6. (18 sts)
Rows 31 – 32: Rep Rows 3 – 4. (18 sts)
Row 33: Ch 1, BLO sc in each st across. (18 sts)
Do not fasten off. Continue on to Section 2. Section 1 should measure approximately 4″ W x 8-1/2″ L.
Size Medium
Rows 7 – 34: Rep Rows 3 – 6. (20 sts)
Row 35: Ch 1, BLO sc in each st across. (20 sts)
Do not fasten off. Continue on to Section 2. Section 1 should measure approximately 4-1/2″ W x 9″ L.
Size Large
Rows 7 – 34: Rep Rows 3 – 6. (22 sts)
Rows 35 – 36: Rep Rows 3 – 4. (22 sts)
Row 37: Ch 1, BLO sc in each st across. (22 sts)
Do not fasten off. Continue on to Section 2. Section 1 should measure approximately 5″ W x 9-1/2″ L.
Size XL
Rows 7 – 38: Rep Rows 3 – 6. (24 sts)
Row 39: Ch 1, BLO sc in each st across. (24 sts)
Do not fasten off. Continue on to Section 2. Section 1 should measure approximately 5-1/2″ W x 10″ L.
Slipper Instructions – Section 2
Note: You’ll begin this section by working Row 1 along the long edge of Section 1. For the Right foot, you’ll only work halfway across the long edge. For the Left Foot, you’ll work across the entire long edge. You’ll then work all remaining rows the same for both feet.
Right Foot
Row 1 (RS): Rotate to work along the long edge, ch 1, sc in the first 17 (18, 19, 20) sts. Turn. (17, 18, 19, 20 sts)
Row 2: Ch 1, sc in each st across. Turn. (17, 18, 19, 20 sts)
Do not fasten off. Continue on to Row 3.
Left Foot
Row 1 (RS): Rotate to work along the long edge, ch 1, sc in each st across. Turn. (33, 35, 37, 39 sts)
Row 2: Ch 1, sc in each of the first 17 (18, 19, 20) sts. Turn. (17, 18, 19, 20 sts)
Do not fasten off. Continue on to Row 3.
Row 3 (RS): Ch 1, sc in each st across. Turn. (17, 18, 19, 20 sts)
Row 4: Ch 1, BLO sl st in each st across. Turn. (17, 18, 19, 20 sts)
Row 5: Ch 1, BLO sc in each st across. Turn. (17, 18, 19, 20 sts)
Rows 6 – 7: Ch 1, sc in each st across. Turn. (17, 18, 19, 20 sts)
Do not fasten off. Continue on to Row 8 for the size and foot you’re making.
Size Small
Right Foot
Rows 8 – 23: Rep Rows 4 – 7. (17 sts)
Fasten off, leaving a tail of yarn that is approximately 24″ L. Continue on to Seaming. Section 2 should measure approximately 4-1/4″ W x 4-1/2″ L.
Left Foot
Rows 8 – 23: Rep Rows 4 – 7. (17 sts)
Row 24: Rep Row 4. (17 sts)
Fasten off, leaving a tail of yarn that is approximately 24″ L. Continue on to Seaming. Section 2 should measure approximately 4-1/4″ W x 4-1/2″ L.
Size Medium
Right Foot
Rows 8 – 27: Rep Rows 4 – 7. (18 sts)
Fasten off, leaving a tail of yarn that is approximately 24″ L. Continue on to Seaming. Section 2 should measure approximately 4-1/2″ W x 5-1/4″ L.
Left Foot
Rows 8 – 27: Rep Rows 4 – 7. (18 sts)
Row 28: Rep Row 4. (18 sts)
Fasten off, leaving a tail of yarn that is approximately 24″ L. Continue on to Seaming. Section 2 should measure approximately 4-1/2″ W x 5-1/4″ L.
Size Large
Right Foot
Rows 8 – 31: Rep Rows 4 – 7. (19 sts)
Fasten off, leaving a tail of yarn that is approximately 24″ L. Continue on to Seaming. Section 2 should measure approximately 4-3/4″ W x 6″ L.
Left Foot
Rows 8 – 31: Rep Rows 4 – 7. (19 sts)
Row 32: Rep Row 4. (19 sts)
Fasten off, leaving a tail of yarn that is approximately 24″ L. Continue on to Seaming. Section 2 should measure approximately 4-3/4″ W x 6″ L.
Size XL
Right Foot
Rows 8 – 35: Rep Rows 4 – 7. (20 sts)
Fasten off, leaving a tail of yarn that is approximately 24″ L. Continue on to Seaming. Section 2 should measure approximately 5″ W x 6-3/4″ L.
Left Foot
Rows 8 – 35: Rep Rows 4 – 7. (20 sts)
Row 36: Rep Row 4. (20 sts)
Fasten off, leaving a tail of yarn that is approximately 24″ L. Continue on to Seaming. Section 2 should measure approximately 5″ W x 6-3/4″ L.
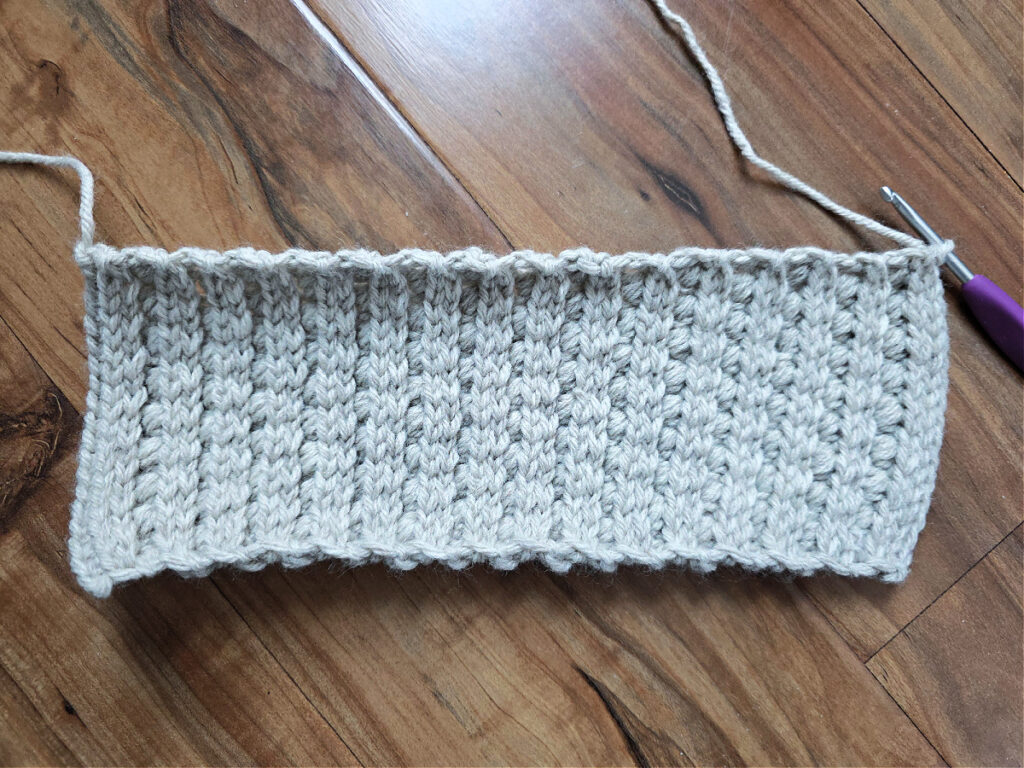
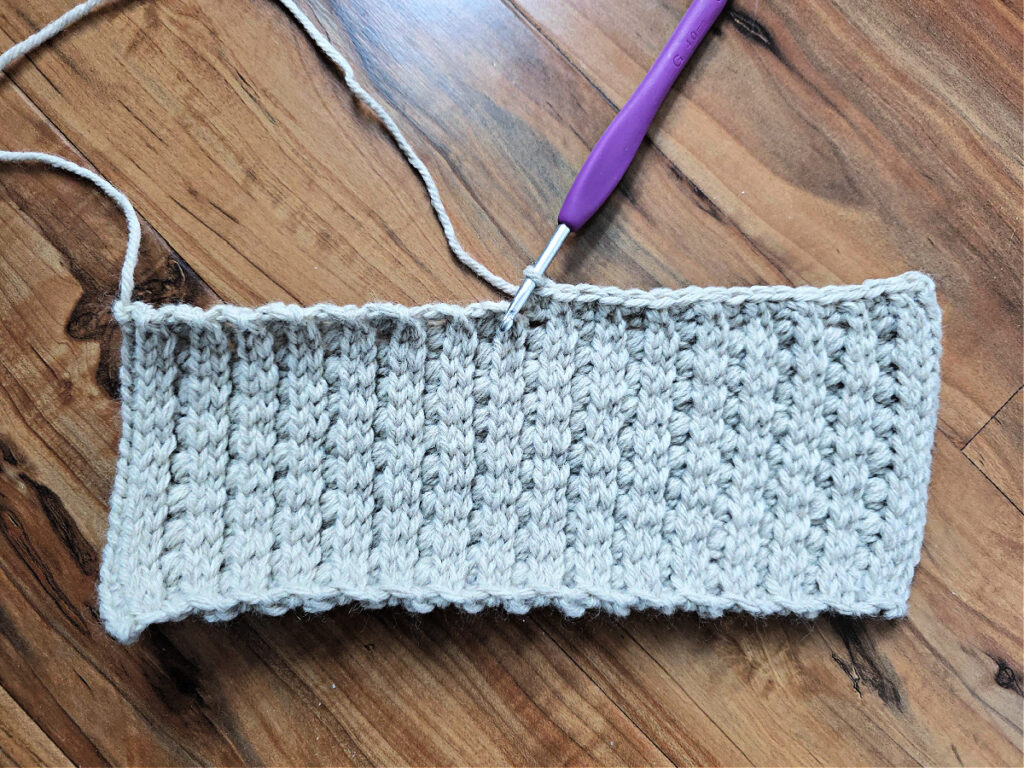
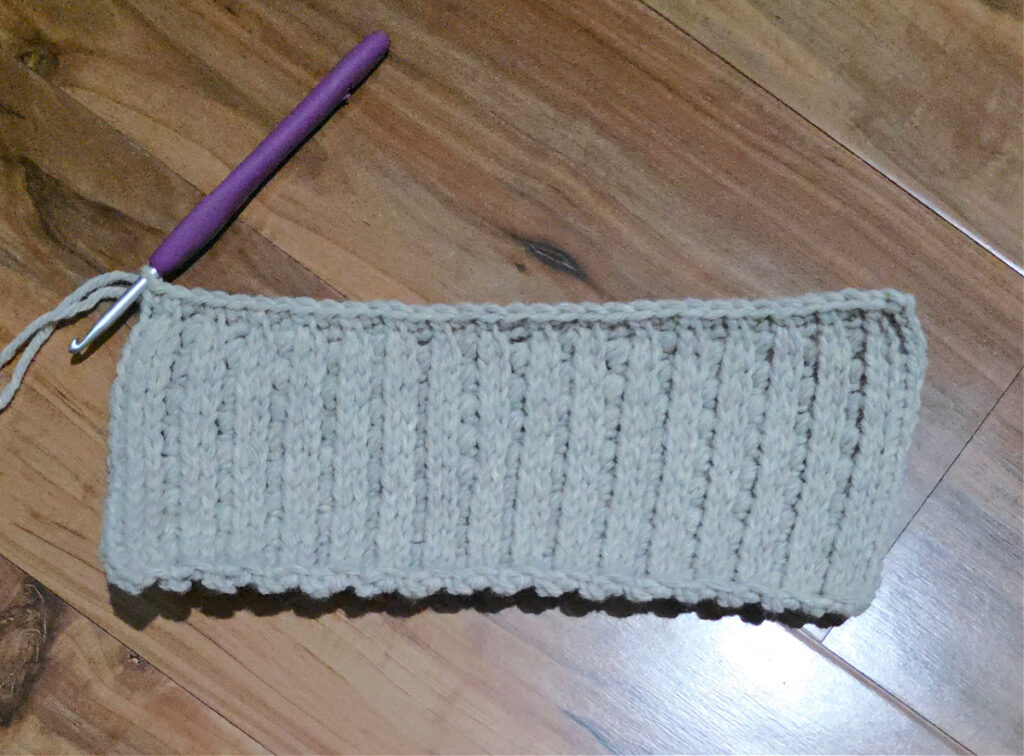
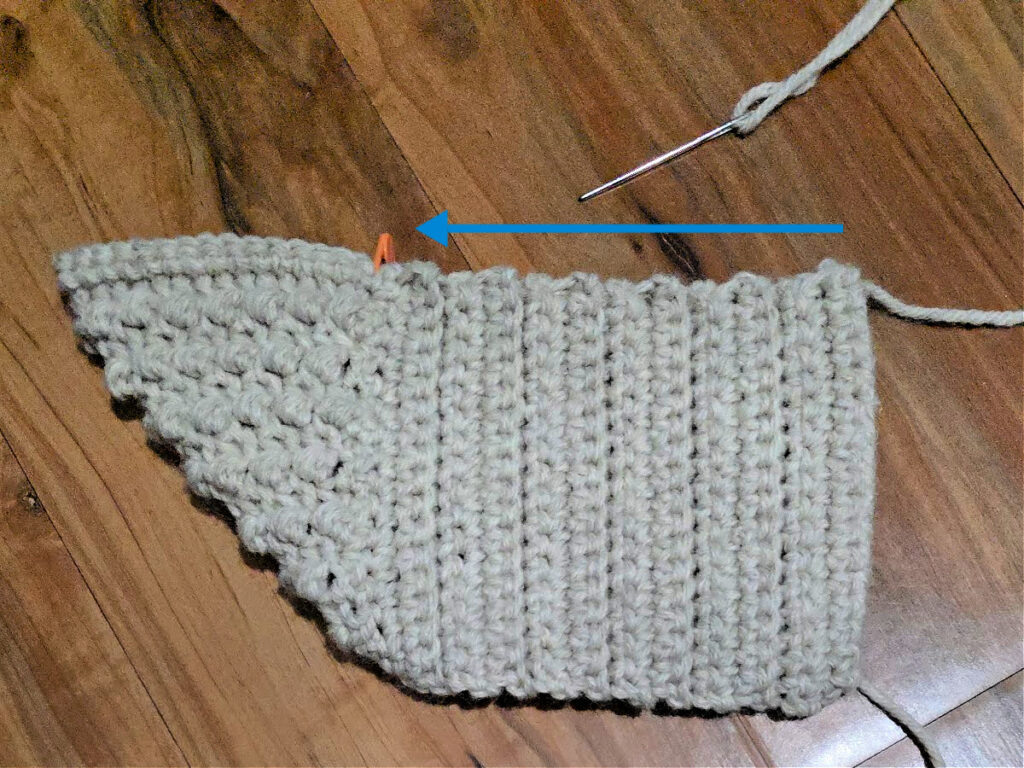
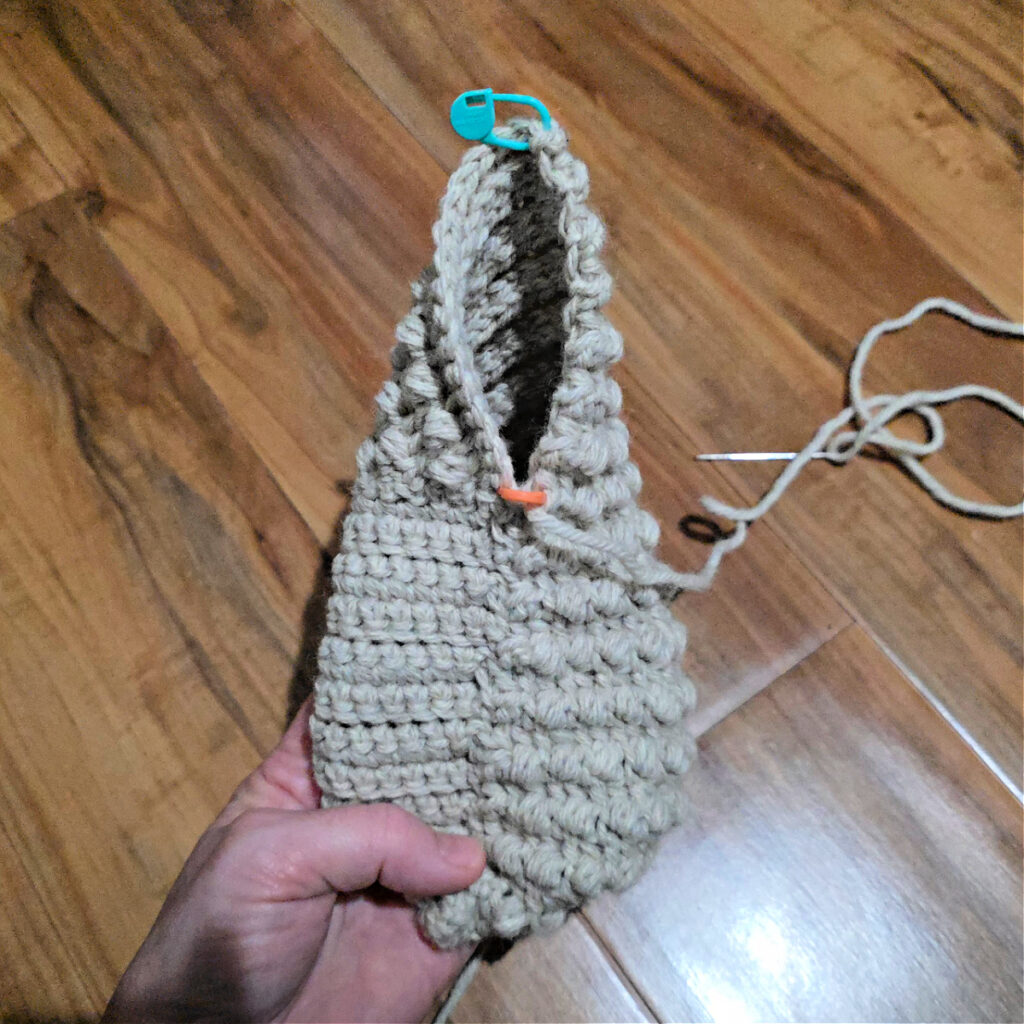
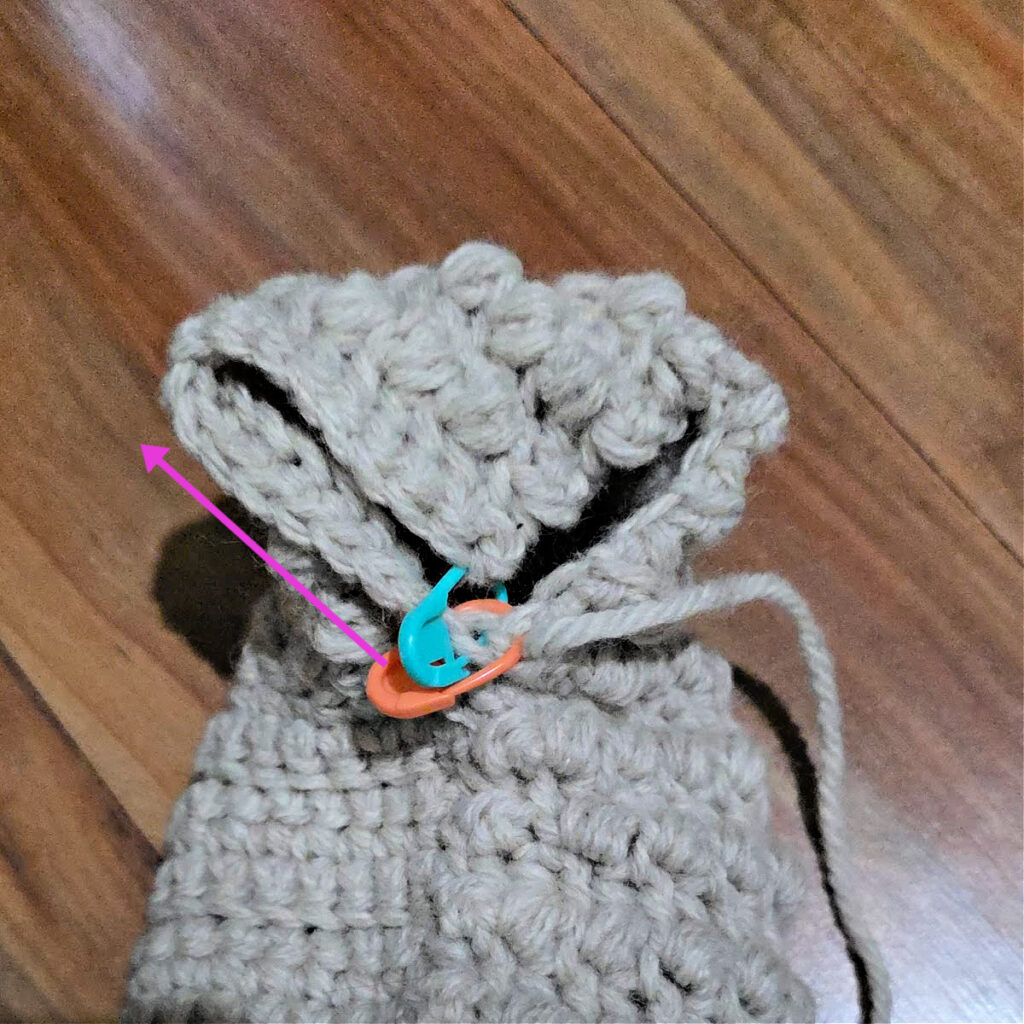
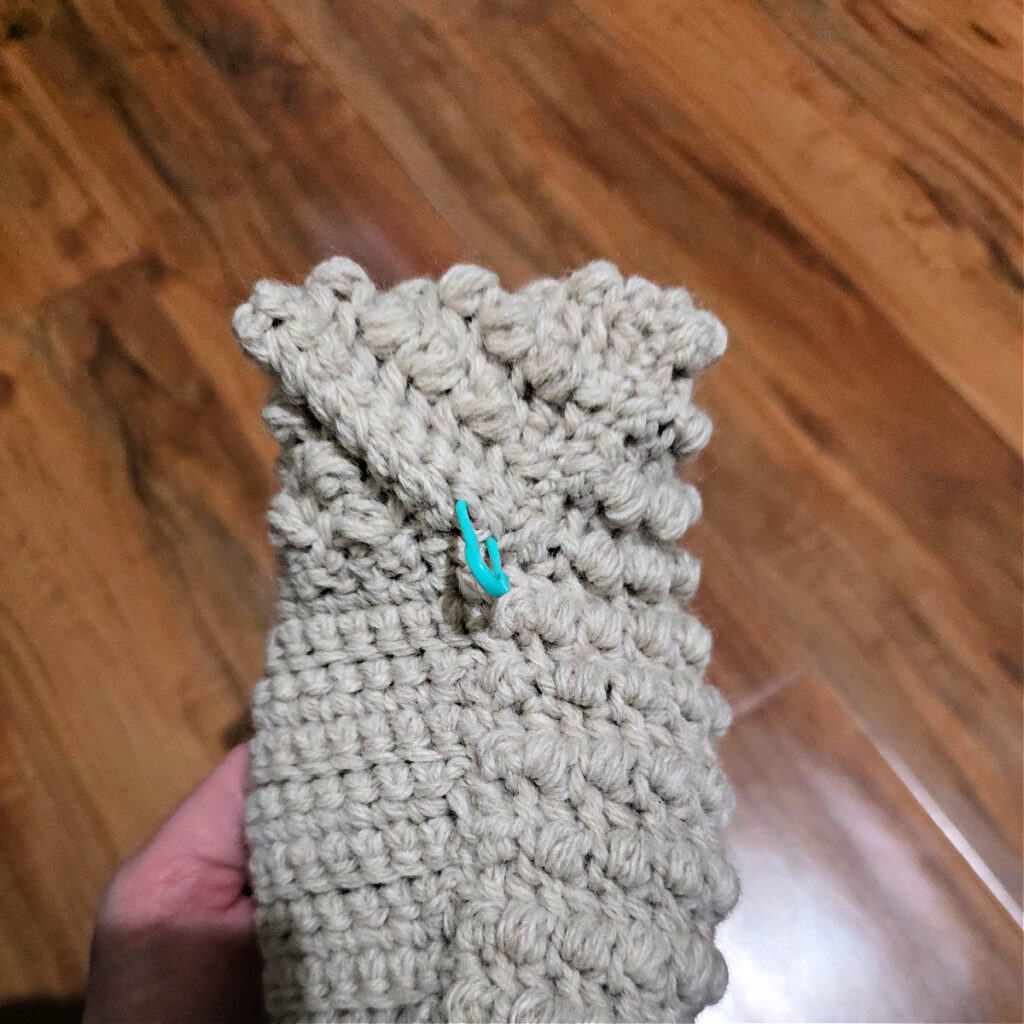
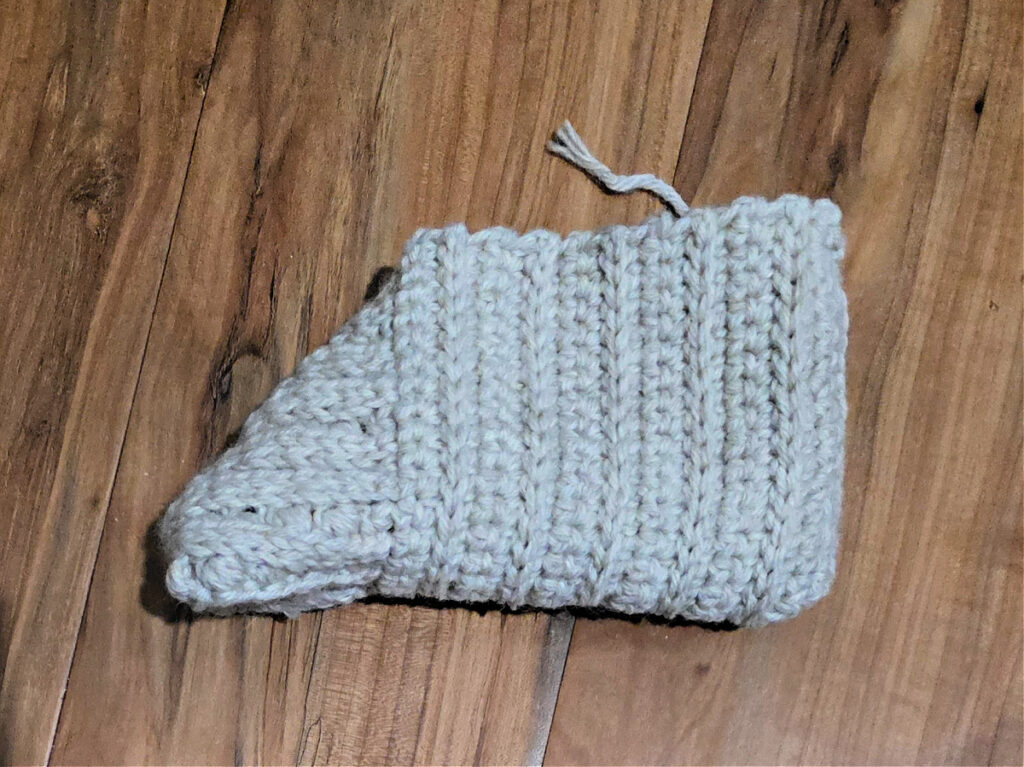
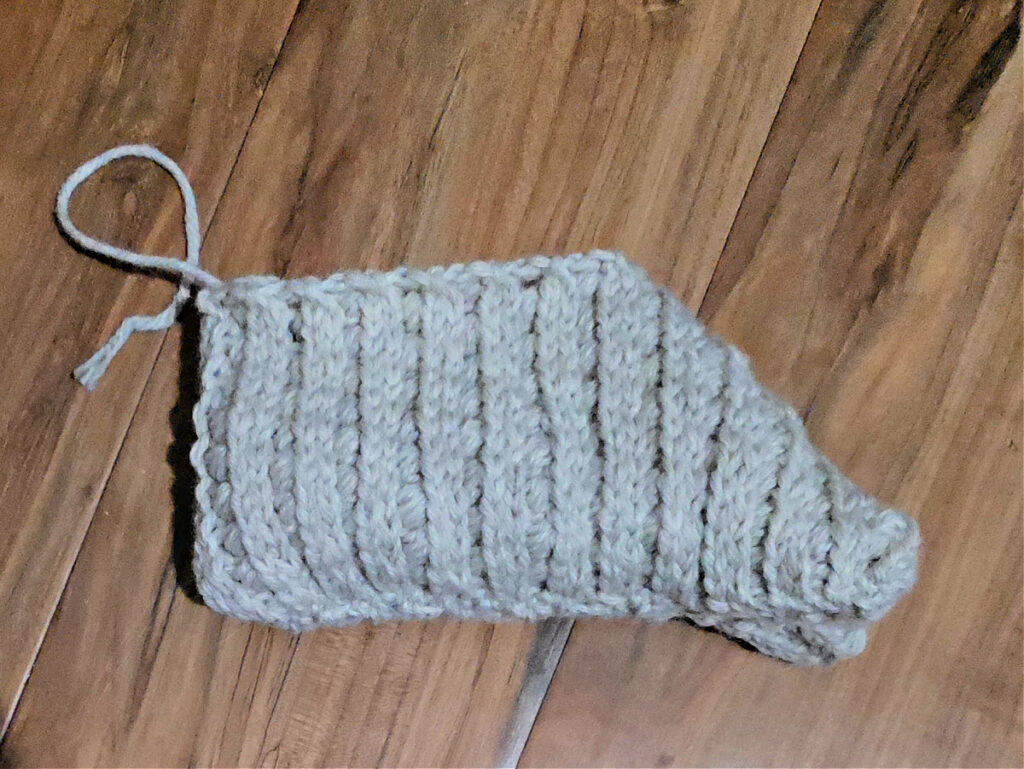
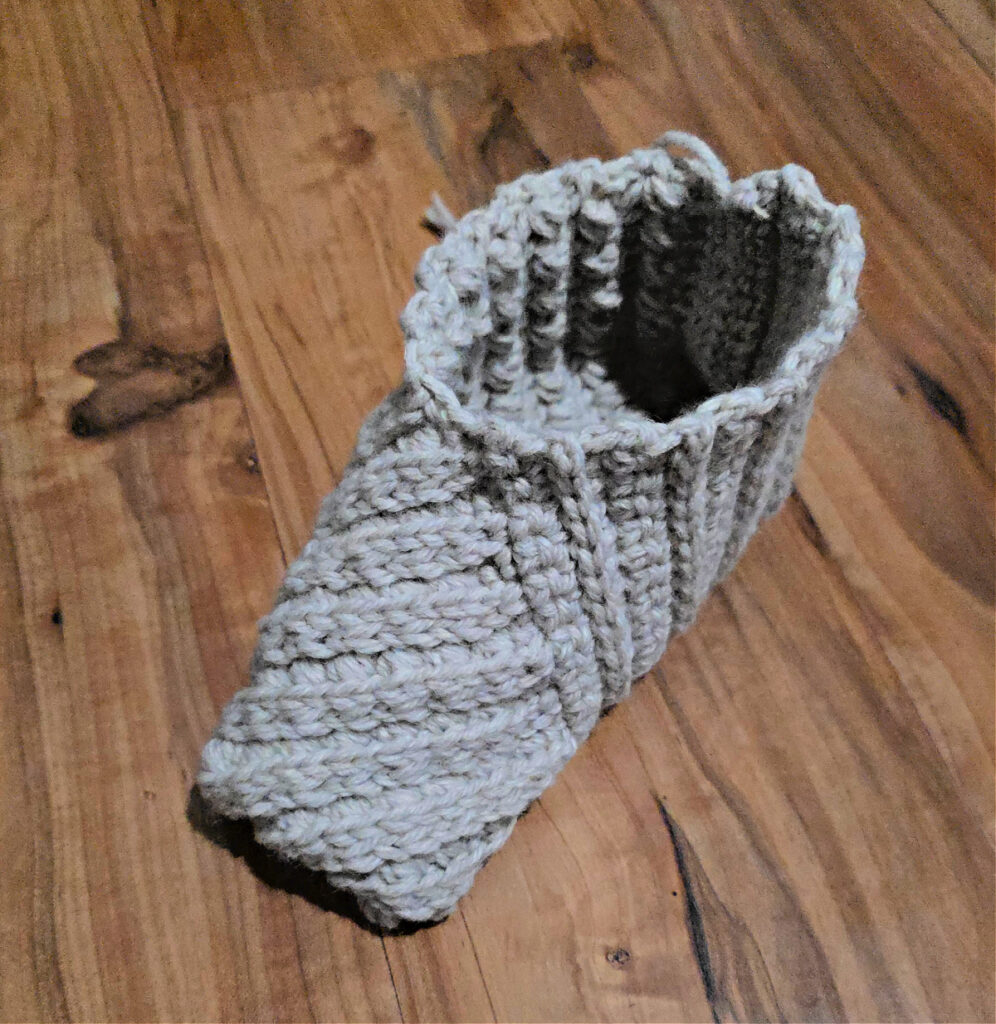
Progression Photos – All Sizes
The slippers shown in the photos are women’s size 7/8. The progression is the same for all sizes.
Seaming
In this section, you’ll fold your work and seam the edges together to form the slipper. You’ll begin by seaming the heel, from top to bottom, then seam across the bottom of the foot to the toes. Lastly, you’ll seam two short seams at the toe section.
*Note: These two edges have a slightly different stitch count. Simply whipstitch the edges evenly.
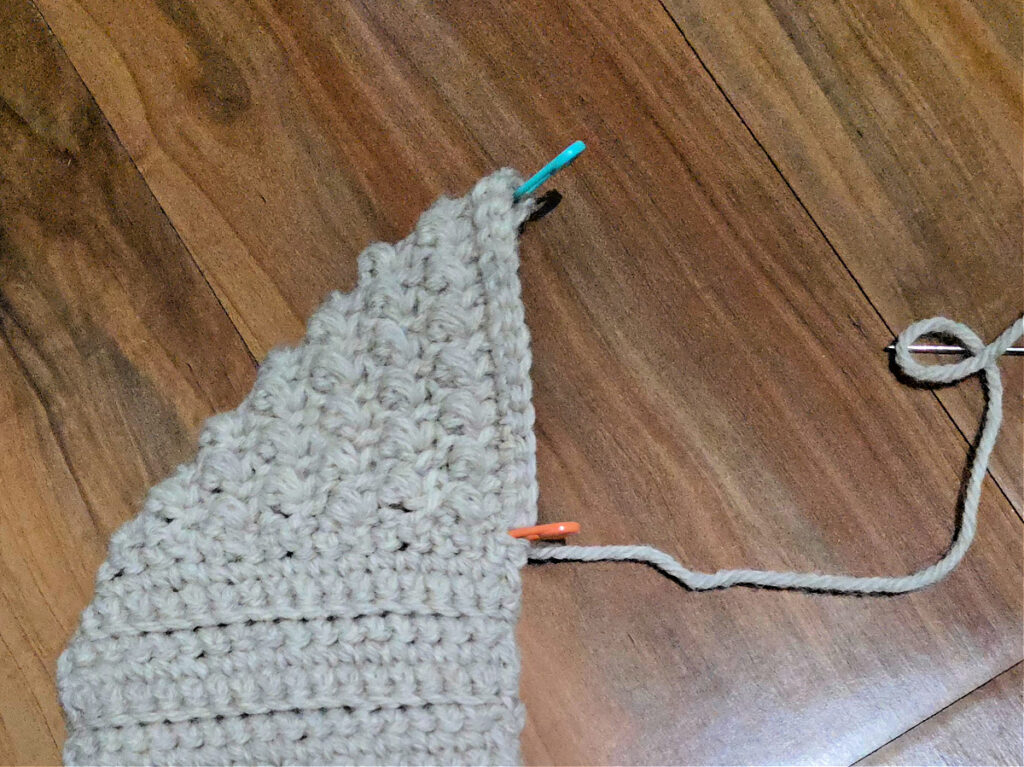
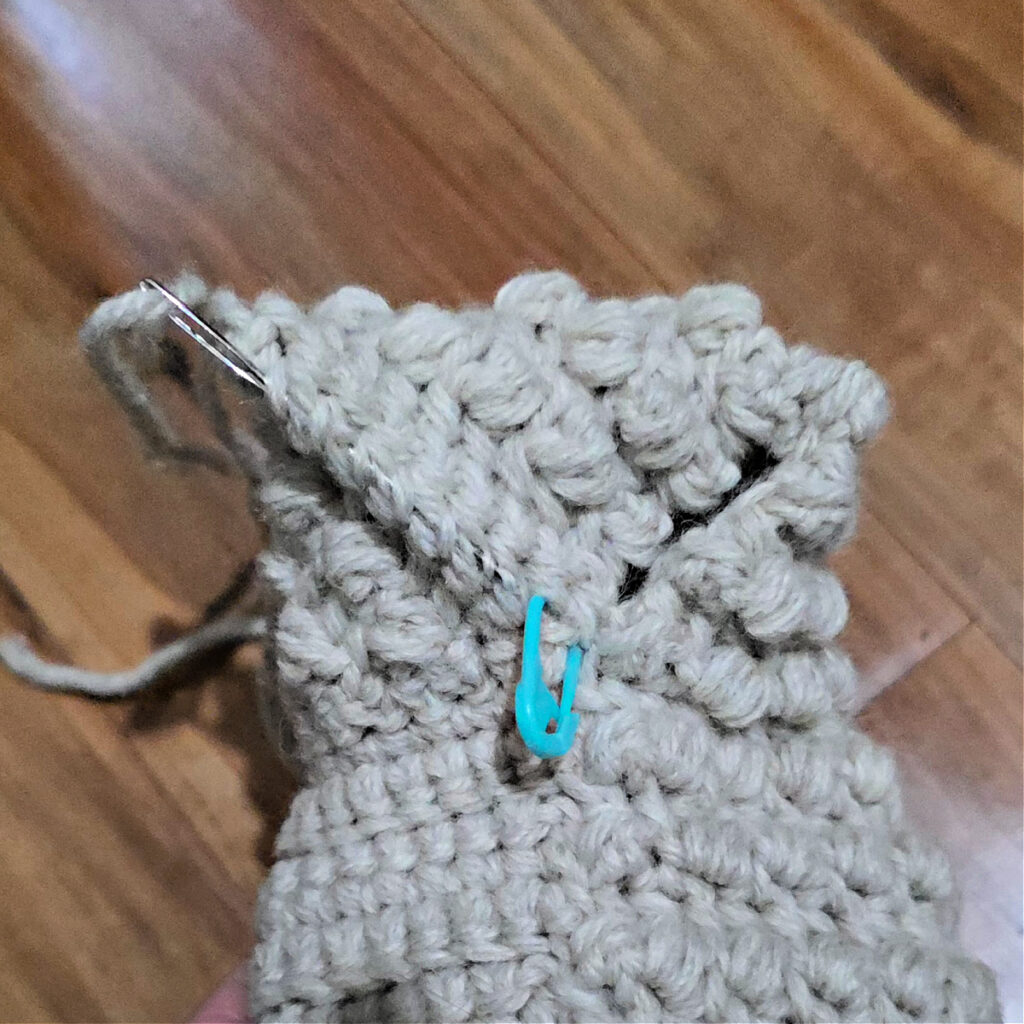
Finishing
Tip: If you prefer a little tighter foot opening, work 4 – 8 single crochet decreases as crochet around the foot opening in1 round 1.
Rnd 1 (RS): With yarn & a 4.00mm crochet hook, join yarn with a standing sc at the back of the heel, sc around the foot opening. Stitch count isn’t crucial.
Fasten off. Weave in ends. See above for ways to Reinforce Your Slipper Soles.
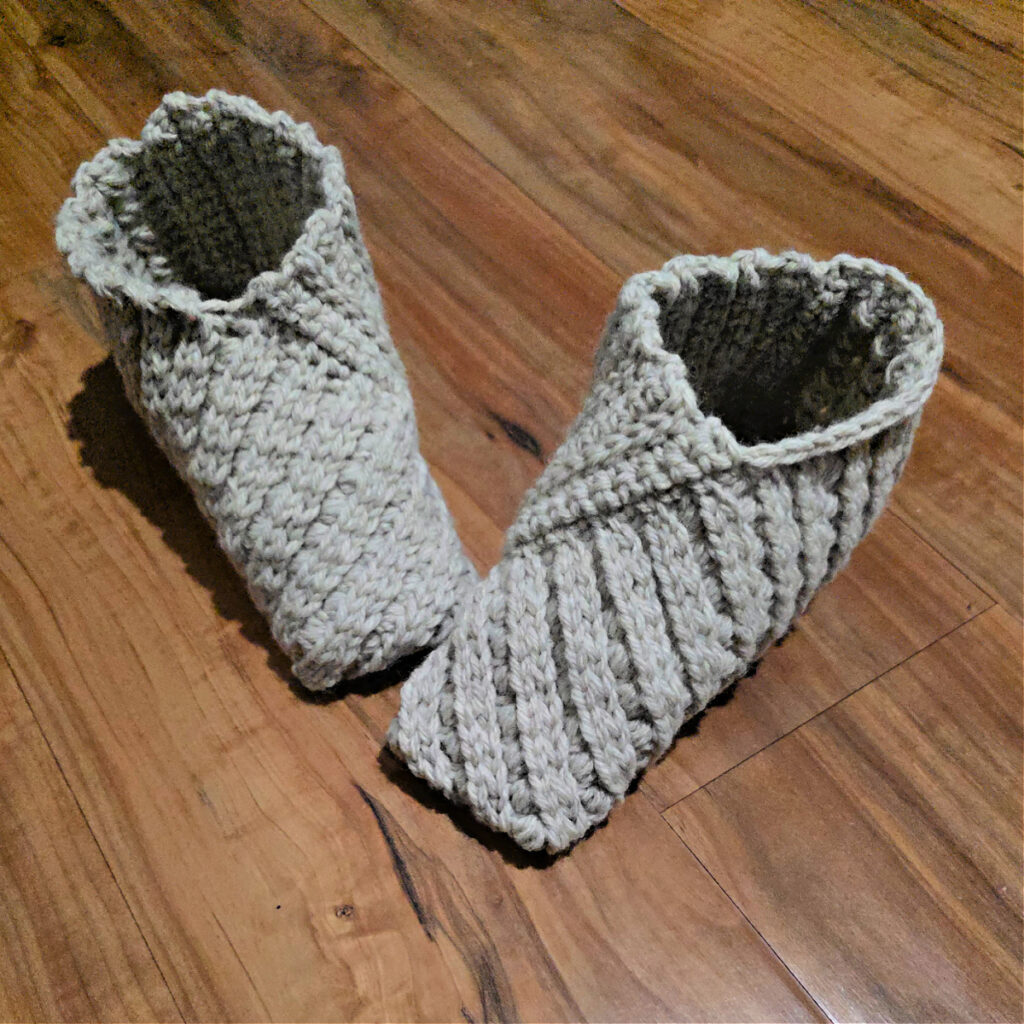
When you’ve had an exhausting day out running errands or at work, you’ll love coming home and putting on your handmade crochet slippers and putting your feet up. They’ll give you just the right amount of coziness, warmth, and comfort while you relax for the rest of the evening with a plate of piping hot food (and maybe some hot cocoa afterwards).
I Made It! Now What?
Pin this post! Save this crochet slippers pattern to your Pinterest boards so that you can come back and make it again.
Leave a comment below: We love to hear your feedback.
Share Your Finished Projects on Facebook or Instagram: I love to see your finished projects! Share with us on social media and tag me @acrochetedsimplicity or use the hashtag #ACrochetedSimplicity so I can find your posts.
Join us in the Facebook Community Group!
Come share your finished projects with us in the A Crocheted Simplicity Crochet Community Group on Facebook. Join us for fun community events such as crochet alongs, join in on crochet conversations, ask questions, get advice, and share your love for crochet!

Free Crochet Footwear Patterns I Think You’ll Love
More Cozy Crochet Patterns
Are you looking for more cozy crochet patterns for fall and winter? We have several more patterns for crochet sweaters, mittens, beanies, and blankets.
We also have a few premium crochet slipper patterns as well.