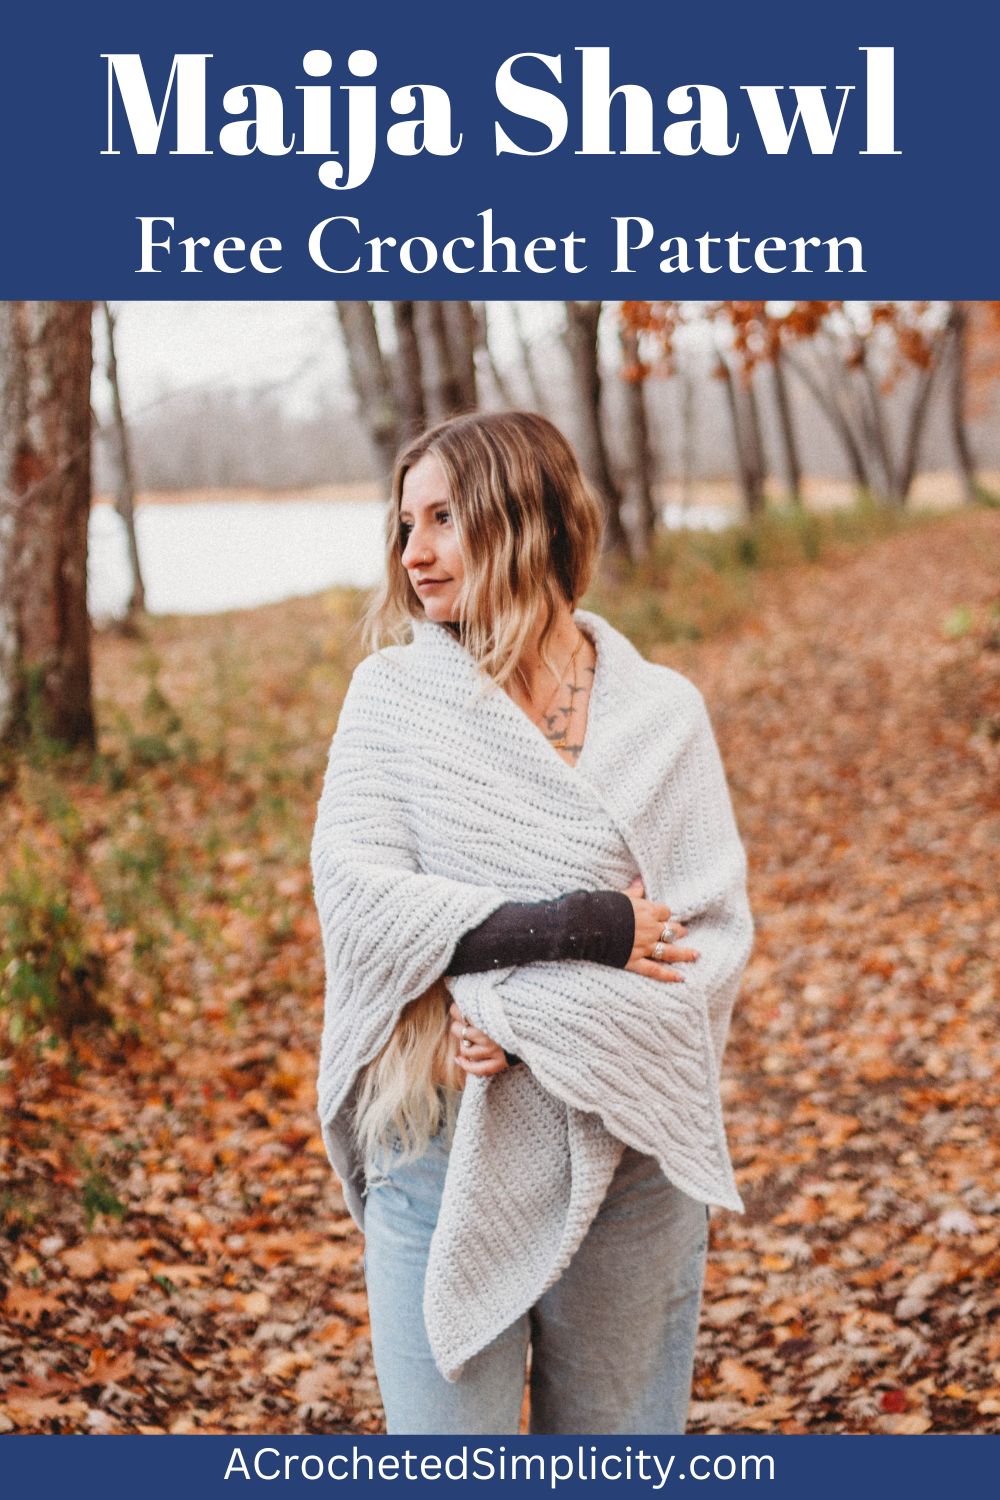
Maija Crochet Triangular Shawl
Imagine you’re out for your evening stroll with a cool wind blowing and the stars twinkling brightly against the dark sky. You don’t have to worry about the chill because you’ve got a beautiful crochet triangular shawl wrapped around your shoulders.
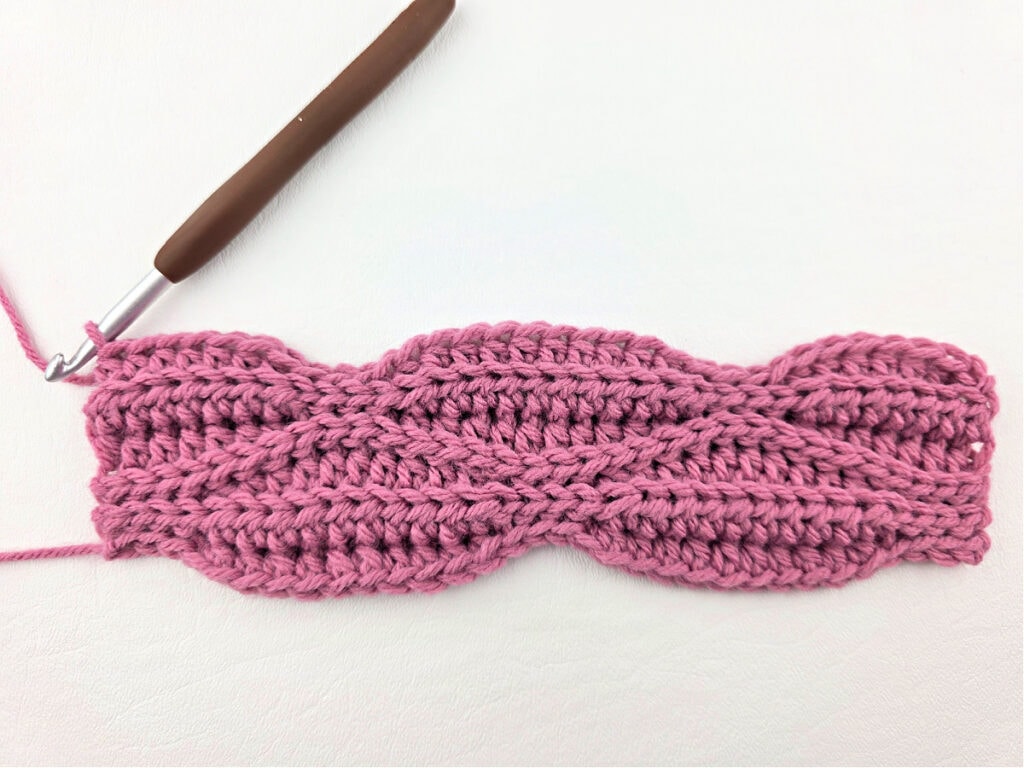
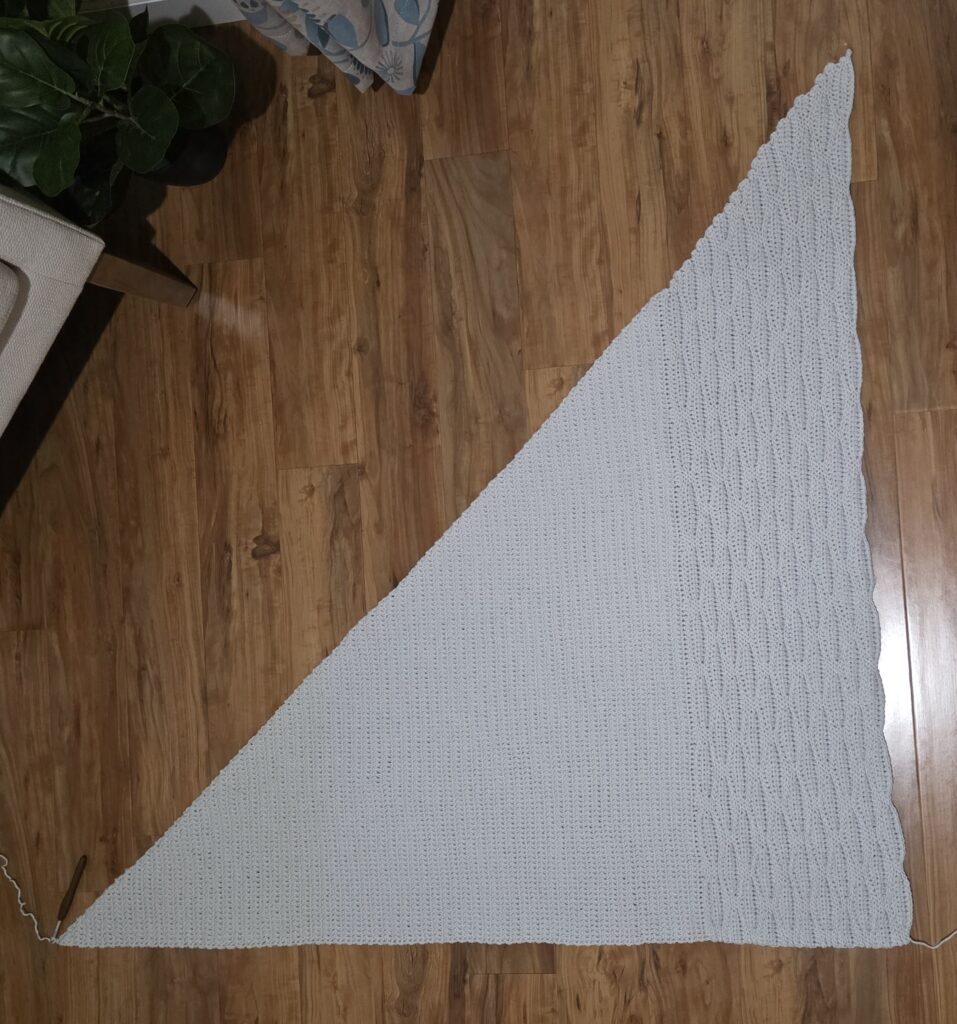
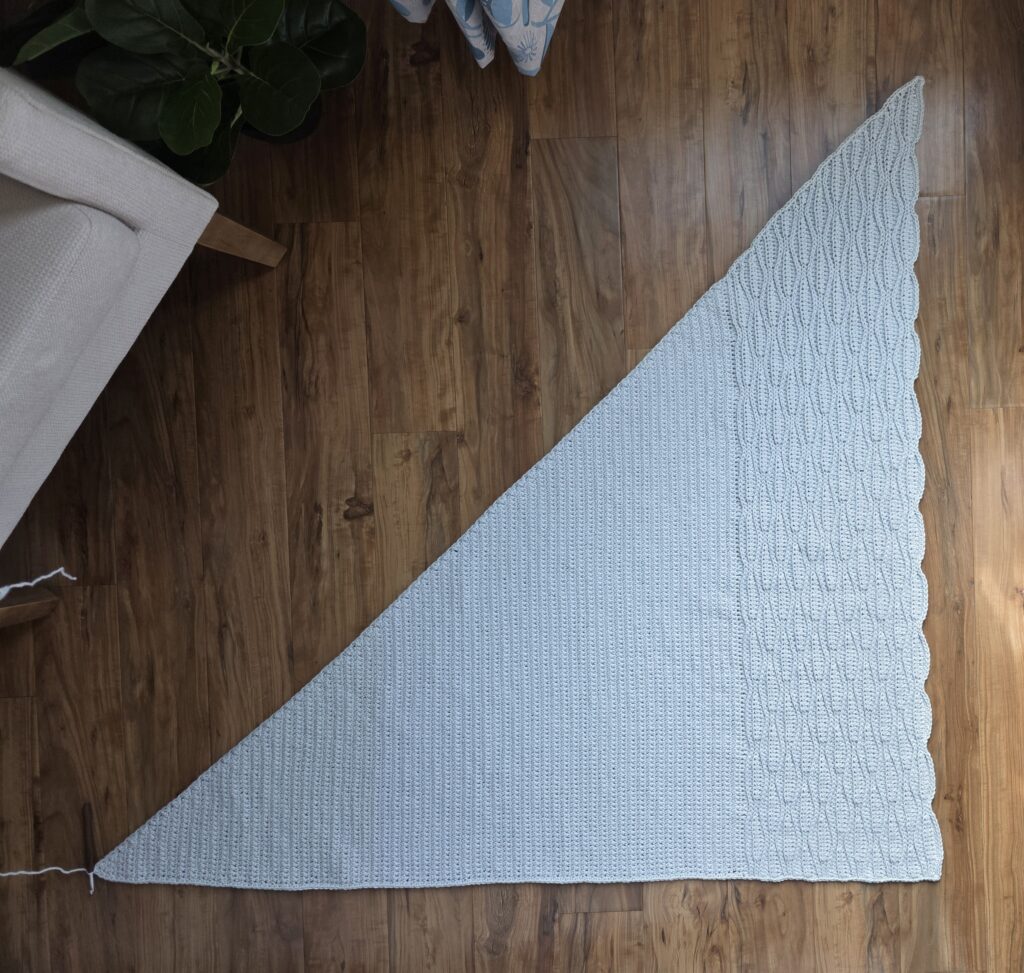
There’s nothing quite like a handmade wrap to keep you cozy on your autumn walks and errand runs. This one has a textured wavy pattern along one side and a solid stitch combination that traps the warmth within.
Whether you’re working up this piece for yourself, wanting to gift it to a loved one, or just practicing your crochet, the Maija Crochet Triangular Shawl is a soothing journey in the world of shawl-making.
You’ll find the free crochet triangular shawl pattern in the post below, or you can find an ad-free printable PDF (that includes all photo tutorials) on Ravelry, or Etsy (aff).
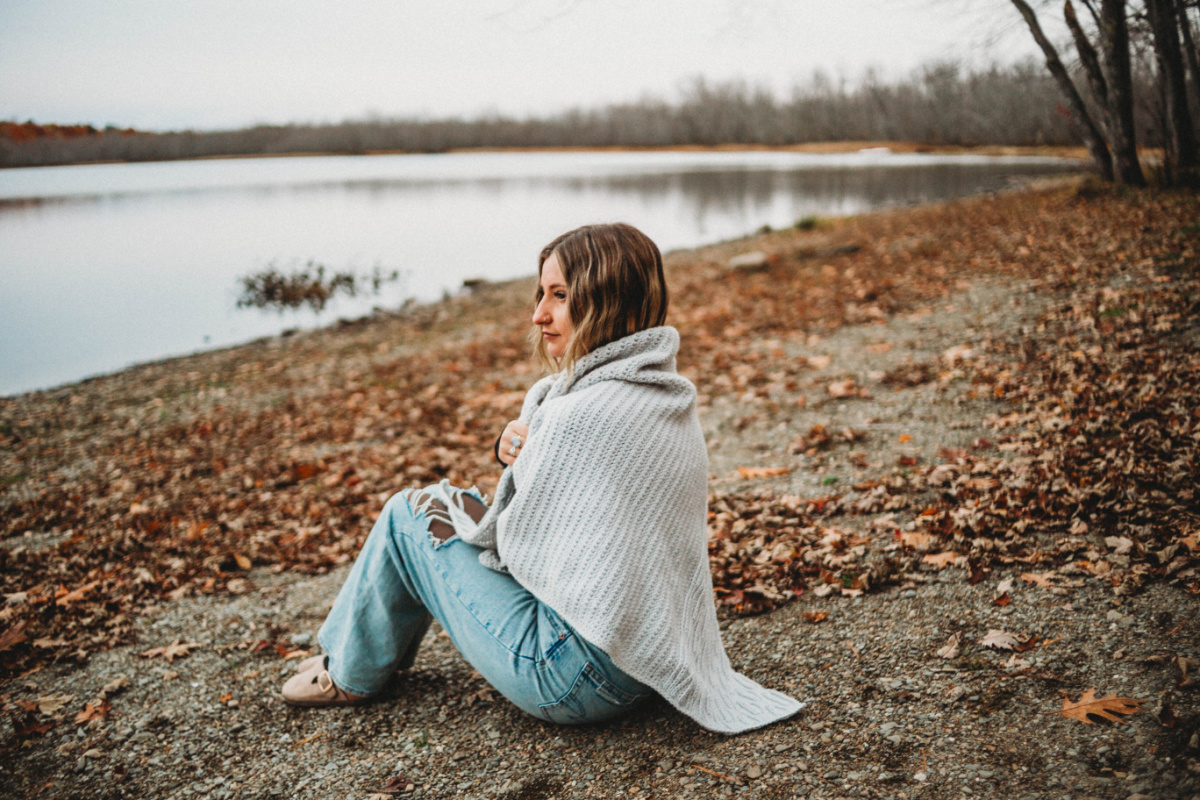
I’ve used a beautiful solid grey color for this shawl because the neutral tone allows me to pair it with any outfit. You can experiment with the look you want and add different colors if that’s what you prefer. I know people like to turn bigger projects like these into stashbusting ones by including all sorts of leftover yarn. That’s the fun of crochet! You can make your shawl stand out by how you work it up.
Since I’ve added a wave section along one side, I highly recommend you read all of the instructions carefully to ensure you’re better prepared for the pattern. There’s a pattern for a gauge swatch as well — be sure to make it so that your shawl ends up looking like you want it to!
Related: Looking for more lightweight crochet shawls? The Coachella Shawl and Water’s Edge Shawl are gorgeous crochet wraps where you can learn different stitch combinations.
Why Crochet a Triangular Wrap?
A triangular shawl is not only fashionable but also incredibly practical. Here are a few reasons why you should consider making one:
- Easy to Make: This pattern is great for beginners and experienced crocheters alike, requiring only basic stitches and a few special stitches that are explained below.
- Customizable: Choose your favorite yarn and color to match your personal style.
- Perfect for Any Season: Make it with different weights of yarn for spring and summer. It’s great for layering all year round. But remember that this will make the final result different from the one that’s pictured!
How to Crochet a Wrap
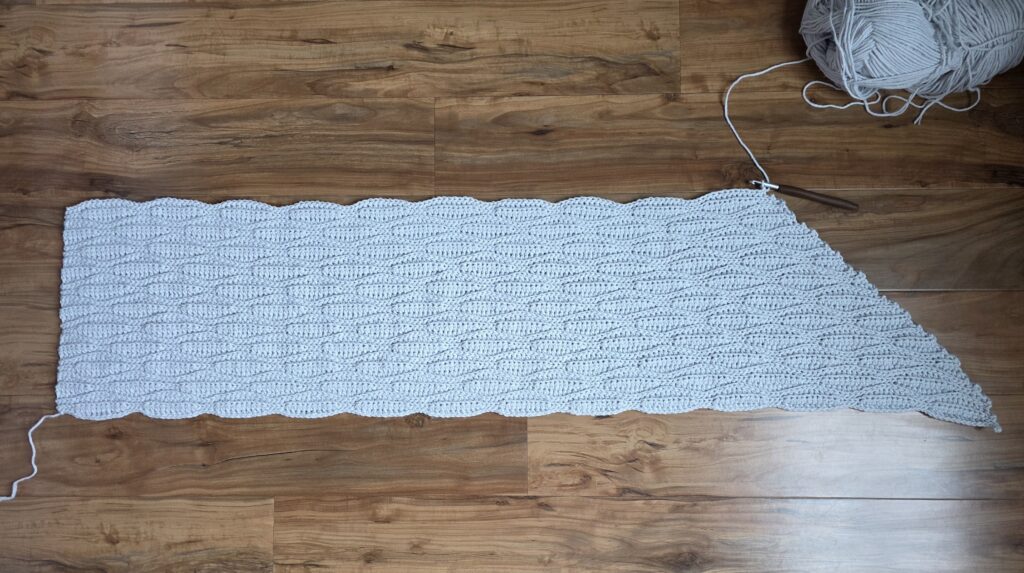
This triangular crochet shawl is worked in rows beginning with the textured, wavy stitch pattern and the angled edge on the right. Every other row, you will decrease by two stitches. These short rows help to shape the shawl.
After the wavy textured section is complete, you’ll begin a solid section of extended single crochet stitches and decrease each row by one stitch. After completing the main portion of the shawl, a single crochet edging is added to bring it all together.
You can add tassels to your wrap if you prefer, however, I kept mine without.

How To Get The
Maija Triangular Shawl Pattern
Option 1: Scroll down for the free shawl crochet pattern right here in this blog post.
Option 2: Purchase the ad-free printable PDF from one of my shops:
Yarn
I used Lion Brand Yarns Pound of Love for my version of the Maija Shawl. This yarn is incredibly soft and squishy and comes in beautiful solid colors. Because it’s acrylic, it’s easily machine washable and durable, making it great for shawls that get a lot of wear out of them.
Pound of Love is the perfect yarn for so many different crochet projects, especially larger ones which require a lot of yarn, and the yardage in one ball is incredible at 1,020 yards, making it affordable too!
Crochet Triangular Shawl Pattern
The Maija Crochet Triangular Shawl is a free pattern below, but if you love to work offline, I’ve got a couple other great options for you.
Purchase the ad-free, printable PDF (that includes all photo tutorials), on Ravelry, or on Etsy (aff).
Purchase the Crochet Shawl Kit: Lion Brand has a full kit of the Maija Crochet Triangular Shawl, available on their website. The includes your choice of colors and a digital copy of the crochet pattern.
This post contains affiliate links.
Materials
- Yarn: Worsted Weight / 4 / Yarn, Lion Brand Yarns Pound of Love was used for the sample shown in the photos.
- Yardage and Color: Elephant Grey: #550-151N (2 Balls / 1,400 yards)
- Crochet Hooks: K/10.5/6.50mm; J/10/6.00mm; or size needed to obtain gauge (My favorite crochet hooks are the Clover Amour Crochet Hooks, I’ve never had an ache in my hand since switching).
- Measuring Tape
- Scissors
- Yarn Needle
Abbreviations (U.S. Terms)
- ch(s): chain(s)
- sl st(s): slip stitch(es)
- st(s): stitch(es)
- yo: yarn over
- hdc: half double crochet
- BLO: back loop only
- Rep: repeat
- RS: right side
Gauge
- In stitch pattern as written in the swatch: 32 sts = 8″; 16 rows = 4.5″
- See Swatch Instructions below.
Experience Level
- Easy
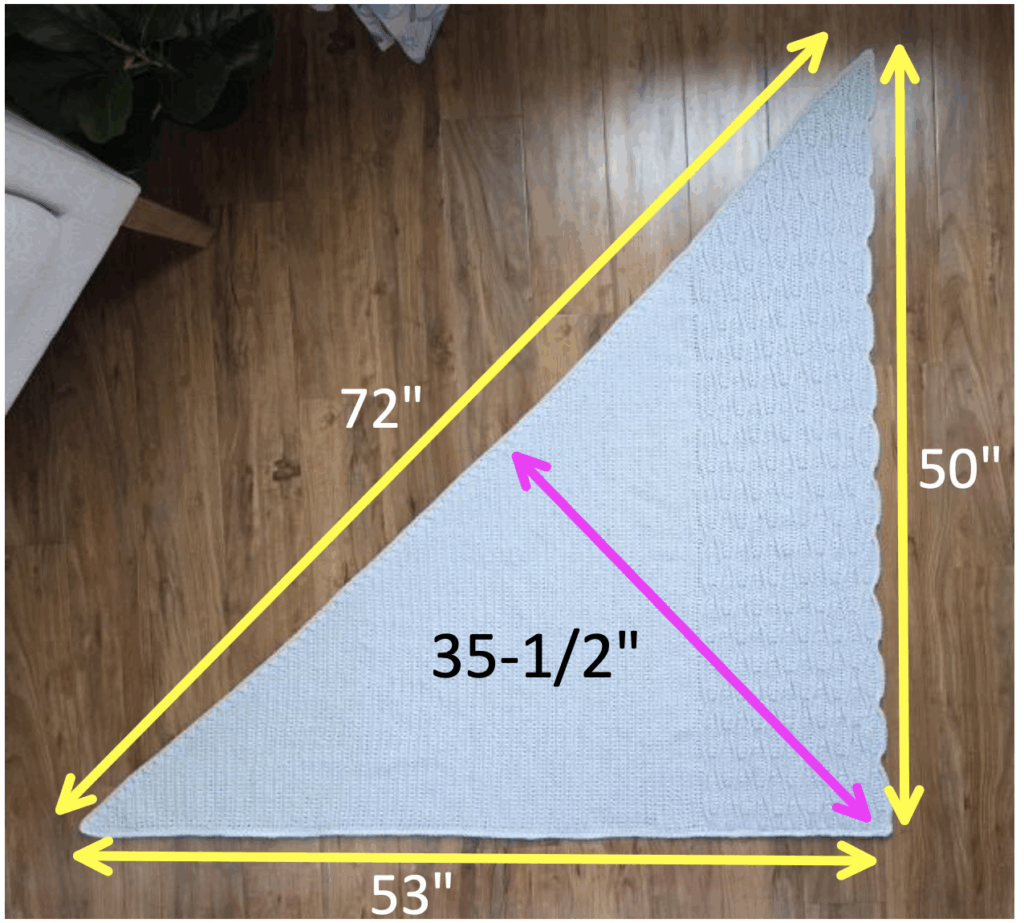
Size
- One Size: 72″ W x 35-1/2″ H (laid flat)
Pattern Notes
- Turning chains are not included in stitch count.
- Yarn Notes: Lion Brand Yarns Pound of Love in Elephant Grey (16 oz / 454 g / 1,020 yards / 932 m / 100% Premium Acrylic) was used for the sample shown in the photos. Another comparable worsted weight yarn may be substituted.
- Yardage & Color
- Elephant Grey: #550-151N (2 Balls / 1,400 yards)
- Construction Notes: This triangular crochet shawl is worked in rows beginning with the textured, wavy stitch pattern and the angled edge on the right. Every other row, you will decrease by two stitches. These short rows help to shape the shawl. After the wavy textured section is complete, you’ll begin a solid section of extended single crochet stitches and decrease each row by one stitch. After completing the main portion of the shawl, a single crochet edging is added.
Make a Custom Size: To increase or decrease the size of your shawl, adjust the foundation chain in Row 1, by multiples of 14 stitches.
Maija Triangular Shawl – Free Crochet Pattern
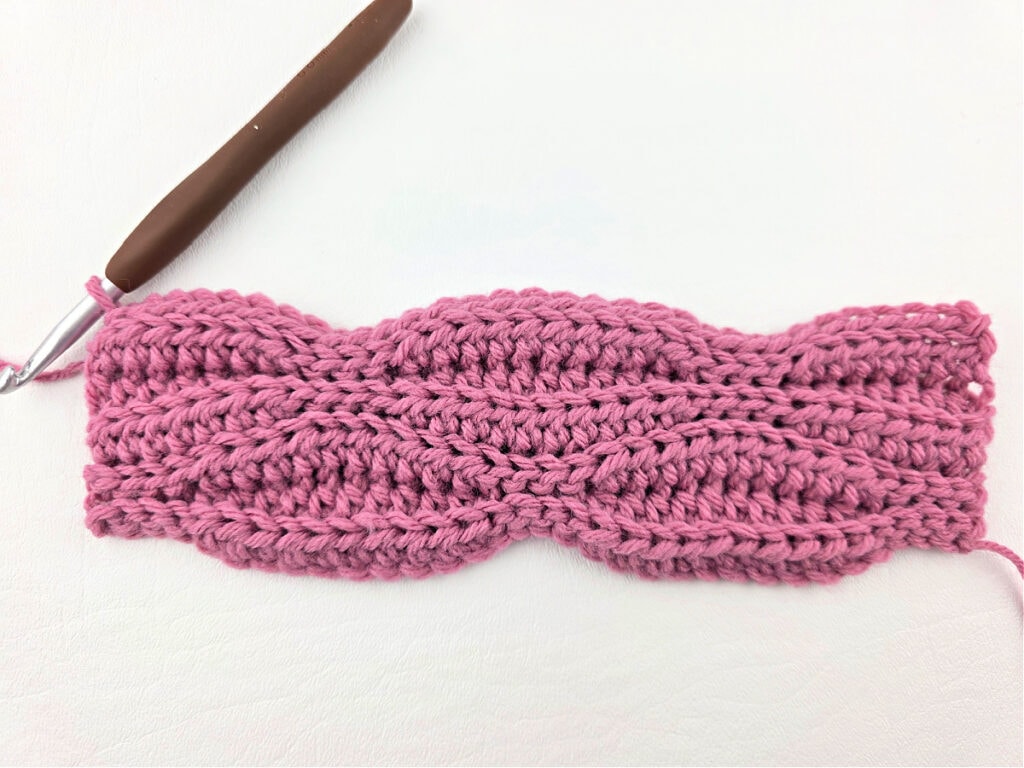
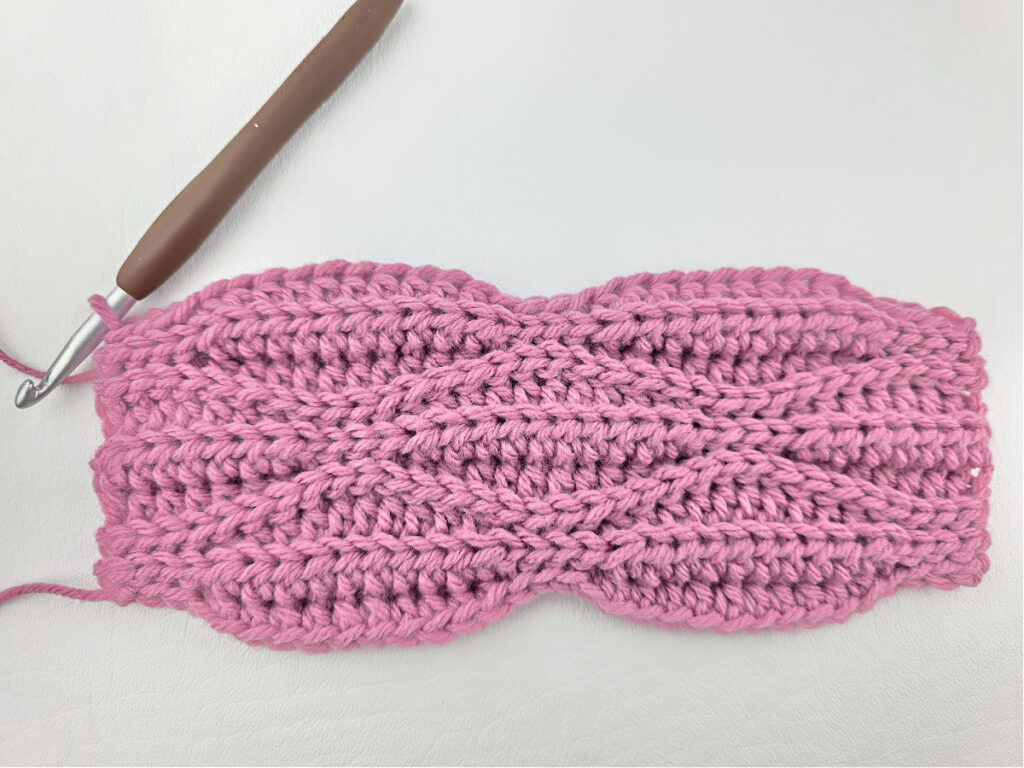
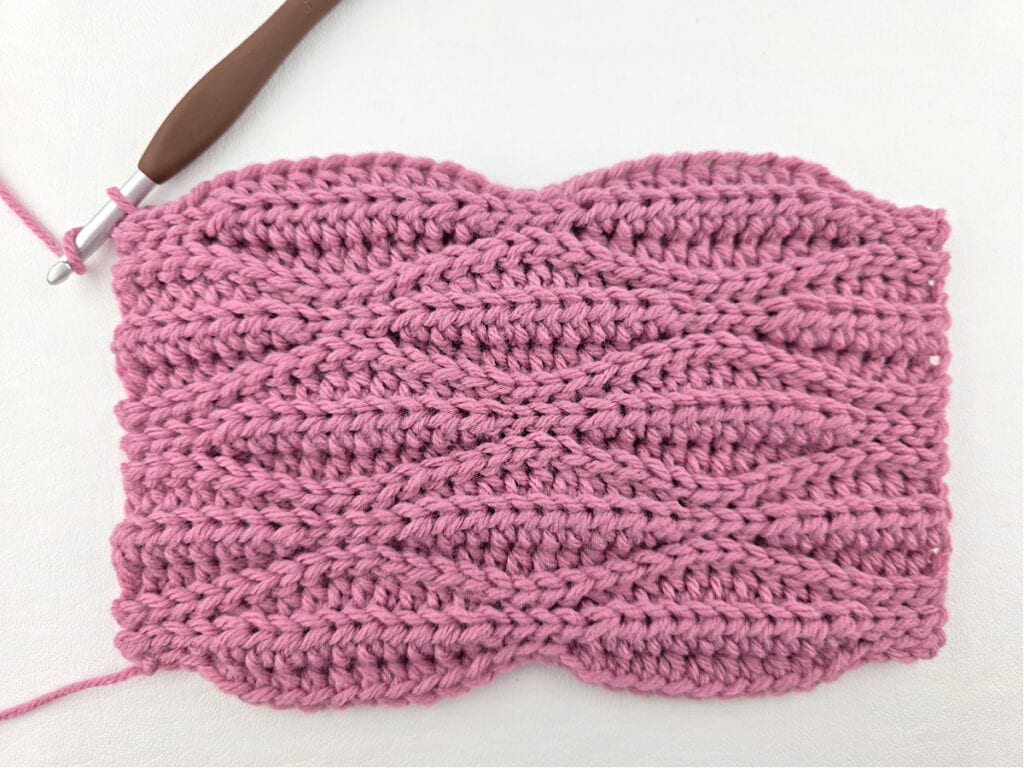
Gauge Swatch Instructions for the Wavy Textured Section
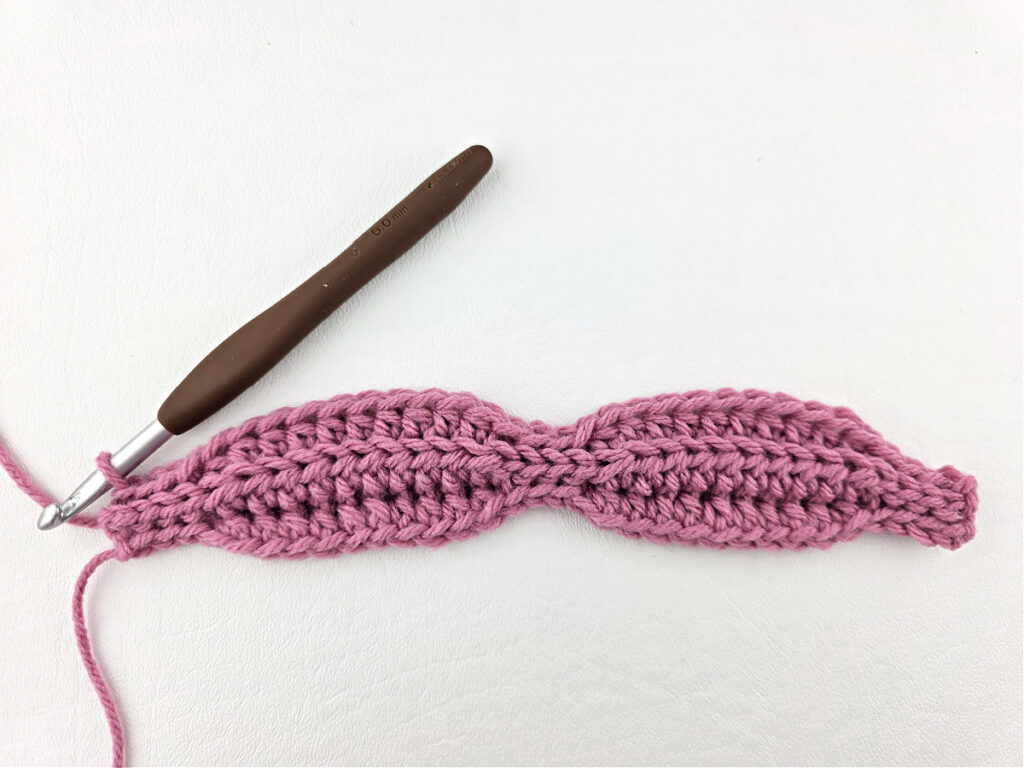
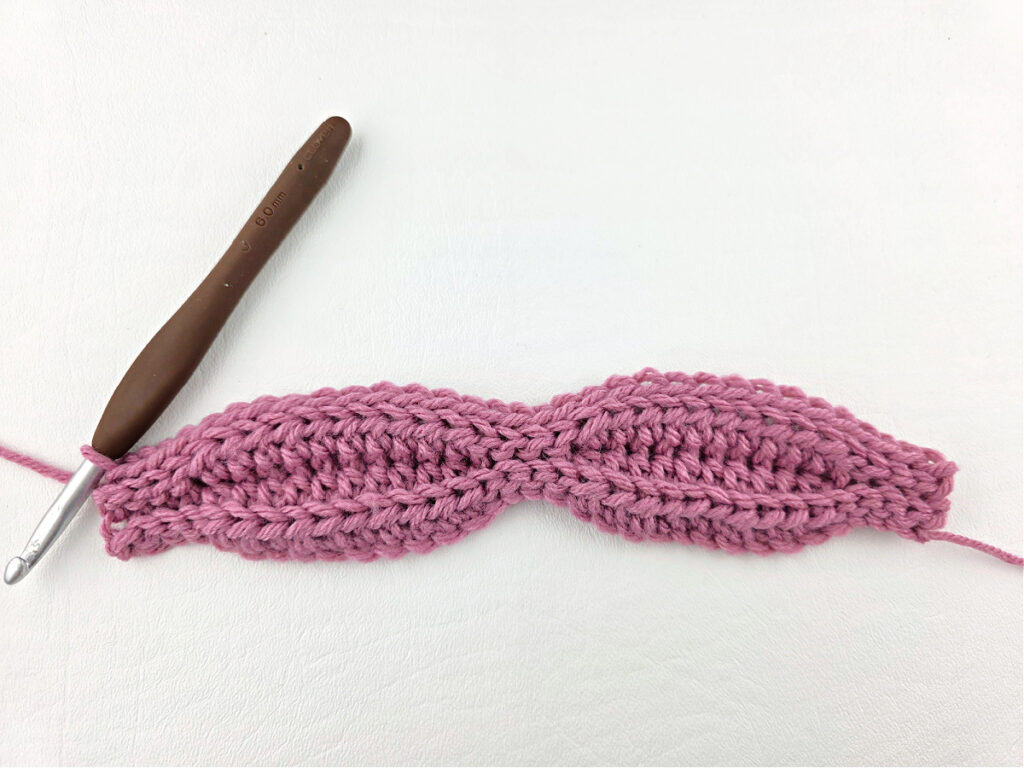
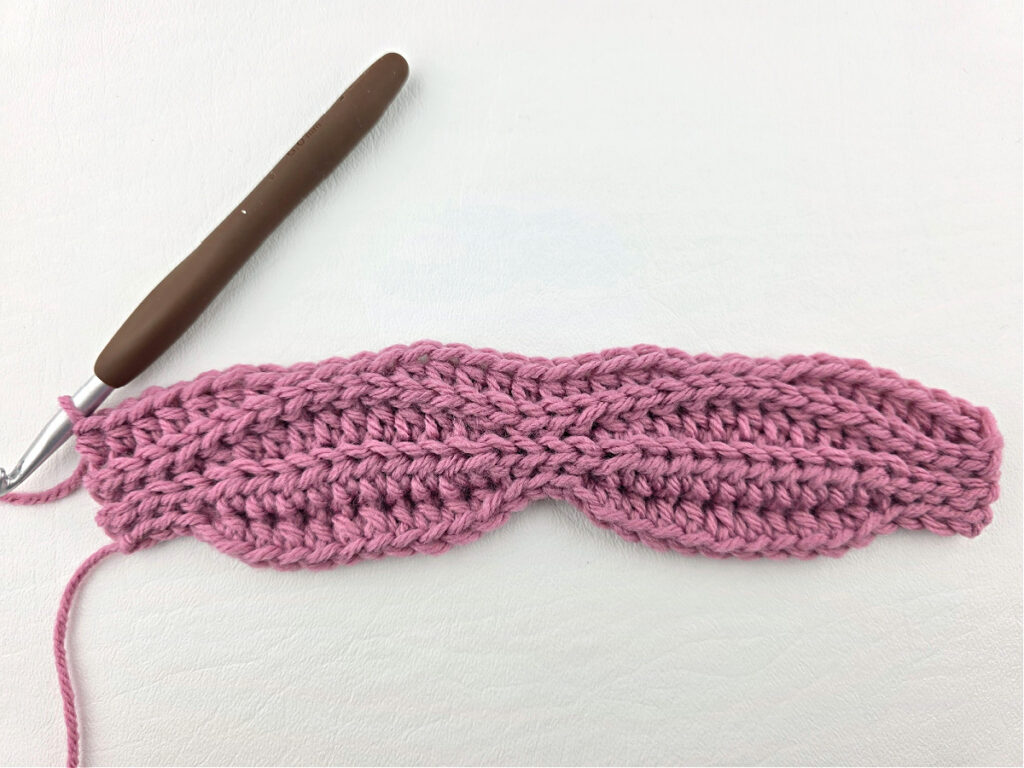
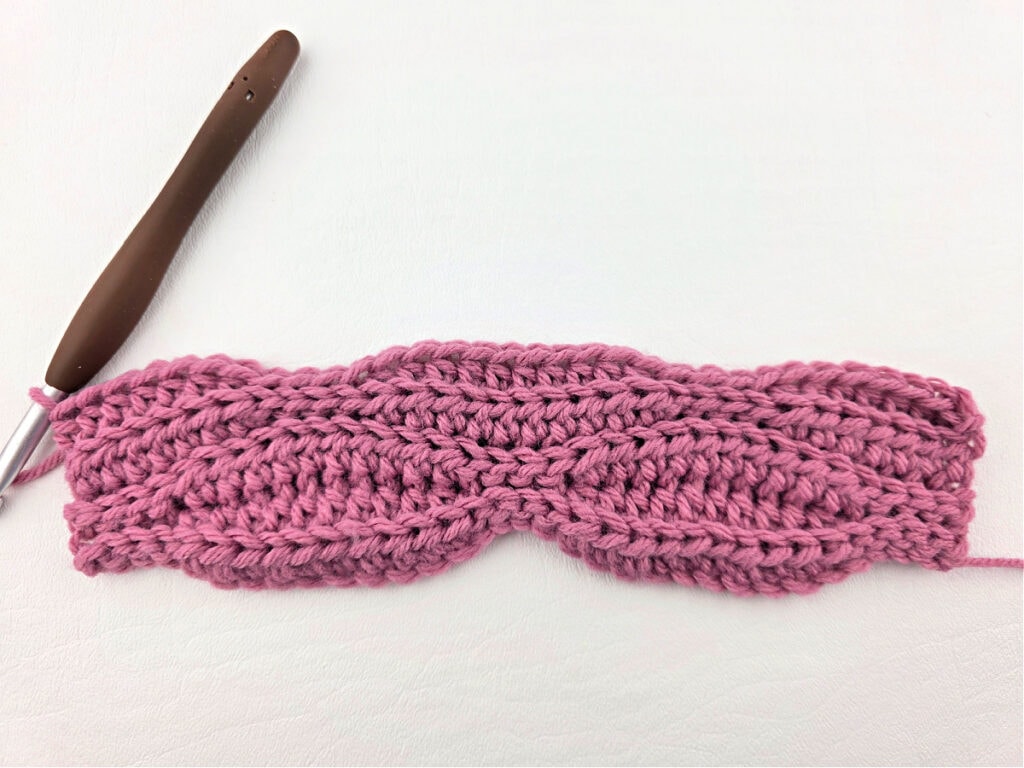
Gauge: In stitch pattern as written in the swatch below: 32 sts = 8″; 16 rows = 4.5″
Tip: If you find it hard to control the tension of your slip stitches, go up a hook size (or two) when working all Row 4 repeats. The loops of your slip stitches should be the same size (or slightly larger is okay too) as the top loops of your half double crochet stitches. Check out my video tutorial for working BLO slip stitches, it includes MANY valuable tips!
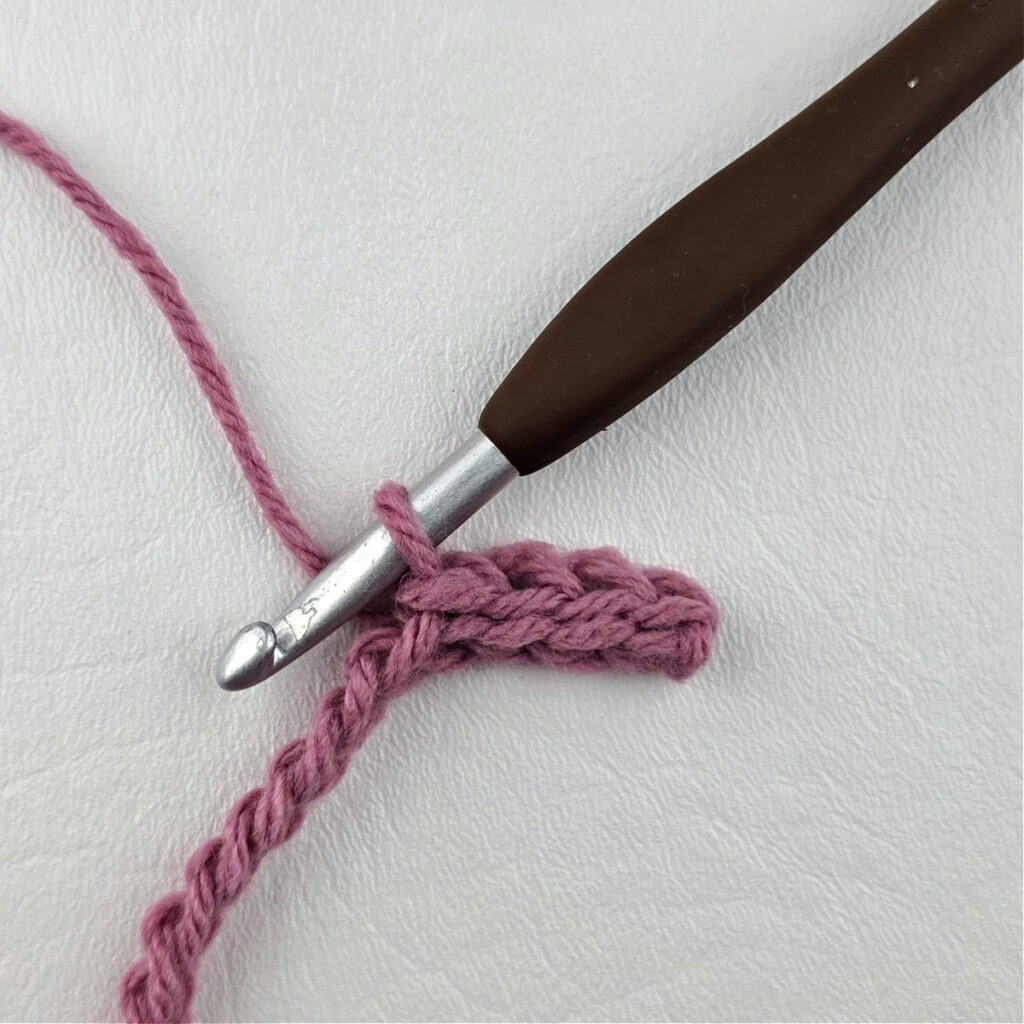
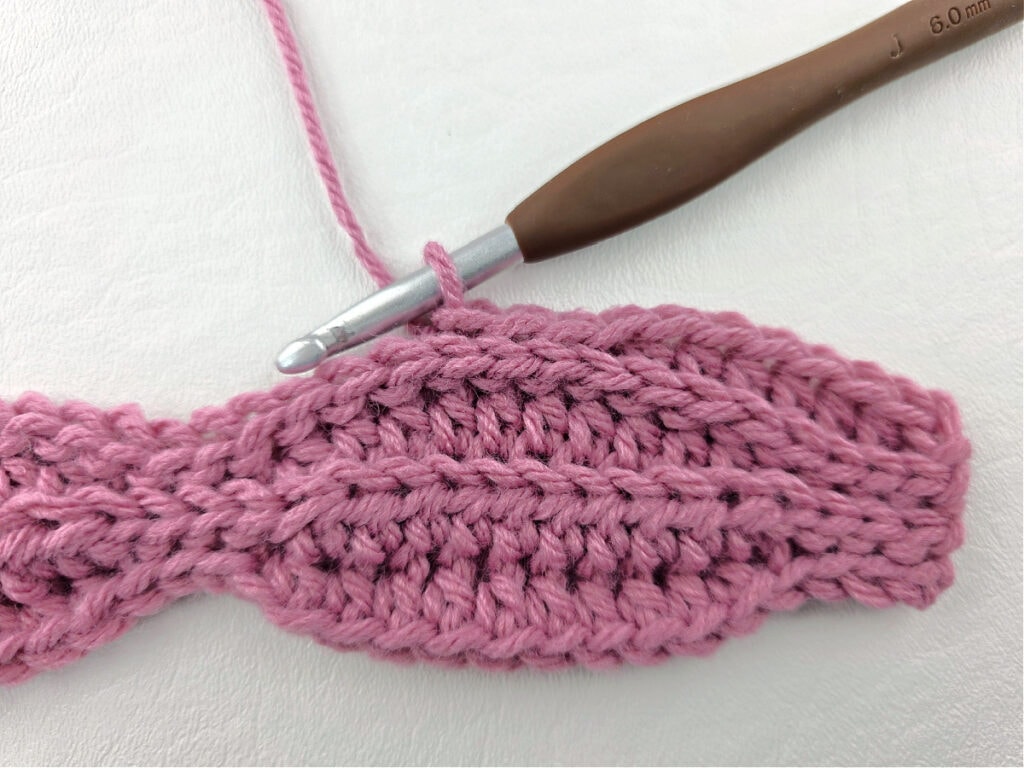
Row 1 (RS): With yarn & a 6.50mm crochet hook, ch 33, switch to a 6.00mm crochet hook, working into the back humps of the foundation ch, sl st in the 2nd ch from your hook, sl st in each of the next 3 chs, (hdc in each of the next 10 chs, sl st in each of the next 4 chs) rep from ( to ) across. Turn. (32 sts)
Rows 2 – 3: Ch 1, BLO sl st in each of the first 4 sts, (BLO hdc in each of the next 10 sts, BLO sl st in each of the next 4 sts) rep from ( to ) across. Turn. (32 sts)
Row 4: Ch 1, BLO sl st in each st across. Turn. (32 sts)
Rows 5 – 7: Ch 1, BLO hdc in each of the first 7 sts, BLO sl st in each of the next 4 sts, BLO hdc in each of the next 10 sts, BLO sl st in each of the next 4 sts, BLO hdc in each of the last 7 sts. Turn. (32 sts)
Row 8: Rep Row 4.
Rows 9 – 11: Ch 1, BLO sl st in each of the first 4 sts, (BLO hdc in each of the next 10 sts, BLO sl st in each of the next 4 sts) rep from ( to ) across. Turn. (32 sts)
Rows 12 – 19: Rep Rows 4 – 11.
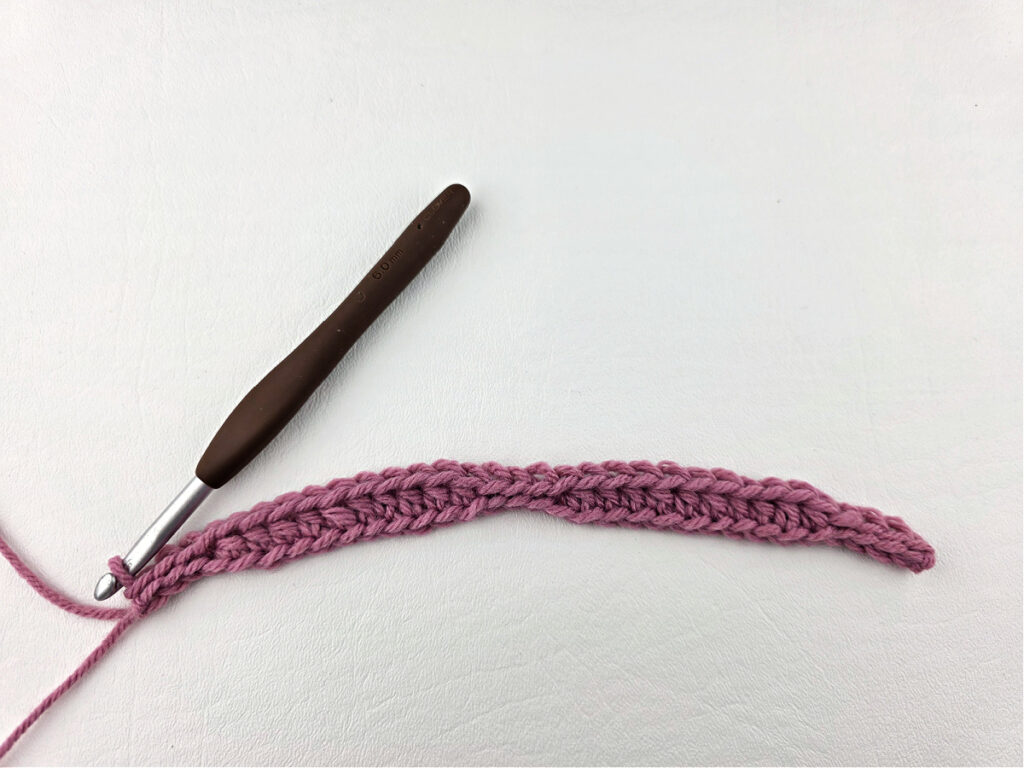
Fasten off. Weave in ends. The finished size of your swatch should be approximately 8″ W x 5.34″ H (at tallest point).


Shawl’s Wavy Textured Section
Shawl Construction Notes: This triangular crochet shawl is worked in rows beginning with the textured, wavy stitch pattern and the angled edge on the right. Every other row, you will decrease by two stitches. These short rows help to shape the shawl. After the wavy textured section is complete, you’ll begin a solid section of extended single crochet stitches and decrease each row by one stitch. After completing the main portion of the shawl, a single crochet edging is added.
Gauge: In stitch pattern as written in the swatch below: 32 sts = 9″; 16 rows = 4.5″
Tip: If you find it hard to control the tension of your slip stitches, go up a hook size (or two) when working all row 4 repeats. The loops of your slip stitches should be the same size (or slightly larger is okay too) as the top loops of your half double crochet stitches. I also have a video tutorial with lots of tips for working BLO slip stitches.
Row 1 (RS): With yarn & a 6.50mm crochet hook, ch 187, switch to a 6.00mm crochet hook, working into the back humps of the foundation ch, sl st in the 2nd ch from your hook, sl st in each of the next 3 chs, (hdc in each of the next 10 chs, sl st in each of the next 4 chs) rep from ( to ) across. Turn. (186 sts)
Row 2: Ch 1, BLO sl st in each of the first 4 sts, (BLO hdc in each of the next 10 sts, BLO sl st in each of the next 4 sts) 12 times, then BLO hdc in each of the next 10 sts, BLO sl st in each of the next 2 sts, skip each of the last 2 sts. Turn. (184 sts)
Row 3: Ch 1, BLO sl st in each of the first 2 sts, (BLO hdc in each of the next 10 sts, BLO sl st in each of the next 4 sts) rep from ( to ) across. Turn. (184 sts)
Row 4: Ch 1, BLO sl st in each st across to the last 2 sts, skip each of the 2 last sts. Turn. (182 sts)
Row 5: Ch 1, BLO hdc in each of the first 3 sts, BLO sl st in each of the next 4 sts, (BLO hdc in each of the next 10 sts, BLO sl st in each of the next 4 sts) rep from ( to ) across to the last 7 sts, BLO hdc in each of the last 7 sts. Turn. (182 sts)
Row 6: Ch 1, BLO hdc in each of the first 7 sts, (BLO sl st in each of the next 4 sts, BLO hdc in each of the next 10 sts) 12 times, BLO sl st in each of the next 4 sts, BLO hdc in the next st, skip each of the last 2 sts. Turn. (180 sts)
Row 7: Ch 1, BLO hdc in the first st, (BLO sl st in each of the next 4 sts, BLO hdc in each of the next 10 sts) rep from ( to ) across to the last 11 sts, BLO sl st in each of the next 4 sts, BLO hdc in each of the last 7 sts. Turn. (180 sts)
Row 8: Rep Row 4. (178 sts)
Row 9: Ch 1, BLO hdc in each of the first 6 sts, (BLO sl st in each of the next 4 sts, BLO hdc in each of the next 10 sts) 12 times, BLO sl st in each of the last 4 sts. Turn. (178 sts)
Row 10: Ch 1, BLO sl st in each of the first 4 sts, (BLO hdc in each of the next 10 sts, BLO sl st in each of the next 4 sts) 12 times, then BLO hdc in each of the next 4 sts, skip each of the last 2 sts. Turn. (176 sts)
Row 11: Ch 1, BLO hdc in each of the first 4 sts, BLO sl st in each of the next 4 sts, (BLO hdc in each of the next 10 sts, BLO sl st in each of the next 4 sts) rep from ( to ) across. Turn. (176 sts)
Row 12: Rep Row 4. (174 sts)
Row 13: Ch 1, BLO hdc in each of the first 9 sts, BLO sl st in each of the next 4 sts, (BLO hdc in each of the next 10 sts, BLO sl st in each of the next 4 sts) 11 times, BLO hdc in each of the last 7 sts. Turn. (174 sts)
Row 14: Ch 1, BLO hdc in each of the first 7 sts, (BLO sl st in each of the next 4 sts, BLO hdc in each of the next 10 sts) 11 times, BLO sl st in each of the next 4 sts, BLO hdc in each of the next 7 sts, skip each of the last 2 sts. Turn. (172 sts)
Row 15: Ch 1, BLO hdc in each of the first 7 sts, (BLO sl st in each of the next 4 sts, BLO hdc in each of the next 10 sts) 11 times, BLO sl st in each of the next 4 sts, BLO hdc in each of the next 7 sts. Turn. (172 sts)
Row 16: Rep Row 4. (170 sts)
Row 17: Ch 1, BLO sl st in each of the first 2 sts, (BLO hdc in each of the next 10 sts, BLO sl st in each of the next 4 sts) rep from ( to ) across. Turn. (170 sts)
Row 18: Ch 1, BLO sl st in each of the first 4 sts, (BLO hdc in each of the next 10 sts, BLO sl st in each of the next 4 sts) 11 times, then BLO hdc in each of the next 10 sts, skip each of the last 2 sts. Turn. (168 sts)
Row 19: Ch 1, BLO hdc in each of the first 10 sts, BLO sl st in each of the next 4 sts, (BLO hdc in each of the next 10 sts, BLO sl st in each of the next 4 sts) rep from ( to ) across. Turn. (168 sts)
Row 20: Rep Row 4. (166 sts)
Row 21: Ch 1, BLO hdc in the first st, BLO sl st in each of the next 4 sts, (BLO hdc in each of the next 10 sts, BLO sl st in each of the next 4 sts) rep from ( to ) across to the last 7 sts, BLO hdc in each of the last 7 sts. Turn. (166 sts)
Row 22: Ch 1, BLO hdc in each of the first 7 sts, (BLO sl st in each of the next 4 sts, BLO hdc in each of the next 10 sts) 11 times, BLO sl st in each of the next 3 sts, skip each of the last 2 sts. Turn. (164 sts)
Row 23: Ch 1, BLO sl st in each of the first 3 sts, (BLO hdc in each of the next 10 sts, BLO sl st in each of the next 4 sts) 11 times, then BLO hdc in each of the last 7 sts. Turn. (164 sts)
Row 24: Rep Row 4. (162 sts)
Row 25: Ch 1, BLO hdc in each of the first 4 sts, BLO sl st in each of the next 4 sts, (BLO hdc in each of the next 10 sts, BLO sl st in each of the next 4 sts) rep from ( to ) across. Turn. (162 sts)
Row 26: Ch 1, BLO sl st in each of the first 4 sts, (BLO hdc in each of the next 10 sts, BLO sl st in each of the next 4 sts) 11 times, then BLO hdc in each of the next 2 sts, skip each of the last 2 sts. Turn. (160 sts)
Row 27: Ch 1, BLO hdc in each of the first 2 sts, BLO sl st in each of the next 4 sts, (BLO hdc in each of the next 10 sts, BLO sl st in each of the next 4 sts) rep from ( to ) across. Turn. (160 sts)
Row 28: Rep Row 4. (158 sts)
Row 29: Ch 1, BLO hdc in each of the first 7 sts, BLO sl st in each of the next 4 sts, (BLO hdc in each of the next 10 sts, BLO sl st in each of the next 4 sts) rep from ( to ) across to the last 7 sts, BLO hdc in each of the last 7 sts. Turn. (158 sts)
Row 30: Ch 1, BLO hdc in each of the first 7 sts, (BLO sl st in each of the next 4 sts, BLO hdc in each of the next 10 sts) 10 times, BLO sl st in each of the next 4 sts, BLO hdc in each of the next 5 sts, skip each of the last 2 sts. Turn. (156 sts)
Row 31: Ch 1, BLO hdc in each of the first 5 sts, BLO sl st in each of the next 4 sts, (BLO hdc in each of the next 10 sts, BLO sl st in each of the next 4 sts) 10 times, BLO hdc in each of the last 7sts. Turn. (156 sts)
Row 32: Rep Row 4. (154 sts)
Row 33: Ch 1, BLO hdc in each of the first 10 sts, BLO sl st in each of the next 4 sts, (BLO hdc in each of the next 10 sts, BLO sl st in each of the next 4 sts) rep from ( to ) across. Turn. (154 sts)
Row 34: Ch 1, BLO sl st in each of the first 4 sts, (BLO hdc in each of the next 10 sts, BLO sl st in each of the next 4 sts) 10 times, then BLO hdc in each of the next 8 sts, skip each of the last 2 sts. Turn. (152 sts)
Row 35: Ch 1, BLO hdc in each of the first 8 sts, BLO sl st in each of the next 4 sts, (BLO hdc in each of the next 10 sts, BLO sl st in each of the next 4 sts) rep from ( to ) across. Turn. (152 sts)
Row 36: Rep Row 4. (150 sts)
Row 37: Ch 1, BLO sl st in each of the first 3 sts, (BLO hdc in each of the next 10 sts, BLO sl st in each of the next 4 sts) 10 times, BLO hdc in each of the last 7sts. Turn. (150 sts)
Row 38: Ch 1, BLO hdc in each of the first 7 sts, (BLO sl st in each of the next 4 sts, BLO hdc in each of the next 10 sts) 10 times, BLO sl st in the next st, skip each of the last 2 sts. Turn. (148 sts)
Row 39: Ch 1, BLO sl st in the first st, (BLO hdc in each of the next 10 sts, BLO sl st in each of the next 4 sts) 10 times, BLO hdc in each of the last 7sts. Turn. (148 sts)
Row 40: Rep Row 4. (146 sts)
Row 41: Ch 1, BLO hdc in each of the first 2 sts, BLO sl st in each of the next 4 sts, (BLO hdc in each of the next 10 sts, BLO sl st in each of the next 4 sts) rep from ( to ) across. Turn. (146 sts)
Row 42: Ch 1, BLO sl st in each of the first 4 sts, (BLO hdc in each of the next 10 sts, BLO sl st in each of the next 4 sts) 10 times, skip each of the last 2 sts. Turn. (144 sts)
Row 43: Ch 1, BLO sl st in each of the first 4 sts, (BLO hdc in each of the next 10 sts, BLO sl st in each of the next 4 sts) 10 times. Turn. (144 sts)
Row 44: Rep Row 4. (142 sts)
Do not fasten off. Continue on to Shawl’s Solid Section.
Your work should measure approximately 46-1/2″ W (widest point) x 12″ H at this point.
Shawl’s Solid Section
Row 1 (RS): Continuing on from the Shawl’s Textured Section with yarn & a 5.00mm crochet hook, skip the first st, Alt-dc in the BLO of the next st, (BLO hdc in each of the next 10 sts, BLO dc in the next st, BLO dc2tog, BLO dc in the next st) 10 times. Turn. (131 sts)
The rest of this section is worked in both loops.
Row 2: Ch 1, ext sc in the first st, ext sc in each st across to the last 2 sts, skip the next st, ext sc in the last st. Turn. (130 sts)
Row 3: Ch 1, skip the first st, ext sc in the next st, ext sc in each remaining st across. Turn. (129 sts)
Rep Rows 2 – 3 until only 1 st remains. Place a locking SM in this last stitch.
Do not fasten off. Continue on to Edging.
Edging
In this section, you’ll crochet around the perimeter of the shawl.
Tip: Stitch count is not crucial for this round. The most important thing is that the edging lays flat. If the edge starts cinching inward, adjust your hook size to a larger hook, or add a few more stitches. If the edge becomes wavy, drop down a hook size or two, or work fewer stitches.
Rnd 1 (RS): Continuing on from the Shawl’s Solid Section with yarn & a 5.00mm crochet hook, working along the first edge work 1 sc into each ext sc, 1 sc into each sl st, and 2 sc into each hdc until you get to the next corner, work 3 sc into the next corner st, rotate to work long the next edge (this is the bottom of the foundation chain of the wave stitch pattern), sc in each of the next 13 sts, (sl st in each of the next 4 sts, sc in each of the next 10 sts) 12 times, sc in each of the next 3 sts, 3 sts in the next corner st, rotate to work along the last edge, work 1 sc into each st across to the st marked with the SM, sc in the marked st. Join with a sl st to the 1st st.
Do not fasten off. Continue on to Finishing.
Finishing
In this section, you’ll add another row of single crochet stitches to the two straight edges. For the first edge, you’ll continue on from the Edging round. After crocheting across the edge, you’ll fasten off. Then, join yarn in the next corner and single crochet across the second straight edge.
First Edge (RS): Ch 1, 2 sc in the first st, sc in each st across to the corner, work a sc in the corner st. Stitch count isn’t crucial.
Fasten off. Weave in ends. Continue on to Second Edge.
Second Edge (RS): With yarn & a 5.00mm crochet hook, join yarn with a standing sc in the next corner st, sc in each st across to the corner where you began the First Edge. Join with a sl st to the 1st st of the First Edge. Stitch count isn’t crucial.
Fasten off. Weave in ends. Block your shawl, if desired.

I MADE IT! NOW WHAT?
Pin this post!: Save this crochet triangular shawl pattern to your Pinterest boards so that you can come back and make it again.
Leave a comment below: We love to hear your feedback.
Share Your Finished Projects on Facebook or Instagram: I love to see your finished projects! Share with us on social media and tag me @acrochetedsimplicity or use the hashtag #ACrochetedSimplicity so I can find your posts.
Join us in the Facebook Community Group!
Come share your finished projects with us in the A Crocheted Simplicity Crochet Community Group on Facebook. Join us for fun community events such as crochet alongs, join in on crochet conversations, ask questions, get advice, and share your love for crochet!

Looking for More Crochet Patterns?
Check out our other free crochet patterns for scarves/shawls, hats, and cozy accessories.
I love the wavy section. I’m wondering why you didn’t continue that pattern through the whole thing? Would it be easy to do the wave pattern on the whole shawl in place of the solid section?
Just curious and wondering if I could easily make the wave pattern work.
Would I still decrease by one when I get to the solid section (if I do the wavy pattern)?
Thank you for your help!
Hi Katy,
You can absolutely continue the wavy pattern for the entire shawl and I almost did that myself. 🙂 I would continue the decreases in the wavy section as they are written.
Thank you so much!