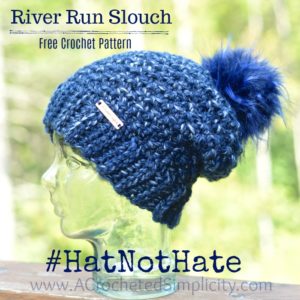
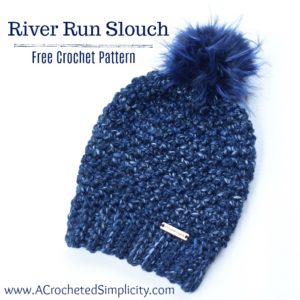
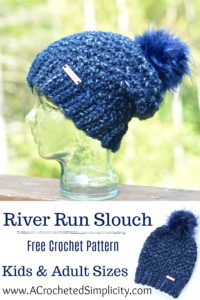
River Run Slouch Crochet Pattern – #HatNotHate
The River Run Slouch crochet hat pattern is a super quick crochet design that’s perfect for the upcoming winter months. It uses less than 1 ball of yarn and less than 2 hours of your time! It’s a fun project that’s quick to make using super bulky yarn and it’s a great hat to make for craft fairs and gifts.
~CLICK HERE to SIGN-UP to Receive our Newsletter!~
This free crochet hat pattern is part of a collaboration with Lionbrand.com. This post may contain affiliate links.
The River Run Slouch is the first hat I designed for the Hat not Hate, anti-bullying campaign. Also, check out the Chevron Peaks Slouch, click here. If this is the first you’re hearing of this campaign, Lion Brand Yarns has teamed up with STOMP Out Bullying and together they have launched this awesome campaign to spread awareness about bullying and to teach others how to respond to bully behavior. To read more, check out their blog post on the Lion Brand blog: Use Crafting to End Bullying: #HatNotHate.
This Campaign Hits Home
When I received the first e-mail from Lion Brand with the details about this campaign, it really tugged at my heartstrings and brought back a flood of emotions. One of my sons was a victim of bullying in school. As a mom, it was one of the hardest things I’ve gone through. For my son, it was so much worse. I wish I had known about Stomp Out Bullying before, but am grateful to hear of them now so I can educate my kids and share the info with their school.
I hope you will join us in helping to spread the awareness of bullying, not just in schools, but everywhere!
Why the color BLUE?
Blue is the color of awareness, and also solidarity, so Lion Brand picked their bluest hues for us to choose from to design our hats for the campaign. I chose Lion Brand Yarns Wool Ease Thick & Quick in the colorway River Run (now you know where the hat’s name came from 😉 ), but you can choose any blue yarn you’d like.
Some other great choices from Lion Brand are: Wool Ease Thick & Quick in Navy or Denim, Hometown USA in San Diego Navy, Key Largo Tweed, Fort Worth Blue, St. Paul Sky, or Washington Denim.
How can I help spread awareness?
- Crochet a blue hat using this River Run Slouch crochet pattern, or one of the many patterns you can find in the #hatnothate crochet & knit patterns collection that can be found on the Lion Brand Yarns website.
- Share a photo on social media of yourself (or kiddo) wearing the blue hat you made. Remember to use the hashtag #HatNotHate.
- Proudly wear your blue hat on World Bullying Prevention Day, October 1, 2018.
- Spread the word about the Hat Not Hate campaign & the Stomp Out Bullying program.
- Donate your hat to an awesome cause! Lion Brand Yarns is hoping to collect 1,500 blue hats to give to a local New York school so they can ALL wear them on October 1st to support the cause. Please make sure they receive the hats by September 24, 2018.
Mail to: Lion Brand Yarn Co.
Attn: Shira Blumenthal
HAT NOT HATE
135 Kero Road
Carlstadt, NJ 07072
Are you ready to crochet a blue hat for the #HatNotHate campaign?
Use the free crochet pattern below to crochet your own blue hat or one to donate to this great cause!
~Don’t lose it! Add it to your Ravelry Favorites or Queue.~
~Don’t forget to Pin-It too!~
*Purchase an AD-FREE PDF of this pattern (including all charts and photo tutorials) on Craftsy or Ravelry*
Materials
- Yarn: Super Bulky Weight / Lion Brand Wool Ease Thick & Quick in the colorway River Run. You’ll only need 1 ball (less than 87 yards).
- Crochet Hooks: L/8.00mm; N/P/10.00mm
- Scissors
- Yarn Needle
- Faux Fur Pom
Many of these materials are available for purchase through our affiliates below:
 Clover 1055/L Amour Crochet...Shop on Amazon
  Clover 1057/NP Amour Croche...Shop on Amazon
  FISKARS All Purpose Scissor...Shop on Amazon
 ") SUSULU DIY 12pcs Faux Racco...Shop on Amazon
SUSULU DIY 12pcs Faux Racco...Shop on Amazon
Skill Level
- Easy
Abbreviations
- ch(s): chain(s)
- sl st(s): slip stitch(es)
- sc: single crochet
- sc2tog: single crochet 2 together (decrease)
- RS: right side
- BLO: back loop only
- FLO: front loop only
- Rep: repeat
- yo: yarn over
Gauge
- In hat band st pattern (8mm hook): 6 sts = 2.25″; 6 rows = 2.5″
-
Body of Hat in sc (10mm hook): 6 sts = 3″; 6 rows = 3″
Fits Head Size
- Kids: 18″ – 21″ circumference
- Adult: 21” – 23-1/2” circumference
Notes
- Turning chains are not included in stitch count unless noted otherwise.
- Yardage: 83 yards (Adult); 78 yards (Kids)
- This hat is worked from the bottom up.
- Changes for sizes written as follows: Kids (Adult)
- Personalized Tags for your crochet: read this blog post to find out where I purchase mine & how to add them!
River Run Slouch Crochet Pattern
Stretchy Hat Band
Row 1 (RS): Using an 8mm crochet hook, ch 6 (7), working into the back hump of the foundation ch, sc in the 2nd ch from your hook and in each ch across. Turn. (5, 6 sts)
Row 2: Ch 1, BLO, sl st in each st across. Turn. (5, 6 sts)
Row 3: Ch 1, BLO, sc in each st across. Turn. (5, 6 sts)
Rows 4 – 33 (37): Rep Rows 2 – 3.
Row 34 (38) – Seam Row: With RS facing out, bring the first row up to meet the last row (the first row should be in front if you kept the RS facing out). Position your working yarn so that it’s on the inside of the band (See photo & video tutorial here for seam). Ch 1, slip stitch the rows together using the following method: insert your hook (from front to back) into the FLO of the 1st stitch of Row 1, insert your hook (from back to front) into the BLO of the 1st stitch of the last row, yo, pull thru all loops on your hook. Continue in this way across the band to complete the seam. (5, 6 sts)
Do not fasten off. Continue on to Body of Hat.
Body of Hat
The entire Body of Hat is worked in continuous rounds. I strongly suggest using a scrap piece of yarn to keep track of the beginning and ending of each round.
Rnd 1 (RS): Using an 8mm crochet hook and working into the sides of the rows of the hat band, ch 1, sc into the side of each row around the hat band, then work 1 more sc in the side of the last row. Do not join. (35, 39 sts)
Rnd 2: Switch to a 10mm crochet hook, *BLO sc in the next st, FLO sc in the next st, rep from * around to the last st, BLO sc in the last st. (35, 39 sts)
Rnd 3: *FLO sc in the next st, BLO sc in the next st, rep from * around to the last st, FLO sc in the last st. (35, 39 sts)
Rnd 4: *BLO sc in the next st, FLO sc in the next st, rep from * around to the last st, BLO sc in the last st. (35, 39 sts)
Rnds 5 – 11 (14): Rep Rnds 3 – 4. Hat height at this point (including the band) should be approximately 8″ (9-1/2″).
Do not fasten off. Continue on to Crown Shaping.
Crown Shaping
Rnd 1: Sc2tog around to the last st, sc in the last st. (18, 20 sts)
Rnd 2: Sc2tog around. Join w/ a sl st to the 1st st. (9, 10 sts)
Fasten off leaving an 8″ tail of yarn. Using a yarn needle, weave the tail of yarn in and out of the stitches from the last round, pull tail to cinch the crown of the hat closed, knot to secure and weave in ends. Attach a faux fur pom for added fun! Finished hat height should be approximately 9″ (10-1/2″).
FIND ALL OF MY FREE CROCHET PATTERNS HERE
Are you intimidated by knit-look crochet? Would you love to learn my tips & tricks? Take an Annies Video Class with me and let me ease your fears and help you increase your skills! Click on the photo below to watch a free preview. You can also see the other 4 video classes I have available!

Please share your finished ACS projects with me in the A Crocheted Simplicity Crochet Community Group on Facebook!
HAPPY CROCHETING!
I made myself a hat with this pattern, and I love how it turned out! However, I did have to make some changes to make sure that it fit me. First of all, I used an 8.00 mm hook for the whole hat, instead of using two different sizes. I did a couple of extra rows on the brim to increase the size to 23.5 inches for my head. Which gave me 51 stitches once I did the first row of the body. Then I did 12 rounds after the ribbing, which didn’t give much slouch, however, I was running out of yarn. So once I got to the crown shaping I followed the first row normally, then I did another sc 2tog round. For the next row I did sc2tog, sc 3, sc2tog, sc 2, sc2tog, sc2, making 10 sts. Then I decreased again to get 5 before finishing off because I wanted a smaller hole. I had just enough yarn to create a small pom pom for the top, meaning I used the entire 106 yards of yarn that I bought. Although it’s a bit small for my head, this is the first hat I have finished for myself, and I love wearing it!
I did have a question about whether I would be able to sell the final product in my esty shop? Including if I made changes to create different sizes. I would credit you and your pattern of course!
Thank You for your pattern!
Hi Carly,
That’s great that you were able to adjust the pattern for your own gauge and individual head size!
Yes, you are more than encouraged to sell hats that you crochet using the pattern.
Happy Friday!
Jennifer
Love this hat, I’m on my third now! Is there a way to avoid the sort of twisting effect on the brim with this ribbing pattern? It’s my absolute favorite kind of ribbing now but I feel like it warps weirdly as it’s worked.
Hi Kim,
It will slant a bit because it is worked entirely in BLO. This usually straightens out after its worn a time or two.
However, there is one slight adjustment you can make to help with this a little, BUT it may also limit the stretch in the band. You could make a small swatch though and see if you’re okay with that. It could also affect fit.
To adjust, work the first and last stitch of every row under BOTH loops, instead of just BLO.
Jennifer
Thank you, I did give that a try already but wasn’t thrilled about how the edge looked and the lack of stretch. I appreciate the insight and the pattern!