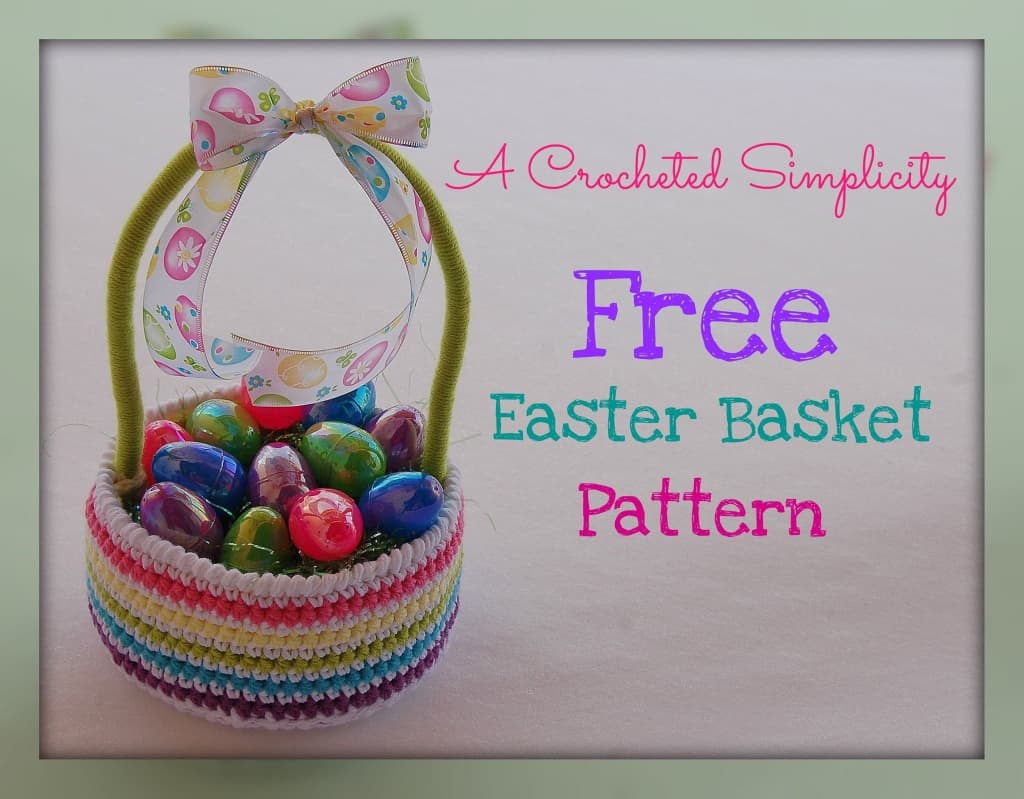
Free Crochet Pattern – Easy Easter Basket
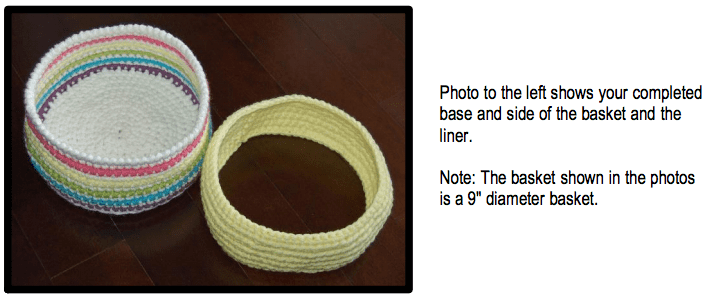
The Easy Easter Basket is a great basket when crocheted as shown, or use the pattern as a base and let your creative juices flow to create your own personalized Easter basket!
~Click HERE to sign-up to receive our newsletter!~
~Don’t lose it, add It To Your Ravelry Favorites or Queue.~
~Don’t forget to Pin It too!~
*Purchase an ad-free PDF of this pattern (including all charts and photo tutorials) on Craftsy or Ravelry*
This post contains affiliate links.
Materials
- Yarn: Worsted Weight yarn (the yarn picture in the photos is Red Heart Super Saver ) You’ll need 1 skein (approximately 230 yards) of your Main Color and minimal amounts (approximately 40 yards) of any Contrasting Colors you choose (the color you choose for a liner will need a little more).
- Crochet Hooks: K/10.5/6.50mm (My favorite crochet hooks are the Clover Amour Hooks, I’ve never had an ache in my hand since switching)
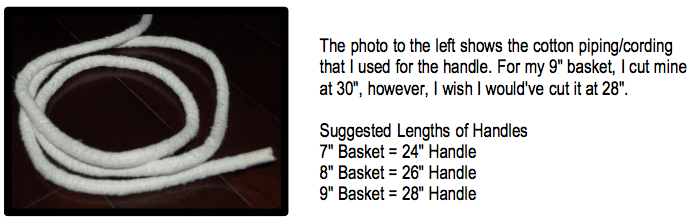
- 24″ – 28″ Cotton Piping/Cording (purchased by the yard at craft stores)
- Plastic Canvas: (2) 10-1/2″ x 13-1/2″ sheets
- Scissors
- Yarn Needle
Many of these materials are available for purchase through our affiliates below:
 Clover 1053/K Amour Crochet...Shop on Amazon
") RED HEART Super Saver Yarn,...Shop on Amazon
RED HEART Super Saver Yarn,...Shop on Amazon Plastic Canvas 12x18-ClearShop on Amazon
Stitch Abbreviations
- ch: chain
- sl st: slip stitch
- sc: single crochet
- hdc: half double crochet
- revsc: reverse single crochet (aka crab stitch)
- st(s): stitch(es)
- yo: yarn over
- MC: main color (white)
- CC: contrasting color (grey heather)
- RS: right side
- WS: wrong side
- Rep: repeat
- BLO: back loop only
- Join w/ a sc: click here for photo tutorial
- Join w/ a hdc: click here for photo tutorial
- Invisible Join Technique: click here for photo tutorial
Gauge
- In hdc: 6 sts x 5 rows = 3″
Finished Sizes
- 7″ diameter x 5-1/2″ deep
- 8″ diameter x 5-1/2″ deep
- 9″ diameter x 5-1/2″ deep
Notes
- I tend to crochet on the tighter side, if you crochet more loosely, you may need to go down a hook size or two to meet gauge.
- Beginning chains are not counted as stitches or included in stitch counts.
- The entire basket is worked holding 2 strands of yarn together and working them as 1 strand.
- Color Changes: Change colors on the last pull thru of the last stitch of the round before joining.
Special Stitch
- Reverse Single Crochet (revsc): This stitch is worked from left to right. With the right side of the work facing you, working left to right, insert hook in next stitch to the right, yo, pull up a loop, yo and draw yarn through 2 loops on your hook = 1 rev sc.
If you’re looking for a great new crochet hook case, click here to check out this one from our affiliates!

Easy Easter Basket Instructions
7″, 8″ or 9″ Diameter Basket
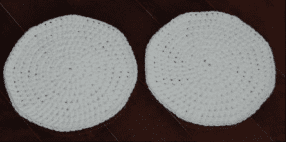
Circular Bottom (Make 2): You may choose to make only 1. I prefer 2 for the added strength in the bottom of the bag. See photos below for assembly & additional options.
Yarn: The entire basket is worked holding 2 strands of yarn together as one. Circular bottoms are worked using your MC.
Round 1: Using a 6.5mm crochet hook, begin with a Magic Ring, sl st into the Magic Ring, work 8 hdc into the Magic Ring. Pull loose end of yarn to tighten center of ring and join w/ a sl st to the 1st hdc of the round. (8 sts)
Round 2: Ch 1, 2 hdc in the same st as ch-1, 2 hdc in each st around. Join. (16 sts)
Round 3: Ch 1, 2 hdc in the same st as ch-1. hdc in next st, [ 2 hdc in next st, hdc in next st ] rep around. Join. (24 sts)
Round 4: Ch 1, 2 hdc in the same st as ch-1, hdc in next 2 sts, [ 2 hdc in next st, hdc in next 2 sts ] rep around. Join. (32 sts)
Round 5: Ch 1, 2 hdc in the same st as ch-1, hdc in next 3 sts, [ 2 hdc in next st, hdc in next 3 sts ] rep around. Join. (40 sts)
Round 6: Ch 1, 2 hdc in the same st as ch-1, hdc in next 4 sts, [ 2 hdc in next st, hdc in next 4 sts ] rep around. Join. (48 sts)
Last Round for 7″ Diameter Basket: Round 7: Ch 1, 2 hdc in the same st as ch-1, hdc in next 5 sts, [ 2 hdc in next st, hdc in next 5 sts ] rep around. Join. (56 sts)
Last Round for 8″ Diameter Basket: Round 8: Ch 1, 2 hdc in the same st as ch-1, hdc in next 6 sts, [ 2 hdc in next st, hdc in next 6 sts ] rep around. Join. (64 sts)
Last Round for 9″ Diameter Basket: Round 9: Ch 1, 2 hdc in the same st as ch-1, hdc in next 7 sts, [ 2 hdc in next st, hdc in next 7 sts ] rep around. Join. (72 sts)
Fasten off. Weave in ends. Continue below to Circular Base Options & Assembly.
Circular Base Options & Assembly
There are 3 Options for the bottom of the basket.
Option #1: Using only 1 circle for the bottom of your basket. If you’re choosing to use only 1 circle for the bottom of your basket, you can skip thru the following steps and move on to the “Side of the Basket”.
Option #2: Using 2 circles for the bottom of your basket without plastic canvas in between the circles. If you choose to use 2 circles for the bottom of your basket, but do not want to add plastic canvas, then you may skip steps 1 thru 4 below and continue with step 5.
Option #3: Using 2 circles for the bottom of your basket and putting plastic canvas in between them. If you are choosing this option, follow steps 1 thru 5 below.
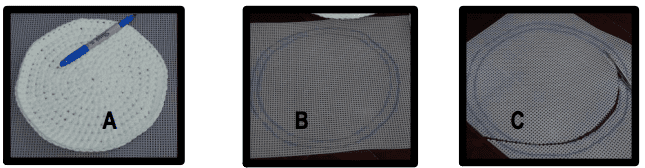
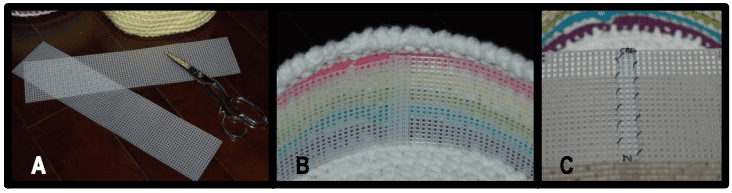
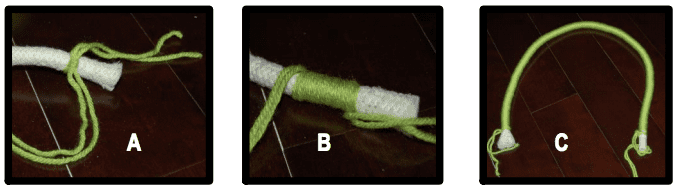
- Step 1: See Photo A. Lay 1 of your completed circles on top of a sheet of plastic canvas.
- Step 2: See Photo B. Using a marker, carefully trace around the edge of your circle. Do not worry about getting too close to your edge, you’ll see why in the next photo.
- Step 3: See Photo C. Cut out your circle by cutting 1/4″ to 3/8″ on the Inside of your trace marks.
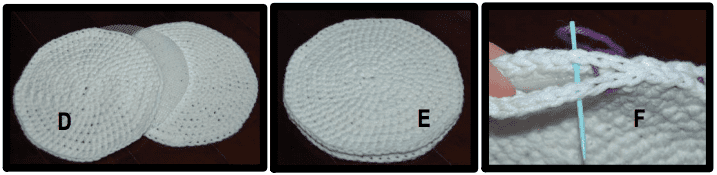
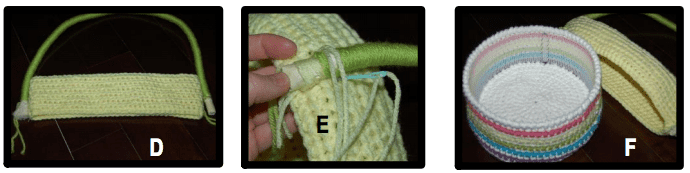
- Step 4: See Photos D & E. Lay your plastic canvas circle on top of 1 of your crocheted circles. Lay your 2nd crocheted circle on top of the plastic canvas.
- Step 5: See Photo F. Using a yarn needle and length of yarn, sew the 2 circles together.
Side of the Basket
Note: Changes for the different size baskets will be noted as follows: 7″ (8″, 9″).
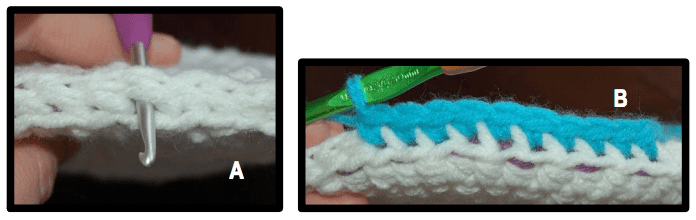
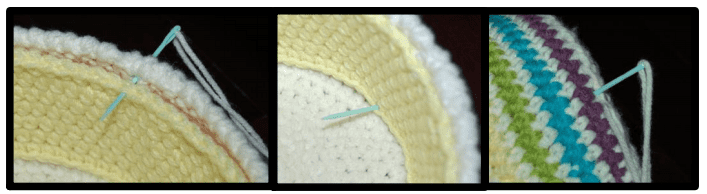
Round 1: (AC) With the bottom of the basket facing you, join yarn w/ a hdc in the Back Loops of the Bottom of the base and BOTH Loops of the top of the base (See Photo A Below), hdc around the base working only in the Back Loops of the Bottom of the base and BOTH Loops of the top of the base (See Photo B). Join. (56, 64, 72 sts)
Round 2: (MC) Ch 1, sc in the same st as ch-1, sc in each st around. Join.
Round 3: (AC) Ch 1, hdc in the same st as ch-1, hdc in each st around. Join.
Round 4: (MC) Rep Round 2.
Round 5: (AC) Rep Round 3.
Round 6: (MC) Rep Round 2.
Round 7: (AC) Rep Round 3.
Round 8: (MC) Rep Round 2.
Round 9: (AC) Rep Round 3.
Round 10: (MC) Rep Round 2.
Round 11: (MC) Ch 1, revsc in each st around. Join.
Fasten off. Weave in ends. Continue on to the Liner.

Liner
Round 1: (AC or MC) Ch 57 (65, 73), hdc in the 2nd ch from hook, hdc in each ch across. Join w/ a sl st to the 1st hdc of the round. (56, 64, 72 sts)
Round 2: Ch 1, hdc in the same st as ch-1, hdc in each st around. Join.
Rounds 3 thru 6: Rep Round 2. 56 (64, 72) sts
Round 7: Ch 1, sc in the same st as ch-1, sc in each st around. Join.
Fasten off. Use the Invisible Join Technique. Using the tail from the beginning foundation ch and a yarn needle, whipstitch the small gap together between the 1st and last sts of Round 1. Weave in ends. Continue on to Reinforcing the Side of the Basket.
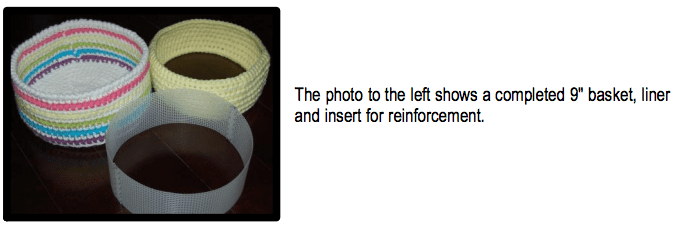
Reinforcing the Side of the Basket
Step 1: See Photo A. Cut (2) 3-1/4″ X 13-1/2″ rectangles of plastic canvas.
Step 2: See Photo B. Position the rectangles on the inside of the basket as shown. I overlap mine by 3 small squares. Mark your cut, if needed. Remove rectangles and trim ends to fit, if needed.
Step 3: See Photo C. Using a needle and thread or yarn, sew the ends of the rectangles together. Make sure to overlap the same distance as you used when measuring in step 2.
Continue on to Constructing the Handle & Assembly.
Constructing the Handle & Assembly
Step 1: See Photo A. After you’ve cut your cotton piping/cording to the suggested length from the previous page, attach 2 strands of yarn near one end of it by tying the yarn in a knot.
Step 2: See Photo B. Keeping your yarn from twisting, wrap it around your cotton piping/cording until you have about 1-1/2″ remaining. Make sure to wrap your yarn close together so you do not have gaps showing your piping/cording. Knot yarn to fasten so that it won’t slip off.
Step 3: See Photo C. Shows your completely wrapped handle.
Step 4: See Photo D. Lay your liner flat and lay one end of the handle at each fold in the liner.
Step 5: See Photo E. Using a yarn needle and 2 strands of yarn, in the same color as your liner, attach the handle to the liner by sewing around it and thru the liner. Continue to sew the length of the liner.
Step 6: See Photo F. Place your plastic canvas piece inside your basket.
Step 7: See Photo G. Place your liner & handle assembly inside your basket.

Note: Your liner may seem too big at first, but if you play with positioning for a moment, it should fit perfectly.
Sew your liner into your basket using a length of yarn and yarn needle. Sew around the top edge weaving in and out of every stitch around. Sew around the bottom edge the same way. Weave in ends.
Find all of my FREE crochet patterns HERE
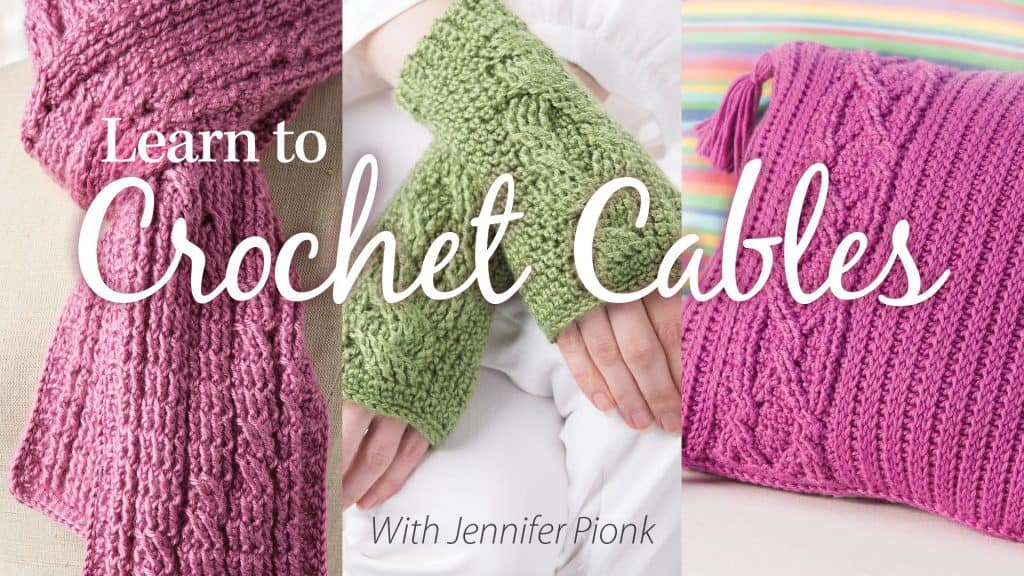
Are you intimidated by crocheted cables? Would you love to learn? Take an Annies Video Class with me and let me ease your fears of crocheted cables! Click on the photo below to watch a free preview. You can also see the other 2 classes I have available! (affiliate link)
I hope you’ve enjoyed this free crochet pattern! Check out my Ravelry shop to see all of my designs!
I LOVE seeing your finished projects! Please feel free to share them in the A Crocheted Simplicity Crochet Community group on Facebook!
Happy Crocheting!


4 Comments