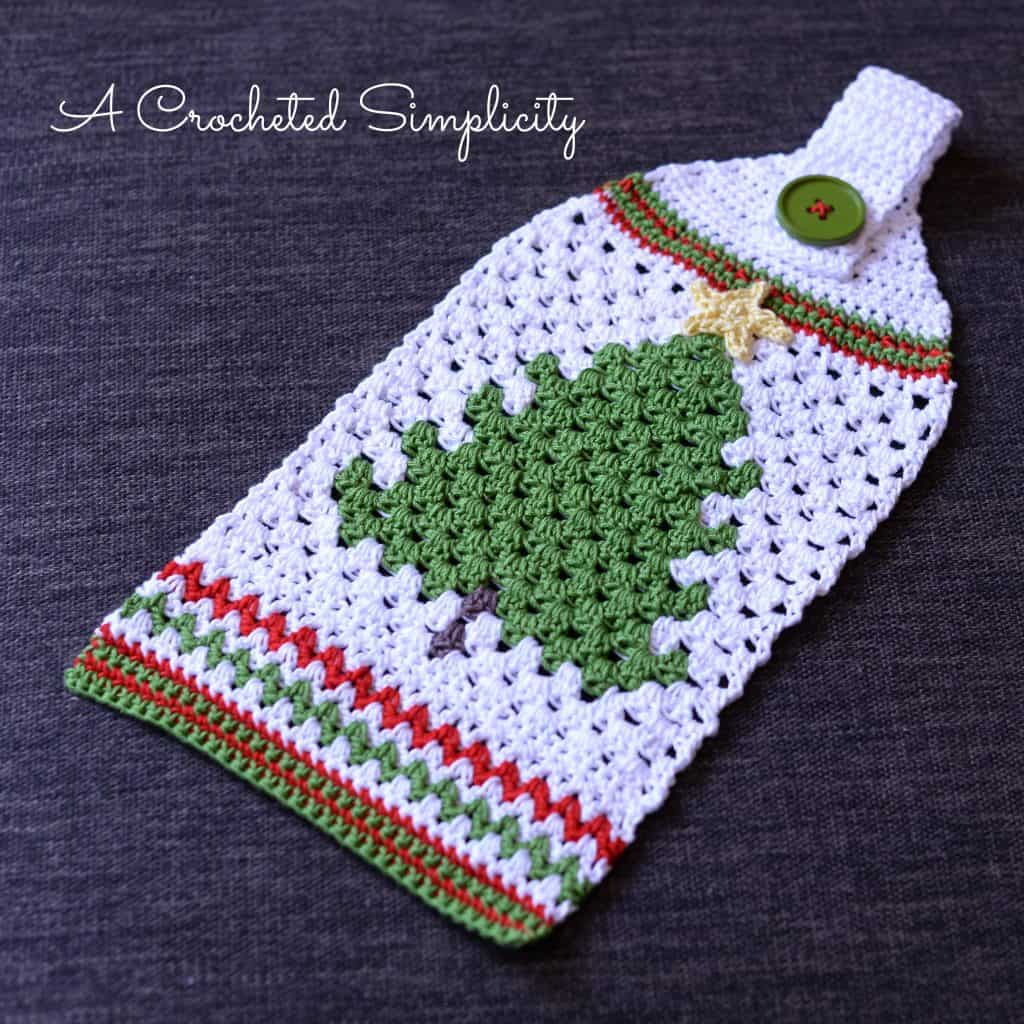
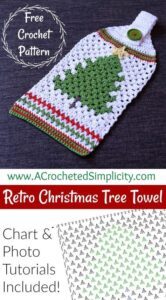
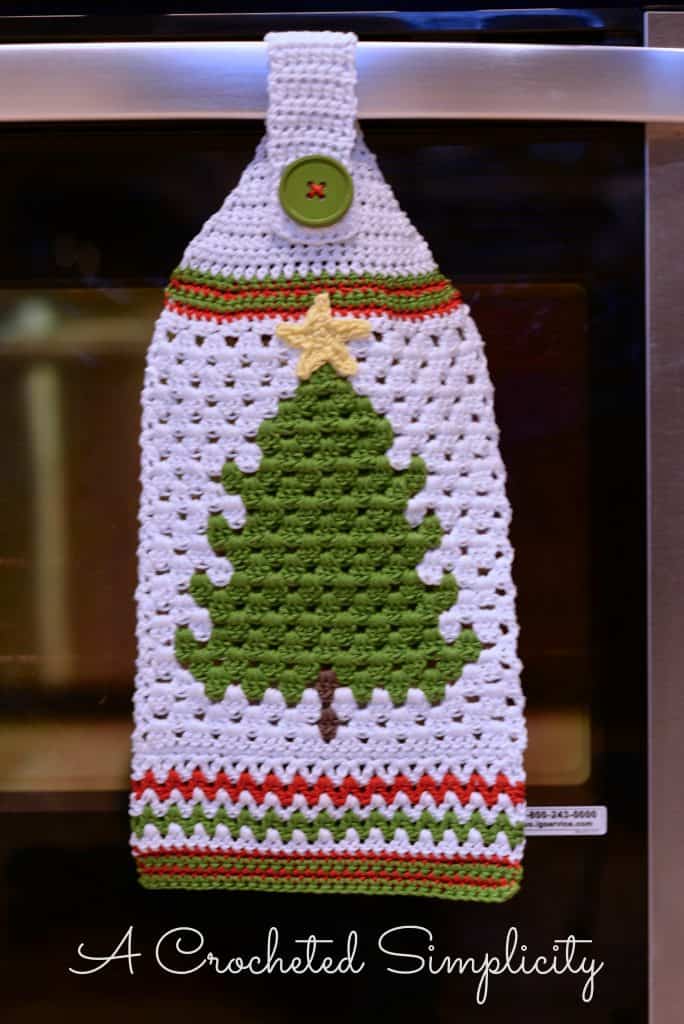
Free Crochet Pattern – Retro Christmas Tree Towel
When each holiday rolls around it brings with it the desire to crochet something cheerful & festive to display in my home! Although I love to create designs that are functional (and this one is functional), I’m not sure I’ll be able to bring myself to actually use it for more than a decoration in my kitchen.
I can hear my husband already, “You are hanging up another Christmas towel and we’re not allowed to use it?” lol I’ve been doing this for years with little store bought hand towels so he’s used to the routine. 😉
The free crochet pattern for the Retro Christmas Tree Towel can be found in this blog post below, or you can find an ad-free print friendly version (including all charts and photo tutorials) on Love Crafts here, Ravelry here, or on Etsy here.
>CLICK HERE TO SIGN-UP TO RECEIVE OUR NEWSLETTER!<
The name of the towel came about because of the use of the granny stitch stitch pattern. I’ve always thought it had a nice retro feel to it.
So, without further ado, let’s make the Retro Christmas Tree Towel (or a pretty little decoration no one’s allowed to touch 😉 ).
THE YARN
Granny Stitch Colorwork
Does crochet colorwork intimidate you? Don’t let it! It’s so much easier to master than you think.
I’ve put together a short photo tutorial for the crochet granny stitch colorwork. If you’re like me and weaving in ends is a daunting task, make sure to check out the tutorial to see how I’ve minimized the number of ends you’ll be left to weave in.
This tutorial also includes a couple tips to help you master the art of granny stitch colorwork. Click here for Color Change Photo Tutorial.
Additional Colorwork Designs using the Granny Stitch
I hope you enjoy this free crochet pattern & that you’ve learned a new technique or two to add to your crochet toolbox!
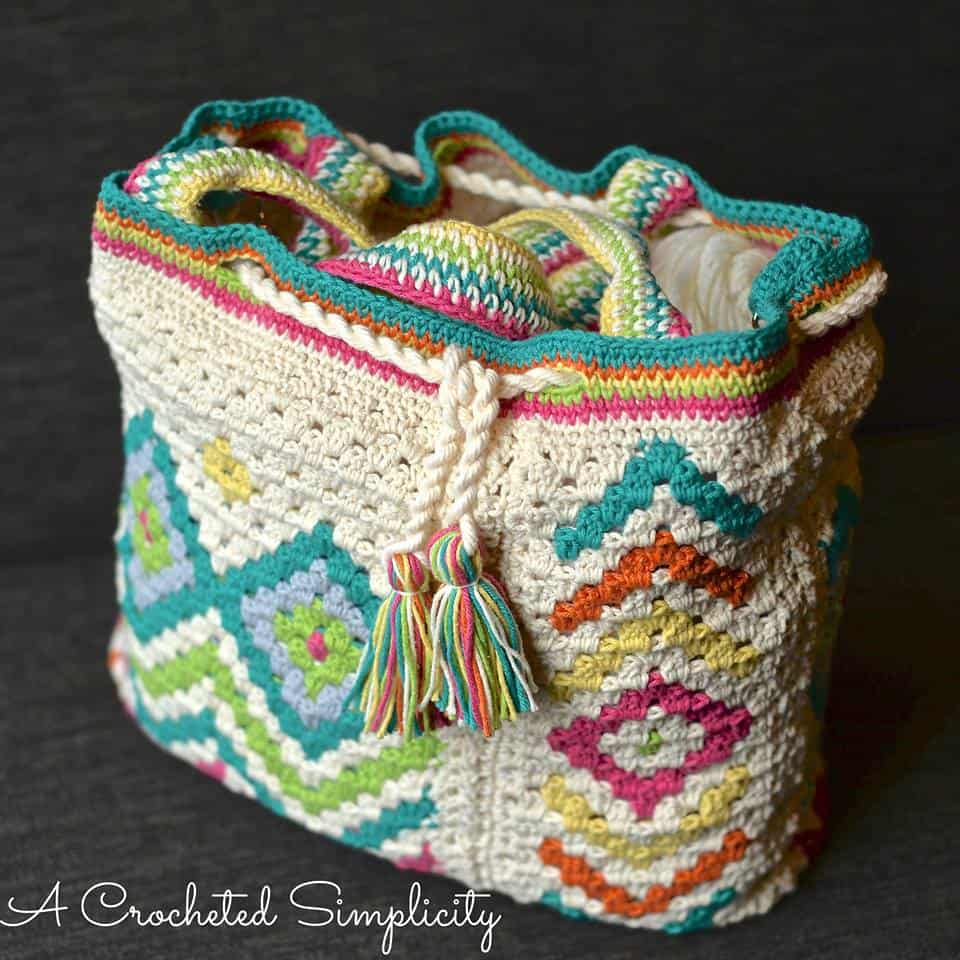
If you love these techniques, check out my Ravelry & Etsy shops for more great crochet patterns (such as the “Boho Chic” Mosaic Tote Bag & Slouch below) to practice your new skills on! Click the photos below to be taken to the patterns.
I have a few other free crochet patterns using granny stitch colorwork. Scroll down to the end of this post for photos and links to them.
P.S. This is my FAVORITE bag of all time! It has made many trips with me. Trips to the beach, trips to visit friends and family, trips to other countries… It’s held up remarkably well and has received dozens of comments!


RETRO CHRISTMAS TREE TOWEL – FREE CROCHET TOWEL PATTERN
The free pattern is below, but if you love to work offline, I’ve got a couple other great options for you.
Purchase the ad-free, printable PDF, including all charts & photo tutorials, on Love Crafts here, Ravelry here, or on Etsy here.
Save this pattern to your Ravelry favorites here.
Pin it for later here.
This post contains affiliate links.
Materials
- Yarn: 100% cotton yarn (the yarn picture in the photos is Lion Brand Yarn 24/7 Cotton) You’ll need 1 ball of the following colors:
- White (MC/140 yds)
- Grass (CA/100 yards)
- Cafe Au Lait (CB/ 6 yards)
- Red (CC/ 50 yards)
- Lemon (CD/ 6 yards)
- Crochet Hooks: H/8/5.00mm; G/6/4.00mm (My favorite crochet hooks are the Clover Amour Hooks, I’ve never had an ache in my hand since switching)
- Locking Stitch Marker
- Scissors
- Tapestry Needle
- Button (1) 1-1/4″ diameter
Many of these materials are available for purchase through our affiliates below:
 24/7 Cotton® Yarn, Ecru") Lion Brand Yarn (1 Skein) 2...Shop on Amazon
Lion Brand Yarn (1 Skein) 2...Shop on Amazon  Clover Amour Crochet Hook: ...Shop on Amazon
  Clover 1045/G Purple Amour ...Shop on Amazon
  Clover Lock Ring Markers, 2...Shop on Amazon
Abbreviations (US Terms)
- ch: chain
- sc: single crochet
- hdc: half double crochet
- dc: double crochet
- sl st: slip stitch
- sc2tog: single crochet decrease
- Alt-ch3(1): alternate chain 3(1) click here for photo tutorial
- st(s): stitch(es)
- yo: yarn over
- yds: yards
- SM: stitch marker
- MC: main color
- CA, CB, CC, CD: contrasting colors listed in materials list
- RS: right side
- Rep: repeat
- Join with a standing sc: standing single crochet (click HERE for tutorial)
Gauge
- In Granny Stitch pattern: 13 sts x 7.75 rows = 3″
Finished Size
- One Size: 7-3/4″ W x 17″ H (when hanging loop is folded over and secured with button)
Notes
- I tend to crochet on the tighter side, if you crochet more loosely, you may need to go down a hook size or two to meet gauge. However, this is a pattern for a hand towel and not a fancy sweater so gauge isn’t too terribly important. But would you be upset if you ended up with a bath towel instead of a hand towel? If so, better check that gauge. 😉
- Beginning ch 3 are counted as a stitch and included in stitch count. Other beginning ch-1 or ch-2 are not included in stitch count, unless stated otherwise.
- First stitch of each row is worked into the same stitch as beginning chain, unless stated otherwise.
- Color Changes: Work all color changes on the final pull thru of the last stitch you’re working before the new color. Example: If the last st you’re working before a color change is a double crochet, begin your double crochet by inserting your hook where indicated, yo, pull up a loop, yo, pull thru 2 loops, yo with the NEW color, pull thru remaining 2 loops to complete the stitch. Then continue on with your new color. *Click here for Change Photo Tutorial.
- This towel is worked from the white just above the top of the tree to the bottom of the towel. Then you will add the top to the towel to finish it off.
Special Stitch
- Alternate Ch-3 (alt-ch3): Complete last st of previous row, take loop off hook, insert hook into the space between the last dc and last 3 dc of previous row, put loop back on hook and pull thru space, turn, ch 3. Click here for photo tutorial.
- Join with a standing sc: When instructed to “Join with a standing sc”, begin with a slip knot on your hook. Insert your hook into the stitch or space indicated, yo, pull up a loop, yo and draw thru both loops on hook. Click HERE for tutorial.
Retro Christmas Tree Towel Instructions
Towel
Row 1: With MC & 5.00mm hook, ch 32, switch to a 4.00mm hook, sc in 2nd ch from hook and in each ch across. Turn. (31 sts)
*Place a SM in the 1st st of Row 1 (before turning).
Row 2 (RS): Ch 3 (counts as 1st dc here & throughout), dc in same st, skip 2 sts, [3 dc in next st, skip next 2 sts] work from [ to ] 9 times, 2 dc in last st. Turn. (31 sts)
Row 3: Ch 3, 3 dc in next 10 sps, dc in top of ch 3. (32 sts)
*Follow color chart below beginning w/ Row 4. Click HERE for the Color Change Tutorial for the Granny Stitch.
Row 4: Alt-ch3, dc in same sp, 3 dc in next 9 sps, 2 dc in last sp. Turn. (31 sts)
Rows 5 – 23: Rep Rows 3 – 4, ending with a Row 3 rep.
Row 24: Alt-ch1 (similar to Alt-ch3, except only ch1), sc in same sp, sc in each st across to last dc & ch3, sc2tog in last dc & top of ch3. Turn. (31 sts)
Do not fasten off. Continue below to Ric Rac Trim.

Ric Rac Trim
Row 1 (MC): Ch 3 (counts as 1st dc), [2 dc in next st, skip next st] 14 times, 2 dc in next st, dc in last st. Turn. (32 sts)
Row 2 (CC): Ch 3, [ 2 dc in sp of next 2-dc cluster from the previous row ] 15 times, dc in top of ch-3. Turn.
Row 3 (MC): Rep Row 2.
Row 4 (CA): Rep Row 2.
Row 5 (MC): Rep Row 2.
Row 6 (CC): Ch 1, sc in each st across. Turn. (32 sts)
Row 7 (CA): Rep Row 6.
Row 8 (CC): Rep Row 6.
Row 9 (CA): Rep Row 6.
Fasten off. Weave in ends. Continue below to Towel Top.
Towel Top
Row 1 (CC): With RS facing you, join yarn with a standing sc in st marked with SM, sc in each st across. Turn. (31 sts)
Row 2 (CA): Ch 1, sc in each st across. Turn.
Row 3 (CC): Ch 1, [sc2tog, sc in next 2 sts] 7 times, sc in next st, sc2tog. Turn. (23 sts)
Row 4 (CA): Ch 1, sc in each st across. Turn. (23 sts)
Rows 5 – 6 (MC): Ch 1, hdc in each st across. Turn.
Rows 7 – 14: Ch 1, skip 1st st, hdc in next st, hdc in each st across to last 2 sts, skip next st, hdc in last st. Turn. *Stitch count at the end of Row 14 should be (7 sts).
Rows 15 – 30: Ch 1, hdc in each st across. (7 sts)
Row 31: Ch 1, hdc in same st as ch1, ch 5 (loosely to make it easier to work into them in the next row), skip next 5 sts (creating buttonhole), hdc in last st. Turn. (2 hdc + 5 chs)
Row 32: Ch 1, hdc in each st and ch across. Turn. (7 sts)
Rows 33 – 34: Ch 1, hdc in each st across. Turn. (7 sts)
Fasten off. Weave in ends. Continue below to Star (or Finishing if you do not prefer to add a star).
Star
Rnd 1: Using a 4.00mm hook & CD, ch 2, sl st in1st ch to form ring, ch 1, work 5 sc into ring. Join w/ a sl st to 1st sc. (5 sts)
Rnd 2: [ *ch 4, sl st in 2nd ch from hook, sc in next ch, hdc in next ch*, sl st in next sc from Rnd 1 ] work from [ to ] 4 times, then work from * to * once more. (5 points)
Fasten off leaving an 8″ tail for sewing. Sew the last point down onto Rnd 1. (You may prefer to sl st it down like the previous 4 points, but I’ve found that it leaves less of a noticeable hump if I sew the last point in place.) Weave in ends. Continue below to Finishing.
Finishing
With the right side of the towel facing you, center your button over Row 9. Using a needle and coordinating thread or yarn, sew on your button.
If you’ve made a star, using a yarn needle and tail of yarn, sew it onto your towel near the top of your Christmas tree.
Hang up & enjoy!
(and tell your hubby & kids it’s for decoration only 😉 )
MORE FREE CROCHET PATTERNS FROM A CROCHETED SIMPLICITY
If you enjoy this free crochet Christmas tree towel pattern, you may enjoy these other projects as well. And if you just want to browse, you can find all of our free crochet patterns HERE.


Are you intimidated by knit-look crochet? Would you love to learn my tips & tricks? Take an Annies Video Class with me and let me ease your fears and help you increase your skills! Click on the photo below to watch a free preview. You can also see the other 4 video classes I have available!

Please share your finished ACS projects with us in the A Crocheted Simplicity Crochet Community Group on Facebook! Use hashtag #ACrochetedSimplicity when sharing on social media so I can find your posts!


I love this pattern and so did my family members in which I made them for gifts.
Are you suppose to carry the green yarn?
Hi Tammi,
Yes, I’ve got a color change tutorial for this here: https://www.acrochetedsimplicity.com/color-change-tutorial-tips-grannies-colorwork/
I love your patterns. May I ask you If you are selling your finished projects ?
Thank you for sharing, you are inspiration!
Good luck, Lalo